Stampin’ Up! Gently Falling

Gently Falling 003 001

I hope you had a fabulous weekend  – are ready to get to a great Mojo start!  Today, we have another go to sketch for your arsenal.  This sketch will give you a great card every time.  It’s quick and easy to put together – all the things I love!  I looked at about 20 stamp sets this morning, and remembered the Sweater Weather Designer Series Paper and thought…can I really give them another card with Gently Falling?  But I knew you’d love it in the end, so here it is!

Mojo311SketchGently Falling 003 003

Creative Tips –

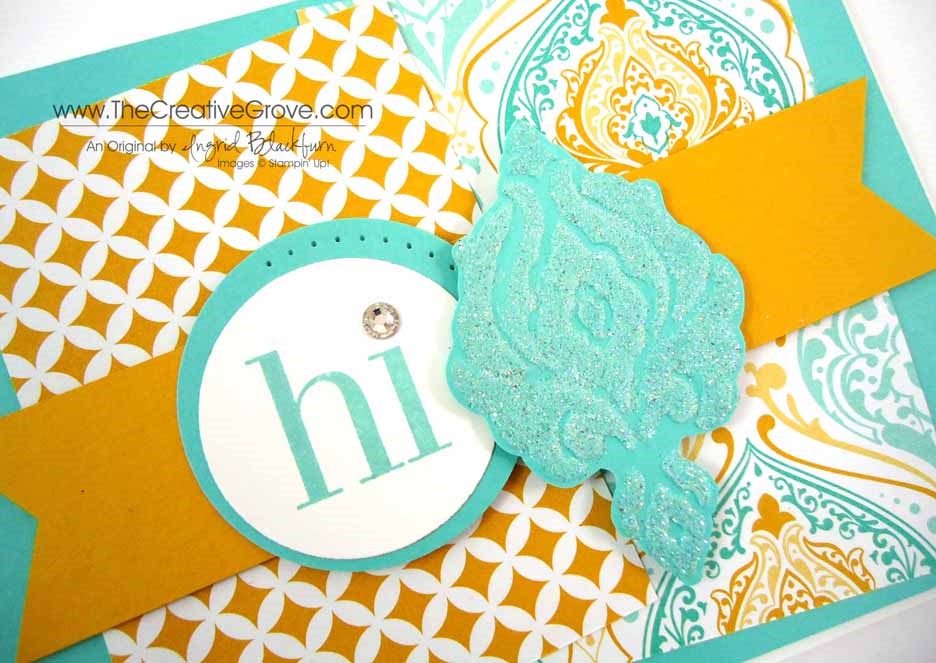
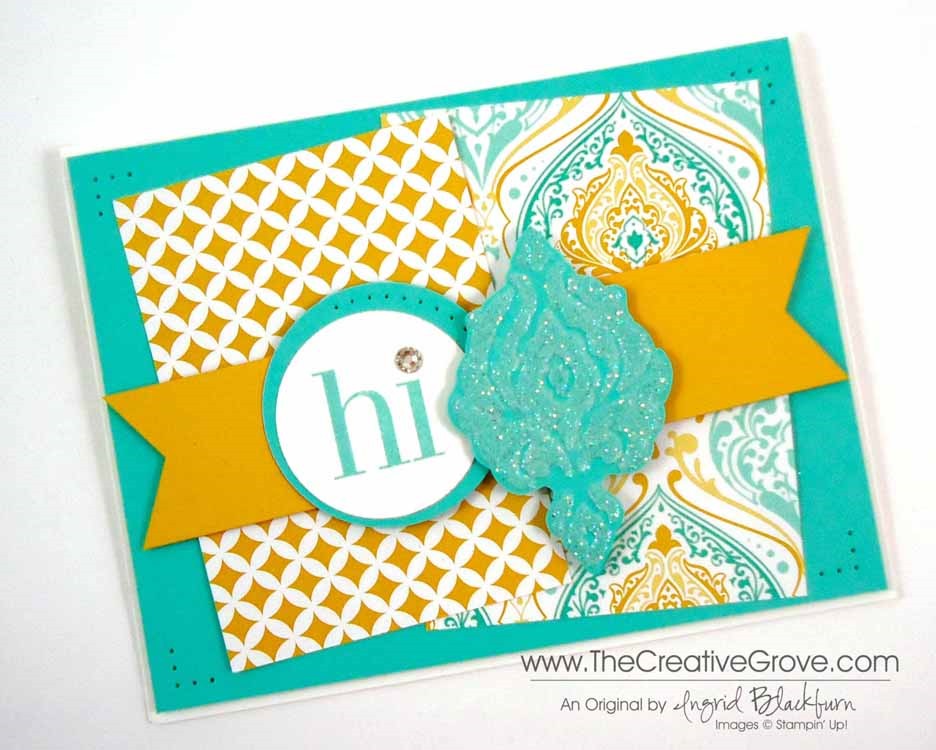
  • I think you will notice that this will work with just about any stamp set, but the plaids in this pack of paper scream fall.
  • You will only want to use the filler images if you are using them as a background as here.  The point was to allow the greeting to pop – that’s why it’s embossed in Early Espresso.Gently Falling 003 009
  • To add a little umph to the card (is that a word?), a little paper piercing goes a long way on the Tangerine Tango circle.
  • All the matting and stabilizing part of the card is in Chocolate Chip, so the accent with the Scallop Trim Border Punch is in the same.  Gently Falling 003 006
  • Rather than use some Chocolate Chip Ribbon, I wanted the stamping to really shine, so I enlarged that portion (4” x 2”), popped it up on Stamping Dimensionals, and just added a card stock strip in place of a bow or knot.
  • To give the card a little finishing touch, some Pearl Basic Jewels were added. Gently Falling 003 002

It’s a classic, Julee Tilman did it again.  I love this sketch.  So, now it’s your turn – what are you going to make?

Are you one of my VIP’s?

If you love this card and creative tips, then be sure to sign up for my Creative Tips list!  You’ll get VIP project videos and projects, special list only sales and discounts, and stay on top of all the cool and great things not only available at Stampin’ Up!, but also here at The Creative Grove. Be in the know, first on the list!  I don’t like excess email or stuff I don’t want, so know that your email address is something sacred to me.  I would never abuse that trust!  Click here if You love creative tips and want to be one of my VIP’s! Smile

Signature Snowflake 001

To order 24/7 – Click Here!

Gently Falling 003 005

Stamp Sets – Gently Falling, Seasonal Sayings Ink – Crushed Curry, Wild Wasabi, Early Espresso, Tangerine Tango Paper – Whisper White, Early Espresso, Tangerine Tango, Sweater Weather Designer Series Paper (132184) Tools – Scallop Trim Border Punch, 1 3/4” Circle Punch, Early Espresso Embossing Powder, Paper Piercing Tool, Stampin’ Pierce Mat, Essentials Paper Piercing Pack Finishing Touch – Stamping Dimensionals, Pearl Basic Jewels

Seasonal Sayings 128009LGently Falling

Sweater Weather Designer Series Paper

Polka Dot Christmas

Clean and simple Christmas card 001

Since we’re packing all weekend, I thought I would dig into the archives and share one on my first Christmas cards that I blogged about on my old blog.  It’s a classic and you can substitute any greeting here.  Hope you enjoy it! SmileClean and simple Christmas card 003

The circles were punched using a 3/4”, 1/2”, and the circle punch from the Itty Bitty Shapes Punch Pack.  The banner was made using a Square Punch, and Decorative label Punch.  It’s a fairly simple card that has a classic contemporary look to it.

The colors are Cherry Cobbler and retired – Baja Breeze and Lucky Limeade. 

Clean and simple Christmas card 002

Moving Special

Don’t miss out – this special ends today!  Everyone who order a minimum $25 before shipping and handling and uses the hostess code – VWCWVJ34 will get 15 – 6×6” sheets of Designer Paper sent to them directly in the mail from me! Smile

Signature Snowflake 001

To shop 24/7 – click here

Beautifully Baroque Eastern Elegance

Don’t you just love light and fun designs?  Cool colors prevail in today’s Mojo Monday sketch; which is a simple go to sketch that you will definitely want to try.  You can see the Eastern Elegance paper plays well with the Beautifully Baroque Embossing Folder.  Here’s the sketch and my interpretation.  Don’t forget about my special that’s running till Wednesday!  It’s at the end. Smile

        Mojo309Sketch

Personal Note – I’m in the process of moving.  Yup, today I’m actually packing up the Stampin’ Studio – and that’s quite a task!  So over the next few weeks, you’ll see a few current and some fun projects from the past.  Don’t worry – I’m finding projects that I just loved – but never blogged…so I hope that’s exciting for you too!  And the only good thing about moving – purging!  So thanks for stopping by!

Creative Tips –

  • You will want to choose two complimentary but completely different pieces of Designer Paper if you go that route.  This way they won’t compete with each other. 
  • For the designs you see in this project – it was necessary to flip the larger rectangle with the smaller one due to the patterns.  It worked better this way.
  • If you don’t like the size of your matte with your circles – try off-setting them like shown here.  Add some piercing to really accentuate it.
  • To help make the baroque medallion stand out, emboss it with the Beautifully Baroque Textured Embossing Folder, then add Dazzling Diamonds glitter to 2-way glue on the raised image portions.
  • Pop the medallion up further than the banner to really give it a little depth.
  • The card front, banner and medallion are all popped up on Stamping Dimensionals.

The Creative Grove Envelope Special

Everyone who orders and Envelope Punch Board (133774) using this hostess code – VWCWVJ34 through me by Wednesday September 4th will get a special packet of 20 sheets of – 6”x6” Designer Series Paper (that’s a value of $5.50!) mailed to them to use for liners or even your own 3” x 4” card sized envelopes!!  And don’t forget about The Creative Grove Rewards Program for free stamps too!

Signature Snowflake 001

To Shop 24/7 in the Creative Store – Click here!

Stamp Sets – Regarding Dahlias (130327c, 130324w) Ink – Coastal Cabana Paper – Whisper White, Eastern Elegance Designer Series Paper, Crushed Curry, Coastal Cabana  Cool Tools – Beautifully Baroque TIEF, Circles Collection Framelits, Two Way Glue, Dazzling Diamonds, Hexagon Punch, 1 3/4” Circle Punch, Paper Piercing Tool, Essentials Mat Pack, Stampin’ Pierce Mat Finishing Touch – Rhinestone Basic Jewels, Stamping Dimensionals

Non-traditional Festive Flurry

Festive Flurry 001 002

Today marks the opening of the Festive Flurry – Class of the Month in the classroom.  So I thought I’d make you a clean and simple non-traditional card using this stamp set!  If you like this card – check out the class here.

Creative Tips –

  • To pick non-traditional colors, use your color coach for inspiration.  Here you see a combination of Sahara Sand, Pear Pizazz and Early Espresso.  It’s quite contemporary in feel.Festive Flurry 001 005
  • Since this card is a straightforward clean and simple card, you can add some depth by popping up the large snowflake and card front on Stamping Dimensionals. Festive Flurry 001 007
  • The three snowflakes on top were stamped in white, one in each color, with the largest (3rd largest snowflake) stamped in Pear Pizazz and then rock n rolled in Early Espresso.
  • You can give a little added fill without competing with the card by adding snowflakes of various size in Pear Pizazz on the Pear Pizazz card stock.Festive Flurry 001 006
  • If you want to add a little sparkle – use your two way glue pen and some Dazzling Diamonds to make the centers of the snowflakes shine.
  • To keep with the contemporary feel of the card, this greeting from More Merry Messages is perfect!  You’ll only find it in my online stamp store – not the holiday catalog.Festive Flurry 001 003
  • To cut the snowflakes out perfectly, use the matching Festive Flurry Collection Framelits or get them as a bundle with the stamp set and save 15% here.

Just released today!

    Festive Flurry Class Banner
    If you like the above project, then you’ll definitely want to check out the brand new class, just released today – Class of the Month : Festive Flurry.  You’ll make four gorgeous cards that will make the recipient really see you as the rock star paper crafter you are!  Even better – learn a few techniques along the way.  The step by step videos are loaded with creative tips and information.  Don’t have the stamp set – don’t worry – substitute your own!  Click Here to see what it’s all about!
    Signature Snowflake 001

Festive Flurry 001 004

To Shop 24/7 in the Creative Store – Click here!

Stamp Sets – Festive Flurry (131781c, 131778w), Festive Flurry Bundle (133285c, 133284w), More Merry Messages (126402c, 132400w) Paper – Sahara Sand, Pear Pizazz, Early Espresso, Whisper White Ink – Pear Pizazz, Early Espresso Cool Tools – 2 way glue pen, Festive Flurry Framelits (132193) The Perfect Finish – Stampin’ Dimensionals, Dazzling Diamonds

Untitled-12Festive Flurry Bundle

How to use your Background Stamps

Really Good Greetings 003 002

It’s Mojo Monday again and today I wanted to show you how to use all those Background stamps and papers that you have.  I love background stamps – they are super hard for me to part with when I have a sale, and I use them over and over – you should take a look at your stash too!

Today’s card is perfect for backgrounds.  With this design, I show you how I used four different sets plus some of my Christmas Paper from Season of Style in a birthday card.  Here is this week’s sketch and my result.

          Mojo307Sketch Really Good Greetings 003 004

Creative Tips –

  • Rather than use the Season of Style Designer Paper Stack paper as the accent triangles, you can go for a much bolder statement with it as the background.
  • You do not want to compete with the bold stripes, so when you choose your background patterns, you will want to stay away from bold lined patterns or Chevrons.  I chose some completely different designs plus one lightly lined (striped) pattern.  Really Good Greetings 003 006
  • The stripes from the Gorgeous Grunge stamp work because it has a varying amount of white space in-between the lines and they are thin lines, not bold like the Designer Paper.
  • The backgrounds you see here are Dictionary, Gorgeous Grunge, World Map and Swallowtail – yes, that’s part of the butterfly wing!  I love patterned images like that – other good ones are the flowers from Regarding Dahlias and Blooming with Kindness.Really Good Greetings 003 008
  • The greeting is from the must have greeting set of this year – Really Good Greetings.  To help it to stand out from all the patterns and busy goings on of the card, you will want to emboss it and leave it alone on that big circle (Circle #7, counting from smallest to largest in the Circles Collection Framelits) with the large amount of white space.  The contrast the extra white space brings to the card lets it shine.  After all – the greeting says it all – and it wouldn’t work if it got hidden by all the competing elements.Really Good Greetings 003 007
  • To help the circle stand out a bit more, you can edge it with your versamark ink pad and embossed it in black as well.
  • The flower is from the BigZ die – Blossom Party Originals.  You can add a center by itself – like the black center here, which was punched with the circle punch from the Itty Bitty Shapes Punch Pack, or top it off like I did with the Large Rhinestone Jewel.  Really Good Greetings 003 009
  • To give the flower a little depth, pop it up with a Stampin’ Dimensional.
  • To make the banner ends, you can use the new Hexagon Punch or make your own with paper snips or a Square Punch.  View my Banner video hereReally Good Greetings 003 003

The sketch this week is a classic that you can use over and over again. 

New Class Release – Final 36 hours for the Pre-release Discount!

Festive Flurry Class Banner

Each month, we are going to highlight a stamp set with four four creative cards that will wow your friends and family.  This month we are highlighting the Festive Flurry Bundle.  Pre-register today and save 10% through midnight, Tuesday August 20th!  Get all the Details Here

Signature Snowflake 001

Really Good Greetings 003 005

To Shop 24/7 in the Creative Store – Click here!

Stamp Sets – Really Good Greetings (130333c, 130330w), Swallowtail (129216c, 131943w), Gorgeous Grunge (130517c, 130514w), Dictionary (130351c, 130348w), World Map (130345c, 130342w) Paper – Whisper White, Crumb Cake, Season of Style Designer Series Paper Stack, Basic Black, Cherry Cobbler Ink – Versamark, Basic Black Cool Tools – Circles Collection Framelits, 1 3/4” Circle Punch, Blossom Party Originals BigZ, Hexagon Punch, Itty Bitty Punch Pack The Perfect Finish – Stampin’ Dimensionals, Large Rhinestone Basic Jewels

DictionarySwallowtail Stamp 129216LWorld Map StampGorgeous GrungeReally Good Greetings

Finding Inspiration

Where do you look for creative inspiration?  For me, I usually head to Pinterest or look in magazines.  I love to look at photographs and generally a color palate or random organization of shapes will strike up an idea.  I thought today I would take you on a journey for a simple CASE (copy and steal everything) of a photo for me. Smile

When you see a photo online, do you sometimes shift in your chair, or move your head?  That to me is the sign that I’ve found something.  Here is the photo I found on Pinterest and my final project:

Cable-Beach-Broome-North-Western-Australia Moonlit Waters 004

While it’s not exact, it was my first attempt at making a mostly all black scenery.   I immediately thought, I can do that.  I’ll challenge myself and try something totally new.  I have to admit – it felt all wrong…lol!

Creative Tips –

  • You will want to start by masking a horizon line and beginning with your sky.
  • Give a good coat of various shades of yellow.  Here I used Glossy paper and a stylus tool to layer several coats of ink.Moonlit Waters 007
  • Mask your moon and continue layering ink, switching to Black.  You’ll want to leave a little faint yellow showing through around your moon for the glow.
  • My edge of my mask lifted up, so I got a splotch of black on my moon on the left side.  To cover that mistake up, I lifted my mask completely and dragged my stylus across a little to create whispy clouds.  Here is my friend Amy’s who didn’t get any on hers – see the difference? Moonlit Waters 001
  • When done with your sky, fully dry and switch your mask to reveal the water and cover the sky.
  • Layer color from the sides across your water being careful to leave the middle showing the moonlight reflection.
  • To create the feel of water, you will want to bring in a little black into your yellow.  Do this a little at a time so that you don’t cover up too much at once.  If you feel like you aren’t sure if you want to add more, stop.Moonlit Waters 008
  • Once you have the desired look, stamp your palm trunks and leaves at the top to give the viewer’s perspective.
  • Stamp the birds, layering a few over your moon.
  • Create a mask for the island and add into the horizon opposite your birds with a sponge in black ink.
  • Pick a saying that fits your scene.
  • This card is finished 5 x 7 and the scenery layer is 4 1/4 x 5 1/2”

It’s a fun scene and looks so striking in person.  I can’t wait to try it in purples next!

If you loved this card…

Be sure to subscribe to the creative tips e-letter & FREE video series. There’s a great scenic project in our first video series that I think you’ll love. And if you want to learn more about scenic cards, be sure to check out our Brayer 101 & 102 classes in addition to our upcoming Stampscapes class where we’ll make this similar project: Find out more HERE

Eveing Sunset Palm Cove Thumbnail

Signature_thumb.jpg

[optin_box style=”2″ alignment=”center” email_field=”email” email_default=”Enter your email address” email_order=”2″ integration_type=”aweber” double_optin=”Y” list=”3846012″ name_field=”name” name_default=”Enter your first name” name_order=”1″ name_required=”Y” opm_packages=””][optin_box_field name=”headline”]Learn more with our exclusive FREE video series:[/optin_box_field][optin_box_field name=”paragraph”][/optin_box_field][optin_box_field name=”privacy”]Plus you’ll be added to my FREE Creative Tips E-letter where I share exclusive projects, videos & the 12 Days of Christmas series[/optin_box_field][optin_box_field name=”top_color”]undefined[/optin_box_field][optin_box_button type=”0″ button_below=”Y”]Get Instant Access![/optin_box_button] [/optin_box]

Stamp Sets – Stampscapes Stamps, Really Good Greetings (130333c, 130330w) Ink – Marvy – Black, Yellow, Brilliant Yellow  Adirondack Lights – Sandal Paper –Glossy White, So Saffron, Basic Black Tools – Colorbox Stylus

Moonlit Waters 006

Mojo Christmas Wishes

Color Me Christmas 002 Main R

Don’t you just love the color Cherry Cobbler with Crumb Cake?  I love the earthy feel to both and find they go very well together.  For this weeks Mojo Monday card we have a contemporary look with the Color Me Christmas stamp set mixed with a little frill – a doily, and some fun new elements to round the card out.  Here is this week’s Mojo Monday Sketch for the challenge:

                      Mojo306SketchColor Me Christmas 002 Front

Creative Tips –

  • Be sure to make sure you are only grabbing one of the Tea Lace Paper Doilies out of the pack – they LOVE to stick together.
  • The new Pretty Print Textured Impressions Embossing Folder (TIEF) is a great background that gives your project a little character without taking over. Color Me Christmas 002 Doily
  • The new Deco Label Framelits pairs perfectly here with a 1 3/4” Circle Punch.  It makes a nice little background for your cut out Tree that is colored with an Aqua Painter.
  • The bold greetings from Joy to the World will compliment all your Christmas Cards this season – I just LOVE this one – it’s great to emboss with! Color Me Christmas 002 Banner
  • One of the new Regals Buttons adds a nice finishing touch with some Linen Thread. 
  • Pop the banner, button, and Deco Framelit are on Dimensionals to add a little depth to your project. Color Me Christmas 002 Side
  • A little Paper Piercing and tiny Pearl Basic Jewels help to balance out the button and put a little something in the white space on the design of the card.
  • The Season of Style Paper Stack offers just that little splash of Designer Paper that you want to compliment a project.  It has 48 sheets each of two double sided designs giving you plenty to make a stack of cards with! Color Me Christmas 002 Main L
  • Fun new items in the Holiday Catalog

    2013 Holiday Catalog

    Have you taken a peek at the new Holiday Catalog yet?  The projects are inspiring and the new products – well many are quite addictive!  My personal favorite is the new Expressions Thinlits Dies.  How about you?  View all our Catalogs here
    Signature Snowflake 001
    Color Me Christmas 002 007

To Shop 24/7 in the Creative Store – Click here!

Stamp Sets – Color Me Christmas (131745c, 131742w), Joy to the world (131796c, 131799w) Paper – Old Olive, Cherry Cobbler, Whisper White, Crumb Cake, Season of Style Designer Series Paper Stack Ink –Cherry Cobber, Gumball Green, Chocolate Chip, Crushed Curry, StazOn Jet Black Cool Tools – Pretty Print TIEF Folder, Paper Piercing Tool, Essentials Mat Pack, Stampin’ Pierce Mat, Aqua Painters, Deco Labels Collection Framelits, 1 3/4” Circle Punch The Perfect Finish – Stampin’ Dimensionals, Linen Thread, Pearl Basic Jewels, Regals Designer Buttons, Tea Lace Paper Doilies

    Color Me ChristmasGreetings of the Season 128033LSeason of Style Paper Stack

Stampscapes: Sunrise Canoe Ride

Stampscapes 004 Main R

Are all of your clothes from the same store?  Probably not, so why would your crafting supplies be?  The world of rubber stamping is vast and varied.  So take what you already have – inks, paper, tools, and incorporate a little nature from Stampscapes into it! 

If I had my way, I’d live at the base of this scene.  Well, pretty close to it at least, the falls might be too loud!  About six months ago I came upon a scene built with these amazing outdoor scenery stamps.  You already know how I love to create brayer scenes, so these stamps really jumped out at me. 

Stampscapes stamps were first created by Kevin Nakagawa in 1993.  They are individual nature stamps that you can very easily combine together to create a seamless scene.  The designs are tonal in nature which allows them to overlap seamlessly.  Here I used 9 different stamps to build this scene.  I know, you’re probably saying, what?  I’ve become quite the addict, and have loved incorporating them into my stamping passion.  If you love creative scenery and scenes with depth, I know you will too.  Enjoy the steps to how I made this card.Stampscapes 004 Front

Creative Tips –

  • This scene was stamped in Black Dye ink on Glossy cardstock.  You can use a dye based ink pad like Memento Tuxedo Black or Marvy Black.  You will want an ink that will dry, that’s why you want a dye based ink.  The Stampin’ Up! Basic Black has had it’s issues since they’ve been working to perfect the formula, so I wouldn’t recommend it for a project on glossy paper at this point.
  • The Cascading Falls is the main image, so to build around that, you’ll want stamps that can accentuate it, not take away from it. 
  • The other images you will want to use for this scene are:  The right side of Side Falls, the left side of Lakeside Reflections, both the right and left side of Tall Rock with Falls, Rock 1 and 2, Reeds, Shimmering Water, and Solo Canoeist.  All stamps are in the large format with the exception of Reeds.
  • When building the scene, you want to overlap about 1/4” of the edge with your new image to create a seamless blend of images without any gaps.  Use a torn piece of paper towel rather than an actual cut out mask.  Since these stamps are tonal in nature, they blend seamlessly with each other.  The added bonus … this method is so much faster that traditional masking!
  • To add color, you will want to carefully place color with your Colorbox Stylus tool using various shades of blue.  Remember to always start with the lightest shade working into darker ones.  Keep some white space to keep the scene light.Stampscapes 004 CU Pool
  • Add a slightly darker shade around the rocks, building up a shadow underwater.  You might want to do the same at the base of your three falls.
  • Be careful not to add too much blue to your falls, waterfalls reflect light and they are primarily white.  I added three shades of blue in streaks in the general same areas. 
  • Use a grey ink color to shade your rocks with your stylus tip.  You will want to be careful as you edge your rocks near the water.  Try also adding a few grey streaks into your pool of water for some shadowing, but not much!Stampscapes 004 Side
  • You can add some green to your trees with a more precise applicator such as a Brushtix Mixed Media Brushes by Tsukineko or use markers.  When using markers, be careful not to add too much color as the images are quite fine.
  • The ripples in the water were stamped with Marvy Salvia Blue.  This gives the water a little depth and movement without taking away from the scene.  Use a light/medium blue for this.
  • To highlight your scene, add some movement in the water with streaks and dots using a Uni-ball Signo White Gel Pen.  Also add random streaks to your waterfalls.  Be sure to add texture along the rocks and base of the falls.  Stampscapes 004 CU Falls
  • To give the look of water mist that you see on waterfalls, you will want to loosen the end of a Q-tip to give it a lighter texture and dab it into the Whisper White White Craft Ink Pad.  It’s a pigment ink that is sticky and will give you the lightness and movement that you are looking for.  Be careful not to press to hard – practice on scrap paper first. 
  • For the sunrise, you can add a little Peach Bellini by Adirondack Lights at the top of your forest line. 
  • I got a little blob of black in my sky on the left, so I dabbed my Q-tip into my grey and lightly added some streaks for clouds in my sky.  You can quickly and easily overdo this, so make sure to use gentle pressure and less is more.
  • Stampscapes 004 Main L

    Creative Scenery Classes

    If you love creative scenes, check out the online Brayer 101: Introduction to Creative Scenery class.  In this class, you will learn how to master the use of your brayer to build scenes using Stampin’ Up! stamps and layering ink in a seamless way.  For more information, click here.

Signature-Snowflake-001_thumb1

To Shop 24/7 in the Creative Store – Click here!

Stampscapes 004 Angle

Stamp Sets – Stampscapes Stamps Ink – Marvy – Black, Prussian Blue, Salvia Blue, Light Blue, Bottle Green, Grey; Adirondack Lights – Cloudy Blue, Aqua, Peach Bellini; Stampin’ Up! – Whisper White Craft Pad  Paper –Glossy White, Basic Black Tools – Colorbox Stylus, Brushtix Mixed Media Brushes Finishing Touch – Uni-ball Signo White Gel Pen, Q-tip