CAS Embossed Tree

So have you had a chance to play along with the Happy Little Stampers new Christmas Challenge yet? If not, jump right on in! Here’s a little more quick, simple, easily mass produced inspiration for you!

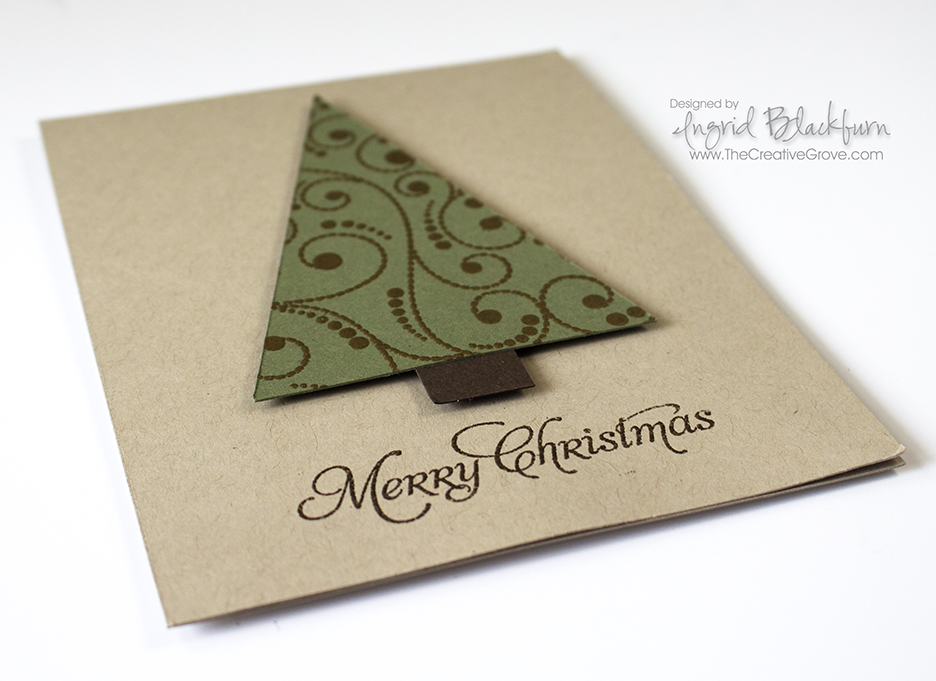
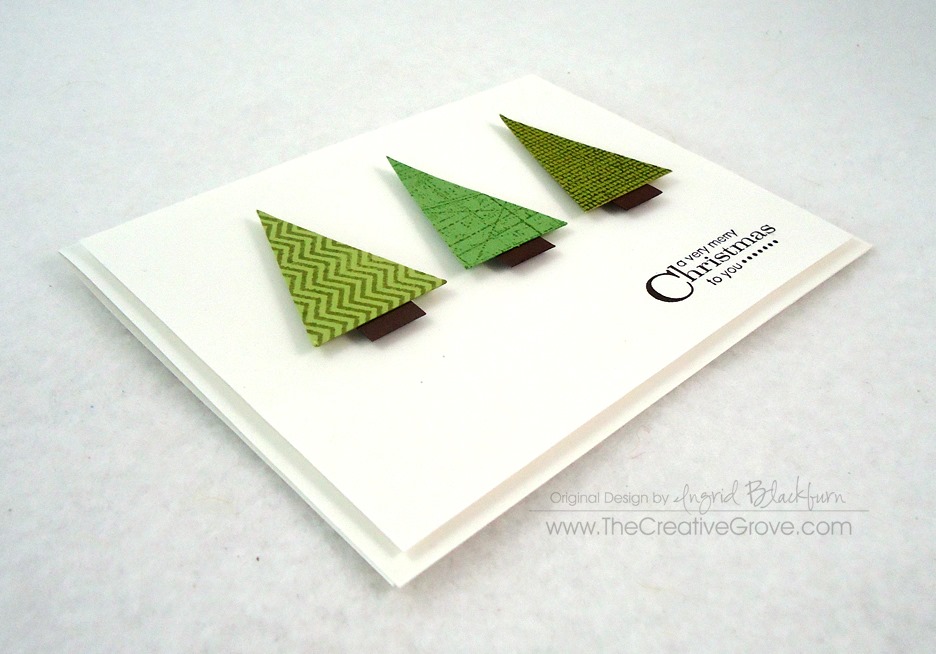
This tree is simply embossed using a fun background stamp and then cut at several angles to form a few trees. You would be surprised at how quick and easy it is to mass produce these beauties.

HLS Christmas Challenge July 2015

CAS Embossed Tree July 2015 HLS

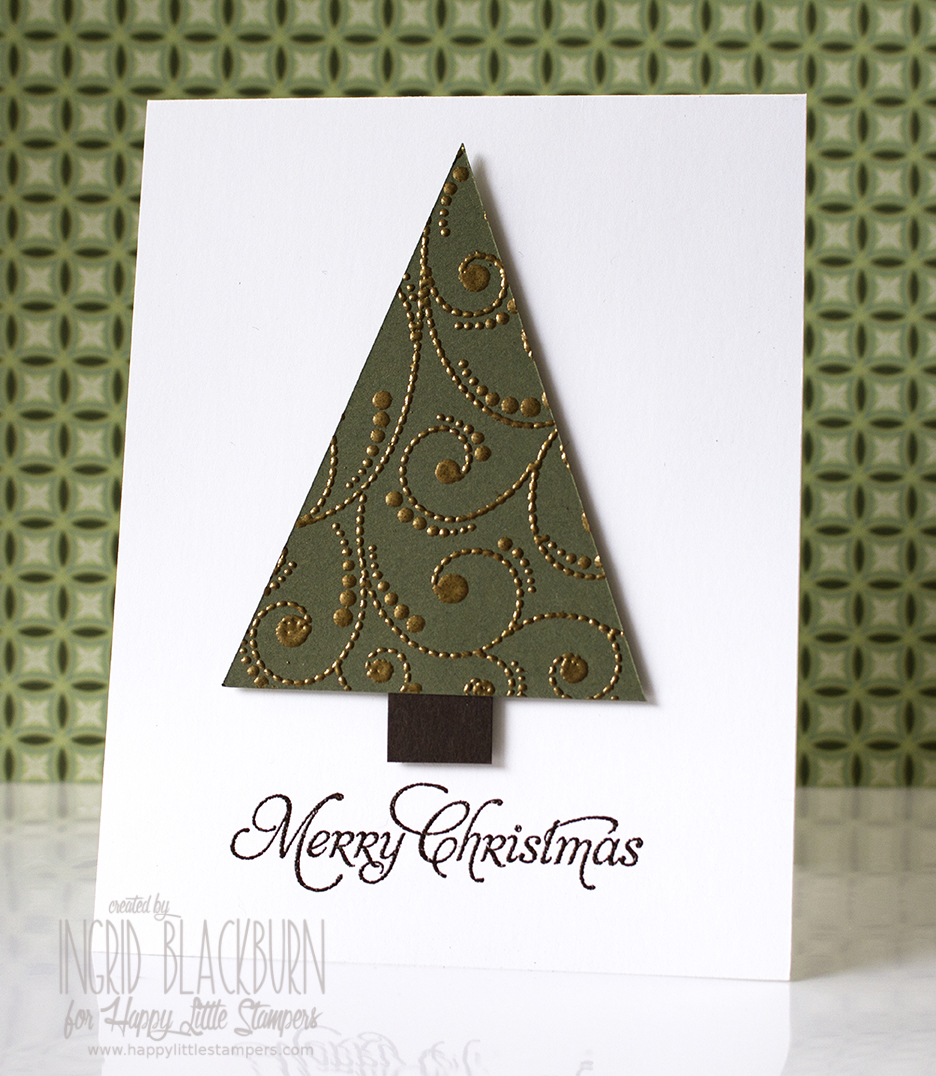
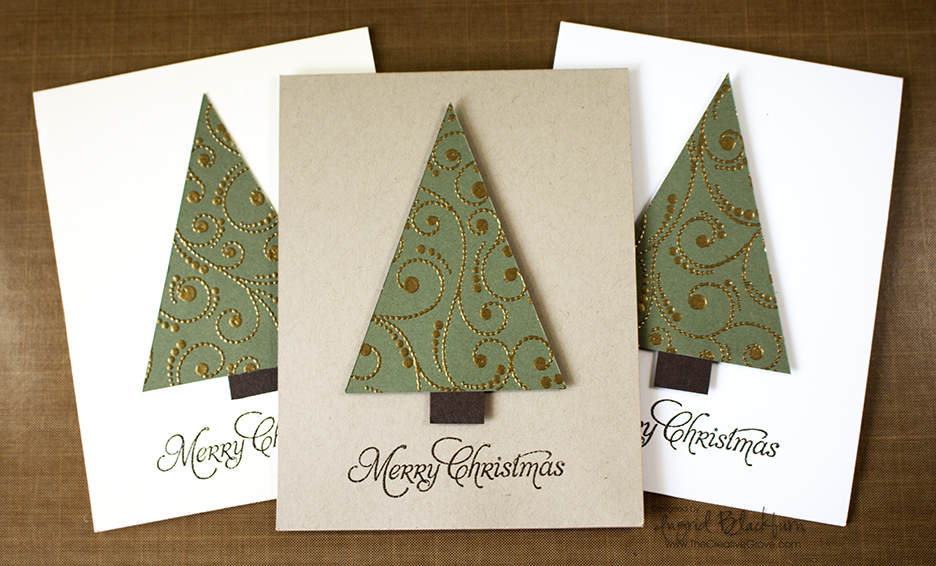
I made several versions on different neutral colored card bases. My tree is in Always Artichoke with an Early Espresso trunk. The background stamp is Dotted Fusion by Penny Black, embossed in gold.

CAS Embossed Tree 003 CAS Embossed Tree Trio

So if you’re in a pinch for a super quick, fun, very clean and simple card – this one is a winner!

Tell me which base you like the best in the comments below – I’m still undecided. And be sure to jump into the challenge fun over at the Happy Little Stampers Christmas Challenge! I can’t wait to see how you are inspired!

Signature-24-pt_thumb.jpg

Using the Watercolor Stamping Technique with the Swallowtail Stamp

Have you tried watercolor stamping yet? This clean and simple quick project uses a great background stamp, the Swallowtail stamp by Stampin Up, and a simple – yet creative watercolor technique.

Watercolor stamping technique

The best part about this technique is that you can get more than one card with just one inking! To help showcase just how easy the watercolor stamping technique is, I made a video just for you!  If you like the video, be sure to give it a thumbs up on You Tube and subscribe to my YouTube channel for continued technique inspiration.

View video on YouTube

As you saw in the video above, this is a super easy stamping technique that gives you the look of watercolor, but with stamping and detail you’d never be able to achieve on your own.  Here’s a breakdown of just how to do it.

Creative Tips for the Watercolor Stamping Technique

First, pick a large image – this doesn’t work too well with tiny images as they get lost.  This particular project uses a rather large stamp – yours doesn’t have to be so big! We chose the Swallowtail stamp by Stampin Up.

Next, ink up your stamp – we chose Ranger Distress Inks for two reasons – translucency and how well they react with water.  The specific colors are Tumbled Glass, Broken China, Salty Ocean, Peacock Feathers and Faded Jeans.  Be sure to pay attention to the little tricks of how and the sequence we use them in, in the video!

Watercolor Stamped Swallowtail Stamp by Stampin Up

Spritz your stamp with a fine mister.  You’ll want a fine spray rather than too strong a spray – think of a garden hose Jet Spray vs. a Shower Spray…there’s a big difference.  You want to coat your stamp, not spray your ink away.  The amount is important too – too much water will leave you with an inky splotch, vs true watercolor stamping.  You want to be able to still see some detail mixed with watercolor.  I used the Stampin Up mister, Ranger has one too.

Stamp onto 140 pound cold pressed watercolor paper.  Choose the smooth side vs. the toothy side.  You’ll want to use watercolor paper.  This particular technique uses quite a bit of water, and that amount will degrade the fibers of regular card stock into an unattractive mess that will take away from your project.

Watercolor Stamping with Distress Inks

Hold your stamp down and with this particular stamp, put a fair amount of pressure on it – it’s big!  If you can put your project onto a foam pad, you’ll get an even better impression with ease.

Distress Swallowtail 008

You can immediately stamp a second time onto regular card stock for a second impression.  You’ll get another impression just fine.  The reason you don’t need watercolor paper the second time is that the watercolor paper the first time around took most of the water away allowing you to safely stamp onto regular card stock for your second image.

Matte and add embellishments as you want.  You can see here that I created two very different project with slight adjustments.  Both have the color spritzing for a little added effect.  I love them both – hopefully you do too!

Distress Swallowtail 010

If you liked this tutorial and learned something – be sure you’re on our exclusive e-letter list – Creative Tips for a great video series you won’t see anywhere else!

Have fun creating your own watercolor stamping projects – be sure to share them with us on our facebook page!

Signature


[optin_box style=”14″ alignment=”center” disable_name=”Y” email_field=”email” email_default=”Enter your email address” email_order=”1″ integration_type=”aweber” double_optin=”Y” list=”2841626″ name_field=”name” name_default=”Enter your first name” name_required=”Y”][optin_box_field name=”headline”]If you enjoyed this tutorial…[/optin_box_field][optin_box_field name=”paragraph”]PHA+Li4ueW914oCZbGwgbG92ZSBvdXIgPHNwYW4gc3R5bGU9ImNvbG9yOiAjMjQ0YzVlOyI+PGVtPjxzdHJvbmc+ZnJlZSA8L3N0cm9uZz48L2VtPjwvc3Bhbj5zdWJzY3JpYmVyIG9ubHkgdmlkZW8gc2VyaWVzISDCoEdldCB0aGXCoDxzcGFuIHN0eWxlPSJjb2xvcjogIzI0NGM1ZTsiPjxlbT48c3Ryb25nPmV4Y2x1c2l2ZTwvc3Ryb25nPjwvZW0+PC9zcGFuPsKgQ3JlYXRpdmUgVGlwcyBlLWxldHRlciB3aGljaCB3aWxsIHRlYWNoIHlvdSBuZXcgdGVjaG5pcXVlcyB0byBhZGQgdG8geW91ciBzdGFtcGluZyBza2lsbCBzZXQuIMKgTGVhcm4gaG93IHRvIG1ha2UgcHJvamVjdHMgeW91J2xswqBsb3ZlITwvcD4K[/optin_box_field][optin_box_field name=”privacy”][/optin_box_field][optin_box_field name=”top_color”]undefined[/optin_box_field][optin_box_button type=”1″ text=”Send me exclusive tips!” text_size=”26″ text_color=”#000000″ text_bold=”Y” text_letter_spacing=”-1″ text_shadow_panel=”Y” text_shadow_vertical=”1″ text_shadow_horizontal=”0″ text_shadow_color=”#a3b640″ text_shadow_blur=”0″ styling_width=”100″ styling_height=”10″ styling_border_color=”#000000″ styling_border_size=”1″ styling_border_radius=”6″ styling_border_opacity=”100″ styling_shine=”Y” styling_gradient_start_color=”#a3b640″ styling_gradient_end_color=”#5b661e” drop_shadow_panel=”Y” drop_shadow_vertical=”1″ drop_shadow_horizontal=”0″ drop_shadow_blur=”1″ drop_shadow_spread=”0″ drop_shadow_color=”#000000″ drop_shadow_opacity=”50″ inset_shadow_panel=”Y” inset_shadow_vertical=”0″ inset_shadow_horizontal=”0″ inset_shadow_blur=”0″ inset_shadow_spread=”1″ inset_shadow_color=”#a3b640″ inset_shadow_opacity=”50″ location=”optin_box_style_14″ button_below=”Y”]Send me exclusive tips![/optin_box_button] [/optin_box]

CAS Watercolor Stamped Thanks

As our three week vacation in the Mediterranean comes to an end, we spend our final day today in Rome…sigh.  I’ll miss the Cioccolato Gelato, Margarita Pizza Neapolitan, Espresso and more historical sights than I can possibly store away in my mind.  What I won’t miss is are the crowds or the street hawkers…lol! To catch a glimpse into some of my favorite sights, be sure to see the end!

20141122_140909

With all this historical overload, today I need a little clean and simple!  Have you tried watercolor stamping yet?  If not, what are you waiting for!?! Today’s project is actually a product of  using what’s left over from my main project.  Always a great thing.

Recently I shared an awesome Watercolor Stamped Birthday Butterfly card for the VIP Community and figured, I already had the ink on my stamp, why not keep going with a scrap?  When I cut tags with my Chalk Talk Framelits by Stampin’ Up, I always cut two or three at a time and keep them in a scrap bin on my desk.  This tag is definitely one of my favs.

CAS Watercolor Stamped Tag CUp

I had inked up my Chevron background stamp with Seedless Preserves Distress Ink, gave a couple spritzes with my mini mister, and then with the left over ink after my main project, threw a tag cut from Stampin Up’s Whisper White card stock on there and what you see is what was left.  Don’t you just love the grunge part of how the tag turned out?  I couldn’t do that if I intentionally tried…lol.  It was a complete product of second generation stamping.

Watercolor Stamped Tag 001

I popped it up on an angle, added a die cut thanks using my Simon Says Stamp Thanks steel die and there you have it – a card in literally minutes!  Leaving all the white gives it such a great clean and simple look – for more on that check out this article on Clean and Simple Defined.

Watercolor Stamped Tag 004

Have you tried watercolor stamping yet?  Show your projects on our Facebook page here, or tell me what inks you’ve tried it with in the comments below!  And definitely tell me what you think of all those street hawkers in places like, Athens, Rome or Paris!  I know I’m not alone…lol!  Here are a few of my favorite photos from these past few weeks…

ETP Planners20141106_133333Sicila Market 001PursesLucca DoorwayPisa and CathedralTower of PisaLucca City WallCapuccinoSaranay Lunch SpotTuolon Market 001Naples Pizza 001Rome ForumRome ForumColosseumRome PantheonNaples Marketplace 001

Ciao for now –

Signature

Of course, if you’d like to see more or follow us along our Travel adventures, be sure to click right here to see and like our Travel Facebook page

Clean and Simple Design with a European Twist

So what exactly is clean and simple card design – we’re going to explore just that…rooted in everyday life with a European Twist.  In the past several weeks, I created several projects to share with you here on the blog, our member VIP Community and the free Creative Tips List – 12 Days of Christmas Newsletter before setting off for a three week tour of seven countries in the Mediterranean.  We have been exploring various countries for a few weeks now, and today we are pulling into Naples, Italy.  As we sail up the Amalfi coast, the rain is pelting the window early this morning.  Thankfully, I don’t think it will last.

Rain or shine we venture out into each new city and country.  So far I’ve been inspired by the gorgeous ancient architecture of Athens, Greece, the barren and desolate countryside of Albania, and the uber-densely populated rich textures of the island of Malta.  In the coming days we will explore several ports in Italy, before venturing on to more countries and adventures.

Europe has such beauty and charm, and one of the things I am definitely drawn to is it’s simplicity sometimes.  Yes, there are the great works of art and architecture as in the Vatican City Sistine chapel and such beauty and grace all around, but the clean and simple look is what always captivates me.  I love the contrasting colors and find myself photographing a single cactus among a gorgeous old wall, or a unique door mixed with the textures of it’s surrounding building – just like clean and simple projects.

The Core of Clean and Simple Design

A true Clean and Simple project, aka CAS, has I would say up to 70% white space with only one true focal point and minimal embellishments.  It’s the empty space that allows you as the reader to focus on the beauty of the card.

Here are a few examples to help illustrate my point.  While the beauty of the Acropolis is amazing (pictured center below), because I truly love the clean and simple look, I am drawn more to the images on the right and left.  There’s real beauty in these photographs – mostly from their simplicity.  I took the CAS photos two days ago on the island of Malta.  On the left in Mdina – the Silent City and on the right in Valetta – the capital.  While the Parthenon (center) at the Acropolis is stunning, there’s a lot going on in this photo.  The Ruins take over.  I find the other two photos to be more interesting in texture and your eye is immediately drawn to the focal image – the door or Cactus.

Malta-Silent-City-DoorAcropolis 001Malta-City-Wall-cactus

In paper crafting, clean and simple projects consist mostly of ‘white’ space with one focal point.  This card definitely exemplifies that theory.  Your focal point should be placed with the Rule of Thirds in mind.  Break your area into a three section grid – horizontally and vertically – this gives you nine boxes (like a tic tac toe box).  In a nutshell, your focal point should never just be in the center, rather it should cross one of the main lines sharing two squares.  We’ll discuss that more in depth another day.  This will create more interest or drama in your project rather than just placing it in the center.  It makes it more appealing to the reader’s eye.

Look at all three photos above – the subject of each photo is never dead center with equal spacing – rather it crosses the thirds or two thirds – and in this, it gives the images interest, depth and character.

So let’s apply these rules to our project today.  The beauty of the stark white mixed with the neutral colors and simple embossed tree draws me in.  It also helps that the image, while in the center, crosses the top and middle rather than have equal spacing all around.  It makes it more interesting.  Take the tree itself as another example.  The greeting is in the bottom third of the tree itself and extends to the right or left, never just directly in the center.  Little details like this help pull a project together.

Clean and Simple Single Tree 001

To make this card, first, you’ll want to cut your tree.  Pick a center point on the top edge of a long rectangle and cut up from both opposite points.  I used a paper trimmer, but scissors will work fine.  I’d recommend longer scissors for a straighter edge over micro tip.

Once you have your tree, run it through your Big Shot with a fun embossing folder.

Clean and Simple Design Single Tree 003

Add a small trunk using a coordinating brown color.  I used Pear Pizazz for my tree and Early Espresso for my trunk.  Cut a sentiment in Espresso as well – I used Happy by Simon Says Stamp for my steel die – Merry would also work here.  Then stamp your greeting – I used Christmas from the coordinating Happy stamp set by Simon Says Stamp.  Use a hexagon punch to create your banner ends and attach them both using liquid glue.

Pop your tree up for a slight shadow on your card and you’ll have a great subtle layer in a shadow.  Overall, this card is super easy, quick and easily mass produced.

Clean and Simple Designed Single Tree 002

I love this card – simple always works for me.  What do you do for your Christmas cards – Clean and Simple or ornate? Tell me in the comments below!

Thanks for stopping by for a little bit about Clean and Simple Card Design today – wait till you see what I have for you next!

Smile

Signature

[optin_box style=”14″ alignment=”center” action=”http://www.aweber.com/scripts/addlead.pl” disable_name=”Y” method=”post” email_field=”email” email_default=”Enter your email address” email_order=”1″ integration_type=”custom” double_optin=”Y” name_default=”Enter your first name”][optin_box_hidden][/optin_box_hidden][optin_box_code]

[/optin_box_code][optin_box_field name=”headline”]If you enjoyed this tutorial…[/optin_box_field][optin_box_field name=”paragraph”]PHA+PHNwYW4gc3R5bGU9ImNvbG9yOiAjNjQ2MzVlOyI+TGV04oCZcyBzdGF5IGluIHRvdWNoISBNeSBvY2Nhc2lvbmFswqA8L3NwYW4+PHNwYW4gc3R5bGU9ImNvbG9yOiAjNjY2Njk5OyI+PHN0cm9uZz48ZW0+ZXhjbHVzaXZlPC9lbT48L3N0cm9uZz7CoDwvc3Bhbj48c3BhbiBzdHlsZT0iY29sb3I6ICM2NDYzNWU7Ij5DcmVhdGl2ZSBUaXBzIGUtbGV0dGVyIHdpbGwgdGVhY2ggeW91IHRvIG1ha2UgcHJvamVjdHMgdGhhdCB5b3UgbG92ZeKApjwvc3Bhbj48L3A+Cg==[/optin_box_field][optin_box_field name=”privacy”][/optin_box_field][optin_box_field name=”top_color”]undefined[/optin_box_field][optin_box_button type=”0″ button_below=”Y”]Send me exclusive tips![/optin_box_button] [/optin_box]

Thankful…A very personal post

Germany Unity Day 001

In case you didn’t know, I’m both German and American.  We moved from the USA to the southwest corner of Germany last fall to spend some time with my father who lives here and expand my husband’s business.  We know we’ll head back to the states one day, but for now – we’re enjoying living in Europe and running our businesses virtually.

Today’s project is a clean and simple one – but quite personal.  Today, October 3rd, was the inspiration for this project, with a little guidance from the CAS(e) this Sketch challenge.

Case This Sketch BadgeCTS_95

Today is a national holiday here – it’s our July 4th.  The cold war ended on November 9th, 1989 with the fall of the Berlin Wall.  Barely a year later, the two German Countries – East and West, as I had known them growing up, were united into one.  The Unification Treaty, signed on Sept 20th called for October 3rd to be officially know as Tag der Deutschen Einheit, or Day of German Unity.

Germany Unity Day 003

Growing up, we visited Germany practically every summer.  My mother, born in Prussia (then Germany, now Poland) was relocated with her family as a refugee to Dresden after World War II – she was just eight years old and the eldest of five.  She grew up in what was then known as Russian controlled East Germany behind the Iron Curtain  – as the Wall that severed this country was known.

Each summer, we would spend about six weeks here visiting friends in the west, and as a toddler, my family in the East.  Once my parents split, we came here with my Dad, and would visit my Godmother’s family in Eisenach, just over the East German Wall (border).  It was quite an experience to cross – something that took almost a whole day.  Russian soldiers would walk up to us with machine guns and take our passports 6-8 times, we’d have to unload and re-load the car several times – and they were always suspicious as to why Americans were allowed, yet wanted to go into East Germany.

To say it was an experience was putting it mildly.  We weren’t allowed to bring books, newspapers or anything really with us.  We had to register and spend every converted dollar (having receipts to show that we were taking everything with us that we were spending) back with us.

The best way I can describe going into the east was coming from a bright colorful place (it was the 70s and 80s after all) into a black and white greyish suppressed place.  It was surreal.  I’ll never forget those trips.  The buildings were still dilapidated, the streets went from paved in the west to cobblestone in the east and while we played on playgrounds in West Germany, we playing in orchards and with farm animals in the East.

So to say that I was stunned and overcome when the wall fell that 9th day in November, 1989 is an understatement.  My grandmother, cousins, aunts and uncles could finally leave and just move around if they wanted to.  It was just the thought of possibilities and color finally making its way to the East.  It would be many decades before life was somewhat normal there, but today – just 25 years later – the world is finally their oyster.

Today’s project is clean and simple, because simply put, I’m thankful for this holiday today.  I’m thankful that my family has choices.  I’m thankful that they have access to food, the bare necessities, and just all that we take for granted on a daily basis. I’m thankful that the east is finally colorful and the land of opportunity.  So this project is just that – simply the German Flag and my brushed gold heartfelt sentiment – thankful.

Germany Unity Day 005

Thank you for reading this very personal blog today, I appreciate you visiting, perusing and being a part of our virtual community.  No matter where you are in the world today, know this country glows a bit brighter on the official 24th German Unity Day.

So grab a beer and celebrate right along side us today.  The party will be big in Berlin – Germans live each day to the fullest – we know how precious freedom and liberty is.  It wasn’t a pretty history, but to be severed for so long and then unified and whole again – that’s something no German takes for granted.  Simply put – we’re thankful for today.

Signature

Germany Unity Day 002

Join me for weekly step by step video tutorials in our Online Community

CAS Christmas Trees

CAS Chistmas Cards 001 (2)

It’s only July 7th…but before you know it, the holiday season will yet once again have crept up on us.  That’s why I’ve started to religiously make a card for the Merry Monday Christmas Card Challenge.  This week the challenge was to create a green and white card.  You were able to incorporate a neutral if you chose to.

116

I kept it completely clean and simple (CAS) this week – just the bare minimum…which can be hard for me.  I usually reach for my paper piercer and add some corner piercing to a card like this, but I wanted to keep it really basic.  What do you think?  Let me know in the comment section – I’d love to know if you think it’s perfect as is, or you think the piercing is the perfect finishing touch.

I’m a bit excited today – this challenge really made me smile.  I enter these challenges as a creative mojo booster, and never expect to win.  It honestly is the furthest from my mind…so I nearly fell off my chair when I saw that I WON last week’s challenge! Smile  I mean…really…little ‘ol me?!!  There were some amazing cards in there!  I’m totally honored and can’t wait to be a guest designer in next weeks challenge.  Here’s the card that gave me my first ever win! Smile

MM Winner Badge Ornament Keepsakes Stamp Set (10)

Creative Tips –

  • To make the trees, stamp various background and large image stamps in tone on tone colors onto a 1 3/4” x 1 1/4” piece of coordinating card stock.  I used Pear Pizzazz, Wild Wasabi, and Old Olive.
  • Don’t have any – no problem – use a versamark pad for whatever color you have.  It’s a watermark of that color and a great muted image.

CAS Chistmas Cards 001 (5)

  • On the reverse side of your rectangle at the top – make a mark with a pencil half way across the smaller measurement.  Should be 5/8”.
  • To make your trees, cut from the opposite corners to that middle mark.  Use a Paper Trimmer or just scissors – larger ones help here to get a straight cut.

  • Add a 1/2” piece of scrap Early Espresso for your trunk and pop them up on a  card front of white.
  • Stamp your sentiment in the corner – I used a contemporary looking greeting from More Merry Messages by Stampin’ Up!.

CAS Chistmas Cards 001 (1)CAS Chistmas Cards 001 (4)

  • Pop up your card front and you’re done!

Totally easy, right?  You could quickly make a bunch of these watching a movie.  Hope you enjoyed that this week.  If you did – be sure to sign up for our Creative Tips list.  You’ll get a video series emailed to you with several cool projects and the occasional email about exclusive projects you won’t see here on the blog!

CAS Chistmas Cards 001 (3)

Now off to make your own green and white Christmas Cards.  Join in on the fun over at the Merry Monday Challenge.

Signature

[optin_box style=”14″ alignment=”center” action=”http://www.aweber.com/scripts/addlead.pl” disable_name=”Y” method=”post” email_field=”email” email_default=”Enter your email address” email_order=”1″ integration_type=”custom” double_optin=”Y” name_default=”Enter your first name”][optin_box_hidden][/optin_box_hidden][optin_box_code]

[/optin_box_code][optin_box_field name=”headline”]If you enjoyed this tutorial…[/optin_box_field][optin_box_field name=”paragraph”]PHA+PHNwYW4gc3R5bGU9ImNvbG9yOiAjNjQ2MzVlOyI+TGV04oCZcyBzdGF5IGluIHRvdWNoISBNeSBvY2Nhc2lvbmFswqA8L3NwYW4+PHNwYW4gc3R5bGU9ImNvbG9yOiAjNjY2Njk5OyI+PHN0cm9uZz48ZW0+ZXhjbHVzaXZlPC9lbT48L3N0cm9uZz7CoDwvc3Bhbj48c3BhbiBzdHlsZT0iY29sb3I6ICM2NDYzNWU7Ij5DcmVhdGl2ZSBUaXBzIGUtbGV0dGVyIHdpbGwgdGVhY2ggeW91IHRvIG1ha2UgcHJvamVjdHMgdGhhdCB5b3UgbG92ZeKApjwvc3Bhbj48L3A+Cg==[/optin_box_field][optin_box_field name=”privacy”][/optin_box_field][optin_box_field name=”top_color”]undefined[/optin_box_field][optin_box_button type=”0″ button_below=”Y”]Send me exclusive tips![/optin_box_button] [/optin_box]

One Layer American Flag

One Layer Cards not only save time, but can really make a statement.  I’m going to keep going with the patriotic theme this week for Independence Day and give you a fun, quick and easy but real impact statement card.

This month at the One Layer Simplicity Challenge, the challenge was to create a card based off elements of the flag of your country.  Well, I have two that I call home.  Today I’m going to show you the one I made for the United States.  I took mine literal with the national holiday this Friday, but think you’ll appreciate it.

I was thinking of our troops stationed around the world and thought the saying a thousand thanks seemed appropriate!  I’m sending this to my friend’s husband – he’s been back and forth to the Middle East serving our country I don’t even know how many times – too many to count.  It’s the perfect card just to say thank you.

Enjoy!  VIP Community members have access to a  step by step video of this project.  To find out more about our VIP membership – click here.

One Layer Americana Card (3)One Layer Americana Card (7)

Have a happy 4th this week!

Signature-Blog

[optin_box style=”13″ alignment=”center” action=”http://www.aweber.com/scripts/addlead.pl” disable_name=”Y” method=”post” email_field=”email” email_default=”Enter your email address” integration_type=”custom” double_optin=”Y” name_default=”Enter your first name”][optin_box_hidden][/optin_box_hidden][optin_box_code]


IF YOU ENJOYED THIS POST
Let’s stay in touch! My occasional Creative Tips will teach you to make projects that you love…

[/optin_box_code][optin_box_field name=”headline”]If you enjoyed this tutorial…[/optin_box_field][optin_box_field name=”paragraph”]PHA+PHNwYW4gc3R5bGU9ImNvbG9yOiAjNjQ2MzVlOyI+TGV04oCZcyBzdGF5IGluIHRvdWNoISBNeSBvY2Nhc2lvbmFswqA8L3NwYW4+PHNwYW4gc3R5bGU9ImNvbG9yOiAjNjY2Njk5OyI+PHN0cm9uZz48ZW0+ZXhjbHVzaXZlPC9lbT48L3N0cm9uZz7CoDwvc3Bhbj48c3BhbiBzdHlsZT0iY29sb3I6ICM2NDYzNWU7Ij5DcmVhdGl2ZSBUaXBzIGUtbGV0dGVyIHdpbGwgdGVhY2ggeW91IHRvIG1ha2UgcHJvamVjdHMgdGhhdCB5b3UgbG92ZeKApjwvc3Bhbj48L3A+Cg==[/optin_box_field][optin_box_field name=”privacy”][/optin_box_field][optin_box_field name=”top_color”]undefined[/optin_box_field][optin_box_button type=”1″ text=”Send me exclusive tips!” text_size=”18″ text_color=”#ffffff” text_bold=”Y” text_letter_spacing=”0″ text_shadow_panel=”Y” text_shadow_vertical=”1″ text_shadow_horizontal=”0″ text_shadow_color=”#000000″ text_shadow_blur=”0″ styling_width=”205″ styling_height=”14″ styling_border_color=”#000000″ styling_border_size=”1″ styling_border_radius=”6″ styling_border_opacity=”100″ styling_shine=”Y” styling_gradient_start_color=”#3a548c” styling_gradient_end_color=”#3a548c” drop_shadow_panel=”Y” drop_shadow_vertical=”1″ drop_shadow_horizontal=”0″ drop_shadow_blur=”1″ drop_shadow_spread=”0″ drop_shadow_color=”#000000″ drop_shadow_opacity=”50″ inset_shadow_panel=”Y” inset_shadow_vertical=”0″ inset_shadow_horizontal=”0″ inset_shadow_blur=”0″ inset_shadow_spread=”1″ inset_shadow_color=”#000000″ inset_shadow_opacity=”50″ location=”optin_box_style_13″]Send me exclusive tips![/optin_box_button] [/optin_box]

One Layer Wetlands Card

DSC01578

Clean and Simple cards is a look that resonates with many people.  Today, learn how to make the simplest of cards with this how-to video and tutorial.  This project was made for the CAS this Sketch Challenge #82 using the Wetlands stamp set by Stampin’ Up!.

The sketch is quite simple, so I kept the card simple:

CTS_Sketch82nwetlands stamp set

A simple mask and easy sponging will yield a scene that blends seamlessly into your one layer card.  Enjoy this video:


I think you’ll agree that it’s an easy card to make.  You can do a ton of these and quickly have a unique little stack to send out anytime!

wetlands one layer cardcards made with wetlands stamp set

To find out more about our VIP community that has exclusive video content, a private facebook community in addition to online classes, click here.

Signature-Blog

wetlands stamp set stampin up