Embossing on Christmas Cards

Today I have a Christmas card for you that would make a wonderful mass produced card. The theme over at the Happy Little Stampers Christmas Challenge this month is embossing – and this card is loaded with embossed pieces.

hls-christmas-challenge-october-2016

I”m using my favorite new wreath and stamped embellishments by Wonderful Wreath by Catherine Pooler Designs. And let me tell you, with the matching die cuts it’s SUPER easy to get nice cut out pieces – love that!

christmas-embossing-ingrid-blackburn-hls

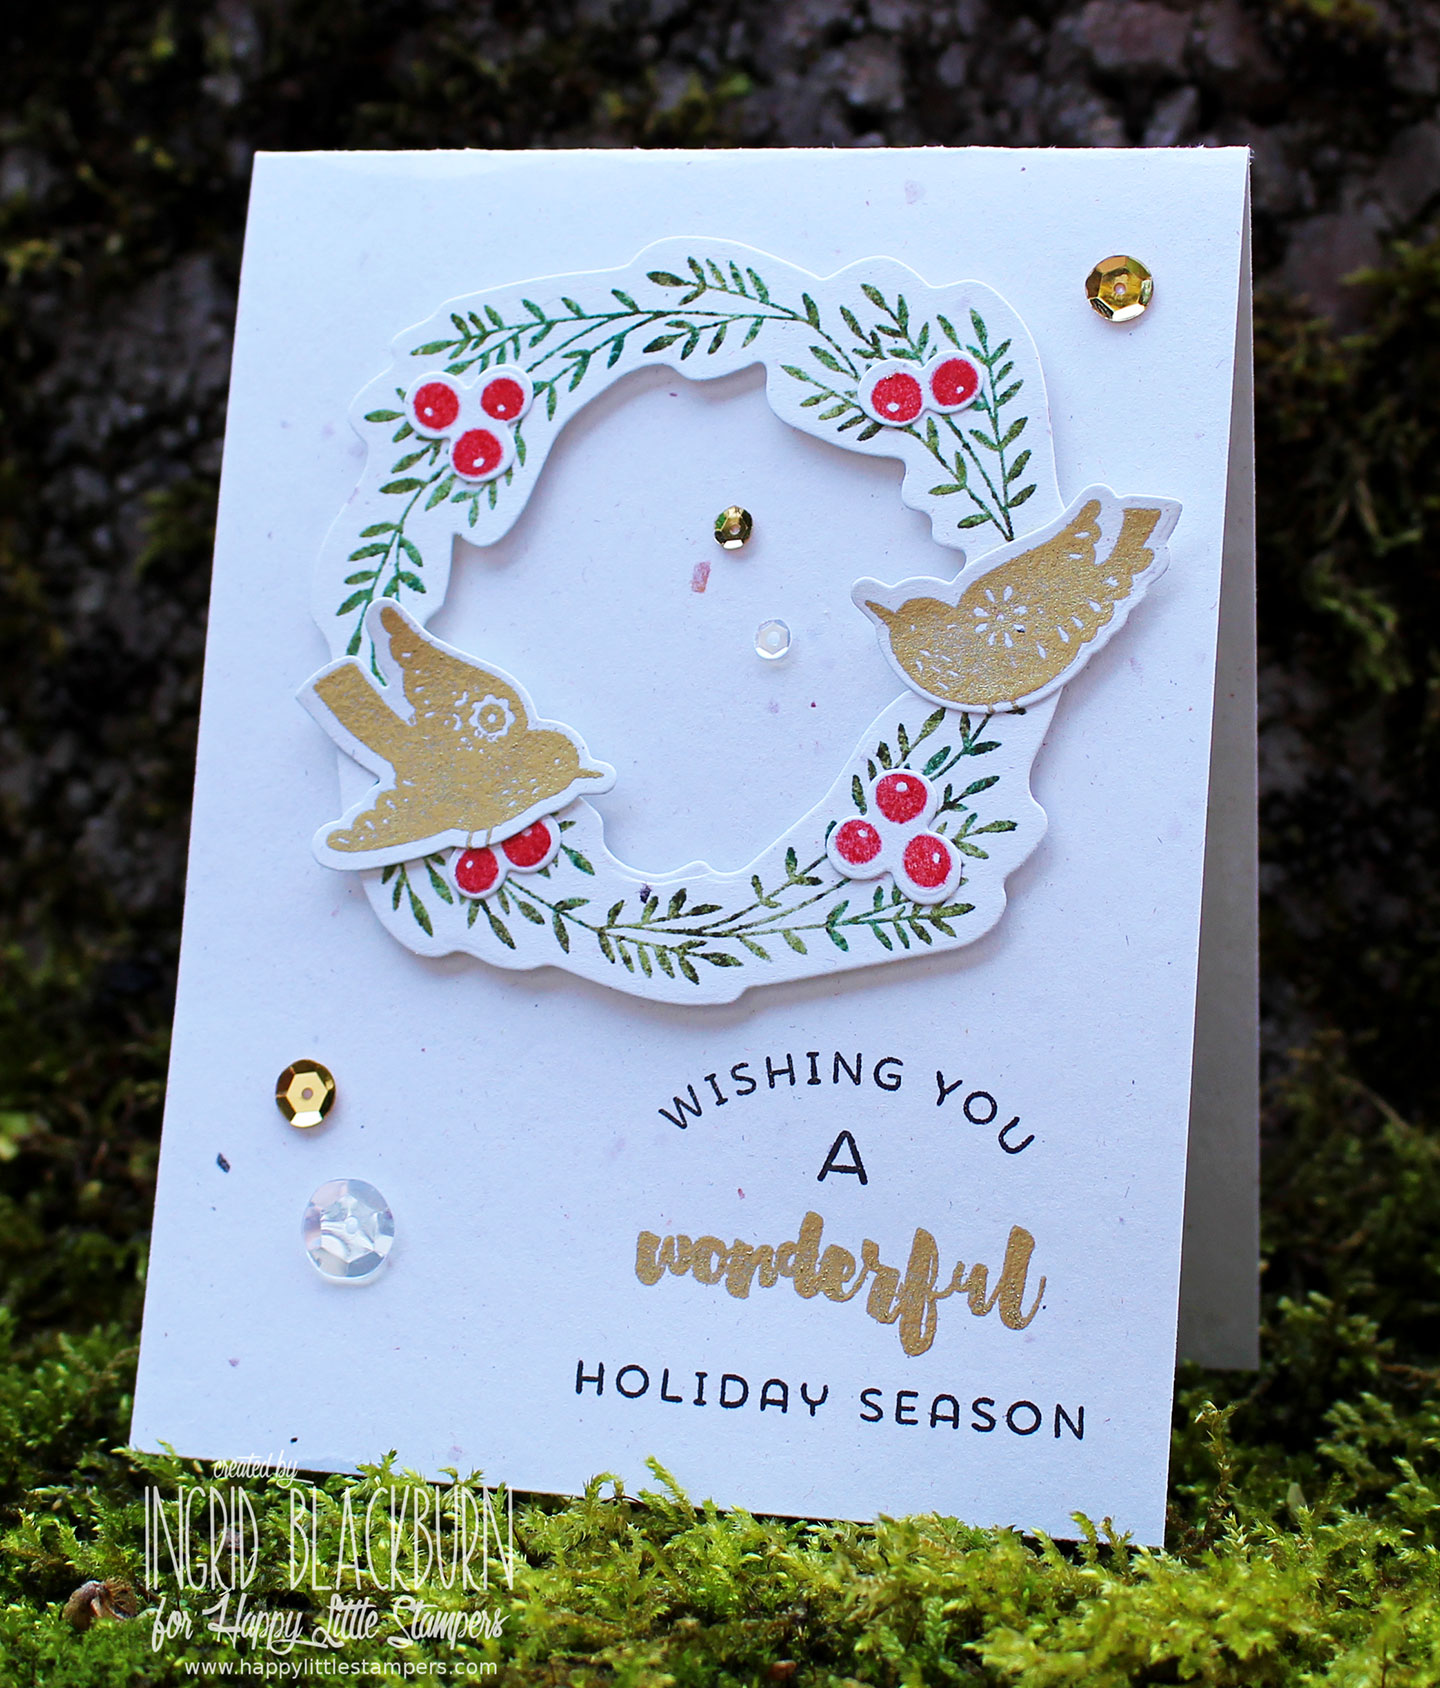
First stamp & emboss the wreath in a few greens. I inked it up in Versamark, then Peeled Paint, Forest Moss & Evergreen Bough Distress inks. Then just emboss in clear and you have your own custom embossed color! Pretty awesome, right? I’ve been doing this technique for years – that way you don’t need to buy all those colors that you’ll only use once – use what you have!

christmas-embossing-ingrid-blackburn-003

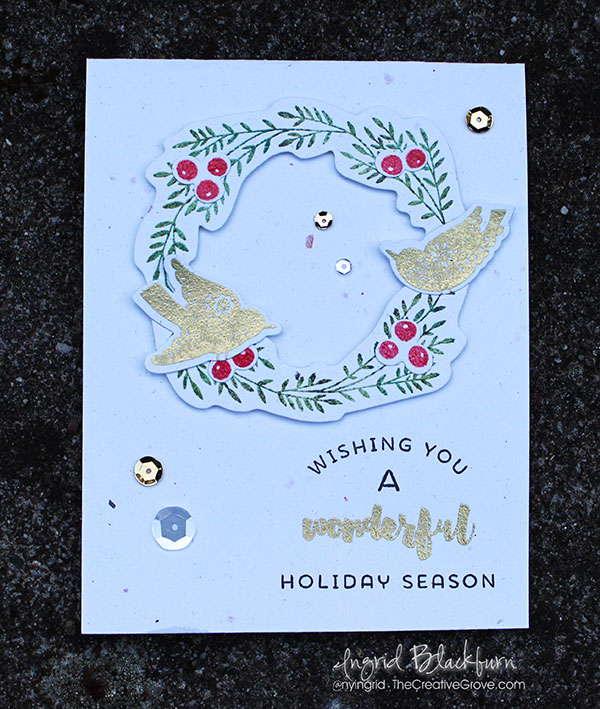
Emboss your berries the same way, using Barn Door. Next, emboss the birds and scripty greeting from this set in Gilded Gold by Brutus Monroe – my go to gold. TIP – Keep in mind that the Gilded Gold looks so much like a foil – it’s a true metallic. Because of it’s metallic properties, it embosses in a flash, literally. If you do over emboss it, it will start to bubble – and that happens quick. I just LOVE this embossing powder.

The Wishing you….Holiday Season is stamped in Early Espresso by Stampin Up and is the only non-embossed image on here!

christmas-embossing-ingrid-blackburn-002

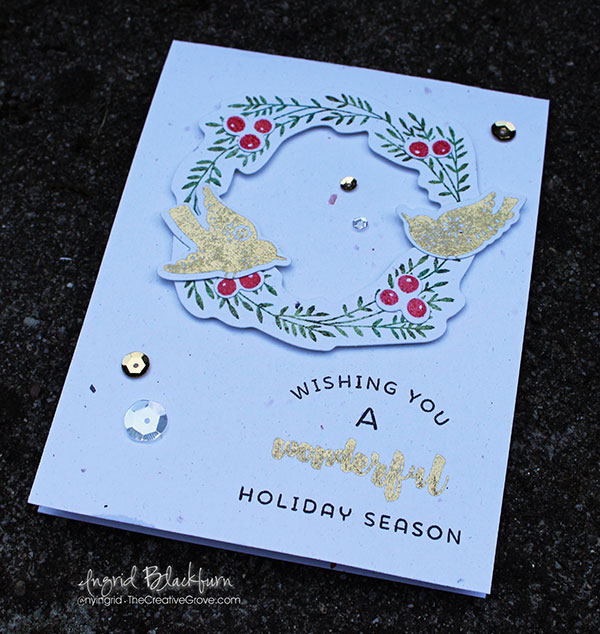
The finish off your card, pop up the wreath and add a few sequins. I think one of the things I love about this project is that it’s just 1/2 a sheet of card stock folded – and it’s a naturals type card stock with neutral flecks. The neutral quality adds to the card a bit – of course bright white would be great too!

Now it’s your turn to check out what the Design Team has done and join in on all the fun for this month’s Christmas Challenge. I KNOW you emboss!

Till next time –

Signature

[optin_box style=”12″ alignment=”center” email_field=”email” email_default=”Enter your email address” integration_type=”aweber” double_optin=”Y” list=”3846012″ name_field=”name” name_default=”Enter your first name” name_required=”Y” opm_packages=””][optin_box_field name=”headline”]Learn more with our exclusive FREE video series:[/optin_box_field][optin_box_field name=”paragraph”]PHA+UGx1cyB5b3XigJlsbCBiZSBhZGRlZCB0byBteSBGUkVFIENyZWF0aXZlIFRpcHMgRS1sZXR0ZXIgd2hlcmUgSSBzaGFyZSBleGNsdXNpdmUgcHJvamVjdHMsIHZpZGVvcyAmYW1wOyB0aGUgPHN0cm9uZz4xMiBEYXlzIG9mIENocmlzdG1hczwvc3Ryb25nPiBQcm9qZWN0IFNlcmllczwvcD4K[/optin_box_field][optin_box_field name=”privacy”][/optin_box_field][optin_box_field name=”top_color”]undefined[/optin_box_field][optin_box_button type=”0″ button_below=”Y”]Get Instant Access![/optin_box_button] [/optin_box]

CAS Christmas Trees

CAS Chistmas Cards 001 (2)

It’s only July 7th…but before you know it, the holiday season will yet once again have crept up on us.  That’s why I’ve started to religiously make a card for the Merry Monday Christmas Card Challenge.  This week the challenge was to create a green and white card.  You were able to incorporate a neutral if you chose to.

116

I kept it completely clean and simple (CAS) this week – just the bare minimum…which can be hard for me.  I usually reach for my paper piercer and add some corner piercing to a card like this, but I wanted to keep it really basic.  What do you think?  Let me know in the comment section – I’d love to know if you think it’s perfect as is, or you think the piercing is the perfect finishing touch.

I’m a bit excited today – this challenge really made me smile.  I enter these challenges as a creative mojo booster, and never expect to win.  It honestly is the furthest from my mind…so I nearly fell off my chair when I saw that I WON last week’s challenge! Smile  I mean…really…little ‘ol me?!!  There were some amazing cards in there!  I’m totally honored and can’t wait to be a guest designer in next weeks challenge.  Here’s the card that gave me my first ever win! Smile

MM Winner Badge Ornament Keepsakes Stamp Set (10)

Creative Tips –

  • To make the trees, stamp various background and large image stamps in tone on tone colors onto a 1 3/4” x 1 1/4” piece of coordinating card stock.  I used Pear Pizzazz, Wild Wasabi, and Old Olive.
  • Don’t have any – no problem – use a versamark pad for whatever color you have.  It’s a watermark of that color and a great muted image.

CAS Chistmas Cards 001 (5)

  • On the reverse side of your rectangle at the top – make a mark with a pencil half way across the smaller measurement.  Should be 5/8”.
  • To make your trees, cut from the opposite corners to that middle mark.  Use a Paper Trimmer or just scissors – larger ones help here to get a straight cut.

  • Add a 1/2” piece of scrap Early Espresso for your trunk and pop them up on a  card front of white.
  • Stamp your sentiment in the corner – I used a contemporary looking greeting from More Merry Messages by Stampin’ Up!.

CAS Chistmas Cards 001 (1)CAS Chistmas Cards 001 (4)

  • Pop up your card front and you’re done!

Totally easy, right?  You could quickly make a bunch of these watching a movie.  Hope you enjoyed that this week.  If you did – be sure to sign up for our Creative Tips list.  You’ll get a video series emailed to you with several cool projects and the occasional email about exclusive projects you won’t see here on the blog!

CAS Chistmas Cards 001 (3)

Now off to make your own green and white Christmas Cards.  Join in on the fun over at the Merry Monday Challenge.

Signature

[optin_box style=”14″ alignment=”center” action=”http://www.aweber.com/scripts/addlead.pl” disable_name=”Y” method=”post” email_field=”email” email_default=”Enter your email address” email_order=”1″ integration_type=”custom” double_optin=”Y” name_default=”Enter your first name”][optin_box_hidden][/optin_box_hidden][optin_box_code]

[/optin_box_code][optin_box_field name=”headline”]If you enjoyed this tutorial…[/optin_box_field][optin_box_field name=”paragraph”]PHA+PHNwYW4gc3R5bGU9ImNvbG9yOiAjNjQ2MzVlOyI+TGV04oCZcyBzdGF5IGluIHRvdWNoISBNeSBvY2Nhc2lvbmFswqA8L3NwYW4+PHNwYW4gc3R5bGU9ImNvbG9yOiAjNjY2Njk5OyI+PHN0cm9uZz48ZW0+ZXhjbHVzaXZlPC9lbT48L3N0cm9uZz7CoDwvc3Bhbj48c3BhbiBzdHlsZT0iY29sb3I6ICM2NDYzNWU7Ij5DcmVhdGl2ZSBUaXBzIGUtbGV0dGVyIHdpbGwgdGVhY2ggeW91IHRvIG1ha2UgcHJvamVjdHMgdGhhdCB5b3UgbG92ZeKApjwvc3Bhbj48L3A+Cg==[/optin_box_field][optin_box_field name=”privacy”][/optin_box_field][optin_box_field name=”top_color”]undefined[/optin_box_field][optin_box_button type=”0″ button_below=”Y”]Send me exclusive tips![/optin_box_button] [/optin_box]

Polka Dot Christmas

Clean and simple Christmas card 001

Since we’re packing all weekend, I thought I would dig into the archives and share one on my first Christmas cards that I blogged about on my old blog.  It’s a classic and you can substitute any greeting here.  Hope you enjoy it! SmileClean and simple Christmas card 003

The circles were punched using a 3/4”, 1/2”, and the circle punch from the Itty Bitty Shapes Punch Pack.  The banner was made using a Square Punch, and Decorative label Punch.  It’s a fairly simple card that has a classic contemporary look to it.

The colors are Cherry Cobbler and retired – Baja Breeze and Lucky Limeade. 

Clean and simple Christmas card 002

Moving Special

Don’t miss out – this special ends today!  Everyone who order a minimum $25 before shipping and handling and uses the hostess code – VWCWVJ34 will get 15 – 6×6” sheets of Designer Paper sent to them directly in the mail from me! Smile

Signature Snowflake 001

To shop 24/7 – click here