Vibrant Flicked Accents


How to tutorial on the Flicked Distress Technique

Church bells fill the air this early Sunday morning here in Rome.  I’m drinking a rich cappuccino while writing this for you.  I created several projects to share with you while I’m traveling for several weeks through Europe, and I thought this was the perfect one to share with you today.  Yesterday we saw all the magnificent works of art in the Sistine chapel and all the Vatican museums.  Those rooms really take your breath away.

I look at those works of art and wonder how those men could paint for years on one project like that!  It really puts it all into perspective – sometimes things just take a little bit of time.  And the masters studied and worked on their craft for years, decades actually.  It’s amazing to me that with the art of Paper Crafting we get to spend a little bit of time in our day to create something beautiful to share with those that we love.  And this is one such project.

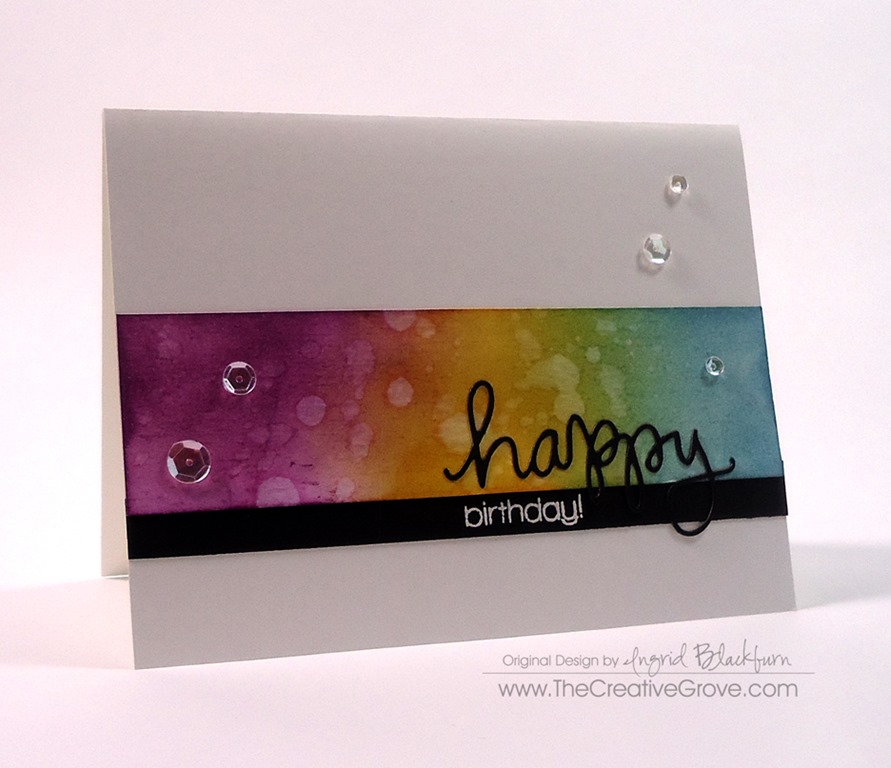
This card really packs a punch with its colors and simplicity.  It’s the simplest of cards to make, you’ll just be shocked!  No need to study for decades for this one – the right tools turn you into the master.

Learn distress ink techniques at The Creative Grove - Flicked Distress Technique

Your first step is to pick the right ink.  Just like anything in life, you need the right stuff.  You’ll want to pick inks that are translucent in nature.  That way as you layer them upon one another – be it just one shade or a mixture as you see in this card, they work together to create deeper hues rather than flat and dull.

This project uses Distress Inks because their very chemical nature is a translucent dye based ink.  What makes it so unique is that it reacts like a watercolor.  When water is added to the mix, it moves, blends and creates something new.  That’s how you get those cool effortless effects with them.  And when you add water to a set project like this one – that’s how you get those cool flicked marks, just like water spots.

If you are one of our Community members, then you have access to a step by step video on how to create the Flicked Distress Technique like this card.  It’s in our Project and Resource library.  To find out more about our online classroom site Click Here.

Flicked Distress Technique 004

Creative Tips:

To create this project, you’ll want to use the right tools with your Distress Inks by Ranger.  I used the mini sponge applicators.  Start with a strip that is long enough to cover the span of your card, mine is 5 1/2 x 1 1/2”.  You can also sponge an entire sheet and cut it down.

Using Ranger Distress Inks, start with Mustard Seed in the middle of your piece of scrap paper.  you’ll want to cover 1/2 of it – leaving enough space at the left and right to show a different color.  Yellow is a great color to combine other colors with to create new ones.  Start by sponging off your paper and lightly in a circular motion, sponge onto your project.  The reason you want to start off your paper is that the first impression you make is always a harsh one since your tool has the most ink on it at that moment.  You will naturally ease up as you work your tool further onto your project.

Add several layers of your mustard seed, and don’t worry if your sponging isn’t flawless in the beginning.  I promise it will all blend together and look effortless at the end.  That’s the beauty of Distress Inks – due to their true translucent nature, they blend effortlessly.  I was so frustrated when I first started layering mine, because it didn’t look flawless and I was really watching my pressure!  But sure enough, as I trusted the process and kept working at it – something happened and it began to look unbelievable.  I still to this day say “that’s so cool” every time I create a project like this.

Flicked Distress Technique Birthday Card

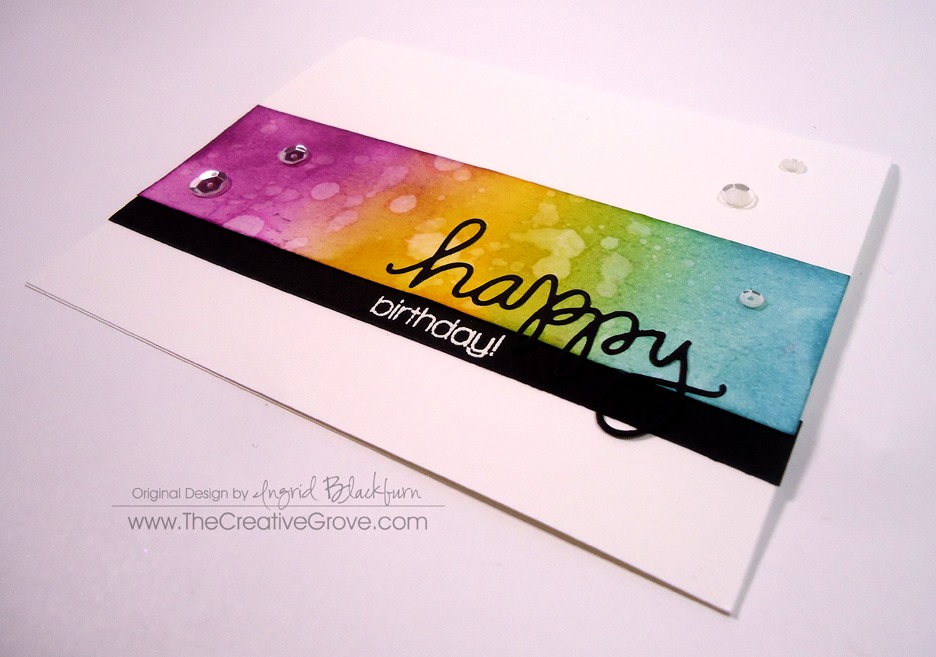
Once you’re happy with the depth of your Mustard Seed, add Broken China to the right.  continue as you did for the Mustard Seed, just overlap a little to create a beautiful shade of Green between the two.  Don’t overlap too much, just a little goes a long way.  Do the same on the opposite side with Seedless Preserves.  Once you have your layers complete, do one final pick me up with the Mustard Seed to brighten it up and you’re all set!

Spritz a little water onto your hand where your palm and fingers meet and in a firm and fluid motion flick the water a few times onto your project.  I encourage you to try this first on a practice piece to “get it”.  That gives the spots your see above.  Dry it quickly with a little zap from a heat tool.  The reason for the heat tool is that water will always react with Distress Inks, and if you get a really get area, you want it to just stop, rather than continue to work the ink.

To finish your card, emboss the word Birthday from the set happy by Simon Says Stamp onto a strip of Black card stock.  Attach it to the bottom of your strip and place the coordinating word Happy above it with liquid glue.  Add a few sparkling clear sequins by Pretty Pink Posh are you’re set!

So what did you think?  Have you tried this technique out before – I’d love to know!  Leave me a comment and tell me what color combinations you’ve tried!  Have fun – Ciao!

Signature


If you like learning how to create this technique then you’ll LOVE our online classroom community.  We add new step by step project tutorials each week with up close photographs and classes.  Learn more about how to be a part of our paper crafting community HERE.

Non-Traditional Christmas Colors

Non-traditional Christmas 016

When you think of Christmas, if you’re anything like me I think of deep reds and greens, silver and gold and of course rich blues – well, I have a soft spot for jewel toned blue wrapping paper!  This week, over at Merry Monday Christmas Challenge, we’ve been challenged to use non-traditional Christmas colors.  Well, I think this card definitely fits the bill.  Here’s the inspirational photo…I think you can tell where my inspiration came from – Mine is a version of this tree!

131

And just to toot the horn a little….I was an honorable mention in last weeks challenge!  If you missed it, be sure to catch my fun snowy drift project and video here.

Honorable Mention

Non-traditional Christmas 020Non-traditional Christmas 022

Thanks for stopping by today – I had a ton of fun working with all sorts of colors I don’t usually use this week.  I hope you like the end result, I actually really love it!  So glad to step outside my comfort zone, yet again thanks to this challenge.  I encourage you to play along too!

Signature

12 Days of Christmas starts soon!

Be sure to sign up for the Creative Tips Newsletter – our 12 Days of Christmas starts at the end of this month!  Don’t miss out – and to tie you over till it starts, you’ll get a fun video series that will get your card making juices flowing!  Sign up here.

That was August?

Did August fly by for you too?  I have no idea where the past 31 days went…lol.  At least we have lots of work to show for it!  Here is just a tiny glimpse into the 20 new video tutorials we added to the VIP Community this past month.

The Creative Grove August 2014 Project Sneak Peek_thumb[2]

We learned a ton of new techniques and even added a few new classes!  Here are some of the highlights:

  • How to master using a brayer for creative scenery
  • Freeform watercolored images based off stamps
  • How to use watercolor pencils as a medium and not a pencil
  • Masking perfection – how to create collages
  • A new glimpse into bokeh using distress and pigment inks
  • Plus Clean and Simple and One Layer Cards that wow!

We are committed to adding great content each and every week that will educate and keep you excited about your paper crafting journey.  For less than the price of a class, you get access to our entire video project and resource library, classes and private Facebook community.

So what are you waiting for?  Become a VIP here at the grove and start learning!

[button_6 bg=”green” text=”style5_getaccessnow.png” align=”center” href=”https://thecreativegrove.com/vip/tcg-vip”/]

Signature

Mojo Monday Garden Flowers

Mojo Monday Flowers

It’s the middle of summer and all the flowers here are in bloom.  I thought I’d bring you a floral card with non-traditional colors today for Mojo Monday. Smile

Today’s sketch had me immediately reach for all my floral stamps.  Did you happen to see my card last week with the amazing floral garden?  If not, check it out here.  But first see all the creative tips listed below.

Here is today’s Mojo Monday sketch from the Challenge Blog and my interpretation:

mojo353DSC01940

As you can see, I strayed a tiny bit and excluded the scallop border.  I planned on including it, but didn’t want to take away any further from the pretty flower background I created.

Creative Tips –

  • Mask various flower stamps that you have to create your own background.  Alternate open images with tighter ones for a filled out look.
  • Don’t feel you need to stick to traditional flower colors.  Here you see Baked Brown Sugar.

DSC01941

  • I kept playing with which colors to put in the background, and finally decided on adding a little texture to Vellum as a subtle piece.  To create this cross-hatch pattern, alternate a striped embossing folder to make the x’s.
  • Do you have stamps that are tucked way in the back and forgotten about?  My filigree background stamp seems to be one of those.  I wanted something with a romantic feel, so I embossed the pattern on a piece of Marina Mist card stock in versamark and clear embossing powder.  It compliments the flowers, yet stands on its own.

DSC01948

  • The greetings from this set are cool.  I love the boldness of chosen words and chose to highlight them.  I didn’t have a baked brown sugar marker, so I inked up the entire image with an ink pad and removed the ink from where I needed with a blender pen.  I then colored those words in with a marker that I did have.

DSC01943DSC01949DSC01947

  • I’m sure you’ve noticed that I rarely use just plain butterflies.  Here you see several stamped with floral images and then punched out.  It gives a little character to the wings and looks pretty cool!
  • For a finishing touch, distress your edge of the greeting, add some pearls and pop up your card front.

Mojo Monday Flowers

This clean and simple project completely works for me.  It’s loaded with various techniques, and works – even with non-traditional garden floral colors!

Signature


[optin_box style=”13″ alignment=”center” action=”http://www.aweber.com/scripts/addlead.pl” disable_name=”Y” method=”post” email_field=”email” email_default=”Enter your email address” integration_type=”custom” double_optin=”Y” name_default=”Enter your first name”][optin_box_hidden][/optin_box_hidden][optin_box_code]


IF YOU ENJOYED THIS POST
Let’s stay in touch! My occasional Creative Tips will teach you to make projects that you love…

[/optin_box_code][optin_box_field name=”headline”]If you enjoyed this tutorial…[/optin_box_field][optin_box_field name=”paragraph”]PHA+PHNwYW4gc3R5bGU9ImNvbG9yOiAjNjQ2MzVlOyI+TGV04oCZcyBzdGF5IGluIHRvdWNoISBNeSBvY2Nhc2lvbmFswqA8L3NwYW4+PHNwYW4gc3R5bGU9ImNvbG9yOiAjNjY2Njk5OyI+PHN0cm9uZz48ZW0+ZXhjbHVzaXZlPC9lbT48L3N0cm9uZz7CoDwvc3Bhbj48c3BhbiBzdHlsZT0iY29sb3I6ICM2NDYzNWU7Ij5DcmVhdGl2ZSBUaXBzIGUtbGV0dGVyIHdpbGwgdGVhY2ggeW91IHRvIG1ha2UgcHJvamVjdHMgdGhhdCB5b3UgbG92ZeKApjwvc3Bhbj48L3A+Cg==[/optin_box_field][optin_box_field name=”privacy”][/optin_box_field][optin_box_field name=”top_color”]undefined[/optin_box_field][optin_box_button type=”0″ button_below=”Y”]Send me exclusive tips![/optin_box_button] [/optin_box]

Merry Monday Bokeh Flurry

DSC01564


Have you tried the Merry Monday Challenge?  I seem to be on a challenge kick lately, and thought I’d have a go at this one this week.

114

This week, the challenge is to add some Sparkle, Shimmer and Shine.  Sounded like fun and I needed to get started on some Christmas Cards! Smile

Here at the grove, we have an exclusive step by step video and we’re having fun with a new technique this week – Bokeh.  I promised them I’d try it with some snowflakes along with all the other samples.  Here’s the result – enjoy!

DSC01574

Signature-Blog

CAS Dahlia Mojo Monday

DSC01372

It’s been a while since I played along with the Mojo Monday challenge.  I have to admit, I’ve missed it!  I’ve been in a technique zone creating our new VIP Community here at the Grove (click here to find out more), so I threw a fun simple one into this project.  Sometimes when you have a cool texture that you’ve created for your card, making the rest clean and simple really allows it to stand out.

Here’s the sketch and my version.  You can see, I stayed pretty true this time.

Mojo349SketchDSC01375

Here are some tips on how to make this card, and join our Creative Tips list (on the right) to see exclusive free videos on how to make cards just like this:

  • Crumple your paper to create a faux leather look to your cardstock.  If you find it’s hard to do this, spritz it lightly with water.  Use the sweat from your palms to aid you in crumpling this up really well.
  • Cut your solid Navy strips thin – just 3/8” wide.
  • Adhere a thin strip of Cherry Cobbler and your Navy strips with Tombo Multi Liquid Glue.  When you alter cardstock, as with the crumpling, it becomes hard to work with.

DSC01376

  • Snip off the edges of all your strips and adhere your Sahara Sand cardstock to a 5 1/4” x 4” piece of white cardstock.
  • When adhering your large piece down, keep the same amount of space to the right, left and bottom.  It becomes an extended mat.
  • Cut a 2 1/2” circle with a circle punch, framelits or nestibilities. Stamp your Dahlia image in Cherry Cobbler.  Attach to your card front, leaving the same amount of space at the top as the bottom white to balance it out.  Use Liquid Glue on textured cardstock, dimensionals or foam tape to attach to the white to adjust for the height variance.

DSC01377DSC01378

  • Stamp your greeting and emboss in white on Navy cardstock.  Create a banner with your snips or hexagon punch (see video here on how to do that).  Attach with dimensionals onto the white, glue onto other parts.
  • Pierce edges of your card with a paper piercer and a template.
  • Add large pearls to Cherry Cobbler cardstock to finish your card.
  • Pop your card front up onto your card base.

DSC01373

You’re done!  It’s a fun little project, isn’t it?  Let me know what you think!  Leave me a comment below.  Happy Creating!

Signature-Blog

Interested in learning stamping techniques each month?  Check out our new VIP Community!


Merry Little Christmas Chalk Talk Card

Chalk Talk 004 Main R

Need a super quick, simple and fun Christmas card?  Well you’ve found it!  Today’s card takes a page from the Clean and Simple rule book.  This card is colorful, packs a punch and is quite trendy!  The Chalkboard look is fun, and the stamp set Merry Little Christmas really works for this look.  Read on for all the details!

What do you think?  It’s a fun little card, right?!!  Simple, but fun.  If you love this card and are looking for great ideas to say thanks, be sure to try out the newest Class of the Month in the classroom – Thanks.  It’s on Pre-sale for 22 more hours, then will go back up to the full price, so save 20% while you can!  Click here for class detailsChalk Talk 004 Side

Creative Tips –

  • Since the black chalk board look is so striking against the Crumb Cake, the color Cherry Cobbler is the perfect compliment to bring the card together. 
  • The cute papers from the Paper Stack Season of Style really helps this particular look.  Don’t you just love the candy cane feel to the paper?Chalk Talk 004 Angle
  • Something else this card looks like is a package.  That’s one of the great ways to use the Chalk Talk Framelits
  • To give a little interest to the great amount of white space, stamp off in Crumb Cake with the splats from Gorgeous Grunge three times, once up top and once in each corner.  Chalk Talk 004 Texture
  • Tip – don’t over stamp this, it will ruin the random effect – trust me on that!  It will look forced rather than just that little interest that you were going for.
  • Your Cherry Cobbler is 2’” x 4.25” and the Basic Black is 2.25” x 4.25”
  • Cut the tag out with the Chalk Talk Framelits and stamp the greeting from Merry Little Christmas in Whisper White Craft Ink.  Draw and outline around the edge with a White Watercolor Pencil.Chalk Talk 004 CU
  • To give it that chalk board look, drop an Embossing Buddy on the tag in several places to look like chalk residue.
  • Wrap your ribbon around and tie a flat knot.  Bring your tag through to make sure of the placement on the card. 
  • Attach the Basic Black to your Crumb Cake base.Chalk Talk 004 Tag
  • Tip – Use Snail on the left side of your tag and two dimensionals on the right.  This will help give it the randomly attached look.
  • Add Pearl Basic Jewels in multiple sizes for a punched up look, it looks great without them too!Chalk Talk 004 Main L

Just in – the Clearance Rack has been updated!  Be sure to check it out along with the one day sale specials. 

Signature Snowflake 001 

Supplies:

Stampin’ Up! Joyful Christmas

Joyful Christmas 001 001

Do you need a quick but colorful Christmas card?  This clean and simple card is powerful with its intense color, yet quite easy to mass produce.  Let me show you how.

For me, when I make 100 Christmas cards, I need something that will keep me excited through the process, are you like that?  One of the things that I love is the color Cherry Cobbler.  I just love it – it makes me happy just to look at it.  Do you have a color that just makes you happy too?  I’d love to know what colors you absolutely love – tell me in the comment section.  Cards like this one with interesting detail keep me fascinated as well.  Last month I showed you how I made this clean and simple Regarding Dahlia’s card:

       Regarding Dahlias 003 Main Angle 2Joyful Christmas 001 005

Can you tell how this card is based of that one.  When you have a great idea – duplicate it!  To make this one, you’ll start with a center image, use a mask to cover it and stamp outward from there. 

  • Tip – be sure to stamp a mask onto a piece of printer paper – not cardstock.  The thickness of cardstock will give you a white space and won’t allow you to get your second image to flow into the main image. 
  • Tip – cut your mask on the inside of the line, not on the line and definitely not outside the line.  That will give you a gap.

Since the cardstock is so rich, you will want to give your sentiment an opportunity to pop off the color by embossing it in Black.  Some glitz and glamour was added using Rhinestone basic Jewels and Dazzling Diamonds Glitter (hard to see on the photos as it’s rather light just on the veins.

Joyful Christmas 001 007Joyful Christmas 001 008

To help the white poinsettia banner pop, you may wish to matte it onto a piece of Basic Black card stock.  To add depth without taking away from the beautiful Cherry Cobbler color you can use Old Olive for the leaves.  It doesn’t take away from the images, rather it compliments it and supports it with a neutral rich color.

  • Tip – stamp your flowers on a larger piece of white and then cut it down to the desired length.  That way you don’t stress yourself out with getting it perfectly centered.  I began with a 4”x 11” piece that I cut down.
  • The final strip is 2 1/2” x 5.5” and the Basic Black is 5.5” x 2 5/8”.  The Cherry Cobbler is an A2 card – 8 1/2” x 5 1/2”
  • Tip – If I was mass producing this card, I would pre-cut my Whisper White Strips.  I would also perfect one and keep it above my working strip as a master.  This would help you as a guide to get each one just right.  You can also draw a box on your grid paper to show where to stamp.

The inside panel is just Whisper White with the same images stamped in the corner.  Keep it small, just a touch.  Joyful Christmas 001 002

It’s a fun card that pops and is easy not only easy to stamp, but gives you that richness that you are looking for.  And added bonus – this is rather easy to prep and cost effective. 

Online Stamping Classes

Do you want to learn how to make creative scenery cards or Christmas Cards?  Try our Brayer 101 – Introduction to Creative Scenery online class or the Class of the Month – Festive Flurry.  You’ll learn how to master this technique using a brayer to create unbelievable scenes that will leave you feeling like an artist or make the coolest cards that will leave your friends and family stunned.  Find out more here.

Signature Snowflake 001

Joyful Christmas 001 004

Stamps – Joyful Christmas Ink – Cherry Cobbler, Old Olive, Versamark Paper – Cherry Cobbler, Basic Black, Whisper White Cool Tools – Heat Gun, Black Embossing Powder Finishing Touch – Pearl Basic Jewels, 2 way glue pen, Dazzling Diamonds