Watercolor Smash in the Mix Mash Forest

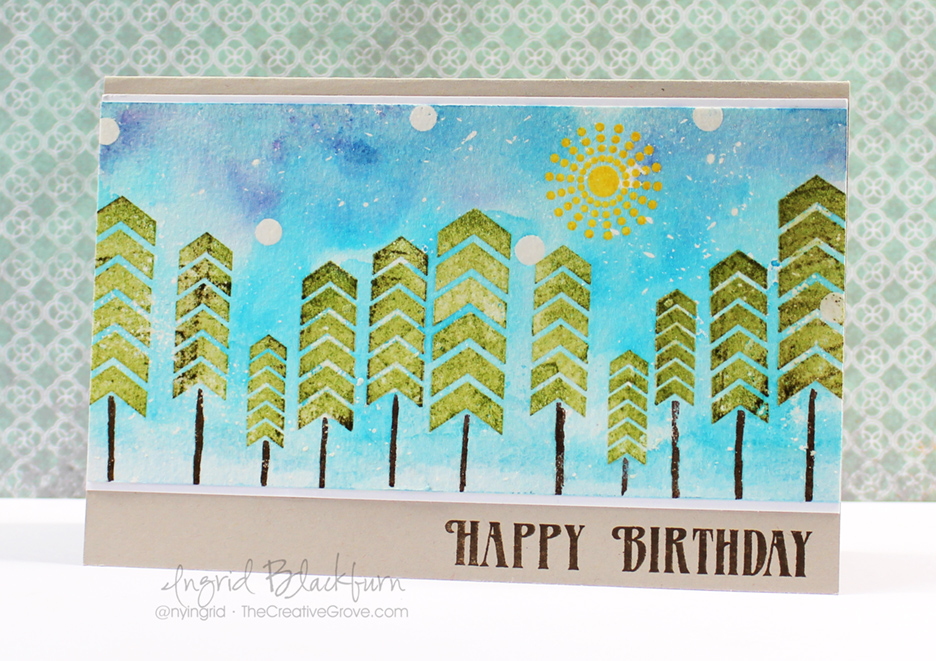
Have you ever tried the Watercolor Smash technique? It’s a super easy one that creates amazing looks. Paired here together with the Mix Mash stamp set by Happy Little Stampers, you get a fun and quirky little scene made out of some graphic elements. Don’t you just love stretching your stamps in ways they weren’t intended?

Distress Techniques SHOP Mix Mash (2)

So you can fully understand all the little tips and ideas that went into creating this card, I filmed a short video tutorial for you. I don’t know how your mind works, but the first time I saw this stamp set, this card idea popped into my head! Enjoy the video:

Watch on YouTube

The Watercolor Smash Technique Tutorial

  • The scene was created on a 6 3/8 x 3 1/4″ piece of 140# cold pressed Hahnnenmuhle watercolor paper. The final card is 4 1/4 x 6 3/8″ folded Sahara Sand card stock by Stampin Up. You’ll also need a white – 6 3/8 x 3 7/16″.
  • I had an idea to create a sunny, snowy day – I know…contradiction…so I wanted to add some flicked masking fluid first with a toothbrush. You have to set it aside to fully dry before beginning – no heat tool!
  • To keep with the quirky theme, add a few of the smallest circles from Mix Mash in the sky portion of the card. Emboss in clear embossing powder.
  • Add the sun by first stamping in Versamark Ink, then Mustard Seed Distress Ink (Ranger).

Watercolor Smash techniques

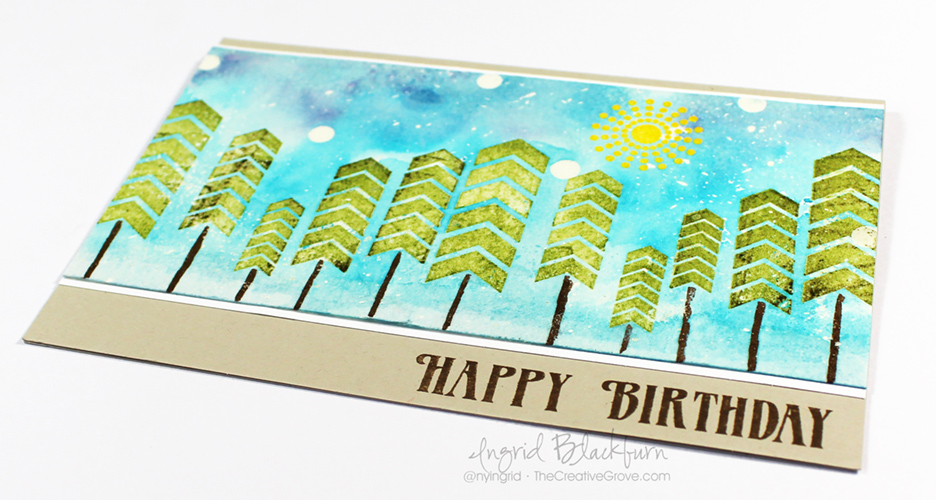
  • Add the trees in the same manner as the sun, using Peeled Paint and Forest Moss Distress with Versamark. TIP – clean your stamp in between so you don’t get green in your watermark pad! I also varied the size and height of the trees so it wasn’t too uniform.
  • Emboss trees in clear, add trunks using a Ground Espresso Distress Marker. Don’t do too many at once before adding the embossing powder – you don’t want the ink to soak into your watercolor paper to quickly. If it does, run over it with a Versamarker, but be sure to only get the brown!
  • Lay down the colors as in the video – Tumbled Glass, Broken China, Mermaid Lagoon and Chipped Sapphire.
  • Add a fair amount of water with a fine mist spritz bottle.
  • Lay your project – image side to ink over your blue palette and smash, holding your card stock there so the ink and water can grab onto your project. You’ll see the sides of your paper curl up just a bit.

Scenic Cards

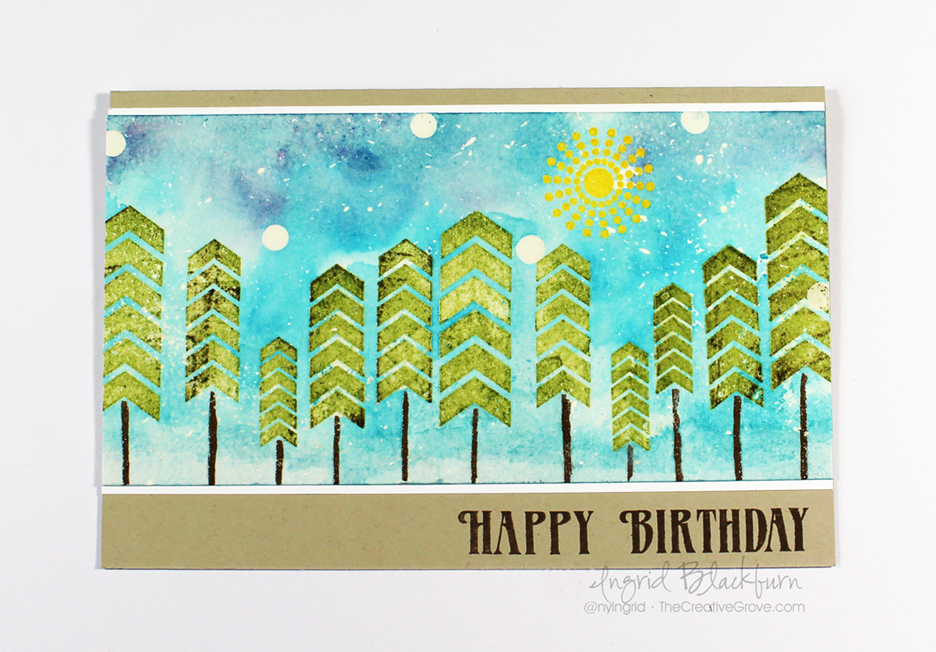
  • Don’t worry if you didn’t get it right in one smash. That’s the beauty of this technique. Keep smashing to get the color you want in certain sections. To get a smooth look, be sure not to allow your project to dry in between.
  • Use a Pentel Water brush loaded with Broken China to move color into desired spots. TIP – Be sure your brush has the same amount of water as your paper, if it is too dry, it will pull watercolor from your project.
  • Once you have the look you are going for, dry your project – either naturally, or with a heat tool. I chose to use a heat tool, but don’t hover over your embossed images too much – you’ll over-emboss them! TIP – if your paper is too soaked and bent, your color and water will seep to the outside. To keep that from happening, just dry the edges a bit with a heat tool so that your project flattens out a bit, then continue to dry naturally if so desired.

Create backgrounds with the Watercolor Smash/Smooshing technique

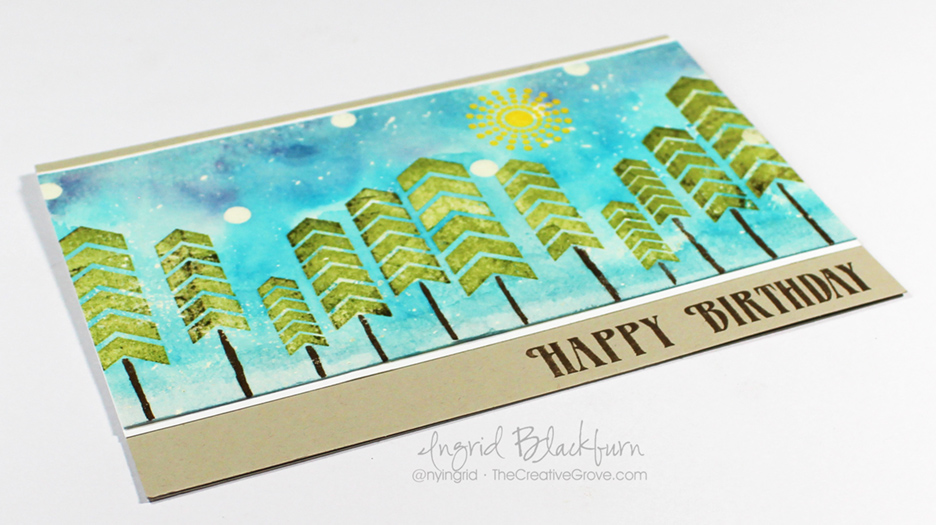
  • When your project is fully dry, rub off your masking fluid.
  • Place the white matte where it will be on the folded card base – do not adhere yet.
  • Stamp greeting from Mix Mash set in Ground Espresso ink to match your trunks. Zap with a heat tool to set.
  • Add Mono liquid glue to the back, adhere to a white matte and then to the stone folded card base.

Mix Mash Stamp Set

That’s it! I hope you enjoyed this tutorial. I love this card – it’s fun nature is what I love about stamping. This technique is so fun, easy and one I use frequently. Once you’ve done a few, you’ll quickly add it to your stamping toolbox. Be sure to subscribe for an exclusive video series with more techniques below!

Keep those fingers inky –

Signature

[optin_box style=”2″ alignment=”center” method=”post” email_field=”email” email_default=”Enter your email address” email_order=”2″ integration_type=”aweber” double_optin=”Y” list=”3846012″ name_field=”name” name_default=”Enter your first name” name_order=”1″ name_required=”Y” opm_packages=””][optin_box_field name=”headline”]Learn with our exclusive FREE video series[/optin_box_field][optin_box_field name=”paragraph”]PHA+R2V0IHRoZSBmcmVlIENyZWF0aXZlIFRpcHMgRS1sZXR0ZXIgYW5kIGxlYXJuIHdpdGggc3Vic2NyaWJlciBleGNsdXNpdmUgdmlkZW8gYW5kIHBpY3RvcmlhbCBjb250ZW50LiBJbmNsdWRpbmcgb3VyIHllYXJseSAxMiBEYXlzIG9mIENocmlzdG1hcyBzZXJpZXMhPC9wPgo=[/optin_box_field][optin_box_field name=”privacy”][/optin_box_field][optin_box_field name=”top_color”]undefined[/optin_box_field][optin_box_button type=”0″ button_below=”Y”]Send me exclusive tips![/optin_box_button] [/optin_box]

Watercolor Stamped Butterflies Video

Today I have a fun little video tutorial for you. You may remember this card from a few months back. Well, I was finally able to get the video uploaded. I created it as a tutorial for the Happy Little Stampers YouTube channel. I’m on their video crew and will be contributing every month to that channel as well. Be sure to subscribe to it to see the rest of the teams creations each week. 🙂

Now for some crafty goodness. Watercolor stamping is so much fun, easy to do and really looks artistic. This stamp set lends itself well to this technique as the images are quite detailed and have great space in-between the lines. Enjoy the video and be sure to subscribe to my YouTube channel if you haven’t already!

Click Here to Watch on YouTube

I hope you enjoyed that! It’s a super fun technique and I love that it works well with clean and simple design! Click Here to see the original blog post.

Watercolor Stamped Birthday Butterflies 002

Till next time. Keep those fingers inky –

Signature.png

Blended Distress Christmas Tags

DIY Vintage Christmas Tags

Christmas Tags is how my stamping journey began…many, many years ago.  I would spend hours stamping cute large Santas and Snowmen by DJ Inkers and coloring them in with pencils and markers. I spent so much time on these tags, I would save them all and reuse them for years to come – I still even have most of them! The kids new the wrapping paper was toast – but not the tags – I know…sad, but true!

So today I have a different version of a tag for you. More of my style today – not as much coloring anymore, I’m more into backgrounds, and clean & simple designs now – well, you may just see some mixed media or watercoloring the next few months from me too! So to kick off this month, I thought I’d film a tutorial on how to create an antique or vintage background for you.

HLS Christmas Challenge November 2015

This month at Happy Little Stampers, the theme is Tags, so for today’s project, I designed a clean and simple tag that has some simple paper piecings, and a great bold font greeting – courtesy of the new Everyday Sentiments stamp set.  Have fun with this tutorial! See you in a few days with another. 🙂

And be sure to check out our guest designer – Bonnie Klass’s blog for her cool project as well. I’ve been a huge fan of Bonnie’s work for a few years now – she’s a very talented stamper. 🙂

Creating a Vintage look for your Christmas Tags

  • Start with a piece of white card stock. I used a scrap piece that was 3 3/4 x 4″. Sponge Distress Inks to create your background as in the video – Old Paper, Antique Linen, Scattered Straw. Be sure to go over the colors to get a smooth antique look
  • Don’t worry about funky marks left initially by the sponge tools – they’ll work themselves out the more layers of distress ink you layer over them.

How to create an Antique Look

  • The key to achieving the antique finish or vintage look is adding a light edging around the antique finish you’ve created. I used Vintage Photo.
  • Cut your tag corners as in the video if you haven’t already.
  • As in the video, the majority of your sponge tool will be off your project, not on. Light is key here.
  • You can even add some of the lighter colors such as Scattered Straw or Antique Linen inside to smooth the Vintage Photo edging out.
  • Assemble your snowflakes and add them to your project. I used the Snowflake BigZ die by Sizzix designed for Stampin Up. Use any Snowflake dies you have. Layer to create a 3D look with different colors and sparkly embellishments.

Distress Ink Blending to create a vintage feel

  • Make sure your vintage background is fully dry – I used a heat tool, as I”m quite impatient. But if you’re making several at a time, you can dry them naturally.
  • Test the tag out as in the video to see if it’s ready to be embossed.
  • Ink up the Merry & Christmas with Versamark, stamp and emboss in Espresso Powder. I used the Everyday Sentiments set by HLS – they are bold and large stamps which works well with this project. You’ll want something that can stand out from the Snowflakes.
  • Attach your snowflakes with a strong adhesive as in the video.
  • Punch a 1/4″ hole and add some ribbon.

Vintage Christmas Tags using Distress Ink Blending

I hope you liked this tutorial! I love the end result of this tag. I’ve made several for various packages this Christmas. It’s quite easy to mass produce actually. Sponge a larger sheet, cut it down, edge and mass assemble. Work smarter – not harder! 🙂

Stay tuned in a few days for another great tag tutorial, and if you want to see more, be sure you’re on the Creative Tips E-letter! Sign up below, it’s free and has exclusive content.

I’m also entering this tag is a fun Christmas Tag event over at my good friend Loll’s blog. I encourage you to enter yours as well!

twelve_tags_badge_2015

Until next time – now go get those fingers inky, make some Christmas Tags and join us for the challenge over at Happy Little Stampers!

Signature-24-pt_thumb.jpg

[optin_box style=”8″ width=”500″ alignment=”center” disable_name=”Y” email_field=”email” email_default=”Enter your email address” email_order=”Enter your email address” integration_type=”aweber” double_optin=”Y” list=”3846012″ name_field=”name” name_default=”Enter your first name” name_order=”1″ name_required=”N” extra_field_1_name=”name” extra_field_1_title=”Enter your first name” extra_field_1_order=”1″ extra_field_1_required=”N”][optin_box_field name=”headline”]If you enjoyed this tutorial…[/optin_box_field][optin_box_field name=”paragraph”]PHA+4oCmeW914oCZbGwgbG92ZSBvdXIgPGVtPjxzdHJvbmc+ZnJlZSA8L3N0cm9uZz48L2VtPnN1YnNjcmliZXIgb25seSB2aWRlbyBzZXJpZXMuIMKgTGVhcm4gbmV3IHRlY2huaXF1ZXMgdGhyb3VnaCBvdXIgPGVtPjxzdHJvbmc+ZXhjbHVzaXZlPC9zdHJvbmc+PC9lbT7CoENyZWF0aXZlIFRpcHMgZS1sZXR0ZXLCoGFuZCBzdWJzY3JpYmVyIG9ubHkgdmlkZW8gYW5kIHByb2plY3QgdHV0b3JpYWxzITwvcD4K[/optin_box_field][optin_box_field name=”privacy”][/optin_box_field][optin_box_field name=”top_color”]undefined[/optin_box_field][optin_box_button type=”1″ text=”Send me exclusive tips!” text_size=”32″ text_color=”#000000″ text_bold=”Y” text_letter_spacing=”0″ text_shadow_panel=”Y” text_shadow_vertical=”1″ text_shadow_horizontal=”0″ text_shadow_color=”#ffffff” text_shadow_blur=”0″ styling_width=”40″ styling_height=”30″ styling_border_color=”#000000″ styling_border_size=”1″ styling_border_radius=”6″ styling_border_opacity=”100″ styling_shine=”Y” styling_gradient_start_color=”#a3b640″ styling_gradient_end_color=”#80902c” drop_shadow_panel=”Y” drop_shadow_vertical=”1″ drop_shadow_horizontal=”0″ drop_shadow_blur=”1″ drop_shadow_spread=”0″ drop_shadow_color=”#000000″ drop_shadow_opacity=”50″ inset_shadow_panel=”Y” inset_shadow_vertical=”0″ inset_shadow_horizontal=”0″ inset_shadow_blur=”0″ inset_shadow_spread=”1″ inset_shadow_color=”#80902c” inset_shadow_opacity=”50″ location=”optin_box_style_8″ button_below=”Y”]Send me exclusive tips![/optin_box_button] [/optin_box]


HLS Texture & Layered Holly

This month at Happy Little Stampers there is a new Christmas Challenge and I thought you would like to get a little creative with some DIY Holly since that’s the theme – Holly! You will have SO much fun making this project – it’s different, has great texture, and is by far one of my favorite Christmas Cards I’ve made all year.

HLS Christmas Challenge September 2015

If you’ve visited my blog before, it’s no secret that I love to create Christmas Cards all year long. Even before being on the design team for HLS! Once I started entering Christmas Challenges a few years ago, I started to send out different cards to all my friends and loved ones. I had always mass produced one or two designs be fore, but I LOVE sending unique individual cards out!

Gone are the days of mass production for me, and it’s kind of nice not having that big work day/week looming over my shoulders. One of the fun processes I go through is picking which card for which person – it’s a tough one sometimes, but the cards speak to me…I know I must sound nuts. If you do this, I’d love to know in the comments that I’m not alone!

Well, onto the cool tutorial and video – yes, of course there’s a video!

Happy Little Stampers Christmas Challenge

I broke out the embossing paste for this project – and used it in an unconventional way. I usually use it with stencils, but for this project, I just thought I’d slather it on – and what a cool look! Here’s the video – I know it’s a bit longer than my normal tutorials, but it’s jam packed with how to’s, tips and lots of various techniques – so enjoy!

So what did you think? Here are a few Creative Tips for you as well. Be sure to play along with us at the Happy Little Stampers Christmas Challenge.

Did you know…HLS put out their own stamps just recently? The sentiment I used on my project is from the Mixed Christmas Sentiments set – it’s awesome – high quality photopolymer that stamped beautifully. (And no, I didn’t get it for free – I paid for it – so that’s an honest opinion!)

Creative Tips –

  • To get an abstract look with the embossing paste – use a rounded short palette knife. This way you can easily slather it on allowing it to create a random look. It spreads like buttercream frosting.
  • When sponging your scrap pieces for your embellishments, don’t worry about getting it perfectly blended. The rough edges of the sponge tool and random spots will give you great texture in your holly leaves.

DIY Holly and Berries

  • Try using different colors to get depth in your leaves and berries
    • Leaves – Mowed Lawn, Peeled Paint, Pine Needles, Forest Moss (edge)
    • Berries – Worn Lipstick, Festive Berries, Barn Door, Fired Brick (edge)
  • To create the layered torn edge, tear a piece of vellum card stock towards you – tearing away puts the texture on the back.
  • Use liquid glue to get the pieces to stick to unfriendly surfaces like vellum and embossing paste.

CAS - clean and simple christmas cards

  • To create your holly leaves – use circle punches – larger are a bit easier. Create your top point as in the video, and continue around the edge.
  • Add water spots to your berries by adding water to your hand then flicking or dripping it onto your distress piece just as in the video. Distress works with water and it creates an amazing look – perfect for the berries.
  • The wider base makes it easier to glue your leaves together. You won’t see it with the berries over it.
  • Be sure to edge your berries and leaves – it helps to create a border that gives you a little interest.

Distress Ink Techniques and Embossing Paste

  • To pop up the entire panel, use fun foam to keep it up through the mail – it’s rather large and that will help ensure you get the same effect once the card is delivered.

Dimensions – 

  • Card Base – White card stock 4 1/2 x 6″
  • Card Front:
    • White – 3 3/4 x 5 3/8″
    • Brushed Gold Matte – 4 1/8 x 5 5/8″
  • Vellum Card Stock – 1 1/2 x 8 1/2″
  • White scraps :
    • Leaves – one at least 2 1/4″ wide the other 2″ wide strips
    • Berries – at least 1″ wide strip

Overall, this projects has lots of techniques in it. They are all simple and that’s what I love about this card so much – it’s clean and simple style with all that white space. Creating your own embellishments is also a great accent – adding little touches like different shades, edging, water spots and partially stamped script just gives your pieces dimension and character.

Christmas Cards with embossing paste

I hope you join me and the talented design team over at Happy Little Stampers for a great Holly Christmas Challenge!

I thought I’d enter this card in another fun challenge –  Merry Monday for their holly challenge this week. Must be a holly week! 🙂

Merry Monday Holly Challenge

I can’t wait to see what YOU create!

ingrid signature

[optin_box style=”13″ width=”500″ alignment=”center” action=”https://www.aweber.com/scripts/addlead.pl” disable_name=”Y” method=”post” email_field=”email” email_default=”Enter your email address” integration_type=”aweber” double_optin=”Y” list=”3846012″ name_field=”name” name_default=”Enter your first name” name_required=”Y”][optin_box_field name=”headline”]If you enjoyed this tutorial…[/optin_box_field][optin_box_field name=”paragraph”]PHA+4oCmeW914oCZbGwgbG92ZSBvdXIgPGVtPjxzdHJvbmc+PHNwYW4gc3R5bGU9ImNvbG9yOiAjMjQ0YzVlOyI+ZnJlZTwvc3Bhbj4gPC9zdHJvbmc+PC9lbT5zdWJzY3JpYmVyIG9ubHkgdmlkZW8gc2VyaWVzLiDCoExlYXJuIG5ldyB0ZWNobmlxdWVzIHRocm91Z2ggb3VyIDxzcGFuIHN0eWxlPSJjb2xvcjogIzI0NGM1ZTsiPjxlbT48c3Ryb25nPmV4Y2x1c2l2ZTwvc3Ryb25nPjwvZW0+wqA8L3NwYW4+Q3JlYXRpdmUgVGlwcyBlLWxldHRlcsKgYW5kIHN1YnNjcmliZXIgb25seSB2aWRlbyBhbmQgcHJvamVjdCB0dXRvcmlhbHMhPC9wPgo=[/optin_box_field][optin_box_field name=”privacy”][/optin_box_field][optin_box_field name=”top_color”]undefined[/optin_box_field][optin_box_button type=”1″ text=”Send me exclusive tips!” text_size=”32″ text_color=”#000000″ text_bold=”Y” text_letter_spacing=”0″ text_shadow_panel=”Y” text_shadow_vertical=”1″ text_shadow_horizontal=”0″ text_shadow_color=”#f6fefb” text_shadow_blur=”0″ styling_width=”50″ styling_height=”19″ styling_border_color=”#000000″ styling_border_size=”1″ styling_border_radius=”6″ styling_border_opacity=”100″ styling_shine=”Y” styling_gradient_start_color=”#a3b640″ styling_gradient_end_color=”#80902c” drop_shadow_panel=”Y” drop_shadow_vertical=”1″ drop_shadow_horizontal=”0″ drop_shadow_blur=”1″ drop_shadow_spread=”0″ drop_shadow_color=”#000000″ drop_shadow_opacity=”50″ inset_shadow_panel=”Y” inset_shadow_vertical=”0″ inset_shadow_horizontal=”0″ inset_shadow_blur=”0″ inset_shadow_spread=”1″ inset_shadow_color=”#80902c” inset_shadow_opacity=”50″ location=”optin_box_style_13″ button_below=”Y”]Send me exclusive tips![/optin_box_button] [/optin_box]


Snowflakes – Ghost Stamping Technique

Ghost Stamping 003

I thought I’d highlight a creative technique today – ghost stamping. Today’s theme seems to be blue, so what better than snowflakes!  So why not participate in a few challenges.  It’s already March, so I better get a jump on my Christmas cards for the year…I know, What?!!  Believe me, it’s MUCH easier to get them done a little at a time rather than in bulk during my busiest time of the year!

The Ghost Stamping Technique

So what is Ghost Stamping anyway? Well, when you think of a ghost, you think of transparent, or white see through object.  That’s the basic premise in the ghost stamping technique – see through by using white.  It’s rather easy actually.  I made a little video for you to showcase it, so why don’t we get started.


View on YouTube

What did you think?  Not that bad – basically, you want to pounce your white pigment ink through your stencil using a sponge dauber.  Then re-align your transparency to slightly off-set your images.  Use a clean sponge dauber to add dye ink, overlapping your original pigment white images.

Well, that’s the technique used with Stencils – of course it’s a little different when you do straight embossing, but it’s the same principle.  We have several videos showcasing that in our 2014 12 Days of Christmas Class and in our Project and Resource Library in the VIP Community – our online paper crafting educational all inclusive site.

Ghost Stamping 002Ghost Stamping 001

The key is to make sure the white is dry before adding your dye base ink.  If you don’t dry it, the dye ink won’t soak into your paper, and you will not get the full ghosting effect. I used two colors in a monochromatic style Pool Party (matches my card stock) and Island Indigo.

To add to the background, I added a few just pool party snowflakes, keeping to the smaller sizes to fill in the background.

Ghost Stamping 005

Once you have that done, you can move onto the tag as in the video.  I added some Sparkling Clear sequins to keep it sparkly as that’s what snow does.

If you liked this video tutorial and want to see more, be sure to get our Creative Tips E-letter delivered to your inbox!  It’s free and there are exclusive videos that you won’t see anywhere else. You can get that right here:

[optin_box style=”12″ alignment=”center” email_field=”email” email_default=”Enter your email address” integration_type=”aweber” double_optin=”Y” list=”3846012″ name_field=”name” name_default=”Enter your first name” name_required=”Y” opm_packages=””][optin_box_field name=”headline”]Learn more with our exclusive FREE video series:[/optin_box_field][optin_box_field name=”paragraph”]PHA+UGx1cyB5b3XigJlsbCBiZSBhZGRlZCB0byBteSBGUkVFIENyZWF0aXZlIFRpcHMgRS1sZXR0ZXIgd2hlcmUgSSBzaGFyZSBleGNsdXNpdmUgcHJvamVjdHMsIHZpZGVvcyAmYW1wOyB0aGUgMTIgRGF5cyBvZiBDaHJpc3RtYXMgUHJvamVjdCBTZXJpZXM8L3A+Cg==[/optin_box_field][optin_box_field name=”privacy”][/optin_box_field][optin_box_field name=”top_color”]undefined[/optin_box_field][optin_box_button type=”0″ button_below=”Y”]Get Instant Access![/optin_box_button] [/optin_box]

I combined both the snowflake stencil from Memory Box with Stampin’ Up’s Festive Flurry stamp and framelit sets. The tag is cut from the Chalk Talk Framelit set, and the banner was made using a Chevron Punch.  I combined Pool Party, Whisper White and Vellum Cardstocks to keep this light and airy.

I just love the color blue – that’s the challenge both at Simon Says Stamp Monday Challenge (Well…anything that begins with B) this week AND Merry Monday – go figure! And I just love the sketch from CAS(e) this Sketch – super cute, huh?!!

If you’re a VIP Community member, here’s a sneak peek into an exclusive video we have for you in the project and resource library!

CTS_Sketch_113149Ghosting Technique Peek

I wanted to use snowflakes, so to keep up with the sketch from CAS(e) this Sketch, I added the vellum partial snowflake peeking out from the tag – I’m sure I’m the only winter one in that challenge, as everyone seems to have moved onto spring…lol!

If you haven’t already – be sure to get the Creative Tips video series – it’s free and you can only see those tutorials through the e-letter! Thanks for stopping by today and checking out our Ghost Stamping Technique video and project!

Signature

Ghost Stamping 004

[optin_box style=”12″ alignment=”center” email_field=”email” email_default=”Enter your email address” integration_type=”aweber” double_optin=”Y” list=”3846012″ name_field=”name” name_default=”Enter your first name” name_required=”Y” opm_packages=””][optin_box_field name=”headline”]Learn more with our exclusive FREE video series:[/optin_box_field][optin_box_field name=”paragraph”]PHA+UGx1cyB5b3XigJlsbCBiZSBhZGRlZCB0byBteSBGUkVFIENyZWF0aXZlIFRpcHMgRS1sZXR0ZXIgd2hlcmUgSSBzaGFyZSBleGNsdXNpdmUgcHJvamVjdHMsIHZpZGVvcyAmYW1wOyB0aGUgMTIgRGF5cyBvZiBDaHJpc3RtYXMgUHJvamVjdCBTZXJpZXM8L3A+Cg==[/optin_box_field][optin_box_field name=”privacy”][/optin_box_field][optin_box_field name=”top_color”]undefined[/optin_box_field][optin_box_button type=”0″ button_below=”Y”]Get Instant Access![/optin_box_button] [/optin_box]

Fall Creations

So what exactly have you been creating this past month?  We’ve been quite busy, behind the scenes in our Community here at The Creative Grove!  Here’s just a quick little peek into our little creative world:

Sept-2014-The-Creative-Grove-Projects

It’s been class mania with both our Brayer 101 and 102 classes being added to the project and resource libraries.  That’s a HUGE savings off the individual cost!  And well worth it.  While the 102 class is still being added this month, it’s been six weeks of creative scenery inspiration fun.  Plus of course lots of clean and simple and watercolor madness also being added.

So if you haven’t checked us out yet, what are you waiting for?  We’re approaching 70 project videos in just a little over three months – crazy, right?  Plus we have lots just waiting to be added.

So come stamp with us in the VIP Community – join in on the conversation in our private members only facebook group and get a craftin’!

See you on the inside.

xoxo –

Signature

To find out more about The Creative Grove Community, click here!

VIP Community

That was August?

Did August fly by for you too?  I have no idea where the past 31 days went…lol.  At least we have lots of work to show for it!  Here is just a tiny glimpse into the 20 new video tutorials we added to the VIP Community this past month.

The Creative Grove August 2014 Project Sneak Peek_thumb[2]

We learned a ton of new techniques and even added a few new classes!  Here are some of the highlights:

  • How to master using a brayer for creative scenery
  • Freeform watercolored images based off stamps
  • How to use watercolor pencils as a medium and not a pencil
  • Masking perfection – how to create collages
  • A new glimpse into bokeh using distress and pigment inks
  • Plus Clean and Simple and One Layer Cards that wow!

We are committed to adding great content each and every week that will educate and keep you excited about your paper crafting journey.  For less than the price of a class, you get access to our entire video project and resource library, classes and private Facebook community.

So what are you waiting for?  Become a VIP here at the grove and start learning!

[button_6 bg=”green” text=”style5_getaccessnow.png” align=”center” href=”https://thecreativegrove.com/vip/tcg-vip”/]

Signature

Mojo World Map Thank You

Zoo Review 002 Main R

Happy Monday!  Today I am taking you to Africa for our Mojo Monday challenge via the new World Map Stamp and Zoo Review Stamp Set.  The World Map background stamp was at the top of my list when the new catalog came out and its release was delayed until just recently – it’s another must have! 

I struggled for about a minute this morning and then I saw the Zoo Review set and it all fell into place.  All my Brayer 102 students will be thrilled as this set is one of the ones we use in that class.  And this card was so simple to put together.  I really like the masculine feel of it, I hope you do to.  Here is what the Mojo Sketch looked like:

       Mojo304Sketch Zoo Review 002 Main Front

Creative Tips –

  • I wanted an easy feel to this card and for the lion to be the stand out.
  • I used the #6 and #7 Circle Framelits for the circle part.  I didn’t want a 1/4” matte, so I took the #6 and used my xacto knife to cut around the outer edge.  It gave me a 1/8” border which is what I was looking for.  The #7 I ran through my Big Shot.Zoo Review 002 Main CU
  • The World Map is stamped tone on tone in Pear Pizzazz.
  • Of course the color combination came straight out of the Color Coach!
  • I added one of the Antique Brads for some texture and interest along with some paper piercing in the top corners.Zoo Review 002 Main Side
  • The Lion is the stand out of the card, so I embossed him and the greeting in Early Espresso Embossing Powder.

It’s a quick and easy card, but I love the feel.  The world map is the perfect accent and feels more like Designer Paper.  I hope you’ve enjoyed another fun Mojo Monday card!  Zoo Review 002 Main L