CAS – Embossing on Vellum

cas-embossing-on-vellum-ingrid-blackburn-hls

Chances are if you love to emboss, you’ve tried embossing on vellum before. Embossing really gets a pop when laid on top of the slick vellum surface. Today I’m playing along with the Clean and Simple challenge over at Happy Little Stampers. And the technique is yup, you guessed it –  embossing on vellum.

oct-2016-cas-badge

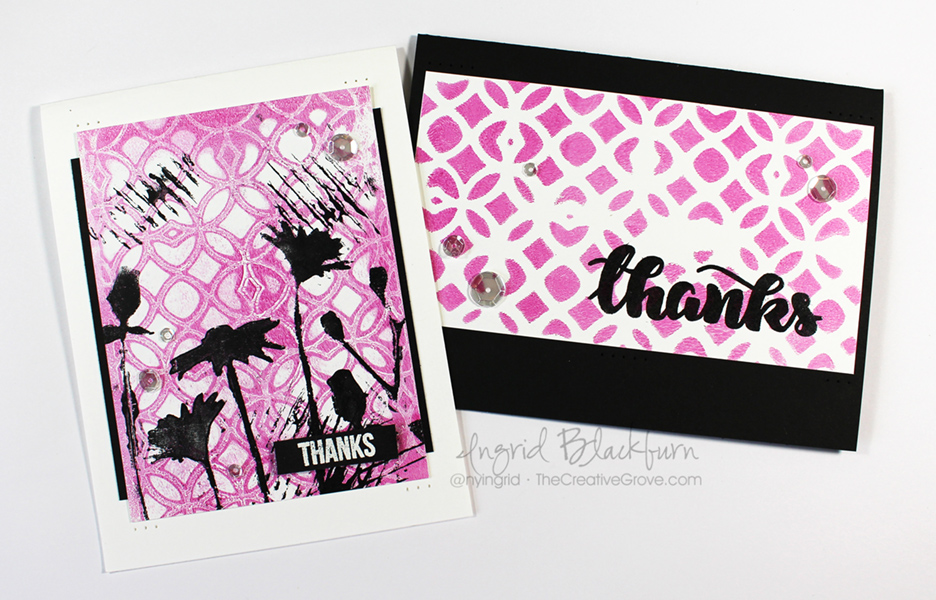
Embossing on Vellum Tutorial

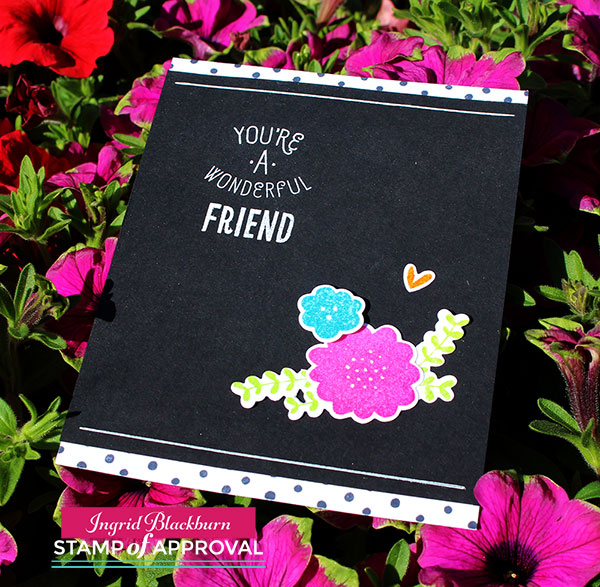
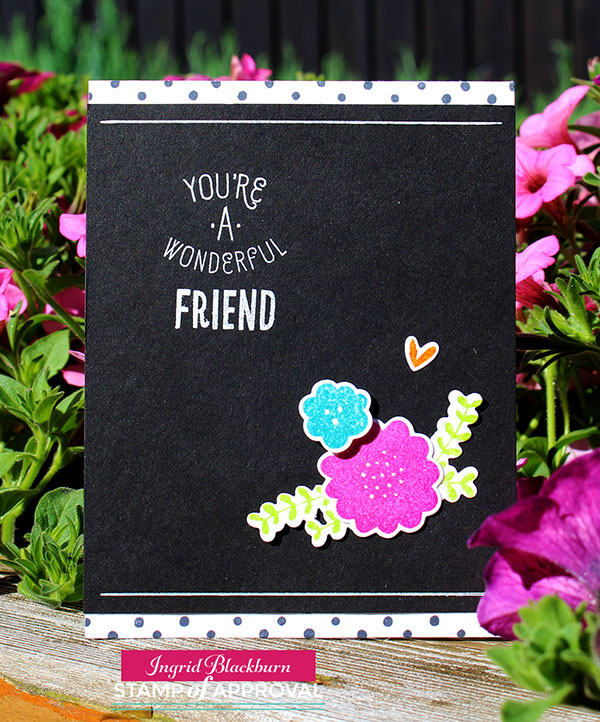
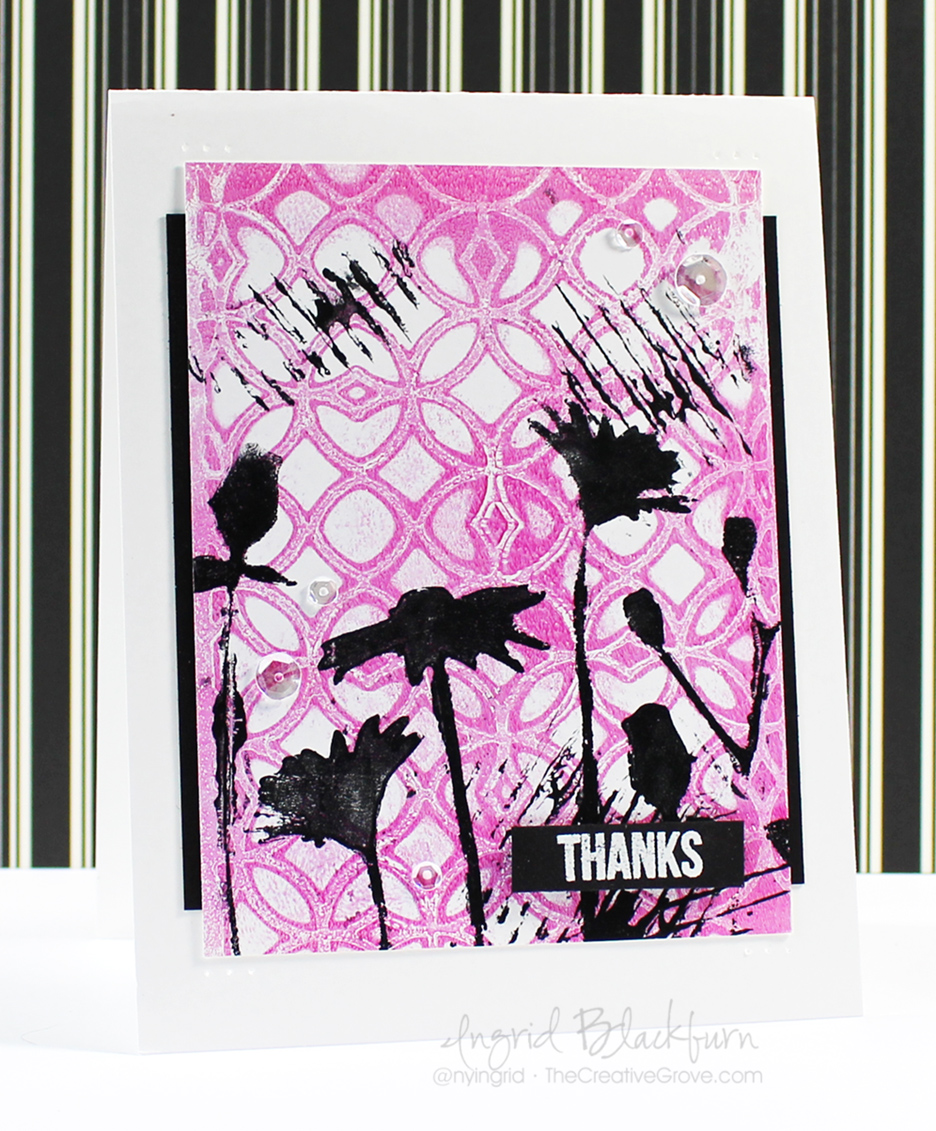
Clean and simple cards need a focal point. This project uses embossing on vellum not just to highlight the focal point, but to soften a busy background as well. To bring more attention to that focal point, emboss a golden twig wreath around.

Embossing on Vellum - DIY Christmas Cards

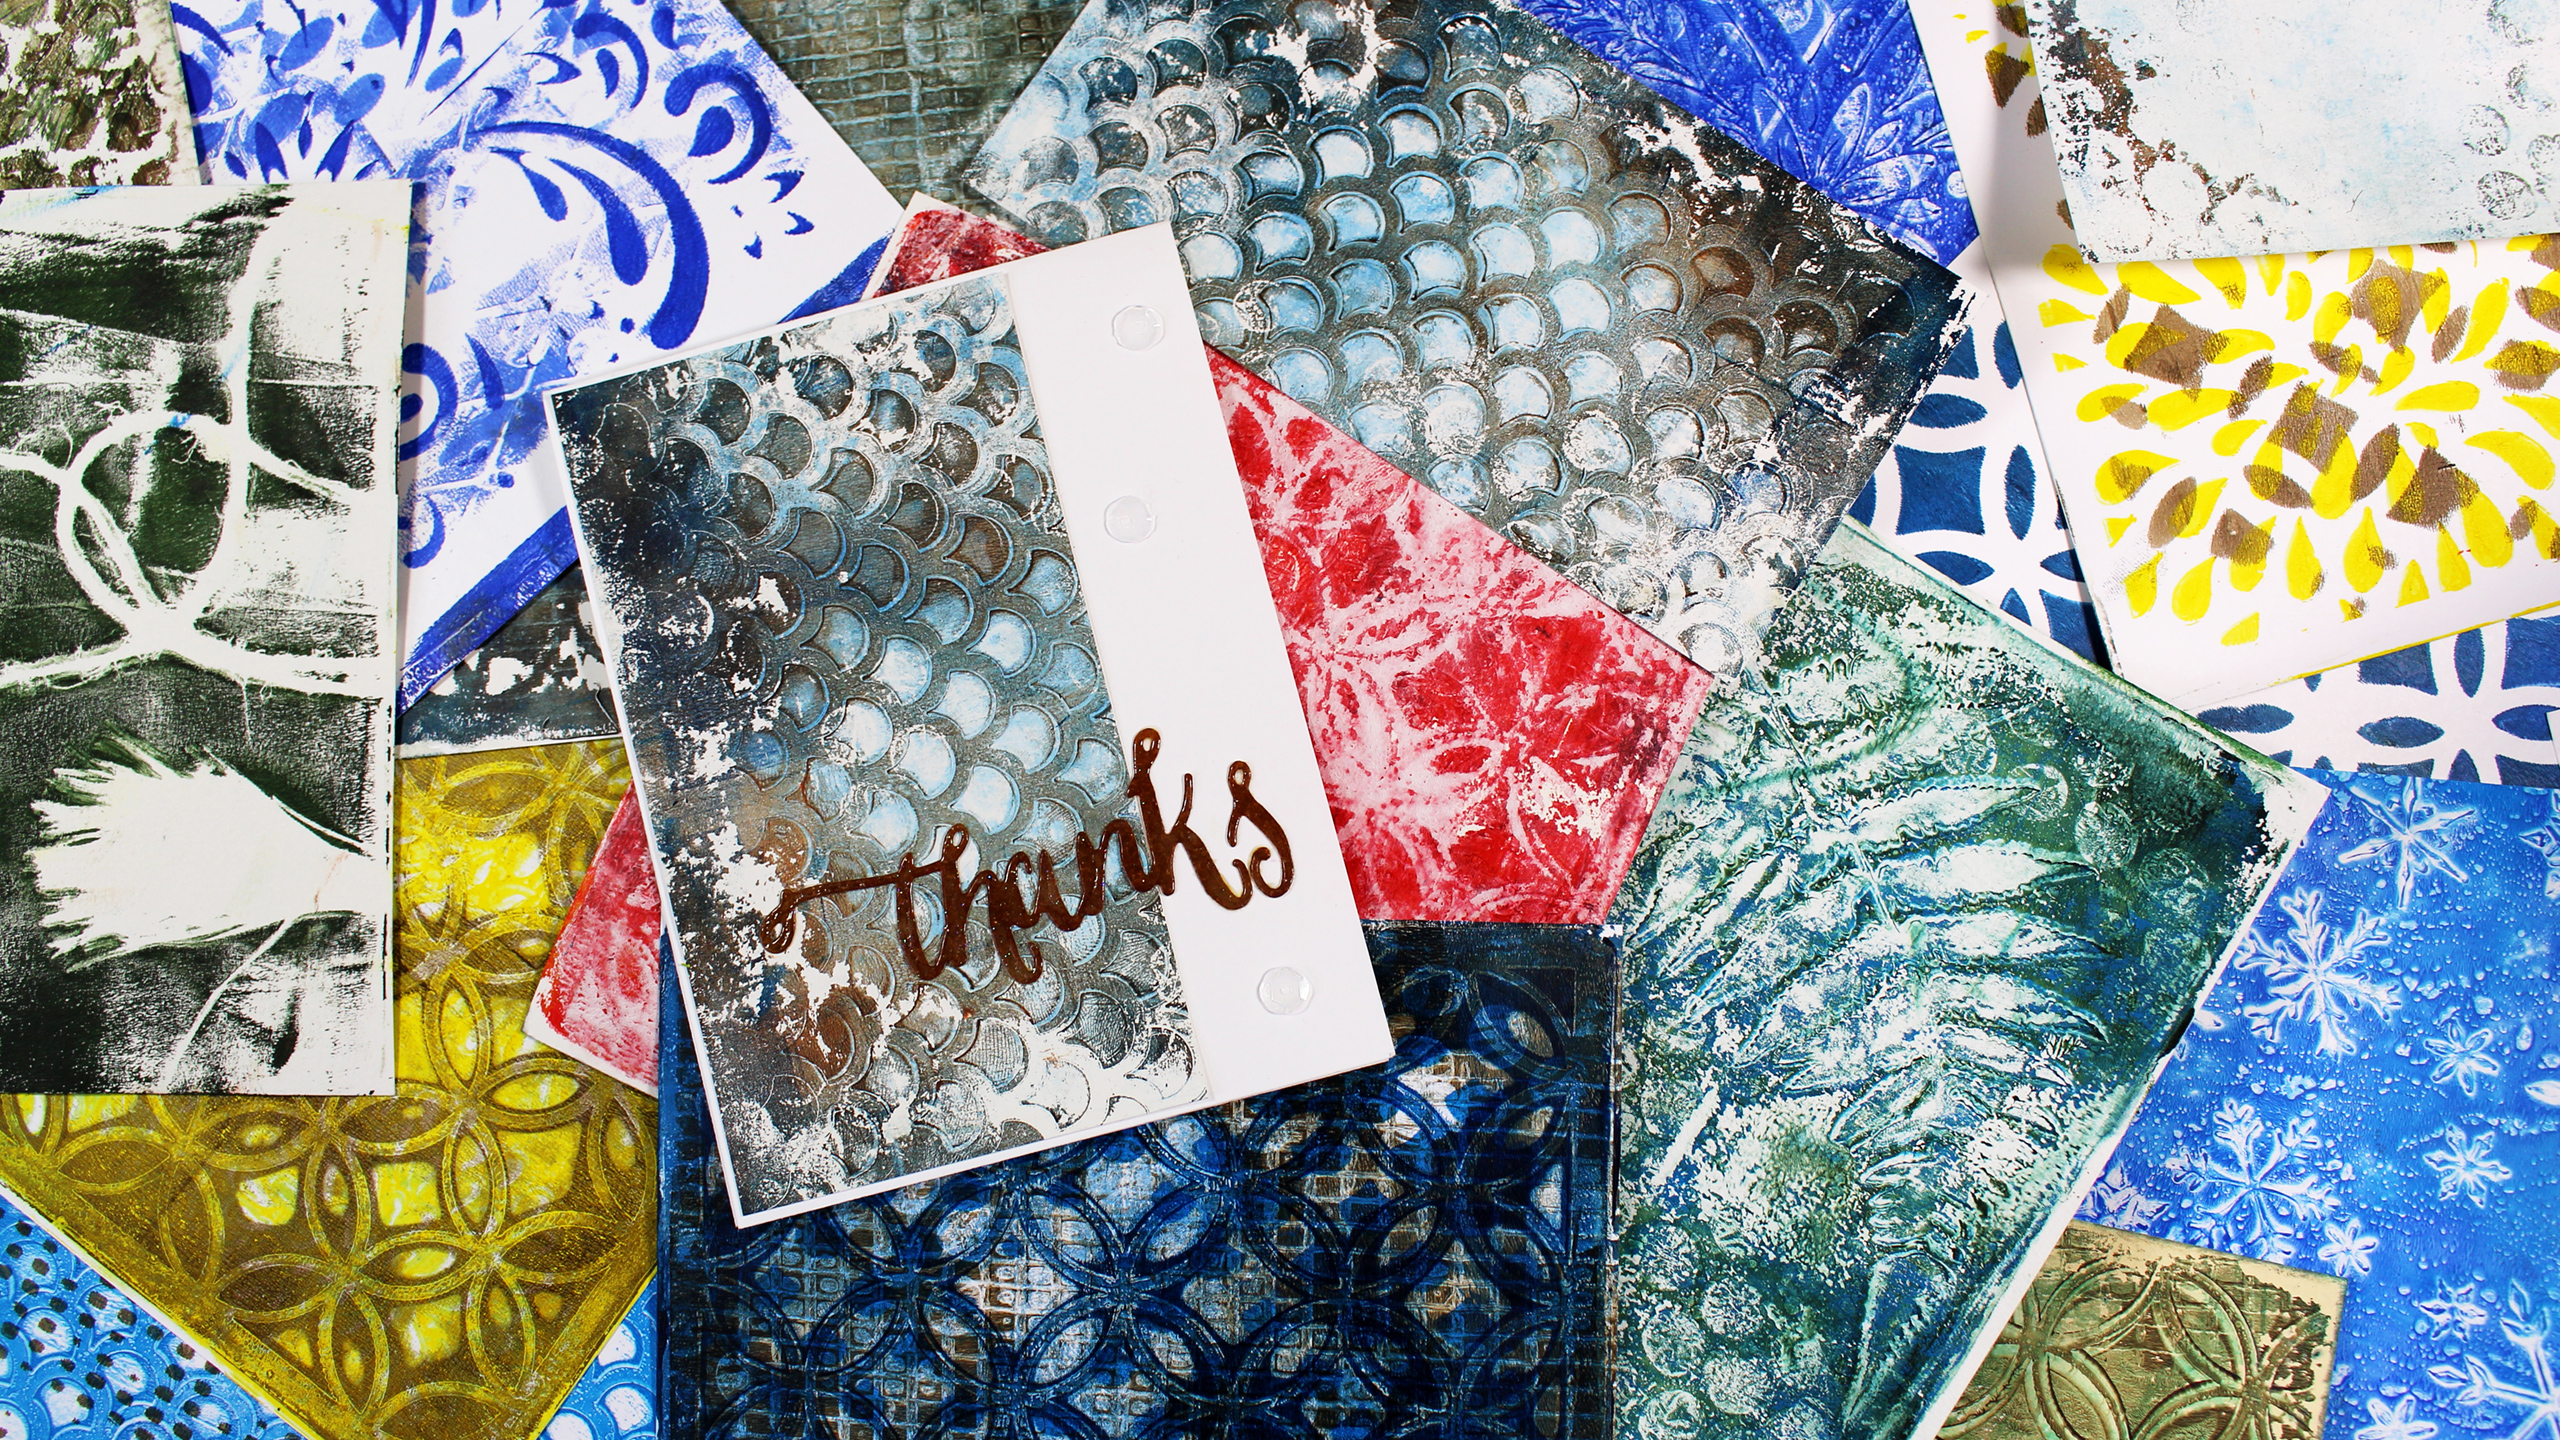
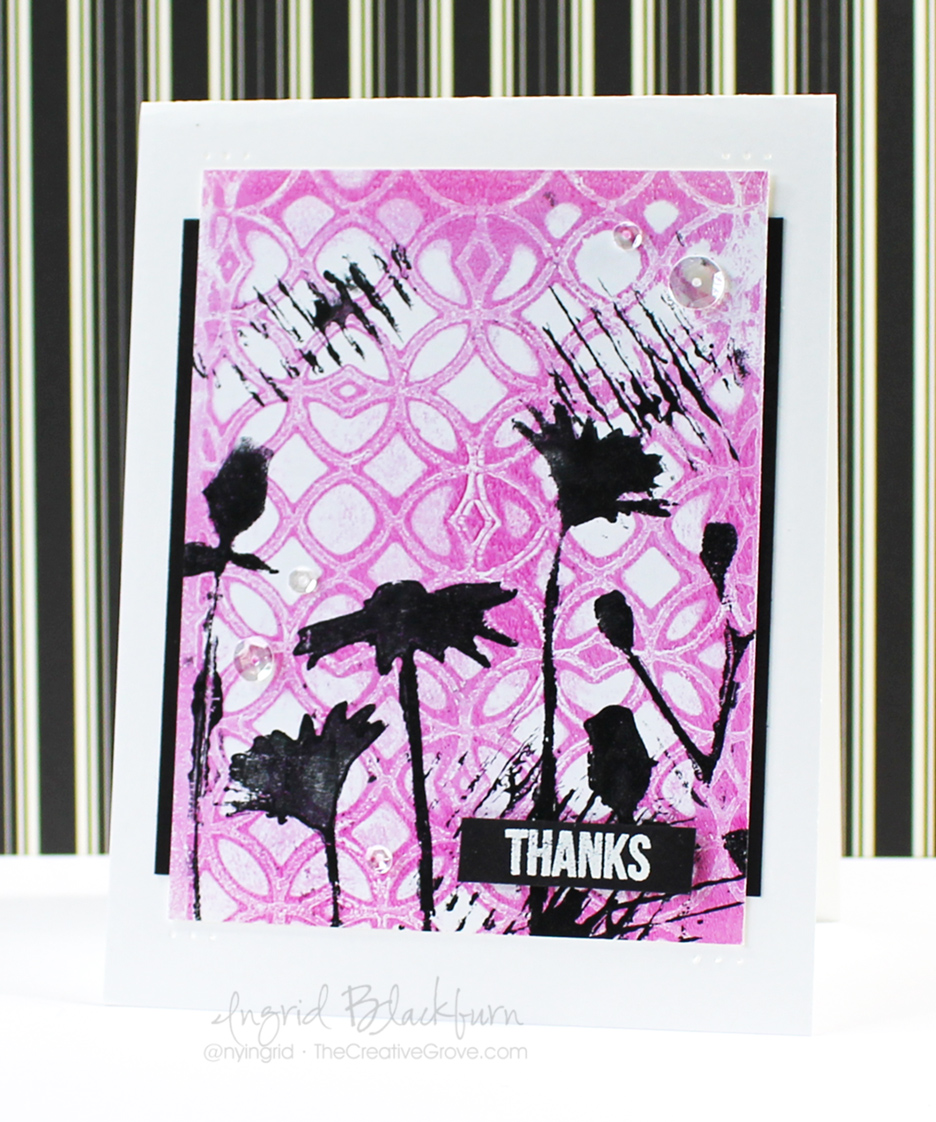
The focal point. One of the brilliant properties of vellum is that it is translucent. So I took a busy stamped off Peppermint Stick background in green and placed it behind my vellum window. With the golden twigs – it really worked.

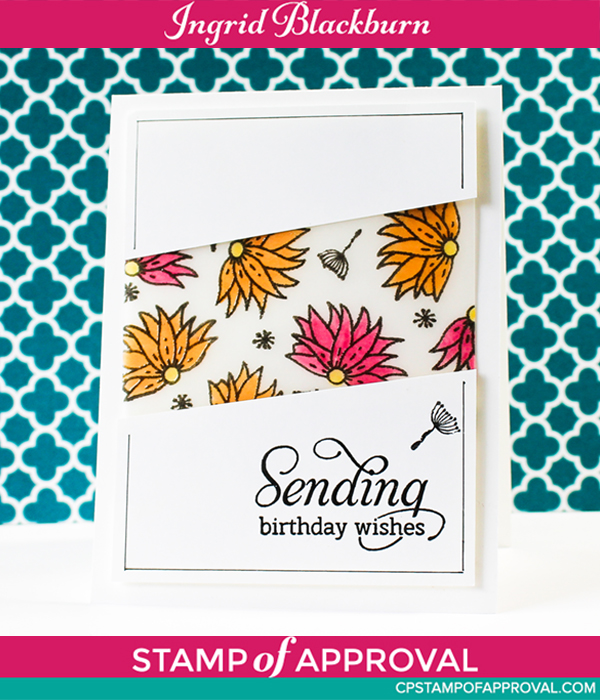
But the card needed a tiny bit more. The clean and simple look was what I was after, so I didn’t want to clutter it up too much. I ended up choosing to add some golden holly leaves & berries in the corner.

Embossing on Vellum Technique

All the little touches seem to pull it together. The vellum cuts down the strong stamped background just the right amount….now it adds something rather than dominating. The golden accents added to the card, without pulling your eye from the dominant focal point – just what you’re looking for in clean and simple design.

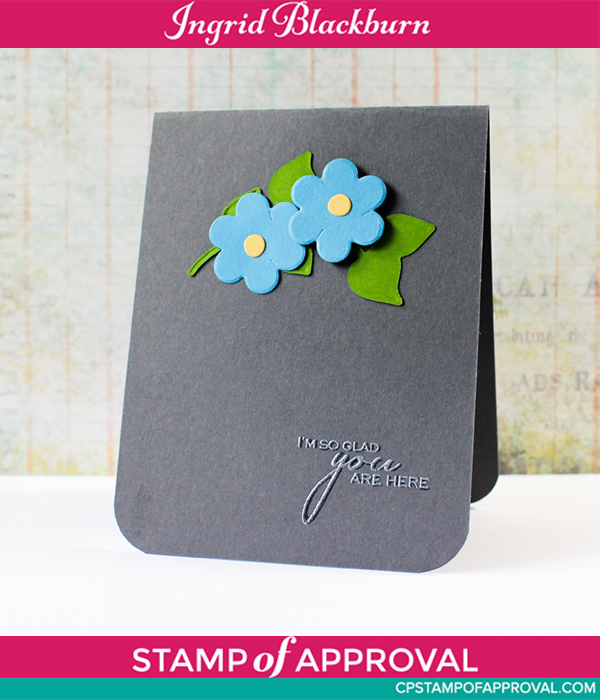
When working on your clean and simple cards – don’t be afraid to stray from a white card. White space – which is what CAS design needs doesn’t literally mean white!

Now it’s your turn – head on over to Happy Little Stampers and join in the Embossing on Vellum Challenge fun!

Till next time –

Signature

[optin_box style=”12″ alignment=”center” email_field=”email” email_default=”Enter your email address” integration_type=”aweber” double_optin=”Y” list=”3846012″ name_field=”name” name_default=”Enter your first name” name_required=”Y” opm_packages=””][optin_box_field name=”headline”]Learn more with our exclusive FREE video series:[/optin_box_field][optin_box_field name=”paragraph”]PHA+UGx1cyB5b3XigJlsbCBiZSBhZGRlZCB0byBteSBGUkVFIENyZWF0aXZlIFRpcHMgRS1sZXR0ZXIgd2hlcmUgSSBzaGFyZSBleGNsdXNpdmUgcHJvamVjdHMsIHZpZGVvcyAmYW1wOyB0aGUgPHN0cm9uZz4xMiBEYXlzIG9mIENocmlzdG1hczwvc3Ryb25nPiBQcm9qZWN0IFNlcmllczwvcD4K[/optin_box_field][optin_box_field name=”privacy”][/optin_box_field][optin_box_field name=”top_color”]undefined[/optin_box_field][optin_box_button type=”0″ button_below=”Y”]Get Instant Access![/optin_box_button] [/optin_box]

Lovely Thank You

Lovely-Notes-Thank-You---Ingrid-Blackburn-003

I probably make thank you cards more than any other card, how about you? I thought I’d share a fun little color blocked project with you today using the Lovely Notes Stamp of Approval Collection. This collection has been arriving all over the world and it’s about to sell out, so if you’re on the fence, don’t wait! Find out more here.

Lovely Notes SOA Now

Color blocking is something I’ve been doing long before I started making cards – I get that from my scrapbooking days. But I love the look on cards. For today’s Thank You card you’ll want to use 1 inch pieces that are stamped tone on tone for a subtle but great look.

I used the Lovely Flowers, Butterfly Notes and Lovely Lattice Background stamps (Catherine Pooler Designs) from this collection for this card. Don’t they just go together perfectly! That’s what I love about the Stamp of Approval collections – the versatility. They are so well thought out – not just slapped together like other boxes or kits. You can literally interchange any of the stamp sets and they’d work together – I LOVE that!

Lovely-Notes-Thank-You---Ingrid-Blackburn-002

A simple supporting colorful panel behind my color blocked piece is a great way to finish off the card and allow you to use a smaller color blocked area if you can’t quite figure the spacing out. Love those little tricks! The key is to remember that you need the measurement to the left, right and three more times for inbetween the middle panels.

A simple Thank You greeting (Butterfly Notes) popped up and adorned with die cuts from the Lovely Flowers & Banners Dies (co-ordinating) adds the perfect finishing touch. I love this card and wanted to share it with you. So tell me in the comments – what kinds of cards do you make most?

Lovely-Notes-Thank-You---Ingrid-Blackburn-001

The Lovely Notes collection is still available – but don’t wait…it’ll be sold out soon, and then not available again until later in the fall. To find out more about the collections – visit the Stamp of Approval site here.

See you very soon – I have a few videos coming up next!

Signature

[optin_box style=”12″ alignment=”center” email_field=”email” email_default=”Enter your email address” integration_type=”aweber” double_optin=”Y” list=”3846012″ name_field=”name” name_default=”Enter your first name” name_required=”Y” opm_packages=””][optin_box_field name=”headline”]Learn more with our exclusive FREE video series:[/optin_box_field][optin_box_field name=”paragraph”]PHA+UGx1cyB5b3XigJlsbCBiZSBhZGRlZCB0byBteSBGUkVFIENyZWF0aXZlIFRpcHMgRS1sZXR0ZXIgd2hlcmUgSSBzaGFyZSBleGNsdXNpdmUgcHJvamVjdHMsIHZpZGVvcyAmYW1wOyB0aGUgMTIgRGF5cyBvZiBDaHJpc3RtYXMgUHJvamVjdCBTZXJpZXM8L3A+Cg==[/optin_box_field][optin_box_field name=”privacy”][/optin_box_field][optin_box_field name=”top_color”]undefined[/optin_box_field][optin_box_button type=”0″ button_below=”Y”]Get Instant Access![/optin_box_button] [/optin_box]


Lovely Flowers – Little Touches

Polka Dot Floral Cards

It’s the little touches in cardmaking that make the biggest statements. Today’s project is the perfect case in point. I’m in love with the Lovely Flowers stamp set and matching dies from the Stamp of Approval Lovely Notes Collection.

I thought it would be fun to stamp a few simple flowers in bright colors (Distress Picked Raspberry &  Mermaid Lagoon) accent them with some sprigs in Twisted Citron and a little heart in Wild Honey. I LOVE that little heart.

Lovely-Polka-Dots-004


To really make your embellishments pop – try embossing them in clear and then popping them on black like this card! A simple white greeting the opposite corner for balance is all you need.

But that alone isn’t enough. The card was falling a little flat – enter the little touches. Add some polka dots with the dotted stamp from this stamp set (see what I did with it yesterday is a video here) for the top and bottom – or just one. To finish the card off completely – I left off sequins or anything that would clutter it up, and instead try adding a simple white line to the top and bottom. All around would have been too much – remember, little touches.

Lovely-Polka-Dots-005

So what do you think? I think Bria likes it…lol! Here’s our gorgeous younger cat – she loves my craft studio…I find her hair everywhere! Do you have a little someone who loves your corner too?

Lovely-Polka-Dots-003

[divider style=”9″]
Lovely Notes SOA Now

If you’ve been hopping along the past few days, the winners were just announce! Head over to Catherine’s Blog to see if you won. 🙂

And if you missed the 18 designers that showcased two-three projects each…here are the links to those Blog Hop days. Have fun!

Day 1               Day 2               Day 3

SO….did you treat yourself to the current Stamp of Approval? Ordering is officially open to the public…don’t wait! It will sell out, and it’s a great collection. To find out more – check out the Stamp of Approval site here.

Those that were on the early notice wait list already are set to ship – check out all this goodness headed all over the world!

Stamp of Approval

I can’t wait to see what you all create with this amazing collection – Till next time!

Signature

[optin_box style=”12″ alignment=”center” email_field=”email” email_default=”Enter your email address” integration_type=”aweber” double_optin=”Y” list=”3846012″ name_field=”name” name_default=”Enter your first name” name_required=”Y” opm_packages=””][optin_box_field name=”headline”]Learn more with our exclusive FREE video series:[/optin_box_field][optin_box_field name=”paragraph”]PHA+UGx1cyB5b3XigJlsbCBiZSBhZGRlZCB0byBteSBGUkVFIENyZWF0aXZlIFRpcHMgRS1sZXR0ZXIgd2hlcmUgSSBzaGFyZSBleGNsdXNpdmUgcHJvamVjdHMsIHZpZGVvcyAmYW1wOyB0aGUgMTIgRGF5cyBvZiBDaHJpc3RtYXMgUHJvamVjdCBTZXJpZXM8L3A+Cg==[/optin_box_field][optin_box_field name=”privacy”][/optin_box_field][optin_box_field name=”top_color”]undefined[/optin_box_field][optin_box_button type=”0″ button_below=”Y”]Get Instant Access![/optin_box_button] [/optin_box]

How to Get Inks to Shine

Mixed-Media-Stained-Glass-Window-001

All you really wanted from your card was a little shine, right? Have you ever created a stunning background, but hours later your ink colors are flat and faded? Well, this technique is for you then! I’m playing along with the new Mixed Media Challenge over at Happy Little Stampers – Shine.

HLS Mixed Media challenge May 2016

I LOVE to create backgrounds – have you noticed? All to often in card making, we create these amazing colorful backgrounds on cards and then the colors settle as the project fully dries and we’re left with something that is a bit flat and has no vibrant nature left. At least I do! I’m always thinking where did the shine go? Okay, not all of it is shiny, but you know what I mean.

I have a video and step by step tutorial for you, so grab a drink, learn how to create amazing depth first, then a stain glass window that captures the true nature of those amazing colors by trapping the shine element of your card. Here’s the video:

Watch in HD on YouTube

So what did you think? Not that difficut really. What did you think about stretching your stencil for better coverage? Have you ever done that? Here’s the step by step tutorial, and if you really loved this, be sure to sign up for the Creative Tips E Letter for an exclusive video series and more…

[optin_box style=”12″ alignment=”center” email_field=”email” email_default=”Enter your email address” email_order=”2″ integration_type=”aweber” double_optin=”Y” list=”3846012″ name_field=”name” name_default=”Enter your first name” name_order=”1″ name_required=”Y” opm_packages=””][optin_box_field name=”headline”]Learn more with our exclusive FREE video series:[/optin_box_field][optin_box_field name=”paragraph”]PHA+UGx1cyB5b3XigJlsbCBiZSBhZGRlZCB0byBteSBGUkVFIENyZWF0aXZlIFRpcHMgRS1sZXR0ZXIgd2hlcmUgSSBzaGFyZSBleGNsdXNpdmUgcHJvamVjdHMsIHZpZGVvcyAmYW1wOyB0aGUgMTIgRGF5cyBvZiBDaHJpc3RtYXMgUHJvamVjdCBTZXJpZXM8L3A+Cg==[/optin_box_field][optin_box_field name=”privacy”][/optin_box_field][optin_box_field name=”top_color”]undefined[/optin_box_field][optin_box_button type=”0″ button_below=”Y”]Get Instant Access![/optin_box_button] [/optin_box]

Creative Tips on Shine, Texture and Stretching your Stencils

  • Create an in depth textured piece by using the wrinkle free distress technique on a piece of 140# cold pressed watercolor paper and dye based inks. (shown in detail in the video) Tip – For the most vibrant results, try Ranger’s Distress Inks.

Mixed-Media-Stained-Glass-Window-003


  • This project uses Distress Mustard Seed, Spiced Marmalade, Twisted Citron and Peacock Feathers
  • Once your project is totally dry, lightly buff over it with a de-static tool to remove any oils.
  • Smoosh Versamark through the Latticeworks stencil by Tim Holtz or your favorite one for a detailed design as in the video. Since this stencil didn’t cover my watercolor paper, I had to do this in two parts and overlap my design for a seamless flow.

Vibrant Mixed Media Cards

  • Emboss in Clear Embossing Powder – I used Brutus Monroe – and if you’ve never tried it – do so…it rocks!
  • Once your embossed stencil has fully dried, sponge over with Soot Black distress ink.
  • Wipe off your stenciled design with light pressure and a slightly damp cloth or paper towel to pick up the resisted ink.
  • Emboss your die cut greeting in clear for a shiny look. I used Handlettered Holiday by WPlus9. Adhere with Ranger Multi Medium Matte.

using distress inks in mixed media

  • Stamp and emboss the Christmas greeting from HLS Everyday Sentiments in white on black card stock – trim and adhere.
  • Adhere your watercolor paper with glue to a black matte with a 1/16″ border.
  • Pop up Mixed Media Panel with Fun Foam and adhere to a White card base with a 1/4″ border all around.

That’s it! Simple and striking Mixed Media card. I’m also going to play along with this months challenge over at CAS Mix it Up….it’s heat embossing – we definitely fit there!

may

So hop on over to the HLS Mixed Media Challenge and check out all the amazing projects my teammates have created for this challenge.  Plus you’ll want to stop by our Guest Designer Kalina’s blog – she’s SUPER talented when it comes to Mixed Media and her projects are out of this world!

Then get those fingers inky….I can’t wait to see what you do to let your creations shine!

Signature

[optin_box style=”12″ alignment=”center” email_field=”email” email_default=”Enter your email address” email_order=”2″ integration_type=”aweber” double_optin=”Y” list=”3846012″ name_field=”name” name_default=”Enter your first name” name_order=”1″ name_required=”Y” opm_packages=””][optin_box_field name=”headline”]Learn more with our exclusive FREE video series:[/optin_box_field][optin_box_field name=”paragraph”]PHA+UGx1cyB5b3XigJlsbCBiZSBhZGRlZCB0byBteSBGUkVFIENyZWF0aXZlIFRpcHMgRS1sZXR0ZXIgd2hlcmUgSSBzaGFyZSBleGNsdXNpdmUgcHJvamVjdHMsIHZpZGVvcyAmYW1wOyB0aGUgMTIgRGF5cyBvZiBDaHJpc3RtYXMgUHJvamVjdCBTZXJpZXM8L3A+Cg==[/optin_box_field][optin_box_field name=”privacy”][/optin_box_field][optin_box_field name=”top_color”]undefined[/optin_box_field][optin_box_button type=”0″ button_below=”Y”]Get Instant Access![/optin_box_button] [/optin_box]

Mixing CAS & Monoprinting

Have you ever mixed a monoprint with clean and simple design? Monoprinting is not only super easy, it’s fun, quick and I’m always amazed at the results. I highly encourage you to give it a try. And most of us LOVE clean and simple, so why not mix them together?

It’s snowing here today in the Black Forest – hard to believe it’s almost May! Seems like a good day to work with my Gelli Plate.

Clean and Simple Mixed Media

In the spirit of creative card making, today we’re going to mix it up a little – for the CAS Mix it Up Challenge. I’m addicted to this challenge, and although it’s in it’s infancy – just two months old…it has a HUGE following already with some amazing card makers.

It’s the brain child of Bonnie Klass and Loll Thompson. You probably have crossed paths with one or both over the years, as they are avid card makers, have designed for numerous teams and both have distinct styles each their own.

april

This challenge is all about mixing clean and simple stamping/design with mixed media. Now the words mixed media get one of two reactions – interest and terror. But today’s project is hoping to not only peak your interest, but dispel the myth that all mixed media is intense, takes a long time and is only for artists who love to art journal.

Both projects today were from the creation of one monoprint. To make a monoprint you need three things – a printing plate (I use a gelli plate), some acrylic paint and a tool to spread the paint – I used a brayer.

Gelli Plates are inexpensive tools that give you the ability to make your work looks masterful, unique and will definitely leave the recipient of your card wondering…how in the world did you do that?!! Here are just a few prints I made quickly one day to give you an idea of how fun this artform is:

Gelli Arts - Gelli Plate Monoprints for Mixed Media

Today we’re going to use a 6×6 inch plate by Gelli Arts. And for this challenge, we’ll incorporated a few stencils as well – after all, that is the theme of this month’s challenge! I think you’ll be pleasantly surprised to see there’s not much else to it.

Why don’t we get started. I filmed the process for you, wrote a step by step tutorial below and added some detailed pictures. The video has three distinct parts – the monoprinting (first five minutes – yup…that’s it), card specifics and why, and lastly (final 2 1/2 minutes) – all about clean and simple design and the rules I live by – don’t miss that part!

Click Here to watch in HD on YouTube

What do you think? Of course you can always use stencils in the traditional way too – I just thought it would be fun to bring a little monoprinting into the mix.

[divider style=”10″]

[optin_box style=”12″ alignment=”center” email_field=”email” email_default=”Enter your email address” email_order=”2″ integration_type=”aweber” double_optin=”Y” list=”3846012″ name_field=”name” name_default=”Enter your first name” name_order=”1″ name_required=”Y” opm_packages=””][optin_box_field name=”headline”]Learn more with our exclusive FREE video series:[/optin_box_field][optin_box_field name=”paragraph”]PHA+UGx1cyB5b3XigJlsbCBiZSBhZGRlZCB0byBteSBGUkVFIENyZWF0aXZlIFRpcHMgRS1sZXR0ZXIgd2hlcmUgSSBzaGFyZSBleGNsdXNpdmUgcHJvamVjdHMsIHZpZGVvcyAmYW1wOyB0aGUgMTIgRGF5cyBvZiBDaHJpc3RtYXMgUHJvamVjdCBTZXJpZXM8L3A+Cg==[/optin_box_field][optin_box_field name=”privacy”][/optin_box_field][optin_box_field name=”top_color”]undefined[/optin_box_field][optin_box_button type=”0″ button_below=”Y”]Get Instant Access![/optin_box_button] [/optin_box]

[divider style=”10″]

CAS Monoprint Tutorial

  • Start out by gathering up all your supplies. Monoprinting goes fast – and there’s nothing worse than not having your paper right there and your paint drying up on you!
  • Spread out your background color with a brayer and the rubber attachment.
  • Clean off your brayer on a piece of scrap paper and immediately roll over your gelli plate to “lift” some of the paint you just laid down. You want to get the look in the video – lots of color still, but a bit subdued. TIP – Don’t “lift” more than twice – you’ll remove too much paint.

Gelli Plate Mixed Media

  • Place your Latticeworks stencil by Tim Holtz over your paint and pull the positive print. TIP – if you want it to be a bit random, only pat the back of your paper in random spots. Try to leave a little paint behind, I chose to pull most of it.
  • Lift your stencil, and place your white card stock on the pattern left behind. Burnish the back of your paper with your hand (I like to add a piece of copy paper if my paper is shorter than my plate as in the video) to transfer as much of your print as possible.
  • Lift your print and try and pull a ghost print with copy paper if you can – I was unable to.

Monoprints and monoprinting

  • Clean your gelli plate in-between if you desire, for me that always depends on how much is left behind and what my goal with the project is.
  • Add the Bloom Silhouette stencil by Artplorations to your plate and add a dark color with a brayer to the desired flowers. I chose to add Paynes Grey. You want a contrasting color to your first color. Brown or Dark Purple with Yellow, Black with Blue or Red, etc…
  • Lift your stencil and pull the print onto your second print (the negative), if you have a ghost print – pull that as well onto another piece.

Mixed Media and CAS Monoprints - Ingrid Blackburn

  • Add some marks to your Gelli Plate with more Paynes Grey and the inside of a Starbucks Cup Wrapper. The corrugated inside is great for texture.
  • Add the lines in three spots – if I could do mine again, I’d add the last one a bit higher. I remember thinking not too high, but my original spot in my mind would have been better. TIP – Lesson learned – go with instinct in art, not the mind.
  • Trim your positive and negative prints down. Measurements are below.

Clean and Simple Mixed Media CAS

CAS Monoprint Card #1 – Black

  • Stamp Thanks from Mini Thanks (Create a Smile) in bold with Versafine Black ink (Tsukeniko) and emboss in clear.
  • Add the negative print to black card stock leaving more space on the bottom than the top (Rule of thirds). Add five sparkling clear sequins.
  • Add a little paper piercing to the top and bottom around your print and you’re set with Card #1

Dimensions:

  • Black card base – 5 1/2 s 4 1/4″ Folded
  • Monoprint –  5 1/4 x 2 7/8″ (trimmed down)

Gelli Plate Prints - Ingrid Blackburn

CAS Monoprint Card #2 – White

  • Stamp Thanks from Mini Thanks (Create a Smile) onto a scrap piece of black card stock with Versamark (Tsukeniko) and emboss in White. Trim it down as in the photo leaving more space to the right and left and just a hair top and bottom.
  • Adhere print to black card stock, making sure it’s centered and the black comes out left/right.
  • Adhere to white card base.
  • Add greeting, popping it up with fun foam.
  • Add five sparkling clear sequins.
  • Paper Pierce three holes top and bottom as in the photo.

Dimensions:

  • White card base – 4 1/4 x 5 1/2″ Folded
  • Monoprint – 3 1/2 x 4 1/2″
  • Black Matte – 3 5/8 x 4″

In the video at the end, I go over my rules for design and clean and simple cards. It’s the last 2 1/2 minutes.

Creative Cards - The Creative Grove

That’s it! What do you think? Don’t let mixed media scare you. It’s just combining different mediums on a project. This project used Acrylic Paint, Stencils, textured surfaces, stamping and heat embossing. We added a little sequins for bling and you’re all set – easy peasy!

Now it’s your turn to get those fingers a little inky. The challenge is coming to an end today, but there will be a new one on the 1st. There’s still time to get one last project in though!I’m also going to play along in some never ending challenges as well…I love all the companies products I used today, and can’t say enough about them. I purchased them all on my own….they are products that I use over and over again.

Playing along with – Stamplorations Anything Goes Challenge for my Bloom Silhouette Stencil, April’s Project Share over at Create a Smile , and Happy Little Stampers Stencil Monoprint challenge – how perfect is that!

Stamplorations and Artplorations Happy Little Stampers CAS Challenge

Leave me a comment and let me know what you think! Have you tried a little Mixed Media before? I’d love to know!

Till next time –

Signature

[optin_box style=”12″ alignment=”center” email_field=”email” email_default=”Enter your email address” email_order=”2″ integration_type=”aweber” double_optin=”Y” list=”3846012″ name_field=”name” name_default=”Enter your first name” name_order=”1″ name_required=”Y” opm_packages=””][optin_box_field name=”headline”]Learn more with our exclusive FREE video series:[/optin_box_field][optin_box_field name=”paragraph”]PHA+UGx1cyB5b3XigJlsbCBiZSBhZGRlZCB0byBteSBGUkVFIENyZWF0aXZlIFRpcHMgRS1sZXR0ZXIgd2hlcmUgSSBzaGFyZSBleGNsdXNpdmUgcHJvamVjdHMsIHZpZGVvcyAmYW1wOyB0aGUgMTIgRGF5cyBvZiBDaHJpc3RtYXMgUHJvamVjdCBTZXJpZXM8L3A+Cg==[/optin_box_field][optin_box_field name=”privacy”][/optin_box_field][optin_box_field name=”top_color”]undefined[/optin_box_field][optin_box_button type=”0″ button_below=”Y”]Get Instant Access![/optin_box_button] [/optin_box]

Enchanted Garden & Dies

Today I’m going to showcase a little from the Enchanted Garden and coordinating Dies collection. We’re going to stay in Clean and simple mode today. Normally I stay away from too many lined images, unless I’m going to watercolor, but I can not stop using these two items from the new  Stamp of Approval – Beautiful World Collection.

If you don’t know what Stamp of Approval (SOA) is, then you must have missed my post yesterday! Click Here to see the three projects I created, real all about Stamp of Approval and see my video too!

Today’s products are from SugarPea Designs. I love the whimsical nature of these flowers. And I have some incredible mixed media pieces headed your way with these two products in a few days – you don’t want to miss those! But today we’re going to stay CAS.

If you like what you see, then be sure you are on the wait list for this collection – that’s the only way to get the sales link when it goes live on April 20th!

To see all the products in action before it goes on sale, just stop by my friend Catherine’s blog every day leading up to the 20th. She’ll showcase each piece so you can see them in action ahead of time.

PLUS...there are feature days from a whole team of designers that are super creative. Today we have a large list of amazing designers. I have links to everyone below.

Stamp of Approval Beautiful World

 Get on the wait list HERE to find out when it’s available

Now… let’s get our fingers inky and started with some CAS inspiration for today. There are many more images from the stamp set Enchanted Garden, you’ll have to check out Catherine’s blog and all the other designers to see how they’re put to use. I’m in love with the dies and flowers. But a quick favorite from all the designers is that cute loose dandelion seed – what a perfect filler stamp. See it below? It rocks!

Enchanted Garden – Day Two

Project One

To create this beauty, you’ll want to cut your panel on the diagonal and space it out however far you’d like. It’s a great way to showcase some pop of color. I love doing this on cards. For the pop, I stamped this cool flower a few times onto vellum with StazOn ink. Color them in using markers or chalk from behind – it gives it a subtler look and attach it to the top piece of your panel.

I find that if I lay it onto an acrylic grid or mat with dimensions, in exactly the size I want it on my card, I’ll get the right spacing.  Another way would be to lie it down on your project upside down to get the spacing right.

Stamp your front – love that greeting, add the little fly away seed and a little black border with a pigment liner by micron or staedtler and you’re all set! Super cute, huh?

Enchanted Garden

Project Two

For my second project, I wanted something super quick, easy and in color! I usually gravitate toward black, brown and white as my based, I thought it would be fun to do a card with this gorgeous Basic Grey color by Stampin Up.

For the popped up details, I chose the SU colors Marina Mist, So Saffron and Gumball Green. They work so great together. My die cuts are layered over each other and to bring a little focus in on one, I popped it up. That simple.

For a slightly different look, you could also stamp these with the coordinating stamps to match the dies. I was going for a simpler look, but that looks awesome too!

I kept the greeting simple and embossed in Pearl which turns grey/pearl on this card stock. To emphasize it a bit better, I shadowed it with a pigment liner by Staedtler. The greeting is from the Beautiful World stamp set by GinaK. It’s by far my favorite greeting – I just LOVE that sentiment.  Just a little sneak peek into tomorrow’s feature stamp set. 🙂

So what do you think , do you like the clean and simple design? I bet you’re thinking – I could totally do that with x dies…tell me in the comments below what YOU would use and what you think of this cool new stamp set/dies. I hope I gave you a little inspiration!

Enchanted Garden Dies

Cute, huh? Now be sure to check out all the other designer’s creations. I have them all linked here for your convenience, Catherine will also have everyone linked for you. Enjoy the creativity – be sure to check back tomorrow for more! And if you missed yesterday’s post, Click Here!

Our featured Designers for today are:

See you tomorrow for more…

Signature

[optin_box style=”12″ alignment=”center” email_field=”email” email_default=”Enter your email address” email_order=”2″ integration_type=”aweber” double_optin=”Y” list=”3846012″ name_field=”name” name_default=”Enter your first name” name_order=”1″ name_required=”Y” opm_packages=””][optin_box_field name=”headline”]Learn more with our exclusive FREE video series:[/optin_box_field][optin_box_field name=”paragraph”]PHA+UGx1cyB5b3XigJlsbCBiZSBhZGRlZCB0byBteTxzdHJvbmc+IEZSRUU8L3N0cm9uZz4gQ3JlYXRpdmUgVGlwcyBFLWxldHRlci4gRnJvbSB0aW1lIHRvIHRpbWUgeW914oCZbGwgZ2V0IGV4Y2x1c2l2ZSBwcm9qZWN0cywgdmlkZW9zICZhbXA7IHRoZSAxMiBEYXlzIG9mIENocmlzdG1hcyBzZXJpZXMuPC9wPgo=[/optin_box_field][optin_box_field name=”privacy”][/optin_box_field][optin_box_field name=”top_color”]undefined[/optin_box_field][optin_box_button type=”0″ button_below=”Y”]Get Instant Access![/optin_box_button] [/optin_box]

Simple Snowflakes

It’s lightly snowing today – I’ve never had a white Thanksgiving! Although nothing is really sticking, and we lost all the snow from the other day…I’m enjoying the fire, and getting ready to make our Thanksgiving dinner. Michael asked me what time the “Wurst” was going in the oven…. I guess that’s his German/Thanksgiving day humor…lol! We’re making a stuffed Pork Loin, as I can never find a large turkey to save my life here. I do miss that!

Snowflake Wishes 001

It’s been a busy past few weeks here – getting ready for the holidays and more Christmas card making, videoing and editing than I’ve ever done! We’re in full swing for our 12 Days of Christmas series and Class! The projects have been varied and so much fun to make and share.

So, In the spirit of snowy days and the upcoming holidays…I have a quick little card for you. Although it’s Thanksgiving – here’s a Christmas one. I’ve been having fun playing with Catherine Pooler’s Stamp of Approval Holiday Box (already sold out – but you can get on her list for the next version in January)! These particular snowflakes will be released in 2016 by CAS-ual Friday and I just LOVE stamping and cutting them out – the designs are awesome and very different from what I’ve seen before.

Snowflake Wishes 002

Here’s the how to for this card:

  • Stamp and emboss your greeting. I used a retired one from the Joyful Christmas Set by Stampin Up. First I inked up stamp in Versamark and then went over the word Christmas with an Island Indigo Marker by Stampin Up. I embossed it in Clear Embossing Powder.
  • Sponge your card base with Rumbled Glass. Leave spots more white for a flurry effect.
  • Cut out several snowflakes using the matching dies to the Bring on the Snowflakes stamps in White.

Snowflake Wishes 003

  • Adhere snowflakes to card. I doubled up the largest one and added two sizes of circles over the top right one.
  • Add Sparkling Clear sequins by Pretty Pink Posh.

That’s it! Super fast and easy. The best part – it’s a very cost effective card! You could easily mass produce this one for the holidays sitting in front of a movie.

Hope you enjoyed that! If you’d like more ideas – check out our 12 Days of Christmas class. We’re LIVE and on day 5 – 24 project ideas, 12 videos and PDFs. Find out more here

Snowflake Wishes 005

Have a Happy Thanksgiving with your friends and family! I wish you a memorable day filled with love and laughter!!

Keep those fingers inky –


Signature-24-pt.jpg

[optin_box style=”2″ width=”500″ alignment=”center” email_field=”email” email_default=”Enter your email address” integration_type=”aweber” double_optin=”Y” list=”3846012″ name_field=”name” name_default=”Enter your first name” name_required=”N”][optin_box_field name=”headline”]Learn with our exclusive FREE Video Series[/optin_box_field][optin_box_field name=”paragraph”]PHA+R2V0IHRoZSBmcmVlIENyZWF0aXZlIFRpcHMgRS1sZXR0ZXIgYW5kIGxlYXJuIHdpdGggc3Vic2NyaWJlciBleGNsdXNpdmUgdmlkZW8gYW5kIHBpY3RvcmlhbCBjb250ZW50LiA8ZW0+PHN0cm9uZz48c3BhbiBzdHlsZT0iY29sb3I6ICM4MDAwMDA7Ij5JbmNsdWRpbmc8L3NwYW4+wqA8L3N0cm9uZz48L2VtPm91ciB5ZWFybHkgMTIgRGF5cyBvZiBDaHJpc3RtYXMgc2VyaWVzITwvcD4K[/optin_box_field][optin_box_field name=”privacy”][/optin_box_field][optin_box_field name=”top_color”]undefined[/optin_box_field][optin_box_button type=”1″ text=”Subscribe now!” text_size=”26″ text_color=”#ffffff” text_bold=”Y” text_letter_spacing=”0″ text_shadow_panel=”Y” text_shadow_vertical=”1″ text_shadow_horizontal=”0″ text_shadow_color=”#000000″ text_shadow_blur=”0″ styling_width=”36″ styling_height=”15″ styling_border_color=”#000000″ styling_border_size=”1″ styling_border_radius=”6″ styling_border_opacity=”100″ styling_shine=”Y” styling_gradient_start_color=”#345523″ styling_gradient_end_color=”#68ab46″ drop_shadow_panel=”Y” drop_shadow_vertical=”1″ drop_shadow_horizontal=”0″ drop_shadow_blur=”1″ drop_shadow_spread=”0″ drop_shadow_color=”#ffffff” drop_shadow_opacity=”50″ inset_shadow_panel=”Y” inset_shadow_vertical=”0″ inset_shadow_horizontal=”0″ inset_shadow_blur=”0″ inset_shadow_spread=”1″ inset_shadow_color=”#000000″ inset_shadow_opacity=”50″ location=”optin_box_style_2″ button_below=”Y”]Subscribe now![/optin_box_button] [/optin_box]

Happy Little Stampers 2nd Blog Hop!

Welcome to The Creative Grove and the second Blog Hop for Happy Little Stampers! Chances are you hopped along from Carol’s blog. Today I have three projects to share for you from the second release at Happy Little Stampers!

Happy Little Stampers Blog Hop

In addition to some great inspired projects, HLS is giving away a $50 gift certificate to the store to one commenter! And, four other randomly selected lucky commenters will win a mystery prize too!  So as you’re hopping along, don’t forget to leave a comment!

Here’s what you do:
  • Start off by leaving a comment on the Happy Little Stampers blog, and then continue on to each Designer.
  • Be sure to comment on all the blogs – including the Happy Little Stampers blog in order to be eligible for the prizes!
  • The blog hop will run for one week giving you enough time to hop through and check out what the designers will be creating.

I used two of the new sets – Mix Mash and Everyday Sentiments to make some great cards that I hope you’ll love! Here are all the creative tips and details…

Blog Hop Projects

Ingrid Blackburn CAS Cards

Project One – OMG #YOUROCK

For this fun card I wanted something funky and cool for my niece Rebecca. I love the lightheartedness of some of the sentiments in the Mix Mash set. To create this card:

  • You’ll want to use the OMG and #YouRock stamps embossed in Black to really stand out from the colorful background.
  • You’ll need to match the quirkiness of the stamps, so choose a fun background stamp or stencil. I chose a Hero Arts Stencil that I recently purchased.
  • To get that fun colorful design, use a sponge applicator and sponge Mustard Seed, Fossilized Amber, Mowed Lawn and Spiced Marmalade Distress Inks to create the pattern on a piece of white card stock.

Hero Arts Stencils

  • To get the sentiment perfectly positioned, you’ll want to figure out how large you want your space to be, then plan on 1/8″ for the top and bottom.
  • I chose 3/4″ for my space and to keep with the Rule of Thirds theory of design, made sure to split my piece 1/3 of the way through. This helps to balance your project.
  • For a little dramatic effect – pop your panels up with dimensionals or foam tape. That will help to give you a great shadow effect.

It’s a fun project, right?

Happy Little Stampers

Project Two – Spunky Birthday

I just spent several weeks with my family in NY. My 10 year old niece Chiarra is all spunk and spirit. She loves to break out in song, dance or just start acting a scene – mark my words…she’ll be a future actress! I couldn’t get her singing out of my head this morning when I was stamping – so… fun, bright and playful is the direction this project went.

The Mix Mash stamp set is filled with great birthday sentiments and some awesome little detail stamps. I actually was going to add white sequins to it, when I decided to add the circle and lined circles in their place – it looks way better and talk about versatile! I love stamps like that. This project is a fun mixed mash itself! Here is how to recreate it:

  • First stamp your main sentiment.  Ink up the center of the largest Happy Birthday stamp with Distress – More Mustard, then use Picked Raspberries and Salty Ocean being sure to overlap them a bit to get a great mix of color. Keep it towards the bottom of a 3 3/4 x 4″ panel, leaving an inch to stamp other sentiments.
  • An embossing buddy/destatic tool is key for this project, as you’ll be handling it numerous times. Use your embossing buddy on a space above or below your main sentiment, and stamp one of the happy birthday stamps repeatedly across in versamark.

Happy Little Stampers Stamps

  • Try to keep them aligned. I had to stamp, add powder, then stamp again to see it right.
  • Once you have white powder on a line  – emboss with a heat tool and then repeat till your panel is filled.
  • Matte onto a matching panel – I used Melon Mambo by SU.  I trimmed my panel so that it was just slightly smaller than a 1/16″ border.
  • Figure out where you are placing your panel and stamp solid and lined circles in a few spots as in the card.
  • Pop up your panel and you’re all set!
  • This card is an A2 top folding card – 4 1/4 x 5 1/2″.

I know she’ll love it, it’s bright and fun. The white Happy Birthday’s really make a statement.

Masculine Cards

Project Three – Masculine Birthday

For this card, I wanted a more masculine look for my nephew Matt’s upcoming birthday. So I decided to go with a grey panel and keep it rather simple. Originally I was going to stamp and emboss the greeting on vellum, tear and overlay, but as I began, I thought simple might be better here. What do you think? This one is pretty straightforward, but here’s the step by step anyway!

  • Stamp and emboss your greeting from Everyday Sentiments in black about 1/3 rd of the way up from the bottom onto a piece of Basic Grey card stock (SU) – 3 7/8 x 5 1/8″.
  • Stamp the arrow stamps from the Mix Mash set in Versamark and emboss with clear powder to get the darker grey color.

Everyday Sentiments Masculine Card 002

  • Stamp and emboss your circle stamps from the Mix Mash set in black.
  • Add gold sequins and matte onto a black base 1/16″ larger ( 4 x 5 1/4″)
  • Adhere to a top folding A2 card – 4 1/4 x 5 1/2″.

It’s a simple card, but sometimes simple is just perfect. One of the reasons I just love CAS cards!!

Well, there you have it – just a few ideas and fun ways to use some of the new stamp sets in this second release. I hope you enjoyed the creative juice…and that’s a wrap for the second blog hop! If you didn’t start at the beginning with the Happy Little Stampers blog…be sure to head there next and hop along the way for 20 other designers ideas! WOW…that’s a ton of creativity!!

And be sure to comment to win too – in order to win, you need to comment on all the blogs including the HLS blog. Happy Hopping, see you next time!!

Signature-24-pt_thumb.jpg

Here are links for the whole hop!

Happy Little Stampers
Kylie Purtell
Loll Thompson
Joyce Mehrberg
Gloria Lee
Tanja Kabel
Susan Bridgman
LesLee
Gail Townsend
Carol Steedman
Melissa Lane
Linda Walmsley
Birgit Norton
Kim Heggins
Valentyna
Sue T.
Bonnie Klass
Toni
Chrissie
Anita
Carol Dunham
Ingrid Blackburn <—- You are Here!