Simple Snowflakes

It’s lightly snowing today – I’ve never had a white Thanksgiving! Although nothing is really sticking, and we lost all the snow from the other day…I’m enjoying the fire, and getting ready to make our Thanksgiving dinner. Michael asked me what time the “Wurst” was going in the oven…. I guess that’s his German/Thanksgiving day humor…lol! We’re making a stuffed Pork Loin, as I can never find a large turkey to save my life here. I do miss that!

Snowflake Wishes 001

It’s been a busy past few weeks here – getting ready for the holidays and more Christmas card making, videoing and editing than I’ve ever done! We’re in full swing for our 12 Days of Christmas series and Class! The projects have been varied and so much fun to make and share.

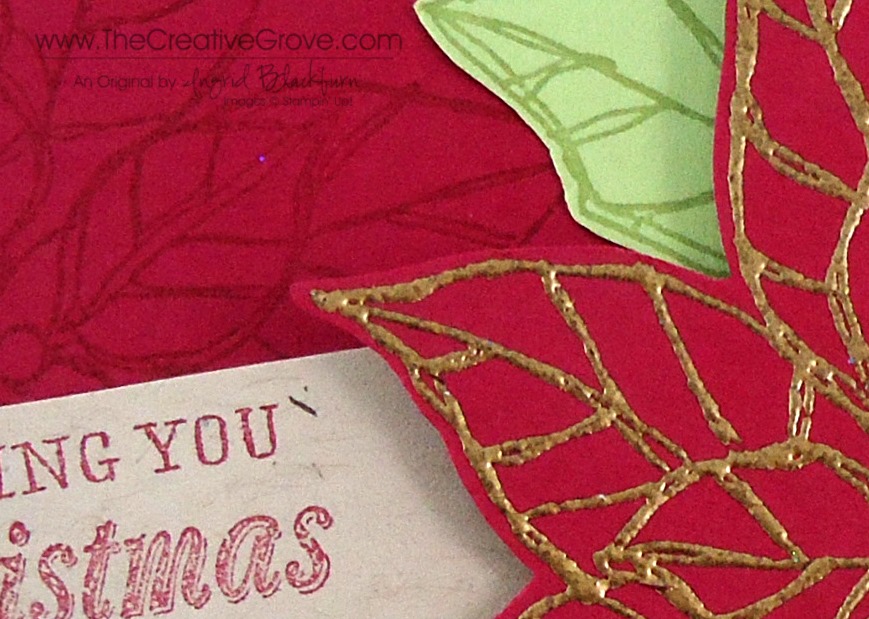
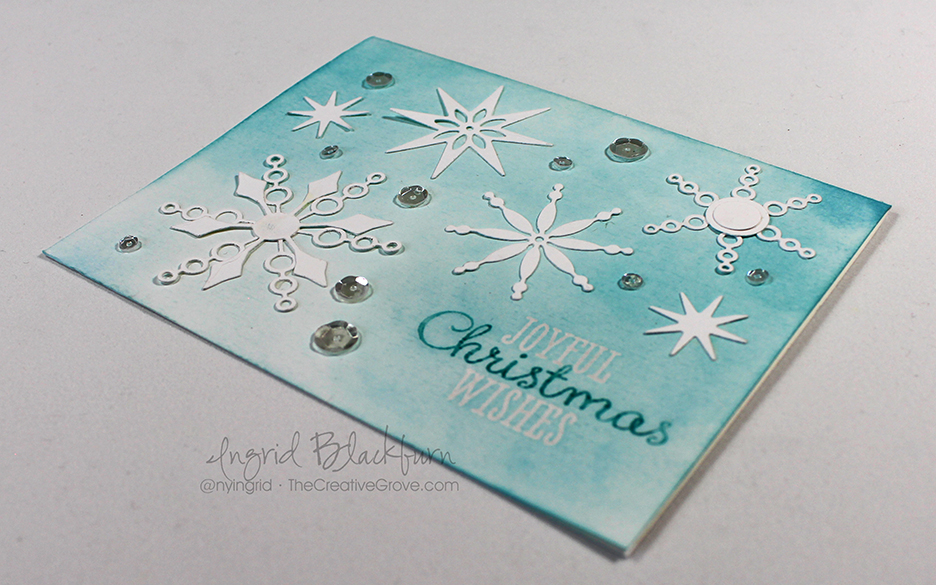
So, In the spirit of snowy days and the upcoming holidays…I have a quick little card for you. Although it’s Thanksgiving – here’s a Christmas one. I’ve been having fun playing with Catherine Pooler’s Stamp of Approval Holiday Box (already sold out – but you can get on her list for the next version in January)! These particular snowflakes will be released in 2016 by CAS-ual Friday and I just LOVE stamping and cutting them out – the designs are awesome and very different from what I’ve seen before.

Snowflake Wishes 002

Here’s the how to for this card:

  • Stamp and emboss your greeting. I used a retired one from the Joyful Christmas Set by Stampin Up. First I inked up stamp in Versamark and then went over the word Christmas with an Island Indigo Marker by Stampin Up. I embossed it in Clear Embossing Powder.
  • Sponge your card base with Rumbled Glass. Leave spots more white for a flurry effect.
  • Cut out several snowflakes using the matching dies to the Bring on the Snowflakes stamps in White.

Snowflake Wishes 003

  • Adhere snowflakes to card. I doubled up the largest one and added two sizes of circles over the top right one.
  • Add Sparkling Clear sequins by Pretty Pink Posh.

That’s it! Super fast and easy. The best part – it’s a very cost effective card! You could easily mass produce this one for the holidays sitting in front of a movie.

Hope you enjoyed that! If you’d like more ideas – check out our 12 Days of Christmas class. We’re LIVE and on day 5 – 24 project ideas, 12 videos and PDFs. Find out more here

Snowflake Wishes 005

Have a Happy Thanksgiving with your friends and family! I wish you a memorable day filled with love and laughter!!

Keep those fingers inky –


Signature-24-pt.jpg

[optin_box style=”2″ width=”500″ alignment=”center” email_field=”email” email_default=”Enter your email address” integration_type=”aweber” double_optin=”Y” list=”3846012″ name_field=”name” name_default=”Enter your first name” name_required=”N”][optin_box_field name=”headline”]Learn with our exclusive FREE Video Series[/optin_box_field][optin_box_field name=”paragraph”]PHA+R2V0IHRoZSBmcmVlIENyZWF0aXZlIFRpcHMgRS1sZXR0ZXIgYW5kIGxlYXJuIHdpdGggc3Vic2NyaWJlciBleGNsdXNpdmUgdmlkZW8gYW5kIHBpY3RvcmlhbCBjb250ZW50LiA8ZW0+PHN0cm9uZz48c3BhbiBzdHlsZT0iY29sb3I6ICM4MDAwMDA7Ij5JbmNsdWRpbmc8L3NwYW4+wqA8L3N0cm9uZz48L2VtPm91ciB5ZWFybHkgMTIgRGF5cyBvZiBDaHJpc3RtYXMgc2VyaWVzITwvcD4K[/optin_box_field][optin_box_field name=”privacy”][/optin_box_field][optin_box_field name=”top_color”]undefined[/optin_box_field][optin_box_button type=”1″ text=”Subscribe now!” text_size=”26″ text_color=”#ffffff” text_bold=”Y” text_letter_spacing=”0″ text_shadow_panel=”Y” text_shadow_vertical=”1″ text_shadow_horizontal=”0″ text_shadow_color=”#000000″ text_shadow_blur=”0″ styling_width=”36″ styling_height=”15″ styling_border_color=”#000000″ styling_border_size=”1″ styling_border_radius=”6″ styling_border_opacity=”100″ styling_shine=”Y” styling_gradient_start_color=”#345523″ styling_gradient_end_color=”#68ab46″ drop_shadow_panel=”Y” drop_shadow_vertical=”1″ drop_shadow_horizontal=”0″ drop_shadow_blur=”1″ drop_shadow_spread=”0″ drop_shadow_color=”#ffffff” drop_shadow_opacity=”50″ inset_shadow_panel=”Y” inset_shadow_vertical=”0″ inset_shadow_horizontal=”0″ inset_shadow_blur=”0″ inset_shadow_spread=”1″ inset_shadow_color=”#000000″ inset_shadow_opacity=”50″ location=”optin_box_style_2″ button_below=”Y”]Subscribe now![/optin_box_button] [/optin_box]

Merry Winter Wonderland

When I think of December I think Winter Wonderland.  With Christmas, trees, lights, snow and all the trimmings!  This card brings out the fun and wintery scene.  I hope you love it!  May you have a very Merry Christmas with your friends and family!

The top image has an embossed background using the Penny Black Fleur de Lys Background stamp – white on white and a watercolored White Christmas stamped image.  The sequins from Pretty Pink Posh give it a snowfall feel.

PB White Christmas 001

This image also is watercolored for the main stamped image from White Christmas, but has a glitter edge using Iridescent Ice Embossing Powder.  The background is just a dots embossing folder and the added silver cord gives it a holiday look.

PB White Christmas 002

Both are for the Merry Monday Christmas Challenge.  Enjoy and have a very Merry Christmas!

139

Signature

For Creative Tips, be sure to add yourself to the Creative Tips E-Letter list to get exclusive videos and projects sent directly to you free!

Just a touch of Embossing

I bet the first time you saw the heat embossing technique for the first time you said out loud – “That’s SO cool!”, right?  Well, embossing can be done many ways and this project takes it to the limit.  This project uses basic embossing in four different ways – yes four!

Gold and SIlver 002

I have to admit, I went to the Merry Monday challenge site last Monday…but it was from my phone as I was in Switzerland at the time…lol!  When I saw the challenge…I knew I had to create something fun.  We were visiting Christmas Markets in the south of Germany, Switzerland and the Alsace in France for a few days, so it had to wait…  Not so easy when all around me I saw inspiration for this card!!!

138

Ever since the Black, Silver and Gold challenge a few months back, I’ve fallen in love with gold on silver and silver on gold.  Click here to see that project…it lead to seven… But for today, this is what happened when I got quite comfy with my heat tool and some embossing powders. Smile

Gold and SIlver 006

Today a couple circumstances lead to my favorite accent on this card the stencil embossed background (1) as an accent.  Adding what I like to call Foil Embossing (2) to the edges is something I’ve been doing to my project for years – always a go to for me when I really need a statement border.  And of course the sparkling clear Pretty Pink Posh sequins really dress it up too.

Apart from the basic embossing (3) used for the ornaments and greeting, the first on the card was for the bough…it’s a simple embossing technique, but rather effective if you don’t have the color powder you need.  Ink up your stamp with Versamark and then use any dye ink you want to magically turn it into an embossed ink – I used Forest Moss Distress Ink here.  Then use Clear embossing powder and you have any color you need.  There you have it – four ways!

Gold and SIlver 003

VIP Community members have a step by step technique video on this project in the Resource and Project library.  I hope you enjoyed my fun with my heat tool today – thanks as usual for the creative inspiration Debbie and Merry Monday!

And one of my favorite stamp company’s challenge too – Simon Says Stamp Wednesday Challenge for Sparkly Creations.  They’re featuring Kaisercraft products, but I don’t have any!  So here are some fun sparkling clear sequins – don’t you agree that they really take this project up a notch!  They’re by Pretty Pink Posh:

sss-wednesdayblog-logo

Signature

Holiday Creative Mojo – It’s finally here!

12 Days of Christmas 604 Banner

Did you get yours?  If not, be sure to sign up right here.  The first 12 days of Christmas project hit in-boxes today!  Don’t miss out on 12 original Christmas cards over the next seven weeks.  It’s the perfect dose of holiday creative mojo sent directly to you.

And not to worry – if you missed the first few – we send them to you along with all the great creative video tutorials that you get just for being part of the Creative Tips list.

So I hope to see you there soon – keep creating – we’re elbow deep in card stock, sequins and ink!  We’ll keep the inspiration coming!

Signature_thumb.jpg

Polka Dots and Striped Christmas

Striped and Polka Dot 003

Have you ever finished a project and just felt so-so about it?  That happened to me for this project.  So, what do you do when it just doesn’t feel right?  Well, make a tiny switch and then just like Emeril – BAM, that’s just what it needed!

128.pngCTS_94 Virginias View clean and simple

I created a clean and simple polka dot/striped card and entered it into three of my fav challenges – the Merry Monday Christmas, CAS(e) this Sketch, and Virginia’s View Challenges this week.  Here is what I came up with and how a small change made all the difference.  If you’re part of the VIP Community – there’s a step by step video tutorial on this project for you!

Striped and Polka Dot 002

Creative Tips –

  • To create subtle stripes, grab those left over 1/2 inch strips that you have from trimming down your card stock and cut them into 3” long strips.
  • Arrange them at the top in a back and forth pattern for a great backing to any element.Striped and Polka Dot 001
  • Cut out a shape – here you see Deco Framelits by Stampin Up and emboss your greeting – I used a bold greeting to be able to keep up with the polka dots.
  • For the polka dots, use any tiny circle stamp you have.  This is a double circle stamp I have from a floral set by Simon Says Stamp – love these little stamps!
  • Stamp them in versamark and emboss with clear powder
  • My original card used Gold Embossing Powder for the greeting and around the card front.  The gold got a bit overpowered – I’m not sure if it was all the elements or the Cherry Cobbler color, but it just wasn’t working for me.Striped and Polka Dot 007
  • To give the card a little more pop and make it work, as Tim Gunn says…I switched to White Embossing Powder for the greeting
  • I loved the embossed edge on the card front – so I duplicated that in white. It’s kind of hard to see the white edge in this photo though…Striped and Polka Dot 006
  • The original card uses pearls, but that didn’t work for me either, so I switched to sequins and BAM – perfection!

Here they are side by side – see the difference?  It’s night and day.  Sometimes minor changes make all the difference in the world.

Striped and Polka Dot 004

So don’t settle for mediocre, next time try it a second time and enjoy your success!

Signature

Find out how to become part of The Creative Grove Community here

Sparkly Pines and Rocks

It’s Merry Monday!  I am so honored to be a guest designer this week on this very cool weekly challenge blog.  If you haven’t yet participated…definitely check it out!  The challenges are fresh and intriguing.  You’ll definitely stretch your Christmas card making abilities into a new stratosphere.  Like this week – Sequins!

117

I wouldn’t normally reach for this little embellishment, but boy what a new addiction I have now after this one!  Thanks a lot girls – look what you’ve done. Smile

Pines on Rocks Winter Scene

Creative Tips –

  • I used the large Stampscapes Pines and Rocks stamp in Night of Navy by Stampin’ Up! here.  Simple, just stamped on some Crumb Cake card stock.
  • To bring the snowy feel in, I used a Uniball Signo White Gel pen for some highlights and snow in the sky.

Pines on Rocks Winter Sequin Card (5)

  • To create some mist and bigger flakes, I used a qtip and white pigment ink.
  • For the sparkle and a fun touch, I added not only the sequins in clear, but the little pieces from the sequin holes.  They add just the right sparkle to this project.
  • The card front and banner are popped up for some character along with some subtle sponging in crumb cake.

Pines on Rocks Winter Sequin Card (8)Pines on Rocks Winter Sequin Card (7)

  • A simple banner greeting from Sweet Essentials from Stampin’ Up! finish this card perfectly.

Now it’s your turn!  I can’t wait to see your cards entered.  Have a Merry Monday!

Signature-Blog

[optin_box style=”13″ width=”500″ alignment=”center” action=”https://www.aweber.com/scripts/addlead.pl” disable_name=”Y” method=”post” email_field=”email” email_default=”Enter your email address” integration_type=”aweber” double_optin=”Y” list=”3846012″ name_field=”name” name_default=”Enter your first name” name_required=”Y”][optin_box_field name=”headline”]If you enjoyed this tutorial…[/optin_box_field][optin_box_field name=”paragraph”]PHA+4oCmeW914oCZbGwgbG92ZSBvdXIgPGVtPjxzdHJvbmc+PHNwYW4gc3R5bGU9ImNvbG9yOiAjMjQ0YzVlOyI+ZnJlZTwvc3Bhbj4gPC9zdHJvbmc+PC9lbT5zdWJzY3JpYmVyIG9ubHkgdmlkZW8gc2VyaWVzLiDCoExlYXJuIG5ldyB0ZWNobmlxdWVzIHRocm91Z2ggb3VyIDxzcGFuIHN0eWxlPSJjb2xvcjogIzI0NGM1ZTsiPjxlbT48c3Ryb25nPmV4Y2x1c2l2ZTwvc3Ryb25nPjwvZW0+wqA8L3NwYW4+Q3JlYXRpdmUgVGlwcyBlLWxldHRlcsKgYW5kIHN1YnNjcmliZXIgb25seSB2aWRlbyBhbmQgcHJvamVjdCB0dXRvcmlhbHMhPC9wPgo=[/optin_box_field][optin_box_field name=”privacy”][/optin_box_field][optin_box_field name=”top_color”]undefined[/optin_box_field][optin_box_button type=”1″ text=”Send me exclusive tips!” text_size=”32″ text_color=”#000000″ text_bold=”Y” text_letter_spacing=”0″ text_shadow_panel=”Y” text_shadow_vertical=”1″ text_shadow_horizontal=”0″ text_shadow_color=”#f6fefb” text_shadow_blur=”0″ styling_width=”50″ styling_height=”19″ styling_border_color=”#000000″ styling_border_size=”1″ styling_border_radius=”6″ styling_border_opacity=”100″ styling_shine=”Y” styling_gradient_start_color=”#a3b640″ styling_gradient_end_color=”#80902c” drop_shadow_panel=”Y” drop_shadow_vertical=”1″ drop_shadow_horizontal=”0″ drop_shadow_blur=”1″ drop_shadow_spread=”0″ drop_shadow_color=”#000000″ drop_shadow_opacity=”50″ inset_shadow_panel=”Y” inset_shadow_vertical=”0″ inset_shadow_horizontal=”0″ inset_shadow_blur=”0″ inset_shadow_spread=”1″ inset_shadow_color=”#80902c” inset_shadow_opacity=”50″ location=”optin_box_style_13″ button_below=”Y”]Send me exclusive tips![/optin_box_button] [/optin_box]

Pines on Rocks Winter Sequin Card (3)

O Holy Night Masterpiece

O Holy Night 001 004

Have you ever set out to create a simple card and end up creating a little piece of art?  That’s how I feel about this project.  My goal was to just create a clean and simple card.  If you look a bit closer, you’ll see some cool techniques come together to make a little piece of artwork.  These are the kind of techniques you’ll learn in the creative cards classes taught in the online classroom.  After all, not everything can just be cut, assemble and create, right?

Creative Tips –

  • The O Holy Night stamps together are striking.  I love the mixture of fonts to create this great image.  Be careful not to mix it with too much in the background, as it will take away from the cool font look.O Holy Night 001 011
  • Night of Navy is always a great choice for a striking card.  Here you will pair it with Elegant Eggplant to create your background along with gold embossing powder.
  • The background is sponged lightly using the two colors onto a piece of Crumb Cake.  You will then use a sponge to randomly add some versamark ink and then Gold Embossing powder.  Don’t overdo the gold.  I blew and tapped off some.  It’s meant to be an added look, not overtake it.O Holy Night 001 001O Holy Night 001 002
  • The piece I made was a bit too wide, so I cut off a strip 1/2” wide, and separated it for some interest to the background.  This broke up the dominant look and allows you to focus on the stamped image instead.  Don’t be afraid to try separating your backgrounds if it’s not working for you.
  • The Night of Navy front needed a little bit, so you can add a little interest with the Festive Flurry set as pictured here, or try Gorgeous Grunge.
  • You’ll want to matte your stamped image, Night of Navy was the only real choice here, but it got lost on the Night of Navy card front, and white would have been too much.  So, I matted it onto a piece of our Vellum cardstock and tore the edge for a little texture.  The outcome was stunning. O Holy Night 001 010O Holy Night 001 013
  • To give it a little more drama, pop it up on Stamping Dimensionals along with the card front.
  • Using card stock like Crumb Cake or Brown Sugar along with rich colors like Night of Navy, sometimes look like gold as here. O Holy Night 001 005

Free Exclusive Content

Are you on the Creative Tips list?  If so, then you are getting exclusive projects, videos, tool tips, specials, discounts and things like the 12 weeks of Christmas.  So much more happens here at The Creative Grove, but not everything is on the blog.  Don’t miss out, sign up today! Click Here to get Creative Tips sent directly to you.

Brayer 102 – Advanced Creative Scenery Pre-Release savings!

Do you love to create Creative Scenery?  Then don’t miss out on the Advanced Techniques class.  Brayer 101 was a huge online hit, and we’re continuing the series by taking these creative pieces of artwork to a whole other level.  The class is slated to go live Thursday October 24th, but you can save during the Pre-release!  Check it out here.  And if you missed the 101 class, get caught up in the 101/102 bundle!  Check out the bundle here.

Signature Snowflake 001

Shop in the Online Store 24/7 – click here

O Holy Night 001 007

Stamps – O Holy Night, Festive Flurry Ink – Night of Navy, Eggplant Envy, Versamark Paper – Crumb Cake, Night of Navy, Vellum Cardstock Cool Tools – Gold Embossing Powder, Heat Tool, Sponges Finishing Touch – Stamping Dimensionals

48 hours left plus two Sneak Peeks

Here’s a little sneak peek at one of the super cute 12 weeks of Christmas projects that will hit inboxes in 48 hours!  Do not miss out on 12 weeks of step by step projects, tags, gifts and wrapping ideas!  You will not find any of these projects on the blog, so if you are a blog subscriber and you would like to see these projects, make sure you sign up for the creative tips list in the box below!

12 Weeks of Christmas banner_small


And be sure to stop by Wednesday for this super cute clean and simple Christmas card!  Here’s a sneak peak of that!

Clean and Simple Christmas Sneak

Have a fun start to the week!

Signature Snowflake 001

Shop 24/7 in the creative store – click here!