Sparkly Moonlit Evening

Stampscapes Scenic Card

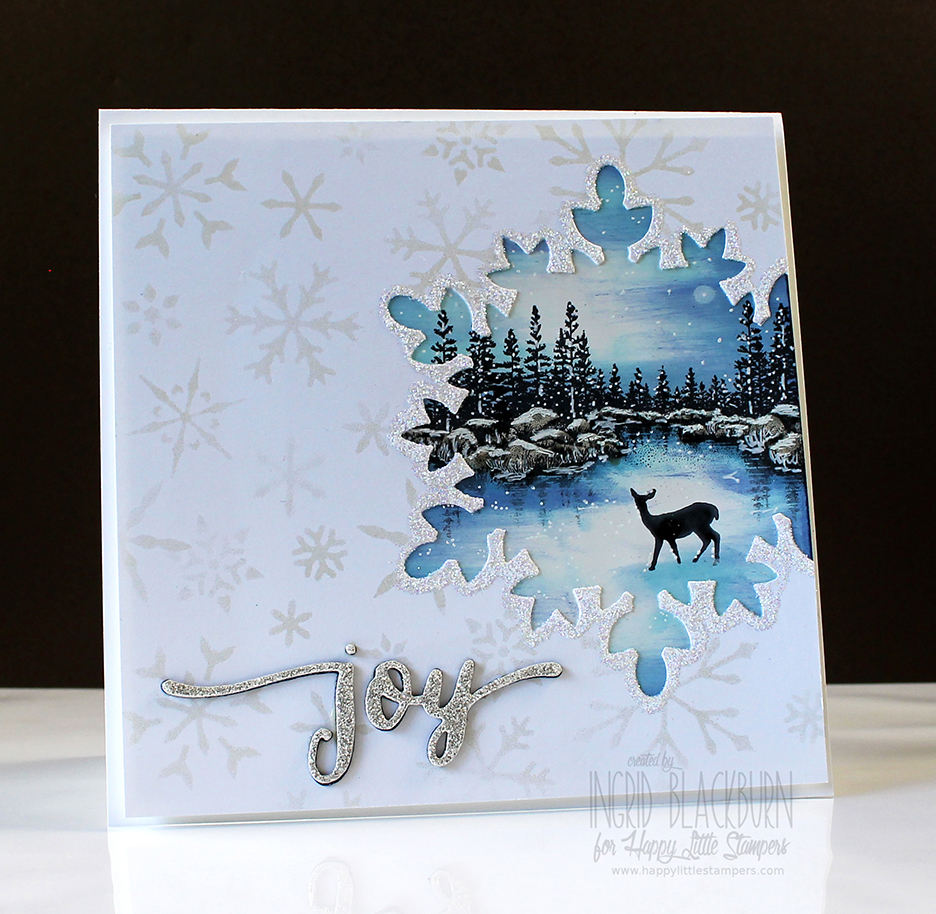
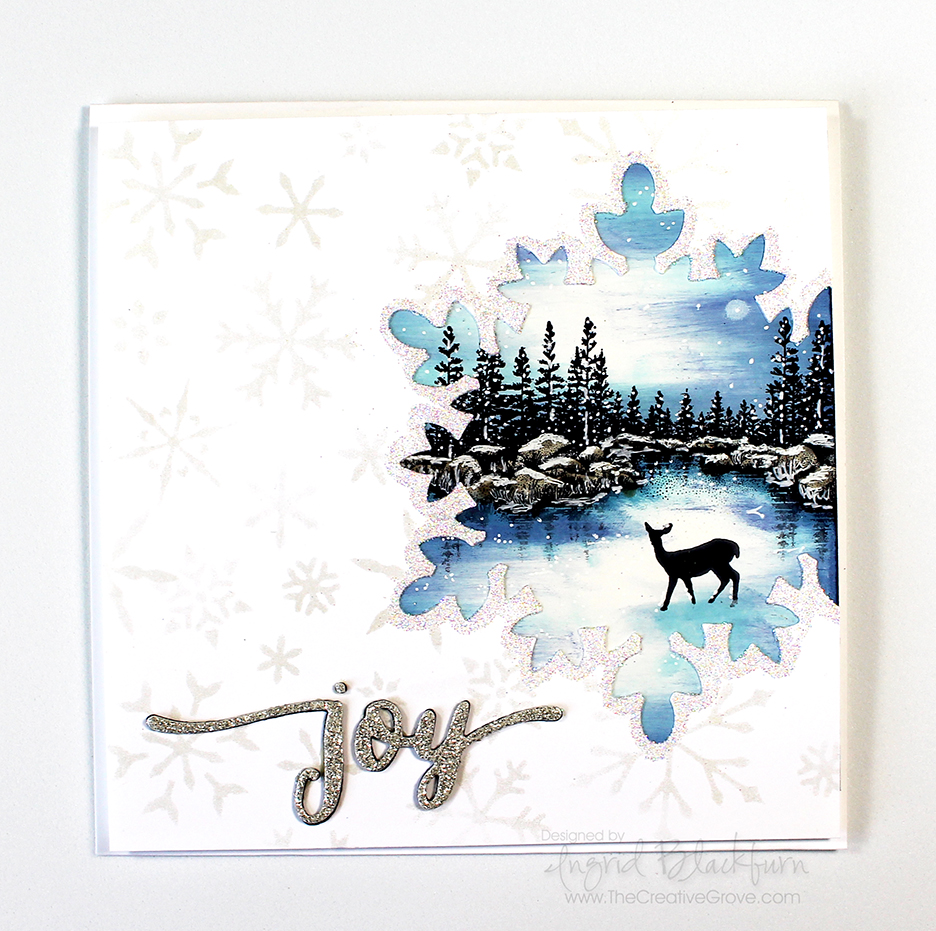
We had a fun first month with the new Christmas Challenge at Happy Little Stampers – well the fun isn’t stopping there! This month the theme is Sparkle, so I figure what’s more sparkly than Snow?

HLS Christmas Challenge August 2015

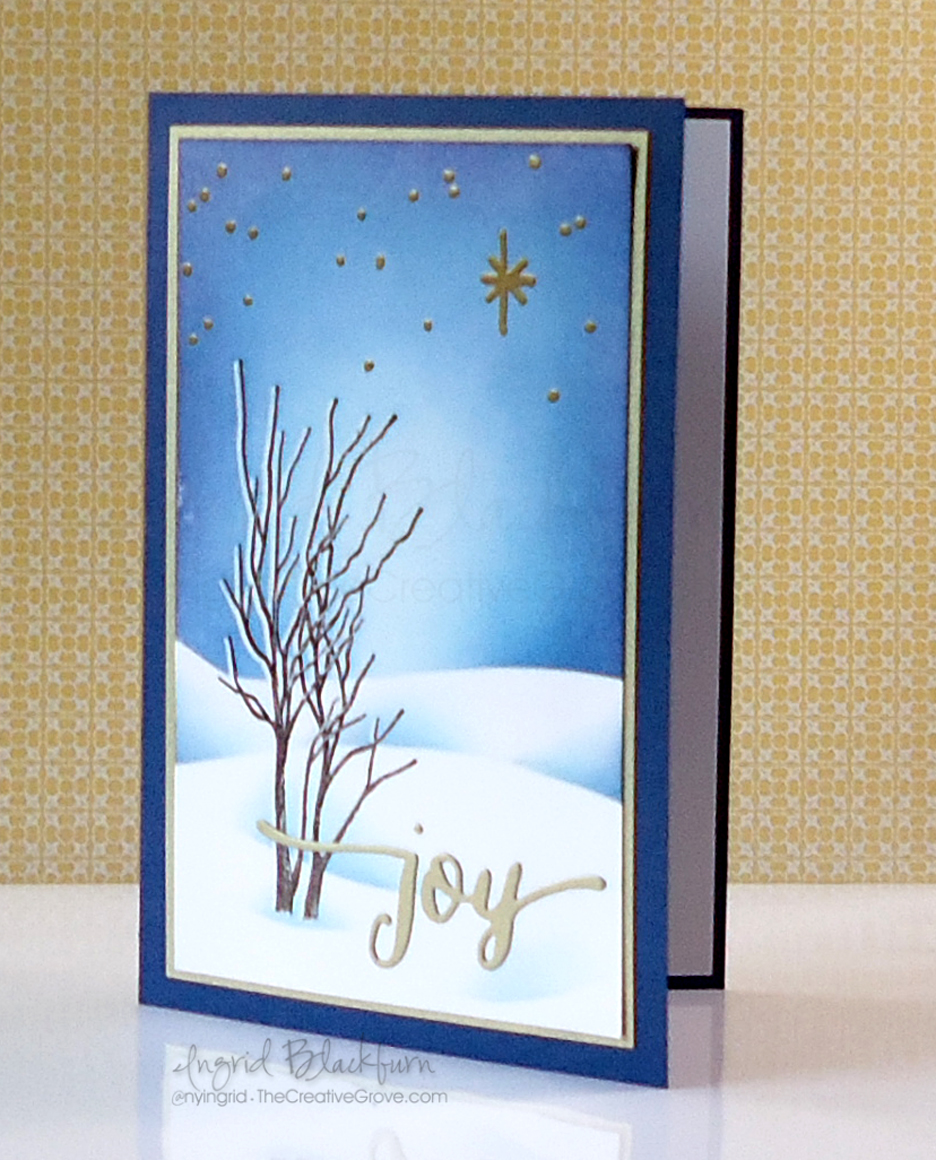
I whipped out some of my favorite stamps for this beauty – Stampscapes. And I have a treat for you today  – I filmed it too! The first video is about the Ink Swipe technique using a Colorbox Stylus and Sponge Applicator. I’ve always admired Kevin Nakagawa’s (Artist and Owner of Stampscapes) videos and creations, so I hope I do his technique some justice! It’s quite a bit longer than my regular videos, so grab a beverage, and enjoy all the creative tips along the way!

The Second video shows you how to put the Sparkle in your card  – that’s the Christmas Challenge theme after all…and how to create the snowflake window with your scene. That one’s a bit more normal length…lol! Both showcase a very cool idea, so have fun with them. They are completely step by step.

View Scenic Card Portion on YouTube

View Snowflake cutout card portion on YouTube

The videos will teach you how to use the Colorbox Stylus tool on glossy card stock for a mystical moonlit scene. It’s loaded with tips and how to’s so enjoy! And I can’t wait to see YOUR creations at Happy Little Stampers for the Christmas Challenge – be sure to play along!

And if you didn’t get a chance to visit any of the challenges at Happy Little Stampers…be sure to stop by to see the new Stamps! What???!! Yes, there is a new stamp company in town – get your hands on the first series. Definitely check out the shop here.

Measurements:

  • Card Base – 11 x 5 1/5″ top folding card
  • Card Front – White – 5 1/4 x 5 1/4″
  • Glossy Card Stock for Scene – 4 3/4 x 4″
  • Glimmer Paper, Navy Card Stock – Stampin Up

Supplies:

  • Stamps – Small Lakeside Cove, Doe – Stampscapes
  • Stencils – Winter – Memory Box
  • Dies – Handlettered Holiday – WPlus9, Festive Flurry – Stampin Up (Retired)
  • Inks – Tuxedo Black – Memento; Ranger Distress –  Tumbled Glass, Broken China, Stormy Sky, Chipped Sapphire, Pumice Stone; Illuminate – Stampin Up, Frost White – Colorbox
  • Other – Colorbox Stylus Tool with Sponge Applicator, Fun Foam, 2 Way Glue Pen, Dazzling Diamonds Glitter – SU, White Gel Pens, Q-Tips, Mini Sponge Tool, Liquid Glue

Ink Swipe Technique

Creative Tips – 

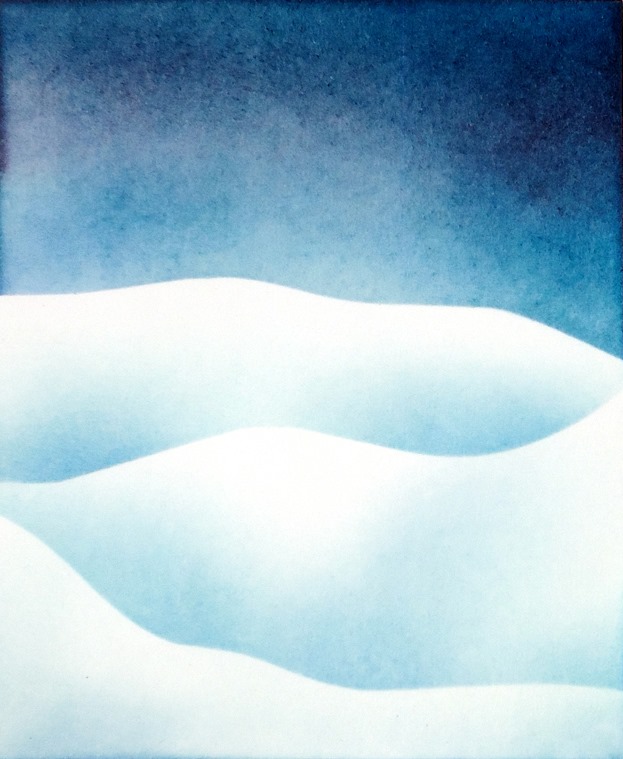
  • Be sure to add a light layer of ink (Distress, Adirondack Lights) to your glossy card stock first to help the rest glide with the stylus tool.
  • To keep your scene elevated evenly use fun foam to mount it for a bit of elevation off the main card.
  • Sponge lightly but thoroughly. Try not to press too hard through your stencil to avoid unsightly marks from your sponge tool.
  • If you don’t have a pearlescent pigment ink like Illuminate – try silver, white or even versamark.
  • If you’re not into scenic cards – throw a photo in that spot!

Snowflake Stampscape 002

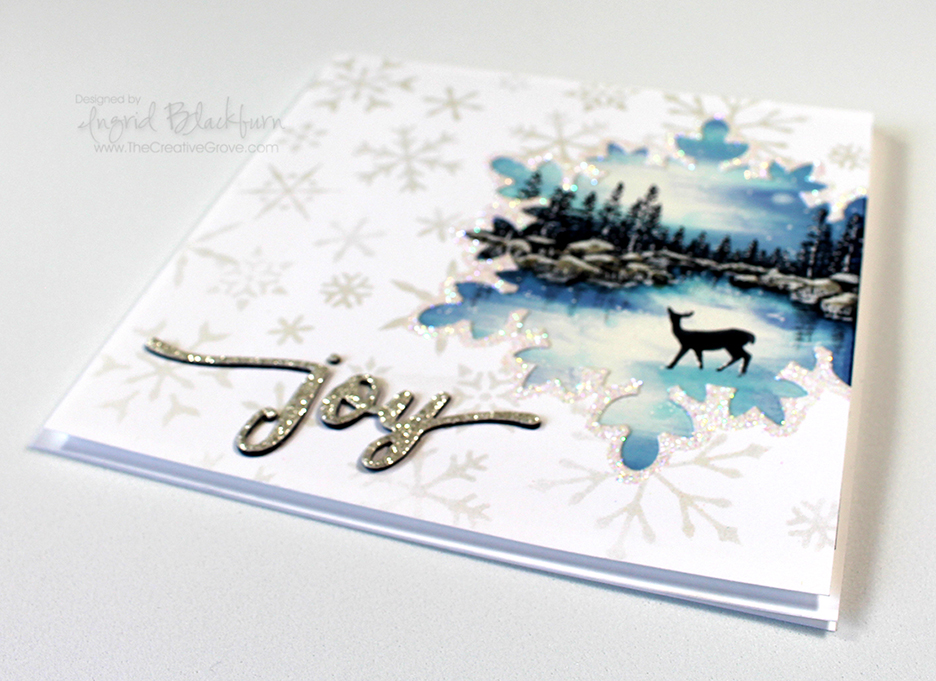
I also love to play along with other challenges – another one of my favorites is Muse Christmas Visions – and this week the inspired card had snowflakes in it. Even though the stars spoke out to me too, it was the snowflakes that ended up on my card to provide the sparkle. Cool how it all tied in!

I also played along with these challenges too this month:

So, now that you’ve learned a little here – be sure to check out all the other great inspirational projects at the Christmas Challenge at Happy Little Stampers! I can’t wait to see what you come up with.

Signature-24-pt_thumb.jpg

[optin_box style=”13″ width=”500″ alignment=”center” action=”https://www.aweber.com/scripts/addlead.pl” disable_name=”Y” method=”post” email_field=”email” email_default=”Enter your email address” integration_type=”aweber” double_optin=”Y” list=”3846012″ name_field=”name” name_default=”Enter your first name” name_required=”Y”][optin_box_field name=”headline”]If you enjoyed this tutorial…[/optin_box_field][optin_box_field name=”paragraph”]PHA+4oCmeW914oCZbGwgbG92ZSBvdXIgPGVtPjxzdHJvbmc+PHNwYW4gc3R5bGU9ImNvbG9yOiAjMjQ0YzVlOyI+ZnJlZTwvc3Bhbj4gPC9zdHJvbmc+PC9lbT5zdWJzY3JpYmVyIG9ubHkgdmlkZW8gc2VyaWVzLiDCoExlYXJuIG5ldyB0ZWNobmlxdWVzIHRocm91Z2ggb3VyIDxzcGFuIHN0eWxlPSJjb2xvcjogIzI0NGM1ZTsiPjxlbT48c3Ryb25nPmV4Y2x1c2l2ZTwvc3Ryb25nPjwvZW0+wqA8L3NwYW4+Q3JlYXRpdmUgVGlwcyBlLWxldHRlcsKgYW5kIHN1YnNjcmliZXIgb25seSB2aWRlbyBhbmQgcHJvamVjdCB0dXRvcmlhbHMhPC9wPgo=[/optin_box_field][optin_box_field name=”privacy”][/optin_box_field][optin_box_field name=”top_color”]undefined[/optin_box_field][optin_box_button type=”1″ text=”Send me exclusive tips!” text_size=”32″ text_color=”#000000″ text_bold=”Y” text_letter_spacing=”0″ text_shadow_panel=”Y” text_shadow_vertical=”1″ text_shadow_horizontal=”0″ text_shadow_color=”#f6fefb” text_shadow_blur=”0″ styling_width=”50″ styling_height=”19″ styling_border_color=”#000000″ styling_border_size=”1″ styling_border_radius=”6″ styling_border_opacity=”100″ styling_shine=”Y” styling_gradient_start_color=”#a3b640″ styling_gradient_end_color=”#80902c” drop_shadow_panel=”Y” drop_shadow_vertical=”1″ drop_shadow_horizontal=”0″ drop_shadow_blur=”1″ drop_shadow_spread=”0″ drop_shadow_color=”#000000″ drop_shadow_opacity=”50″ inset_shadow_panel=”Y” inset_shadow_vertical=”0″ inset_shadow_horizontal=”0″ inset_shadow_blur=”0″ inset_shadow_spread=”1″ inset_shadow_color=”#80902c” inset_shadow_opacity=”50″ location=”optin_box_style_13″ button_below=”Y”]Send me exclusive tips![/optin_box_button] [/optin_box]

Blue, White & Gold Muse: Christmas Visions

Frosted Evening 002

This week I’m playing along at at few Christmas challenges, but my inspiration came from a new one – Muse: Christmas Visions. It’s no secret that I love clean and simple cards, and Ardyth Percy-Robb is the queen of Clean and Simple. I love all her creations and am inspired by her work. I encourage you to check out her blog – Maskerade. This past week, she started a new Christmas Challenge which is a spin off the weekly challenge – Muse. It’s called Muse: Christmas Visions.

I’m excited to play along in their first challenge. The way the Muse challenge works is a design team member posts a project and you use that as your Muse for your creations. The first challenge was created by Kimberly Wiener and here is her card:

MUSE02

Kimberly’s card has several possibilities to pull from, but I chose the core – Blue, White and Gold. The colors immediately inspired me to think of the Christmas Star and a frosted scene, so I decided to grab one of my Stampscapes stamps and make a scenic card. Here is my creation:

Stampscapes Stamps

If you would like to see the exact video for this project, it’s in our project library at The Creative Grove VIP Community. Click here to find out more about becoming a member.

Creative Tips –

  • To get the soft winter glow in the sky, you’ll want to try Distress Inks as they blend quite effortless – Click Here for a video on how to blend distress inks
  • For the snow banks, I used a few shades of blue to create depth and interest among the drifts. If you’d like to learn more on how to create snow drifts – Click Here for a video on Snow Drifts

Muse Christmas Visions Challenge

  • The Leafless Limb stamp by Stampscapes was stamped twice, once in versamark, then again in Versamark/Espresso just slightly offset. They were then both embossed in clear embossing powder.
  • Embossing your limbs gives you that frosty shadow and allows you to use the emboss resist technique preserving your image while you create the scene around your image.
  • I wanted to have some stars, but wanted a little more gold in my card, so I created several dots with my Versamarker and drew a north star before embossing them in gold.

scenic card tutorials


  • The greeting is cut from Brushed Gold card stock and the Hand Lettered Holiday dies from WPlus9.
  • The scene is matted onto a brushed gold card stock layer before going onto a Night of Navy layer by Stampin Up.

I’m also submitting this project to three other great challenges that I encourage you to check out:

157

I love the feel of this peaceful frozen evening, I hope you do to! I encourage you to play along in all the above challenges, I had fun creating this one, and am excited for a few more at Muse: Christmas Visions. Smile

See you soon –

Signature 24 pt


[optin_box style=”13″ width=”500″ alignment=”center” action=”https://www.aweber.com/scripts/addlead.pl” disable_name=”Y” method=”post” email_field=”email” email_default=”Enter your email address” integration_type=”aweber” double_optin=”Y” list=”3846012″ name_field=”name” name_default=”Enter your first name” name_required=”Y”][optin_box_field name=”headline”]If you enjoyed this tutorial…[/optin_box_field][optin_box_field name=”paragraph”]PHA+4oCmeW914oCZbGwgbG92ZSBvdXIgPGVtPjxzdHJvbmc+PHNwYW4gc3R5bGU9ImNvbG9yOiAjMjQ0YzVlOyI+ZnJlZTwvc3Bhbj4gPC9zdHJvbmc+PC9lbT5zdWJzY3JpYmVyIG9ubHkgdmlkZW8gc2VyaWVzLiDCoExlYXJuIG5ldyB0ZWNobmlxdWVzIHRocm91Z2ggb3VyIDxzcGFuIHN0eWxlPSJjb2xvcjogIzI0NGM1ZTsiPjxlbT48c3Ryb25nPmV4Y2x1c2l2ZTwvc3Ryb25nPjwvZW0+wqA8L3NwYW4+Q3JlYXRpdmUgVGlwcyBlLWxldHRlcsKgYW5kIHN1YnNjcmliZXIgb25seSB2aWRlbyBhbmQgcHJvamVjdCB0dXRvcmlhbHMhPC9wPgo=[/optin_box_field][optin_box_field name=”privacy”][/optin_box_field][optin_box_field name=”top_color”]undefined[/optin_box_field][optin_box_button type=”1″ text=”Send me exclusive tips!” text_size=”32″ text_color=”#000000″ text_bold=”Y” text_letter_spacing=”0″ text_shadow_panel=”Y” text_shadow_vertical=”1″ text_shadow_horizontal=”0″ text_shadow_color=”#f6fefb” text_shadow_blur=”0″ styling_width=”50″ styling_height=”19″ styling_border_color=”#000000″ styling_border_size=”1″ styling_border_radius=”6″ styling_border_opacity=”100″ styling_shine=”Y” styling_gradient_start_color=”#a3b640″ styling_gradient_end_color=”#80902c” drop_shadow_panel=”Y” drop_shadow_vertical=”1″ drop_shadow_horizontal=”0″ drop_shadow_blur=”1″ drop_shadow_spread=”0″ drop_shadow_color=”#000000″ drop_shadow_opacity=”50″ inset_shadow_panel=”Y” inset_shadow_vertical=”0″ inset_shadow_horizontal=”0″ inset_shadow_blur=”0″ inset_shadow_spread=”1″ inset_shadow_color=”#80902c” inset_shadow_opacity=”50″ location=”optin_box_style_13″ button_below=”Y”]Send me exclusive tips![/optin_box_button] [/optin_box]

Vintage Christmas Cards–How to achieve a vintage look

Vintage Snow Covered Bridge

If you have been following my blog for a while, you know one thing you don’t usually see here are vintage Christmas cards! But this week the gals over at Merry Monday threw me for a loop – yes…the theme is to create a vintage Christmas card!

154

I don’t have ANY stamps that fit this bill, so I pulled out my trusty Stampscapes stamps and sat down to create my own vintage feel. Now if you’re a VIP Community member you’ll get to see exactly how I created this in a step by step video…I know all the members who love scenic cards will just love it. And if you want other exclusive videos, be sure to get the creative tips e-letter!

Every now and then it’s good to step outside your comfort zone and try something new. I know doing just that keeps my creative juices sharp! So how exactly do you make a vintage card.

Well, first I googled it…lol! Yes, I know it seems rather cut and dry, but like I said, this is not my style, so I thought I’d surf for a little visual help. I came across several how to tutorials for turning photos into a vintage look with Photoshop and that gave me my color palette. Basically, muted colors – a little more on the earthy side with some framing – which I would do with a scene anyway.

how to make a vintage christmas card

The scene is built on a foundation of Crumb Cake card stock. I used a stipple brush to color in my scene along with some Stampin’ Up! Classic Ink pads. For the road I used Tea Dye and the stream – Stormy Sky Distress inks. My hills are in Pear Pizazz, the barn is in Riding Hood Red, the clouds are in Midnight Muse and the stamping was done in Early Espresso.

You’ll want to add some concentrated Pigment ink in the form of a q-tip from a white Craft Pad, I used one by Stampin Up and a pigment pen – Signo Uniball Gel pen. I also stippled a little with the white craft ink to get a muted white feel. To get the vintage feel around the edges, use a mini sponge tool and some walnut stain distress ink.

Of course there is quite a bit of masking that went on to build the scene along with coloring certain elements. I just wish I had masked the sky off when I did the hills – at the horizon they are a bit green – oh well!

Vintage Snow Covered Bridge -vintage christmas cards

Overall, to build the scene, I used the following stampscapes stamps – Snowy Covered Bridge, Single Pine & Trees and Hills from Nature Set 1, Tree Duo Sm, Lilly Grass, Snowy Rocks Sm, and Cloud Cumulous Large. I stretched out the scene a bit with an Early Espresso Marker in a few spots.

To keep with the vintage feel, the greeting is embossed in Pewter rather than a shiny silver. The finishing touch of course is the sliver just shy of 1/16” matting in Very Vanilla popped up on dimensionals onto Early Espresso. My card measures 6 3/8 x 5 3/8”.

Overall, I think my vintage Christmas card turned out pretty cool. I’m glad I tried it out! Have a crafty weekend!

Signature

[optin_box style=”13″ width=”500″ alignment=”center” action=”https://www.aweber.com/scripts/addlead.pl” disable_name=”Y” method=”post” email_field=”email” email_default=”Enter your email address” integration_type=”aweber” double_optin=”Y” list=”3846012″ name_field=”name” name_default=”Enter your first name” name_required=”Y”][optin_box_field name=”headline”]If you enjoyed this tutorial…[/optin_box_field][optin_box_field name=”paragraph”]PHA+4oCmeW914oCZbGwgbG92ZSBvdXIgPGVtPjxzdHJvbmc+PHNwYW4gc3R5bGU9ImNvbG9yOiAjMjQ0YzVlOyI+ZnJlZTwvc3Bhbj4gPC9zdHJvbmc+PC9lbT5zdWJzY3JpYmVyIG9ubHkgdmlkZW8gc2VyaWVzLiDCoExlYXJuIG5ldyB0ZWNobmlxdWVzIHRocm91Z2ggb3VyIDxzcGFuIHN0eWxlPSJjb2xvcjogIzI0NGM1ZTsiPjxlbT48c3Ryb25nPmV4Y2x1c2l2ZTwvc3Ryb25nPjwvZW0+wqA8L3NwYW4+Q3JlYXRpdmUgVGlwcyBlLWxldHRlcsKgYW5kIHN1YnNjcmliZXIgb25seSB2aWRlbyBhbmQgcHJvamVjdCB0dXRvcmlhbHMhPC9wPgo=[/optin_box_field][optin_box_field name=”privacy”][/optin_box_field][optin_box_field name=”top_color”]undefined[/optin_box_field][optin_box_button type=”1″ text=”Send me exclusive tips!” text_size=”32″ text_color=”#000000″ text_bold=”Y” text_letter_spacing=”0″ text_shadow_panel=”Y” text_shadow_vertical=”1″ text_shadow_horizontal=”0″ text_shadow_color=”#f6fefb” text_shadow_blur=”0″ styling_width=”50″ styling_height=”19″ styling_border_color=”#000000″ styling_border_size=”1″ styling_border_radius=”6″ styling_border_opacity=”100″ styling_shine=”Y” styling_gradient_start_color=”#a3b640″ styling_gradient_end_color=”#80902c” drop_shadow_panel=”Y” drop_shadow_vertical=”1″ drop_shadow_horizontal=”0″ drop_shadow_blur=”1″ drop_shadow_spread=”0″ drop_shadow_color=”#000000″ drop_shadow_opacity=”50″ inset_shadow_panel=”Y” inset_shadow_vertical=”0″ inset_shadow_horizontal=”0″ inset_shadow_blur=”0″ inset_shadow_spread=”1″ inset_shadow_color=”#80902c” inset_shadow_opacity=”50″ location=”optin_box_style_13″ button_below=”Y”]Send me exclusive tips![/optin_box_button] [/optin_box]


Silent Night…Merry Monday

Midnight Snow Drifts 004

It’s well into the fall season here in Germany, and I love that the Christmas Season is approaching.  Making card for the Merry Monday challenge has been a bright spot to my crafting week on Mondays.  This week, the task is to create a card that evokes the feel of a Silent Night before Christmas.  I think this card works, hope you enjoy it!

130

For a tutorial this week, I thought I would show you exactly how I create these snow drifts, so I filmed a step by step video tutorial and put it onto my You Tube channel.  If you are interested in watching the tutorial How to sponge flawless snow drifts, please click here to see it.

Midnight Snow Drifts 010

Thanks for stopping by today!  And in case you missed my YouTube link above…be sure to check out my step by step tutorial here.  Just click this image:

Video Screenshot Title

Creatively yours –

Signature

12 Days of Christmas starts soon!

CLICK HERE to sign up for Creative Tips and get the 12 Days of Christmas sent directly to your inbox free starting Tuesday October 28th!

Sparkly Pines and Rocks

It’s Merry Monday!  I am so honored to be a guest designer this week on this very cool weekly challenge blog.  If you haven’t yet participated…definitely check it out!  The challenges are fresh and intriguing.  You’ll definitely stretch your Christmas card making abilities into a new stratosphere.  Like this week – Sequins!

117

I wouldn’t normally reach for this little embellishment, but boy what a new addiction I have now after this one!  Thanks a lot girls – look what you’ve done. Smile

Pines on Rocks Winter Scene

Creative Tips –

  • I used the large Stampscapes Pines and Rocks stamp in Night of Navy by Stampin’ Up! here.  Simple, just stamped on some Crumb Cake card stock.
  • To bring the snowy feel in, I used a Uniball Signo White Gel pen for some highlights and snow in the sky.

Pines on Rocks Winter Sequin Card (5)

  • To create some mist and bigger flakes, I used a qtip and white pigment ink.
  • For the sparkle and a fun touch, I added not only the sequins in clear, but the little pieces from the sequin holes.  They add just the right sparkle to this project.
  • The card front and banner are popped up for some character along with some subtle sponging in crumb cake.

Pines on Rocks Winter Sequin Card (8)Pines on Rocks Winter Sequin Card (7)

  • A simple banner greeting from Sweet Essentials from Stampin’ Up! finish this card perfectly.

Now it’s your turn!  I can’t wait to see your cards entered.  Have a Merry Monday!

Signature-Blog

[optin_box style=”13″ width=”500″ alignment=”center” action=”https://www.aweber.com/scripts/addlead.pl” disable_name=”Y” method=”post” email_field=”email” email_default=”Enter your email address” integration_type=”aweber” double_optin=”Y” list=”3846012″ name_field=”name” name_default=”Enter your first name” name_required=”Y”][optin_box_field name=”headline”]If you enjoyed this tutorial…[/optin_box_field][optin_box_field name=”paragraph”]PHA+4oCmeW914oCZbGwgbG92ZSBvdXIgPGVtPjxzdHJvbmc+PHNwYW4gc3R5bGU9ImNvbG9yOiAjMjQ0YzVlOyI+ZnJlZTwvc3Bhbj4gPC9zdHJvbmc+PC9lbT5zdWJzY3JpYmVyIG9ubHkgdmlkZW8gc2VyaWVzLiDCoExlYXJuIG5ldyB0ZWNobmlxdWVzIHRocm91Z2ggb3VyIDxzcGFuIHN0eWxlPSJjb2xvcjogIzI0NGM1ZTsiPjxlbT48c3Ryb25nPmV4Y2x1c2l2ZTwvc3Ryb25nPjwvZW0+wqA8L3NwYW4+Q3JlYXRpdmUgVGlwcyBlLWxldHRlcsKgYW5kIHN1YnNjcmliZXIgb25seSB2aWRlbyBhbmQgcHJvamVjdCB0dXRvcmlhbHMhPC9wPgo=[/optin_box_field][optin_box_field name=”privacy”][/optin_box_field][optin_box_field name=”top_color”]undefined[/optin_box_field][optin_box_button type=”1″ text=”Send me exclusive tips!” text_size=”32″ text_color=”#000000″ text_bold=”Y” text_letter_spacing=”0″ text_shadow_panel=”Y” text_shadow_vertical=”1″ text_shadow_horizontal=”0″ text_shadow_color=”#f6fefb” text_shadow_blur=”0″ styling_width=”50″ styling_height=”19″ styling_border_color=”#000000″ styling_border_size=”1″ styling_border_radius=”6″ styling_border_opacity=”100″ styling_shine=”Y” styling_gradient_start_color=”#a3b640″ styling_gradient_end_color=”#80902c” drop_shadow_panel=”Y” drop_shadow_vertical=”1″ drop_shadow_horizontal=”0″ drop_shadow_blur=”1″ drop_shadow_spread=”0″ drop_shadow_color=”#000000″ drop_shadow_opacity=”50″ inset_shadow_panel=”Y” inset_shadow_vertical=”0″ inset_shadow_horizontal=”0″ inset_shadow_blur=”0″ inset_shadow_spread=”1″ inset_shadow_color=”#80902c” inset_shadow_opacity=”50″ location=”optin_box_style_13″ button_below=”Y”]Send me exclusive tips![/optin_box_button] [/optin_box]

Pines on Rocks Winter Sequin Card (3)

One Layer Tropical Scene

Stampscapes Palm Tree One Layer Creative Scenery Card (4)

Do you ever just want to escape through your paper crafts?  Michael is in Saint Lucia today.  And yesterday he was in St. Barts – what a life!  Of course, it’s business – researching the Southern Caribbean for the family travel biz.  Well, he called me from the beach in St. Barts (I know – the nerve!) – so I just HAD to put myself there somehow – it’s SO gorgeous there.  This card was a close as I could get.  Here are some photos from when we were there last March!

DSC02207

DSC02283

For the full tutorial, be sure to watch my video One Layer Creative Scenery #2 posted on my YouTube channel.  If you haven’t already – subscribe! Smile  And be sure to give me thumbs up below the video too if you like it.

Stampscapes Palm Tree One Layer Creative Scenery Card (3)

To make this card, you will want to mask off the space you are looking to create.  I used a 1/2” border to the top, left and bottom and made my scene 2 1/4” wide leaving a white border on the right of 1 3/4”.

I used the following supplies:

  • Ranger Adirondack Lights Cloudy Blue and Aqua
  • Marvy Matchables Caribbean Blue, Turquoise, and Jungle Green
  • Stampin’ Up! Chocolate Chip and Sahara Sand
  • You will need a greeting, Pictured is Expressly You (hostess) by Stampin’ Up!
  • Stampscapes Stamps – Palm Trio (one trunk) and both Palm Leaf Left and Right
  • Sponges
  • Post It Notes
  • White cardstock – 4 1/4” x 11”
  • Stampscapes Palm Tree One Layer Creative Scenery Card (5)

This card does make me feel like I’m looking out a window into the gorgeous waters of St Barts and the Caribbean.  I hope I was able to transport you too!

Be sure to check out the Creative Scenery Classes in the classroom – over 2 hours of instruction in each one.  And if you’re not on The Creative Grove Newsletter List – be sure to sign up today – exclusive videos and tips are mailed out only to subscribers.  Don’t miss out!

Stampscapes Palm Tree One Layer Creative Scenery Card (8)

Signature Snowflake 001

The Creative Process and a Sneak Peek!

Stampscapes Tropical Lagoon 9.5.13  (6)

Do you ever feel like it is a definite process to get to your desired project result?  Do you hit a home run each time you start a new creative project?  I certainly do not!  I hope this post will help you to realize that it’s okay to re-do a project, or take it in steps.  Today, I thought it might be helpful for you to see what my desk looks like when I’m right in the middle of a project.  I took a break from packing to get a little creative for you!  Here’s a snapshot of my process – notice a not completed project in the upper right, a middle project template  in the center and then my actual finished project in process.

Stampscapes Tropical Lagoon 9.5.13  (5)

This is actually not that bad.  I cut my paper in a different space or it’s just too much!  Today you see that I’m using various types of ink pads – four different brands actually!  And to get some business inspiration at the same time, I was taking a class – that’s what’s on the computer monitor.  My space started to get a little overwhelming, and I had to put some stuff in it’s place so that I felt like I had some elbow room, but my end result worked out awesome!

To the left, you see a sneak peek of tomorrow’s project with the end result at the top, my middle test project that became my creative process, and my beginning project that went all wrong in several ways.  I know it doesn’t look like it, but trust me, it did!

I began a project for a friend and wanted it to be just right.  It didn’t quite turn out the way I had planned.  So what I did was take a piece of scrap paper and work the project out so that I felt a bit more confident and now I LOVE the end result.  Please tune in tomorrow to see it!

Update – Packing up the Stamping Studio – It’s been quite a task to pack up the studio.  We’ve been here for nine years and my craft room is 28’ x 14’ – it’s loaded with open spaces and shelves filled with projects, cards, and supplies.  And that’s not even my classroom.  Yes, I’m lucky – when I first started in this industry, I had a 4’ x 2’ folding table, chair and one plastic set of drawers – in the corner of our family room.  I couldn’t stand putting things away each time I scrapbooked or made cards – I vowed to have a room all to myself with a door someday!

I didn’t get it until we purchased our home nine years ago, and now I’m leaving my dream space.  It’s okay – we’re on to a fun adventure – but I now have the experience of knowing how much space I truly need to be creative and productive.  While my huge room (rooms if you include my even larger classroom), will be missed – I know I will be fine in a smaller space.  Actually – I’m looking forward to it.  You see, I ended up collecting way too much stuff with such a huge space (makes sense – we just have to fill it, don’t we!) – it made for a nice downsizing sale for my local customers though!  Thanks for bearing with me as I continue to pack and purge!

See you tomorrow – you’ll want to tune in…this card is my most impressive Creative Scenery project to date.  I’m going to have to make myself one to keep!  Have fun stamping!

Signature Snowflake 001

To Shop 24/7 in the Creative Store – Click here!

Stamp Sets – Stampscapes Stamps Ink – Marvy – Oriental Blue, Turquoise, Caribbean Blue, Jungle Green, Yellow, Brilliant Yellow; Adirondack Lights – Cloudy Blue, Aqua, Peach Bellini; Stampin’ Up! – Early Espresso, Crushed Curry, Tangerine Tango, Sahara Sand, Crisp Cantaloupe, Early Espresso Marker; Memento – Black Paper –Glossy White, Early Espresso Tools – Colorbox Stylus, Brushtix Mixed Media Brushes Finishing Touch – Uni-ball Signo White Gel Pen