One Layer Tropical Scene

Stampscapes Palm Tree One Layer Creative Scenery Card (4)

Do you ever just want to escape through your paper crafts?  Michael is in Saint Lucia today.  And yesterday he was in St. Barts – what a life!  Of course, it’s business – researching the Southern Caribbean for the family travel biz.  Well, he called me from the beach in St. Barts (I know – the nerve!) – so I just HAD to put myself there somehow – it’s SO gorgeous there.  This card was a close as I could get.  Here are some photos from when we were there last March!

DSC02207

DSC02283

For the full tutorial, be sure to watch my video One Layer Creative Scenery #2 posted on my YouTube channel.  If you haven’t already – subscribe! Smile  And be sure to give me thumbs up below the video too if you like it.

Stampscapes Palm Tree One Layer Creative Scenery Card (3)

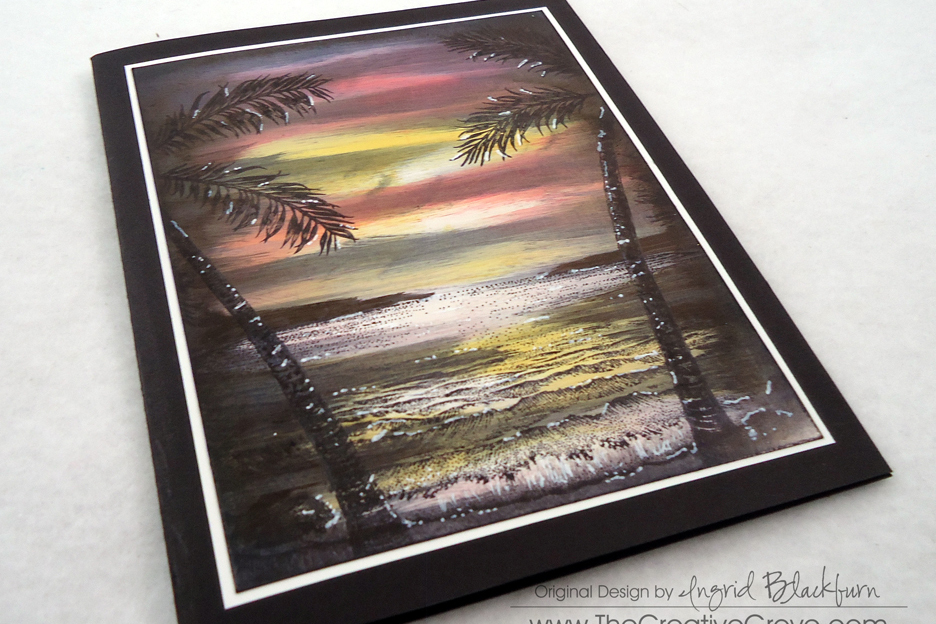
To make this card, you will want to mask off the space you are looking to create.  I used a 1/2” border to the top, left and bottom and made my scene 2 1/4” wide leaving a white border on the right of 1 3/4”.

I used the following supplies:

  • Ranger Adirondack Lights Cloudy Blue and Aqua
  • Marvy Matchables Caribbean Blue, Turquoise, and Jungle Green
  • Stampin’ Up! Chocolate Chip and Sahara Sand
  • You will need a greeting, Pictured is Expressly You (hostess) by Stampin’ Up!
  • Stampscapes Stamps – Palm Trio (one trunk) and both Palm Leaf Left and Right
  • Sponges
  • Post It Notes
  • White cardstock – 4 1/4” x 11”
  • Stampscapes Palm Tree One Layer Creative Scenery Card (5)

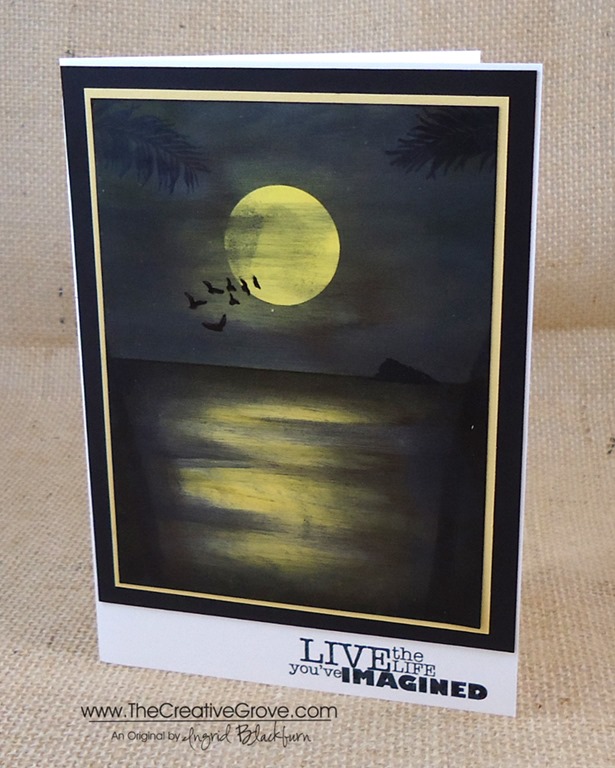
This card does make me feel like I’m looking out a window into the gorgeous waters of St Barts and the Caribbean.  I hope I was able to transport you too!

Be sure to check out the Creative Scenery Classes in the classroom – over 2 hours of instruction in each one.  And if you’re not on The Creative Grove Newsletter List – be sure to sign up today – exclusive videos and tips are mailed out only to subscribers.  Don’t miss out!

Stampscapes Palm Tree One Layer Creative Scenery Card (8)

Signature Snowflake 001

Dog Days of Summer: Tropical Lagoon

Stampscapes Tropical Lagoon 9.5.13  (12)_thumb[2]

Is your creative process for a project always perfect?  I know mine sometimes is not.  Yesterday I worked on a project for my friend Trish in Australia.  What you see above is the final result.  Here’s the creative process it took me this time around.  I hope this helps some of you!

Stampscapes-Tropical-Lagoon-9.5.13--[3]

This time, I began with the following project. My  lagoon stamp was larger than my intended project size, so I wanted to only use part of it with still having room for a palm tree in the forefront for perspective.  It didn’t work out as I intended. 

Stampscapes Tropical Lagoon 1 CU_thumb[3]

My original project is at the bottom.  The grass didn’t blend with the palm tree well enough, I didn’t care for the extra grass and so much real estate at the bottom.  By accident I swiped red right over my sun, the card stock had divot’s  at the top that wouldn’t take in any ink, and the bungalows were stamped strangely.  Now, you may be saying I’m being nit-picky, but that’s a whole lot of things wrong for me, so I created a plan to fix my scene.

I began by taking a piece of scrap paper and stamping my scene on a larger card – 3 3/4” x 9” instead.  Here you see my beginning project, my test scene and the final project all next to each other.  I think you’ll agree with me – it’s MUCH better!Stampscapes Tropical Lagoon 9.5.13  (3)_thumb[7]

I used several colors of Marvy, Adirondack Lights, and Stampin’ Up! inks to get my desired look with a Colorbox Stylus Sponge Tool  Now I’m going to have to make one for myself!  Stampscapes Tropical Lagoon 9.5.13  (16)_thumb[2]

Creative Tips –

  • I stamped the entire scene in Early Espresso rather than Black.
  • I stamped the lagoon and then masked the sky.  I colored in my water – Aqua Adirondack Lights, Caribbean and Turquoise Blue.  I kept the color in streaks so to leave a little light in it.
  • For the sand, I used Sahara Sand Stampin’ Up! ink.  I then masked the water and my sun.  The sky is made of Yellow, Brilliant Yellow, Crushed Curry, Peach Bellini, Crisp Cantaloupe, Tangerine Tango, Cloudy Blue and Oriental Blue.Stampscapes Tropical Lagoon 9.5.13  (18)_thumb[3]
  • The huts were stamped after the horizon masks were removed and right on the horizon line.  The roofs were colored in using a Brushtix Sponge Tip applicator and Jungle Green with Early Espresso Marker accents.
  • You can extend the dots that make up the surrounding scene with the fine tip of the Early Espresso Marker.
  • The reeds and tropical plant are stamped with Jungle Green.  It was necessary to mask the tree with a little bit from a paper towel.Stampscapes Tropical Lagoon 9.5.13  (17)_thumb[3]
  • Three of the birds were colored with the Early Espresso Marker and stamped in the sky.
  • The Palms extend off the page and I stamped the lower parts of the leaves in Jungle Green.
  • To brighten up the scene and give it some life, you can use a Uniball Signo White Gel Pen.  You may want to go over some of the natural waves from the stamp if you’ve gotten color on them like I did.  Add some dots in the sand for the foam left behind the wave that rolls onto the shore.
  • Highlight the trees, huts and birds, keeping in mind where you light source is coming from.Stampscapes Tropical Lagoon 9.5.13  (10)_thumb[3]Stampscapes Tropical Lagoon 9.5.13  (14)_thumb[3]
  • Here you see the difference between sponging the edge of the scene in Early Espresso and leaving the canvas as is.Stampscapes Tropical Lagoon 9.5.13  (13)_thumb[2]

I love the end result – it’s by far the best Stampscapes tropical scene I’ve done.  In the end, I used 9 various stamps to create this scenery.  I hope you love it too!  It’s a fitting end to the summer.

Online Brayer Class

Do you want to learn how to make creative scenery cards?  Try our Brayer 101 – Introduction to Creative Scenery online class.  You’ll learn how to master this technique using a brayer to create unbelievable scenes that will leave you feeling like an artist.  Find out more here.

Signature-Snowflake-001_thumb1

To Shop 24/7 in the Creative Store – Click here!

Stamp Sets – Stampscapes Stamps Ink – Marvy – Oriental Blue, Turquoise, Caribbean Blue, Jungle Green, Yellow, Brilliant Yellow; Adirondack Lights – Cloudy Blue, Aqua, Peach Bellini; Stampin’ Up! – Early Espresso, Crushed Curry, Tangerine Tango, Sahara Sand, Crisp Cantaloupe, Early Espresso Marker Paper –Glossy White, Early Espresso Tools – Colorbox Stylus, Brushtix Mixed Media Brushes Finishing Touch – Uni-ball Signo White Gel Pen

The Creative Process and a Sneak Peek!

Stampscapes Tropical Lagoon 9.5.13  (6)

Do you ever feel like it is a definite process to get to your desired project result?  Do you hit a home run each time you start a new creative project?  I certainly do not!  I hope this post will help you to realize that it’s okay to re-do a project, or take it in steps.  Today, I thought it might be helpful for you to see what my desk looks like when I’m right in the middle of a project.  I took a break from packing to get a little creative for you!  Here’s a snapshot of my process – notice a not completed project in the upper right, a middle project template  in the center and then my actual finished project in process.

Stampscapes Tropical Lagoon 9.5.13  (5)

This is actually not that bad.  I cut my paper in a different space or it’s just too much!  Today you see that I’m using various types of ink pads – four different brands actually!  And to get some business inspiration at the same time, I was taking a class – that’s what’s on the computer monitor.  My space started to get a little overwhelming, and I had to put some stuff in it’s place so that I felt like I had some elbow room, but my end result worked out awesome!

To the left, you see a sneak peek of tomorrow’s project with the end result at the top, my middle test project that became my creative process, and my beginning project that went all wrong in several ways.  I know it doesn’t look like it, but trust me, it did!

I began a project for a friend and wanted it to be just right.  It didn’t quite turn out the way I had planned.  So what I did was take a piece of scrap paper and work the project out so that I felt a bit more confident and now I LOVE the end result.  Please tune in tomorrow to see it!

Update – Packing up the Stamping Studio – It’s been quite a task to pack up the studio.  We’ve been here for nine years and my craft room is 28’ x 14’ – it’s loaded with open spaces and shelves filled with projects, cards, and supplies.  And that’s not even my classroom.  Yes, I’m lucky – when I first started in this industry, I had a 4’ x 2’ folding table, chair and one plastic set of drawers – in the corner of our family room.  I couldn’t stand putting things away each time I scrapbooked or made cards – I vowed to have a room all to myself with a door someday!

I didn’t get it until we purchased our home nine years ago, and now I’m leaving my dream space.  It’s okay – we’re on to a fun adventure – but I now have the experience of knowing how much space I truly need to be creative and productive.  While my huge room (rooms if you include my even larger classroom), will be missed – I know I will be fine in a smaller space.  Actually – I’m looking forward to it.  You see, I ended up collecting way too much stuff with such a huge space (makes sense – we just have to fill it, don’t we!) – it made for a nice downsizing sale for my local customers though!  Thanks for bearing with me as I continue to pack and purge!

See you tomorrow – you’ll want to tune in…this card is my most impressive Creative Scenery project to date.  I’m going to have to make myself one to keep!  Have fun stamping!

Signature Snowflake 001

To Shop 24/7 in the Creative Store – Click here!

Stamp Sets – Stampscapes Stamps Ink – Marvy – Oriental Blue, Turquoise, Caribbean Blue, Jungle Green, Yellow, Brilliant Yellow; Adirondack Lights – Cloudy Blue, Aqua, Peach Bellini; Stampin’ Up! – Early Espresso, Crushed Curry, Tangerine Tango, Sahara Sand, Crisp Cantaloupe, Early Espresso Marker; Memento – Black Paper –Glossy White, Early Espresso Tools – Colorbox Stylus, Brushtix Mixed Media Brushes Finishing Touch – Uni-ball Signo White Gel Pen

Finding Inspiration

Where do you look for creative inspiration?  For me, I usually head to Pinterest or look in magazines.  I love to look at photographs and generally a color palate or random organization of shapes will strike up an idea.  I thought today I would take you on a journey for a simple CASE (copy and steal everything) of a photo for me. Smile

When you see a photo online, do you sometimes shift in your chair, or move your head?  That to me is the sign that I’ve found something.  Here is the photo I found on Pinterest and my final project:

Cable-Beach-Broome-North-Western-Australia Moonlit Waters 004

While it’s not exact, it was my first attempt at making a mostly all black scenery.   I immediately thought, I can do that.  I’ll challenge myself and try something totally new.  I have to admit – it felt all wrong…lol!

Creative Tips –

  • You will want to start by masking a horizon line and beginning with your sky.
  • Give a good coat of various shades of yellow.  Here I used Glossy paper and a stylus tool to layer several coats of ink.Moonlit Waters 007
  • Mask your moon and continue layering ink, switching to Black.  You’ll want to leave a little faint yellow showing through around your moon for the glow.
  • My edge of my mask lifted up, so I got a splotch of black on my moon on the left side.  To cover that mistake up, I lifted my mask completely and dragged my stylus across a little to create whispy clouds.  Here is my friend Amy’s who didn’t get any on hers – see the difference? Moonlit Waters 001
  • When done with your sky, fully dry and switch your mask to reveal the water and cover the sky.
  • Layer color from the sides across your water being careful to leave the middle showing the moonlight reflection.
  • To create the feel of water, you will want to bring in a little black into your yellow.  Do this a little at a time so that you don’t cover up too much at once.  If you feel like you aren’t sure if you want to add more, stop.Moonlit Waters 008
  • Once you have the desired look, stamp your palm trunks and leaves at the top to give the viewer’s perspective.
  • Stamp the birds, layering a few over your moon.
  • Create a mask for the island and add into the horizon opposite your birds with a sponge in black ink.
  • Pick a saying that fits your scene.
  • This card is finished 5 x 7 and the scenery layer is 4 1/4 x 5 1/2”

It’s a fun scene and looks so striking in person.  I can’t wait to try it in purples next!

If you loved this card…

Be sure to subscribe to the creative tips e-letter & FREE video series. There’s a great scenic project in our first video series that I think you’ll love. And if you want to learn more about scenic cards, be sure to check out our Brayer 101 & 102 classes in addition to our upcoming Stampscapes class where we’ll make this similar project: Find out more HERE

Eveing Sunset Palm Cove Thumbnail

Signature_thumb.jpg

[optin_box style=”2″ alignment=”center” email_field=”email” email_default=”Enter your email address” email_order=”2″ integration_type=”aweber” double_optin=”Y” list=”3846012″ name_field=”name” name_default=”Enter your first name” name_order=”1″ name_required=”Y” opm_packages=””][optin_box_field name=”headline”]Learn more with our exclusive FREE video series:[/optin_box_field][optin_box_field name=”paragraph”][/optin_box_field][optin_box_field name=”privacy”]Plus you’ll be added to my FREE Creative Tips E-letter where I share exclusive projects, videos & the 12 Days of Christmas series[/optin_box_field][optin_box_field name=”top_color”]undefined[/optin_box_field][optin_box_button type=”0″ button_below=”Y”]Get Instant Access![/optin_box_button] [/optin_box]

Stamp Sets – Stampscapes Stamps, Really Good Greetings (130333c, 130330w) Ink – Marvy – Black, Yellow, Brilliant Yellow  Adirondack Lights – Sandal Paper –Glossy White, So Saffron, Basic Black Tools – Colorbox Stylus

Moonlit Waters 006

Evergreen Snowy Hillside Redo

Evergreen 005 Main R

My friend and fellow CG Crew member Aleida was over yesterday for a much needed afternoon of stamping.  She wanted to make a fun card that would teach her a little something, yet give her a great Christmas card that wasn’t too difficult to mass produce.  We had the new Expressions Thinlits in our hands and this card popped into my head.  Off we went with a slightly new take on this fun snowy card.

Creative Tips –

  • I stamped the large Evergreen solid image in various heights using a torn mask for my hillside.  First I stamped in Versamark ink and then I used Wild Wasabi. 
  • To give my trees a glossy look and protect them from the brayer, I embossed all my trees in Clear Embossing powder. Evergreen 005 Side
  • Once I had my skyline done I wanted a larger trees up close that I could decorate.  I tore another mask and stamped one more Wild Wasabi Tree.
  • I created a mask for the sun.  Then I used the skyline mask and sponged over my trees in Soft Sky. 
  • To accentuate the ridge, I used the reverse mask to sponge a light edge for the snow in Pool Party.
  • To create the snow drifts, I used the same mask, but alternated it’s direction.
  • I sponged in the sun using Crushed CurryEvergreen 005 CU
  • For my tree decorations, I used Pearl Basic Jewels.
  • I cut out the word Merry in Cherry Cobbler using the new Expressions Thinlit Framelits – available in the new Holiday Catalog on August 1st.
  • I matted the entire scene on a piece of Early Espresso card stock.
  • For a finishing touch I stamped a tree on the inside panel as well.
  • Evergreen 005 Main L

Aleida LOVED the card, it was fun to make and actually much faster than I anticipated.  Maybe because it was like my first, view that post here, but a bit different.  I could easily mass produce these, and their cost effective too!

Free DSP_edited-1

Don’t miss out on this great special!  Order six? You’ll get two for free. Nine? You’ll get three for free. Check out our Designer Series Papers in the annual catalog pages 151, 153, and 154.

Signature Snowflake 001

To Shop 24/7 in the Creative Store – Click here!

Evergreen 005 Angle

Stamp Sets – Evergreen (127973) Paper –Whisper White (107330), Early Espresso Ink – Wild Wasabi (126959), Soft Sky (131181), Crushed Curry,  Pool Party, Versamark (102283) Cool Tools – New Heat Tool (129053), Clear Embossing Powder (109130), Stampin’ Sponges  The Perfect Finish – Pearl Basic Jewels(119247), Expressions Thinlit Framelits

Evergreen 127973L

Stampscapes Creative Scene

Stampscapes 001 001

Today is my brother’s birthday, and I wanted to make him something special.  Matt and I love the mountains, we spent most of our down time in the summers in the outdoors together.  So, for him today I broke out my Stampscapes scene building stamps and created this lakeside evening scene.  Stampscapes stamps can be used to build scenes with seemless blending images. 

Creative Tips –

  • I stamped out my scene first layering several lakeside tree and rock stamps. 
  • To keep the scene matte in nature, I used our Ultrasmooth White cardstock.
  • My first two I actually colored over the trees with my Always Artichoke and Garden Green markers, but I didn’t like the result.  The rest of the scene, I continued to use my Basic Black ink pad.  Stampscapes 001 003
  • For a little focal point at the bottom edge, I stamped the boulders at various angles and a few of the trees on the edge.  I really needed a bigger tree, but didn’t have one.  I wouldn’t use the stamp I used in this one for that again – it’s too small.
  • I added a few of the small reeds and used the grass filler for some texture at the bottom. 
  • Next I filled in the empty space using my small water texture stamp.  I think I went a bit overboard, but it still works.  Remember, when you want to add one more – stop!
  • Once the scene was built I could start coloring.  I used a Colorbox stylus to apply my Stampin’ Up! Classic Inks.
  • I began layering a base of Soft Sky in the sky and near the rocks in the water.  Next I used some Pool Party in the lake followed by Tempting Turquoise.
  • For a little added color I added Baja Breeze and then Marina Mist to the both the lake and the sky.  My water was pretty much how I wanted it so I moved on to the sky.  Stampscapes 001 006
  • I tried to keep a few spots off the horizon going upward more white in nature for some contrast.
  • To brighten the scene up I added some Pacific Point across and in the middle of the night sky followed by some Not Quite Navy.
    • I wanted to have some shadows in the water, so I used the side of the stylus and some Not Quite Navy to the edge of the boulders and the edge of the card. 
    • The boulders were filled in with Basic Grey and some Early Espresso was added to the edge of the center bottom for a little earth.
    • Midnight Muse gave a finishing touch around the perimeter of the card followed by Basic Grey.
    • I stamped the cloud space in Midnight Muse once the card had been completed.Stampscapes 001 005
    • For some highlighting and detailing, I used a Signo White Gel Pen.  I went over the edges in the water along the rocks after with a paper towel to dull the look a little.
    • To help pop the card, I matted it on a 1/16” border of Whisper White and then on a larger piece of Basic Black
    • The greeting uses the Four You stamp set.  I used a embossing buddy to ensure that I would not have little silver straggler powder on the Basic Black cardstock before embossing the greeting in Silver Embossing Powder.

I love the result.  The Stampin’ Up! inks give just the right depth of color.  Next, I’m going to try some brayering with these scenes.  I can’t wait!Stampscapes 001 002

    Learn a new technique in the Online Brayer Class

    This class is still available at the introductory price – it’s going up next week!  Creative Scenery classes using a brayer have by far been my biggest hit with stampers.  The Brayer has stumped many crafters over the years, well actually more.  Learn how to create gorgeous gradual transitions with 100+ minutes of step by step detailed video instruction teaching you how to master this technique.  The end result – You will feel like an artist.  Best of all, you will look at your stamps in a whole new way, and try things you never would have thought to do before.  Find out more here

      Signature-Snowflake-001_thumb1

    To Shop 24/7 in the Creative Store – Click here!

    Stampscapes 001 004

    To view the details or see close ups of any products used in the above project, just click on the green link to view it in my store 24/7.

    Stamp Sets – Four You (130538c, 130535w), Stampscapes Stamps Ink – Stampin’ Write Markers –Always Artichoke, Garden Green, Classic Ink Pads – Basic Black, Soft Sky, Pool Party, Tempting Turquoise, Marina Mist, Pacific Point, Midnight Muse, Early Espresso, Basic Gray, Retired – Not Quite Navy, Baja Breeze Paper –Whisper White, Basic Black, Versamark Tools – Colorbox Stylus Finishing Touch – Silver Embossing Powder, Signo White Gel Pen

Zoo Review Bookmarks

Zoo Review 001 Bookmarks Main

Everyone loves a good bookmark.  I love being able to take a stamp set that I use for one purpose and doing something unexpected with it.  I had fun stamping with some second graders and their moms and needed a good project that would hold everyone’s attention – enter the bookmark! 

I have more fun with the Zoo Review Stamp Set than I ever expected.  I initially got it to use it when I teach Brayer 102 – Advanced Creative Scenery.  But to my surprise, I just wanted to keep stamping with it!  The images aren’t too cutesy, and they work for any occasion – that’s a great stamp set. 

                        Zoo Review 001 Polar Main      Zoo Review 001 Giraffe

Creative Tips:

  • My bookmarks measure 2 1/4” x 5 1/2”.  I actually used two stamp sets – Zoo Review and the great set – Every Little Bit.
  • To color, I used our Watercolor Pencils – but you could use any color medium.

          Zoo Review 001 Polar CUZoo Review 001 Giraffe CU

  • I used the Aqua Painters to blend my colors and honestly, this project went rather quick for me.  I just wanted to keep making more and more!
  • One of the most unique bookmarks that were made that day was the world and universe.  We just made a curved line and free hand drew the rest.  It was rather easy and didn’t her bookmark turn out super cute?!

SU Workshop 002SU Workshop 004

See, bookmarks are for everyone, not just kids!  Have a creative weekend. Smile

Signature Snowflake 001

Check out the Retired Lists!  Get all your favorites while you still can.

Retired Stamp Sets                      Retired Accessories List

To Shop 24/7 in the Creative Store – Click here!

Zoo Review 001 Polar Side

Stamp Sets – Zoo Review (122197w, 122199c) Paper – Whisper White (100730), Not Quite Navy (Retired), Night of Navy (100867) Ink – Jet Black StazOn (101406) Cool Tools – Aqua Painters (103954), Watercolor Pencils (101879)  The Perfect Finish – Not Quite Navy 3/8” Taffeta Ribbon (122978)

new stamp

Every Little Bit 120558L

Home Sweet Home

SF Day 1 009 edited

This week I’m spending time in San Francisco, California to visit my family and celebrate my dad’s 80th birthday, spend some quality time with my mom, and brother.  I was born and raised in San Francisco and it’s a beautiful place to visit.  Plus I’m super excited to meet my new niece – Aubrey.

I would never change a thing about growing up in San Francisco.  We had amazing culture, I grew up in a melting pot of people, culture, excellent food, and more physical sports and outdoor activities than you can think of.  I’m quite proud to say I’m a California girl – even if I don’t live here anymore.  

One of the things we loved about being in the Bay Area was going to our old family cabin in the Santa Cruz Mountains.  I loved being surrounded by the towering Redwoods (hummm, wonder where my love of redwoods came from?)  We would go on hikes, walk through the Basins, and go to the Boardwalk in Santa Cruz.  The Boardwalk had the scariest (well as a kid) rollercoaster, because it was all wood!  I loved it.  So when we had the free Sale-a-bration Stamp set Feeling Sentimental, I had to do a sunset boardwalk scene – it just reminded me of the Boardwalk in Santa Cruz. 

This card was one of the projects in my Brayer 101 – Introduction to Creative Scenery class that I taught the past few months.  The stamp set is now gone (but I know several of you have it!), so I’ve come up with a great new project to replace it, but wanted to share this beautiful card with you.  I hope you like it!

I will be sharing how I made this card in a detailed post filled with Creative Tips to anyone subscribed to my Creative Tips mailing list!  I’m going to share it on Saturday at 12 noon – the day of my Dad’s party, so you have plenty of time to subscribe still! 

Have a great day – enjoy your families – I’m going to enjoy spending quality time with mine.  I’ll be sure to report back all week so that you can see all the fun places and things I’m doing.

For information about taking Brayer classes as part of my Creative University series in person, check out my upcoming events page by clicking here.

Signature Snowflake 001

To Shop 24/7 in the Creative Store – Click here!