1+2=3 Stamp Series #001: part 3

So what did you think so far?  We’ve had some great feedback from this series!  I hope you’ve enjoyed the simplicity of it.  And if you were on the Creative Tips list, then you saw the bonus 4th project too!  Don’t fret – get on the list by tomorrow (6/21/14) and I’ll send it out to you.  For the bonus project I broke from the rules a bit set forth from the challenge, but figured since it was a bonus it was okay!  Smile

So, just to review, here are the rules for this challenge:

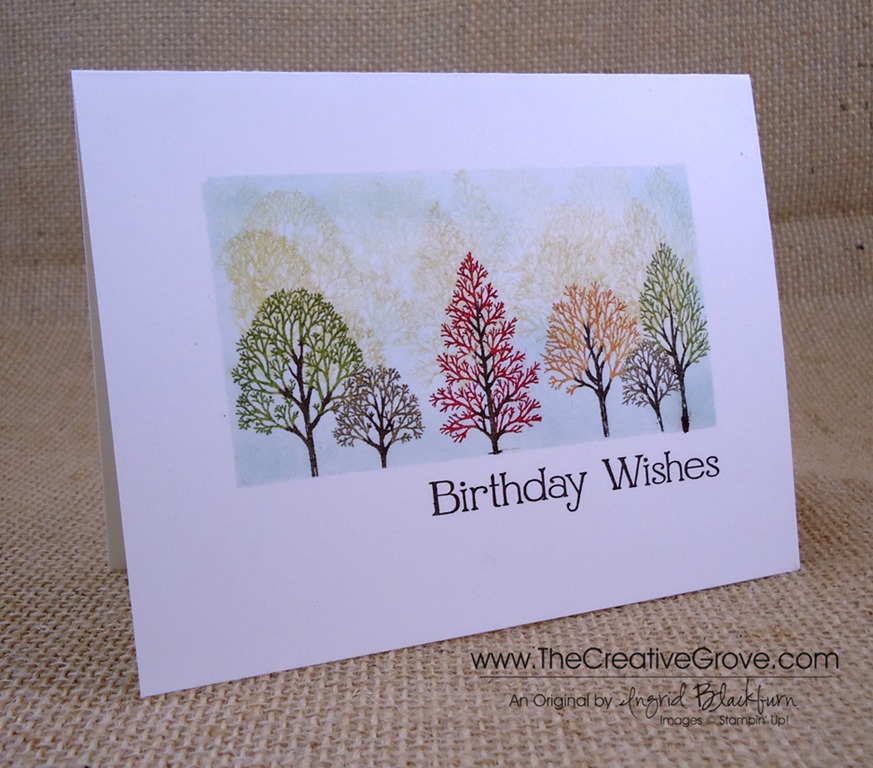
1 Stamp – For this series I thought I’d choose a stamp set that has been available for over 20 years and is still on the market…the ever popular Stampin’ Up! set Lovely as A Tree.  This works with any large tree stamp.  Since there aren’t any greeting stamps in this set, I used one from the retired set Perfect Words.

+ 2 Colors – Two colors were used in all three projects: Sahara Sand and Soft Suede by Stampin Up.  For the cardstock in later projects, I only used Soft Suede along with Whisper White. =

= 3 Projects – while a few are a bit similar, they are vastly different.  Enjoy!

If you remember from yesterday’s post, I messed up my first and second try at this project.  Rather than let that get me down, I turned them into two totally different looks!  And a series was born.  Okay, corny enough for you – Michael is rolling his eyes…lol!  Here is my messed up version of this project – it was intended as a one layer card, but instead I turned it into the beauty you see further below.  Here is my original card – miss-masked (note the lower right corner).

DSC01406

And here is the final result:

DSC01421

To make this card – I used the exact one layer card as a base, and added a popped up frame.  Here are a few tricks to make this seem flawless and intended.

  • The cut out frame is just slightly smaller than the original masked off window.  The original window was 3/4”, my cut out frame measures 1/16” larger – that’s the width of the frame (13/16ths) , producing a smaller visible area.  This will help to hide the white area that was masked off originally.

DSC01408

  • Add some interest to the frame.  Here you see random spritzed dots in Soft Suede using a color spritzer and a marker.  To keep with the outdoor theme, sponge both the interior and exterior of your frame.
  • Add some criss-crossed thread to one side.

DSC01442

  • Sponge the complete exterior of your one layer card first before adding the frame.  Use the same color of your frame.  This way, should your frame be slightly off, if the white shows, it blends flawlessly with your frame.  Can you see the entire top of my card?  It shows as my frame was slightly smaller.

DSC01443DSC01444

  • Finally, pop the entire frame up using foam tape or dimensionals.  Keep your tape and dimensionals closer to the inside of the frame giving it more of a shadowbox look.

To learn how I sponged, masked and created this card, check out the first and second cards in this series here:

Project One                               Project Two

DSC01420

I hope you enjoyed this series!  Thanks for joining me and be sure to stop by tomorrow for another project with this stamp set… why, just because!!  It’s completely different and used a totally different color combination, but turned out fabulous!  Just thought I’d keep the theme going this week.

Have a creative day and see you around the grove!

Signature-Blog

[optin_box style=”14″ alignment=”center” action=”http://www.aweber.com/scripts/addlead.pl” disable_name=”Y” method=”post” email_field=”email” email_default=”Enter your email address” email_order=”1″ integration_type=”custom” double_optin=”Y” name_default=”Enter your first name”][optin_box_hidden][/optin_box_hidden][optin_box_code]

[/optin_box_code][optin_box_field name=”headline”]If you enjoyed this tutorial…[/optin_box_field][optin_box_field name=”paragraph”]PHA+PHNwYW4gc3R5bGU9ImNvbG9yOiAjNjQ2MzVlOyI+TGV04oCZcyBzdGF5IGluIHRvdWNoISBNeSBvY2Nhc2lvbmFswqA8L3NwYW4+PHNwYW4gc3R5bGU9ImNvbG9yOiAjNjY2Njk5OyI+PHN0cm9uZz48ZW0+ZXhjbHVzaXZlPC9lbT48L3N0cm9uZz7CoDwvc3Bhbj48c3BhbiBzdHlsZT0iY29sb3I6ICM2NDYzNWU7Ij5DcmVhdGl2ZSBUaXBzIGUtbGV0dGVyIHdpbGwgdGVhY2ggeW91IHRvIG1ha2UgcHJvamVjdHMgdGhhdCB5b3UgbG92ZeKApjwvc3Bhbj48L3A+Cg==[/optin_box_field][optin_box_field name=”privacy”][/optin_box_field][optin_box_field name=”top_color”]undefined[/optin_box_field][optin_box_button type=”0″ button_below=”Y”]Send me exclusive tips![/optin_box_button] [/optin_box]


Dog Days of Summer: Tropical Lagoon

Stampscapes Tropical Lagoon 9.5.13  (12)_thumb[2]

Is your creative process for a project always perfect?  I know mine sometimes is not.  Yesterday I worked on a project for my friend Trish in Australia.  What you see above is the final result.  Here’s the creative process it took me this time around.  I hope this helps some of you!

Stampscapes-Tropical-Lagoon-9.5.13--[3]

This time, I began with the following project. My  lagoon stamp was larger than my intended project size, so I wanted to only use part of it with still having room for a palm tree in the forefront for perspective.  It didn’t work out as I intended. 

Stampscapes Tropical Lagoon 1 CU_thumb[3]

My original project is at the bottom.  The grass didn’t blend with the palm tree well enough, I didn’t care for the extra grass and so much real estate at the bottom.  By accident I swiped red right over my sun, the card stock had divot’s  at the top that wouldn’t take in any ink, and the bungalows were stamped strangely.  Now, you may be saying I’m being nit-picky, but that’s a whole lot of things wrong for me, so I created a plan to fix my scene.

I began by taking a piece of scrap paper and stamping my scene on a larger card – 3 3/4” x 9” instead.  Here you see my beginning project, my test scene and the final project all next to each other.  I think you’ll agree with me – it’s MUCH better!Stampscapes Tropical Lagoon 9.5.13  (3)_thumb[7]

I used several colors of Marvy, Adirondack Lights, and Stampin’ Up! inks to get my desired look with a Colorbox Stylus Sponge Tool  Now I’m going to have to make one for myself!  Stampscapes Tropical Lagoon 9.5.13  (16)_thumb[2]

Creative Tips –

  • I stamped the entire scene in Early Espresso rather than Black.
  • I stamped the lagoon and then masked the sky.  I colored in my water – Aqua Adirondack Lights, Caribbean and Turquoise Blue.  I kept the color in streaks so to leave a little light in it.
  • For the sand, I used Sahara Sand Stampin’ Up! ink.  I then masked the water and my sun.  The sky is made of Yellow, Brilliant Yellow, Crushed Curry, Peach Bellini, Crisp Cantaloupe, Tangerine Tango, Cloudy Blue and Oriental Blue.Stampscapes Tropical Lagoon 9.5.13  (18)_thumb[3]
  • The huts were stamped after the horizon masks were removed and right on the horizon line.  The roofs were colored in using a Brushtix Sponge Tip applicator and Jungle Green with Early Espresso Marker accents.
  • You can extend the dots that make up the surrounding scene with the fine tip of the Early Espresso Marker.
  • The reeds and tropical plant are stamped with Jungle Green.  It was necessary to mask the tree with a little bit from a paper towel.Stampscapes Tropical Lagoon 9.5.13  (17)_thumb[3]
  • Three of the birds were colored with the Early Espresso Marker and stamped in the sky.
  • The Palms extend off the page and I stamped the lower parts of the leaves in Jungle Green.
  • To brighten up the scene and give it some life, you can use a Uniball Signo White Gel Pen.  You may want to go over some of the natural waves from the stamp if you’ve gotten color on them like I did.  Add some dots in the sand for the foam left behind the wave that rolls onto the shore.
  • Highlight the trees, huts and birds, keeping in mind where you light source is coming from.Stampscapes Tropical Lagoon 9.5.13  (10)_thumb[3]Stampscapes Tropical Lagoon 9.5.13  (14)_thumb[3]
  • Here you see the difference between sponging the edge of the scene in Early Espresso and leaving the canvas as is.Stampscapes Tropical Lagoon 9.5.13  (13)_thumb[2]

I love the end result – it’s by far the best Stampscapes tropical scene I’ve done.  In the end, I used 9 various stamps to create this scenery.  I hope you love it too!  It’s a fitting end to the summer.

Online Brayer Class

Do you want to learn how to make creative scenery cards?  Try our Brayer 101 – Introduction to Creative Scenery online class.  You’ll learn how to master this technique using a brayer to create unbelievable scenes that will leave you feeling like an artist.  Find out more here.

Signature-Snowflake-001_thumb1

To Shop 24/7 in the Creative Store – Click here!

Stamp Sets – Stampscapes Stamps Ink – Marvy – Oriental Blue, Turquoise, Caribbean Blue, Jungle Green, Yellow, Brilliant Yellow; Adirondack Lights – Cloudy Blue, Aqua, Peach Bellini; Stampin’ Up! – Early Espresso, Crushed Curry, Tangerine Tango, Sahara Sand, Crisp Cantaloupe, Early Espresso Marker Paper –Glossy White, Early Espresso Tools – Colorbox Stylus, Brushtix Mixed Media Brushes Finishing Touch – Uni-ball Signo White Gel Pen

Expressions Thinlits Sneak Peek

Expressions Thinlits 001 001

I’m in love with the new Expressions Thinlits.  What an awesome new product!  Starting August 1st, you will be able to cut cute little words just like this one with the new Expressions Thinlits – available in the new Holiday Catalog.  My mother always taught me it was rude to tease, but I thought you would love a little Sneak Peek of this fun and quick little card.  It literally came together in a matter of minutes.Expressions Thinlits 001 005

Creative Tips –

  • Definitely put a piece of wax paper between the word Thinlit and your cardstock.  It will help to pop it out after.
  • I used my paper piercer to help guide my word out from the back of the Thinlit.  It was super easy.Expressions Thinlits 001 007
  • Two spots didn’t punch through on my word – the loop in the second R and the Y.  I didn’t worry about it, because it gave me a place to drop a little multi-liquid glue.  It really is thin – you have to use the Multi-Liquid Glue.
  • To make my holly leaves I used a 3/4” and 1/2” circle punch.  I don’t own a thinlit to punch those out, so why not make your own.  It was super easy.Expressions Thinlits 001 006
  • I wanted to accent my holly and berries, but didn’t want it to focus too much on that, so I used a blender pen and the ink from my ink pads.  I squeezed my ink pad – love that you can do that with Stampin’ Up! inks, and the ink collected in the lid. I then picked some up with my blender pen and added some subtle highlights.
  • The background was made with the Chevron Embossing Folder and I popped the panel up on Stampin’ Dimensionals for some interest.

This card literally took 4 minutes to make, so if you need a great go to holiday card in a pinch in December – make sure you have the Expressions Thinlits.  You can use them with any embossing folder for a quick and easy card! Always a great thing.

Expressions Thinlits 001 002

Learn a new technique in the Online Brayer Class

      Would you like to learn how to make Creative Scenery cards?  Have you been frustrated when trying to use your brayer?  Creative Scenery classes using a brayer have by far been my biggest hit with stampers.  Learn how to create gorgeous gradual transitions with 100+ minutes of step by step detailed video instruction teaching you how to master this technique.  The end result – You will feel like an artist.  Best of all, you will look at your stamps in a whole new way, make amazing projects and try things you never would have thought to do before.  This class is in its introductory period – get it while you can for less! Find out more here

      Signature Snowflake 001

      Expressions Thinlits 001 004

    To Shop 24/7 in the Creative Store – Click here!

Ornament Mojo

Happy Monday to you!  This morning I decided to break out my Holiday Ornaments Framelits and More Merry Messages for the Mojo Monday Challenge.  The sketch for today is a straightforward one that got me stamping right away.  I hope you love the design!

                More Merry Messages 001 FrontMojo303Sketch

Creative Tips –

  • I wanted to emboss my ornament and run it through the Big Shot, so I cut the ornament shape using my framelits.  This set has a matching stamp set too – Ornament Keepsakes.  I embossed the ornament with the Chevron Embossing Folder, and lightly rubbed Versamark on the raised chevron lines to add gold embossing powder to it.  I love the end result – it really looks like an ornament!  To finish that off, I added a touch of our Brushed Gold  Card Stock for the top.More Merry Messages 001 CU
  • I wanted to add a little flair to the ornament, so I used some Linen Thread for a fun little accent behind the ornament. 
  • To add a subtle accent under the ornament, I used the Gorgeous Grunge stamp set to add some simple stripes.  More Merry Messages 001 Side
  • A Chevron Punch made perfect banner flags for the greeting and accent banner.
  • For a little finishing touch, some Pearl Basic Jewels give just a little something to the card along with a little decorative Paper Piercing in a few spots.
    More Merry Messages 001 Main L

It’s a simple little card, but captures the spirit of the holidays.  For some quick, easy and straightforward Christmas Cards, use the Ornament Keepsakes and More Merry Messages stamp sets.  Both can be found online only and not in any catalog – so you’d easily miss them.  I’ve made several easy and great looking card with both sets.  You can’t go wrong with them!

Learn a new technique in the Online Brayer Class

      Would you like to learn how to make Creative Scenery cards?  Have you been frustrated when trying to use your brayer?  Creative Scenery classes using a brayer have by far been my biggest hit with stampers.  Learn how to create gorgeous gradual transitions with 100+ minutes of step by step detailed video instruction teaching you how to master this technique.  The end result – You will feel like an artist.  Best of all, you will look at your stamps in a whole new way, make amazing projects and try things you never would have thought to do before.  Find out more here

      Signature Snowflake 001

To Shop 24/7 in the Creative Store – Click here!

Stamp Sets – More Merry Messages (126402c, 126400w), Gorgeous Grunge (130517c, 130514w) Paper – Crumb Cake, Real Red, Gumball Green  Ink –Real Red, Versamark Cool Tools – Holiday Ornaments Framelits ,  Paper Piercing Tool, Essentials Mat Pack, Stampin’ Pierce Mat , Gold Embossing Powder The Perfect Finish – Stampin’ Dimensionals, Linen Thread, Pearl Basic Jewels 

Holiday Ornaments FramelitsUntitled-12

Did YOU get the video for this card?

Lovely as a Tree004 Main L

Did you get the video to make this card?  If not, then you’re not on The Creative Grove Mailing List!

So what’s the big deal about this special list anyway?

  • You will get exclusive videos and creative tips sent directly to your inbox that are not shared on the blog.
  • Get Creative Grove Specials for list members only.
  • Be in the know of everything that’s happening with Stampin’ Up! products and new releases.

Lovely as a Tree004 CU

You can still get this video – it’s one in a series of Creative Tips sent to subscribers.  So when I ask – why would you be on the list?  Why wouldn’t you?

Subscribe today here or in the box on the upper right.

Take me to see the original blog post for this card with all the photos and creative tips.

      Signature-Snowflake-001_thumb1

    To Shop 24/7 in the Creative Store – Click here!

    Lovely as a Tree004 Angle

    To view the details or see close ups of any products used in the above project, just click on the green link to view it in my store 24/7.

    Stamp Sets – Lovely as a Tree (127793c, 128655w),  Four You (130538c, 130535w)Ink – Stampin’ Write Markers – Crushed Curry, Old Olive, Real Red, Pumpkin Pie, Early Espresso, Soft Suede;  Early Espresso Paper –Whisper White

Fall One Layer Wishes

Have you ever tried creative depth with Lovely as a Tree, or any nature stamps? I was in a simplicity mood this morning.  I love color and the mountains.  When I think of the mountains, I’m reminded of when I lived in Utah and California.  The scenery was so beautiful, and it really put me at peace.  So this morning, I wanted to create a Fall Foliage scenery on a one layer card.

I grabbed my Lovely as a Tree stamp set and went to work.  It took me three cards to get the right result, but I’m happy with it!  Here is the result!

If you love the look of this stamp set – be sure to check out my online brayer class too!

Lovely as a Tree OLC tutorial – 

    • First I cut out a mask leaving a 3/4” border on the top, left and right.
    • I inked up my six tree stamp in Crushed Curry, stamped it off and then stamped it three times filling the top 2/3 of the frame.  When inking my stamp, I did not ink up the bottom grass and trunks.  You can do this with a marker or your ink pad.Lovely as a Tree004 CU
    • I lightly sponged Soft Sky to create my rectangular frame, being sure to focus a bit heavier on the outline than the middle.  I filled in the bottom 1/3 before stamping my main image.
    • To color my main image, I used Stampin’ Write Markers.  I first colored my trees, then my trunks in Early Espresso.
    • For my Greeting, I used the Four You stamp set – I LOVE this set.

Lovely as a Tree004 Main L

It’s a simple card, but I love the color.  It makes me feel like I’m looking out at a scene in the Uinta mountains in Utah.  I hope you like it too!

Lovely as a Tree004 Angle


[optin_box style=”2″ alignment=”center” email_field=”email” email_default=”Enter your email address” email_order=”2″ integration_type=”aweber” double_optin=”Y” list=”3846012″ name_field=”name” name_default=”Enter your first name” name_order=”1″ name_required=”Y” opm_packages=””][optin_box_field name=”headline”]Learn with our exclusive FREE video series[/optin_box_field][optin_box_field name=”paragraph”]PHA+R2V0IHRoZSBmcmVlIENyZWF0aXZlIFRpcHMgRS1sZXR0ZXIgYW5kIGxlYXJuIHdpdGggc3Vic2NyaWJlciBleGNsdXNpdmUgdmlkZW8gYW5kIHBpY3RvcmlhbCBjb250ZW50LiBJbmNsdWRpbmcgb3VyIHllYXJseSAxMiBEYXlzIG9mIENocmlzdG1hcyBzZXJpZXMgJmFtcDsgdGhlIHZpZGVvIGZvciB0aGlzIHByb2plY3QhPC9wPgo=[/optin_box_field][optin_box_field name=”privacy”][/optin_box_field][optin_box_field name=”top_color”]undefined[/optin_box_field][optin_box_button type=”0″ button_below=”Y”]Get Access Now![/optin_box_button] [/optin_box]