Blue, White & Gold Muse: Christmas Visions

Frosted Evening 002

This week I’m playing along at at few Christmas challenges, but my inspiration came from a new one – Muse: Christmas Visions. It’s no secret that I love clean and simple cards, and Ardyth Percy-Robb is the queen of Clean and Simple. I love all her creations and am inspired by her work. I encourage you to check out her blog – Maskerade. This past week, she started a new Christmas Challenge which is a spin off the weekly challenge – Muse. It’s called Muse: Christmas Visions.

I’m excited to play along in their first challenge. The way the Muse challenge works is a design team member posts a project and you use that as your Muse for your creations. The first challenge was created by Kimberly Wiener and here is her card:

MUSE02

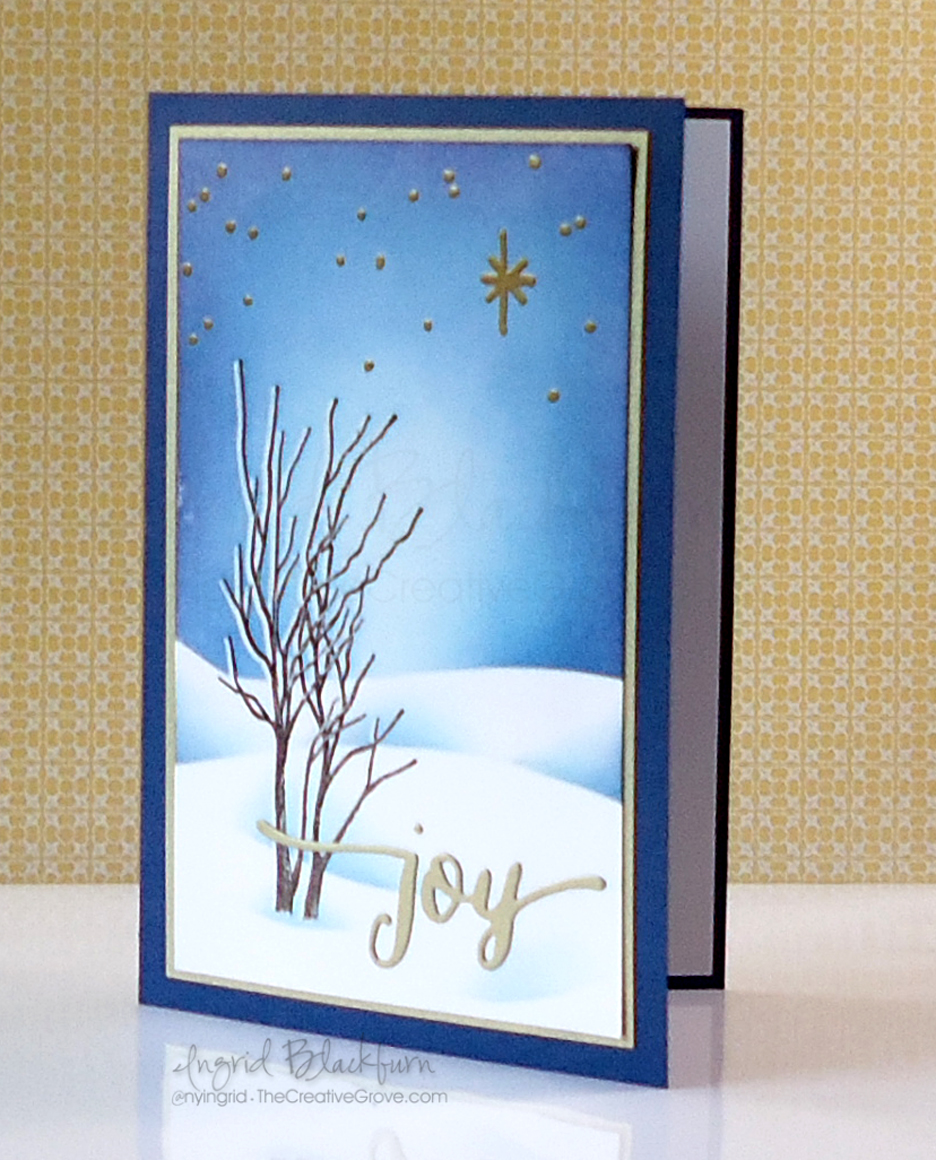
Kimberly’s card has several possibilities to pull from, but I chose the core – Blue, White and Gold. The colors immediately inspired me to think of the Christmas Star and a frosted scene, so I decided to grab one of my Stampscapes stamps and make a scenic card. Here is my creation:

Stampscapes Stamps

If you would like to see the exact video for this project, it’s in our project library at The Creative Grove VIP Community. Click here to find out more about becoming a member.

Creative Tips –

  • To get the soft winter glow in the sky, you’ll want to try Distress Inks as they blend quite effortless – Click Here for a video on how to blend distress inks
  • For the snow banks, I used a few shades of blue to create depth and interest among the drifts. If you’d like to learn more on how to create snow drifts – Click Here for a video on Snow Drifts

Muse Christmas Visions Challenge

  • The Leafless Limb stamp by Stampscapes was stamped twice, once in versamark, then again in Versamark/Espresso just slightly offset. They were then both embossed in clear embossing powder.
  • Embossing your limbs gives you that frosty shadow and allows you to use the emboss resist technique preserving your image while you create the scene around your image.
  • I wanted to have some stars, but wanted a little more gold in my card, so I created several dots with my Versamarker and drew a north star before embossing them in gold.

scenic card tutorials


  • The greeting is cut from Brushed Gold card stock and the Hand Lettered Holiday dies from WPlus9.
  • The scene is matted onto a brushed gold card stock layer before going onto a Night of Navy layer by Stampin Up.

I’m also submitting this project to three other great challenges that I encourage you to check out:
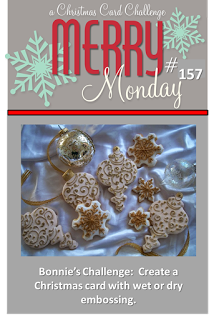
157

I love the feel of this peaceful frozen evening, I hope you do to! I encourage you to play along in all the above challenges, I had fun creating this one, and am excited for a few more at Muse: Christmas Visions. Smile

See you soon –

Signature 24 pt


[optin_box style=”13″ width=”500″ alignment=”center” action=”https://www.aweber.com/scripts/addlead.pl” disable_name=”Y” method=”post” email_field=”email” email_default=”Enter your email address” integration_type=”aweber” double_optin=”Y” list=”3846012″ name_field=”name” name_default=”Enter your first name” name_required=”Y”][optin_box_field name=”headline”]If you enjoyed this tutorial…[/optin_box_field][optin_box_field name=”paragraph”]PHA+4oCmeW914oCZbGwgbG92ZSBvdXIgPGVtPjxzdHJvbmc+PHNwYW4gc3R5bGU9ImNvbG9yOiAjMjQ0YzVlOyI+ZnJlZTwvc3Bhbj4gPC9zdHJvbmc+PC9lbT5zdWJzY3JpYmVyIG9ubHkgdmlkZW8gc2VyaWVzLiDCoExlYXJuIG5ldyB0ZWNobmlxdWVzIHRocm91Z2ggb3VyIDxzcGFuIHN0eWxlPSJjb2xvcjogIzI0NGM1ZTsiPjxlbT48c3Ryb25nPmV4Y2x1c2l2ZTwvc3Ryb25nPjwvZW0+wqA8L3NwYW4+Q3JlYXRpdmUgVGlwcyBlLWxldHRlcsKgYW5kIHN1YnNjcmliZXIgb25seSB2aWRlbyBhbmQgcHJvamVjdCB0dXRvcmlhbHMhPC9wPgo=[/optin_box_field][optin_box_field name=”privacy”][/optin_box_field][optin_box_field name=”top_color”]undefined[/optin_box_field][optin_box_button type=”1″ text=”Send me exclusive tips!” text_size=”32″ text_color=”#000000″ text_bold=”Y” text_letter_spacing=”0″ text_shadow_panel=”Y” text_shadow_vertical=”1″ text_shadow_horizontal=”0″ text_shadow_color=”#f6fefb” text_shadow_blur=”0″ styling_width=”50″ styling_height=”19″ styling_border_color=”#000000″ styling_border_size=”1″ styling_border_radius=”6″ styling_border_opacity=”100″ styling_shine=”Y” styling_gradient_start_color=”#a3b640″ styling_gradient_end_color=”#80902c” drop_shadow_panel=”Y” drop_shadow_vertical=”1″ drop_shadow_horizontal=”0″ drop_shadow_blur=”1″ drop_shadow_spread=”0″ drop_shadow_color=”#000000″ drop_shadow_opacity=”50″ inset_shadow_panel=”Y” inset_shadow_vertical=”0″ inset_shadow_horizontal=”0″ inset_shadow_blur=”0″ inset_shadow_spread=”1″ inset_shadow_color=”#80902c” inset_shadow_opacity=”50″ location=”optin_box_style_13″ button_below=”Y”]Send me exclusive tips![/optin_box_button] [/optin_box]

Sparkly Pines and Rocks

It’s Merry Monday!  I am so honored to be a guest designer this week on this very cool weekly challenge blog.  If you haven’t yet participated…definitely check it out!  The challenges are fresh and intriguing.  You’ll definitely stretch your Christmas card making abilities into a new stratosphere.  Like this week – Sequins!

117

I wouldn’t normally reach for this little embellishment, but boy what a new addiction I have now after this one!  Thanks a lot girls – look what you’ve done. Smile

Pines on Rocks Winter Scene

Creative Tips –

  • I used the large Stampscapes Pines and Rocks stamp in Night of Navy by Stampin’ Up! here.  Simple, just stamped on some Crumb Cake card stock.
  • To bring the snowy feel in, I used a Uniball Signo White Gel pen for some highlights and snow in the sky.

Pines on Rocks Winter Sequin Card (5)

  • To create some mist and bigger flakes, I used a qtip and white pigment ink.
  • For the sparkle and a fun touch, I added not only the sequins in clear, but the little pieces from the sequin holes.  They add just the right sparkle to this project.
  • The card front and banner are popped up for some character along with some subtle sponging in crumb cake.

Pines on Rocks Winter Sequin Card (8)Pines on Rocks Winter Sequin Card (7)

  • A simple banner greeting from Sweet Essentials from Stampin’ Up! finish this card perfectly.

Now it’s your turn!  I can’t wait to see your cards entered.  Have a Merry Monday!

Signature-Blog

[optin_box style=”13″ width=”500″ alignment=”center” action=”https://www.aweber.com/scripts/addlead.pl” disable_name=”Y” method=”post” email_field=”email” email_default=”Enter your email address” integration_type=”aweber” double_optin=”Y” list=”3846012″ name_field=”name” name_default=”Enter your first name” name_required=”Y”][optin_box_field name=”headline”]If you enjoyed this tutorial…[/optin_box_field][optin_box_field name=”paragraph”]PHA+4oCmeW914oCZbGwgbG92ZSBvdXIgPGVtPjxzdHJvbmc+PHNwYW4gc3R5bGU9ImNvbG9yOiAjMjQ0YzVlOyI+ZnJlZTwvc3Bhbj4gPC9zdHJvbmc+PC9lbT5zdWJzY3JpYmVyIG9ubHkgdmlkZW8gc2VyaWVzLiDCoExlYXJuIG5ldyB0ZWNobmlxdWVzIHRocm91Z2ggb3VyIDxzcGFuIHN0eWxlPSJjb2xvcjogIzI0NGM1ZTsiPjxlbT48c3Ryb25nPmV4Y2x1c2l2ZTwvc3Ryb25nPjwvZW0+wqA8L3NwYW4+Q3JlYXRpdmUgVGlwcyBlLWxldHRlcsKgYW5kIHN1YnNjcmliZXIgb25seSB2aWRlbyBhbmQgcHJvamVjdCB0dXRvcmlhbHMhPC9wPgo=[/optin_box_field][optin_box_field name=”privacy”][/optin_box_field][optin_box_field name=”top_color”]undefined[/optin_box_field][optin_box_button type=”1″ text=”Send me exclusive tips!” text_size=”32″ text_color=”#000000″ text_bold=”Y” text_letter_spacing=”0″ text_shadow_panel=”Y” text_shadow_vertical=”1″ text_shadow_horizontal=”0″ text_shadow_color=”#f6fefb” text_shadow_blur=”0″ styling_width=”50″ styling_height=”19″ styling_border_color=”#000000″ styling_border_size=”1″ styling_border_radius=”6″ styling_border_opacity=”100″ styling_shine=”Y” styling_gradient_start_color=”#a3b640″ styling_gradient_end_color=”#80902c” drop_shadow_panel=”Y” drop_shadow_vertical=”1″ drop_shadow_horizontal=”0″ drop_shadow_blur=”1″ drop_shadow_spread=”0″ drop_shadow_color=”#000000″ drop_shadow_opacity=”50″ inset_shadow_panel=”Y” inset_shadow_vertical=”0″ inset_shadow_horizontal=”0″ inset_shadow_blur=”0″ inset_shadow_spread=”1″ inset_shadow_color=”#80902c” inset_shadow_opacity=”50″ location=”optin_box_style_13″ button_below=”Y”]Send me exclusive tips![/optin_box_button] [/optin_box]

Pines on Rocks Winter Sequin Card (3)

Not so tropical Birthday

Today is Michael’s birthday!  He usually wants to be out of the country on a beach somewhere (that way the number doesn’t change in his mind…lol), but he’s stuck here in the Black Forest, Germany with me…not a bad place to be!  So this was as close as I could get him today.  I re-created one of my favorite cards from before.  Thought I’d share it with you.  Enjoy!

We’re headed out for some good ‘ol German fun in the forest.  I hope you all have a great day too – and GO Germany in the World Cup today! Smile

Signature-Blog

Dog Days of Summer: Tropical Lagoon

Stampscapes Tropical Lagoon 9.5.13  (12)_thumb[2]

Is your creative process for a project always perfect?  I know mine sometimes is not.  Yesterday I worked on a project for my friend Trish in Australia.  What you see above is the final result.  Here’s the creative process it took me this time around.  I hope this helps some of you!

Stampscapes-Tropical-Lagoon-9.5.13--[3]

This time, I began with the following project. My  lagoon stamp was larger than my intended project size, so I wanted to only use part of it with still having room for a palm tree in the forefront for perspective.  It didn’t work out as I intended. 

Stampscapes Tropical Lagoon 1 CU_thumb[3]

My original project is at the bottom.  The grass didn’t blend with the palm tree well enough, I didn’t care for the extra grass and so much real estate at the bottom.  By accident I swiped red right over my sun, the card stock had divot’s  at the top that wouldn’t take in any ink, and the bungalows were stamped strangely.  Now, you may be saying I’m being nit-picky, but that’s a whole lot of things wrong for me, so I created a plan to fix my scene.

I began by taking a piece of scrap paper and stamping my scene on a larger card – 3 3/4” x 9” instead.  Here you see my beginning project, my test scene and the final project all next to each other.  I think you’ll agree with me – it’s MUCH better!Stampscapes Tropical Lagoon 9.5.13  (3)_thumb[7]

I used several colors of Marvy, Adirondack Lights, and Stampin’ Up! inks to get my desired look with a Colorbox Stylus Sponge Tool  Now I’m going to have to make one for myself!  Stampscapes Tropical Lagoon 9.5.13  (16)_thumb[2]

Creative Tips –

  • I stamped the entire scene in Early Espresso rather than Black.
  • I stamped the lagoon and then masked the sky.  I colored in my water – Aqua Adirondack Lights, Caribbean and Turquoise Blue.  I kept the color in streaks so to leave a little light in it.
  • For the sand, I used Sahara Sand Stampin’ Up! ink.  I then masked the water and my sun.  The sky is made of Yellow, Brilliant Yellow, Crushed Curry, Peach Bellini, Crisp Cantaloupe, Tangerine Tango, Cloudy Blue and Oriental Blue.Stampscapes Tropical Lagoon 9.5.13  (18)_thumb[3]
  • The huts were stamped after the horizon masks were removed and right on the horizon line.  The roofs were colored in using a Brushtix Sponge Tip applicator and Jungle Green with Early Espresso Marker accents.
  • You can extend the dots that make up the surrounding scene with the fine tip of the Early Espresso Marker.
  • The reeds and tropical plant are stamped with Jungle Green.  It was necessary to mask the tree with a little bit from a paper towel.Stampscapes Tropical Lagoon 9.5.13  (17)_thumb[3]
  • Three of the birds were colored with the Early Espresso Marker and stamped in the sky.
  • The Palms extend off the page and I stamped the lower parts of the leaves in Jungle Green.
  • To brighten up the scene and give it some life, you can use a Uniball Signo White Gel Pen.  You may want to go over some of the natural waves from the stamp if you’ve gotten color on them like I did.  Add some dots in the sand for the foam left behind the wave that rolls onto the shore.
  • Highlight the trees, huts and birds, keeping in mind where you light source is coming from.Stampscapes Tropical Lagoon 9.5.13  (10)_thumb[3]Stampscapes Tropical Lagoon 9.5.13  (14)_thumb[3]
  • Here you see the difference between sponging the edge of the scene in Early Espresso and leaving the canvas as is.Stampscapes Tropical Lagoon 9.5.13  (13)_thumb[2]

I love the end result – it’s by far the best Stampscapes tropical scene I’ve done.  In the end, I used 9 various stamps to create this scenery.  I hope you love it too!  It’s a fitting end to the summer.

Online Brayer Class

Do you want to learn how to make creative scenery cards?  Try our Brayer 101 – Introduction to Creative Scenery online class.  You’ll learn how to master this technique using a brayer to create unbelievable scenes that will leave you feeling like an artist.  Find out more here.

Signature-Snowflake-001_thumb1

To Shop 24/7 in the Creative Store – Click here!

Stamp Sets – Stampscapes Stamps Ink – Marvy – Oriental Blue, Turquoise, Caribbean Blue, Jungle Green, Yellow, Brilliant Yellow; Adirondack Lights – Cloudy Blue, Aqua, Peach Bellini; Stampin’ Up! – Early Espresso, Crushed Curry, Tangerine Tango, Sahara Sand, Crisp Cantaloupe, Early Espresso Marker Paper –Glossy White, Early Espresso Tools – Colorbox Stylus, Brushtix Mixed Media Brushes Finishing Touch – Uni-ball Signo White Gel Pen

Finding Inspiration

Where do you look for creative inspiration?  For me, I usually head to Pinterest or look in magazines.  I love to look at photographs and generally a color palate or random organization of shapes will strike up an idea.  I thought today I would take you on a journey for a simple CASE (copy and steal everything) of a photo for me. Smile

When you see a photo online, do you sometimes shift in your chair, or move your head?  That to me is the sign that I’ve found something.  Here is the photo I found on Pinterest and my final project:

Cable-Beach-Broome-North-Western-Australia Moonlit Waters 004

While it’s not exact, it was my first attempt at making a mostly all black scenery.   I immediately thought, I can do that.  I’ll challenge myself and try something totally new.  I have to admit – it felt all wrong…lol!

Creative Tips –

  • You will want to start by masking a horizon line and beginning with your sky.
  • Give a good coat of various shades of yellow.  Here I used Glossy paper and a stylus tool to layer several coats of ink.Moonlit Waters 007
  • Mask your moon and continue layering ink, switching to Black.  You’ll want to leave a little faint yellow showing through around your moon for the glow.
  • My edge of my mask lifted up, so I got a splotch of black on my moon on the left side.  To cover that mistake up, I lifted my mask completely and dragged my stylus across a little to create whispy clouds.  Here is my friend Amy’s who didn’t get any on hers – see the difference? Moonlit Waters 001
  • When done with your sky, fully dry and switch your mask to reveal the water and cover the sky.
  • Layer color from the sides across your water being careful to leave the middle showing the moonlight reflection.
  • To create the feel of water, you will want to bring in a little black into your yellow.  Do this a little at a time so that you don’t cover up too much at once.  If you feel like you aren’t sure if you want to add more, stop.Moonlit Waters 008
  • Once you have the desired look, stamp your palm trunks and leaves at the top to give the viewer’s perspective.
  • Stamp the birds, layering a few over your moon.
  • Create a mask for the island and add into the horizon opposite your birds with a sponge in black ink.
  • Pick a saying that fits your scene.
  • This card is finished 5 x 7 and the scenery layer is 4 1/4 x 5 1/2”

It’s a fun scene and looks so striking in person.  I can’t wait to try it in purples next!

If you loved this card…

Be sure to subscribe to the creative tips e-letter & FREE video series. There’s a great scenic project in our first video series that I think you’ll love. And if you want to learn more about scenic cards, be sure to check out our Brayer 101 & 102 classes in addition to our upcoming Stampscapes class where we’ll make this similar project: Find out more HERE

Eveing Sunset Palm Cove Thumbnail

Signature_thumb.jpg

[optin_box style=”2″ alignment=”center” email_field=”email” email_default=”Enter your email address” email_order=”2″ integration_type=”aweber” double_optin=”Y” list=”3846012″ name_field=”name” name_default=”Enter your first name” name_order=”1″ name_required=”Y” opm_packages=””][optin_box_field name=”headline”]Learn more with our exclusive FREE video series:[/optin_box_field][optin_box_field name=”paragraph”][/optin_box_field][optin_box_field name=”privacy”]Plus you’ll be added to my FREE Creative Tips E-letter where I share exclusive projects, videos & the 12 Days of Christmas series[/optin_box_field][optin_box_field name=”top_color”]undefined[/optin_box_field][optin_box_button type=”0″ button_below=”Y”]Get Instant Access![/optin_box_button] [/optin_box]

Stamp Sets – Stampscapes Stamps, Really Good Greetings (130333c, 130330w) Ink – Marvy – Black, Yellow, Brilliant Yellow  Adirondack Lights – Sandal Paper –Glossy White, So Saffron, Basic Black Tools – Colorbox Stylus

Moonlit Waters 006