Easy DIY Beach Cards

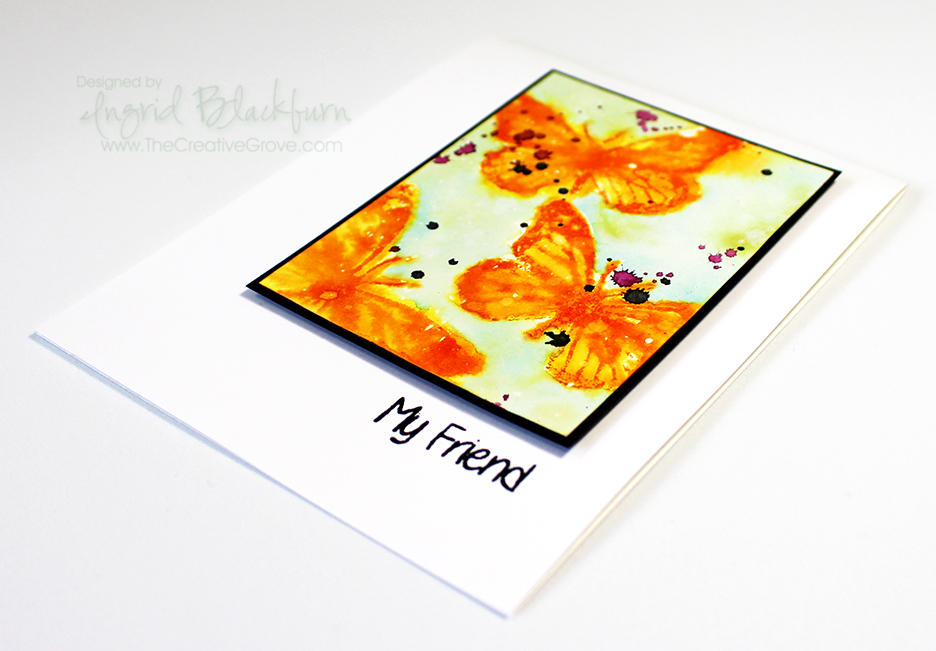
Ever wanted to create some easy DIY beach cards? We’re in the height of summer and what says summer more than a day at the beach! This week I’m playing along with the Unsinkable Release over at Catherine Pooler Designs and I have several cool cards and even a few videos for you. Let’s Dive right in (okay – a little pun intended)…

Today I’m going to showcase a fun paper pack – the Salt and Seaweed Pack , one of my all time favorite sequin mix by CPD – Big Sur Sequins, and a few of my favorite stamps from this release – Vitamin Sea. Okay….a die set too – Coral Dies – someone STOP me!!

Unsinkable Collection: I Want It All…
[ CTH ]
Under the Sea Bundle
[ CTH ]
Vitamin Sea Stamp Set
[ CTH ]
Vitamin Sea Dies
[ CTH ]
Hook, Line and Sinker Stamp Set
[ CTH ]
Coral Dies
[ CTH ]
Salt and Seaweed Patterned Paper
[ CTH ]
Big Sur Sequin Mix
[ CTH ]

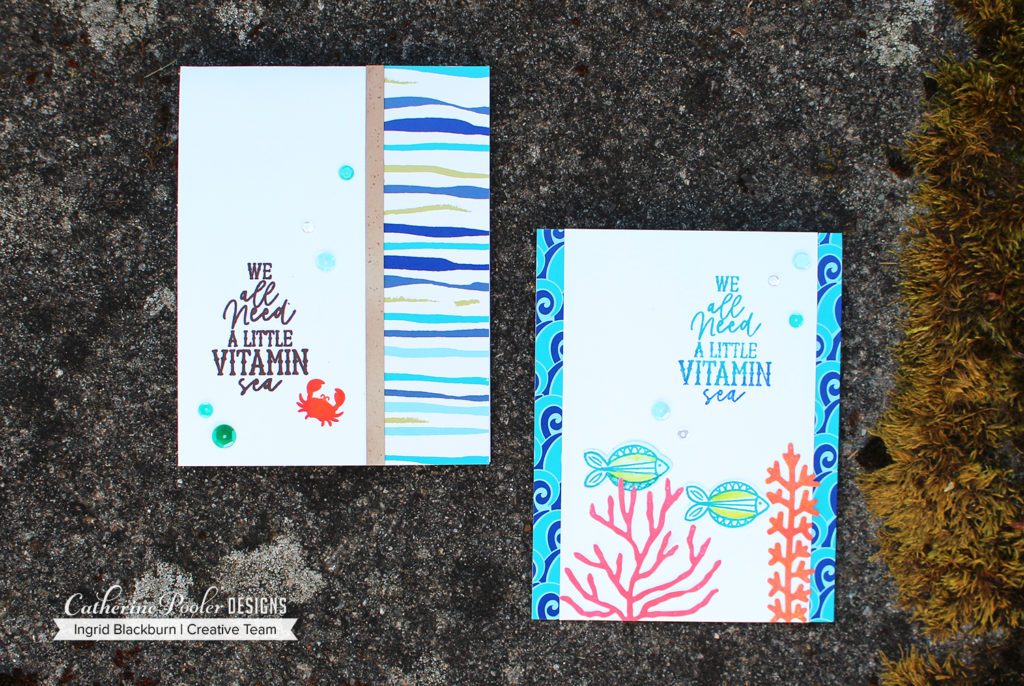
I was in a clean and simple mood when I created these two cards for you. They were so quick to put together, both are great designs for you to keep in your repertoire.

No. 1 – Under the Waves

The waves pattern on this paper from the Salt and Seaweed Pack is so much fun. It felt like the perfect accent to the sides. Normally I would keep those a bit smaller, so not to overpower the card, but in this case having 3/8″ wide borders made the card feel like an underwater scene.

Patterned paper can really overpower cards, so it’s important to remember to balance them with the design.

Beach and Ocean Themed greeting cards

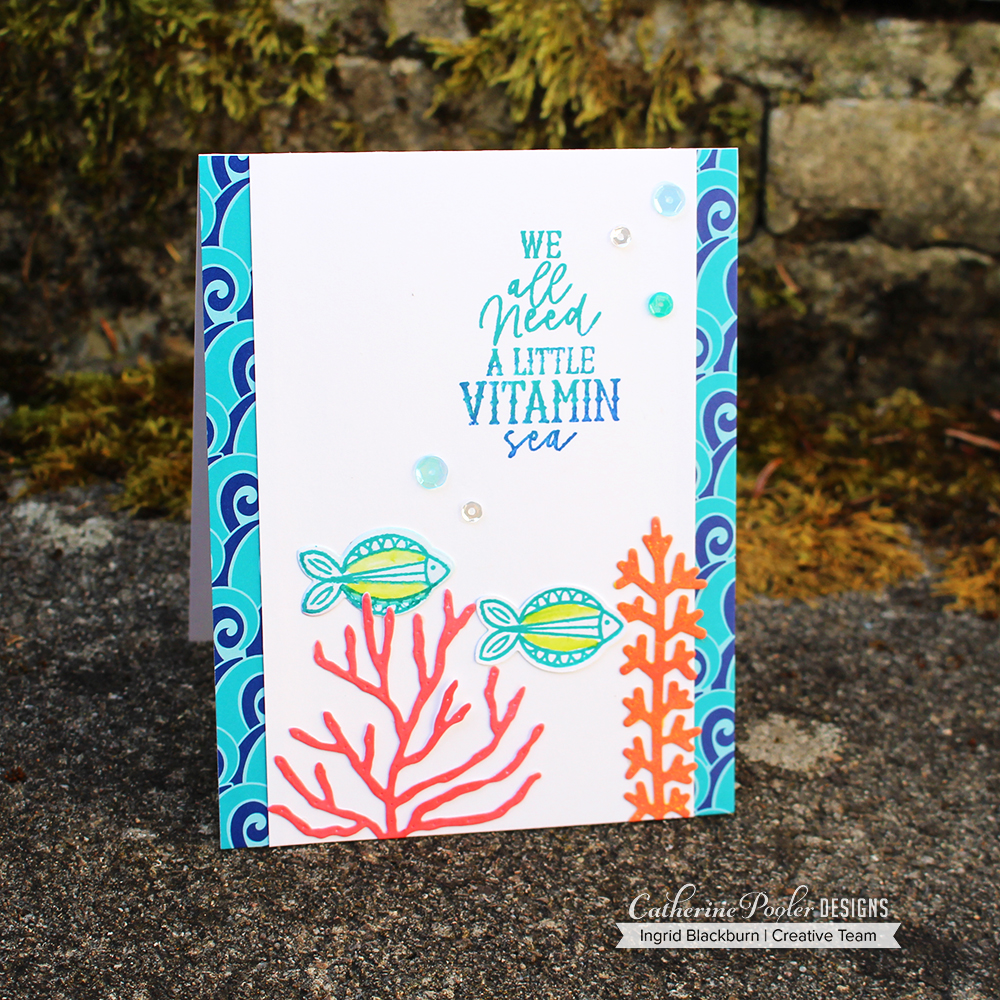
A little super light watercolor on those little fish – well, let’s be honest – it’s regular cardstock, and water is not its friend, right? But the Lime Rickey mixed with the All that Jazz is very cool. I wanted to throw some Coral Cabana on there, but refrained…lol.

The Coral Dies are SO awesome and quite lifelike. I remember when I was 16, I went to Italy for the first time. I bought this gorgeous coral necklace – you know the kind with the spindly fingers, and I took it apart when home and made a necklace and set of earrings out of it for my mom. She still wears it to this day. I love that kind of coral, and the one of the left reminded me right away of that necklace.

You can cut out your coral dies, then use your ink pads (I used the Carnivale Minis) by pressing right onto the top of the die cuts. It’s super easy, quick and looks amazing.

beach greeting card

TIP – to get the cool orange color on the the tall coral, first ink your coral in Limoncello, then follow with Samba. It makes the coolest Orange – PERFECT for coral.

Okay – I got a LITTLE off topic there, sorry about that! Do you ever have products that evoke favorite memories for you? Tell me in the comments – I’d LOVE to know.

A few of the new Big Sur Sequins and this card was all set. To pay a nod to the cool wave patterned paper, you could stamp your sentiment like mine – first in All that Jazz, then add a little Blue Suede to the bottom. It turned out pretty cool!

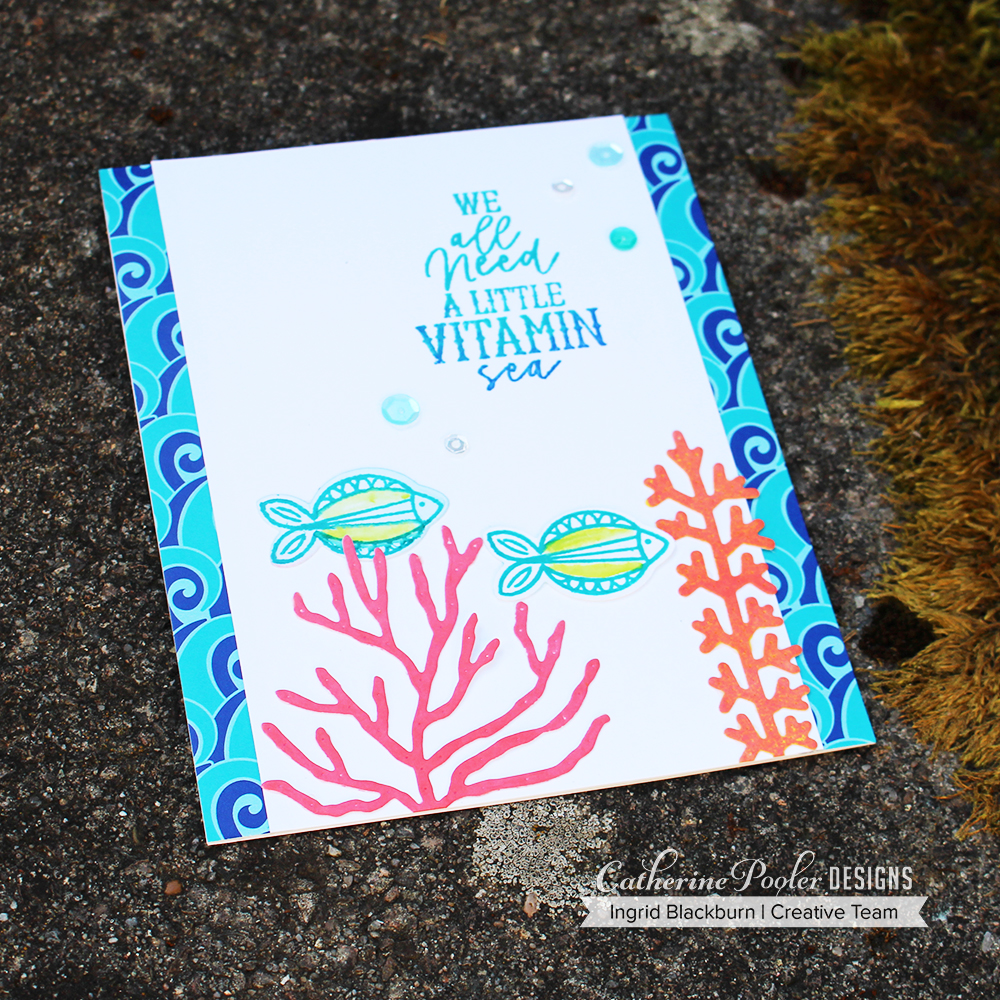
No. 2 – Abstract Beach

Easy DIY Beach Cards

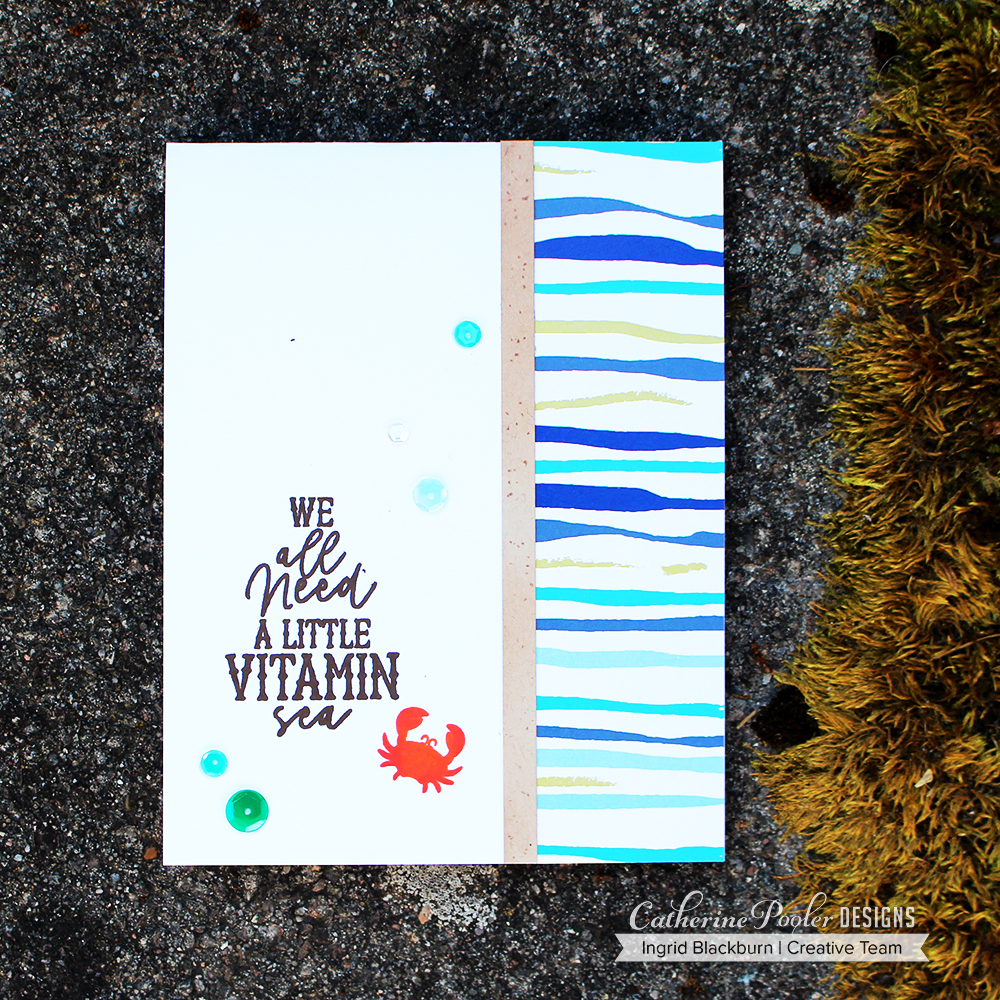
This super fast card can be easily mass produced and is a great one to use with any paper you love – or stamp that section!. The fun wavy paper – or zebra stripe from the Salt and Seaweed Pack, just has my heart. I love the colors, broken strands, it just reminds me of water. SO, if you look at the card from an abstract perspective, those are the waves, lapping up onto the sand, represented by this small 1/4″ strip – lightly ink blended with Sandcastle and then speckled with a brown colored pencil.

Easy DIY Beach Cards

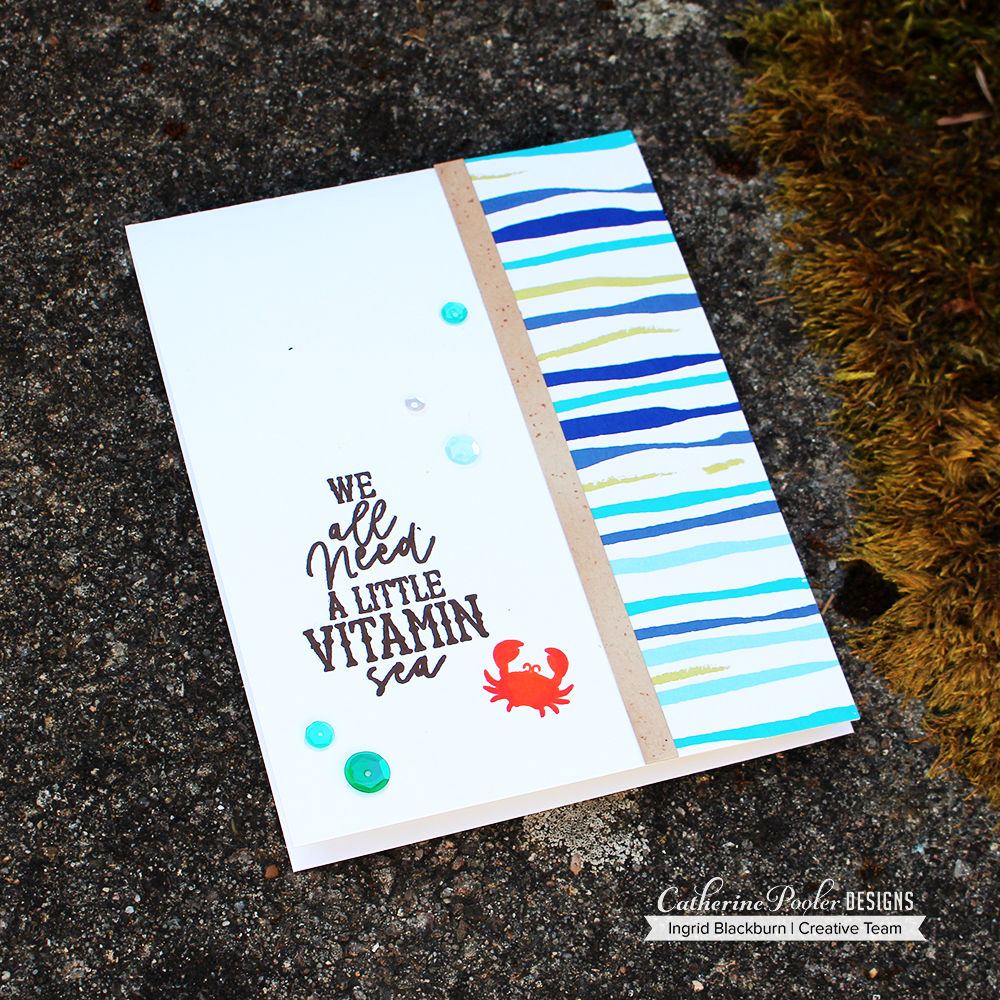
To keep with the clean look, a good sized sentiment (From Vitamin Sea), lots of white space, some bubbles representled by the Big Sur Sequins and of course a little crab from Hook Line & Sinker. He’s stamped in Orange Twist with a slight overlay of Samba.

Hope you liked those quick easy DIY beach cards! We all need some quick little cards. And just imagine those designs in holiday, birthday, any theme really!! Stay tuned to my YouTube channel today and tomorrow for some great new videos too!

Easy DIY Beach Cards

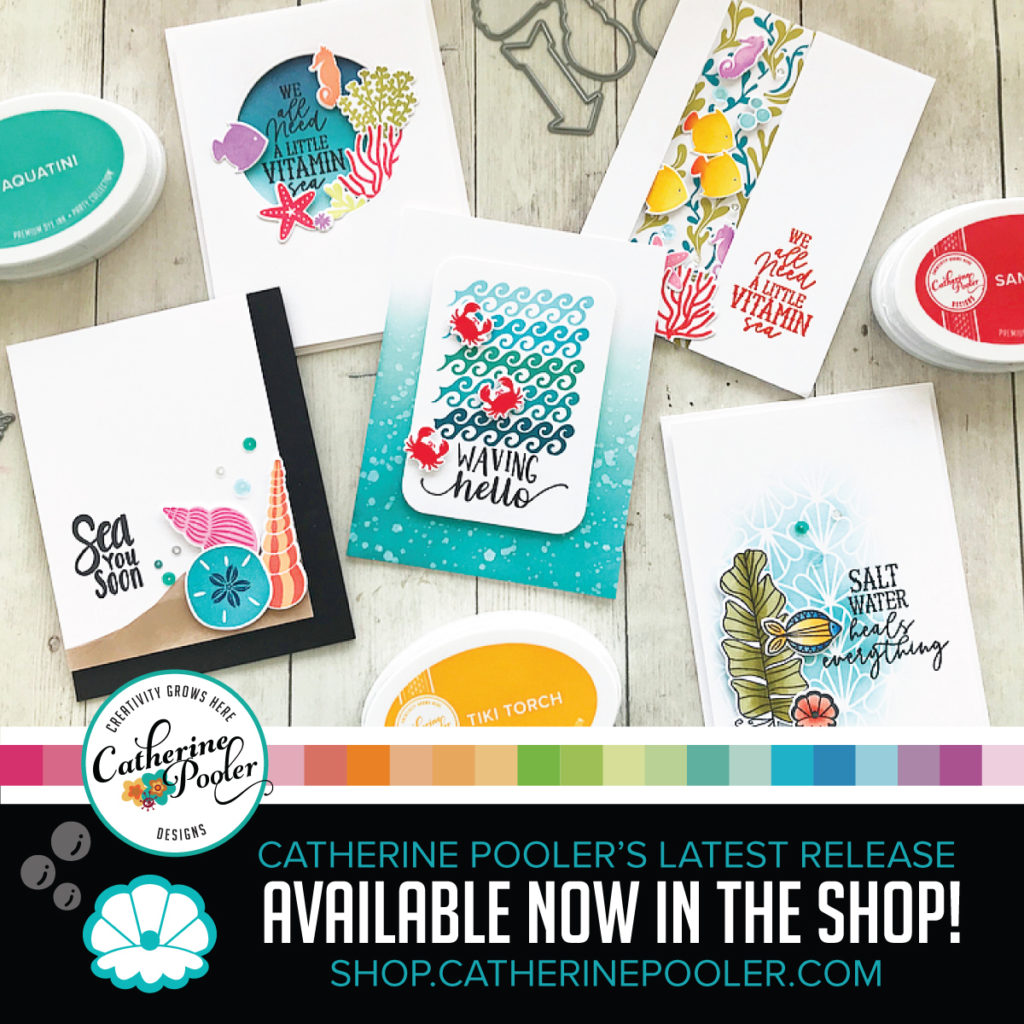
Here’s the entire new release:

Unsinkable Collection: I Want It All…
[ CTH ]
Under the Sea Bundle
[ CTH ]
Vitamin Sea Stamp Set
[ CTH ]
Vitamin Sea Dies
[ CTH ]
Hook, Line and Sinker Stamp Set
[ CTH ]
Hook, Line, and Sinker Dies
[ CTH ]
She Sells Seashells Stamp Set
[ CTH ]
She Sells Seashells Dies
[ CTH ]
Refuse to Sink Stamp Set
[ CTH ]
Refuse to Sink Dies
[ CTH ]
Coral Dies
[ CTH ]
Ship’s Wheel Dies
[ CTH ]
Ahoy Die
[ CTH ]
Shell Parade Stencil
[ CTH ]
Salt and Seaweed Patterned Paper
[ CTH ]
Big Sur Sequin Mix
[ CTH ]

Till next time –

Supplies:

Below are all the supplies I used for these projects.

Butterfly Birthday

Watercolor Stamped Birthday Butterflies 005

I am so excited…today the mailman brought me some stamps from the first ever release from Happy Little Stampers! Yes, there’s a new stamp company in town and get a load to this amazing Butterfly Birthday set! I always think of my friend Dawn when I see a butterfly – as she really loves them! Do you have a stamp image that reminds you of somebody, or is it just me? Tell me in the Comments below!

This Butterfly Birthday set has three very different bold butterflies that will definitely give you loads of ideas and a good variety of cards – just what you want from a stamp set. Even better – there are three great sayings that are the perfect size and in a handwritten print. It’s the perfect compliment, I just love it when there are greetings mixed in with great images.

Watercolor Stamped Birthday Butterflies 002

Now, you may think I’m biased, because I’m on the design team for the Christmas Challenge, but I purchased these myself, and let me tell you – the quality is there and I’m overjoyed with the design and size of each. Kylie will get these right out to you, they’re well priced and she ships internationally quite reasonably. I can’t wait to use the Mixed Christmas Sentiments set on my next challenge card – it’s always great when a set uses different fonts. Love that kind of variety.

So if you haven’t checked them out yet…be sure to do so – and one of the many challenges over at Happy Little Stampers – there is definitely something for everyone!

I watercolor stamped this card  using water along with the following distress inks – Mustard Seed, Spiced Marmalade, Tumbled Glass, Broken China, Peeled Paint, Seedless Preserves and Soot Black. I did a little light wet on wet watercoloring for the background.  Stay tuned for a video of this technique card in the upcoming weeks!

🙂

Signature-24-pt_thumb.jpg

CAS Cards – Winged Muse

DIY cards

I love CAS cards. Do you ever just see something and just get inspired sometimes? That’s what the Muse challenge is all about. Seeing a great project and taking some part of it as inspiration for your project. This week, I used the popped up wings and colors of this card on the left by Chrissie Stokes as inspiration.

             Chrissie Stokes  CAS card designs

I was in the mood for a very CAS card, so I left a ton of white space. I love the multiple layers of the card front, popped up butterfly and die cut greeting. Read on for creative details and tips.

Creative Tips for CAS Cards

  • To keep the whole white feel, I embossed my butterfly from Flora and Fauna 2 by WPlus9 in Pearl embossing powder.
  • Next I sponged Distress Wild Honey and Mustard Seed as a base

Butterfly Stamps

  • Around the edges I added Spiced Marmalade, Ripe Persimmon and Barn Door to create different depths of orange when in contact with the yellow.
  • I wanted to give the illusion of flight, I fussy cut out my butterfly and then popped up parts of the wings higher in areas off the card.

Clean and Simple Butterfly Cards

  • To add interest to the greeting, after cutting out the word inspire from the Inspired Dies by Penny Black, I coated them in Versamark and embossed it with Pearl Embossing Powder. – I love how it stands apart from the white background!
  • I added it with Mono Liquid Glue and popped up the card front onto the base.

Embossed Butterfly Stamps

So what did you think? When I see butterflies, it reminds me of two things – summer at Camp Mather outside Yosemite as a kid and my friend Dawn who LOVES all things butterflies. What about you? What do butterflies remind you of – I want to know – let me know in the comments below. Smile

I’m also entering this into

Signature 24 pt


[optin_box style=”13″ width=”500″ alignment=”center” action=”https://www.aweber.com/scripts/addlead.pl” disable_name=”Y” method=”post” email_field=”email” email_default=”Enter your email address” integration_type=”aweber” double_optin=”Y” list=”3846012″ name_field=”name” name_default=”Enter your first name” name_required=”Y”][optin_box_field name=”headline”]If you enjoyed this tutorial…[/optin_box_field][optin_box_field name=”paragraph”]PHA+4oCmeW914oCZbGwgbG92ZSBvdXIgPGVtPjxzdHJvbmc+PHNwYW4gc3R5bGU9ImNvbG9yOiAjMjQ0YzVlOyI+ZnJlZTwvc3Bhbj4gPC9zdHJvbmc+PC9lbT5zdWJzY3JpYmVyIG9ubHkgdmlkZW8gc2VyaWVzLiDCoExlYXJuIG5ldyB0ZWNobmlxdWVzIHRocm91Z2ggb3VyIDxzcGFuIHN0eWxlPSJjb2xvcjogIzI0NGM1ZTsiPjxlbT48c3Ryb25nPmV4Y2x1c2l2ZTwvc3Ryb25nPjwvZW0+wqA8L3NwYW4+Q3JlYXRpdmUgVGlwcyBlLWxldHRlcsKgYW5kIHN1YnNjcmliZXIgb25seSB2aWRlbyBhbmQgcHJvamVjdCB0dXRvcmlhbHMhPC9wPgo=[/optin_box_field][optin_box_field name=”privacy”][/optin_box_field][optin_box_field name=”top_color”]undefined[/optin_box_field][optin_box_button type=”1″ text=”Send me exclusive tips!” text_size=”32″ text_color=”#000000″ text_bold=”Y” text_letter_spacing=”0″ text_shadow_panel=”Y” text_shadow_vertical=”1″ text_shadow_horizontal=”0″ text_shadow_color=”#f6fefb” text_shadow_blur=”0″ styling_width=”50″ styling_height=”19″ styling_border_color=”#000000″ styling_border_size=”1″ styling_border_radius=”6″ styling_border_opacity=”100″ styling_shine=”Y” styling_gradient_start_color=”#a3b640″ styling_gradient_end_color=”#80902c” drop_shadow_panel=”Y” drop_shadow_vertical=”1″ drop_shadow_horizontal=”0″ drop_shadow_blur=”1″ drop_shadow_spread=”0″ drop_shadow_color=”#000000″ drop_shadow_opacity=”50″ inset_shadow_panel=”Y” inset_shadow_vertical=”0″ inset_shadow_horizontal=”0″ inset_shadow_blur=”0″ inset_shadow_spread=”1″ inset_shadow_color=”#80902c” inset_shadow_opacity=”50″ location=”optin_box_style_13″ button_below=”Y”]Send me exclusive tips![/optin_box_button] [/optin_box]

Stacked Die Cuts – CAS Green Christmas Card

Stacked Die Cuts seem to be all the rage lately. If you haven’t tried this creative technique yet, I think you’ll be surprised at just how easy it is. Enjoy this quick tutorial into how this simple card was created!

Stacked Die Cuts 001

Stacked Die Cuts Card

  • You will first want to create your blended background on the top fourth of the card.  To see a step by step video tutorial on how to create a perfectly blended background, click here.
  • Mask off the bottom 3/4 of your card with post it notes. Use the following Distress inks in order when blending from the bottom up – Bundled Sage, Peeled Paint and Forest Moss.
  • Die cut the word Merry from your project, being sure to keep all the little pieces (Y, M – 2, E, R).  I keep these stuck to a piece of washi or painters tape so they don’t go missing.
  • Emboss the word Christmas in Black up above your Negative Die Cut word in the green area. Tip – be sure that area is totally dry – definitely use a de-static tool like an embossing buddy.

Stacked Die Cuts 003

  • Lay your Green/White cut out word Merry on a piece of painters tape or masking tape. Smoosh a versamark pad over your word and emboss in clear to give a shine. Once cool, remove with tweezers and set aside.
  • Stamp your gift in the bottom right corner using Memento Tuxedo Black ink. I use this ink because I’m going to watercolor with distress inks and it doesn’t bleed and gives a crisp image.
  • Watercolor your image using Bundled Sage, Peeled Paint and Fire Brick with an Aqua Painter.  Tip – be sure your paint brush isn’t too wet, as this is regular card stock. If you use too much water, you’ll get little white dots or lines from your paper.
  • Die Cut four more words in white.
  • To create your Die Cut stack, glue all five die cuts to each other with your Blended Piece on top.

Stacked Die Cuts 004Stacked Die Cuts 006

  • Add adhesive to a piece of Copy Paper that is wider than your negative cut out, adhere so that the sticky side faces the front.
  • Add your die cut and the cut out pieces to the sticky paper exposed in the negative die cut image. And there’s your stacked die cut!
  • Attach your card front to your card base and add a little Forest Moss to the top at the fold so there is no white exposed.
  • Add sparkling clear sequins from Pretty Pink Posh if you desire using Tombow Mono Liquid Glue.

Stacked Die Cuts 002

I designed this card with three challenges in mind today – Merry Monday – Gifts and Addicted to CAS – Green and Happy Little Stampers – Sponged.

CAS_Mar2015 150ATCAS - code word green

If you liked this tutorial on Stacked Die Cuts, be sure to get our exclusive video tutorial series by being on the Creative Tips E-letter list, sign up at the bottom!

Signature

[optin_box style=”14″ alignment=”center” disable_name=”Y” email_field=”email” email_default=”Enter your email address” email_order=”1″ integration_type=”aweber” double_optin=”Y” list=”2841626″ name_field=”name” name_default=”Enter your first name” name_required=”Y”][optin_box_field name=”headline”]If you enjoyed this tutorial…[/optin_box_field][optin_box_field name=”paragraph”]PHA+Li4ueW914oCZbGwgbG92ZSBvdXIgPHNwYW4gc3R5bGU9ImNvbG9yOiAjMjQ0YzVlOyI+PGVtPjxzdHJvbmc+ZnJlZSA8L3N0cm9uZz48L2VtPjwvc3Bhbj5zdWJzY3JpYmVyIG9ubHkgdmlkZW8gc2VyaWVzISDCoEdldCB0aGXCoDxzcGFuIHN0eWxlPSJjb2xvcjogIzI0NGM1ZTsiPjxlbT48c3Ryb25nPmV4Y2x1c2l2ZTwvc3Ryb25nPjwvZW0+PC9zcGFuPsKgQ3JlYXRpdmUgVGlwcyBlLWxldHRlciB3aGljaCB3aWxsIHRlYWNoIHlvdSBuZXcgdGVjaG5pcXVlcyB0byBhZGQgdG8geW91ciBzdGFtcGluZyBza2lsbCBzZXQuIMKgTGVhcm4gaG93IHRvIG1ha2UgcHJvamVjdHMgeW91J2xswqBsb3ZlITwvcD4K[/optin_box_field][optin_box_field name=”privacy”][/optin_box_field][optin_box_field name=”top_color”]undefined[/optin_box_field][optin_box_button type=”1″ text=”Send me exclusive tips!” text_size=”26″ text_color=”#000000″ text_bold=”Y” text_letter_spacing=”-1″ text_shadow_panel=”Y” text_shadow_vertical=”1″ text_shadow_horizontal=”0″ text_shadow_color=”#a3b640″ text_shadow_blur=”0″ styling_width=”100″ styling_height=”10″ styling_border_color=”#000000″ styling_border_size=”1″ styling_border_radius=”6″ styling_border_opacity=”100″ styling_shine=”Y” styling_gradient_start_color=”#a3b640″ styling_gradient_end_color=”#5b661e” drop_shadow_panel=”Y” drop_shadow_vertical=”1″ drop_shadow_horizontal=”0″ drop_shadow_blur=”1″ drop_shadow_spread=”0″ drop_shadow_color=”#000000″ drop_shadow_opacity=”50″ inset_shadow_panel=”Y” inset_shadow_vertical=”0″ inset_shadow_horizontal=”0″ inset_shadow_blur=”0″ inset_shadow_spread=”1″ inset_shadow_color=”#a3b640″ inset_shadow_opacity=”50″ location=”optin_box_style_14″ button_below=”Y”]Send me exclusive tips![/optin_box_button] [/optin_box]

Using the Watercolor Stamping Technique with the Swallowtail Stamp

Have you tried watercolor stamping yet? This clean and simple quick project uses a great background stamp, the Swallowtail stamp by Stampin Up, and a simple – yet creative watercolor technique.

Watercolor stamping technique

The best part about this technique is that you can get more than one card with just one inking! To help showcase just how easy the watercolor stamping technique is, I made a video just for you!  If you like the video, be sure to give it a thumbs up on You Tube and subscribe to my YouTube channel for continued technique inspiration.

View video on YouTube

As you saw in the video above, this is a super easy stamping technique that gives you the look of watercolor, but with stamping and detail you’d never be able to achieve on your own.  Here’s a breakdown of just how to do it.

Creative Tips for the Watercolor Stamping Technique

First, pick a large image – this doesn’t work too well with tiny images as they get lost.  This particular project uses a rather large stamp – yours doesn’t have to be so big! We chose the Swallowtail stamp by Stampin Up.

Next, ink up your stamp – we chose Ranger Distress Inks for two reasons – translucency and how well they react with water.  The specific colors are Tumbled Glass, Broken China, Salty Ocean, Peacock Feathers and Faded Jeans.  Be sure to pay attention to the little tricks of how and the sequence we use them in, in the video!

Watercolor Stamped Swallowtail Stamp by Stampin Up

Spritz your stamp with a fine mister.  You’ll want a fine spray rather than too strong a spray – think of a garden hose Jet Spray vs. a Shower Spray…there’s a big difference.  You want to coat your stamp, not spray your ink away.  The amount is important too – too much water will leave you with an inky splotch, vs true watercolor stamping.  You want to be able to still see some detail mixed with watercolor.  I used the Stampin Up mister, Ranger has one too.

Stamp onto 140 pound cold pressed watercolor paper.  Choose the smooth side vs. the toothy side.  You’ll want to use watercolor paper.  This particular technique uses quite a bit of water, and that amount will degrade the fibers of regular card stock into an unattractive mess that will take away from your project.

Watercolor Stamping with Distress Inks

Hold your stamp down and with this particular stamp, put a fair amount of pressure on it – it’s big!  If you can put your project onto a foam pad, you’ll get an even better impression with ease.

Distress Swallowtail 008

You can immediately stamp a second time onto regular card stock for a second impression.  You’ll get another impression just fine.  The reason you don’t need watercolor paper the second time is that the watercolor paper the first time around took most of the water away allowing you to safely stamp onto regular card stock for your second image.

Matte and add embellishments as you want.  You can see here that I created two very different project with slight adjustments.  Both have the color spritzing for a little added effect.  I love them both – hopefully you do too!

Distress Swallowtail 010

If you liked this tutorial and learned something – be sure you’re on our exclusive e-letter list – Creative Tips for a great video series you won’t see anywhere else!

Have fun creating your own watercolor stamping projects – be sure to share them with us on our facebook page!

Signature


[optin_box style=”14″ alignment=”center” disable_name=”Y” email_field=”email” email_default=”Enter your email address” email_order=”1″ integration_type=”aweber” double_optin=”Y” list=”2841626″ name_field=”name” name_default=”Enter your first name” name_required=”Y”][optin_box_field name=”headline”]If you enjoyed this tutorial…[/optin_box_field][optin_box_field name=”paragraph”]PHA+Li4ueW914oCZbGwgbG92ZSBvdXIgPHNwYW4gc3R5bGU9ImNvbG9yOiAjMjQ0YzVlOyI+PGVtPjxzdHJvbmc+ZnJlZSA8L3N0cm9uZz48L2VtPjwvc3Bhbj5zdWJzY3JpYmVyIG9ubHkgdmlkZW8gc2VyaWVzISDCoEdldCB0aGXCoDxzcGFuIHN0eWxlPSJjb2xvcjogIzI0NGM1ZTsiPjxlbT48c3Ryb25nPmV4Y2x1c2l2ZTwvc3Ryb25nPjwvZW0+PC9zcGFuPsKgQ3JlYXRpdmUgVGlwcyBlLWxldHRlciB3aGljaCB3aWxsIHRlYWNoIHlvdSBuZXcgdGVjaG5pcXVlcyB0byBhZGQgdG8geW91ciBzdGFtcGluZyBza2lsbCBzZXQuIMKgTGVhcm4gaG93IHRvIG1ha2UgcHJvamVjdHMgeW91J2xswqBsb3ZlITwvcD4K[/optin_box_field][optin_box_field name=”privacy”][/optin_box_field][optin_box_field name=”top_color”]undefined[/optin_box_field][optin_box_button type=”1″ text=”Send me exclusive tips!” text_size=”26″ text_color=”#000000″ text_bold=”Y” text_letter_spacing=”-1″ text_shadow_panel=”Y” text_shadow_vertical=”1″ text_shadow_horizontal=”0″ text_shadow_color=”#a3b640″ text_shadow_blur=”0″ styling_width=”100″ styling_height=”10″ styling_border_color=”#000000″ styling_border_size=”1″ styling_border_radius=”6″ styling_border_opacity=”100″ styling_shine=”Y” styling_gradient_start_color=”#a3b640″ styling_gradient_end_color=”#5b661e” drop_shadow_panel=”Y” drop_shadow_vertical=”1″ drop_shadow_horizontal=”0″ drop_shadow_blur=”1″ drop_shadow_spread=”0″ drop_shadow_color=”#000000″ drop_shadow_opacity=”50″ inset_shadow_panel=”Y” inset_shadow_vertical=”0″ inset_shadow_horizontal=”0″ inset_shadow_blur=”0″ inset_shadow_spread=”1″ inset_shadow_color=”#a3b640″ inset_shadow_opacity=”50″ location=”optin_box_style_14″ button_below=”Y”]Send me exclusive tips![/optin_box_button] [/optin_box]

Chalktalk Distress Layered Thanks

Chalktalk Thanks 001

What do you do when you try out a new technique on a piece of scrap paper?  Do you use the left over piece for a project?  I try to, I figure if I’m going to take the time to figure it out, why not create something small at the very least!  That’s what this project is – my scrap turned into tag.

Chalktalk Thanks 003

Layer several shades of blue distress inks with Vintage Photo, spatter a little water, dry your piece thoroughly and then layer a lightly stamped layer from a background script stamp.  The end result is stunning!  I cut out my scrap with the biggest tag framelit from the set Chalk Talk by Stampin’ Up! Next, you’ll want to use a darker brown to stamp your greeting from the stamp set Thanks by Simon Says Stamp on an angle and voila – you have a perfect tag.

Chalktalk Thanks 002

For a little emphasis, I decided to use some left over tiny strips of white to randomly place back and forth behind my tag.  I added a few pearls and some corner piercing to the main card front.  I like that the colors of the card are masculine – this card is a great clean and simple design that’s easily mass produced – just sponge colors on larger strips of white paper and then cut out your tags!

We have videos on this technique in our VIP Community with a few different projects if you want more step by step tutorials.  Hope to see you there!

I’m wrapping up our week in Tuscany, we’re sad to go, but had a wonderful time here!  I must say after all the rich colors and texture, I’m excited to get into the stamping studio.  See you soon with more great projects.  For now, I’ll leave you with a few of the rich colors of the Tuscan countryside and villages.

20150113_15553720150112_144755DSC0831720141118_02332020150112_144938DSC08243DSC08355

Have a great day – thanks for stopping by!

Signature

Buds and Blooms–Scribble Flower

Scribble Flowers Trio002

It’s the beginning of a new year, which is always exciting.  This week on Less is More Challenge Blog, the theme is New Beginnings – which is very fitting for a new year.  To keep it simple, I have a Clean and Simple card that’s just perfect for a quick go to simple one layer card.

I’m also adding this to the Clean Slate challenge at Virginia’s View Challenge.

I did end up popping up one of the flowers for emphasis, but it would also look just perfect stamped directly onto the main layer.

Scribble Flowers Trio003

Here you see Scribble Flowers by Simon Says Stamp in some fun bright colors – Picked Raspberries, Mustard Seed and Mowed Lawn Distress Inks by Ranger. For the black, I used Memento Jet Black Ink.

I masked off the buds (the beginning) and stamped the leaves.  For the popped up flower I glued on the middle and leaves, but they would also work perfectly masked as well if stamping on a single layer.  Okay – I know I deviated from the true One Layer Rule, but I just felt like it on this one – forgive me! Smile

Scribble Flowers Trio001

I always make a ton of birthday cards at the beginning of each year – how about you?  This one is great as a quick and easy go to simple card that will brighten anyone’s day.  I hope you loved it as much as I did!

Want more creative inspiration – check out our free video series and ongoing creative tips – sign up for our inspirational newsletter here – Creative Tips Newsletter!

I’m spending the week in Tuscany this week.  We’re off to explore the countryside a bit – here are a few photos from our day yesterday in Chianti and Loro Ciufenna.  Be sure to stop back to see more soon!

Enjoy your day!

Signature

CAS Watercolor Stamped Thanks

As our three week vacation in the Mediterranean comes to an end, we spend our final day today in Rome…sigh.  I’ll miss the Cioccolato Gelato, Margarita Pizza Neapolitan, Espresso and more historical sights than I can possibly store away in my mind.  What I won’t miss is are the crowds or the street hawkers…lol! To catch a glimpse into some of my favorite sights, be sure to see the end!

20141122_140909

With all this historical overload, today I need a little clean and simple!  Have you tried watercolor stamping yet?  If not, what are you waiting for!?! Today’s project is actually a product of  using what’s left over from my main project.  Always a great thing.

Recently I shared an awesome Watercolor Stamped Birthday Butterfly card for the VIP Community and figured, I already had the ink on my stamp, why not keep going with a scrap?  When I cut tags with my Chalk Talk Framelits by Stampin’ Up, I always cut two or three at a time and keep them in a scrap bin on my desk.  This tag is definitely one of my favs.

CAS Watercolor Stamped Tag CUp

I had inked up my Chevron background stamp with Seedless Preserves Distress Ink, gave a couple spritzes with my mini mister, and then with the left over ink after my main project, threw a tag cut from Stampin Up’s Whisper White card stock on there and what you see is what was left.  Don’t you just love the grunge part of how the tag turned out?  I couldn’t do that if I intentionally tried…lol.  It was a complete product of second generation stamping.

Watercolor Stamped Tag 001

I popped it up on an angle, added a die cut thanks using my Simon Says Stamp Thanks steel die and there you have it – a card in literally minutes!  Leaving all the white gives it such a great clean and simple look – for more on that check out this article on Clean and Simple Defined.

Watercolor Stamped Tag 004

Have you tried watercolor stamping yet?  Show your projects on our Facebook page here, or tell me what inks you’ve tried it with in the comments below!  And definitely tell me what you think of all those street hawkers in places like, Athens, Rome or Paris!  I know I’m not alone…lol!  Here are a few of my favorite photos from these past few weeks…

ETP Planners20141106_133333Sicila Market 001PursesLucca DoorwayPisa and CathedralTower of PisaLucca City WallCapuccinoSaranay Lunch SpotTuolon Market 001Naples Pizza 001Rome ForumRome ForumColosseumRome PantheonNaples Marketplace 001

Ciao for now –

Signature

Of course, if you’d like to see more or follow us along our Travel adventures, be sure to click right here to see and like our Travel Facebook page