Fluttering through a Beautiful World

Ah, to be a butterfly and flutter your way though a Beautiful World. When I think of butterflies, my head immediately goes two places – elegant and whimsical. How about you? Be sure to tell me in the comment section what you love about Butterfly stamps!

The perfect way to describe the stamp set Beautiful World by GinaK is elegant and whimsical – that’s why I relate to it so well! This stamp set, designed for the Stamp of Approval Beautiful World Collection is a dream to stamp with.  You can keep it light and fun, go dramatic and elegant or just say colorful and whimsical. Any way you stamp it, you can’t go wrong.

I created a video for you too – it’s the second project plus a great tip for customizing the perspective on your stamps! Especially Butterflies.

View on YouTube in HD

Here are just a few ways I had fun with this set – okay, and a few others from the collection – for you today.

My Colorful Beautiful World – Day Four

Project One

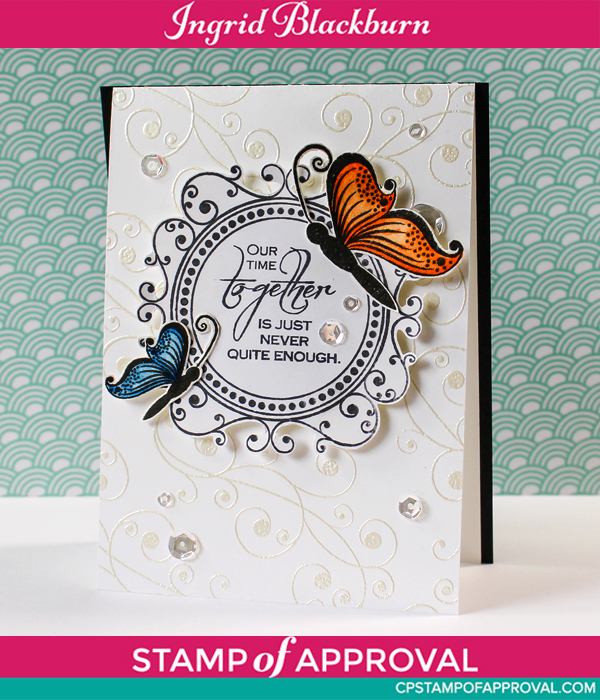
To create this elegant card, break out your pearl embossing powder for a definite wow in the background. The swirly flourish stamp is just stunning in Pearl. To get the effect I was after, I have most of my tails lead toward a spot in the center behind the frame. I wanted to keep the card rather simple and just have a little pop. The card front is the actual folded card and it’s mounted onto a traditional A2 card base just 4 1/4 x 5 1/2″.

The frame is popped up and I just LOVE that greeting!

Creative Tip –  This set has two butterflies in it – a large full one and a smaller half flying toward the right. Well, did you notice that my larger butterfly is flying to the left and is on it’s side? Check out the images in Project Two and you’ll see what I mean.

To make a butterfly on it’s side, cut around one side, and trim off the other side of wings and that side’s antennae. Viola – you have a half on it’s side in whichever direction you need!

SOA Enchanted Frame

Project Two

For this colorful project, you’ll want to start off with an effortlessly blended background. If you are subscribed to my YouTube channel, there’s a video above showing you how I get a perfect blend for this card.

Colorful Beautiful World 001

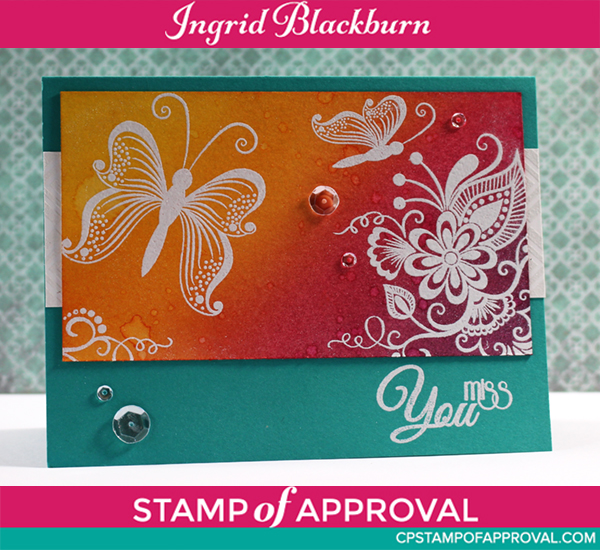
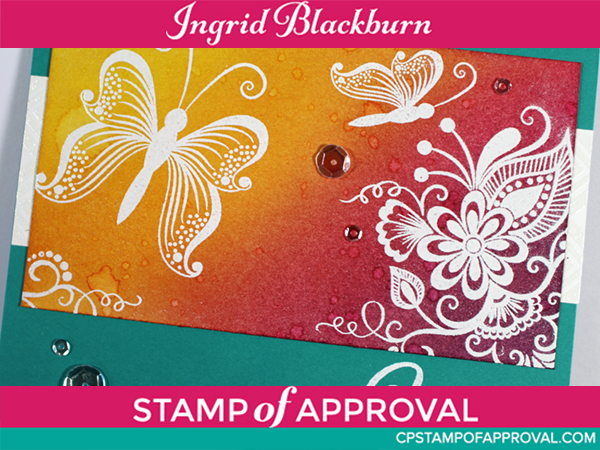
The key is to pick colors that not only compliment one another, but won’t make mud – an ugly shade of brown. After creating my gorgeous background, I added the Beautiful World images and embossed them with white powder. I just LOVE that fancy flourish image in the bottom right – simply gorgeous. Some of my design team mates have made the most beautiful cards with that stamp – and the butterfly. Don’t forget to check out all their inspiration as well!

It may be hard to see, but I used Catherine’s new Geobuilders stamp set for some interest behind my panel. I embossed it white on white, and it’s the perfect small touch to finish the card.

Colorful Beautiful World Close Up

The greeting is from the All about You set by CAS-ual Fridays. I love that set – anytime I have stamps that I can mix match and build my own greetings, I”m sold! And in one of my favorite fonts too – perfection! Some simple sparkling clear sequins finish the card out.

Be sure to stop by tomorrow for a full Blog Hop. Here are the other designers that are creating amazing works for you today:

In case you missed all the inspiration from the past three days, here are a few quick links to get you to the other seven projects I’ve created. The DT on each day has created some amazing inspired works for you.

Day One            Day Two               Day Three

If you’re not on the list to find out the link for when SOA Beautiful World goes on sale…what are you waiting for? Click Here to be in the know first before it sells out on the 20th.

SOA April 2016

Stamp of Approval comes with many many many projects all put together in a project guide. Be sure to visit Catherine’s Blog, she’s linked to everyone’s projects each day, and is featuring all the stamp sets in videos leading up to the 20th. See you tomorrow for a fun blog hop, prizes and yet more inspiration! Now run off and create your own sideways butterflies ….have fun!

Signature

[optin_box style=”12″ alignment=”center” email_field=”email” email_default=”Enter your email address” email_order=”2″ integration_type=”aweber” double_optin=”Y” list=”3846012″ name_field=”name” name_default=”Enter your first name” name_order=”1″ name_required=”Y” opm_packages=””][optin_box_field name=”headline”]Learn more with our exclusive FREE video series:[/optin_box_field][optin_box_field name=”paragraph”]PHA+UGx1cyB5b3XigJlsbCBiZSBhZGRlZCB0byBteTxzdHJvbmc+IEZSRUU8L3N0cm9uZz4gQ3JlYXRpdmUgVGlwcyBFLWxldHRlci4gRnJvbSB0aW1lIHRvIHRpbWUgeW914oCZbGwgZ2V0IGV4Y2x1c2l2ZSBwcm9qZWN0cywgdmlkZW9zICZhbXA7IHRoZSAxMiBEYXlzIG9mIENocmlzdG1hcyBzZXJpZXMuPC9wPgo=[/optin_box_field][optin_box_field name=”privacy”][/optin_box_field][optin_box_field name=”top_color”]undefined[/optin_box_field][optin_box_button type=”0″ button_below=”Y”]Get Instant Access![/optin_box_button] [/optin_box]

CAS Cards – Winged Muse

DIY cards

I love CAS cards. Do you ever just see something and just get inspired sometimes? That’s what the Muse challenge is all about. Seeing a great project and taking some part of it as inspiration for your project. This week, I used the popped up wings and colors of this card on the left by Chrissie Stokes as inspiration.

             Chrissie Stokes  CAS card designs

I was in the mood for a very CAS card, so I left a ton of white space. I love the multiple layers of the card front, popped up butterfly and die cut greeting. Read on for creative details and tips.

Creative Tips for CAS Cards

  • To keep the whole white feel, I embossed my butterfly from Flora and Fauna 2 by WPlus9 in Pearl embossing powder.
  • Next I sponged Distress Wild Honey and Mustard Seed as a base

Butterfly Stamps

  • Around the edges I added Spiced Marmalade, Ripe Persimmon and Barn Door to create different depths of orange when in contact with the yellow.
  • I wanted to give the illusion of flight, I fussy cut out my butterfly and then popped up parts of the wings higher in areas off the card.

Clean and Simple Butterfly Cards

  • To add interest to the greeting, after cutting out the word inspire from the Inspired Dies by Penny Black, I coated them in Versamark and embossed it with Pearl Embossing Powder. – I love how it stands apart from the white background!
  • I added it with Mono Liquid Glue and popped up the card front onto the base.

Embossed Butterfly Stamps

So what did you think? When I see butterflies, it reminds me of two things – summer at Camp Mather outside Yosemite as a kid and my friend Dawn who LOVES all things butterflies. What about you? What do butterflies remind you of – I want to know – let me know in the comments below. Smile

I’m also entering this into

Signature 24 pt


[optin_box style=”13″ width=”500″ alignment=”center” action=”https://www.aweber.com/scripts/addlead.pl” disable_name=”Y” method=”post” email_field=”email” email_default=”Enter your email address” integration_type=”aweber” double_optin=”Y” list=”3846012″ name_field=”name” name_default=”Enter your first name” name_required=”Y”][optin_box_field name=”headline”]If you enjoyed this tutorial…[/optin_box_field][optin_box_field name=”paragraph”]PHA+4oCmeW914oCZbGwgbG92ZSBvdXIgPGVtPjxzdHJvbmc+PHNwYW4gc3R5bGU9ImNvbG9yOiAjMjQ0YzVlOyI+ZnJlZTwvc3Bhbj4gPC9zdHJvbmc+PC9lbT5zdWJzY3JpYmVyIG9ubHkgdmlkZW8gc2VyaWVzLiDCoExlYXJuIG5ldyB0ZWNobmlxdWVzIHRocm91Z2ggb3VyIDxzcGFuIHN0eWxlPSJjb2xvcjogIzI0NGM1ZTsiPjxlbT48c3Ryb25nPmV4Y2x1c2l2ZTwvc3Ryb25nPjwvZW0+wqA8L3NwYW4+Q3JlYXRpdmUgVGlwcyBlLWxldHRlcsKgYW5kIHN1YnNjcmliZXIgb25seSB2aWRlbyBhbmQgcHJvamVjdCB0dXRvcmlhbHMhPC9wPgo=[/optin_box_field][optin_box_field name=”privacy”][/optin_box_field][optin_box_field name=”top_color”]undefined[/optin_box_field][optin_box_button type=”1″ text=”Send me exclusive tips!” text_size=”32″ text_color=”#000000″ text_bold=”Y” text_letter_spacing=”0″ text_shadow_panel=”Y” text_shadow_vertical=”1″ text_shadow_horizontal=”0″ text_shadow_color=”#f6fefb” text_shadow_blur=”0″ styling_width=”50″ styling_height=”19″ styling_border_color=”#000000″ styling_border_size=”1″ styling_border_radius=”6″ styling_border_opacity=”100″ styling_shine=”Y” styling_gradient_start_color=”#a3b640″ styling_gradient_end_color=”#80902c” drop_shadow_panel=”Y” drop_shadow_vertical=”1″ drop_shadow_horizontal=”0″ drop_shadow_blur=”1″ drop_shadow_spread=”0″ drop_shadow_color=”#000000″ drop_shadow_opacity=”50″ inset_shadow_panel=”Y” inset_shadow_vertical=”0″ inset_shadow_horizontal=”0″ inset_shadow_blur=”0″ inset_shadow_spread=”1″ inset_shadow_color=”#80902c” inset_shadow_opacity=”50″ location=”optin_box_style_13″ button_below=”Y”]Send me exclusive tips![/optin_box_button] [/optin_box]

Stampin’ Up! Swallowtail Splendor

Swallowtail (43)

Greetings from St. John in the British Virgin Islands!  This island is a flora and fauna mecca with white gorgeous beaches and amazing snorkeling.   Unfortunately it is raining so hard we can’t leave the ship yet.  So I thought I would share a quick card with you today.  With the natural beauty that this island holds, I thought a card with the Swallowtail stamp would be appropriate.  It is quickly becoming my favorite background stamp to use.  .

Swallowtail (44)

What’s so great about the Swallowtail is that it really is such an impressive image to use as the focal point for your creative projects.  Here I chose to add a little color to my project with a blender pen and some Stampin’ Up! Markers.  I have really grown used to my clear mount Swallowtail stamp which has really surprised me.  I normally always favor wood mount stamps when it comes to background stamps.  Click here to read my first experience with this great stamp

Creative Tips:

  • I embossed my image in Black Craft Ink and Crystal Clear Embossing Powder. 
  • To color my image, I used a Summer Starfruit Marker for the base and a blender pen with More Mustard ink  for highlights and depth.  To add a little orange to my wings, I used my blender pen in the Tangerine Tango Ink Pad.
  • To collect ink for coloring, squeeze your pad and collect ink in the lid.  Don’t worry about wiping it out, the ink will stay fresh on the plastic surface.  This is one of the benefits of Stampin’ Up! Ink Pads – you can squeeze them.

Swallowtail (47)

  • For a lighter shade, use an Aqua Painters instead of a Blender Pen.
  • To bring a little emphasis to my image, I sponged more mustard around the edge of my image before mounting it to a piece of Basic Black card stock.
  • My project looked best on a base of More Mustard to pull color from the main image.
  • For my greeting, I used my favorite Thanks stamp from a set that retired 10 years ago. 

The Swallowtail stamp can be used for just about any occasion.  I personally love this look and find that it works for a masculine card as well – and that’s always a good thing!

Signature Snowflake 001

To Shop 24/7 in the Creative Store – Click here!

Swallowtail (45)

Stamp Sets – Swallowtail (129213w, 129216c) Ink – Tangerine Tango (126946), Summer Starfruit Marker (126856), More Mustard (126964)  Paper – Whisper White (100730), More Mustard (100946), Basic Black (121045)  Cool Tools – blender pen (102845), Aqua Painters (103954)  Finishing Touch – Stampin’ Sponges (101610)

Swallowtail Stamp 129216L