Too Kind Stamp Set

Too Kind 002 Main

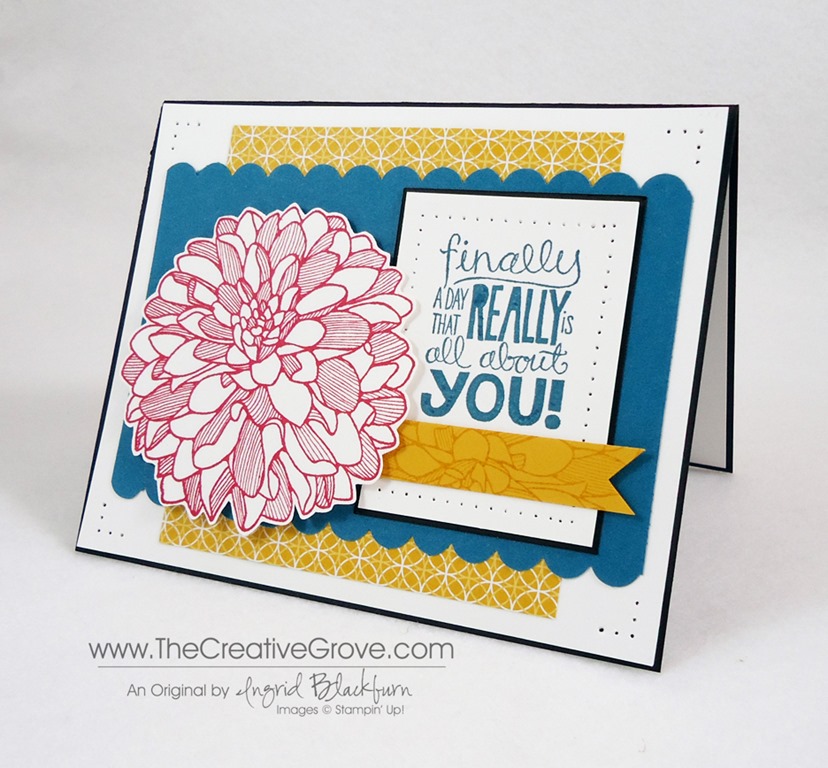
The new Too Kind stamp set is an easy and quick set to use.  The images are striking in any color and make wonderful backgrounds as well.  Two step stamping to me is always a great thing.  The images are bold yet soft at the same time.  Paired here with the Gorgeous Grunge stamp set (have I told you yet that’s my #1 new go to set?!) in the background, you can’t go wrong.  Learn the Two Step stamping technique with this video

Creative Tips –

  • For a pop on this card I wanted to use one of the new Chalk Talk Framelits as a spotlight.  I stamped in full color to really provide a pop with these fun bright colors.Too Kind 002 CU
  • To begin, I used my new Stampin’ Up! catalog.  I needed a color combination and I wasn’t feeling the two in the color coach.  I wanted to use Pistachio Pudding, so I started leafing through the pages in my catalog.  I saw the combination on page 14 and pulled out Pistachio Pudding, Island Indigo and Tangerine Tango.  It’s a striking bold combination that I just loved!  Tip – Did you know that those color blocks behind every project idea in the catalog together make color combinations – when in doubt…go to your catalog!Too Kind 002 Side
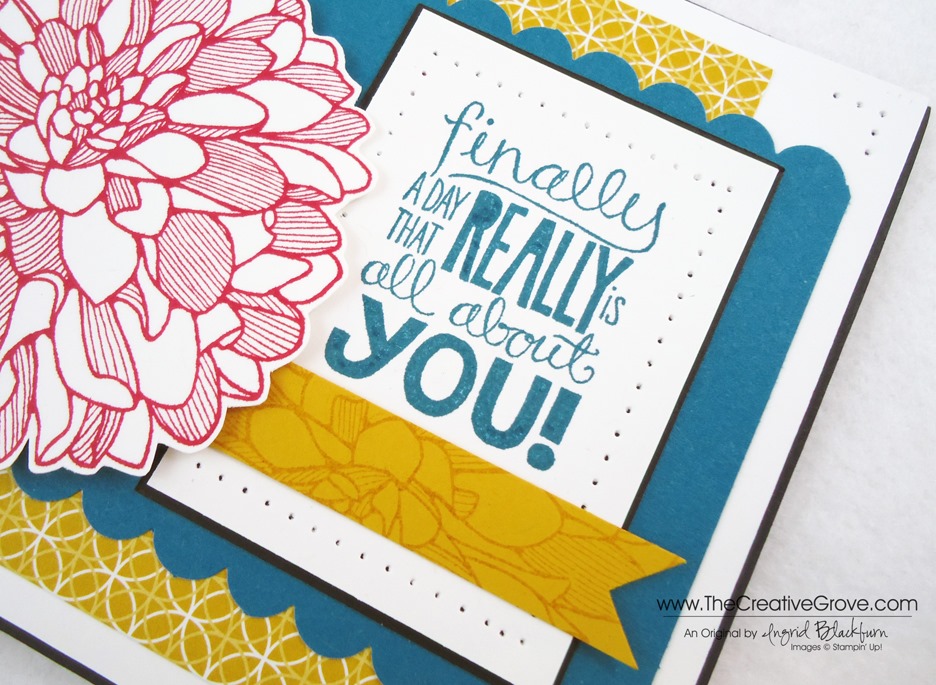
  • For a muted background I used tone on tone stamping with Pistachio Pudding for a few more images with the Too Kind set and the tiny flecks stamp from Gorgeous Grunge.  This one stamp is your best friend.  It it such a well executed image that it literally looks like you flecked little drops of ink onto your image.  Check out the entire set at the end of this post.  And to see more of the images in action, be sure to check out the two posts preceding this one.Too Kind 002 Height
  • I popped the tag up using Stampin’ Dimensionals so that it really stood out.
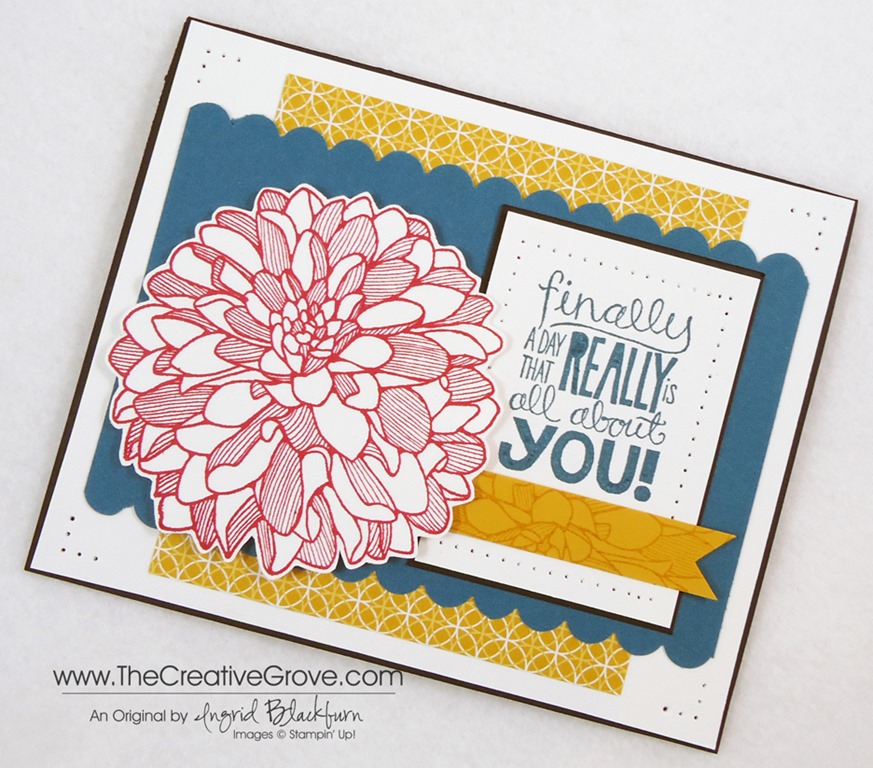
  • A complete Whisper White matte in between the Pistachio and Island Indigo might have been a little much, so I decided to go with simple squares to help frame my card front.  I love the end result.

It’s a quick, easy and fun bright card.  Anyone who gets this in the mail would immediately smile.  Don’t you think?  I’d love to hear your thoughts – squares or a full matte?  Do you like the color combination?  Have you used Pistachio Pudding yet?  It’s not an Ingrid color so I struggle with colors like this – I’d love to hear what you’ve paired it with so far!

Free Product Drawing

It’s new Catalog Extravaganza week and I’m continuing the celebration all weekend long until Sunday 10 pm!  Anyone who uses the hostess code QGTZ4ADP will get an entry into my drawing for $25 in free product for every $25 in product puchases (pre-tax/shipping) from my Stampin’ Up! store.  Good luck to you!

Signature-Snowflake-001_thumb1_thumb

To Shop 24/7 in the Creative Store – Click here!

Too Kind 002 Angle

Stamp Sets – Too Kind (130450c, 130447w), Gorgeous Grunge (130517) Ink – Pistachio Pudding (131177), Tangerine Tango (126946), Island Indigo (126986) Paper – Whisper White (100730), Island Indigo (122923), Pistachio Pudding (131294) Cool Tools – Chalk Talk Framelits (129983) Finishing Touch – Stampin’ Dimensionals (104430) 

Gorgeous Grunge 

Untitled-12

Wetlands and Gorgeous Grunge Stamp Sets

Wetlands 001 Main

I had two stamp sets that were must have’s for me from the new Stampin’ Up! catalog – Wetlands and Gorgeous Grunge.  Wetlands is one everyone should get – it’s easy to stamp with and has three sayings.  Gorgeous Grunge on the other hand is going to become a staple of mine.  Gorgeous Grunge is made up of filler and background type images, which are worth their weight in gold!  Read through to see how you can get this very card sent directly to you!

For today’s project, I wanted to do something fun for you.  I spent all day yesterday cleaning my computer from a virus that had taken it over, so while the scans were running and keeping me from blogging, I stamped!  Go figure?! On a side note – as I just typed this sentence about having a virus, my husband calls me to come look at his computer, and lo and behold – he had one too!  Weird, right?!!  Okay, back to stamping….

I started to create some of the projects for my online brayer classes and I just had to do something that you would see with this stamp set!  I decided to launch a virtual brayer monthly club where those who become part of the CG brayer community will get exclusive projects each month – let me tell you, I was a sketching fool yesterday and then made some amazing cards!  That’s going to launch July 1st so stay tuned!Wetlands 001 Front

Creative Tips –

  • I wanted to use the Canadian Goose stamp so I decided to highlight this amazing stamp by using one of the coolest new framelits that we have – Chalk Talk.  This is the large tag in this cool set. 
  • I stamped the goose in Basic Black and hit it with my heat tool to set it.  The new black ink in this pad rocks.  The color is so rich.  Since it reacts with our Whisper White in a way that leaves it a bit wet, the best thing to do with it is to hit it with the heat tool to properly set it so that it doesn’t smear. 
  • Once the goose was dry, I created a mask out of print paper and then added some grass.  TIP – You want to use printer/copy paper rather than cardstock when creating masks – they aren’t as thick and you will get a better stamped image of the back image.  When you use card stock, you get a white space because the card stock is thicker and your stamp won’t be able to get too close to the mask edge.Wetlands 001 Chalk Talk
  • I have to admit I didn’t know what kind of bird this was, so I googled wetland birds and there she was – a Canadian Goose.  I like my images to have some factual representation to them, so I colored it exactly as I saw it.  I used my Aqua Painter to get a light look using Sahara Sand.  Because I used our Basic Black instead of StazOn, I knew some of the black would smear with the water – I was looking for that.  It gave me just the right look that this bird had.  I added a little Smoky Slate to the neck and beak, and my bird was done.
  • My grass was stamped first in So Saffron and then directly in Pear Pizazz before stamping.  I wanted the blend of color.  To finish the grass, I filled in a few blades on the left and right and wherever needed using my Pear Pizazz Stampin’ Write Marker.  Wetlands 001 Side
  • I sponged the edge of my Chalk Tag tag with Smoky Slate and sponged a little at the top of the tag like a cloudy day.  I have to admit, that was a result of my getting a little black on my tag from my finger.  It’s the perfect way to cover up an unwanted smudge.  I actually love the end result – I love when that happens!
  • For a little texture behind the tag I added the lined stamp from Gorgeous Grunge.  I stamped this image four times top to bottom.  I trim my stamps, so I knew exactly where the edge was for perfect placement.  I love this stamp and I know you’ll see it a ton from me.  This stamp set will quickly become one of my most used along with Sweet Essentials.  I’m calling it now!
  • For the greeting, I copied the white with Smoky Slate sponging and stamped it in Basic Gray.  I added an individual wheat stalk to it in So Saffron/Pear Pizazz to tie it back to my tag.  Learn how I create my Banner FlagsWetlands 001 Banner
  • Some drama was needed for this crisp looking card, so I popped up the banner and tag before matting my Smoky Slate card front to a piece of Basic Black cut just 1/16” larger.  I adhered that to a Pear Pizazz card base.  The proportion of color is just right. 
  • For the finishing touch I added a few Pearl Basic Jewels in triangles.  It’s the perfect touch.

I hope you love the end result.  I have one of these cards that I’m going to send to a random winner!  All you have to do is leave me a comment.  Tell me what you like about it or the stamp sets I used.  Have a great stamping day!

Signature-Snowflake-001_thumb1

To Shop 24/7 in the Creative Store – Click here!

Wetlands 001 Angle

Stamp Sets – Wetlands (126697c, 126695w), Gorgeous Grunge (130517c, 130514w)  Ink – Smoky Slate (131179), Basic Gray (126981), So Saffron (126957), Pear Pizazz (131180), So Saffron and Pear Pizazz Stampin’ Write Markers (131264) Paper – Whisper White (100730), Smoky Slate (131202), Basic Black (121045), Pear Pizazz (131201) Cool Tools – 1” Square Punch (124094), Chalk Talk Framelits (129983), Stampin’ Sponges (101610) Finishing Touch – Stampin’ Dimensionals (104430), Pearl Basic Jewels (119247)

Untitled-12Gorgeous Grunge

Chalk Talk Bundle

Regarding Dahlias Mojo

Good Morning!  It’s that time of the week again – Mojo Monday and today I broke out my new Regarding Dahlias stamp set.  I have been dying to use this one.  This image is on the same level as the Blooming with Kindness flower.  Having these stamp sets in your arsenal makes you a superstar because they completely rock! I also decided to use my Eastern Elegance Designer Series Paper for the first time.  If you saw my post yesterday about the Beautifully Baroque Bundle – you’ll love this set of DSP.  It fits perfectly with the Baroque image. 

Here’s the Mojo Monday sketch and my interpretation, I sure hope you like it – leave me a comment if you do!

        Mojo297SketchRegarding Dahlias 001 Front

Creative Tips –

  • I struggled with the dimensions on this card because I knew I wanted to use the flower as a focal point, so I just stretched the size of the card to 4 1/2” x 5 1/2”. 
  • After I chose to use the stamp set, I decided on which paper to use.  I liked the simple elegance of the Crushed Curry patterns in the Eastern Elegance DSP collection, so I checked my new Color Coach for combinations with Crushed Curry.  I quickly settled on the second one with Island Indigo and Real Red.  I have to admit, I question a lot of these combinations – as you know, I’m color challenged!  But low and behold, it’s an awesome combination!
  • I added the Island Indigo Matte with the top and bottom punched using our Scallop Edge Border Punch.
  • I stamped the Dahlia in Real Red and cut it out using my Paper Snips.
  • Regarding Dahlias has an awesome amount of sayings and I really wanted to use the “hi” that comes with this set, but I needed a saying a bit larger – tall and skinny to be precise to fill the square portion of the sketch.  So I took out my new Really Good Greetings set and chose this one.  I think it works perfectly.
  • At first I cropped the Whisper White and Basic Black matte to just the right size, but I knew I wanted to paper pierce and to add the banner I needed to stretch the matte.  I don’t know why I don’t automatically go to do that, but I have to admit, Julee Tilman, who designed the sketch and is the owner of Verve Stamps, really did a great job.  I wasn’t convinced my card would come out so awesome, and I love it!
  • The colors are just right and to continue my paper piercing motif, I added a little to the corners and around the greeting.  Like I always say, paper piercing is the cheapest embellishment in your arsenal!
  • For the banner, I originally had just a plain piece of Crushed Curry card stock there, but then replaced it with one that was stamped tone on tone with the Dahlia stamp.  I like the subtle addition.  It’s better than having too many plain pieces of card stock.  What do you think?
  • Finally, for a tiny bit of drama to the card I popped up the dahlia.  After all, it is the focal point for me!  I do think all the remaining components balance out the design and card.  Now it’s your turn!

Let me know what you think in the comment section, I’d love to hear from you!

Signature-Snowflake-001_thumb1

To Shop 24/7 in the Creative Store – Click here!

Stamp Sets – Regarding Dahlias (130327c, 130324w), Really Good Greetings (130333c, 130330w)  Ink – Island Indigo (126986), Crushed Curry (131173), Real Red (126949) Paper – Whisper White (100730), Island Indigo (122923), Crushed Curry (131199), Basic Black (121045), Eastern Elegance DSP (130131) Cool Tools – 1” Square Punch (124094), Scallop Edge Border Punch (119882), Paper Piercing Tool (126189), Stampin’ Pierce Mat (126199), Essentials Paper Piercing Pack (126187), Chevron TIEF (127749) Finishing Touch – Stampin’ Dimensionals (104430), Pearl Basic Jewels (119247)

Regarding Dahlias    Really Good Greetings

Eastern Elegance

Beautifully Baroque Bundle

Beautifully Baroque 001 Main

Let me introduce you to one of my must have’s out of the new catalog this year – the Beautifully Baroque bundle.  Two products are bundled for a 15% discount – this stamp, Beautifully Baroque and the Baroque Motif Textured Impressions Embossing Folder.  And this card is the perfect combination of the two.  I hope you love it!

Creative Tips –

  • Baroque reminds me of palaces in Europe and regal things.  So I naturally gravitate toward the color of royalty – purple.  I chose the Elegant Eggplant color to bring that royal quality to my project today.Beautifully Baroque 001 Side
  • This stamp only comes in the wood mount option.  I stamped my image using the Stampin’ Mat so that I would get a good solid image.  The stamp itself if rather large, and I didn’t want to miss the middle.  The Mat helps give me a nice firm cushioned base so that I can stamp larger images and get even pressure everywhere, not just the edges, it’s a miracle worker!
  • To accentuate it, I cut out my image and put Stampin’ Dimensionals on it.
  • To add some glitz to my image, I used a 2 way glue pen and let it dry for a few seconds before adding some Dazzling Diamonds to it.  I didn’t want to over do it, so I just added a little on the longer lines.  Beautifully Baroque 001 CU
  • For the background, I ran a 3 3/4” x 5” piece of Whisper White through my Big Shot using the Baroque Motif TIEF folder and matted it onto my Elegant Eggplant base.
  • I made a banner using my 1” Square Punch.  The greeting is from the new set – Four You which has four great greetings for every occasion! Click Here for a video on how to make perfect banners.Beautifully Baroque 001 CU 1
  • To give the card a little drama, I popped up my banner with Stampin’ Dimensionals and then figured out the spacing for my main image and my banner.  Don’t just adhere it first – use both to get the proper spacing.
  • Once adhered, I added some Rhinestone Basic Jewels.  The ironic thing is if I look at them, I see the Eiffel Tower! Beautifully Baroque 001 Front
    This is a fun project that’s pretty quick and quite simple.  The glitz of the Dazzling Diamonds and Rhinestones really sets this project apart from a just stamped one!

Are you getting my Exclusive Video Series?

Be sure to sign up for my Creative Tips Newsletter and get the latest Creative Grove news in addition to my free Creative Techniques Video Series!  Don’t miss out on our creative community – the only way to get this exclusive content is to sign up in the box on the upper right or click here.

Signature-Snowflake-001_thumb1_thumb

To Shop 24/7 in the Creative Store – Click here!

Beautifully Baroque 001 Angle

Stamp Sets – Beautifully Baroque (130895),  Beautifully Baroque Bundle (132732) , Four You (130538c, 130535w) Ink – Elegant Eggplant (126969) Paper – Whisper White (100730), Elegant Eggplant (105126) Finishing Touch – Two Way Glue (100425) Dazzling Details (102023), Stampin’ Dimensionals (104430), Pearl Basic Jewels (119247)

Untitled-12Beautifully Baroque Bundle

Four You

Too Kind Stamping Video

Too Kind 001 Main Espresso

I thought today I would do a technique video for you.  The new Too Kind stamp set is a great simple stamp set to make wonderful quick and easy cards.  Here I chose a fun color combination using my new color coach for a great little card set.  Enjoy!

Two Step Stamping Technique Video


Measurements –

  • Whisper White card front – 3 5/8” x 4 7/8”
  • Early Espresso – 3 3/4” x 5”
  • Whisper White Card Base – 4 1/4” x 5 1/2”

Signature-Snowflake-001_thumb1

To Shop 24/7 in the Creative Store – Click here!

Too Kind 001 Angle

Stamp Sets – Too Kind (130450c, 130447w)  Ink – Early Espresso (126974), Calypso Coral (126983), Wild Wasabi (126959) Paper – Whisper White (100730), Early Espresso (119686) Finishing Touch – Stampin’ Dimensionals (104430), Pearl Basic Jewels (119247)

    Six Sided Sampler Fun Card

    Six Sided Sampler 001 Main

    I have been dying to get my hands on the new Hexagon Punch and Six Sided Sampler stamp set.  Today I made a quick Clean and Simple (CAS) card for one of my fun little make-n-takes for tonight’s New Catalog Kick Off stampin’ party at my house.  I’m breaking out all the new goodies that arrived in my box yesterday fresh off the UPS truck from Utah.  I just love the smell of new stuff! Smile 

    You’ll have to stop by tomorrow to see the other fun card made with Beautifully Baroque and Baroque Motif all the gals are going to make tonight.  Here are a few tips about this fun new set from the new 2013-2014 Catalog.  If you don’t have one, click here to find out how to get one shipped directly to you!

    Six Sided Sampler 001 Side

    Creative Tips –

    • The first thing I whipped out of my box was my brand new color coach.  This is a stampin’ girls or guy’s best friend.  I quickly flipped to a color that I love – pool party and chose the top color combination of Pool Party, Crushed Curry and Old Olive.  I wanted a nice bright cheery card. 
    • Next I stamped several of the hexagon images in my three colors, being careful to line them up just right.  I trim my stamps down to the edge which makes it easier for me to see exactly where my image is. 
    • I stamped the pool party hexagons also on my whisper white card stock  because I needed to see where my punches would be placed.  Six Sided Sampler 001 CU
    • I alternated colors as I went so that everything would be spaced just right.
    • I stamped two hexagons on a piece of scrap paper and punched them out using the brand new hexagon punch.  I can see that we will quickly become friends! Smile
    • I just love the three sayings that come with this stamp set (one of my favorite things – when stamp sets have sayings).  I chose the one I liked the best and stamped it in my main color – Pool Party in the open space.  Six Sided Sampler 001 Height
    • My white front is 3 3/4” x 5”, my pool party front is 3 7/8” x 5 1/8” and my white card base is 4 1/4” x 5 1/2”.
    • I added a few small Pearl Basic Jewels to add a little fun finishing touch to my card and popped up my two punched hexagons.Six Sided Sampler 001 Front

    You can see that I free hand stamped this card, if I was worried about being absolutely precise, I would use a Stamp-a-Majig.   I hope you love this fun little card!  See you tomorrow – off to finish setting up for everyone today….be sure to check back for specials, retired merchandise and online fun tomorrow. Smile

    Signature Snowflake 001

    To Shop 24/7 in the Creative Store – Click here!

    Six Sided Sampler 001 Angle

    Stamp Sets – Six Sided Sampler (130956c, 130953w), Six Sided Sampler Bundle (132724c, 132725w) Ink – Pool Party (126982), Crushed Curry (131173), Old Olive (126953) Paper – Whisper White (100730), Pool Party (122924) Cool Tools – Hexagon  Punch (130919) Finishing Touch – Stampin’ Dimensionals (104430), Pearl Basic Jewels (119247)

    Six Sided Sampler Bundle

    Secret Garden DIY Wedding Invitations

    Secret Garden 004 DIY Wedding Set

    It’s finally a good few days into June, so I’ve been thinking of weddings.  I thought I would showcase a simple but elegant Wedding set that fits every brides budget.  This is great little set that covers the invitation, thank you card and place card.  There is no question, the wedding invitations and paper items that go along with it will run any bride a pretty bundle.  With Stamps, ink and any word processing program you too can make amazing item for your wedding without paying an arm and a leg.

    Secret Garden 004 Wedding Invite

    Creative Tips –

    • Stampin’ Up! colors are great for just this purpose.  The inks are vibrant and rich.  Here I chose Elegant Eggplant and Perfect Plum.
    • My wedding invitation is 8 1/2 x 5 1/2” and fits into an A9 envelope.Secret Garden 004 Invite Front-Back
    • I used my word software to print onto a piece of 8 1/2 x 11 piece of cardstock.  I first created two columns.  One side had my Invitation and the other column had my reception information.  This invitation/reception card is front and back to save on the budget.
    • My Thank You card uses our Notecard and Envelopes package.  They are pre-scored for your ease and makes a quick and simple Thank You card.  The Thank You stamp is from our Lacy & Lovely stamp set, but The Thank You in our new Four You Stamp set would be perfect also.Secret Garden 004 Thank You Card
    • The Place Holder card is also quite simple.  I can get 16 per page printed at 1 1/4” x 3”.  The full size is 3” x 3 1/4” folded so that it’s 1 1/2” x 3 1/4”.Secret Garden 004 Place Holder
    • For a little variety I made the Table Number out of our Island Indigo Paper, but it is stamped with the same stamp set.  I ran 1/2 a sheet through on our Mini Milk Carton Die through the Big Shot for the base.  I filled it with rice and used a small dowel for the stick.  I printed the table number twice and matted it twice.  I adhered them together with Sticky Strip.  It’s a cute little item that does not take up much place.Secret Garden 004 Table Number

    Overall, there are so many ideas out there for weddings.  This set will run you $151 before shipping and tax, and you’ll have an additional $25 to spend from the hostess benefits.  The best part about it – it makes 100 invitations, RSVP Cards/Envelopes, Thank You cards and place cards.  Now that’s not bad for something that’s elegant and full sized.  Here’s what you will need:Secret Garden 004 DIY Wedding Set

    Invitation Kit – 100 Invitations w/reception card, RSVP cards/Envelopes, Thank You cards/Envelopes + Coordinating Place Cards

      • $8.50ea (4) Ultra Smooth Whisper White Cardstock (40 sheets each) (100730)
      • $6.95ea (3) 8 ½” x 11” Colored Cardstock (24 sheets each) (105126)
      • $5.95 (5) Note Cards & Envelopes (20 each) (131527)
      • $6.50 (3) White Envelopes (40 each) (107301)
      • $6.95 Snail Adhesive (104332)
      • $4.50 (2) Snail Refill (104331)
      • $25.95 Secret Garden Stamp Set Wood (129144c, 131940)
      • $5.95 (2) Coordinating Classic Ink Pads (126963, 126969)

    * Additional items – Kit price is based on a wood stamp set, if you order the clear, you will need the Starter Kit bundle Acrylic Blocks.  You will also need A9 envelopes and a paper trimmer.

      Signature Snowflake 001

    To Shop 24/7 in the Creative Store – Click here!

    Secret Garden

    Mojo Simply Sketched

    Simply Sketched 003 Main

    It’s the first Mojo Monday of the new Catalog!  So today I thought I’d use a few stamp sets that are brand new.  You’ve seen a few sneak peeks from me with Simply Sketched before, but and I thought I’d have some fun with the new color Crisp Cantaloupe.  I decided to pair it with Midnight Muse – primarily because I chose one of the color combinations in the catalog layout – I love how they label the colors for our ease.  And I needed it, as my Color Coach is en route to me in my very first order – I can’t wait to get it to play with all the cool new stuff!

                        Simply Sketched 003 FrontMojo296Sketch

    Creative Tips –

    • I decided to keep the sizes of the circles simple.  This would have been much easier with my brand new Circle Framelits (there are 10 sizes!), but they are somewhere crossing the US from Utah to Florida as we speak.  So I used my 2 1/2” Circle punch as my main size. 
    • I stamped my flower in Versamark and Midnight Muse before embossing it with Clear Embossing Powder.  Of course I used my Embossing Buddy first!
    • I chose to water color my image using Aqua Painters in various shades of Crisp Cantaloupe.  To get the darker highlights, I just went over my original coloring two to three times.  The stems I did in Pear Pizzazz – a new fav! Simply Sketched 003 CU
    • I added a little texture by embossing my back Crisp Cantaloupe circle with the Chevron TIEF folder.
    • I originally had my Pear Pizzazz piece of card stock plain, but the card needed a little something.  Enter the best background stamp in the world – Travel Journal Builder Wheel.  I have three stacked here, which was the perfect dimension.  You can also unmount your wheels and use them as regular stamps, did you know that?! I wheeled my Jumbo wheel with the three builder wheels on it on a Pear Pizzazz Ink Pad since I’m still waiting on my ink refills to make a cartridge.  Simply Sketched 003 Side
    • Once everything was layered just as I wanted it, I paper Pierced my corners first.  I chose to add five punches to the top and three to the bottom.  You don’t have to always do the same.  I used my Paper Piercing Tool, Stampin’ Pierce Mat and Essentials Paper Piercing Pack.
      • I used the stamp For You from probably one of the coolest new stamp sets – Chalk Talk which has the best framelits in the catalog.  It’s a very cool new tag set that has endless options!  You can even get it as a bundle and save 15%.  I punched it out using our 1 3/8” Circle Punch and popped it up using Stampin’ Dimensionals.Simply Sketched 003 Height
    • For a finishing touch I added three large Pearl Basic Jewels, and one medium to the greeting.  I love the end result and think the colors work well together.

    Today is the final day you can order from the retired lists and old catalog.  So don’t wait!!!  Of course you can order from the new catalog too. Smile  If you don’t have your very own copy, click here to find out how to get one shipped directly to you.

    Signature Snowflake 001

    To Shop 24/7 in the Creative Store – Click here!

    Simply Sketched 003 Angle

    Stamp Sets – Simply Sketched (129672c, 129669w), Chalk Talk (130634c, 130631w) Chalk Talk Bundle (132730c, 132731w), Travel Journal Builder Wheel (3) (126937)  Ink – Crisp Cantaloupe (131176), Pear Pizazz (131180), Midnight Muse (126860), Versamark (102283) Paper – Whisper White (100730), Crumb Cake (120953), Midnight Muse (126843), Crisp Cantaloupe (131298), Pear Pizzazz (131201) Cool Tools – Aqua Painters (103954), 2 1/2” Circle Punch (120906), 1 3/8” Circle Punch (119860), Paper Piercing Tool (126189), Stampin’ Pierce Mat (126199), Essentials Paper Piercing Pack (126187), Chevron TIEF (127749) Finishing Touch – Stampin’ Dimensionals (104430), Pearl Basic Jewels (119247)

    Chalk Talk Bundle

    Simply Sketched Stamp Set