CAS Non-traditional Christmas

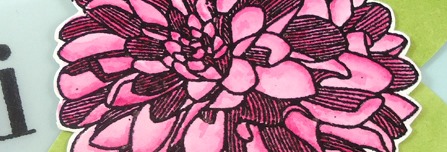
Do you ever use non-traditional Christmas colors or images? Today’s projects were inspired from Muse: Christmas Visions. Chris Blagrave created this non-traditional flower card. Her reasoning behind it was that it reminded her of a Poinsettia. Here is mine along side her creation.

Chris Blagrave Muse Christmas Visions   One Layer Christmas Cards

I love the clean and simple style of the card, it’s crisp and straightforward. The sentiment pops and the warm silver is perfect for it.

When I look at her card, I think Peacock for some reason – maybe it’s the color and the way her flower fans out. I didn’t have a peacock image, and I didn’t want to use Distress which has the perfect shade – Peacock Feathers. I wanted to use Bermuda Bay by Stampin Up, so off I went to create. My original project was this:

Non Traditional Evergreen Christmas Cards

Although it is a great simple CAS card, something just wasn’t sitting well with me as far as the inspiration went. So I created the coral embossed card instead.

The image is perfect, and I love the Teal Christmas in-between the Silver Embossed Joyful Wishes – that looks great! You will want to use a Bermuda Bay Marker to do that part first, then you would use a stamp-a-majig/Misti to add the Versamark Words to emboss them in the Pewter.

My Non-Traditional Christmas Creation

I also created one where the coral was going off the side and a bit smaller so I could layer it with a pop of the Bermuda Bay teal color.  You can also add a few sequins – it didn’t necessarily need it, but I couldn’t resist! Smile

Beach Christmas Cards

Overall, what you’ll love the most is how quick and easy these cards are to make. I literally made all three in a just a few minutes – they all work for Christmas cards.

I found it so interesting that the Coral stamp worked so well as a non-traditional Christmas image. It’s a beauty when embossed – and would be good for any occasion – especially weddings!

TIP – You will want to stay with a rich feel, so you’ll want to use Pewter instead of traditional Silver. It’s a bit warmer and muted which suits this card much better.

If I had to pick an absolute favorite…it’s the One Layer one! The simplicity and ease of just the single layer is stunning.

How about you? Which one is your favorite? Tell me in the comments – I’d love to know.

Quick DIY Christmas CardsClean and Simple Christmas Cards

Have fun crafting, be sure to whip out your Bermuda Bay or any Teal color – Peacock Feathers Distress would be great! Try the non-traditional Christmas route…you may just surprise yourself!

Signature 24 pt


[optin_box style=”13″ width=”500″ alignment=”center” action=”https://www.aweber.com/scripts/addlead.pl” disable_name=”Y” method=”post” email_field=”email” email_default=”Enter your email address” integration_type=”aweber” double_optin=”Y” list=”3846012″ name_field=”name” name_default=”Enter your first name” name_required=”Y”][optin_box_field name=”headline”]If you enjoyed this tutorial…[/optin_box_field][optin_box_field name=”paragraph”]PHA+4oCmeW914oCZbGwgbG92ZSBvdXIgPGVtPjxzdHJvbmc+PHNwYW4gc3R5bGU9ImNvbG9yOiAjMjQ0YzVlOyI+ZnJlZTwvc3Bhbj4gPC9zdHJvbmc+PC9lbT5zdWJzY3JpYmVyIG9ubHkgdmlkZW8gc2VyaWVzLiDCoExlYXJuIG5ldyB0ZWNobmlxdWVzIHRocm91Z2ggb3VyIDxzcGFuIHN0eWxlPSJjb2xvcjogIzI0NGM1ZTsiPjxlbT48c3Ryb25nPmV4Y2x1c2l2ZTwvc3Ryb25nPjwvZW0+wqA8L3NwYW4+Q3JlYXRpdmUgVGlwcyBlLWxldHRlcsKgYW5kIHN1YnNjcmliZXIgb25seSB2aWRlbyBhbmQgcHJvamVjdCB0dXRvcmlhbHMhPC9wPgo=[/optin_box_field][optin_box_field name=”privacy”][/optin_box_field][optin_box_field name=”top_color”]undefined[/optin_box_field][optin_box_button type=”1″ text=”Send me exclusive tips!” text_size=”32″ text_color=”#000000″ text_bold=”Y” text_letter_spacing=”0″ text_shadow_panel=”Y” text_shadow_vertical=”1″ text_shadow_horizontal=”0″ text_shadow_color=”#f6fefb” text_shadow_blur=”0″ styling_width=”50″ styling_height=”19″ styling_border_color=”#000000″ styling_border_size=”1″ styling_border_radius=”6″ styling_border_opacity=”100″ styling_shine=”Y” styling_gradient_start_color=”#a3b640″ styling_gradient_end_color=”#80902c” drop_shadow_panel=”Y” drop_shadow_vertical=”1″ drop_shadow_horizontal=”0″ drop_shadow_blur=”1″ drop_shadow_spread=”0″ drop_shadow_color=”#000000″ drop_shadow_opacity=”50″ inset_shadow_panel=”Y” inset_shadow_vertical=”0″ inset_shadow_horizontal=”0″ inset_shadow_blur=”0″ inset_shadow_spread=”1″ inset_shadow_color=”#80902c” inset_shadow_opacity=”50″ location=”optin_box_style_13″ button_below=”Y”]Send me exclusive tips![/optin_box_button] [/optin_box]

CAS Watercolor Stamped Thanks

As our three week vacation in the Mediterranean comes to an end, we spend our final day today in Rome…sigh.  I’ll miss the Cioccolato Gelato, Margarita Pizza Neapolitan, Espresso and more historical sights than I can possibly store away in my mind.  What I won’t miss is are the crowds or the street hawkers…lol! To catch a glimpse into some of my favorite sights, be sure to see the end!

20141122_140909

With all this historical overload, today I need a little clean and simple!  Have you tried watercolor stamping yet?  If not, what are you waiting for!?! Today’s project is actually a product of  using what’s left over from my main project.  Always a great thing.

Recently I shared an awesome Watercolor Stamped Birthday Butterfly card for the VIP Community and figured, I already had the ink on my stamp, why not keep going with a scrap?  When I cut tags with my Chalk Talk Framelits by Stampin’ Up, I always cut two or three at a time and keep them in a scrap bin on my desk.  This tag is definitely one of my favs.

CAS Watercolor Stamped Tag CUp

I had inked up my Chevron background stamp with Seedless Preserves Distress Ink, gave a couple spritzes with my mini mister, and then with the left over ink after my main project, threw a tag cut from Stampin Up’s Whisper White card stock on there and what you see is what was left.  Don’t you just love the grunge part of how the tag turned out?  I couldn’t do that if I intentionally tried…lol.  It was a complete product of second generation stamping.

Watercolor Stamped Tag 001

I popped it up on an angle, added a die cut thanks using my Simon Says Stamp Thanks steel die and there you have it – a card in literally minutes!  Leaving all the white gives it such a great clean and simple look – for more on that check out this article on Clean and Simple Defined.

Watercolor Stamped Tag 004

Have you tried watercolor stamping yet?  Show your projects on our Facebook page here, or tell me what inks you’ve tried it with in the comments below!  And definitely tell me what you think of all those street hawkers in places like, Athens, Rome or Paris!  I know I’m not alone…lol!  Here are a few of my favorite photos from these past few weeks…

ETP Planners20141106_133333Sicila Market 001PursesLucca DoorwayPisa and CathedralTower of PisaLucca City WallCapuccinoSaranay Lunch SpotTuolon Market 001Naples Pizza 001Rome ForumRome ForumColosseumRome PantheonNaples Marketplace 001

Ciao for now –

Signature

Of course, if you’d like to see more or follow us along our Travel adventures, be sure to click right here to see and like our Travel Facebook page

A Mojo Celebration

Are you getting ready for the 4th of July in the States?  I’m not sure why the 4th of July popped into my head this morning, but I thought, why not go with that color combination!  Today’s sketch is a pretty straight forward one. Here is the Mojo Monday sketch and my interpretation:

Mojo351SketchMojo Monday (6)

The key to this project of me was to find a greeting that worked on a large enough banner. 

  • The butterflies have a pattern from a flower stamp on them for a little more interest. 
  • Mojo Monday (5)

  • The pattern stamped on the circle comes from an embossing folder.
  • The final pieces that pull this card together are the paper piercings in the corners & on the tag plus the final two pearls on the banner believe it or not. 
  • Mojo Monday (1)Mojo Monday (7)

Originally I just had pearls on the butterflies, but the card needed something.  I had ruled out pearls there when I tried the same size as the butterflies, but it really needed something.  Once you place the tiniest pearls you have on it, you’ll see that it all clicks.

Mojo Monday (2)

Be sure to check out the Mojo Monday challenge – it’s a great way to kick off the week in a creative way!

Signature-Blog

Interested in more great ideas than just on the blog – sign up for the Creative Tips List and I’ll send you a creative video series with several projects and techniques to try out!

Mojo Monday (4)

CAS Dahlia Mojo Monday

DSC01372

It’s been a while since I played along with the Mojo Monday challenge.  I have to admit, I’ve missed it!  I’ve been in a technique zone creating our new VIP Community here at the Grove (click here to find out more), so I threw a fun simple one into this project.  Sometimes when you have a cool texture that you’ve created for your card, making the rest clean and simple really allows it to stand out.

Here’s the sketch and my version.  You can see, I stayed pretty true this time.

Mojo349SketchDSC01375

Here are some tips on how to make this card, and join our Creative Tips list (on the right) to see exclusive free videos on how to make cards just like this:

  • Crumple your paper to create a faux leather look to your cardstock.  If you find it’s hard to do this, spritz it lightly with water.  Use the sweat from your palms to aid you in crumpling this up really well.
  • Cut your solid Navy strips thin – just 3/8” wide.
  • Adhere a thin strip of Cherry Cobbler and your Navy strips with Tombo Multi Liquid Glue.  When you alter cardstock, as with the crumpling, it becomes hard to work with.

DSC01376

  • Snip off the edges of all your strips and adhere your Sahara Sand cardstock to a 5 1/4” x 4” piece of white cardstock.
  • When adhering your large piece down, keep the same amount of space to the right, left and bottom.  It becomes an extended mat.
  • Cut a 2 1/2” circle with a circle punch, framelits or nestibilities. Stamp your Dahlia image in Cherry Cobbler.  Attach to your card front, leaving the same amount of space at the top as the bottom white to balance it out.  Use Liquid Glue on textured cardstock, dimensionals or foam tape to attach to the white to adjust for the height variance.

DSC01377DSC01378

  • Stamp your greeting and emboss in white on Navy cardstock.  Create a banner with your snips or hexagon punch (see video here on how to do that).  Attach with dimensionals onto the white, glue onto other parts.
  • Pierce edges of your card with a paper piercer and a template.
  • Add large pearls to Cherry Cobbler cardstock to finish your card.
  • Pop your card front up onto your card base.

DSC01373

You’re done!  It’s a fun little project, isn’t it?  Let me know what you think!  Leave me a comment below.  Happy Creating!

Signature-Blog

Interested in learning stamping techniques each month?  Check out our new VIP Community!


Quick and Easy Masked Tag

DSC01313

Sometimes you just need a really super quick thank you card.  Today I thought I’d share a fun, quick and super easy way to add a custom background to your project.  Create your own stencil from whatever background you’d like, here you see a tag made from the Chalk Talk Framelit set by Stampin’ Up!, use a sponge to mask a background and complete your card!

DSC01318

To see this project as part of the Creative Tips video series, be sure to join the Creative Tips list!

Creative Tips –

  • Create your mask out of copy paper.
  • Sponge lightly with Wild Honey Distress ink DSC01316
  • Stamp two step stamping images using Cherry Cobbler and Old Olive
  • Stamp greeting from Lots of Thanks by Stampin’ Up! in Memento Tuxedo Black
  • Spritz black ink from a dye based black marker and color spritzer by Ranger DSC01317
  • Pop up panel on dimensionals and add pearls.
  • Complete card – final dimension is 4 1/4 x 5 1/2 DSC01322

To see even more tips and exactly how I did all the steps above, subscribe to the Creative Tips list and stay in the know!


Are you interested in learning more?  Try one of our classes out.  Click here to find one that interests you!

Signature Snowflake 001