Warmth and Wonder: Just out of the woods

Warmth & Wonder Christmas Brayer Card 008

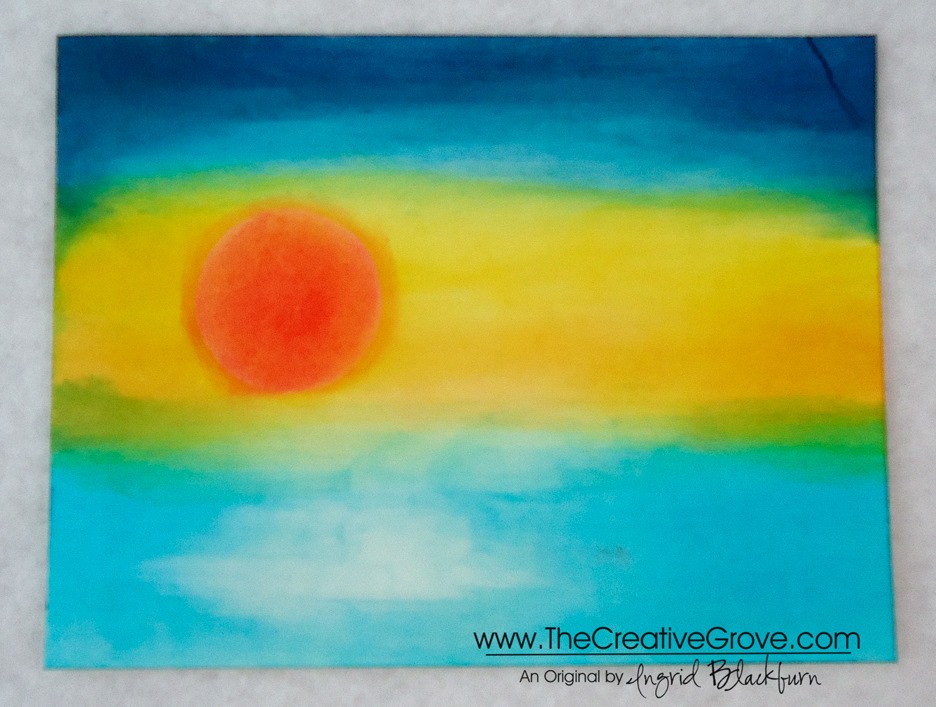
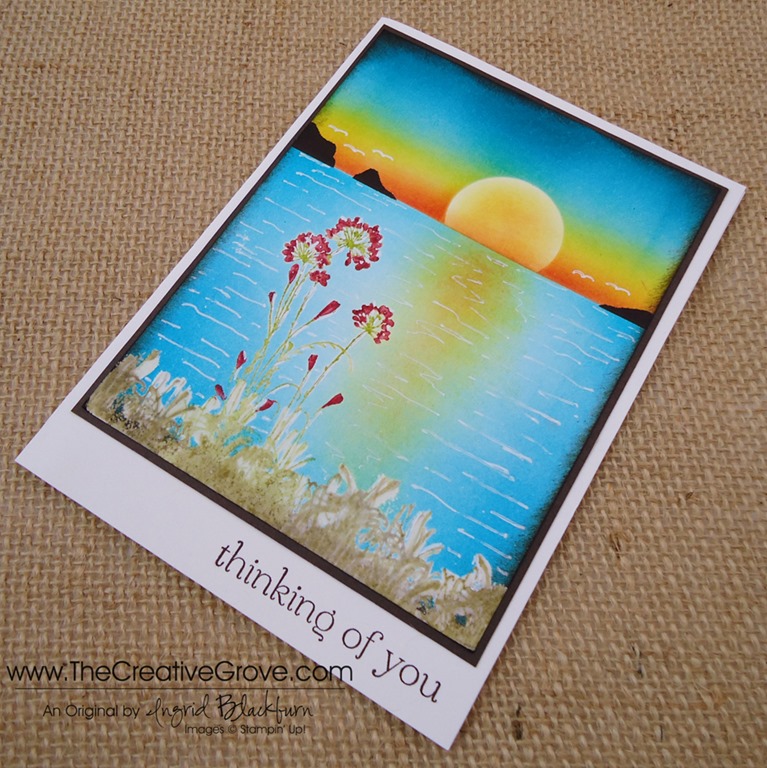
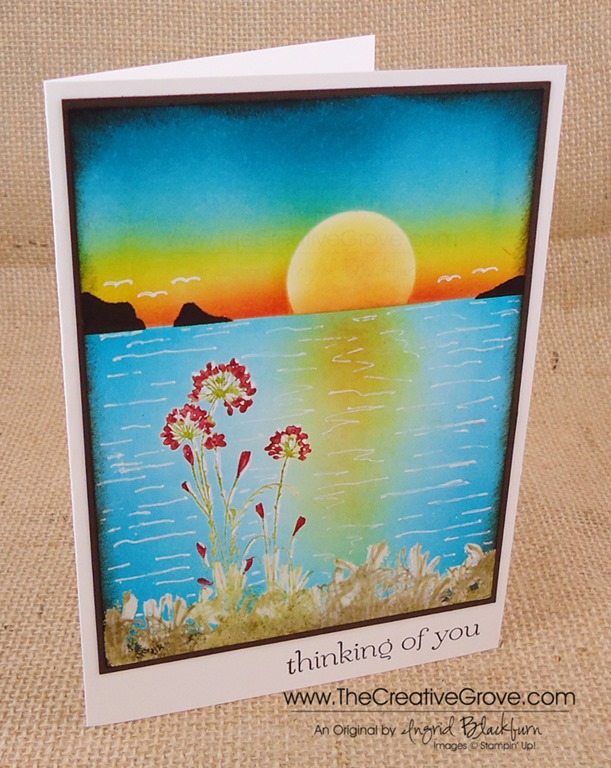
Today, I wanted to make a simple Creative Scene using advanced Brayer techniques and the Holiday Hostess Set Warmth and Wonder.  I have to confess, I slept in today.  Usually I start Mojo Monday at 5 am, that’s what time the sketch goes up!  So as I began to wake up and saw the sketch, I knew this would take me a while.  I’ve been dying to make this card, and today’s sketch was perfect for it!

Many of you have wondered how to make amazing scenes like this.  They look so simple, but actually aren’t.  They involve many different techniques and steps, but every person can make this card – regardless of your stamping ability.  In our classroom, we have a few Brayer classes that teach you step by step with precise videos to help bring the inner artist out in each of you.  The advanced class is in pre-release, save $10 until 10/24 here.  Similar Brayer Cards:

      Evergreen 003 005Plant Hope 002 Side

I needed a custom size card and envelope for this card.  I didn’t want the creative scene to be too small.  So I started out by deciding how big my scene should be and built my card around that.  With the Envelope Punch Board I can make any size envelope I need, so I didn’t have to worry about that!  What a stress relief!  Click here for a quick video on how to make a custom sized envelope.  Here’s the Mojo Monday sketch and my project.

            Warmth & Wonder Christmas Brayer Card 011Mojo316Sketch

Creative Tips –

  • Create the scene using Early Espresso, Always Artichoke, Soft Sky and Marina Mist, embossing powders, masks, a brayer and some sponges.  You will want to pop it up on dimensionals to help set it apart from the rest of the card.Warmth & Wonder Christmas Brayer Card 013
  • Sponging the various pieces of the card tied it together.  Sponging the creative scene draws the reader into it.
  • The background was sanded using the Stampin’ Sanding System in a random fashion. 
  • The circle was cut out with the Circle Collections Framelits – it’s the 3rd largest.Warmth & Wonder Christmas Brayer Card 014
  • To get the diagonal stripe on the vellum, use the Stylish Stripes Embossing Folder.
  • The ribbon is Soft Sky 1/2” Seam Binding Ribbon Warmth & Wonder Christmas Brayer Card 020
  • The little banner flags are made with paper from the Winter Frost Designer Series Paper Stack and the hexagon punch.  View a video to see how to make banner flags here
  • It was hard to figure out how to incorporate a greeting.  You don’t want to take away from the scene too much, so a simple banner with a greeting from this very set brought out to the circle worked well.Warmth & Wonder Christmas Brayer Card 007
  • Here is the card height so you can see the height of the various elements.
    Warmth & Wonder Christmas Brayer Card 010
    If you’d like to learn how to use your brayer along with many other tools to create little works of art like this one, check out all the classes we have.  We even have a bundle here at a huge savings!
    Have a creative day!
    Signature Snowflake 001

Shop 24/7 in the Creative Online Store – click here

Tropical Sunset Stampscape

Stampscapes 002 006

If you hadn’t noticed, I love creating sunset scenery.  Today I have a tropical sunset using a great image from Stampscapes.  This is the perfect birthday card for someone who would love a little of the tropics to escape to.  For me – I’m sending this to my mom for her Birthday this week.  I know she’ll love it.

I worked on glossy paper with a colorbox sylus tool for this scene and Stampscapes 002 008

Creative Tips –

    • I used the now retired Stampin’ Up! glossy paper as my base.
    • To keep my paper wet so that my stylus could move a bit better, I worked in sections.
    • I gave the middle of my paper a good coat of So saffron in the middle, followed by Daffodil Delight and Crushed Curry.  I had masked the sun, so I had a white sun when done.
    • Next I layered a small amount of Tangerine Tango towards my horizon line.  Stampscapes 002 002
    • I created my sun first with a light coating of Crushed Curry followed by Real Red.  I worked my stylus just outside the white lined border to not have such a defined line, but have that white outline that you see in the sun.
    • For my sea, I began with a light coat of Soft Sky.
    • Next I layered Pool Party, Bermuda Bay and a little Tempting Turquoise into my water in a streaking motion.  I kept a little white area off to the left just below the sun.
    • For the sky I started with Soft Sky, followed by Tempting Turquoise, Marina Mist and Island Indigo.Stampscapes 002 010
    • I stamped my tropical island, birds and water texture stamp in Black.  I wanted the island in a particular spot, so I used a Stamp-a-Majig to position my stamp.  Of course I dropped it as I lifted it, so I had to stamp it twice since on the glossy, the Black ink was still wet and smeared.  I was able to save the image!
    • I used a White Gel Pen to accent my trees and water.

 Stampscapes 002 008

My colored base was so pretty – I almost didn’t want to stamp on it!  Something unexpected happened to me – This scene made me want to paint.  So I have a feeling the more I do these types of scenes on paper – the more I will definitely venture into the art of painting.  Do any of you paint?  If so, what is your favorite medium?Stampscapes 002 007

Try our Online Brayer Class

Creative Scenery classes using a brayer have by far been my biggest hit with stampers.  Learn how to create gorgeous gradual transitions with 100+ minutes of step by step detailed video instruction teaching you how to master this technique.  The end result – You will feel like an artist.  Best of all, you will look at your stamps in a whole new way, and try things you never would have thought to do before.  Find out more here

Signature-Snowflake-001_thumb1


[optin_box style=”14″ alignment=”center” action=”http://www.aweber.com/scripts/addlead.pl” disable_name=”Y” method=”post” email_field=”email” email_default=”Enter your email address” email_order=”1″ integration_type=”custom” double_optin=”Y” name_default=”Enter your first name”][optin_box_hidden][/optin_box_hidden][optin_box_code]

[/optin_box_code][optin_box_field name=”headline”]If you enjoyed this tutorial…[/optin_box_field][optin_box_field name=”paragraph”]PHA+PHNwYW4gc3R5bGU9ImNvbG9yOiAjNjQ2MzVlOyI+TGV04oCZcyBzdGF5IGluIHRvdWNoISBNeSBvY2Nhc2lvbmFswqA8L3NwYW4+PHNwYW4gc3R5bGU9ImNvbG9yOiAjNjY2Njk5OyI+PHN0cm9uZz48ZW0+ZXhjbHVzaXZlPC9lbT48L3N0cm9uZz7CoDwvc3Bhbj48c3BhbiBzdHlsZT0iY29sb3I6ICM2NDYzNWU7Ij5DcmVhdGl2ZSBUaXBzIGUtbGV0dGVyIHdpbGwgdGVhY2ggeW91IHRvIG1ha2UgcHJvamVjdHMgdGhhdCB5b3UgbG92ZeKApjwvc3Bhbj48L3A+Cg==[/optin_box_field][optin_box_field name=”privacy”][/optin_box_field][optin_box_field name=”top_color”]undefined[/optin_box_field][optin_box_button type=”0″ button_below=”Y”]Send me exclusive tips![/optin_box_button] [/optin_box]

Stampscapes 002 009

Stamp Sets – Four You (130538c, 130535w), Stampscapes Stamps Ink – Memento Tuxedo Black, Soft Sky, Pool Party, Tempting Turquoise, Bermuda Bay, Marina Mist, Island Indigo, So Saffron, Daffodil Delight, Crushed Curry, Tangerine Tango, Real Red, Versamark Paper –Glossy White,Whisper White, Tangerine Tango Tools – Colorbox Stylus Finishing Touch – Black Embossing Powder, Signo White Gel Pen


Wetlands One Layer Card

Wetlands 003 009

It’s been a while since I’ve made a One Layer Card and the Wetlands stamp set is the perfect set for this.  Here is a creative scenery that’s quick, easy, cost effective and just beautiful for anyone receiving this in the mail.  So get out your brayers and sponges today, and follow along with the tutorial.

Creative Tips –

  • I created a mask for the top and bottom using two sheets of printer paper.  I have to admit, my first try at this was foiled because I only used one sheet and the ink bled through to my project.  That’s one of those argh moments!Wetlands 003 Side
  • I brayered my sky and water with Soft Sky and then added a touch of Island Indigo at the top.  My Island Indigo got a little too strong about 1/2” in so I went over it with more Soft Sky to blend it out.  You can usually blend out mistakes with a little more ink in a lighter color.
  • I tossed my top mask (the blue one) and flipped my bottom mask around.  I sponged in my Sahara Sand in a circular motion to create my land.
  • For the horizon, I used a straight edge piece of printer paper and sponged on a little Island Indigo.Wetlands 003 CU
  • I stamped my birds in Early Espresso, any lighter color would not stand out enough.  I tried Basic Gray and even that wasn’t dark enough.  To test out my colors, I stamped my birds on my scrap brayered piece of printer paper that I tossed.
  • Keeping my bottom mask in place I stamped the reeds in Wild Wasabi.  I’ve tried this in lighter shades of green before and they too aren’t dark enough.
  • Brayer cards with scenery work great if you have a focal frame at the bottom of your card, as if you were standing right there looking out at your scene.Wetlands 003 Front
  • Once I had my reeds where I wanted them, I colored my reed stamp in using my Wild Wasabi marker, but only colored the grass portion.  I stamped this over my images to make them a bit fuller and bring my focal frame a little closer to the middle.
  • Normally I would use my white gel pen for some highlights, but I wanted to keep this card light and airy and uncomplicated – so I decided to leave it out.

I love this card – best part – it only cost 1/2 a sheet of Whisper White.  So if you’re stamping on a budget and have to make a lot of cards – next time try some one layer cards!

Learn how to master the techniques behind this card 

Two comprehensive classes leave you feeling like an artist ready to create any scene possible with brayers and sponges.  Detailed step by step video instruction, and much more.  Check it out in the classroom here: Find out more here

Signature-Snowflake-001_thumb1

Wetlands 003 Angle

Stamp Sets – Wetlands (126697c, 126695w) Ink – Soft Sky (131181), Island Indigo (126986), Sahara Sand (126976), Wild Wasabi (126959), Wild Wasabi Stampin’ Write Marker (131264) Paper –Whisper White (100730) Cool Tools – Brayer (102395),Stampin’ Sponges (101610)

Untitled-12

So Long Farewell to the Spring Catalog…Project Parade!

Secret Garden 002 MainOh Hello 001 Main

We’ve had so much fun at The Creative Grove with the Spring Catalog this year.  The CG Crew felt this year’s mini catalog was the best one in 25 years.  So if there is anything that you were holding out on, don’t wait – tomorrow starts the brand new catalog year which means that today is the official LAST day to order from the Spring Catalog.  Some products made it into the new catalog, but most unfortunately did not.  So we bid good bye to several favorites.

Click on any image to see the card details and creative tips.

Ciao Baby 001 Main

Ciao Baby – I didn’t get to stamp with this set as much as I would like, but here is the first actual creative scenery card I’ve ever made actually based off a real life photo or experience.  It brings back such great memories of a wonderful day in St. Barts. Click Here for card details, creative tips and more photos

By the Tide – This was by far my most highly anticipated stamp set out of this year’s catalog.  I was dying to do an underwater scene like the one above and below.  The images were just begging to be brayered.  I love all the projects I’ve made with this set, and there were many more, just made as exclusive content for clubs and classes.  The top right one actually was a CG Crew project in January.  Click each photo for card details, creative tips and more photos.

By the Tide 003 Main

Collage Curios – This is a fun set that I was shocked didn’t make the new Catalog.  Here are a few easy projects that highlight this stamp set in a great way.  This project was acutally a CG Crew project in March.  We loved making this along with a necklace out of Soda Pop Tops.  Those little flowers from our 5/8” Flower Trim and Soda Pop Tops also didn’t make it, which makes me glad I’m stocked up!  The Soda Pop Top card features all the best from the Spring Catalog – Honeycomb Embossing Folder, Pool Party Core’dinations Paper, Paper Doilies, Hearts a Flutter Bundle, Oval Framelits, Collage Curios, Soda Pop Tops and 5/8” Flower Trim. Click each photo for card details, creative tips and more photos.

Collage Curios 002 Side

Hearts a Flutter – This set I had a ton of fun with around Valentine’s Day.  I love the coordinating framelits that come along with it as well.  As a bundle you save 15% which I just love!  And the framelit set has a banner flag die in it.  Below you see my use of the new Occasions Paper Piercing Templates in the Spring Mini – I just love all the different sizes of Hearts on the one of three templates.  The first project was my actual Anniversary card for my sweetie Michael and was a Just Cards Class card.  Smile Click each photo for card details, creative tips and more photos.

Swallowtail okay, I think we can all agree that this ended up being my surprisingly favorite stamp set out of this years Spring Catalog.  There are so many projects you didn’t even see with this amazing stamp too.  But this is still probably one of my top five cards I’ve made over the past five months.  My favorite detail is the Banner Flag.  Look closely – that’s the butterfly image stamped tone on tone under the Thanks.  I’ll miss that Thanks too – it’s part of the stamp set Kindness Matters which is retiring from the big catalog – and at $8.95 for the clear set is by far the best Stamp Set deal you’ll find.  I think that one stamp has gotten almost as much usage as Thinking of You from Sweet Essentials.  Click each photo for card details, creative tips and more photos.

Some more favorites from the Swallowtail Stamp Set.

Swallowtail 007 MainSwallowtail 004 Main

Do you want to get the latest specials and creative tips sent right to your inbox?  Then click here to sign up for my Creative Tips Mailing List!

Signature-Snowflake-001_thumb1_thumb

Into the Sunset with Serene Silhouettes

Today is about color.  I have to admit, I struggled with a project today…let’s just say that I can procrastinate with the best of them if I put my mind to it, how about you?  This is why I usually create between the hours of 5 and 9 am!  Well, if this is the result of a little procrastination every now and then, I guess it’s not that bad!  Today I focused on starting with three of the retiring colors as no other stamp set struck me with inspiration.  So it’s all about River Rock, Bashful Blue and Riding Hood Red today.

Once I knew what colors wanted, I went looking for inspiration on Pinterest and I happened to see a card with Serene Silhouettes and the rest is shall we say history.  Thankfully this stamp set isn’t going away, and I thought, humm….it’s been a few weeks since I whipped out my brayer.  I’m sure my friend and CG Crew member Amy has been wondering if my brayer got locked up in a drawer somewhere…she and I seem to text each other a new brayer project we’ve created almost every week it feels like…lol!

As I sat in front of my blank piece of 5.5” x 4.25” Whisper White paper, I thought of my Dad.  I grew up in San Francisco and we had a view of the Pacific Ocean from my house.  I’m lucky, I’ve seen my fair share of amazing sunsets over Ocean Beach.  And on a good day, you can even see the Farallon Islands in the distance.  My dad used to always tell us stories about the firemen who would dive for abalone there in the shark infested waters.  This card is paying homage to my roots back home in San Francisco, California.  The grass in the sand dunes, gorgeous blue waters, an amazing sunset and sea gulls flying around with islands in the distance.   Here’s to you Dad, I miss seeing you more often, I’m thinking of you and hope your day is filled with beauty like this!

Creative Tips –

  • I started out by stamping my main image in Versamark and then coloring it with all retiring colors – Lucky Limeade, River Rock and Riding Hood Red with Classic Ink Pads and Stampin’ Write Markers.  (They’ll be gone for good on June 3rd – if even available still)
  • I then embossed my image in Crystal Clear Embossing Powder. 
  • I repeated the grass portion of the same stamp set several times along the bottom. Serene Silhouettes 001 Bottom Angle
  • Once my stamped images were cooled and set, I masked my horizon and began to brayer my ocean in Bashful Blue.  I went across in a horizontal motion and then focused from the left and then the right in a vertical motion, leaving my middle a bit white.
  • I went over it with Tempting Turquoise to brighten it up a bit and then focused on the horizon line both with my brayer and a sponge.
  • I switched my mask and placed a sun on my paper under my mask in the area where the sun sinks into the water. 
  • I brayered the top 2/3 of my sky, in this order, with Bashful Blue, Tempting Turquoise and hit the very top with Island Indigo.
  • I layered Daffodil Delight next with my brayer from the horizon to the blue to create a little pop of yellow.  Where it met the Bashful Blue it created that pop of green that you get.  Serene Silhouettes 001 CU Sunset
  • I intensified my color with a Daffodil Delight sponge in a circular motion.
  • I added a hint of Tangerine Tango first with a brayer and then with a little sponging from the horizon.
  • My final color is Riding Hood Red just at the horizon line to add a little drama and intense orange color right at the horizon.
  • I removed all my mask and sponged a little color into my sun with Daffodil Delight and then just a hint of Tangerine Tango.
  • I lightly sponged some Daffodil Delight in the water where I left the white area.  I didn’t over do this as I didn’t want it to turn green from the Bashful Blue.  If you don’t leave enough whitish space, you will get too much green – remember yellow and blue make green.  I followed up with a hint of Tangerine Tango.Serene Silhouettes 001 Front
  • I created a mask of two islands and sponged them in using Early Espresso.
  • For my finishing touch, I used a White Gel Pen to create my seagulls & water ripples .  Finally, I used Early Espresso and a sponge to frame my card.

I hope you love this card as much as I do.  I just love sunsets, who doesn’t!  We’ve had some amazing ones here in Florida this week, maybe I just have them on the brain!  I hope your evening is filled with beauty today.  I’d love to hear from you – let me know if you whip out your brayer and give some creative scenery a try! 

Hands on Creative Scenery Classes

If you’re in the Orlando area on June 21st, I will be teaching Creative Scenery 101!  For more information on this fun class click here.  If you would like me to come to you directly, contact me – I’m up for traveling to teach these classes!  Be sure to check back here for the online version of this class later this month as well. Smile

To Shop 24/7 in the Creative Store – Click here!

Serene Silhouettes 001 Side


Stamp Sets – Serene Silhouettes (127324c, 132073w), Sweet Essentials (126455w, 126457c) Ink – Versamark (102283), Tempting Turquoise (126952), Island Indigo (126986), River Rock (126977), Daffodil Delight (126944), Tangerine Tango (126946), Riding Hood Red (126968), Red Riding Hood Marker (119701 – Regals Marker Collection)  Paper – Whisper White (100730), Early Espresso (119686)  Cool Tools – Stamping Sponges (101610), Brayer (102395), Blender Pen (102845), VersaMarker (retired), Clear Embossing Powder (109130), Heat Tool (129053), 1” Circle Punch (119868)  Finishing Touch – White Gel Pen (105021)

Simply Sketched Sneak Peek

Simply Sketched 001 Main

I love making creative scenery cards with my brayer.  And what better way to give you a sneak peek into the next catalog (goes live May 31st!), than to do a creative Bermuda Scene using one of the new exclusive hostess stamp sets – Simply Sketched.

Here I used two stamps – the bird on the grass and the berry/leaf branch.  I wanted to use some of the new 2013-2014 In Colors, so I settled on a daytime Bermuda scene.  I hope you love this card as much as I do!

Simply Sketched 001 Front

Creative Tips:

  • I settled on a primary color combination – the new In Colors – Crisp Cantaloupe and Coastal Cabana.  I then pulled in Strawberry Slush (new), Pear Pizazz, Wild Wasabi, Baked Brown Sugar (new), Tempting Turquoise, Bermuda Bay, Soft Sky, Cherry Cobbler and Early Espresso.Simply Sketched 001 AB
  • I began by stamping my scene in Jet Black StazOn.  I colored my scene using the Aqua Painters and the Classic Ink Pads in various colors.  I then embossed it in crystal clear so that I could brayer directly over top. Simply Sketched 001 AA
  • To create the sandy beach I used Sahara Sand.  I wanted to keep it light and Crumb Cake would have been a little too dark.  I thought a beach scene would be a nice way for the stamped images to pop on the neutral background.
  • I then brayered my water after masking off my horizon.  I used a foundation of Tempting Turquoise, then Coastal Cabana and finally Bermuda Bay. Simply Sketched 001 AC
  • For my sky, I used Soft Sky – which to my surprise was a little bluish gray, so I added a little pop of Tempting Turquoise to brighten it up.
  • I masked my islands in Early Espresso and added my water movement and foam in our Uniball White Gel Pen.  Simply Sketched 001 Side
  • One of my birds got a little thick unfortunately and there really wasn’t a way to fix it, so I have a little fat seagull…lol!
  • I usually sponge the edges in a dark color and I would have used Early Espresso if I did that, but I wanted to keep it nice and light on the Cantaloupe, so I left the edge clean.

Overall, I think the card is light and fun.  I matted my scenery onto Crisp Cantaloupe because it really gave it a Bermuda feel.  This is the type of card you would learn to make in my Creative Scenery 102 class or 200 level classes.  Be sure to sign up for my creative tips mailing list at the right to be sure you are getting the latest information about classes in the Orlando area and my online classes.   If you are interested in hosting a weekend of brayer classes in your area – be sure to contact me – I do travel!

Learn Online!

If you loved this card – be sure to check out my in depth step by step video online class for how to create scenes just like this one!  Check out brayer classes here – Brayer 101   Brayer 102  and save huge with the Bundled Classes here

Are you getting my Exclusive Video Series?

Be sure to sign up for my Creative Tips Newsletter and get the latest Creative Grove news in addition to my free Creative Techniques Video Series!  Don’t miss out on our creative community – the only way to get this exclusive content is to sign up in the box on the upper right or click here.

Signature-Snowflake-001_thumb1_thumb

To Shop 24/7 in the Creative Store – Click here!

Simply Sketched 001 Angle

Stamp Sets – Simply Sketched (129672c, 129669w)  Ink –Sahara Sand (126976), Crisp Cantaloupe (131176), Strawberry Slush (131178), Baked Brown Sugar (131174), Pear Pizazz (131180), Soft Sky (131181), Cherry Cobbler (126966), Coastal Cabana (131175), Bermuda Bay (131171), Tempting Turquoise (126952), Early Espresso (126974), Jet Black StazOn (101406), Wild Wasabi (126959) Paper – Whisper White (100730), Crisp Cantaloupe (131298) Cool Tools – Brayer (102395), Stampin’ Sponges (101610), Versamarker, Clear Embossing Powder (109130), Heat Tool (129053), Aqua Painter (103954) Finishing Touch – Uniball White Gel Pen (105021)

Home Sweet Home

SF Day 1 009 edited

This week I’m spending time in San Francisco, California to visit my family and celebrate my dad’s 80th birthday, spend some quality time with my mom, and brother.  I was born and raised in San Francisco and it’s a beautiful place to visit.  Plus I’m super excited to meet my new niece – Aubrey.

I would never change a thing about growing up in San Francisco.  We had amazing culture, I grew up in a melting pot of people, culture, excellent food, and more physical sports and outdoor activities than you can think of.  I’m quite proud to say I’m a California girl – even if I don’t live here anymore.  

One of the things we loved about being in the Bay Area was going to our old family cabin in the Santa Cruz Mountains.  I loved being surrounded by the towering Redwoods (hummm, wonder where my love of redwoods came from?)  We would go on hikes, walk through the Basins, and go to the Boardwalk in Santa Cruz.  The Boardwalk had the scariest (well as a kid) rollercoaster, because it was all wood!  I loved it.  So when we had the free Sale-a-bration Stamp set Feeling Sentimental, I had to do a sunset boardwalk scene – it just reminded me of the Boardwalk in Santa Cruz. 

This card was one of the projects in my Brayer 101 – Introduction to Creative Scenery class that I taught the past few months.  The stamp set is now gone (but I know several of you have it!), so I’ve come up with a great new project to replace it, but wanted to share this beautiful card with you.  I hope you like it!

I will be sharing how I made this card in a detailed post filled with Creative Tips to anyone subscribed to my Creative Tips mailing list!  I’m going to share it on Saturday at 12 noon – the day of my Dad’s party, so you have plenty of time to subscribe still! 

Have a great day – enjoy your families – I’m going to enjoy spending quality time with mine.  I’ll be sure to report back all week so that you can see all the fun places and things I’m doing.

For information about taking Brayer classes as part of my Creative University series in person, check out my upcoming events page by clicking here.

Signature Snowflake 001

To Shop 24/7 in the Creative Store – Click here!

Emerald Pool Creative Scenery

In Dominica, we took a tour to the Emerald Pool.  After a short walk through the rain forest, the trail opened up revealing this beauty.  I took some photos from above and then walked down to the pool itself.  As we approached, the water was this amazing turquoise blue with slabs of grey rocks peaking out.  The walls were lush with green foliage and amazing chocolate brown ropes hanging down from above. 

I took several pictures from the grey rock steps, then took a dip into the pool itself.  The water was, shall we say refreshing, but after a few minutes surprisingly comfortable.  I grabbed my camera and took a few shots of the waterfall from the view of the pool and ended up with this shot.  I digitally enhanced the colors to try and capture the vibrant nature of this beautiful spot hidden deep in the rain forest. 

I woke up this morning at 4 am, I know – I’m on a beautiful ship well into the Caribbean Sea and what am I doing up?  Well, I was thinking about this pool and how much I wanted to try to re-create it with my Brayer, Ink and Sponges.  After lying awake for an hour I finally took all my ink pads and tools up to the pool deck to create while watching the sun rise over the ocean.  Here is the final result. 

Creative Tips:

  • I started out creating the pool.  I wasn’t sure which colors would do it justice and finally settled on brayering pure Tempting Turquoise.  I added a little Pacific Point with a sponge and ultimately a little Basic Gray for the underwater rocks in the center and at the waterfall line.
  • I next went to work on the structure of the cavern.  First I created a mask for my rocks.  I then brayered River Rock on an angle from both sides.  I made sure to keep the center top v a little white for my sky.

  • I then tore a little area for my sky.  I left my Bashful Blue at home, so I had to settle for some Baja Breeze.  It seemed to do the job just fine.  I sponged a tiny bit of Tempting Turquoise to brighten it up a bit.
  • I then sponged some more River Rock in my cavern to blend it and darken spots. 
  • Next I sponged Soft Suede along the base of my cavern and in spots along the waterline.  The color was really starting to come together.
  • To add the lush foliage, I lightly sponged Old Olive first and then spotlighted a few areas in Wild Wasabi with a few dabs of Gumball Green.  Once I was happy with how that looked, I moved on to the rocky area.
  • To create the rocks, I brayered Basic Gray lightly from the pool upward.  Be sure to keep your masks in place over the water and at the line of the rocks.  I added a small amount at the mouth of the falls as well.
  • I used both a Basic Black marker and Basic Grey sponge to create the separation of the rocks and shadows. 

  • To create the plants, I used the brush side of an Old Olive Marker.  I worked in sections using a sponge to blend it as I went.  Once happy with the Old Olive, I went over it in sections again using a Garden Green Marker.  I spotlighted a few areas using a Summer Starfruit marker which has a great green tone to it.
  • I added my vines using the pointed part of a Chocolate Chip and Early Espresso Marker.  Start with an Old Olive Marker until you are comfortable – it will blend in underneath and allow you to make a mistake.
  • I added my moss on the rocks using the same colors, but did not blend them with a sponge.
  • To make the waterfall, I used a White Gel Pen.  I had a lot of layers of ink by now on my card, and I think this process would have gone easier had I let my project dry a bit.  I was so excited to get it done though!  The gel pen doesn’t work so great for a complete stream of this length, so I did it in stages. 
  • First I created the pool waterline so I wouldn’t go too far.  If you do, just take a little Tempting Turquoise sponge over it and you can correct that. 

  • Next, I created my two outermost streams and worked to fill it in from there.  I used my finger to blend it a little, and it would have been nice to have my Whisper White Craft Pad, but alas – that’s in Orlando!
  • I took my time with it and when I thought I wanted to keep going, I did what I always advise my students – I stopped.
  • I created a few ripples, didn’t like how they turned out, so I went over them with a Tempting Turquoise Sponge and started over.  I didn’t add too many as I didn’t want to take away from the beauty of the pool.
  • I chose to mat my finished project on Whisper White and then put it on a White Card to let the beauty of it stand alone.

I hope you like my finished card.  I signed it with the location, my initials and year.  I had several guests and crew members stop by to see what I was creating and one even asked if I was selling my work!  I told him no, but what do you think?  If I sold this, how much would you ask for (tell me in the comment section)? 

I bumped into another Stampin’ Up! addict as she put it – Gail from South Carolina.  I certainly enjoyed speaking to her, and it was good to know that I was in good company on board this ship.  Gail saw my card in its beginning stages, be sure to leave me a comment when you see it on the blog Gail!

I’m sure several of you are wondering how long it takes me to create these projects.  Each one differs.  My last one of St. Barts I was able to do in one hour.  I had created beach scenes before, so the basic knowledge and direction I was going was already in my mind.  This project was quite different.  I tested several colors out first on scrap paper as my project is 5” x 7” and I wanted to get it just right.  With some breaks so that I could capture the slate blue sun rise this morning from several points on the ship (look for that project later), this project took me three hours.  Okay – pick yourselves up off the floor!  Yes, you can’t rush art as I told Michael when I came back to the room.  If I were to do this a second time, I know I would cut that down to just over one hour.  It takes time to conceptualize a project initially and break it down into steps.

I’m thrilled with the end result and I know if you venture on to tackle this on your own – you’ll love it too.

If you are in the Orlando, Florida area and would like to take my Creative University Brayering Creative Scenery classes – check out my schedule on the Upcoming Events page or my Events page from my Online Store Website.  If you would like me to travel to you to teach a class, contact me for details. To learn more about my University Class series click here

Signature Snowflake 001

To Shop 24/7 in the Creative Store – Click here!

Stamp – none Ink – Tempting Turquoise (126952), Pacific Point (126951), Old Olive (126953), Wild Wasabi (126959), Basic Gray (126981), River Rock (126977), Soft Suede (126978), Garden Green Marker (119701 – Regals Marker Collection), Old Olive Marker (100079), Summer Starfruit Marker (2012-2014 In Color Marker Collection 126856), Basic Black Marker (100082) Paper – Whisper White (100730) Cool Tools – Stamping Sponges (101610), Brayer (102395), White Gel Pen (105021)