How to Get Inks to Shine

Mixed-Media-Stained-Glass-Window-001

All you really wanted from your card was a little shine, right? Have you ever created a stunning background, but hours later your ink colors are flat and faded? Well, this technique is for you then! I’m playing along with the new Mixed Media Challenge over at Happy Little Stampers – Shine.

HLS Mixed Media challenge May 2016

I LOVE to create backgrounds – have you noticed? All to often in card making, we create these amazing colorful backgrounds on cards and then the colors settle as the project fully dries and we’re left with something that is a bit flat and has no vibrant nature left. At least I do! I’m always thinking where did the shine go? Okay, not all of it is shiny, but you know what I mean.

I have a video and step by step tutorial for you, so grab a drink, learn how to create amazing depth first, then a stain glass window that captures the true nature of those amazing colors by trapping the shine element of your card. Here’s the video:

Watch in HD on YouTube

So what did you think? Not that difficut really. What did you think about stretching your stencil for better coverage? Have you ever done that? Here’s the step by step tutorial, and if you really loved this, be sure to sign up for the Creative Tips E Letter for an exclusive video series and more…

[optin_box style=”12″ alignment=”center” email_field=”email” email_default=”Enter your email address” email_order=”2″ integration_type=”aweber” double_optin=”Y” list=”3846012″ name_field=”name” name_default=”Enter your first name” name_order=”1″ name_required=”Y” opm_packages=””][optin_box_field name=”headline”]Learn more with our exclusive FREE video series:[/optin_box_field][optin_box_field name=”paragraph”]PHA+UGx1cyB5b3XigJlsbCBiZSBhZGRlZCB0byBteSBGUkVFIENyZWF0aXZlIFRpcHMgRS1sZXR0ZXIgd2hlcmUgSSBzaGFyZSBleGNsdXNpdmUgcHJvamVjdHMsIHZpZGVvcyAmYW1wOyB0aGUgMTIgRGF5cyBvZiBDaHJpc3RtYXMgUHJvamVjdCBTZXJpZXM8L3A+Cg==[/optin_box_field][optin_box_field name=”privacy”][/optin_box_field][optin_box_field name=”top_color”]undefined[/optin_box_field][optin_box_button type=”0″ button_below=”Y”]Get Instant Access![/optin_box_button] [/optin_box]

Creative Tips on Shine, Texture and Stretching your Stencils

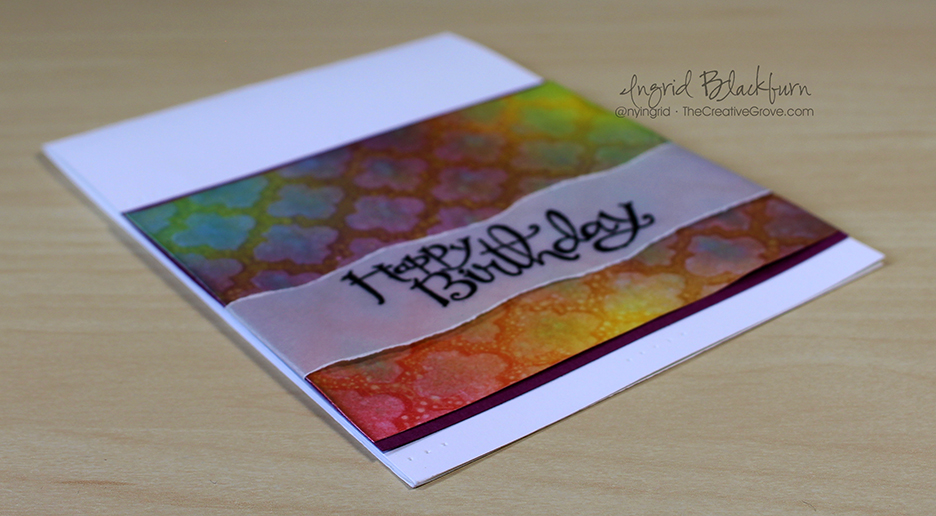
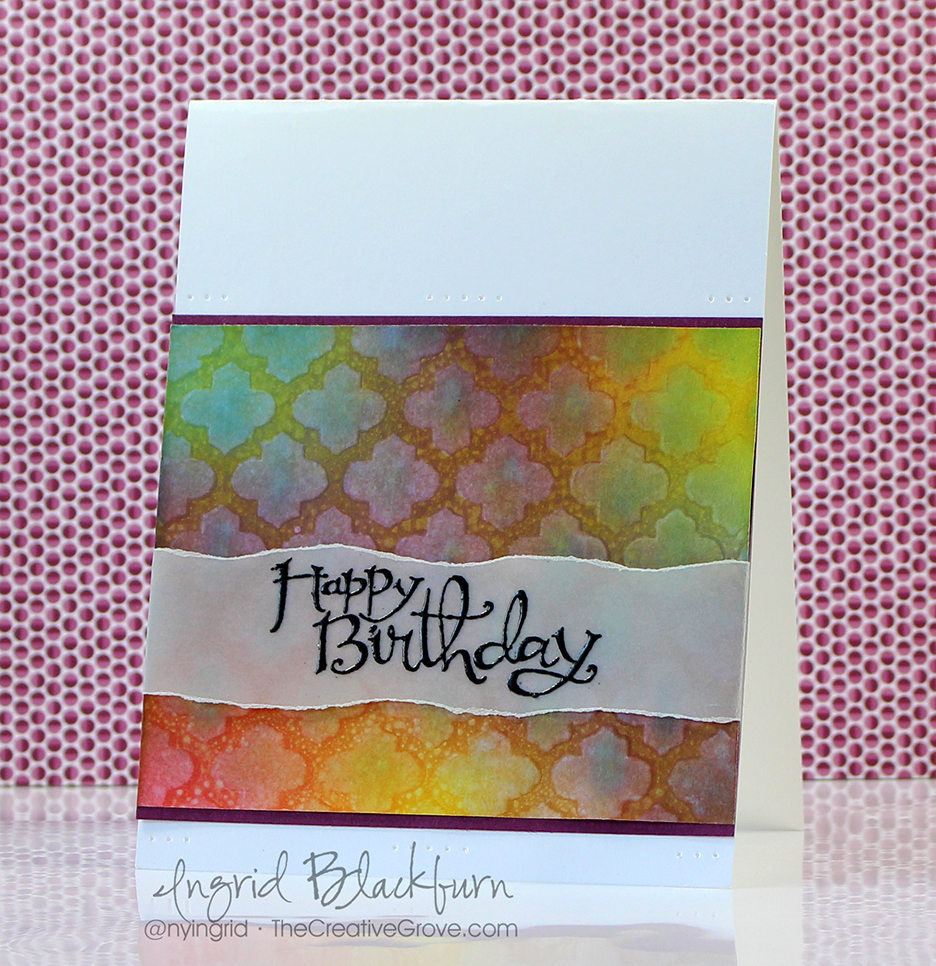
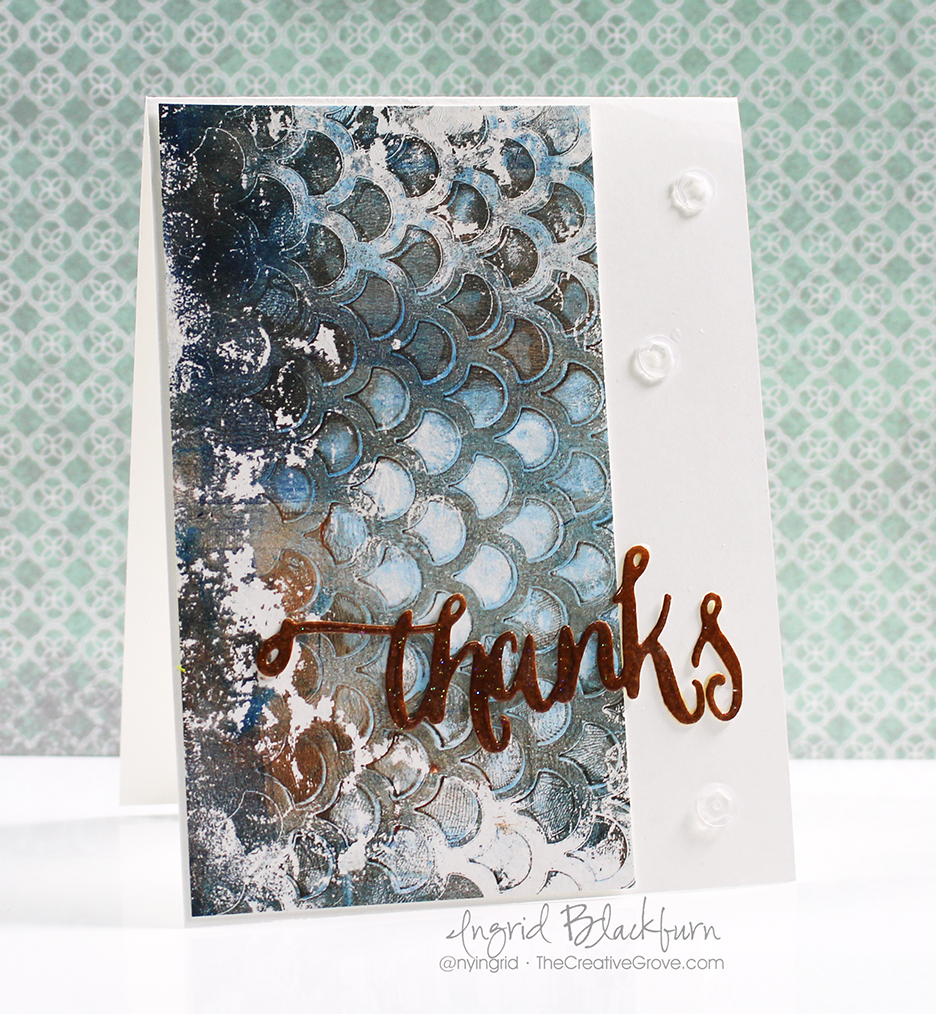
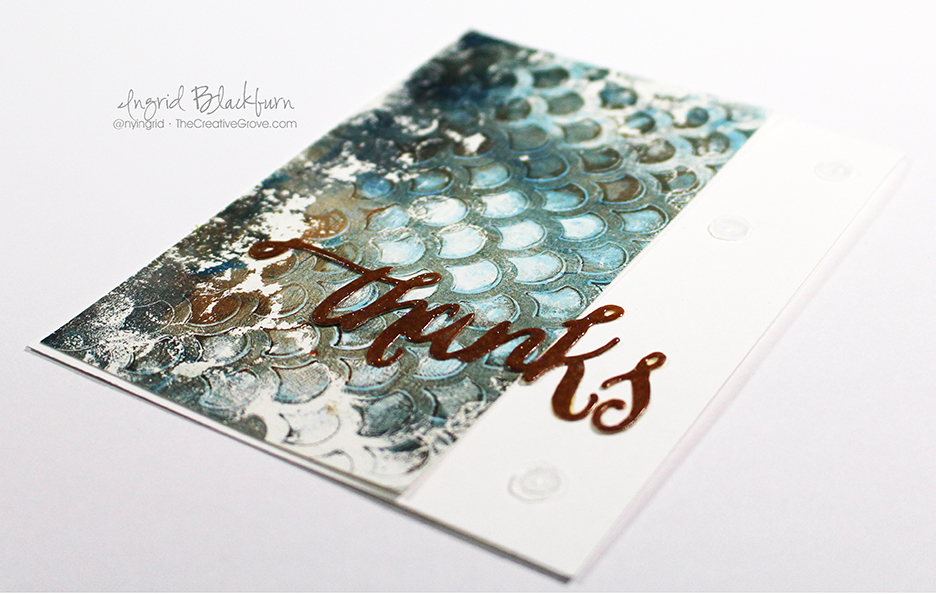
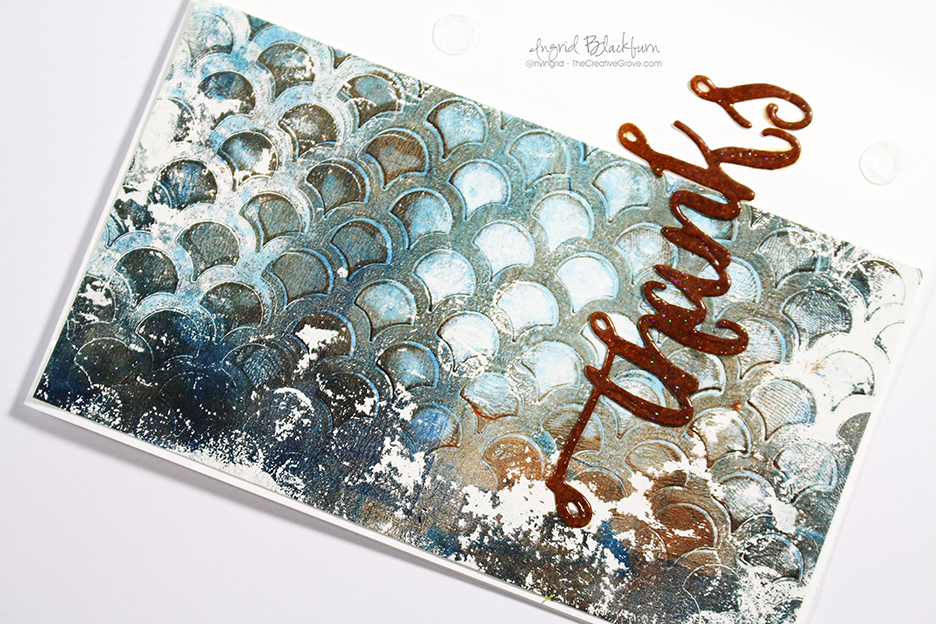
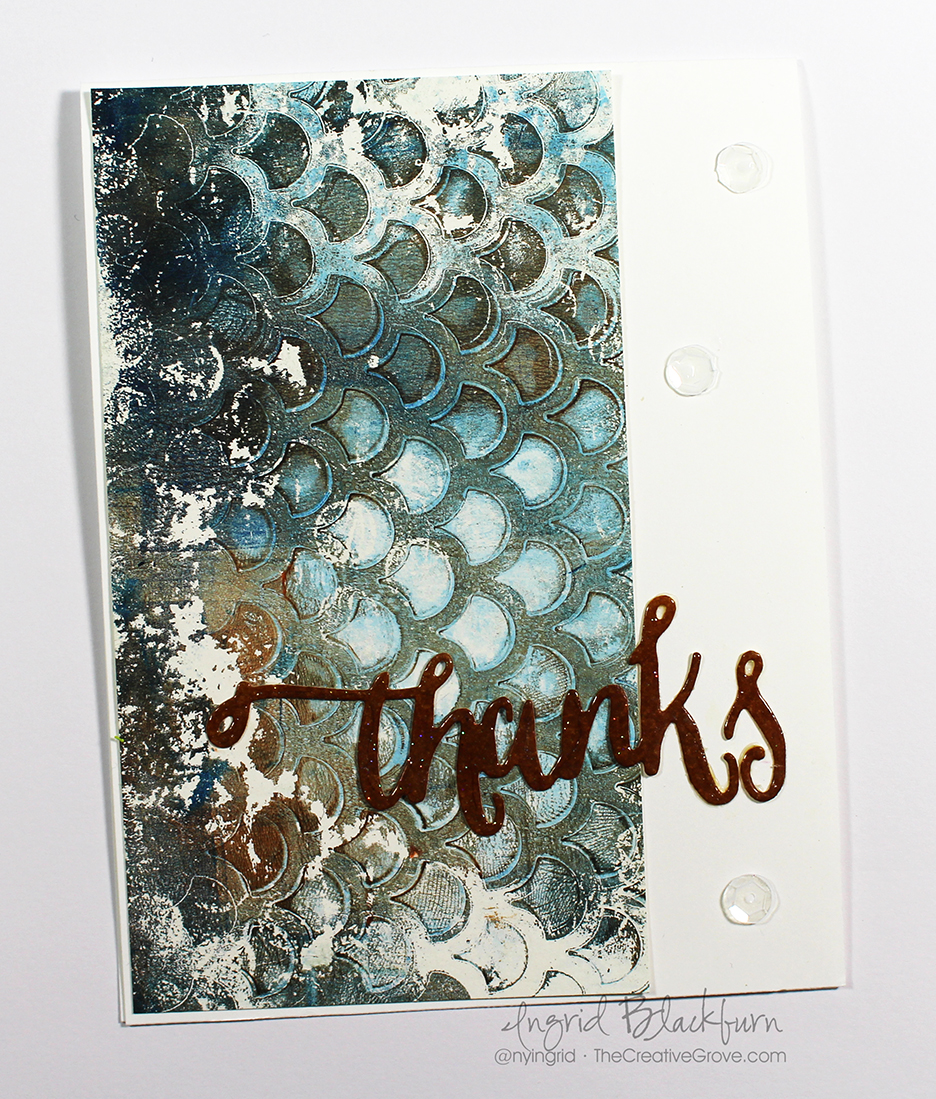
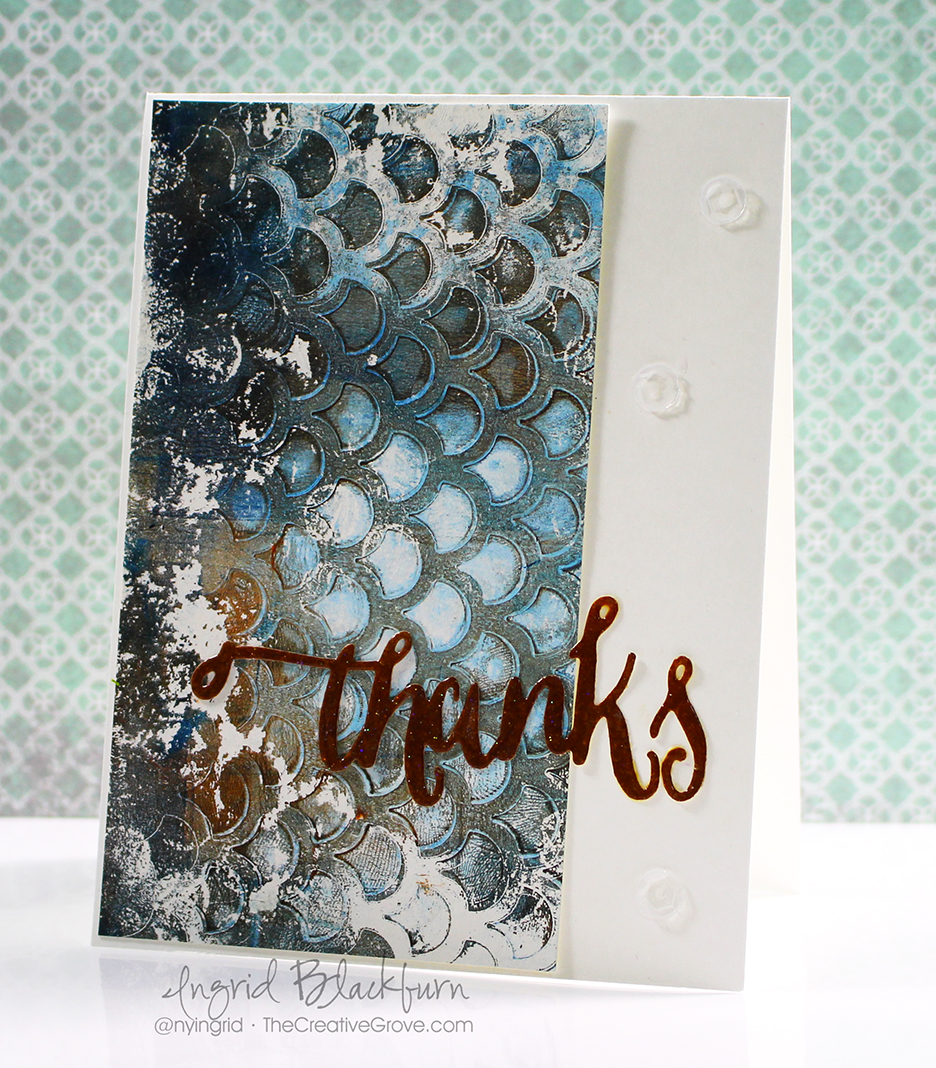
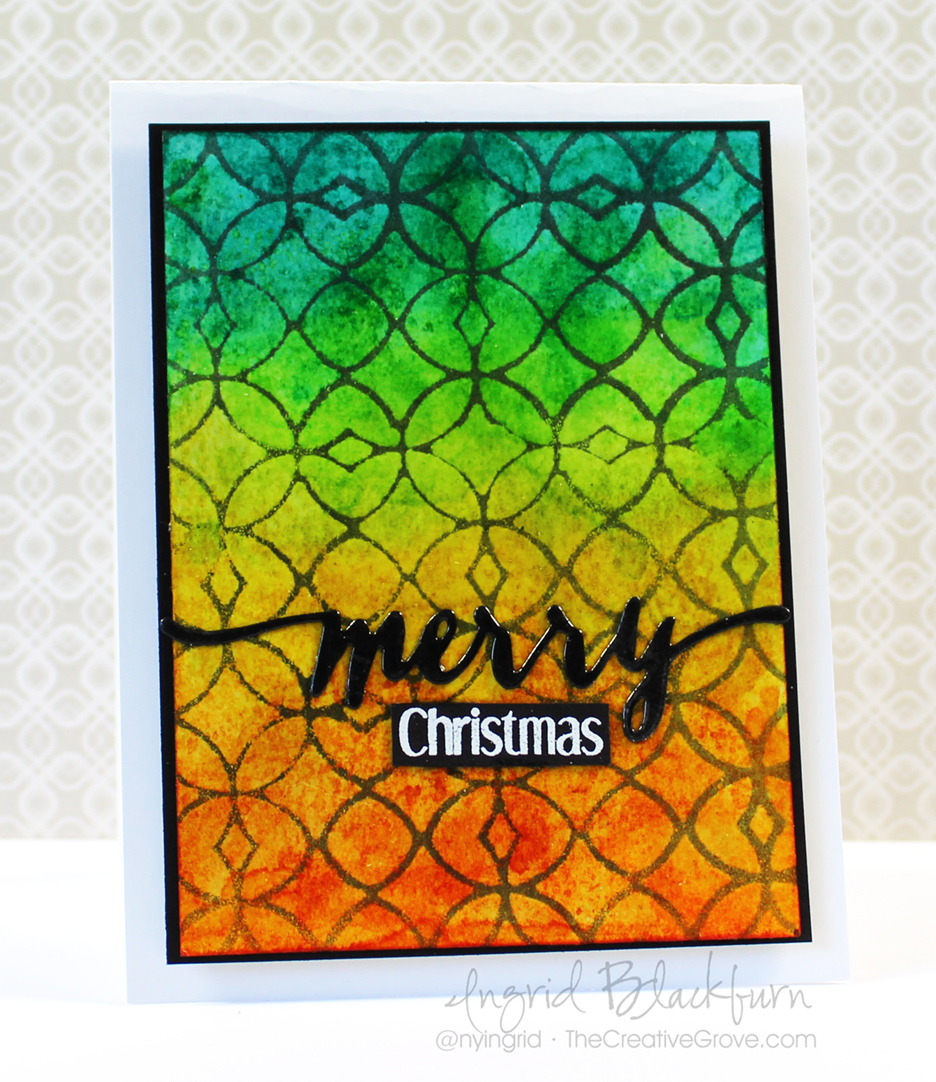
  • Create an in depth textured piece by using the wrinkle free distress technique on a piece of 140# cold pressed watercolor paper and dye based inks. (shown in detail in the video) Tip – For the most vibrant results, try Ranger’s Distress Inks.

Mixed-Media-Stained-Glass-Window-003


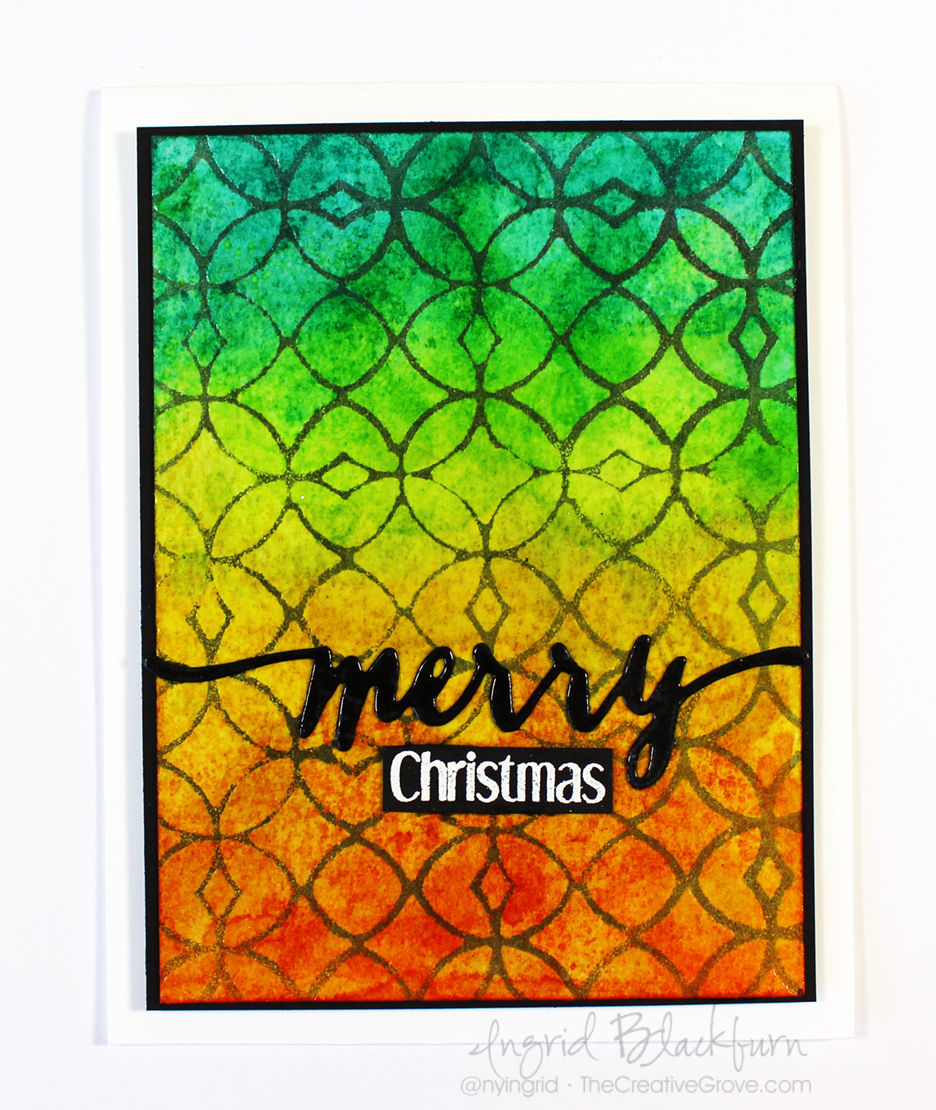
  • This project uses Distress Mustard Seed, Spiced Marmalade, Twisted Citron and Peacock Feathers
  • Once your project is totally dry, lightly buff over it with a de-static tool to remove any oils.
  • Smoosh Versamark through the Latticeworks stencil by Tim Holtz or your favorite one for a detailed design as in the video. Since this stencil didn’t cover my watercolor paper, I had to do this in two parts and overlap my design for a seamless flow.

Vibrant Mixed Media Cards

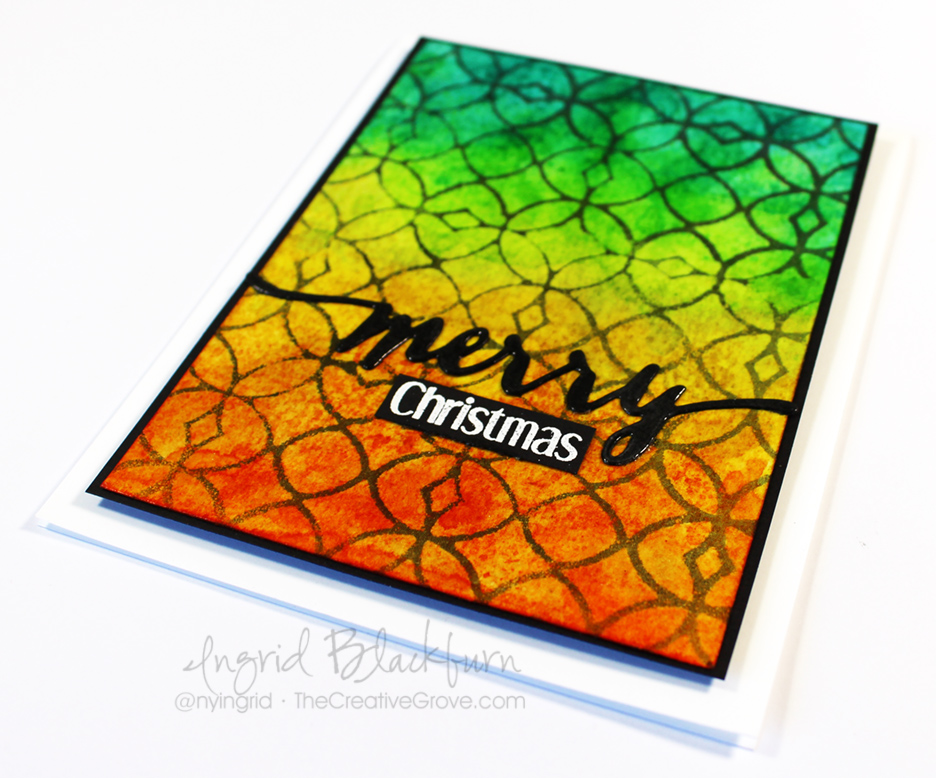
  • Emboss in Clear Embossing Powder – I used Brutus Monroe – and if you’ve never tried it – do so…it rocks!
  • Once your embossed stencil has fully dried, sponge over with Soot Black distress ink.
  • Wipe off your stenciled design with light pressure and a slightly damp cloth or paper towel to pick up the resisted ink.
  • Emboss your die cut greeting in clear for a shiny look. I used Handlettered Holiday by WPlus9. Adhere with Ranger Multi Medium Matte.

using distress inks in mixed media

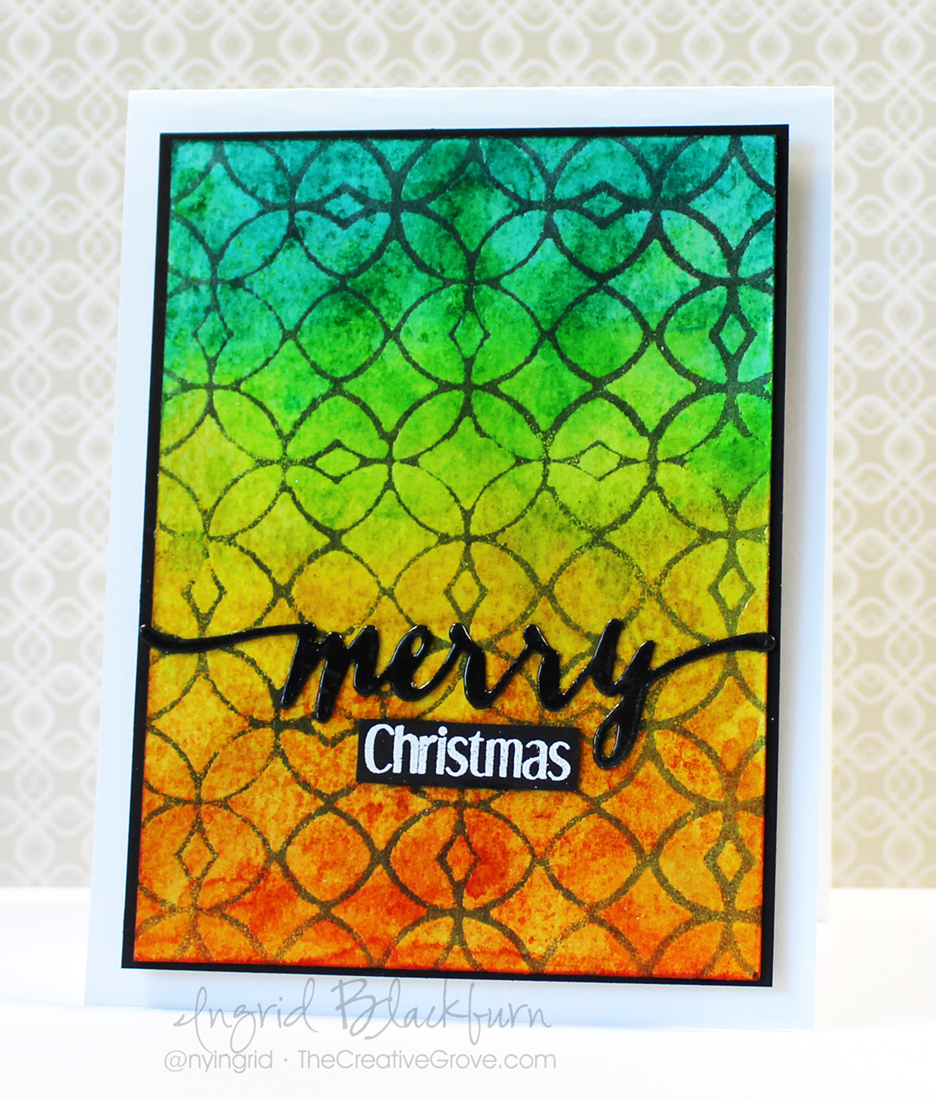
  • Stamp and emboss the Christmas greeting from HLS Everyday Sentiments in white on black card stock – trim and adhere.
  • Adhere your watercolor paper with glue to a black matte with a 1/16″ border.
  • Pop up Mixed Media Panel with Fun Foam and adhere to a White card base with a 1/4″ border all around.

That’s it! Simple and striking Mixed Media card. I’m also going to play along with this months challenge over at CAS Mix it Up….it’s heat embossing – we definitely fit there!

may

So hop on over to the HLS Mixed Media Challenge and check out all the amazing projects my teammates have created for this challenge.  Plus you’ll want to stop by our Guest Designer Kalina’s blog – she’s SUPER talented when it comes to Mixed Media and her projects are out of this world!

Then get those fingers inky….I can’t wait to see what you do to let your creations shine!

Signature

[optin_box style=”12″ alignment=”center” email_field=”email” email_default=”Enter your email address” email_order=”2″ integration_type=”aweber” double_optin=”Y” list=”3846012″ name_field=”name” name_default=”Enter your first name” name_order=”1″ name_required=”Y” opm_packages=””][optin_box_field name=”headline”]Learn more with our exclusive FREE video series:[/optin_box_field][optin_box_field name=”paragraph”]PHA+UGx1cyB5b3XigJlsbCBiZSBhZGRlZCB0byBteSBGUkVFIENyZWF0aXZlIFRpcHMgRS1sZXR0ZXIgd2hlcmUgSSBzaGFyZSBleGNsdXNpdmUgcHJvamVjdHMsIHZpZGVvcyAmYW1wOyB0aGUgMTIgRGF5cyBvZiBDaHJpc3RtYXMgUHJvamVjdCBTZXJpZXM8L3A+Cg==[/optin_box_field][optin_box_field name=”privacy”][/optin_box_field][optin_box_field name=”top_color”]undefined[/optin_box_field][optin_box_button type=”0″ button_below=”Y”]Get Instant Access![/optin_box_button] [/optin_box]

CAS Mix Up

Skinny-Watercolor-Stenciled-Chevron-001

March 1st was a great day! Two exciting things happened – we welcomed little Lylah into the world – more about that below….and my super creative and very CAS styled friends Bonnie Klass and Loll Thompson launched their new challenge – CAS Mix Up – a clean and simple mixed media challenge. So, naturally I created a birthday card to welcome little Lylah – after all – it literally was her birthday!

The new CAS Mix Up challenge is dedicated to clean and simple cards with a mixed media twist. Now you may think that mixed media can’t be CAS, but at it’s heart, mixed media is just that – mixed mediums. Why can’t it be CAS? That’s the challenge – no pun intended! For the first one this month, we’re challenged to use watercolor, stamping and your choice – I chose watercolor stenciling – and it’s actually a negative image that was stamped from a stencil!

march 2016

Skinny-Watercolor-Stenciled-Chevron-2006

This project is actually a bonus panel from a regularly stenciled project using sponged distress inks. I had all this ink left over on my stencil, so I spritzed it to get it wet with a fine mist spritzer, and stamped the stencil onto a piece of watercolor. Here’s how I did it.

Negative Watercolor Stamped Stencil Technique – 

  • Create a project where you use the stencil in a positive way – or just add ink to your stencil directly without worrying about the “stenciling” part. I used the Skinny Chevron stencil by Create a Smile to give off a skinny positive image like this one I created for a challenge over at StampNation (Of course it’s double stenciled – but you get the point):

Double-Stenciled-Background-Sneak-2

  • For this project, I used More Mustard, Fossilized Amber, Spiced Marmalade, Worn Lipstick, Mermaid Lagoon and Seedless Preserves
  • This will leave lots of color on the negative part of your stencil that you would normally just wash or clean up.  Instead – mist your stencil with a fine mist spritzer to get the ink to bead up on the stencil.

Skinny-Watercolor-Stenciled-Chevron-002

  • Lay a piece of 140# cold pressed watercolor paper onto your stencil to stamp the stenciled image. You can also pick up your stencil and stamp, but I didn’t want the colors to run when I picked it up. Hold your paper there a few seconds to allow the water to soak in.
  • You are left with a negative image – the part you couldn’t stencil!

Skinny-Watercolor-Stenciled-Chevron-003

  • Adhere to an A2 card base, add a stamped greeting and die – both also from Create a Smile – I just LOVE their fonts. This is from the birthday trio dies and the Mini Birthday stamp set.
  • Add a few sparkling clear sequins by Pretty Pink Posh and you’re all set!

I love the way this card turned out. Look at how bold the colors are in the sneak peek image above and how muted the very same colors are with a little water spritzed onto them. Truly amazing! And that’s mixed media at it’s core. Not so scary, huh?!!

I’d love for you all to play along in Loll and Bonnie’s first challenge over at CAS Mix it Up – so head on over and check it out! I’m also playing along in a few other challenges – Laura’s Loft, and NBUS – as this is the first time I’m using this stencil and die by Create a Smile!

Feb.-Challenge-Board button aqua use this the

I can’t wait to see what you create!

Skinny-Watercolor-Stenciled-Chevron-004

On a personal note –

I know this blog is all about paper crafting, but from time to time we all have big moments in our lives. Yesterday was definitely one – our first grandchild! Yes, I’m a grandmother at the tender age of 46! Michael is a bit older than me, and I’ve been blessed to have two beautiful and amazing girls as my bonus daughters for the past 18 years. Our youngest – Allyson and Jeff welcomed their first child into the world yesterday – Lylah RaeAnn.

First Family Photo

Lylah is a character from a book that Allyson read in high school and just fell in love with the name. Raeann is in honor of Rachel and Annie – Allyson & Jeff’s sisters – isn’t that just sweet. I love the name!

Mom & Lylah

We can’t wait to fly to New York and meet our precious little grand daughter Lylah. Feel free to leave me any grandmom (I’m going to go by Omi – German) advice in the comments below!

Thank for stopping by , now go get those fingers inky and have a great day!

Ingrid Blackburn - The Creative Grove

[optin_box style=”2″ alignment=”center” email_field=”email” email_default=”Enter your email address” email_order=”2″ integration_type=”aweber” double_optin=”Y” list=”3846012″ name_field=”name” name_default=”Enter your first name” name_order=”1″ name_required=”Y” opm_packages=””][optin_box_field name=”headline”]Learn with our exclusive FREE video series[/optin_box_field][optin_box_field name=”paragraph”]PHA+R2V0IHRoZSBmcmVlIENyZWF0aXZlIFRpcHMgRS1sZXR0ZXIgYW5kIGxlYXJuIHdpdGggc3Vic2NyaWJlciBleGNsdXNpdmUgdmlkZW8gYW5kIHBpY3RvcmlhbCBjb250ZW50LiBJbmNsdWRpbmcgb3VyIHllYXJseSAxMiBEYXlzIG9mIENocmlzdG1hcyBzZXJpZXMhPC9wPgo=[/optin_box_field][optin_box_field name=”privacy”][/optin_box_field][optin_box_field name=”top_color”]undefined[/optin_box_field][optin_box_button type=”0″ button_below=”Y”]Get Instant Access![/optin_box_button] [/optin_box]

Stenciled Birthday Wishes

Stenciled Birthday Wishes 001

Today I have a simple and colorful birthday card for you. It’s amazing the things you can do with Distress inks and a little water. I have to admit, my card stock (Stampin Up Whisper White) had a weird reaction to this project and left me all these little dots. I still love the end result, and thought you’d like to see something that didn’t turn out perfect – but is still cool is my eyes!

Creative Tips: 

  • First you’ll want to blend some fun and bright colors for the background. I used Mustard Seed, Seedless Preserves, Broken China, and a little Barn Door.

Stenciled Birthday Wishes 002

  • Next, pop the Moroccan stencil from Simon Says Stamp right over and mist it with water – keep your mist light.  That will started to lighten the card immediately.
  • Once you have the desired look, place your stencil back over and add a little more color – but keep it light.
  • I didn’t want to take away from the fun background, so I added a sentiment on some torn vellum, & kept the matting light to keep the clean and simple feel.
  • For some further embellishment – add some paper piercing to the white.

Stenciled Birthday Wishes 003

The end result is a fun, colorful card that pops!

I thought I’d play along at a new challenge for me – Seize the Birthday – how cool is that a challenge dedicated just to birthdays! Love that!

I’ve been in major stenciling mode the past few weeks, creating some cool pieces for a fun class – Creative Stencils & Mediums over at StampNation. Here’s a peek at some of the Design Teams examples from the last lesson, mine is the blue one:

Stamp Nation Birthday Bash CSM 10 snippets

Thanks for joining me today. Keep those fingers inky – I do!

Ingrid Blackburn - The Creative Grove


Mixed Media Stencil Backgrounds

Gelli Plate Stencil Backgrounds 001

I love creating backgrounds for cards – it’s probably one of my favorite things to do…and in the past year, I’ve grown quite addicted to Stencil Backgrounds! This card takes stencils to a whole other level. This month over at Happy Little Stampers Mixed Media Challenge we’re playing around with Stencils. If you’ve taken any class with me in the past year online or watched any of my YouTube Videos – then you KNOW I love stencils.

HLS Mixed Media challenge January 2016

I’m still getting my feet wet in the Mixed Media world, but this Gelli Plate has quickly given me the ability to create some amazing pieces of art. And let’s be honest – that’s exactly what it is – art! I used to spend a crazy amount of money on papers that look like this….now I can create them myself…what? That’s insame!!! Don’t worry – some videos will definitely appear in the future, but for now – just enjoy one of my latest goofing off pieces (I wish every goofing off piece turned out like this!).

Of course for the Mixed Media Challenge, you don’t need a Gelli Plate – just a trusty ol stencil. Use your favorite way to add a medium – gel, embossing paste, ink, sponging, gelli, you name it – they are a tool not just every Mixed Media gal and guy needs – but every stamper!

Gelli Plate Stencil Backgrounds 002

Creative Tips on How to Create Stencil Backgrounds using a Gelli Plate

  • Add some acrylic paint to your Gelli Plate – start off with your darkest shade. I used Phylo Blue. Use a brayer to spread your acrylic paint covering it edge to edge.
  • Roll off on a piece of scrap paper and pull off some paint leaving a blue layer around the edge of your Gelli. It took me a bit to get the hang of this.
  • Allow the blue to completely dry, then add some Raw Sienna and cover in the same manner. Remove a bit of it toward the middle, then place a stencil over – I used My Favorite Things Scallop stencil.

Gelli Plate Stencil Backgrounds 004

  • Place a piece of copy paper over and lightly tap with your fingers to remove a bit here and there. Remove your stencil and allow to completely dry.
  • If you want to get a feel for what it’s starting to look like, lift your Gelli Plate and see it from the bottom. Of course, don’t place your finger in your creation!
  • Next, add a layer of white. Now, I have white acrylic paint – but it’s lost somewhere in my craft room – would you believe that! I knocked my paint box over and now I can’t find that one all important tube…maybe the cat took it away…yeah – I’ll go with that! Of course, that prompted me to clean my work area today – I think Bria still has my tube…lol! So I used the next best thing – white gesso.
  • Lay a sheet of small bubble wrap over the white to get a stamped impression in white. Tap it lightly in random places to create a slightly stamped circular pattern.
  • Quickly place your piece of paper over – I used 138 lb Canson Mixed Media paper.  Firmly rub the back of your paper with your fingers. I didn’t quite do this quick enough and a little of my paint didn’t lift properly around the perimeter, but that was okay because it created this gorgeous distressed look. I bet I couldn’t duplicate that if I tried!

Gelli Plate Stencil Backgrounds 003

  • My Gelli Plate is a 6 x 6 inch one. My piece also measures 6 x 6″. I cut my paper in two (Pained me to do so – it was SO beautiful). This is the left half.
  • I trimmed it down to 5 3/8″ x 3″. That was a happy accident. Originally I intended on 5 1/2 to go top to bottom, but I love the slight 1/16″ border it ended up with.
  • You don’t want to take away from the beauty of the background. So I opted to add a sponged die cut that was embossed in clear. This is the Handlettered Thanks die by WPlus9.
  • To get a similar hue to the Raw Sienna in the project, so I first sponged a piece of white scrap paper with Rusty Hinge, then a bit of Gathered Twigs and Walnut Stain Distress Inks to get a matching hue. Distress inks really helped here, as their translucent nature allowed me to build upon previous layers fro just the right color.

Gelli Plate Stencil Backgrounds 005

A few clear sequins finished it off. I love the simplicity yet complexity that this card has. I have to admit, some of the creations I whipped up with my Gelli Plate really stunned me. Once I got the hang of it, and that creating mono-prints was about layering and pulling it up together, I really started to have fun! I see a ton of “Gelli-ing” in my future!

So whip out those stencils – take what you will from this project, mono-printing, sponging, color combo, layout, anything and get those stencils out. Add fun stuff to the challenge gallery!

Remember our definition of Mixed Media is – stamps + ink, plus two other elements which add texture and/or dimension. Can’t wait to see what you stencil up!

Now go get those fingers inky –

ingrid signature

[optin_box style=”12″ width=”600″ alignment=”center” email_field=”email” email_default=”Enter your email address” email_order=”2″ integration_type=”aweber” double_optin=”Y” list=”3846012″ name_field=”name” name_default=”Enter your first name” name_order=”1″ name_required=”Y”][optin_box_field name=”headline”]If you enjoyed this tutorial…[/optin_box_field][optin_box_field name=”paragraph”]PHA+4oCmeW914oCZbGwgbG92ZSBvdXIgPGVtPjxzdHJvbmc+ZnJlZSA8L3N0cm9uZz48L2VtPnN1YnNjcmliZXIgb25seSB2aWRlbyBzZXJpZXMuIMKgTGVhcm4gbmV3IHRlY2huaXF1ZXMgdGhyb3VnaCBvdXLCoDxlbT48c3Ryb25nPmV4Y2x1c2l2ZTwvc3Ryb25nPjwvZW0+wqBDcmVhdGl2ZSBUaXBzIGUtbGV0dGVywqBhbmQgc3Vic2NyaWJlciBvbmx5IHZpZGVvIGFuZCBwcm9qZWN0IHR1dG9yaWFscyE8L3A+Cg==[/optin_box_field][optin_box_field name=”privacy”][/optin_box_field][optin_box_field name=”top_color”]undefined[/optin_box_field][optin_box_button type=”0″ button_below=”Y”]Get Exclusive Tips![/optin_box_button] [/optin_box]