Mixing CAS & Monoprinting

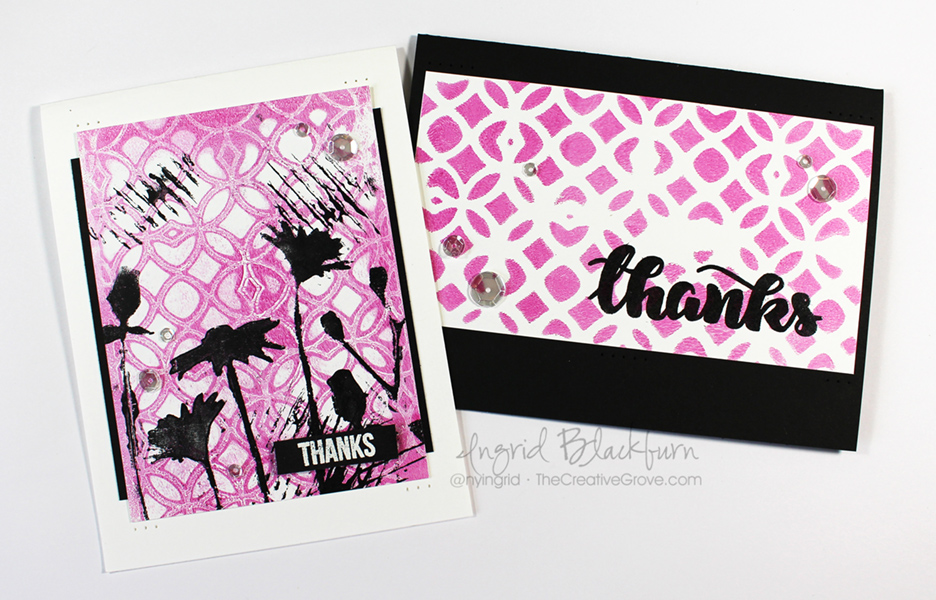
Have you ever mixed a monoprint with clean and simple design? Monoprinting is not only super easy, it’s fun, quick and I’m always amazed at the results. I highly encourage you to give it a try. And most of us LOVE clean and simple, so why not mix them together?

It’s snowing here today in the Black Forest – hard to believe it’s almost May! Seems like a good day to work with my Gelli Plate.

Clean and Simple Mixed Media

In the spirit of creative card making, today we’re going to mix it up a little – for the CAS Mix it Up Challenge. I’m addicted to this challenge, and although it’s in it’s infancy – just two months old…it has a HUGE following already with some amazing card makers.

It’s the brain child of Bonnie Klass and Loll Thompson. You probably have crossed paths with one or both over the years, as they are avid card makers, have designed for numerous teams and both have distinct styles each their own.

april

This challenge is all about mixing clean and simple stamping/design with mixed media. Now the words mixed media get one of two reactions – interest and terror. But today’s project is hoping to not only peak your interest, but dispel the myth that all mixed media is intense, takes a long time and is only for artists who love to art journal.

Both projects today were from the creation of one monoprint. To make a monoprint you need three things – a printing plate (I use a gelli plate), some acrylic paint and a tool to spread the paint – I used a brayer.

Gelli Plates are inexpensive tools that give you the ability to make your work looks masterful, unique and will definitely leave the recipient of your card wondering…how in the world did you do that?!! Here are just a few prints I made quickly one day to give you an idea of how fun this artform is:

Gelli Arts - Gelli Plate Monoprints for Mixed Media

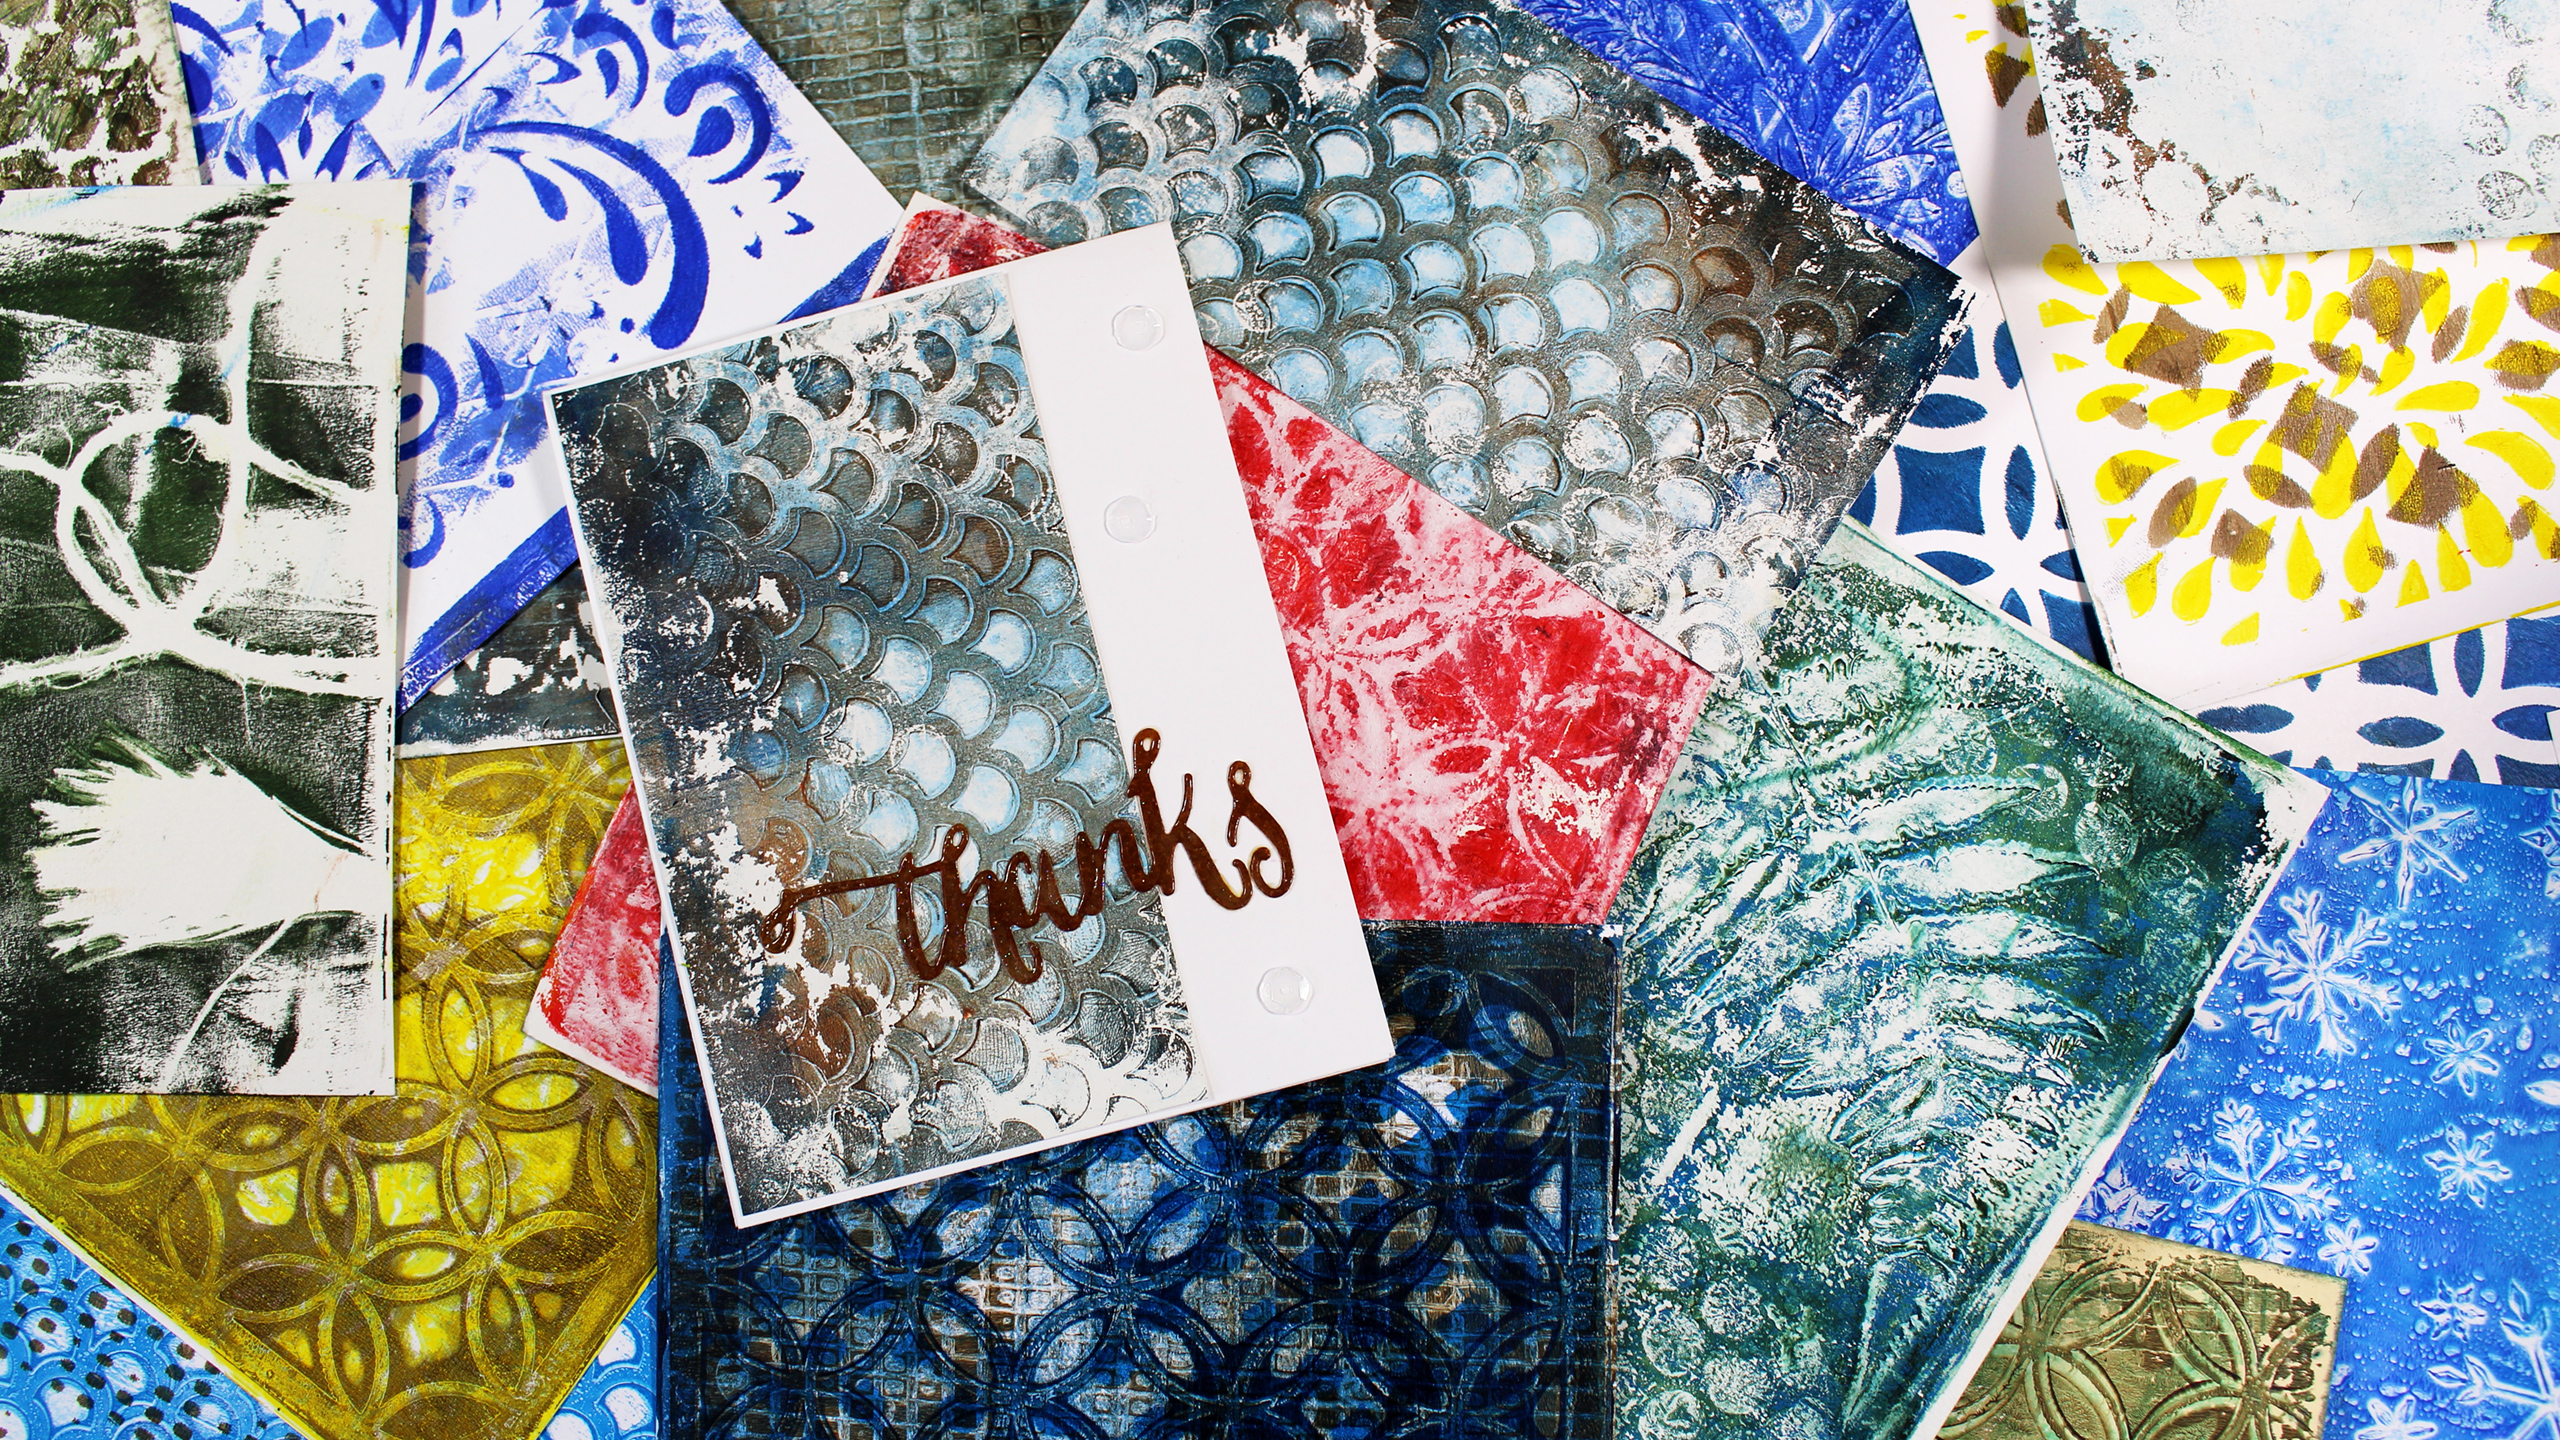
Today we’re going to use a 6×6 inch plate by Gelli Arts. And for this challenge, we’ll incorporated a few stencils as well – after all, that is the theme of this month’s challenge! I think you’ll be pleasantly surprised to see there’s not much else to it.

Why don’t we get started. I filmed the process for you, wrote a step by step tutorial below and added some detailed pictures. The video has three distinct parts – the monoprinting (first five minutes – yup…that’s it), card specifics and why, and lastly (final 2 1/2 minutes) – all about clean and simple design and the rules I live by – don’t miss that part!

Click Here to watch in HD on YouTube

What do you think? Of course you can always use stencils in the traditional way too – I just thought it would be fun to bring a little monoprinting into the mix.

[divider style=”10″]

[optin_box style=”12″ alignment=”center” email_field=”email” email_default=”Enter your email address” email_order=”2″ integration_type=”aweber” double_optin=”Y” list=”3846012″ name_field=”name” name_default=”Enter your first name” name_order=”1″ name_required=”Y” opm_packages=””][optin_box_field name=”headline”]Learn more with our exclusive FREE video series:[/optin_box_field][optin_box_field name=”paragraph”]PHA+UGx1cyB5b3XigJlsbCBiZSBhZGRlZCB0byBteSBGUkVFIENyZWF0aXZlIFRpcHMgRS1sZXR0ZXIgd2hlcmUgSSBzaGFyZSBleGNsdXNpdmUgcHJvamVjdHMsIHZpZGVvcyAmYW1wOyB0aGUgMTIgRGF5cyBvZiBDaHJpc3RtYXMgUHJvamVjdCBTZXJpZXM8L3A+Cg==[/optin_box_field][optin_box_field name=”privacy”][/optin_box_field][optin_box_field name=”top_color”]undefined[/optin_box_field][optin_box_button type=”0″ button_below=”Y”]Get Instant Access![/optin_box_button] [/optin_box]

[divider style=”10″]

CAS Monoprint Tutorial

  • Start out by gathering up all your supplies. Monoprinting goes fast – and there’s nothing worse than not having your paper right there and your paint drying up on you!
  • Spread out your background color with a brayer and the rubber attachment.
  • Clean off your brayer on a piece of scrap paper and immediately roll over your gelli plate to “lift” some of the paint you just laid down. You want to get the look in the video – lots of color still, but a bit subdued. TIP – Don’t “lift” more than twice – you’ll remove too much paint.

Gelli Plate Mixed Media

  • Place your Latticeworks stencil by Tim Holtz over your paint and pull the positive print. TIP – if you want it to be a bit random, only pat the back of your paper in random spots. Try to leave a little paint behind, I chose to pull most of it.
  • Lift your stencil, and place your white card stock on the pattern left behind. Burnish the back of your paper with your hand (I like to add a piece of copy paper if my paper is shorter than my plate as in the video) to transfer as much of your print as possible.
  • Lift your print and try and pull a ghost print with copy paper if you can – I was unable to.

Monoprints and monoprinting

  • Clean your gelli plate in-between if you desire, for me that always depends on how much is left behind and what my goal with the project is.
  • Add the Bloom Silhouette stencil by Artplorations to your plate and add a dark color with a brayer to the desired flowers. I chose to add Paynes Grey. You want a contrasting color to your first color. Brown or Dark Purple with Yellow, Black with Blue or Red, etc…
  • Lift your stencil and pull the print onto your second print (the negative), if you have a ghost print – pull that as well onto another piece.

Mixed Media and CAS Monoprints - Ingrid Blackburn

  • Add some marks to your Gelli Plate with more Paynes Grey and the inside of a Starbucks Cup Wrapper. The corrugated inside is great for texture.
  • Add the lines in three spots – if I could do mine again, I’d add the last one a bit higher. I remember thinking not too high, but my original spot in my mind would have been better. TIP – Lesson learned – go with instinct in art, not the mind.
  • Trim your positive and negative prints down. Measurements are below.

Clean and Simple Mixed Media CAS

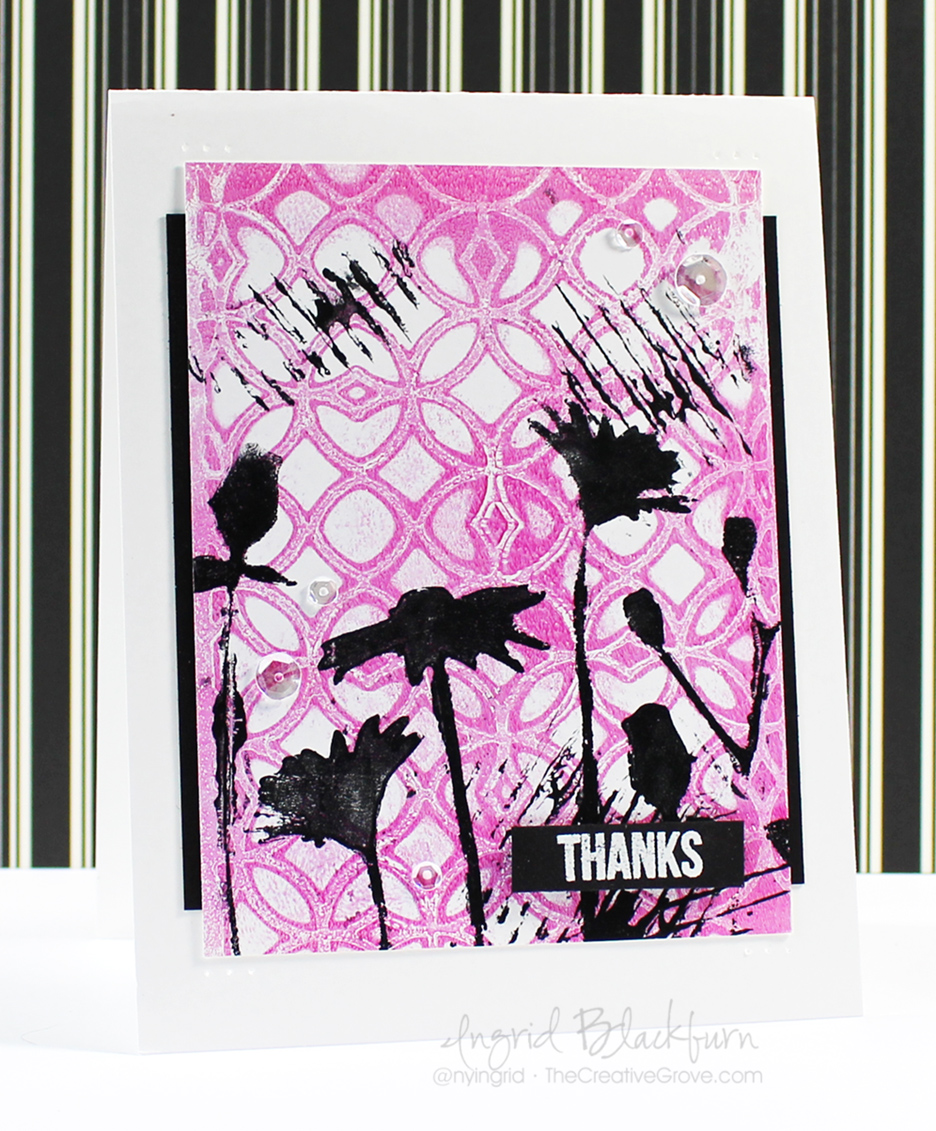
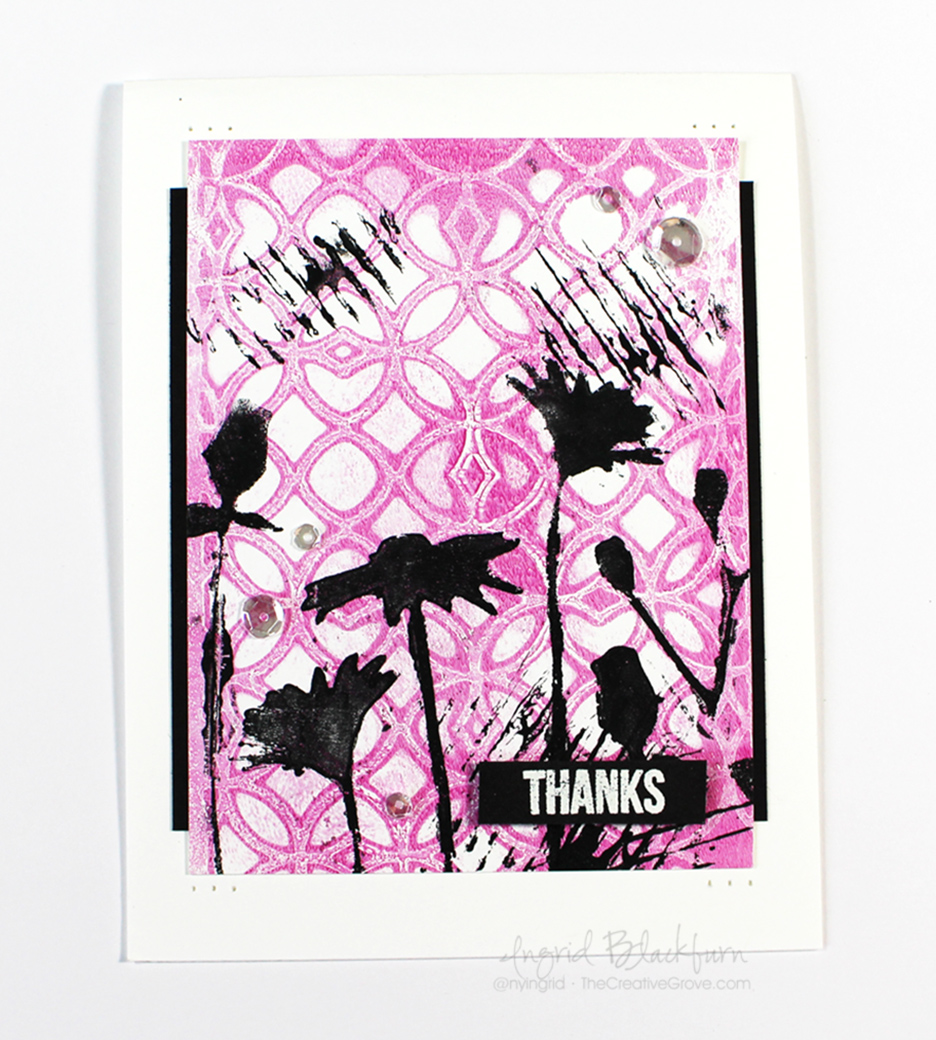
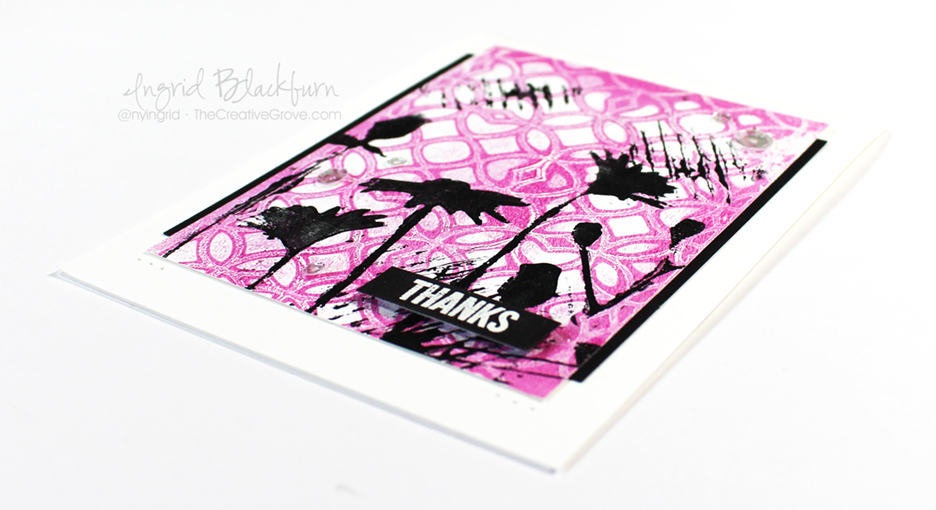
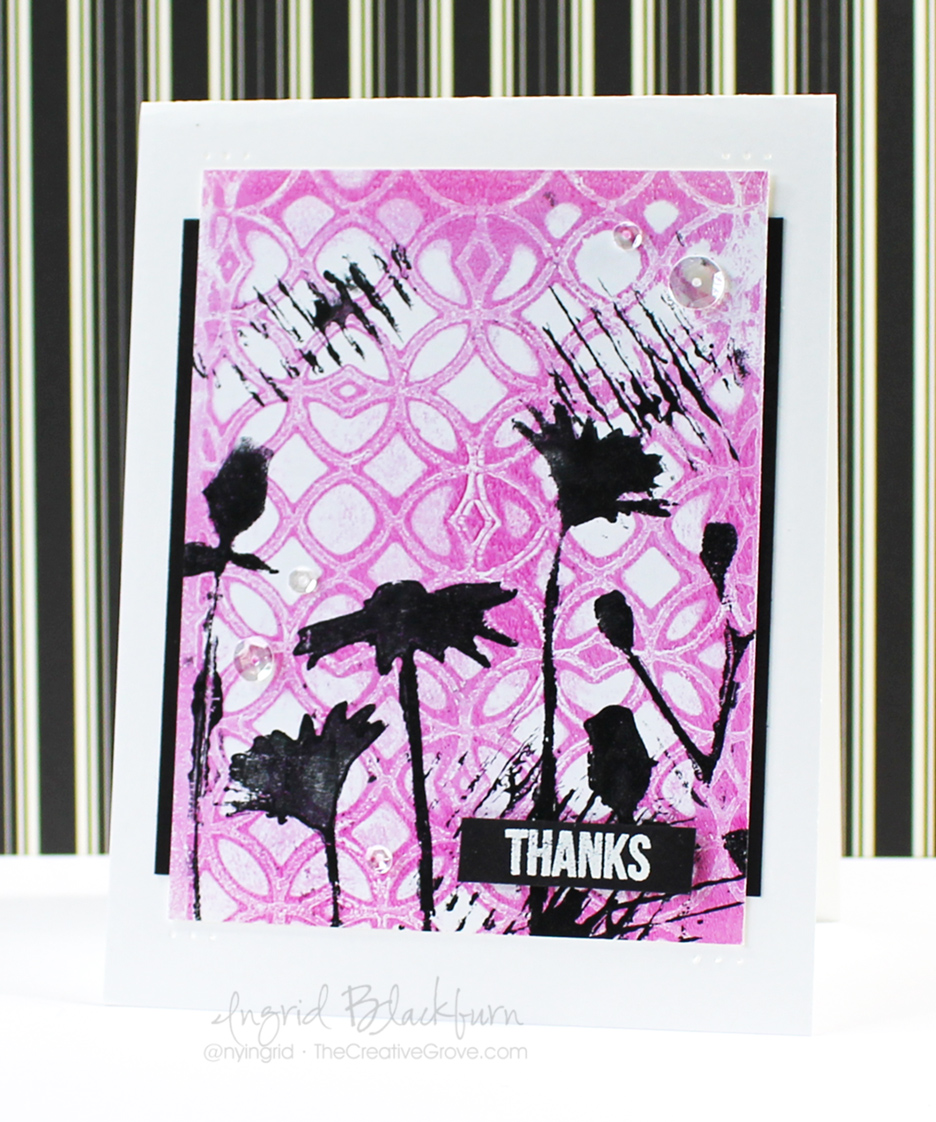
CAS Monoprint Card #1 – Black

  • Stamp Thanks from Mini Thanks (Create a Smile) in bold with Versafine Black ink (Tsukeniko) and emboss in clear.
  • Add the negative print to black card stock leaving more space on the bottom than the top (Rule of thirds). Add five sparkling clear sequins.
  • Add a little paper piercing to the top and bottom around your print and you’re set with Card #1

Dimensions:

  • Black card base – 5 1/2 s 4 1/4″ Folded
  • Monoprint –  5 1/4 x 2 7/8″ (trimmed down)

Gelli Plate Prints - Ingrid Blackburn

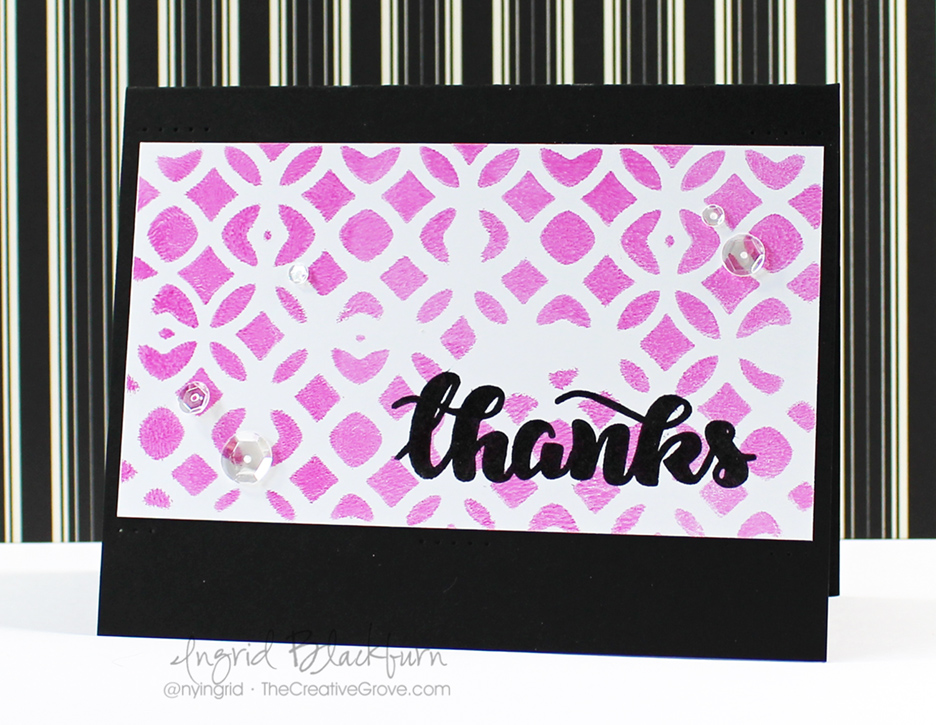
CAS Monoprint Card #2 – White

  • Stamp Thanks from Mini Thanks (Create a Smile) onto a scrap piece of black card stock with Versamark (Tsukeniko) and emboss in White. Trim it down as in the photo leaving more space to the right and left and just a hair top and bottom.
  • Adhere print to black card stock, making sure it’s centered and the black comes out left/right.
  • Adhere to white card base.
  • Add greeting, popping it up with fun foam.
  • Add five sparkling clear sequins.
  • Paper Pierce three holes top and bottom as in the photo.

Dimensions:

  • White card base – 4 1/4 x 5 1/2″ Folded
  • Monoprint – 3 1/2 x 4 1/2″
  • Black Matte – 3 5/8 x 4″

In the video at the end, I go over my rules for design and clean and simple cards. It’s the last 2 1/2 minutes.

Creative Cards - The Creative Grove

That’s it! What do you think? Don’t let mixed media scare you. It’s just combining different mediums on a project. This project used Acrylic Paint, Stencils, textured surfaces, stamping and heat embossing. We added a little sequins for bling and you’re all set – easy peasy!

Now it’s your turn to get those fingers a little inky. The challenge is coming to an end today, but there will be a new one on the 1st. There’s still time to get one last project in though!I’m also going to play along in some never ending challenges as well…I love all the companies products I used today, and can’t say enough about them. I purchased them all on my own….they are products that I use over and over again.

Playing along with – Stamplorations Anything Goes Challenge for my Bloom Silhouette Stencil, April’s Project Share over at Create a Smile , and Happy Little Stampers Stencil Monoprint challenge – how perfect is that!

Stamplorations and Artplorations Happy Little Stampers CAS Challenge

Leave me a comment and let me know what you think! Have you tried a little Mixed Media before? I’d love to know!

Till next time –

Signature

[optin_box style=”12″ alignment=”center” email_field=”email” email_default=”Enter your email address” email_order=”2″ integration_type=”aweber” double_optin=”Y” list=”3846012″ name_field=”name” name_default=”Enter your first name” name_order=”1″ name_required=”Y” opm_packages=””][optin_box_field name=”headline”]Learn more with our exclusive FREE video series:[/optin_box_field][optin_box_field name=”paragraph”]PHA+UGx1cyB5b3XigJlsbCBiZSBhZGRlZCB0byBteSBGUkVFIENyZWF0aXZlIFRpcHMgRS1sZXR0ZXIgd2hlcmUgSSBzaGFyZSBleGNsdXNpdmUgcHJvamVjdHMsIHZpZGVvcyAmYW1wOyB0aGUgMTIgRGF5cyBvZiBDaHJpc3RtYXMgUHJvamVjdCBTZXJpZXM8L3A+Cg==[/optin_box_field][optin_box_field name=”privacy”][/optin_box_field][optin_box_field name=”top_color”]undefined[/optin_box_field][optin_box_button type=”0″ button_below=”Y”]Get Instant Access![/optin_box_button] [/optin_box]

Blog Hop, Prizes, and lots of inspiration!

Welcome back my friend – it’s the fifth day of sharing great creativity with you and we’re going out with a bang! Yup…it’s a uber talented line up for the Blog Hop and *gasp* there are prizes!!! In addition to all that goodness – I have two projects for you today and a video! But first – I chose these cards – and more importantly their sayings because that’s how I feel about you – my blog readers! So enjoy this post, all the creative goodness and thanks for Making me Smile, you all are just awesome! 🙂 🙂

SOA April 2016

Just in case you were trapped under something heavy the past four days and couldn’t get to a computer to see all the creative goodness – whew…I hope you’re okay…Stamp of Approval is a curated collection put together by my friend Catherine Pooler. Tomorrow’s collection – yup – tomorrow, is called Beautiful World. This collection has gorgeous stamps and dies by Gina K, CAS-ual Fridays, SugarPea Designs and the debut of Catherine Pooler Designs. It’s a very cool collection.

I wasn’t sure when I first saw it, then when I laid it all out in front of me and I started sketching I literally couldn’t stop. (See my Day One post – link at the bottom for my sketches) And I have been creating for weeks. The ideas just keep coming – it is seriously that easy to stamp with!

But to find out how to get it, you want to be on the wait list – because first – StampNation members will get the sales link, then the wait list finds out, and if you’re not on one of those two places – the -public won’t find out until the day after. You may think – that’s okay, I’ll wait…but the first SOA Collection literally sold out in a few hours! So if you’ve liked what you’ve seen from myself and all the amazing, talented designers – get on the wait list at the very least – I’d hate for you to miss out. Click Here for more detailed information on that

win win win

GIVEAWAY Okay…let’s get to the good stuff – prizes….yup – you guessed it! Someone will win the entire Stamp of Approval – Beautiful World Collection! Not bad, huh? Just stop along the hop and leave comments along the way – don’t forget Catherine’s! The more you stop, the more entries you’ll have! *Entries close on THURSDAY at 9AM EST. The winner will be announced that morning. If you already bought a box, then you will be refunded! How cool is that!

And now….are you ready for some creative inspiration?!!!

Beautiful World Blog Hop Creations – Day Five

Project One

To say thank you to you all, I wanted to showcase something elegant and SUPER simple. Now put your imagination caps on and envision matching Wedding invites, or an Anniversary celebration – Tea invitations, you name it. I LOVE this stamp! And did you see some of the cool coloring my team mates have done with it? I mean really!!! If you love Copics, then make sure you see some of the past features (Links at the bottom).

Simple and classic silver on Navy – you can NEVER go wrong. Little things like a pop of white at the top and bottom (that’s the card base) – easy to print on, and less $ than colored card stock. When mass producing you have to think of these things. Simple triple wrapped silver cord – you can buy that stuff cheap! It’s timeless and a classic, don’t you agree?

Elegant Silver Flourish

So thank you for always stopping by and commenting. Visiting my YouTube channel and being a subscriber and student. From the bottom of my heart – Thank You!

Project Two

And for the grand finale one of my favorite projects from the week. I wish I could take credit for the design of this card, but my good friend Kylie Purtell came up with it. When I saw her version, I just had to add the rainbow colors and it was screaming for that awesome butterfly from Beautiful World by Gina K. Add those killer greetings from All about YOU by CAS-ual Fridays and it’s sheer perfection.

Here’s a super short video on how I created this card – plus a little trip down memory lane from the past five days at the end!

Click Here to watch in HD on YouTube

Let’s chat about those greetings by CAS-ual Fridays for a second. If you love versatility – then I highly encourage stamp sets where you can build your own greetings. I love that you can mix and match stuff, and the Riesling font (one of my favs for years) paired with that bold is just awesome! It’s a super cute card – isn’t it?
SOA Rainbow Butterflies

Thanks for coming back each and every day over the past five days – in all we’ve had 11 projects on The Creative Grove alone! But don’t just stop here – my fellow Dream Team sistahs are super creative and talented, be sure to check out all their creations as well, Catherine has had five solid days of videos and tons of projects PLUS we have several creative and very inspiring additions from all over Blog-land!

SO….check out all this goodness, be sure to leave me a comment – you wouldn’t want to miss out on prizes, would you?!!! And I certainly hope to see you again either here, on the e-letter or over at my YouTube channel again!

* Note that Kathy Racoosin (After me in the hop) is traveling today and we had a slight change in the line up! Be sure to go directly to Kelly Latevola after her, just click on both names here and you’re all set!

Catherine Pooler
Maureen Merritt
Kristie Goulet
Heather North
Allison Cope
Laurel Beard
Lisa Harrolle
Ingrid Blackburn – That’s me! You are HERE
Kathy Racoosin Quick…Hop HERE next!
Kelly Latevola 
Beth Silaika

And when you’re all done hopping – seriously you don’t want to miss out on this talented line up… if you missed the first four feature days loaded with projects….check them out here:

Day One            Day Two               Day Three            Day Four

Happy Hopping – Keep those fingers inky –

Signature

[optin_box style=”12″ alignment=”center” email_field=”email” email_default=”Enter your email address” email_order=”2″ integration_type=”aweber” double_optin=”Y” list=”3846012″ name_field=”name” name_default=”Enter your first name” name_order=”1″ name_required=”Y” opm_packages=””][optin_box_field name=”headline”]Learn more with our exclusive FREE video series:[/optin_box_field][optin_box_field name=”paragraph”]PHA+UGx1cyB5b3XigJlsbCBiZSBhZGRlZCB0byBteTxzdHJvbmc+IEZSRUU8L3N0cm9uZz4gQ3JlYXRpdmUgVGlwcyBFLWxldHRlci4gRnJvbSB0aW1lIHRvIHRpbWUgeW914oCZbGwgZ2V0IGV4Y2x1c2l2ZSBwcm9qZWN0cywgdmlkZW9zICZhbXA7IHRoZSAxMiBEYXlzIG9mIENocmlzdG1hcyBzZXJpZXMuPC9wPgo=[/optin_box_field][optin_box_field name=”privacy”]We value your privacy and would never spam you[/optin_box_field][optin_box_field name=”top_color”]undefined[/optin_box_field][optin_box_button type=”0″ button_below=”Y”]Get Instant Access![/optin_box_button] [/optin_box]

Enchanted Garden & Dies

Today I’m going to showcase a little from the Enchanted Garden and coordinating Dies collection. We’re going to stay in Clean and simple mode today. Normally I stay away from too many lined images, unless I’m going to watercolor, but I can not stop using these two items from the new  Stamp of Approval – Beautiful World Collection.

If you don’t know what Stamp of Approval (SOA) is, then you must have missed my post yesterday! Click Here to see the three projects I created, real all about Stamp of Approval and see my video too!

Today’s products are from SugarPea Designs. I love the whimsical nature of these flowers. And I have some incredible mixed media pieces headed your way with these two products in a few days – you don’t want to miss those! But today we’re going to stay CAS.

If you like what you see, then be sure you are on the wait list for this collection – that’s the only way to get the sales link when it goes live on April 20th!

To see all the products in action before it goes on sale, just stop by my friend Catherine’s blog every day leading up to the 20th. She’ll showcase each piece so you can see them in action ahead of time.

PLUS...there are feature days from a whole team of designers that are super creative. Today we have a large list of amazing designers. I have links to everyone below.

Stamp of Approval Beautiful World

 Get on the wait list HERE to find out when it’s available

Now… let’s get our fingers inky and started with some CAS inspiration for today. There are many more images from the stamp set Enchanted Garden, you’ll have to check out Catherine’s blog and all the other designers to see how they’re put to use. I’m in love with the dies and flowers. But a quick favorite from all the designers is that cute loose dandelion seed – what a perfect filler stamp. See it below? It rocks!

Enchanted Garden – Day Two

Project One

To create this beauty, you’ll want to cut your panel on the diagonal and space it out however far you’d like. It’s a great way to showcase some pop of color. I love doing this on cards. For the pop, I stamped this cool flower a few times onto vellum with StazOn ink. Color them in using markers or chalk from behind – it gives it a subtler look and attach it to the top piece of your panel.

I find that if I lay it onto an acrylic grid or mat with dimensions, in exactly the size I want it on my card, I’ll get the right spacing.  Another way would be to lie it down on your project upside down to get the spacing right.

Stamp your front – love that greeting, add the little fly away seed and a little black border with a pigment liner by micron or staedtler and you’re all set! Super cute, huh?

Enchanted Garden

Project Two

For my second project, I wanted something super quick, easy and in color! I usually gravitate toward black, brown and white as my based, I thought it would be fun to do a card with this gorgeous Basic Grey color by Stampin Up.

For the popped up details, I chose the SU colors Marina Mist, So Saffron and Gumball Green. They work so great together. My die cuts are layered over each other and to bring a little focus in on one, I popped it up. That simple.

For a slightly different look, you could also stamp these with the coordinating stamps to match the dies. I was going for a simpler look, but that looks awesome too!

I kept the greeting simple and embossed in Pearl which turns grey/pearl on this card stock. To emphasize it a bit better, I shadowed it with a pigment liner by Staedtler. The greeting is from the Beautiful World stamp set by GinaK. It’s by far my favorite greeting – I just LOVE that sentiment.  Just a little sneak peek into tomorrow’s feature stamp set. 🙂

So what do you think , do you like the clean and simple design? I bet you’re thinking – I could totally do that with x dies…tell me in the comments below what YOU would use and what you think of this cool new stamp set/dies. I hope I gave you a little inspiration!

Enchanted Garden Dies

Cute, huh? Now be sure to check out all the other designer’s creations. I have them all linked here for your convenience, Catherine will also have everyone linked for you. Enjoy the creativity – be sure to check back tomorrow for more! And if you missed yesterday’s post, Click Here!

Our featured Designers for today are:

See you tomorrow for more…

Signature

[optin_box style=”12″ alignment=”center” email_field=”email” email_default=”Enter your email address” email_order=”2″ integration_type=”aweber” double_optin=”Y” list=”3846012″ name_field=”name” name_default=”Enter your first name” name_order=”1″ name_required=”Y” opm_packages=””][optin_box_field name=”headline”]Learn more with our exclusive FREE video series:[/optin_box_field][optin_box_field name=”paragraph”]PHA+UGx1cyB5b3XigJlsbCBiZSBhZGRlZCB0byBteTxzdHJvbmc+IEZSRUU8L3N0cm9uZz4gQ3JlYXRpdmUgVGlwcyBFLWxldHRlci4gRnJvbSB0aW1lIHRvIHRpbWUgeW914oCZbGwgZ2V0IGV4Y2x1c2l2ZSBwcm9qZWN0cywgdmlkZW9zICZhbXA7IHRoZSAxMiBEYXlzIG9mIENocmlzdG1hcyBzZXJpZXMuPC9wPgo=[/optin_box_field][optin_box_field name=”privacy”][/optin_box_field][optin_box_field name=”top_color”]undefined[/optin_box_field][optin_box_button type=”0″ button_below=”Y”]Get Instant Access![/optin_box_button] [/optin_box]

HLS Poinsettia Challenge

Watercolored Poinsettia 001

What’s a girl to do to create amazing cards for you from the road – watercolor using distress inks, naturally! I brought a few Christmas sets with me, just in case we weren’t back yet (We’ve been traveling for 9 weeks so far); so when I sat down for this month’s Poinsettia Challenge, I stared at my stamp set and this idea popped in my head.

You know by now that I love to watercolor, especially with distress inks, so I thought a more three dimensional Poinsettia on a cool smooshed background might look cool, and I have to say – even I’m thrilled with how it turned out – and I’m my worst critic! I bet you are your own worst critic too – tell me in the comments – it can’t just be me!

HLS Christmas Challenge October 2015

This month at the Happy Little Stampers Christmas Challenge, the theme is Poinsettia. So I hope this card inspires you in some way to create your own amazing creation and join in the Challenge. Not only does the design team have some amazing projects created for you…we also have a guest designer this month – Pat from Colourful Creations.

You’ll see a tutorial below. I know I normally have a video, but I don’t have a tripod with me – sorry about that! But if you are looking for some great holiday inspiration – later this month my annual 12 Days of Christmas card series is starting – be sure to be on the Creative Tips E-Letter to get those – they won’t be on the blog!!

To join me this month, use any element of this or the design teams cards as inspiration, just make sure it has a poinsettia in some way on your card and is Christmas themed. I can’t wait to see your creations – now for the good stuff!

Watercolored Poinsettia 003

Creative Tips on Watercolor using Distress Inks

Here was my thought process for choosing the colors for the card. Originally I was going to do a no line watercolor white poinsettia, but then I was in the mood for red. I knew a deeply watercolored red 3D poinsettia would look awesome, but needed an equally awesome background. So what do you choose? On the color wheel, the complimentary color (opposite on the wheel) to red  is green. So while the leaves would be green, I thought maybe a more vibrant version with lighter bleached out in spots along with great texture created with deeper flicks and edges might just do the trick!

  • To start, you’ll want to smoosh a few greens into your craft mat or work surface. I used Bundled Sage, Peeled Paint and Mowed Lawn. Bundled Sage helped me with the lighter bleached out spots, Mowed Lawn was my bright vibrant contrast to that, Peeled Paint married the two.
  • Generously spritz your colors. Make sure you lay down enough to cover your background piece. While spritzing, you want to have enough water down without overdoing it. To gauge the amount of water, when you press your watercolor card front down and it comes up dry or not glistening, you don’t have enough water. On the other hand if all your color runs right off your watercolor paper, you have too much! It’s a science, so play around. Don’t worry if you don’t get it right, just go right back with another layer adjusted with more or less water. Layers is what makes this piece awesome! So it’s very forgiving.

Watercolored Poinsettia 002

  • Don’t over do the smooshing – get just enough to cover your piece. This way you keep the light areas light. If you have too much light, strategically smoosh more vibrant spots over some without pressing it into the whole card.
  • Set your background aside to dry before moving onto the next step.
  • Next – create the splatter. I did this in two ways – flicked water, then colored splatter.
  • First spritz your hand and flick your colored surface. Here’s a video on this technique (at the 2:59 mark)
  • Smoosh some Forest Moss into your craft mat. Spritz with water to get it into a liquid state – just add enough, you don’t want it too diluted in hue. Load up a paint brush and splatter it hard with your finger on the opposite hand creating splatter onto your card. If you hold it closer to your project it will be more condensed. I held mine about 10 inches from my card to get it to splatter outward.
  • Edge your watercolor paper directly with your ink pad – a little more generously at the corners to complete your background.
  • Set it aside to try. Now you can move onto the Poinsettia!

Watercolored Poinsettia 006

  • To get a more painted look to your Poinsettia. you’ll want to use a few shades of red and create layers. Stamp your image in a lighter shade twice on a larger piece of 140# cold pressed watercolor paper. I used Tattered Rose and stamped it off so that it was really light. This will give you an outline to work with without defining the edges. This allows you to control the look of the flower, rather than painting in the lines of an outlined image.
  • You will color one flower completely and another just the smaller inner flower. When painting the larger flower – ignore the lines of the smaller flower – just extend the leaf as if it’s a large petal. Look really close at mine and you’ll see the smaller outline slightly – but you have to really look for it!

Watercolored Poinsettia 005

  • Color your berries on the smaller flower in using Peeled Paint. Your larger flower you’ll color the berries with Festive Berries to match the flower better.
  • Next create a light wash of Worn Lipstick by spritzing it generously with water. Test it out on a scrap piece to make sure it’s light. It’s easier to start lighter and add darker layers for depth – you can’t go so easily dark to light.
  • Add a spritzed version of Festive Berries, keeping some light areas. Apply your color using the veins of the flower as a guide and spread the color outward with wet brush – I used a Pentel AquaBrush.
  • Repeat using Barn Door and add a little detail to the veins with Fired Brick. With each layer, add the color in different spots – some heavier and lighter. This will help you to develop texture in  your flower.
  • Fussy cut both of your flowers out right at the line image – don’t leave any excess white. You should have a large and smaller flower.
  • Edge your petals in Gathered Twigs. Be careful to just get the very edge and not onto the flower if possible. Use a Distress marker if you’re more comfortable.

Watercolored Poinsettia 004

  • Stamp your leaves in Bundled Sage and Paint them in a similar manner using a light wash of Bundled Sage and add a little Peeled Paint  and an even smaller amount of Forest Moss at the veins. Keep them really light to help as a contrast from the background.
  • Fussy cut them out. Glue your leaves to the larger flower, and then your smaller flower on top.
  • Emboss your greeting onto Espresso card stock – I used the set Mixed Christmas Sentiments by Happy Little Stampers. I then created a banner and attached it to the back of my flower.
  • Before using liquid glue to attach the flower and banner to the card, I gently bent up s few of the petals and the banner to give a better 3D look.
  • Add some sparkling clear sequins by pretty pink posh for a final touch.

Watercolored Poinsettia 007

Here are the card dimensions:

  • Card – Top folding 8 1/2 x 5 1/2″ White
  • Card front – 140# water color paper by Canson – 3 3/4 x 5″
  • Espresso – Matte – 5 1/2 x 3 1/2″, banner – scrap

I hope you enjoyed this little tutorial on watercolor using distress inks, okay – not so little. You can use watercolor paints as well, or any dye based inks that blend well with water. In my experience, the distress are the most transparent of the dye inks out there. Have fun with it, and I can’t wait to see what you create. And don’t forget – if you want the 12 Days of Christmas series, be sure to sign up for the Creative Tips E-letter.

Signature-24-pt_thumb.jpg

Black and White Emboss Resist Poppies

Pleasant Poppies Background Stamp

The emboss resist technique is one that you probably use in card making so often that you don’t even give it a thought. It can be used in several ways; today we’re going to feature it with a little coloring using markers and the Pleasant Poppies background stamp.

Embossing techniques are probably some of my favorites. And embossing in general was probably one of the biggest wow techniques you first saw when learning how to stamp, am I right? I’d love to know what it was for you…tell me in the comments below!

Emboss Resist + Markers Video Tutorial

This project tutorial uses emboss resist to create monochromatic poppies for a truly striking card. Like I say in the video, creating black flowers is kind of weird for me, but I have to admit, the card is gorgeous! Here’s the step by step tutorial:

View on YouTube

Now that you’ve seen the video, I listed some instructions for this project. If you haven’t had a chance to see the video, it gives a lot more detail than the tutorial below.

Emboss Resist Technique

Creative Tips –

  • You’ll want to create your background first. Stamp the Dictionary stamp in tone on tone ink (Basic Gray). The Basic Gray card front measures 4 x 5 1/4”.
  • Be sure the background is completely dry as in the video.
  • Use a de-static tool like an embossing buddy on your card front.
  • Emboss the Pleasant Poppies stamp using White Pigment Ink and embossing powder.
  • Color your flowers in using a Basic Black marker.

Embossing Techniques

    • The embossed poppy outline will “resist” the dye ink – that’s the emboss resist technique! Simple, right?
    • Color your images in sections.
    • Lightly dampen a paper towel by spritzing it with a fine mist mini-spritzer. I can not stress lightly enough. You don’t want to add water to your project, just use it as a tool to remove the ink that the embossed image resisted.
    • Wipe lightly over your emboss resisted image. I first pat it, then wipe, being careful not to push my towel into my cardstock. You want to just stay on the raised surface.
    • Add a greeting embossed on Vellum card stock and adhere your card front to the white base. The card base measures 4 1/4 x 11”.

How to embossing tutorials

That’s it! You can try this technique with any colors, but you’ll want to make sure that your marker is darker than your background image (the dictionary stamp). Otherwise you’ll see the background image through your colored flower.

I entered this card in the following challenges:  Happy Little Stampers and Virginia’s View.

HLS March Sketch Challenge   Virginias View March 2014

So what did you think? Are the emboss resist flowers Weird or Striking for you – tell me in the comments – I’d love to know!

Signature

[optin_box style=”14″ alignment=”center” disable_name=”Y” email_field=”email” email_default=”Enter your email address” email_order=”1″ integration_type=”aweber” double_optin=”Y” list=”2841626″ name_field=”name” name_default=”Enter your first name” name_required=”Y”][optin_box_field name=”headline”]If you enjoyed this tutorial…[/optin_box_field][optin_box_field name=”paragraph”]PHA+Li4ueW914oCZbGwgbG92ZSBvdXIgPHNwYW4gc3R5bGU9ImNvbG9yOiAjMjQ0YzVlOyI+PGVtPjxzdHJvbmc+ZnJlZSA8L3N0cm9uZz48L2VtPjwvc3Bhbj5zdWJzY3JpYmVyIG9ubHkgdmlkZW8gc2VyaWVzISDCoEdldCB0aGXCoDxzcGFuIHN0eWxlPSJjb2xvcjogIzI0NGM1ZTsiPjxlbT48c3Ryb25nPmV4Y2x1c2l2ZTwvc3Ryb25nPjwvZW0+PC9zcGFuPsKgQ3JlYXRpdmUgVGlwcyBlLWxldHRlciB3aGljaCB3aWxsIHRlYWNoIHlvdSBuZXcgdGVjaG5pcXVlcyB0byBhZGQgdG8geW91ciBzdGFtcGluZyBza2lsbCBzZXQuIMKgTGVhcm4gaG93IHRvIG1ha2UgcHJvamVjdHMgeW91J2xswqBsb3ZlITwvcD4K[/optin_box_field][optin_box_field name=”privacy”][/optin_box_field][optin_box_field name=”top_color”]undefined[/optin_box_field][optin_box_button type=”1″ text=”Send me exclusive tips!” text_size=”26″ text_color=”#000000″ text_bold=”Y” text_letter_spacing=”-1″ text_shadow_panel=”Y” text_shadow_vertical=”1″ text_shadow_horizontal=”0″ text_shadow_color=”#a3b640″ text_shadow_blur=”0″ styling_width=”100″ styling_height=”10″ styling_border_color=”#000000″ styling_border_size=”1″ styling_border_radius=”6″ styling_border_opacity=”100″ styling_shine=”Y” styling_gradient_start_color=”#a3b640″ styling_gradient_end_color=”#5b661e” drop_shadow_panel=”Y” drop_shadow_vertical=”1″ drop_shadow_horizontal=”0″ drop_shadow_blur=”1″ drop_shadow_spread=”0″ drop_shadow_color=”#000000″ drop_shadow_opacity=”50″ inset_shadow_panel=”Y” inset_shadow_vertical=”0″ inset_shadow_horizontal=”0″ inset_shadow_blur=”0″ inset_shadow_spread=”1″ inset_shadow_color=”#a3b640″ inset_shadow_opacity=”50″ location=”optin_box_style_14″ button_below=”Y”]Send me exclusive tips![/optin_box_button] [/optin_box]

Buds and Blooms–Scribble Flower

Scribble Flowers Trio002

It’s the beginning of a new year, which is always exciting.  This week on Less is More Challenge Blog, the theme is New Beginnings – which is very fitting for a new year.  To keep it simple, I have a Clean and Simple card that’s just perfect for a quick go to simple one layer card.

I’m also adding this to the Clean Slate challenge at Virginia’s View Challenge.

I did end up popping up one of the flowers for emphasis, but it would also look just perfect stamped directly onto the main layer.

Scribble Flowers Trio003

Here you see Scribble Flowers by Simon Says Stamp in some fun bright colors – Picked Raspberries, Mustard Seed and Mowed Lawn Distress Inks by Ranger. For the black, I used Memento Jet Black Ink.

I masked off the buds (the beginning) and stamped the leaves.  For the popped up flower I glued on the middle and leaves, but they would also work perfectly masked as well if stamping on a single layer.  Okay – I know I deviated from the true One Layer Rule, but I just felt like it on this one – forgive me! Smile

Scribble Flowers Trio001

I always make a ton of birthday cards at the beginning of each year – how about you?  This one is great as a quick and easy go to simple card that will brighten anyone’s day.  I hope you loved it as much as I did!

Want more creative inspiration – check out our free video series and ongoing creative tips – sign up for our inspirational newsletter here – Creative Tips Newsletter!

I’m spending the week in Tuscany this week.  We’re off to explore the countryside a bit – here are a few photos from our day yesterday in Chianti and Loro Ciufenna.  Be sure to stop back to see more soon!

Enjoy your day!

Signature

Simply Sketched Watercolor

Watercolor Bird Mojo Mon 001

Today is my 52nd Mojo Monday challenge!  Wow – that’s enough to fill up a WHOLE year!  Now, it is over the course of not quite two, but still…quite a few.  To say I love this challenge is an understatement.

For today’s challenge, I pulled out my watercolor pencils, aqua painter and was a little creative with my background.  There are so many techniques in this one card, that I had to just film a video for our VIP Community.  Below are the steps in a nutshell.  Enjoy!

Today’s Mojo sketch and my interpretation:

                               Mojo358SketchWatercolor Bird Mojo Mon 008

Creative Steps –

  • I watercolored this image from Simply Sketched.  I pulled color from some Faber Castell Watercolor Pencils with my Aqua Painter in a unique way, rather than color directly on my paper.  We have a watercolor class on this and many other techniques here if you’re interested in watercolor.

Watercolor Bird Mojo Mon 004

  • I wanted to keep the watercolor as the star, so I lightly sponged every background piece. 
  • To keep the card light, fun and neutral, I chose Crumb Cake, Early Espresso, Very Vanilla, Old Olive and Primrose Petals by Stampin’ Up!.
  • The flower was cut using the spring garden framelits, then sponged and bent up at the edges. 

Watercolor Bird Mojo Mon 006Watercolor Bird Mojo Mon 007

  • The greeting was placed on a banner, made with a hexagon punch (see this video for tips on how) and is from the set Lots of Thanks
  • I wanted a subtle background, so I stamped argyle using the Argle Embossing Folder and some Crumb Cake ink.
  • Watercolor Bird Mojo Mon 003

I love how it turned out.  There’s just the right amount of pop with color to compliment the watercolored piece.

Here’s to another 52 Mojo Mondays! Smile

Signature

Want exclusive tutorials and videos – get the Creative Tips E-letter

Want access to 4-5 stamping video tutorials each week?  Learn techniques, projects and get access to our classes!  Check out our VIP Community here.

Clean and Simple Birthday Card for LeAnne

Clean and Simple Flower Birthday Card (2)

I decided to combine my Monday challenges today and when I saw the Merry Monday challenge today was a Birthday Hop – I was SO excited!  Of course, I went to Mojo Monday first thing at 5 AM East Coast Time…and fell in love with the sketch right away – I mean how could you not – the possibilities were endless!  I was already thinking up all sorts of Christmas ideas…then quickly switched gears and made a fun bright CAS birthday card instead!

Surprise Hop Graphic for LeAnnemojo356Clean and Simple Flower Birthday Card (4)

I love LeAnne Pugliese’s cards every time I see them on the Merry Monday Christmas Challenge Blog, so I decided she needed a Birthday card that was fun, sassy, and colorful with no less than my latest little addiction – sequins (thanks Deanne – I have you to blame for these).

I knew I wanted to use the Sassy Salutations birthday greeting and my mind immediately went to the bright pink Gerber Daisy.  My sister-in-law Claudia had these at her wedding and I couldn’t stop taking photos of them, they were so editorial!

Claudias Wedding 015Claudias Wedding 016

Now I know the middles are mostly yellow, but I left it black so that I didn’t bring another color in.  It’s a fun little card, don’t you think?  My favorite parts – the flower, belly band and of course, I’m a convert – the sequins!  So LeAnne – this card is for you!  I hope you have a FABULOUS birthday!

Clean and Simple Flower Birthday Card (3)Clean and Simple Flower Birthday Card (1)Clean and Simple Flower Birthday Card (5)Clean and Simple Flower Birthday Card (8)

Hope you liked that!  If you’re a TCG VIP Member – you’ll see a video of this project in the Project and Resource Video library. Smile

Have a great start to the week!

Signature