Label Thinlit Flip Flop Card

Regarding Dahlias 004 (2)

Have you ever just needed an really quick wow card?  Well then the new Card Thinlits are for you.  For one, they have an interactive rotating feature.  Second – talk about super quick!  You can literally make this awesome project in a matter of minutes!  Here’s how.Regarding Dahlias 004 (4)

Creative Tips –

  • First cut your cardstock to 6” x 5 1/2”.  Lay your Thinlit over.  Add a piece of Whisper White cardstock cut 5 1/4 x 2 3/4” to the left side with some adhesive lining up the outside three edges.
  • Run through your Big Shot to cut the card and flip flop cuts.
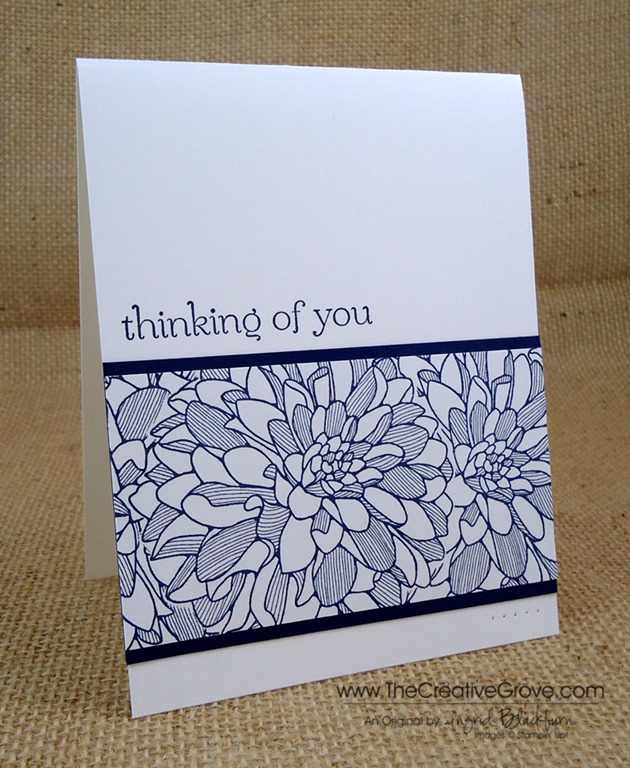
  • Cut the matching label framelits from this set and stamp with Raspberry Ripple using the Regarding Dahlia’s Stamp.
  • Cut a mask using the label portion of the Card Thinlit out of scrap paper – Keep your mask for future use with your Thinlit set!Regarding Dahlias 004 (1)
  • Stamp the Regarding Dahlia’s  in Raspberry Ripple on the left portion of the card.
  • Tie some linen thread and add Rhinestone Basic Jewels.
  • Stamp your greeting and send to someone you love!

Wasn’t that fast!  Be sure to tune in later this week for a video tutorial – I’m so excited to use my new microphone – yes, you read that right…finally better sound!  Have a fabulous day.Regarding Dahlias 004 (7)

New Creative Grove Classroom

Did you know that we have a new classroom for you to take all your online classes?  Check it out by clicking the Classroom tab up top or here.  Our latest class – Class of the Month : Festive Flurry has gotten some rave reviews!  It just launched and is packed with amazing projects that you’ll be able to use no matter what stamps or framelits you own. Check that class out here.

Signature Snowflake 001

To Shop 24/7 in the Creative Store – Click here!

Regarding Dahlias 004 (6)

Stamp Sets – Regarding Dahlias (130327c, 130324w)  Ink – Raspberry Ripple Paper – Whisper White (100730), Raspberry Ripple Cool Tools – Label Thinlits (133479) Finishing Touch – Linen Thread, Rhinestone Basic Jewels 

Regarding DahliasLabel Thinlits

Finding Inspiration

Where do you look for creative inspiration?  For me, I usually head to Pinterest or look in magazines.  I love to look at photographs and generally a color palate or random organization of shapes will strike up an idea.  I thought today I would take you on a journey for a simple CASE (copy and steal everything) of a photo for me. Smile

When you see a photo online, do you sometimes shift in your chair, or move your head?  That to me is the sign that I’ve found something.  Here is the photo I found on Pinterest and my final project:

Cable-Beach-Broome-North-Western-Australia Moonlit Waters 004

While it’s not exact, it was my first attempt at making a mostly all black scenery.   I immediately thought, I can do that.  I’ll challenge myself and try something totally new.  I have to admit – it felt all wrong…lol!

Creative Tips –

  • You will want to start by masking a horizon line and beginning with your sky.
  • Give a good coat of various shades of yellow.  Here I used Glossy paper and a stylus tool to layer several coats of ink.Moonlit Waters 007
  • Mask your moon and continue layering ink, switching to Black.  You’ll want to leave a little faint yellow showing through around your moon for the glow.
  • My edge of my mask lifted up, so I got a splotch of black on my moon on the left side.  To cover that mistake up, I lifted my mask completely and dragged my stylus across a little to create whispy clouds.  Here is my friend Amy’s who didn’t get any on hers – see the difference? Moonlit Waters 001
  • When done with your sky, fully dry and switch your mask to reveal the water and cover the sky.
  • Layer color from the sides across your water being careful to leave the middle showing the moonlight reflection.
  • To create the feel of water, you will want to bring in a little black into your yellow.  Do this a little at a time so that you don’t cover up too much at once.  If you feel like you aren’t sure if you want to add more, stop.Moonlit Waters 008
  • Once you have the desired look, stamp your palm trunks and leaves at the top to give the viewer’s perspective.
  • Stamp the birds, layering a few over your moon.
  • Create a mask for the island and add into the horizon opposite your birds with a sponge in black ink.
  • Pick a saying that fits your scene.
  • This card is finished 5 x 7 and the scenery layer is 4 1/4 x 5 1/2”

It’s a fun scene and looks so striking in person.  I can’t wait to try it in purples next!

If you loved this card…

Be sure to subscribe to the creative tips e-letter & FREE video series. There’s a great scenic project in our first video series that I think you’ll love. And if you want to learn more about scenic cards, be sure to check out our Brayer 101 & 102 classes in addition to our upcoming Stampscapes class where we’ll make this similar project: Find out more HERE

Eveing Sunset Palm Cove Thumbnail

Signature_thumb.jpg

[optin_box style=”2″ alignment=”center” email_field=”email” email_default=”Enter your email address” email_order=”2″ integration_type=”aweber” double_optin=”Y” list=”3846012″ name_field=”name” name_default=”Enter your first name” name_order=”1″ name_required=”Y” opm_packages=””][optin_box_field name=”headline”]Learn more with our exclusive FREE video series:[/optin_box_field][optin_box_field name=”paragraph”][/optin_box_field][optin_box_field name=”privacy”]Plus you’ll be added to my FREE Creative Tips E-letter where I share exclusive projects, videos & the 12 Days of Christmas series[/optin_box_field][optin_box_field name=”top_color”]undefined[/optin_box_field][optin_box_button type=”0″ button_below=”Y”]Get Instant Access![/optin_box_button] [/optin_box]

Stamp Sets – Stampscapes Stamps, Really Good Greetings (130333c, 130330w) Ink – Marvy – Black, Yellow, Brilliant Yellow  Adirondack Lights – Sandal Paper –Glossy White, So Saffron, Basic Black Tools – Colorbox Stylus

Moonlit Waters 006

Santa’s List

Santas List 001 Main R

Santa’s List is a cute little three stamp set with an awesome jolly image. Here’s a quick Christmas card that uses non-traditional colors for a classic card.  It was designed by fellow CG Crew member Amy Seigler, and I loved making it!  Check out her blog here.

Creative Tips –

  • To get the main image to pop, you’ll want to emboss it.  Here Santa was stamped first in Versamark ink and then in Bermuda Bay.  You will want to used clear embossing powder to get that glossy sheen.
  • You can add some texture and character to your designer paper quickly by just sanding the edges with your Stampin’ Sanding System.  It’s quick, easy and has a great distressed and weathered look.  Santas List 001 CU
  • This card uses one of four designs in the 48 page Winter Frost Paper Stack.
  • If you want your greeting to have the look of icing or wet snow, stamp it in Whisper White Craft Ink and emboss it with Clear embossing powder rather than white.  This way it doesn’t take over the card with that bright white look.  Santas List 001 Embossing
  • Isn’t this ribbon slide the perfect compliment to the big guy?  It’s the perfect belt buckle for all your Santa cards.  You get sixteen pieces for only $1.99 for an entire package – that’s 60% off the original price!  But hurry, they are in the clearance rack and when they’re gone, they are gone. Santas List 001 Main L

  • CG rewards

       Don’t forget to print up your CG Reward Tracker to track your earned pinecones!  Not sure what I’m talking about?  Check out the new Reward program that just started yesterday.  You earn free stamps for your online purchases!  Remember…there are still 31 hours left in your double reward points special!

    Signature Snowflake 001
    Santas List 001 Angle

To Shop 24/7 in the Creative Store – Click here!

Stamp Sets – Santa’s List (131811c, 131808w), Sassy Salutations (126707c, 132070w) Paper – Brown Sugar, Whisper White, Winter Frost Designer Series Paper Stack Ink – Versamark, Bermuda Bay, Whisper White Craft Cool Tools – 3/16” Corner Rounder, Clear Embossing Powder, Stampin’ Sanding System The Perfect Finish – Stampin’ Dimensionals, Island Indigo Satin Ribbon (retired), Ribbon Slide

  Santa's ListUntitled-12

Mojo Christmas Wishes

Color Me Christmas 002 Main R

Don’t you just love the color Cherry Cobbler with Crumb Cake?  I love the earthy feel to both and find they go very well together.  For this weeks Mojo Monday card we have a contemporary look with the Color Me Christmas stamp set mixed with a little frill – a doily, and some fun new elements to round the card out.  Here is this week’s Mojo Monday Sketch for the challenge:

                      Mojo306SketchColor Me Christmas 002 Front

Creative Tips –

  • Be sure to make sure you are only grabbing one of the Tea Lace Paper Doilies out of the pack – they LOVE to stick together.
  • The new Pretty Print Textured Impressions Embossing Folder (TIEF) is a great background that gives your project a little character without taking over. Color Me Christmas 002 Doily
  • The new Deco Label Framelits pairs perfectly here with a 1 3/4” Circle Punch.  It makes a nice little background for your cut out Tree that is colored with an Aqua Painter.
  • The bold greetings from Joy to the World will compliment all your Christmas Cards this season – I just LOVE this one – it’s great to emboss with! Color Me Christmas 002 Banner
  • One of the new Regals Buttons adds a nice finishing touch with some Linen Thread. 
  • Pop the banner, button, and Deco Framelit are on Dimensionals to add a little depth to your project. Color Me Christmas 002 Side
  • A little Paper Piercing and tiny Pearl Basic Jewels help to balance out the button and put a little something in the white space on the design of the card.
  • The Season of Style Paper Stack offers just that little splash of Designer Paper that you want to compliment a project.  It has 48 sheets each of two double sided designs giving you plenty to make a stack of cards with! Color Me Christmas 002 Main L
  • Fun new items in the Holiday Catalog

    2013 Holiday Catalog

    Have you taken a peek at the new Holiday Catalog yet?  The projects are inspiring and the new products – well many are quite addictive!  My personal favorite is the new Expressions Thinlits Dies.  How about you?  View all our Catalogs here
    Signature Snowflake 001
    Color Me Christmas 002 007

To Shop 24/7 in the Creative Store – Click here!

Stamp Sets – Color Me Christmas (131745c, 131742w), Joy to the world (131796c, 131799w) Paper – Old Olive, Cherry Cobbler, Whisper White, Crumb Cake, Season of Style Designer Series Paper Stack Ink –Cherry Cobber, Gumball Green, Chocolate Chip, Crushed Curry, StazOn Jet Black Cool Tools – Pretty Print TIEF Folder, Paper Piercing Tool, Essentials Mat Pack, Stampin’ Pierce Mat, Aqua Painters, Deco Labels Collection Framelits, 1 3/4” Circle Punch The Perfect Finish – Stampin’ Dimensionals, Linen Thread, Pearl Basic Jewels, Regals Designer Buttons, Tea Lace Paper Doilies

    Color Me ChristmasGreetings of the Season 128033LSeason of Style Paper Stack

CAS Regarding Dahlias

Regarding Dahlias 003 Main

Clean and Simple (CAS) cards are always great.  They’re quick, easy and striking!  The Regarding Dahlias stamp set has several greetings and one very powerful floral image.  Perfect for clean and simple cards. 

Do you ever have an image remind you of someone?  That happens to me, and today I’m using flowers because I’m thinking of Yvonne.  Regarding Dahlias 003 Main  Duo

I teach card and scrapbooking classes locally here in my home and in various communities.  I’ll never forget the day I met Yvonne.  It was at a vendor event when she made her way to my table with her walker and oxygen tank.  Yvonne could not stop looking at my scrapbooks and cards – I could tell she was definitely an avid paper crafter!  She quickly arranged for me to teach scrapbooking in her community with a few of her friends religiously every month.  Each one became stampers in addition to scrapbookers, and I’ve loved every class that I taught there.  The friendships these ladies have with each other, in addition to just really loving every crafting moment together has always been special to be a part of for me. 

Yvonne has been one of my die hard stampers who never let anything get in the way of her trying all the paper crafting techniques she could – not even a broken shoulder or arm.  I have truly admired her zest for life and not letting the little things get to her (As if those are little things!). 

Yvonne was unable to make the trip up the stairs to my stamping studio for my stamping classes in my home, so one day I decided to bring class to her.  It was an awesome fun afternoon, stamping with a friend.  We made several projects using various techniques and to this day is one of my fondest memories of a private one on one class.  Yvonne never missed a class, and over time, I noticed that she gravitated toward the floral images.  So, today this card is for you Yvonne.  You will be greatly missed and I know that wherever you are, you are most definitely living life to the fullest and certainly stamping and scrapbooking!

                DSC00891 002

Creative Tips –

  • To create the floral design, you will want to make a mask out of printer paper.  Card stock will be too thick, and you will find that you have a white gap at the edge of your masked images, which I know will frustrate you!
  • Turn your stamp as you stamp the other images.  This way you have variety and not a repetitive look.Regarding Dahlias 003 Main Front 1
  • This image above has two stamped identically and then one not – can you see the difference?  My other sample has the flower at a slightly different angle.  It’s a bit easier on the eye.
  • You can see that I chose to matte the strip two ways, white strip on white and white strip on matching Night of Navy card stock.  Both are lovely, and have very different looks.Regarding Dahlias 003 Main  Duo
  • You might want to try stamping a long strip that you can cut to the size you need – that way you will have it for multiple cards.
  • Remember the law of 1/3rds when you are placing your images.  In CAS cards, you want to have a lot of white space, so placing your strip and greeting in the top or bottom third will be visually appealing to the reader.
  • For a finishing touch, add some paper piercing to the the opposite side of your strip. 
    2013 Holiday Catalog
    Have you taken a peek at the new Holiday Catalog yet?  The projects are awesome, the new products, well many are quite addictive!  My personal favorite is the new Expressions Thinlits Dies.  How about you?  View all our Catalogs here

Regarding Dahlias 003 Main Angle 2

To Shop 24/7 in the Creative Store – Click here!

Stamp Sets – Regarding Dahlias (130327c, 130324w), Sweet Essentials (126457c, 132085w) Paper – Whisper White, Night of Navy Ink – Night of Navy  Cool Tools – Paper Piercing Tool, Essentials Mat Pack, Stampin’ Pierce Mat

  Regarding DahliasUntitled-12

By the Tide Humor

By the Tide 004 Main R

This card is my attempt at a little card humor.  I wanted to do something different this morning, so I got out my By the Tide stamp set and chose two images to color.  I tangled them up in a little line and threw them on the world map.  I love it, I hope it makes sense to you!

Creative Tips –

  • I chose my colors based on the color coach today.  Have I told you before that I can not put colors together?  I don’t know where I’d be without it!By the Tide 004 Main Fish
  • To color my fish and shell, I used Stampin’ Write Markers and a Blender Pen.  I wanted to blend my colors a bit, so I stamped my images in StazOn Jet Black ink on our Watercolor Paper.  It’s nice and thick which absorbs the water well.
  • The World Map is a portrait sized stamp, so I flipped it on it’s side.  I really wanted a landscape card, so I figured, hey it’s a map…it can be on it’s side!By the Tide 004 Main Side
  • I wanted the colored images to pop, so I outlined them with my Basic Black Stampin’ Write Marker, popped them up and made sure to have a neutral color beneath them. 
  • Since I chose to matte my map with a 1/16” border in Whisper White, I wanted my banner in the same color – it ties the card together that way.  Try it next time with the card base color – it’s the neutral that makes it all work.By the Tide 004 Main Height
  • To get my linen thread to stay in one place, I used three little piles of our Liquid Glue before adding my stamped images on Stampin’ Dimensionals
  • The Map and Banner are also popped up on Stampin’ Dimensionals to give the card a little more interest.By the Tide 004 Main L

It’s a unique card that works for almost any occasion – especially when you need a card to let someone know it’s going to get better.  After all, it’s just life, right?

2013 Holiday Catalog 2

Have you seen our new Holiday Catalog?

This year’s holiday catalog is filled with cool new products!  Be sure to go through it carefully.  It has great new Thinlits, Envelope Framelits, awesome papers, great stamp sets and so much more.   The project ideas are inspiring as well.  If you’d like your very own, be sure to check out how to get one free from me here.

    World Map Stamp

Tropical Sunset Stampscape

Stampscapes 002 006

If you hadn’t noticed, I love creating sunset scenery.  Today I have a tropical sunset using a great image from Stampscapes.  This is the perfect birthday card for someone who would love a little of the tropics to escape to.  For me – I’m sending this to my mom for her Birthday this week.  I know she’ll love it.

I worked on glossy paper with a colorbox sylus tool for this scene and Stampscapes 002 008

Creative Tips –

    • I used the now retired Stampin’ Up! glossy paper as my base.
    • To keep my paper wet so that my stylus could move a bit better, I worked in sections.
    • I gave the middle of my paper a good coat of So saffron in the middle, followed by Daffodil Delight and Crushed Curry.  I had masked the sun, so I had a white sun when done.
    • Next I layered a small amount of Tangerine Tango towards my horizon line.  Stampscapes 002 002
    • I created my sun first with a light coating of Crushed Curry followed by Real Red.  I worked my stylus just outside the white lined border to not have such a defined line, but have that white outline that you see in the sun.
    • For my sea, I began with a light coat of Soft Sky.
    • Next I layered Pool Party, Bermuda Bay and a little Tempting Turquoise into my water in a streaking motion.  I kept a little white area off to the left just below the sun.
    • For the sky I started with Soft Sky, followed by Tempting Turquoise, Marina Mist and Island Indigo.Stampscapes 002 010
    • I stamped my tropical island, birds and water texture stamp in Black.  I wanted the island in a particular spot, so I used a Stamp-a-Majig to position my stamp.  Of course I dropped it as I lifted it, so I had to stamp it twice since on the glossy, the Black ink was still wet and smeared.  I was able to save the image!
    • I used a White Gel Pen to accent my trees and water.

 Stampscapes 002 008

My colored base was so pretty – I almost didn’t want to stamp on it!  Something unexpected happened to me – This scene made me want to paint.  So I have a feeling the more I do these types of scenes on paper – the more I will definitely venture into the art of painting.  Do any of you paint?  If so, what is your favorite medium?Stampscapes 002 007

Try our Online Brayer Class

Creative Scenery classes using a brayer have by far been my biggest hit with stampers.  Learn how to create gorgeous gradual transitions with 100+ minutes of step by step detailed video instruction teaching you how to master this technique.  The end result – You will feel like an artist.  Best of all, you will look at your stamps in a whole new way, and try things you never would have thought to do before.  Find out more here

Signature-Snowflake-001_thumb1


[optin_box style=”14″ alignment=”center” action=”http://www.aweber.com/scripts/addlead.pl” disable_name=”Y” method=”post” email_field=”email” email_default=”Enter your email address” email_order=”1″ integration_type=”custom” double_optin=”Y” name_default=”Enter your first name”][optin_box_hidden][/optin_box_hidden][optin_box_code]

[/optin_box_code][optin_box_field name=”headline”]If you enjoyed this tutorial…[/optin_box_field][optin_box_field name=”paragraph”]PHA+PHNwYW4gc3R5bGU9ImNvbG9yOiAjNjQ2MzVlOyI+TGV04oCZcyBzdGF5IGluIHRvdWNoISBNeSBvY2Nhc2lvbmFswqA8L3NwYW4+PHNwYW4gc3R5bGU9ImNvbG9yOiAjNjY2Njk5OyI+PHN0cm9uZz48ZW0+ZXhjbHVzaXZlPC9lbT48L3N0cm9uZz7CoDwvc3Bhbj48c3BhbiBzdHlsZT0iY29sb3I6ICM2NDYzNWU7Ij5DcmVhdGl2ZSBUaXBzIGUtbGV0dGVyIHdpbGwgdGVhY2ggeW91IHRvIG1ha2UgcHJvamVjdHMgdGhhdCB5b3UgbG92ZeKApjwvc3Bhbj48L3A+Cg==[/optin_box_field][optin_box_field name=”privacy”][/optin_box_field][optin_box_field name=”top_color”]undefined[/optin_box_field][optin_box_button type=”0″ button_below=”Y”]Send me exclusive tips![/optin_box_button] [/optin_box]

Stampscapes 002 009

Stamp Sets – Four You (130538c, 130535w), Stampscapes Stamps Ink – Memento Tuxedo Black, Soft Sky, Pool Party, Tempting Turquoise, Bermuda Bay, Marina Mist, Island Indigo, So Saffron, Daffodil Delight, Crushed Curry, Tangerine Tango, Real Red, Versamark Paper –Glossy White,Whisper White, Tangerine Tango Tools – Colorbox Stylus Finishing Touch – Black Embossing Powder, Signo White Gel Pen


Simple One Layer Wetlands

Wetlands 005 001

I needed a super quick birthday card the other day and decided to try some acrylic block stamping.  The sandpiper image from the Wetlands stamp set is the perfect image for a beach scene. 

Creative Tips –

  • I used my Stampin’ Write markers to create my own scene on one of my larger acrylic blocks. 
  • For my sand, I used Crumb Cake, and then created my water with Bermuda Bay.  Next I drew a sun in Crushed Curry and colored my sky in Island Indigo around it.  Wetlands 005 009
  • I spritzed my block with a light mist of water and stamped onto a folded piece of card stock.
  • My sandpiper birds were then stamped in Early Espresso as was my greeting from Four You.
  • Here is a similar card done and matted onto Bermuda Bay for a contrasting look, which do you like better – one layer or matted?  Let me know if the comment section.

   Wetlands 005 003 Wetlands 005 006

This card literally takes minutes and is a cute simple watercolor of a fun beach scene.  It’s yet again just one more reason you want to have the Wetlands stamp set in your arsenal – it’s versatile, and easy to use!

Wetlands 005 002


Signature-Snowflake-001_thumb1

To Shop 24/7 in the Creative Store – Click here!

Wetlands 005 010

Stamp Sets – Wetlands (126697c, 126695w), Four You (130538c, 130535w) Ink – Early Espresso, Stampin’ Write Markers: Island Indigo, Crumb Cake, Bermuda Bay, Crushed Curry Paper –Whisper White (100730)

Untitled-12