Mixed Media Challenge: Paint

Mixed-Media-Gelli-Plate-Monoprint-2.1016-001

We’re playing around with Paint over at Happy Little Stampers this month for the Mixed Media Challenge. I thought I would re-visit my Gelli Plate and create a cool monoprint using some Acrylic paint for you. I hope this project inspires you in some way! I’d love for you to join us, the prize is a gift certificate this month, so you have nothing to lose!

HLS Mixed Media challenge February 2016

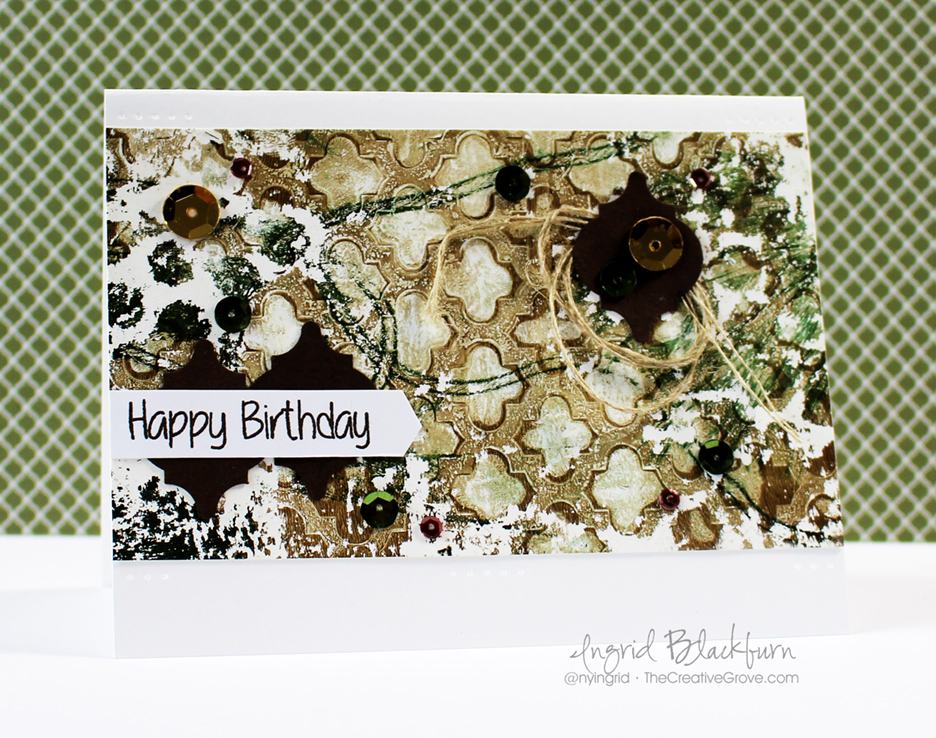
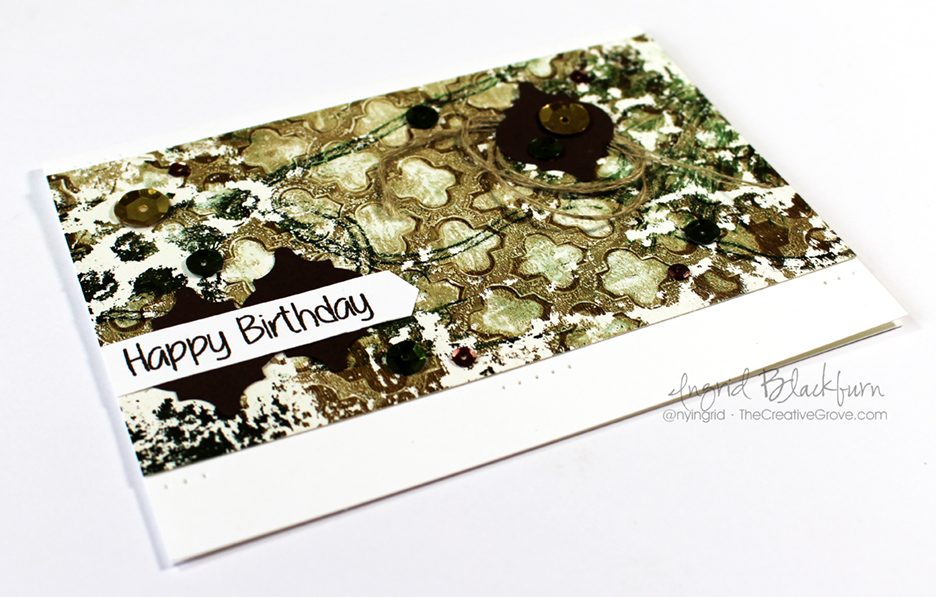
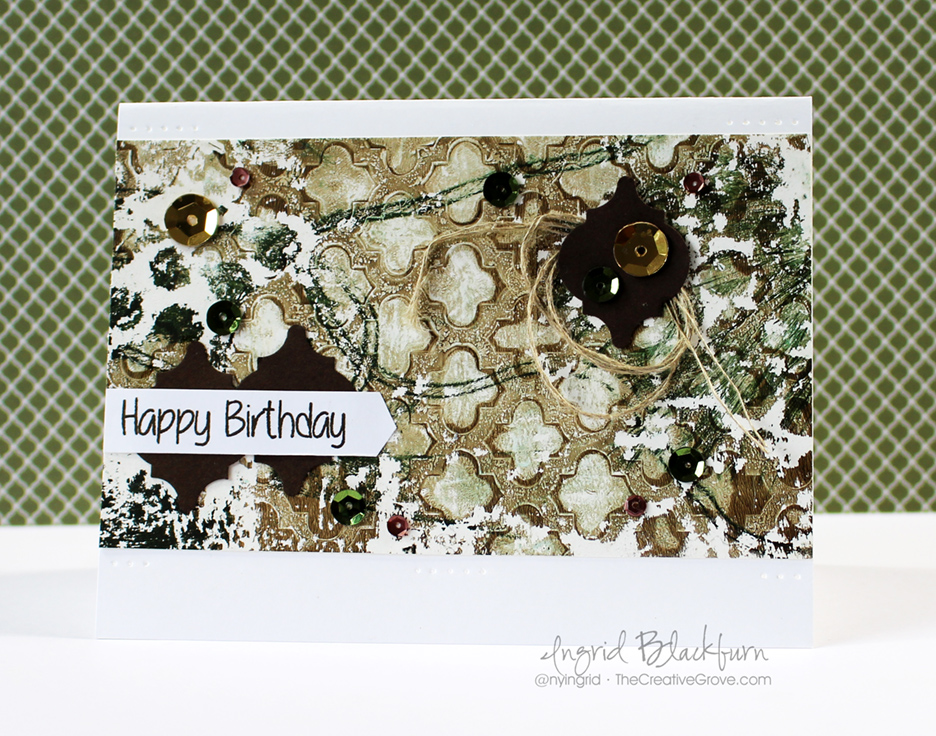
To create this fun card, I used several layers of acrylic paint, some left over Christmas tree branches, bubble wrap, a stencil and some twine. I pulled prints from each layer, and layered each one on this piece. The end result is a varied project with deep character. You’ll notice the Phthalo Green, Burnt Umber and white acrylic paint layers. I love the distressed look it took toward the end. My Umber dried a bit so I only was able to pull a partial in those spots, but that left me with some awesome character.

Mixed-Media-Gelli-Plate-Monoprint-003

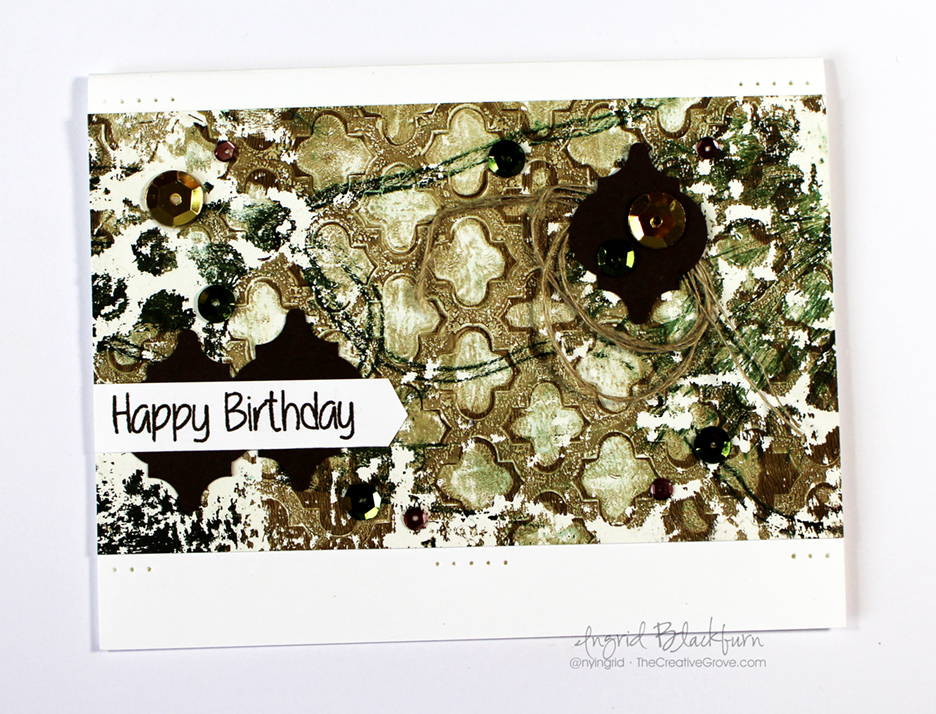
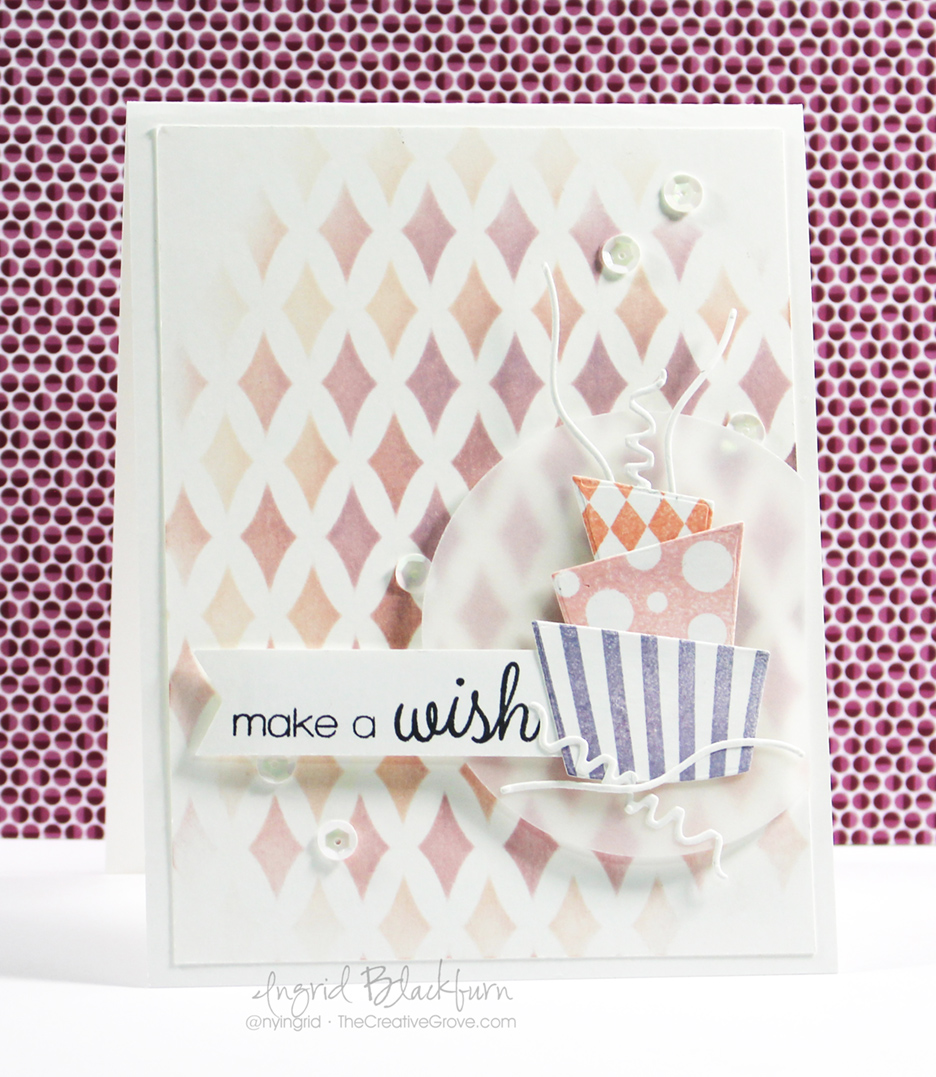
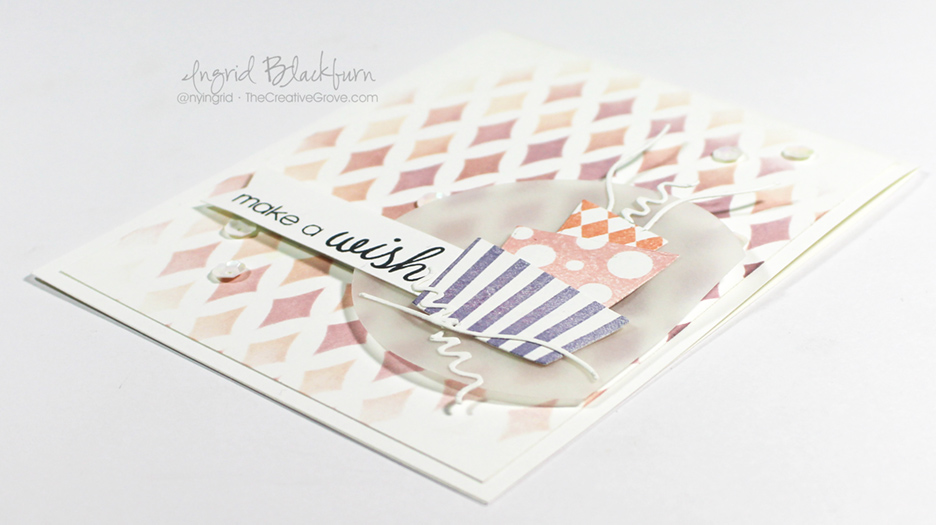
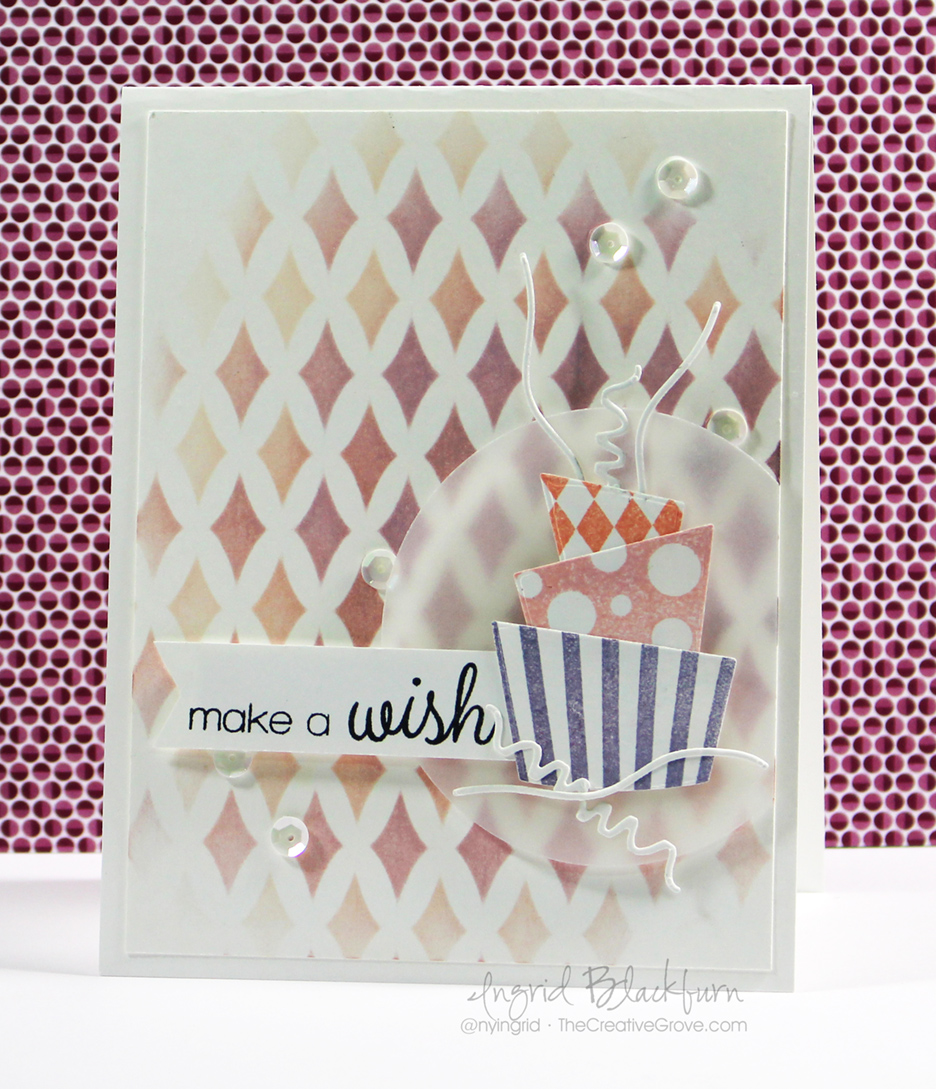
To finish the card, I punched a few pieces of Espresso card stock, used a little linen thread and some sequins. I thought a simple banner with the greeting from the HLS Butterfly Birthday set would be perfect. Rather than create a traditional banner edge, I pulled my card stock through half a hexagon punch and punched the reverse for the point. I thought it went a bit better with the image from the Moroccan Simon Says Stamp stencil. The card needed something, so a little paper piercing rounded it all out.

Mixed-Media-Gelli-Plate-Monoprint-002b

I think it turned out pretty cool, I love that I can paint with several layers on a monoprint and it still is just like a piece of printed paper – that’s so cool! So how are you going to paint your creation?

Mixed-Media-Gelli-Plate-Monoprint-004

Remember, Mixed Media can be simple like this card – all you need is stamps, ink, and a way to develop texture with another element like a stencil, or paste, or paint. Quite simple!

So get those fingers inky – mine were for this one!

Signature

[optin_box style=”2″ alignment=”center” email_field=”email” email_default=”Enter your email address” email_order=”2″ integration_type=”aweber” double_optin=”Y” list=”3846012″ name_field=”name” name_default=”Enter your first name” name_order=”1″ name_required=”Y”][optin_box_field name=”headline”]Learn with our exclusive FREE video series[/optin_box_field][optin_box_field name=”paragraph”]PHA+R2V0IHRoZSBmcmVlIENyZWF0aXZlIFRpcHMgRS1sZXR0ZXIgYW5kIGxlYXJuIHdpdGggc3Vic2NyaWJlciBleGNsdXNpdmUgdmlkZW8gYW5kIHBpY3RvcmlhbCBjb250ZW50LsKgPGVtPjxzdHJvbmc+SW5jbHVkaW5nwqA8L3N0cm9uZz48L2VtPm91ciB5ZWFybHkgMTIgRGF5cyBvZiBDaHJpc3RtYXMgc2VyaWVzITwvcD4K[/optin_box_field][optin_box_field name=”privacy”][/optin_box_field][optin_box_field name=”top_color”]undefined[/optin_box_field][optin_box_button type=”0″ button_below=”Y”]Get started now![/optin_box_button] [/optin_box]


Frosted Crooky Cake

Frosted-Crooky-Cake-001

Okay, I know Crooky Cake is not the official name of this stamp set, but it’s stuck in my head – thanks Catherine! The official name of this super cute stamp set is Bring on the Cake – designed by SugarPea Designs. For now, you can only get it the Young at Heart Stamp of Approval collection – which is almost sold out – just a few boxes left! It will be released, along with the matching dies sometime in 2016/2017.

I have to say, normally, I wouldn’t immediately buy this kind of a set for myself – I gravitate towards nature, backgrounds and designs. But the more I stamp with it, the more versatility I see in it, and I’m in love with this one & all the little companion dies too – those rock, especially since there are two frames with it too!

Frosted-Crooky-Cake-002

I love stamp sets that have little stamps – the flowers, swirls, streamers and stars make this a very cool and fun set to create with. The long streamer stamps will be quite cool for backgrounds (yes, tons of ideas for cards with that), and don’t get me started on the sentiments – those are great! I love font/script together, and this set did not disappoint. Can you tell how much I love it?!! To get a close up look, check out Catherine’s video about this set along with some cool samples – Click Here.

Along with today’s cake, I used the Harleen stencil by Winnie & Walter. Another great one – also in the Stamp of Approval collection. I did a little double stenciling. Since there are only a few boxes left, I wanted to show you this creation. Here’s the video post as well – be sure to check it out along with the written tutorial – Click here for Video and Tutorial  If you missed my other card – Click Here.

Frosted-Crooky-Cake-004

I wanted you to see what a fun and quirky design this card has. I call it the Frosted Crooky Cake, in honor of my friend Catherine Pooler who had a helping hand in designing this fun set.

So make a wish, check out the Stamp of Approval Young at Heart Collection if you haven’t already, and if you miss out on this great box of stamps, dies and stencils (did I mention there’s only a few left)…don’t fret – you too can have a piece of crooky cake (Bring on the Cake) later in 2016/2017 too – of course you’ll have to wait! 😉

See you soon with the video tutorial!

Signature

[optin_box style=”2″ alignment=”center” email_field=”email” email_default=”Enter your email address” email_order=”2″ integration_type=”aweber” double_optin=”Y” list=”3846012″ name_field=”name” name_default=”Enter your first name” name_order=”1″ name_required=”Y”][optin_box_field name=”headline”]Learn with our exclusive FREE video series[/optin_box_field][optin_box_field name=”paragraph”]PHA+R2V0IHRoZSBmcmVlIENyZWF0aXZlIFRpcHMgRS1sZXR0ZXIgYW5kIGxlYXJuIHdpdGggc3Vic2NyaWJlciBleGNsdXNpdmUgdmlkZW8gYW5kIHBpY3RvcmlhbCBjb250ZW50LsKgPGVtPjxzdHJvbmc+SW5jbHVkaW5nwqA8L3N0cm9uZz48L2VtPm91ciB5ZWFybHkgMTIgRGF5cyBvZiBDaHJpc3RtYXMgc2VyaWVzITwvcD4K[/optin_box_field][optin_box_field name=”privacy”][/optin_box_field][optin_box_field name=”top_color”]undefined[/optin_box_field][optin_box_button type=”0″ button_below=”Y”]Get started now![/optin_box_button] [/optin_box]

Clean and Simple Chalk Talk Birthday

Chalk Talk 001 Main R

This week is always a big Birthday week for everyone I know, this month actually.  So why not keep with the celebration theme?  Chalk Talk has not only this awesome stamp set, but a great tag framelit set that anyone can use.  Today I made a very simple, but elegant card that actually fits any celebration, not just birthdays.  I have to admit, it was a little simple to me, until I put the Pearl Basic Jewels on.  Then it all came together and worked.  I wish I actually had taken a before and after photo, it made that much of a difference!

Chalk Talk 001 Front

Creative Tips –

  • I actually made this little tag for all of Michael’s birthday presents on Saturday.  They completely worked – and best thing – I didn’t even have to write on it!  Once I whipped these little guys up, this card popped in my head.Chalk Talk 001 CU
  • Obviously it’s a present, but the Chevron Embossing Folder really adds a nice touch to what would be the wrapping paper.
  • If you didn’t have ribbon, you could easily substitute strips of card stock.  I would still wrap them around the edge of the gift for that gift wrapped look.Chalk Talk 001 Height
  • To emphasize the gift, I popped it up with dimensionals, along with the greeting portion of the tag. 
  • The Happy Big Day tag is actually two tags from this set.  Chalk Talk 001 Side
  • Proportions made the difference on this card.  I have the full 1/8” border at the base, so I needed any other Mattes to be 1/16”. 

I love this card – and I think I’m going to make a bunch, they serve so many occasions – birthday, wedding, promotion, any firsts, etc…  What other occasions do you think it would fit?  Let me know if the comment section and I’ll send one to one random winner!  Who wouldn’t want one of these in the mail – I know I love mail…other than bills, right?

Chalk Talk 001 Main L

    Online Brayer Class now Available

    You’ve patiently waited…it’s finally here!  Creative Scenery classes using a brayer have by far been my biggest hit with stampers in class.  Now you too can learn from the comfort of your very own craft room.  The Brayer has stumped many crafters over the years, well actually more.  Over three varied step by step video projects, you will master how to create gradual transitions than stun the card recipient.  You will feel like an artist.  Best of all, you will look at your stamps in a whole new way, and try things you never would have thought to do before.  Take part of the series, take the whole series, or get the class for free – you choose. Find out more here

    Signature-Snowflake-001_thumb1

To Shop 24/7 in the Creative Store – Click here!

Chalk Talk 001 Angle

To view the details or see close ups of any products used in the above project, just click on the green link to view it in my store 24/7.

Stamp Sets – Chalk Talk (130634c, 130631w),  Chalk Talk Bundle (132730c, 132731w) Ink – Tempting Turquoise, Early Espresso Paper –Whisper White, Tempting Turquoise, Early Espresso Cool Tools – Chalk Talk Framelits, Chevron Embossing Folder, Big Shot, Magnetic Platform Finishing Touch –Stampin’ Dimensionals,Pearl Basic Jewels, Whisper White 3/8” Taffeta Ribbon

Chalk Talk Bundle

Chalk Talk Birthday Wishes

Chalk Talk 003 Main R

Who doesn’t love a bright and cheery Birthday card?  Today I’ve combined the new Chalk Talk stamp set and framelit collection with some of our new Eastern Elegance Designer Series Paper and the Gorgeous Grunge stamp set for a fun little Birthday for someone special.  I needed a quick and easy birthday card, I’ve been stamping, filming and editing my Brayer 101 – Introduction the Creative online video class series the last few days.  It’s almost ready – look for it tomorrow!  If you’ve taken the live class with me, you’ll love this class too – the projects are all different!

Creative Tips –

  • I stamped the large tag in So Saffron and cut it out using the Chalk Talk Collection Framelits.  If you get the stamp set and the framelits together – it’s a bundle and you save 15%!  I’m all about savings. Chalk Talk 003 CU
  • To give a little variety to my tag, I stamped it again in Rose Red and cut out the banner within the tag.  I tried it on white, but it didn’t look right.
  • I wanted to add a little splash of design behind my tag, but I didn’t want to take away from it, so I picked a simple design and then created another with my stripe stamp from the gorgeous grunge set.
  • To make my banner ends I used the 1” square punch for the smaller banner and cut the large one with my paper snipsCheck out this video on how to make Banner Flags Chalk Talk 003 Side
  • I used the Greeting from the new Four You stamp set, it covers all bases without breaking the bank!
  • I popped my greeting banner and Chalk Talk tag up on Stamping Dimensionals for some depth to the card.
  • For finishing touches, I added a little piercing to the extra white space at the top of the card and some Pearl Basic Jewels on the tag, banner and card.
    Chalk Talk 003 Main L

It’s a fun card that is bright, cherry and simple.  Best of all it took me under 10 minutes to make!  My kind of birthday card. Smile

Announcing a new Online Video Class

It’s coming – Saturday July 13th!!  Brayer 101 – Introduction to Creative Scenery will be available as an online class.  Be sure to stop by to check it out.  You will want to learn how to make these amazing projects.  Get step by step video instruction and access to a private blog just for this class. 


Signature-Snowflake-001_thumb1

To Shop 24/7 in the Creative Store – Click here!

Chalk Talk 003 Angle

To view the details or see close ups of any products used in the above project, just click on the green link to view it in my store 24/7. 

Stamp Sets – Chalk Talk (130634c, 130631w),  Chalk Talk Bundle (132730c, 132731w), Gorgeous Grunge (130517c, 130514w), Four You (130538c, 130535w) Ink – So Saffron, Rose Red Paper –Whisper White, So Saffron, Rose Red Cool Tools – 1” Square Punch, Chalk Talk Framelits,Stampin’ Sponges Finishing Touch – Stampin’ Dimensionals,Pearl Basic Jewels

Gorgeous GrungeFour You

Chalk Talk Bundle

Blooming with Kindness Birthday

Blooming with Kindness 002 Side

This morning I couldn’t sleep!  So what’s the cure – stamping, of course.  It certainly helped that my insomnia came on the same morning of the Mojo Monday challenge.  I hoped up to my office, and wouldn’t you know it, it was so early (3:45 am…yikes!), that the challenge wasn’t even posted yet!  I read some email, got caught up from all the friends and family Easter fun yesterday on facebook and twitter, and finally the challenge was up.  Here’s what the sketch looked like:   Mojo287SketchBlooming with Kindness 002 Tilt

I thought about it for a second, and finally settled in with Blooming with Kindness .  I grabbed some extra pieces of cardstock that I had prepped for a previous project (nothing like using already cut cardstock!) and grabbed my color coach to pick my remaining colors.  I’ve been in this white/vanilla kick lately and have decided that it’s my new favorite thing – so naturally it’s on this card too!  I hope you love the end result just as much as I do.  I’m excited, because my good friend Sherry’s birthday is coming up and I just know she’ll love to get this card in the mail. 

Blooming with Kindness 002 Main

Creative Tips:

  • I wanted the stamp to be the star along with the color combination, so I chose a neutral backdrop for the Flower to be stamped and popped up. 
  • I stamped my flower in Cherry Cobbler first, but it wasn’t dramatic enough so I added a little highlighting with my Cherry Cobbler Stampin’ Write Marker on top of my rubber image to really add some depth in the same shade.
  • Before I stamped my flower, I used my Blender Pen to remove the red that had gotten onto the stem.  I then added the Early Espresso color with a Stampin’ Write Marker.  I LOVE this process – you can alter any stamp with a Blender Pen! Blooming with Kindness 002 CU
  • I ran the Early Espresso cardstock (2.5” x 4”) through my Big Shot using the Woodgrain TIEF folder and enhancing the depth of the color by using the Bisque Pottery Technique.  Be sure to stop by later this week for a video on how to do this technique!
  • I added a little strip of First Edition DSP and a partial Doily for a little feminine flair in addition to the Pearl Basic Jewels
  • I made my banner flag for my greeting with a 1” Square punch and popped that in addition to the flower up on Stampin’ DimensionalsBlooming with Kindness 002 Height
  • The card needed a little something so I added something I haven’t used in forever – my Color Spritzer Tool!  I just love this tool and can’t believe how long it’s been since I picked it up. 
  • To perfectly get just the right splat, make sure you like up your Stampin’ Write Marker completely up with the plastic end.  Be sure to hold the marker straight and play with the height of the marker end to the project.  Give it a firm squeeze. Blooming with Kindness 002 Splat
  •  Best tip – And always, always, always do a few on your grid paper first – it doesn’t matter how good you are at it.  I’ve been using one for 11 years and still do this.  It’s about whether or not the marker is aligned properly.
  • Be careful with the splat too, sometimes a lot of ink gets deposited and you will need to place it to the side to dry or run a Heat Tool over it so that it doesn’t smear. I just love this end result.  I hope you do too.  Have fun making yours and see you back here soon for some more Mojo!
  •   Signature Snowflake 001

To Shop 24/7 in the Creative Store – Click here!

Blooming with Kindness 002 Angle

Stamp Sets – Blooming with Kindness (126422) Paper – Whisper White (100730), Early Espresso (119686), Pool Party (122924), Cherry Cobbler (119685), First Edition Specialty Designer Series Paper (DSP) (121878), Paper Doilies (129399) Ink – Cherry Cobbler (126966), Early Espresso (126974), Early Espresso Stampin’ Write Marker (119680), Cherry Cobbler Stampin’ Write Marker (119681) Cool Tools – 1” Square Punch (124094), Stampin’ Trimmer (126889), Paper Snips (103579), Stamp-a-Majig (101049), Woodgrain TIEF (127821), Brayer (102395), Blender Pen (102845) Color Spritzer Tool (107066) The Perfect Finish – Pearl Basic Jewels (119247), Stampin’ Dimensionals (104430)

Blooming with Kindness126422L

Mojo Monday Birthday

I love Mojo Mondays!  This morning I really was challenged by this sketch.  I don’t do many round cards, so I thought I’d take the square challenge on.  I love how this creation turned out.  This is a very special birthday card for my sweet Mother-In-Law’s 85th birthday.  I wanted a card that was fun, classy and colorful, just like her!  Happy Birthday Vigie!  Here are some fun creative tips for you.

Mojo265Sketch

Creative tips:

  • Keep your mattes uniform.  Here I played with some 1/16” mattes.  I did switch up the colors since the International Bazaar DSP were so colorful. 
  • Strips of card stock are great fillers for an odd amount of space.  Here you see Tangerine Tango 3/8” strips behind the greeting.  They added a fun element to this birthday card and are a great way to use up scraps!
  • I had a strange amount of white the the top two corners, so I added a little piercing.  To continue this flow I decided to add a smaller amount to the corners of the Lucky Limeade Matte as well.

  • To create the banner ends, use a square punch.
  • My original idea was to stamp the greeting on several sheets of cardstock and cut out some of the letters, giving the greeting a fun feel, but since the card had so many colors already, I decided to stick with the Clean and Simple look of just one color – Rich Razzleberry.
  • To create a little pop, the Greeting Accent Framelit is popped up by using Stampin’ Dimensionals.
  • This greeting can be ordered in this set Seasonal Greetings or by itself until January 2, 2013.  Click here for Single Stamp Details
  • When adding Pearl Basic Jewels to your project – use a paper-piercer or Paper Snips tip to lift them from the sheet.  That way you will easily grab the glue dot beneath the pearl and have a much easier time placing it on your project.

I hope you love the end result as much as I do.  Enjoy making yours!

Promo_15percentstamps_DBWS_Oct29012_NA

This Monday is our one day sale – first ever!  Don’t miss out on this great opportunity to get your stamps at a discount, just because!  To see the details of this fun special – click here.

Signature Snowflake 001

To Shop 24/7 in the Creative Store Click here!

Stamp Sets – Seasonal Sayings (128009) Paper – International Bazaar DSP (126920) Whisper White (10730), Lucky Limeade (122926), Rich Razzleberry (115316), Daffodil Delight (119683), Tangerine Tango (111349), Chocolate Chip (102128) Ink – Rich Razzleberry (126950) Cool Tools – 1” Square Punch (124094), Apothecary Accents Framelits (127003), Paper-Piercing Tool (126189), Stampin’ Pierce Mat (126119), Essentials Paper-Piercing Pack (126187) The Perfect Finish – Stampin’ Dimensionals (104430), Pearl Basic Jewels (119247)

Seasonal Sayings 128009L