Fall One Layer Wishes

Have you ever tried creative depth with Lovely as a Tree, or any nature stamps? I was in a simplicity mood this morning.  I love color and the mountains.  When I think of the mountains, I’m reminded of when I lived in Utah and California.  The scenery was so beautiful, and it really put me at peace.  So this morning, I wanted to create a Fall Foliage scenery on a one layer card.

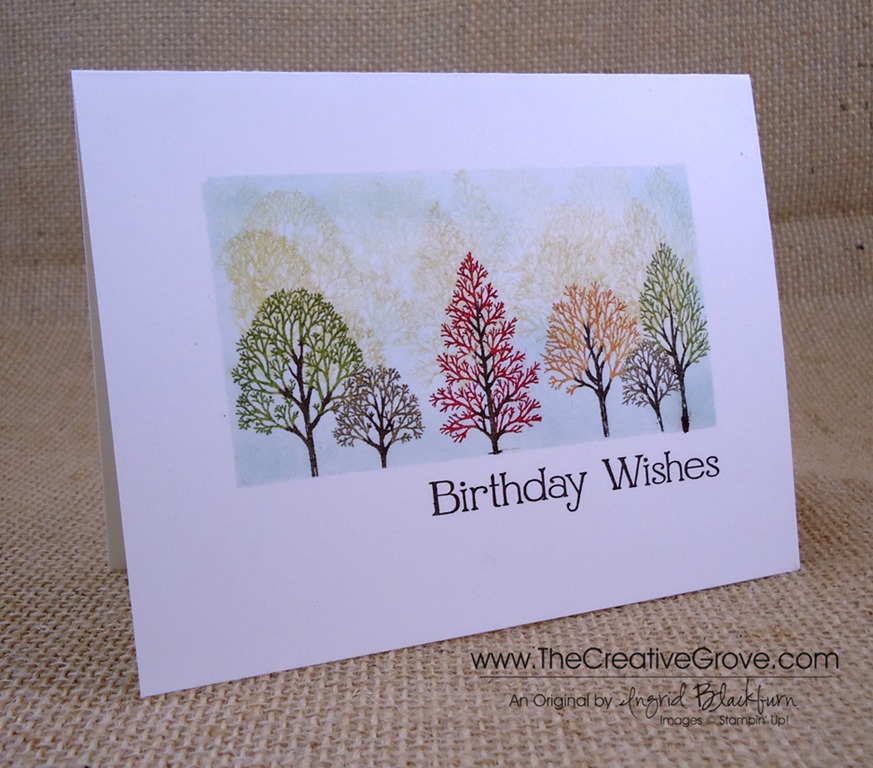
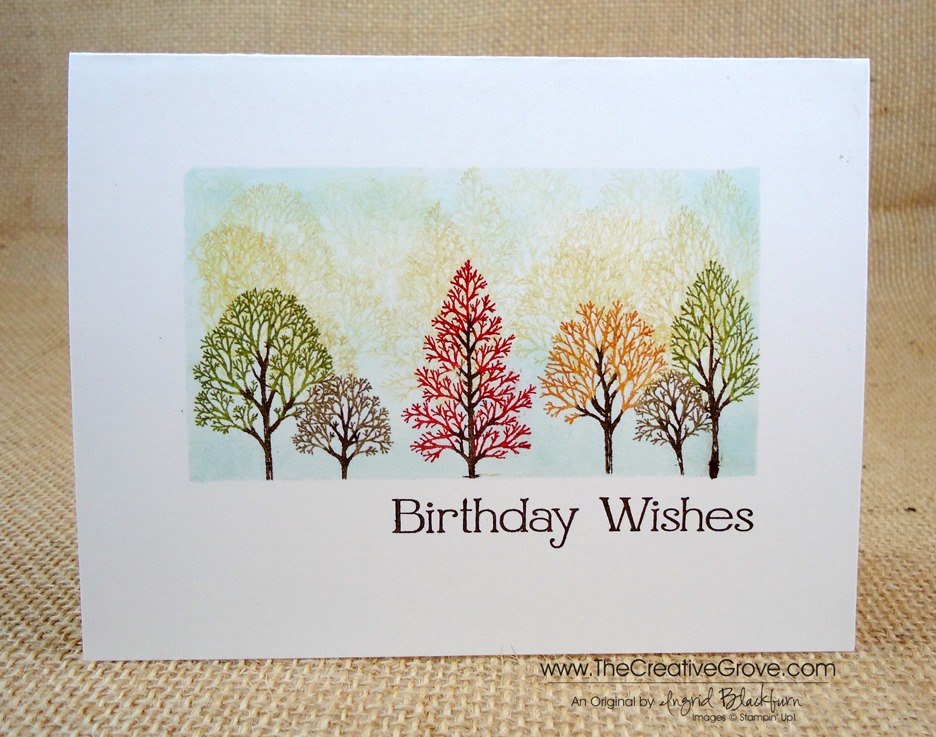
I grabbed my Lovely as a Tree stamp set and went to work.  It took me three cards to get the right result, but I’m happy with it!  Here is the result!

If you love the look of this stamp set – be sure to check out my online brayer class too!

Lovely as a Tree OLC tutorial – 

    • First I cut out a mask leaving a 3/4” border on the top, left and right.
    • I inked up my six tree stamp in Crushed Curry, stamped it off and then stamped it three times filling the top 2/3 of the frame.  When inking my stamp, I did not ink up the bottom grass and trunks.  You can do this with a marker or your ink pad.Lovely as a Tree004 CU
    • I lightly sponged Soft Sky to create my rectangular frame, being sure to focus a bit heavier on the outline than the middle.  I filled in the bottom 1/3 before stamping my main image.
    • To color my main image, I used Stampin’ Write Markers.  I first colored my trees, then my trunks in Early Espresso.
    • For my Greeting, I used the Four You stamp set – I LOVE this set.

Lovely as a Tree004 Main L

It’s a simple card, but I love the color.  It makes me feel like I’m looking out at a scene in the Uinta mountains in Utah.  I hope you like it too!

Lovely as a Tree004 Angle


[optin_box style=”2″ alignment=”center” email_field=”email” email_default=”Enter your email address” email_order=”2″ integration_type=”aweber” double_optin=”Y” list=”3846012″ name_field=”name” name_default=”Enter your first name” name_order=”1″ name_required=”Y” opm_packages=””][optin_box_field name=”headline”]Learn with our exclusive FREE video series[/optin_box_field][optin_box_field name=”paragraph”]PHA+R2V0IHRoZSBmcmVlIENyZWF0aXZlIFRpcHMgRS1sZXR0ZXIgYW5kIGxlYXJuIHdpdGggc3Vic2NyaWJlciBleGNsdXNpdmUgdmlkZW8gYW5kIHBpY3RvcmlhbCBjb250ZW50LiBJbmNsdWRpbmcgb3VyIHllYXJseSAxMiBEYXlzIG9mIENocmlzdG1hcyBzZXJpZXMgJmFtcDsgdGhlIHZpZGVvIGZvciB0aGlzIHByb2plY3QhPC9wPgo=[/optin_box_field][optin_box_field name=”privacy”][/optin_box_field][optin_box_field name=”top_color”]undefined[/optin_box_field][optin_box_button type=”0″ button_below=”Y”]Get Access Now![/optin_box_button] [/optin_box]

Clean and Simple Chalk Talk Birthday

Chalk Talk 001 Main R

This week is always a big Birthday week for everyone I know, this month actually.  So why not keep with the celebration theme?  Chalk Talk has not only this awesome stamp set, but a great tag framelit set that anyone can use.  Today I made a very simple, but elegant card that actually fits any celebration, not just birthdays.  I have to admit, it was a little simple to me, until I put the Pearl Basic Jewels on.  Then it all came together and worked.  I wish I actually had taken a before and after photo, it made that much of a difference!

Chalk Talk 001 Front

Creative Tips –

  • I actually made this little tag for all of Michael’s birthday presents on Saturday.  They completely worked – and best thing – I didn’t even have to write on it!  Once I whipped these little guys up, this card popped in my head.Chalk Talk 001 CU
  • Obviously it’s a present, but the Chevron Embossing Folder really adds a nice touch to what would be the wrapping paper.
  • If you didn’t have ribbon, you could easily substitute strips of card stock.  I would still wrap them around the edge of the gift for that gift wrapped look.Chalk Talk 001 Height
  • To emphasize the gift, I popped it up with dimensionals, along with the greeting portion of the tag. 
  • The Happy Big Day tag is actually two tags from this set.  Chalk Talk 001 Side
  • Proportions made the difference on this card.  I have the full 1/8” border at the base, so I needed any other Mattes to be 1/16”. 

I love this card – and I think I’m going to make a bunch, they serve so many occasions – birthday, wedding, promotion, any firsts, etc…  What other occasions do you think it would fit?  Let me know if the comment section and I’ll send one to one random winner!  Who wouldn’t want one of these in the mail – I know I love mail…other than bills, right?

Chalk Talk 001 Main L

    Online Brayer Class now Available

    You’ve patiently waited…it’s finally here!  Creative Scenery classes using a brayer have by far been my biggest hit with stampers in class.  Now you too can learn from the comfort of your very own craft room.  The Brayer has stumped many crafters over the years, well actually more.  Over three varied step by step video projects, you will master how to create gradual transitions than stun the card recipient.  You will feel like an artist.  Best of all, you will look at your stamps in a whole new way, and try things you never would have thought to do before.  Take part of the series, take the whole series, or get the class for free – you choose. Find out more here

    Signature-Snowflake-001_thumb1

To Shop 24/7 in the Creative Store – Click here!

Chalk Talk 001 Angle

To view the details or see close ups of any products used in the above project, just click on the green link to view it in my store 24/7.

Stamp Sets – Chalk Talk (130634c, 130631w),  Chalk Talk Bundle (132730c, 132731w) Ink – Tempting Turquoise, Early Espresso Paper –Whisper White, Tempting Turquoise, Early Espresso Cool Tools – Chalk Talk Framelits, Chevron Embossing Folder, Big Shot, Magnetic Platform Finishing Touch –Stampin’ Dimensionals,Pearl Basic Jewels, Whisper White 3/8” Taffeta Ribbon

Chalk Talk Bundle

Chalk Talk Birthday Wishes

Chalk Talk 003 Main R

Who doesn’t love a bright and cheery Birthday card?  Today I’ve combined the new Chalk Talk stamp set and framelit collection with some of our new Eastern Elegance Designer Series Paper and the Gorgeous Grunge stamp set for a fun little Birthday for someone special.  I needed a quick and easy birthday card, I’ve been stamping, filming and editing my Brayer 101 – Introduction the Creative online video class series the last few days.  It’s almost ready – look for it tomorrow!  If you’ve taken the live class with me, you’ll love this class too – the projects are all different!

Creative Tips –

  • I stamped the large tag in So Saffron and cut it out using the Chalk Talk Collection Framelits.  If you get the stamp set and the framelits together – it’s a bundle and you save 15%!  I’m all about savings. Chalk Talk 003 CU
  • To give a little variety to my tag, I stamped it again in Rose Red and cut out the banner within the tag.  I tried it on white, but it didn’t look right.
  • I wanted to add a little splash of design behind my tag, but I didn’t want to take away from it, so I picked a simple design and then created another with my stripe stamp from the gorgeous grunge set.
  • To make my banner ends I used the 1” square punch for the smaller banner and cut the large one with my paper snipsCheck out this video on how to make Banner Flags Chalk Talk 003 Side
  • I used the Greeting from the new Four You stamp set, it covers all bases without breaking the bank!
  • I popped my greeting banner and Chalk Talk tag up on Stamping Dimensionals for some depth to the card.
  • For finishing touches, I added a little piercing to the extra white space at the top of the card and some Pearl Basic Jewels on the tag, banner and card.
    Chalk Talk 003 Main L

It’s a fun card that is bright, cherry and simple.  Best of all it took me under 10 minutes to make!  My kind of birthday card. Smile

Announcing a new Online Video Class

It’s coming – Saturday July 13th!!  Brayer 101 – Introduction to Creative Scenery will be available as an online class.  Be sure to stop by to check it out.  You will want to learn how to make these amazing projects.  Get step by step video instruction and access to a private blog just for this class. 


Signature-Snowflake-001_thumb1

To Shop 24/7 in the Creative Store – Click here!

Chalk Talk 003 Angle

To view the details or see close ups of any products used in the above project, just click on the green link to view it in my store 24/7. 

Stamp Sets – Chalk Talk (130634c, 130631w),  Chalk Talk Bundle (132730c, 132731w), Gorgeous Grunge (130517c, 130514w), Four You (130538c, 130535w) Ink – So Saffron, Rose Red Paper –Whisper White, So Saffron, Rose Red Cool Tools – 1” Square Punch, Chalk Talk Framelits,Stampin’ Sponges Finishing Touch – Stampin’ Dimensionals,Pearl Basic Jewels

Gorgeous GrungeFour You

Chalk Talk Bundle

By The Seashore 4th of July

By the Seashore 001 001

Happy 4th of July!  I thought I’d make it a beach one this year since I’m usually on a beach every year!  Every year except this one – go figure!  So I’m bringing the beach to my 4th of July.  Usually we’re traveling this week, but today we’re hanging poolside Florida style.  I hope you have fabulous plans yourself – here’s a little good ‘ol Red, White and Blue for you from us here at The Creative Grove!By the Seashore 001 005

Creative Tips –

  • I needed a quick and simple card for today, so I created my own flag using Painters Tape and my Real Red Inkpad.By the Seashore 001 007
  • For my star field I used a piece of Midnight Muse that I distressed on the edges using the Distressing Tool – love that thing!
  • I popped up my stars for a little depth to the card.
  • I also matted my flag on a 1/16” border of Midnight Muse before going with a 1/8” border of Real Red.By the Seashore 001 003
  • I stamped the inside as well with the starfish to carry on the theme, in addition to my envelope.
  • I wanted a beach feel, so I grabbed my By the Seashore stamp set and used the starfish!  I can see this card in Night of Navy, Cherry Cobbler and Crumb Cake for a Cape Cod feel too!
  • By the Seashore 001 002

It’s a quick and easy one – and I hope you love the result.  Off to get my ribs started and make the slaw!  Happy 4th!

Free DSP_edited-1

We’re celebrating this summer!!  This month – buy any three Designer Series Papers and get one free!  Here’s the scoop on this awesome special!

Signature Snowflake 001

To Shop 24/7 in the Creative Store – Click here!

By the Seashore 001 004

Stamp Sets – By the Seashore (126532c, 132582w) Ink – Real Red (126949), Midnight Muse (126860)  Paper – Whisper White (100730), Real Red (102482), Midnight Muse (126843) Cool Tools – Distress Tool (127562) Finishing Touch –Stampin’ Dimensionals (104430)

The Stampin’ Up! Pansy Punch

Four You 001 Main R

Did you call for Pansies?  I’m in love with the new Stampin’ Up! Pansy Punch!  I made a super cute card yesterday for the Mojo Monday 300th sketch challenge and on it I had a little pansy flower that I made using the new Pansy Punch.  Well, today I kept with the same color theme and did three of these cute easy flowers and what a great little card for someone.  Add a little piercing and you have a classic.

Creative Tips –

  • The color combination is straight out of the new Color Coach – Coastal Cabana, Crushed Curry and Pumpkin Pie.
  • I kept the card clean and simple.  This card believe it or not can be put together in under 10 minutes – with all the little extras too – the pearl accents, piercing and paper piecing.Four You 001 CU
  • I used a Whisper White piece of scrap paper that was sized 1 3/4” x 4 5/8”, a piece of Coastal Cabana – 1 7/8” x 4 3/4” and a Crushed Curry piece that was 2 1/4” x 5 3/16”.
  • To jazz it up, I added some Paper Piercing using the Essentials Mat Pack.  Don’t be afraid to add different points of view in piercing rather than just all around.  By breaking it up, it adds it’s own element to the card.Four You 001 Flowers
  • I broke up the fibers using my fingers on the petals of the pansies.  I curled them in and glued them together using Liquid Glue.
  • A center punched in Crushed Curry using the 1/2” Circle Punch provided consistency along with three small pearls.  Four You 001 Height
  • The Flower Panel is popped up on Stampin’ Dimensionals for some depth.
  • I finished the card off with the fun Thank You saying from Four You, one of our newest greeting sets and three pearl in a triangle. Four You 001 Main L

It’s a fun, simple and classic card that will brighten anyone’s day.  I hope you’ll be stamping this holiday week!  Have a Happy Fourth of July!

Signature Snowflake 001

To Shop 24/7 in the Creative Store – Click here!

Four You 001 Angle

Stamp Sets – Really Good Greetings (130333c, 130330w), Dictionary (130351c, 130348w),Gorgeous Grunge (130517c, 130514w) Ink – Coastal Cabana (131175), Pumpkin Pie (126945), Pumpkin Pie Stampin’ Write Marker (105115), Crushed Curry Stampin’ Write Marker (131901), 2013-2015 In Color Marker Collection (131260)  Paper – Whisper White (100730), Coastal Cabana (131297), Pumpkin Pie (105117), Crushed Curry (131199), Eastern Elegance DSP (130131) Cool Tools –Paper Snips (103579), 1/2” Circle Punch(119869), Circles Collection Framelits (130911), Pansy Punch (130698), 1” Square Punch (124094) Finishing Touch –Stampin’ Dimensionals (104430), Pearl Basic Jewels (119247), Paper Piercing Tool(126189), Stampin’ Pierce Mat (126199), Essentials Paper Piercing Pack (126187)

Four YouPansy Punch

Clean and Simple Happy Day

Happy Day 002 Main R

Smile, today’s project uses the Happy Day stamp set!  I was in a clean and simple mood this morning.  Part of it must have been because I cleaned off my creative space and filed away all those pesky little scraps that we tend to accumulate.  The end result, a clean and simple card that leaves the recipient smiling.  SmileHappy Day 002 Side

Creative Tips –

  • I pulled out my color coach and the first color to catch my eye was the new In Color Strawberry Slush.  It’s not an Ingrid color, so I was surprised to be drawn to it.  I’m more of a Midnight Muse/Island Indigo kind of a gal.  

                        Color Coach2013-2015 In Colors

  •   The top color combination was Strawberry Slush, Sahara Sand and Rich Razzleberry – I know, you’re saying huh?  Me too, but look at the end result – it totally works! (Just one reason I can’t live without my color coach!)Happy Day 002 CU
  • I was going for simplicity with a little drama, not TOO simple.  So I decided to emboss my elements and pop up my panels.
  • Tip – To emboss my medallions, I stamped my image in Versamark and then the color I needed.  I embossed each image in Clear Embossing Powder.  This particular image is super fine in design – you’ll want Stampin’ Up! embossing powder – they’re quite fine.
  • The greeting Smile, I embossed in Black for some contrast. Happy Day 002 Height
  • Each panel is popped up on Stampin’ Dimensionals and for the finishing touch, a medium sized Rhinestone was added to the center. Happy Day 002 Main L
    See, it’s a clean and simple card that will literally take you a few minutes, but the end result is striking.  The colors are really growing on me the more I look at them.


Signature Snowflake 001

To Shop 24/7 in the Creative Store – Click here!

Happy Day 002 Angle

Stamp Sets – Happy Day (130297c, 130294w) Ink – Versamark (102283), Strawberry Slush (131178), Rich Razzleberry (126950), Sahara Sand (126976) Paper – Whisper White (100730), Strawberry Slush (131295), Rich Razzleberry (115316), Sahara Sand (121043) Cool Tools –  Color Coach (130118) + In Color Cards (130120), Clear Embossing Powder (109130), Black Embossing Powder (109133) Finishing Touch –Stampin’ Dimensionals (104430),  Rhinestone Basic Jewels (119246),

Happy Day Stamp Set

Too Kind Stamp Set

Too Kind 002 Main

The new Too Kind stamp set is an easy and quick set to use.  The images are striking in any color and make wonderful backgrounds as well.  Two step stamping to me is always a great thing.  The images are bold yet soft at the same time.  Paired here with the Gorgeous Grunge stamp set (have I told you yet that’s my #1 new go to set?!) in the background, you can’t go wrong.  Learn the Two Step stamping technique with this video

Creative Tips –

  • For a pop on this card I wanted to use one of the new Chalk Talk Framelits as a spotlight.  I stamped in full color to really provide a pop with these fun bright colors.Too Kind 002 CU
  • To begin, I used my new Stampin’ Up! catalog.  I needed a color combination and I wasn’t feeling the two in the color coach.  I wanted to use Pistachio Pudding, so I started leafing through the pages in my catalog.  I saw the combination on page 14 and pulled out Pistachio Pudding, Island Indigo and Tangerine Tango.  It’s a striking bold combination that I just loved!  Tip – Did you know that those color blocks behind every project idea in the catalog together make color combinations – when in doubt…go to your catalog!Too Kind 002 Side
  • For a muted background I used tone on tone stamping with Pistachio Pudding for a few more images with the Too Kind set and the tiny flecks stamp from Gorgeous Grunge.  This one stamp is your best friend.  It it such a well executed image that it literally looks like you flecked little drops of ink onto your image.  Check out the entire set at the end of this post.  And to see more of the images in action, be sure to check out the two posts preceding this one.Too Kind 002 Height
  • I popped the tag up using Stampin’ Dimensionals so that it really stood out.
  • A complete Whisper White matte in between the Pistachio and Island Indigo might have been a little much, so I decided to go with simple squares to help frame my card front.  I love the end result.

It’s a quick, easy and fun bright card.  Anyone who gets this in the mail would immediately smile.  Don’t you think?  I’d love to hear your thoughts – squares or a full matte?  Do you like the color combination?  Have you used Pistachio Pudding yet?  It’s not an Ingrid color so I struggle with colors like this – I’d love to hear what you’ve paired it with so far!

Free Product Drawing

It’s new Catalog Extravaganza week and I’m continuing the celebration all weekend long until Sunday 10 pm!  Anyone who uses the hostess code QGTZ4ADP will get an entry into my drawing for $25 in free product for every $25 in product puchases (pre-tax/shipping) from my Stampin’ Up! store.  Good luck to you!

Signature-Snowflake-001_thumb1_thumb

To Shop 24/7 in the Creative Store – Click here!

Too Kind 002 Angle

Stamp Sets – Too Kind (130450c, 130447w), Gorgeous Grunge (130517) Ink – Pistachio Pudding (131177), Tangerine Tango (126946), Island Indigo (126986) Paper – Whisper White (100730), Island Indigo (122923), Pistachio Pudding (131294) Cool Tools – Chalk Talk Framelits (129983) Finishing Touch – Stampin’ Dimensionals (104430) 

Gorgeous Grunge 

Untitled-12

Beautifully Baroque Bundle

Beautifully Baroque 001 Main

Let me introduce you to one of my must have’s out of the new catalog this year – the Beautifully Baroque bundle.  Two products are bundled for a 15% discount – this stamp, Beautifully Baroque and the Baroque Motif Textured Impressions Embossing Folder.  And this card is the perfect combination of the two.  I hope you love it!

Creative Tips –

  • Baroque reminds me of palaces in Europe and regal things.  So I naturally gravitate toward the color of royalty – purple.  I chose the Elegant Eggplant color to bring that royal quality to my project today.Beautifully Baroque 001 Side
  • This stamp only comes in the wood mount option.  I stamped my image using the Stampin’ Mat so that I would get a good solid image.  The stamp itself if rather large, and I didn’t want to miss the middle.  The Mat helps give me a nice firm cushioned base so that I can stamp larger images and get even pressure everywhere, not just the edges, it’s a miracle worker!
  • To accentuate it, I cut out my image and put Stampin’ Dimensionals on it.
  • To add some glitz to my image, I used a 2 way glue pen and let it dry for a few seconds before adding some Dazzling Diamonds to it.  I didn’t want to over do it, so I just added a little on the longer lines.  Beautifully Baroque 001 CU
  • For the background, I ran a 3 3/4” x 5” piece of Whisper White through my Big Shot using the Baroque Motif TIEF folder and matted it onto my Elegant Eggplant base.
  • I made a banner using my 1” Square Punch.  The greeting is from the new set – Four You which has four great greetings for every occasion! Click Here for a video on how to make perfect banners.Beautifully Baroque 001 CU 1
  • To give the card a little drama, I popped up my banner with Stampin’ Dimensionals and then figured out the spacing for my main image and my banner.  Don’t just adhere it first – use both to get the proper spacing.
  • Once adhered, I added some Rhinestone Basic Jewels.  The ironic thing is if I look at them, I see the Eiffel Tower! Beautifully Baroque 001 Front
    This is a fun project that’s pretty quick and quite simple.  The glitz of the Dazzling Diamonds and Rhinestones really sets this project apart from a just stamped one!

Are you getting my Exclusive Video Series?

Be sure to sign up for my Creative Tips Newsletter and get the latest Creative Grove news in addition to my free Creative Techniques Video Series!  Don’t miss out on our creative community – the only way to get this exclusive content is to sign up in the box on the upper right or click here.

Signature-Snowflake-001_thumb1_thumb

To Shop 24/7 in the Creative Store – Click here!

Beautifully Baroque 001 Angle

Stamp Sets – Beautifully Baroque (130895),  Beautifully Baroque Bundle (132732) , Four You (130538c, 130535w) Ink – Elegant Eggplant (126969) Paper – Whisper White (100730), Elegant Eggplant (105126) Finishing Touch – Two Way Glue (100425) Dazzling Details (102023), Stampin’ Dimensionals (104430), Pearl Basic Jewels (119247)

Untitled-12Beautifully Baroque Bundle

Four You