Beautifully Baroque Eastern Elegance

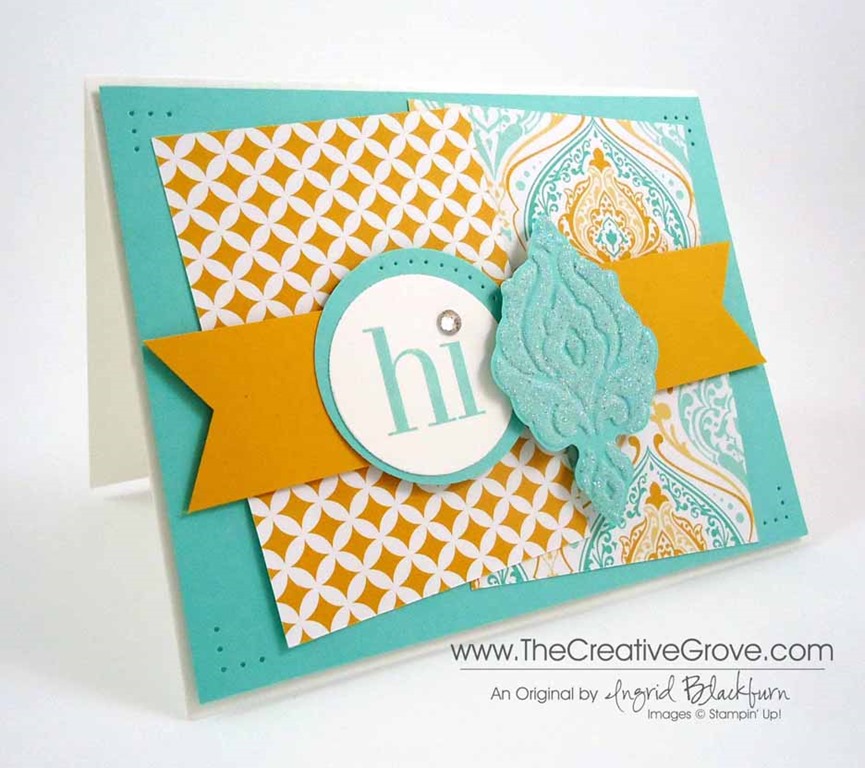
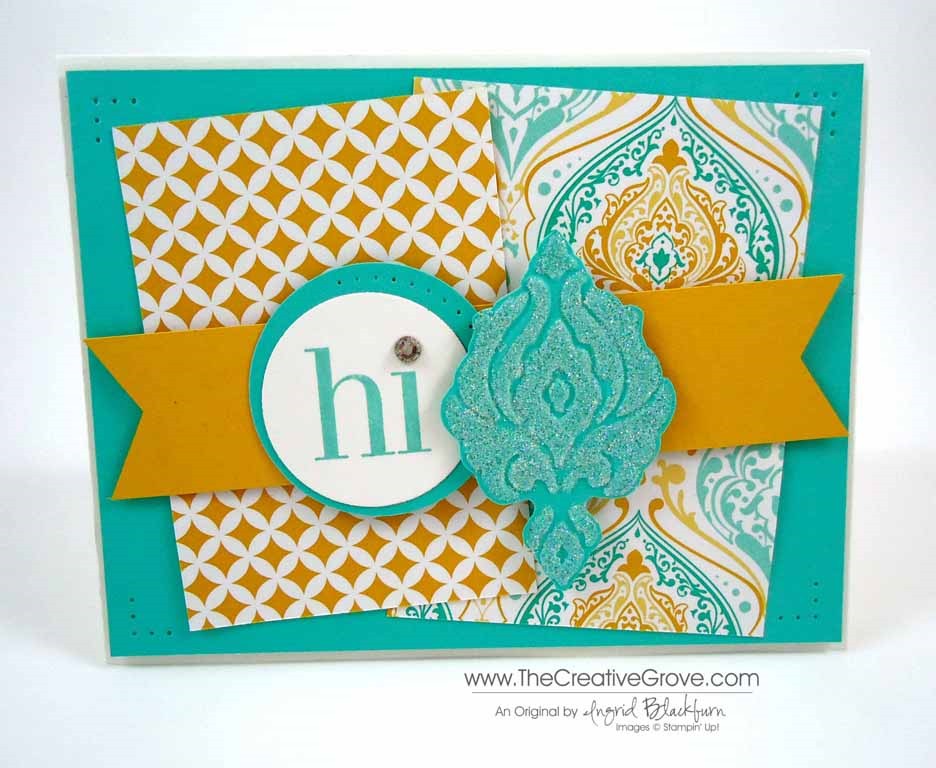
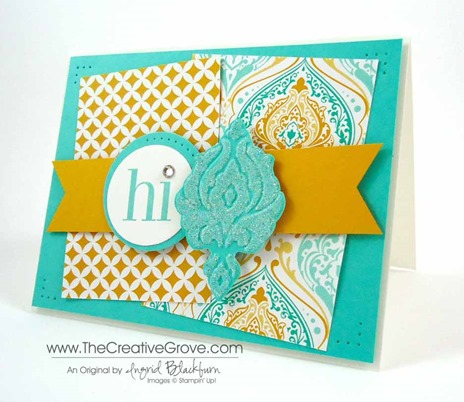
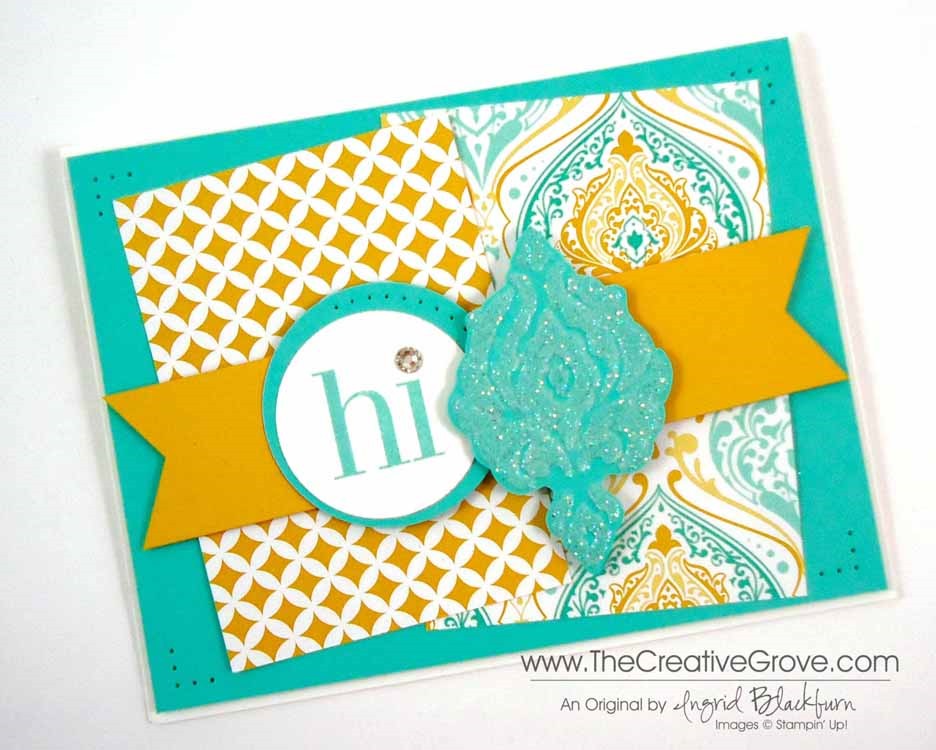
Don’t you just love light and fun designs?  Cool colors prevail in today’s Mojo Monday sketch; which is a simple go to sketch that you will definitely want to try.  You can see the Eastern Elegance paper plays well with the Beautifully Baroque Embossing Folder.  Here’s the sketch and my interpretation.  Don’t forget about my special that’s running till Wednesday!  It’s at the end. Smile

        Mojo309Sketch

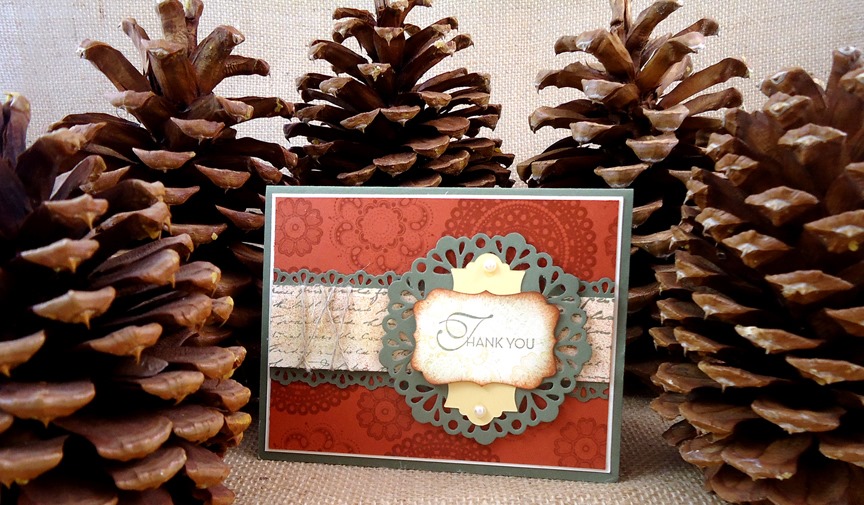
Personal Note – I’m in the process of moving.  Yup, today I’m actually packing up the Stampin’ Studio – and that’s quite a task!  So over the next few weeks, you’ll see a few current and some fun projects from the past.  Don’t worry – I’m finding projects that I just loved – but never blogged…so I hope that’s exciting for you too!  And the only good thing about moving – purging!  So thanks for stopping by!

Creative Tips –

  • You will want to choose two complimentary but completely different pieces of Designer Paper if you go that route.  This way they won’t compete with each other. 
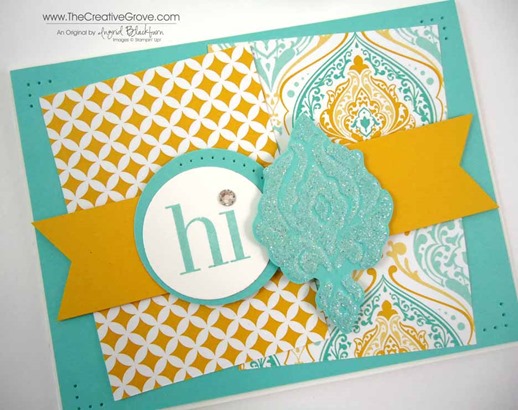
  • For the designs you see in this project – it was necessary to flip the larger rectangle with the smaller one due to the patterns.  It worked better this way.
  • If you don’t like the size of your matte with your circles – try off-setting them like shown here.  Add some piercing to really accentuate it.
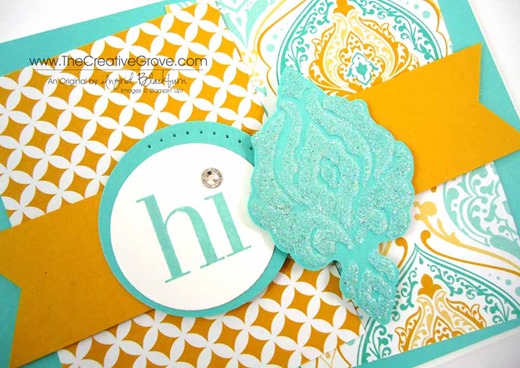
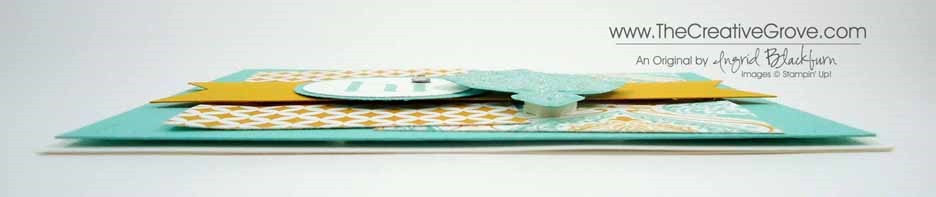
  • To help make the baroque medallion stand out, emboss it with the Beautifully Baroque Textured Embossing Folder, then add Dazzling Diamonds glitter to 2-way glue on the raised image portions.
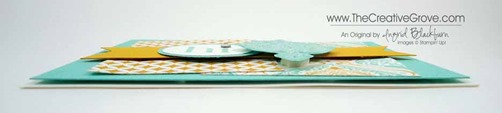
  • Pop the medallion up further than the banner to really give it a little depth.
  • The card front, banner and medallion are all popped up on Stamping Dimensionals.

The Creative Grove Envelope Special

Everyone who orders and Envelope Punch Board (133774) using this hostess code – VWCWVJ34 through me by Wednesday September 4th will get a special packet of 20 sheets of – 6”x6” Designer Series Paper (that’s a value of $5.50!) mailed to them to use for liners or even your own 3” x 4” card sized envelopes!!  And don’t forget about The Creative Grove Rewards Program for free stamps too!

Signature Snowflake 001

To Shop 24/7 in the Creative Store – Click here!

Stamp Sets – Regarding Dahlias (130327c, 130324w) Ink – Coastal Cabana Paper – Whisper White, Eastern Elegance Designer Series Paper, Crushed Curry, Coastal Cabana  Cool Tools – Beautifully Baroque TIEF, Circles Collection Framelits, Two Way Glue, Dazzling Diamonds, Hexagon Punch, 1 3/4” Circle Punch, Paper Piercing Tool, Essentials Mat Pack, Stampin’ Pierce Mat Finishing Touch – Rhinestone Basic Jewels, Stamping Dimensionals

Label Thinlit Flip Flop Card

Regarding Dahlias 004 (2)

Have you ever just needed an really quick wow card?  Well then the new Card Thinlits are for you.  For one, they have an interactive rotating feature.  Second – talk about super quick!  You can literally make this awesome project in a matter of minutes!  Here’s how.Regarding Dahlias 004 (4)

Creative Tips –

  • First cut your cardstock to 6” x 5 1/2”.  Lay your Thinlit over.  Add a piece of Whisper White cardstock cut 5 1/4 x 2 3/4” to the left side with some adhesive lining up the outside three edges.
  • Run through your Big Shot to cut the card and flip flop cuts.
  • Cut the matching label framelits from this set and stamp with Raspberry Ripple using the Regarding Dahlia’s Stamp.
  • Cut a mask using the label portion of the Card Thinlit out of scrap paper – Keep your mask for future use with your Thinlit set!Regarding Dahlias 004 (1)
  • Stamp the Regarding Dahlia’s  in Raspberry Ripple on the left portion of the card.
  • Tie some linen thread and add Rhinestone Basic Jewels.
  • Stamp your greeting and send to someone you love!

Wasn’t that fast!  Be sure to tune in later this week for a video tutorial – I’m so excited to use my new microphone – yes, you read that right…finally better sound!  Have a fabulous day.Regarding Dahlias 004 (7)

New Creative Grove Classroom

Did you know that we have a new classroom for you to take all your online classes?  Check it out by clicking the Classroom tab up top or here.  Our latest class – Class of the Month : Festive Flurry has gotten some rave reviews!  It just launched and is packed with amazing projects that you’ll be able to use no matter what stamps or framelits you own. Check that class out here.

Signature Snowflake 001

To Shop 24/7 in the Creative Store – Click here!

Regarding Dahlias 004 (6)

Stamp Sets – Regarding Dahlias (130327c, 130324w)  Ink – Raspberry Ripple Paper – Whisper White (100730), Raspberry Ripple Cool Tools – Label Thinlits (133479) Finishing Touch – Linen Thread, Rhinestone Basic Jewels 

Regarding DahliasLabel Thinlits

Non-traditional Festive Flurry

Festive Flurry 001 002

Today marks the opening of the Festive Flurry – Class of the Month in the classroom.  So I thought I’d make you a clean and simple non-traditional card using this stamp set!  If you like this card – check out the class here.

Creative Tips –

  • To pick non-traditional colors, use your color coach for inspiration.  Here you see a combination of Sahara Sand, Pear Pizazz and Early Espresso.  It’s quite contemporary in feel.Festive Flurry 001 005
  • Since this card is a straightforward clean and simple card, you can add some depth by popping up the large snowflake and card front on Stamping Dimensionals. Festive Flurry 001 007
  • The three snowflakes on top were stamped in white, one in each color, with the largest (3rd largest snowflake) stamped in Pear Pizazz and then rock n rolled in Early Espresso.
  • You can give a little added fill without competing with the card by adding snowflakes of various size in Pear Pizazz on the Pear Pizazz card stock.Festive Flurry 001 006
  • If you want to add a little sparkle – use your two way glue pen and some Dazzling Diamonds to make the centers of the snowflakes shine.
  • To keep with the contemporary feel of the card, this greeting from More Merry Messages is perfect!  You’ll only find it in my online stamp store – not the holiday catalog.Festive Flurry 001 003
  • To cut the snowflakes out perfectly, use the matching Festive Flurry Collection Framelits or get them as a bundle with the stamp set and save 15% here.

Just released today!

    Festive Flurry Class Banner
    If you like the above project, then you’ll definitely want to check out the brand new class, just released today – Class of the Month : Festive Flurry.  You’ll make four gorgeous cards that will make the recipient really see you as the rock star paper crafter you are!  Even better – learn a few techniques along the way.  The step by step videos are loaded with creative tips and information.  Don’t have the stamp set – don’t worry – substitute your own!  Click Here to see what it’s all about!
    Signature Snowflake 001

Festive Flurry 001 004

To Shop 24/7 in the Creative Store – Click here!

Stamp Sets – Festive Flurry (131781c, 131778w), Festive Flurry Bundle (133285c, 133284w), More Merry Messages (126402c, 132400w) Paper – Sahara Sand, Pear Pizazz, Early Espresso, Whisper White Ink – Pear Pizazz, Early Espresso Cool Tools – 2 way glue pen, Festive Flurry Framelits (132193) The Perfect Finish – Stampin’ Dimensionals, Dazzling Diamonds

Untitled-12Festive Flurry Bundle

Santa’s List

Santas List 001 Main R

Santa’s List is a cute little three stamp set with an awesome jolly image. Here’s a quick Christmas card that uses non-traditional colors for a classic card.  It was designed by fellow CG Crew member Amy Seigler, and I loved making it!  Check out her blog here.

Creative Tips –

  • To get the main image to pop, you’ll want to emboss it.  Here Santa was stamped first in Versamark ink and then in Bermuda Bay.  You will want to used clear embossing powder to get that glossy sheen.
  • You can add some texture and character to your designer paper quickly by just sanding the edges with your Stampin’ Sanding System.  It’s quick, easy and has a great distressed and weathered look.  Santas List 001 CU
  • This card uses one of four designs in the 48 page Winter Frost Paper Stack.
  • If you want your greeting to have the look of icing or wet snow, stamp it in Whisper White Craft Ink and emboss it with Clear embossing powder rather than white.  This way it doesn’t take over the card with that bright white look.  Santas List 001 Embossing
  • Isn’t this ribbon slide the perfect compliment to the big guy?  It’s the perfect belt buckle for all your Santa cards.  You get sixteen pieces for only $1.99 for an entire package – that’s 60% off the original price!  But hurry, they are in the clearance rack and when they’re gone, they are gone. Santas List 001 Main L

  • CG rewards

       Don’t forget to print up your CG Reward Tracker to track your earned pinecones!  Not sure what I’m talking about?  Check out the new Reward program that just started yesterday.  You earn free stamps for your online purchases!  Remember…there are still 31 hours left in your double reward points special!

    Signature Snowflake 001
    Santas List 001 Angle

To Shop 24/7 in the Creative Store – Click here!

Stamp Sets – Santa’s List (131811c, 131808w), Sassy Salutations (126707c, 132070w) Paper – Brown Sugar, Whisper White, Winter Frost Designer Series Paper Stack Ink – Versamark, Bermuda Bay, Whisper White Craft Cool Tools – 3/16” Corner Rounder, Clear Embossing Powder, Stampin’ Sanding System The Perfect Finish – Stampin’ Dimensionals, Island Indigo Satin Ribbon (retired), Ribbon Slide

  Santa's ListUntitled-12

CAS Regarding Dahlias

Regarding Dahlias 003 Main

Clean and Simple (CAS) cards are always great.  They’re quick, easy and striking!  The Regarding Dahlias stamp set has several greetings and one very powerful floral image.  Perfect for clean and simple cards. 

Do you ever have an image remind you of someone?  That happens to me, and today I’m using flowers because I’m thinking of Yvonne.  Regarding Dahlias 003 Main  Duo

I teach card and scrapbooking classes locally here in my home and in various communities.  I’ll never forget the day I met Yvonne.  It was at a vendor event when she made her way to my table with her walker and oxygen tank.  Yvonne could not stop looking at my scrapbooks and cards – I could tell she was definitely an avid paper crafter!  She quickly arranged for me to teach scrapbooking in her community with a few of her friends religiously every month.  Each one became stampers in addition to scrapbookers, and I’ve loved every class that I taught there.  The friendships these ladies have with each other, in addition to just really loving every crafting moment together has always been special to be a part of for me. 

Yvonne has been one of my die hard stampers who never let anything get in the way of her trying all the paper crafting techniques she could – not even a broken shoulder or arm.  I have truly admired her zest for life and not letting the little things get to her (As if those are little things!). 

Yvonne was unable to make the trip up the stairs to my stamping studio for my stamping classes in my home, so one day I decided to bring class to her.  It was an awesome fun afternoon, stamping with a friend.  We made several projects using various techniques and to this day is one of my fondest memories of a private one on one class.  Yvonne never missed a class, and over time, I noticed that she gravitated toward the floral images.  So, today this card is for you Yvonne.  You will be greatly missed and I know that wherever you are, you are most definitely living life to the fullest and certainly stamping and scrapbooking!

                DSC00891 002

Creative Tips –

  • To create the floral design, you will want to make a mask out of printer paper.  Card stock will be too thick, and you will find that you have a white gap at the edge of your masked images, which I know will frustrate you!
  • Turn your stamp as you stamp the other images.  This way you have variety and not a repetitive look.Regarding Dahlias 003 Main Front 1
  • This image above has two stamped identically and then one not – can you see the difference?  My other sample has the flower at a slightly different angle.  It’s a bit easier on the eye.
  • You can see that I chose to matte the strip two ways, white strip on white and white strip on matching Night of Navy card stock.  Both are lovely, and have very different looks.Regarding Dahlias 003 Main  Duo
  • You might want to try stamping a long strip that you can cut to the size you need – that way you will have it for multiple cards.
  • Remember the law of 1/3rds when you are placing your images.  In CAS cards, you want to have a lot of white space, so placing your strip and greeting in the top or bottom third will be visually appealing to the reader.
  • For a finishing touch, add some paper piercing to the the opposite side of your strip. 
    2013 Holiday Catalog
    Have you taken a peek at the new Holiday Catalog yet?  The projects are awesome, the new products, well many are quite addictive!  My personal favorite is the new Expressions Thinlits Dies.  How about you?  View all our Catalogs here

Regarding Dahlias 003 Main Angle 2

To Shop 24/7 in the Creative Store – Click here!

Stamp Sets – Regarding Dahlias (130327c, 130324w), Sweet Essentials (126457c, 132085w) Paper – Whisper White, Night of Navy Ink – Night of Navy  Cool Tools – Paper Piercing Tool, Essentials Mat Pack, Stampin’ Pierce Mat

  Regarding DahliasUntitled-12

Simple One Layer Wetlands

Wetlands 005 001

I needed a super quick birthday card the other day and decided to try some acrylic block stamping.  The sandpiper image from the Wetlands stamp set is the perfect image for a beach scene. 

Creative Tips –

  • I used my Stampin’ Write markers to create my own scene on one of my larger acrylic blocks. 
  • For my sand, I used Crumb Cake, and then created my water with Bermuda Bay.  Next I drew a sun in Crushed Curry and colored my sky in Island Indigo around it.  Wetlands 005 009
  • I spritzed my block with a light mist of water and stamped onto a folded piece of card stock.
  • My sandpiper birds were then stamped in Early Espresso as was my greeting from Four You.
  • Here is a similar card done and matted onto Bermuda Bay for a contrasting look, which do you like better – one layer or matted?  Let me know if the comment section.

   Wetlands 005 003 Wetlands 005 006

This card literally takes minutes and is a cute simple watercolor of a fun beach scene.  It’s yet again just one more reason you want to have the Wetlands stamp set in your arsenal – it’s versatile, and easy to use!

Wetlands 005 002


Signature-Snowflake-001_thumb1

To Shop 24/7 in the Creative Store – Click here!

Wetlands 005 010

Stamp Sets – Wetlands (126697c, 126695w), Four You (130538c, 130535w) Ink – Early Espresso, Stampin’ Write Markers: Island Indigo, Crumb Cake, Bermuda Bay, Crushed Curry Paper –Whisper White (100730)

Untitled-12

A Big Shot Birthday

004

My niece Chiarra is in Orlando for a visit for her 8th birthday.  I felt she needed a fun card with her name on it – since she never finds anything with her name!  So I took out my trusty Big Shot, some of my favorite BigZ dies and went to work. 

009

I created a fun background with the Chevron Embossing Folder in Pink Pirouette and cut her name out using a retired set of BigZ dies in Rich Razzleberry.  For the greeting I used my Word program to write Happy  th Birthday in a fun font – Pea Mel in Between – it’s a handwriting font, and I added the Number 8 from the Typeset Alphabet BigZ dies.  I printed it on vellum and tore it before attaching it with two mini-brads.

003

Chiarra loved the card and especially the gifts to go with it!  There’s nothing like a personalized birthday card to make you feel special.

Expressions Thinlits Sneak Peek

Expressions Thinlits 001 001

I’m in love with the new Expressions Thinlits.  What an awesome new product!  Starting August 1st, you will be able to cut cute little words just like this one with the new Expressions Thinlits – available in the new Holiday Catalog.  My mother always taught me it was rude to tease, but I thought you would love a little Sneak Peek of this fun and quick little card.  It literally came together in a matter of minutes.Expressions Thinlits 001 005

Creative Tips –

  • Definitely put a piece of wax paper between the word Thinlit and your cardstock.  It will help to pop it out after.
  • I used my paper piercer to help guide my word out from the back of the Thinlit.  It was super easy.Expressions Thinlits 001 007
  • Two spots didn’t punch through on my word – the loop in the second R and the Y.  I didn’t worry about it, because it gave me a place to drop a little multi-liquid glue.  It really is thin – you have to use the Multi-Liquid Glue.
  • To make my holly leaves I used a 3/4” and 1/2” circle punch.  I don’t own a thinlit to punch those out, so why not make your own.  It was super easy.Expressions Thinlits 001 006
  • I wanted to accent my holly and berries, but didn’t want it to focus too much on that, so I used a blender pen and the ink from my ink pads.  I squeezed my ink pad – love that you can do that with Stampin’ Up! inks, and the ink collected in the lid. I then picked some up with my blender pen and added some subtle highlights.
  • The background was made with the Chevron Embossing Folder and I popped the panel up on Stampin’ Dimensionals for some interest.

This card literally took 4 minutes to make, so if you need a great go to holiday card in a pinch in December – make sure you have the Expressions Thinlits.  You can use them with any embossing folder for a quick and easy card! Always a great thing.

Expressions Thinlits 001 002

Learn a new technique in the Online Brayer Class

      Would you like to learn how to make Creative Scenery cards?  Have you been frustrated when trying to use your brayer?  Creative Scenery classes using a brayer have by far been my biggest hit with stampers.  Learn how to create gorgeous gradual transitions with 100+ minutes of step by step detailed video instruction teaching you how to master this technique.  The end result – You will feel like an artist.  Best of all, you will look at your stamps in a whole new way, make amazing projects and try things you never would have thought to do before.  This class is in its introductory period – get it while you can for less! Find out more here

      Signature Snowflake 001

      Expressions Thinlits 001 004

    To Shop 24/7 in the Creative Store – Click here!