Lovely Thank You

Lovely-Notes-Thank-You---Ingrid-Blackburn-003

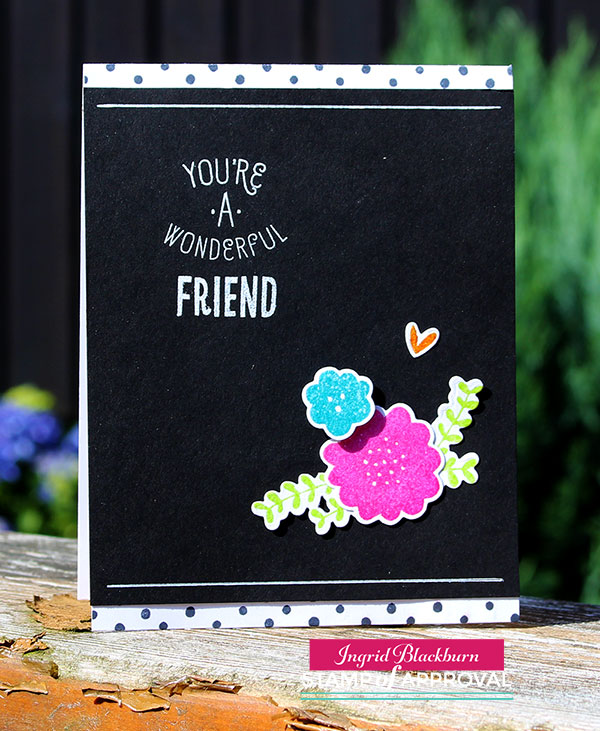
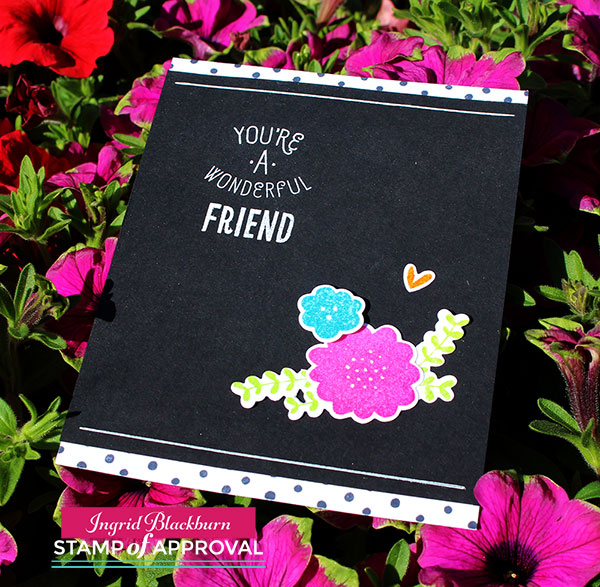
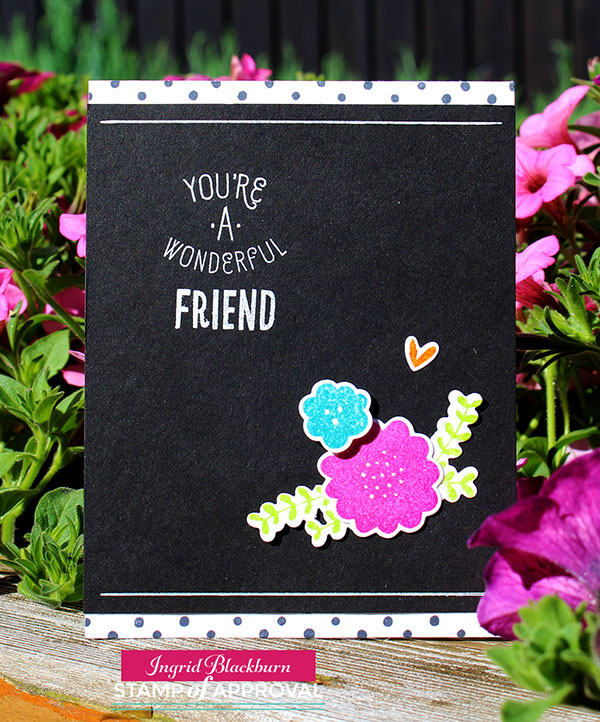
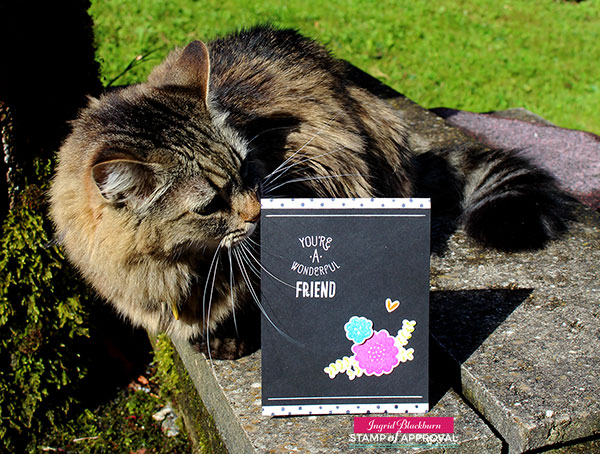
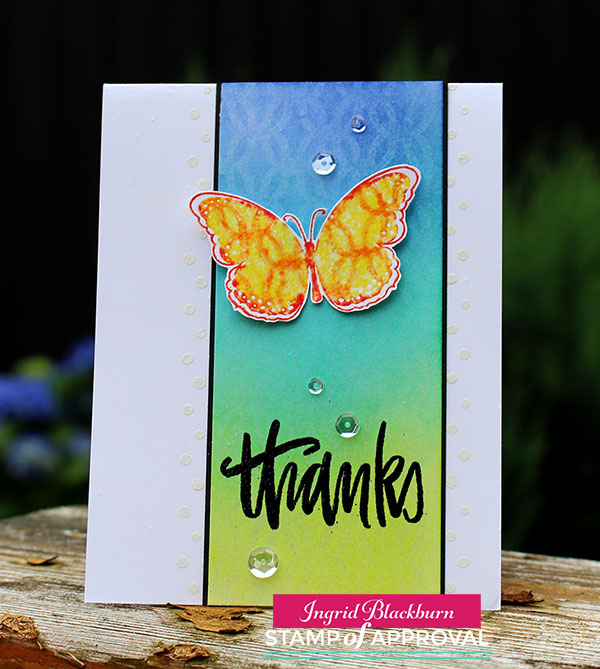
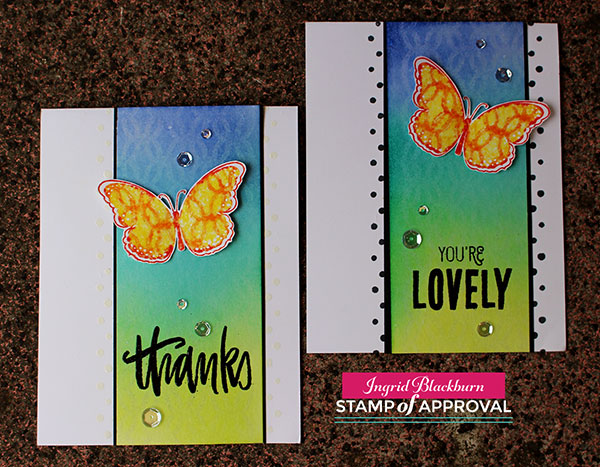
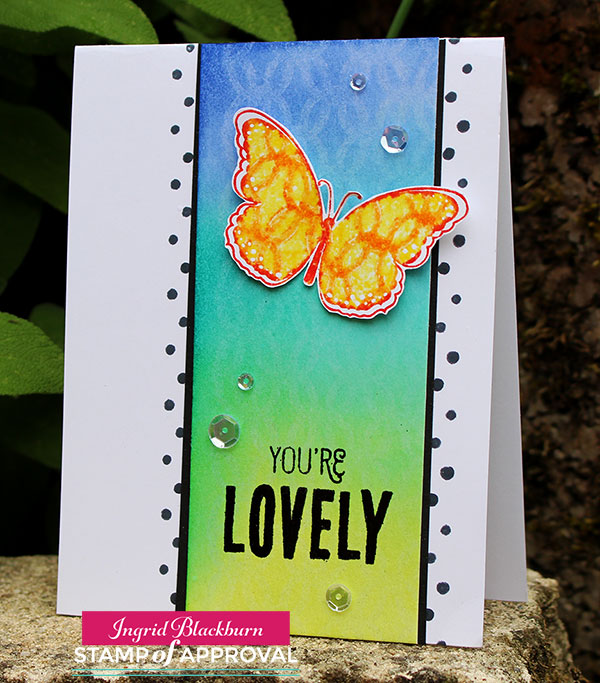
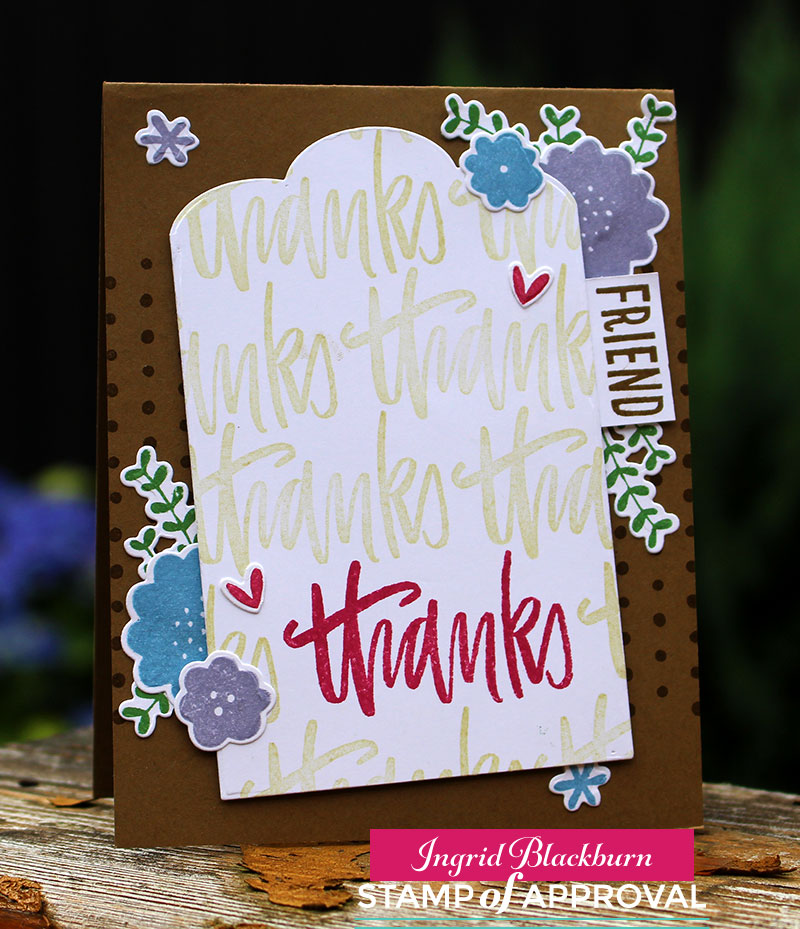
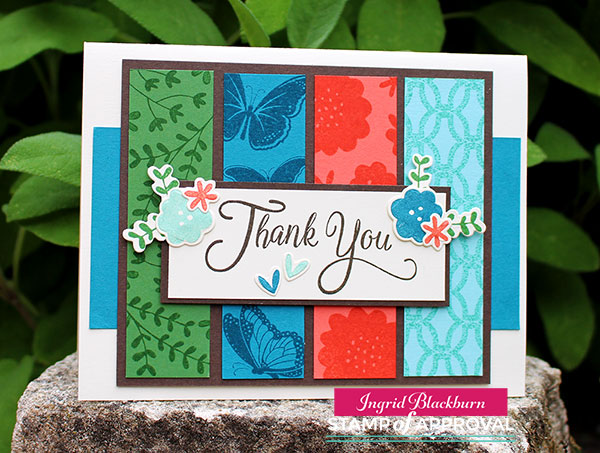
I probably make thank you cards more than any other card, how about you? I thought I’d share a fun little color blocked project with you today using the Lovely Notes Stamp of Approval Collection. This collection has been arriving all over the world and it’s about to sell out, so if you’re on the fence, don’t wait! Find out more here.

Lovely Notes SOA Now

Color blocking is something I’ve been doing long before I started making cards – I get that from my scrapbooking days. But I love the look on cards. For today’s Thank You card you’ll want to use 1 inch pieces that are stamped tone on tone for a subtle but great look.

I used the Lovely Flowers, Butterfly Notes and Lovely Lattice Background stamps (Catherine Pooler Designs) from this collection for this card. Don’t they just go together perfectly! That’s what I love about the Stamp of Approval collections – the versatility. They are so well thought out – not just slapped together like other boxes or kits. You can literally interchange any of the stamp sets and they’d work together – I LOVE that!

Lovely-Notes-Thank-You---Ingrid-Blackburn-002

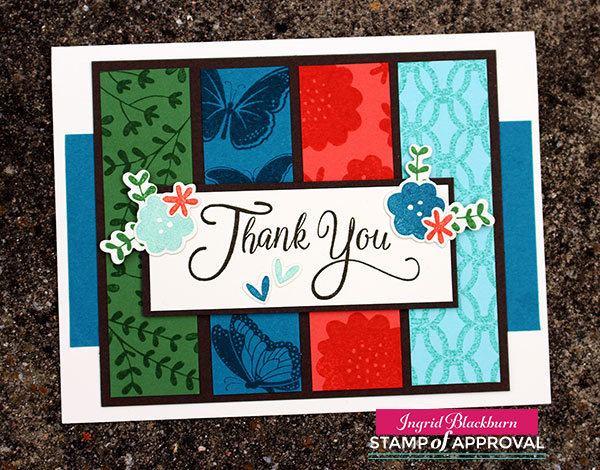
A simple supporting colorful panel behind my color blocked piece is a great way to finish off the card and allow you to use a smaller color blocked area if you can’t quite figure the spacing out. Love those little tricks! The key is to remember that you need the measurement to the left, right and three more times for inbetween the middle panels.

A simple Thank You greeting (Butterfly Notes) popped up and adorned with die cuts from the Lovely Flowers & Banners Dies (co-ordinating) adds the perfect finishing touch. I love this card and wanted to share it with you. So tell me in the comments – what kinds of cards do you make most?

Lovely-Notes-Thank-You---Ingrid-Blackburn-001

The Lovely Notes collection is still available – but don’t wait…it’ll be sold out soon, and then not available again until later in the fall. To find out more about the collections – visit the Stamp of Approval site here.

See you very soon – I have a few videos coming up next!

Signature

[optin_box style=”12″ alignment=”center” email_field=”email” email_default=”Enter your email address” integration_type=”aweber” double_optin=”Y” list=”3846012″ name_field=”name” name_default=”Enter your first name” name_required=”Y” opm_packages=””][optin_box_field name=”headline”]Learn more with our exclusive FREE video series:[/optin_box_field][optin_box_field name=”paragraph”]PHA+UGx1cyB5b3XigJlsbCBiZSBhZGRlZCB0byBteSBGUkVFIENyZWF0aXZlIFRpcHMgRS1sZXR0ZXIgd2hlcmUgSSBzaGFyZSBleGNsdXNpdmUgcHJvamVjdHMsIHZpZGVvcyAmYW1wOyB0aGUgMTIgRGF5cyBvZiBDaHJpc3RtYXMgUHJvamVjdCBTZXJpZXM8L3A+Cg==[/optin_box_field][optin_box_field name=”privacy”][/optin_box_field][optin_box_field name=”top_color”]undefined[/optin_box_field][optin_box_button type=”0″ button_below=”Y”]Get Instant Access![/optin_box_button] [/optin_box]


Lovely Flowers – Little Touches

Polka Dot Floral Cards

It’s the little touches in cardmaking that make the biggest statements. Today’s project is the perfect case in point. I’m in love with the Lovely Flowers stamp set and matching dies from the Stamp of Approval Lovely Notes Collection.

I thought it would be fun to stamp a few simple flowers in bright colors (Distress Picked Raspberry &  Mermaid Lagoon) accent them with some sprigs in Twisted Citron and a little heart in Wild Honey. I LOVE that little heart.

Lovely-Polka-Dots-004


To really make your embellishments pop – try embossing them in clear and then popping them on black like this card! A simple white greeting the opposite corner for balance is all you need.

But that alone isn’t enough. The card was falling a little flat – enter the little touches. Add some polka dots with the dotted stamp from this stamp set (see what I did with it yesterday is a video here) for the top and bottom – or just one. To finish the card off completely – I left off sequins or anything that would clutter it up, and instead try adding a simple white line to the top and bottom. All around would have been too much – remember, little touches.

Lovely-Polka-Dots-005

So what do you think? I think Bria likes it…lol! Here’s our gorgeous younger cat – she loves my craft studio…I find her hair everywhere! Do you have a little someone who loves your corner too?

Lovely-Polka-Dots-003

[divider style=”9″]
Lovely Notes SOA Now

If you’ve been hopping along the past few days, the winners were just announce! Head over to Catherine’s Blog to see if you won. 🙂

And if you missed the 18 designers that showcased two-three projects each…here are the links to those Blog Hop days. Have fun!

Day 1               Day 2               Day 3

SO….did you treat yourself to the current Stamp of Approval? Ordering is officially open to the public…don’t wait! It will sell out, and it’s a great collection. To find out more – check out the Stamp of Approval site here.

Those that were on the early notice wait list already are set to ship – check out all this goodness headed all over the world!

Stamp of Approval

I can’t wait to see what you all create with this amazing collection – Till next time!

Signature

[optin_box style=”12″ alignment=”center” email_field=”email” email_default=”Enter your email address” integration_type=”aweber” double_optin=”Y” list=”3846012″ name_field=”name” name_default=”Enter your first name” name_required=”Y” opm_packages=””][optin_box_field name=”headline”]Learn more with our exclusive FREE video series:[/optin_box_field][optin_box_field name=”paragraph”]PHA+UGx1cyB5b3XigJlsbCBiZSBhZGRlZCB0byBteSBGUkVFIENyZWF0aXZlIFRpcHMgRS1sZXR0ZXIgd2hlcmUgSSBzaGFyZSBleGNsdXNpdmUgcHJvamVjdHMsIHZpZGVvcyAmYW1wOyB0aGUgMTIgRGF5cyBvZiBDaHJpc3RtYXMgUHJvamVjdCBTZXJpZXM8L3A+Cg==[/optin_box_field][optin_box_field name=”privacy”][/optin_box_field][optin_box_field name=”top_color”]undefined[/optin_box_field][optin_box_button type=”0″ button_below=”Y”]Get Instant Access![/optin_box_button] [/optin_box]

Lovely Lattice Butterflies – SOA is live!

Lovely Lattice Background - Catherine Pooler Designs

I’ve been creating a lot with the kissing technique lately. I have to say, this simple technique always amazed me!  It’s been a cram packed few days of inspiration here and on the design team blogs. If you’ve missed any of the fun, I have links at the end for you.

Lovely Notes SOA Now

Today the Stamp of Approval Lovely Notes Collection goes live – yup…if you’re on the wait list you’ve received a link to head on over and grab a box. It’s the first release of these six stamp and two dies sets. You’ll also get a loaded PDF with projects and step by step instructions – how’s that for a place to start! Not on the list – no worries – get on it right here and get a head start on the public release tomorrow (if it hasn’t sold out!).

If you’ve seen any of my past three posts, you know I still have more projects for you – yup…today I even have another video! Over at StampNation, there’s a challenge going live today – Meadow Daydreams. I have to say, this challenge is made for me – I LOVE this kind of a color palette and theme. I’m actually shocked that I didn’t do a scenic card! Here’s a sneak peek into the project I created…to see it, you have to be a member of StampNation though.

Meadow-Daydreams-Sneak Peek

New Inspiration for you

So to piggy back on the challenge – I created a few cards with the same color palette, theme and then I loaded them up with techniques – after all, that’s kind of my thing, isn’t it?I have a video tutorial for you here and a written one below.And if you aren’t already – I’d love for you to subscribe to my YouTube channel too – click here.

Click Here to see the video in HD

Lattice Butterfly Tutorial – the Kissing Technique + others

  • Ink up your Lovely Lattice Background stamp by Catherine Pooler Designs in Versamark
  • Transfer your image to a piece of 140# Cold Pressed Watercolor Paper (5 1/2 x 4 3/4″) & clean your stamp
  • Sponge your colors over your image blending the colors Twisted Citron, Peacock Feathers and Blueprint Sketch

Kissing Technique - Stamp of Approval

  • Allow your Distress Ink to fully dry while working on your butterflies
  • Ink up the large butterfly from Butterfly Notes by Catherine Pooler Designs in Squeezed Lemonade & Edge in Barn Door.
  • Ink up your Lovely Lattice Background stamp in Spiced Marmalade (you only need an area as large as your stamp)
  • Kiss your inked up butterfly to your inked up background stamp; thus transferring your image to it – or kissing

Butterfly Notes - Stamp of Approval - Catherine Pooler

  • Stamp on a piece of regular white card stock and heat emboss immediately in clear embossing powder. If your image has dried before your powder sticks, just stamp over your butterfly in versamark. Repeat for a second butterfly.
  • Fussy cut out your images
  • Cut your background in half (5 1/2 x 4 3/8″) and rub a de-static bag onto the bottom half. Stamp (Versamark) the greeting Thanks – Handpainted Thanks by Neat & Tangled & You’re Lovely by Catherine Pooler Designs – Lovely Flowers. Emboss in Black.
  • Trace the edges of your strip lightly for a guide where you plan to adhere it to your card base.
  • Stamp the polka dots from Lovely Flowers (landscape so you have the alternating ends) down the side using the line to keep your pattern straight. You’ll need to overlap the bottom dot with the top for an even pattern. I stamped one in Memento Tuxedo Black and the other I embossed with Versamark and white embossing powder.

The Kissing Technique - Versamark - Ingrid Blackburn

  • Matte your background onto black (5 1/2 x 4 1/2″) so that it just has a sliver of black – this will cover your line.
  • Adhere your butterfly with two mini glue dots in the center and place a foam dot under each wing toward the top to help with the illusion of flight.
  • Add Sparkling Clear Sequins by Pretty Pink Posh.

I love how the background stamp just magically appears. This technique has the biggest wow on glossy card stock & with darker inks, but the subtle effect here is lovely and the perfect accent.

Stamp of Approval

Lovely Notes SOA Banner

Thanks for joining me today! I have two more projects headed your way in the days to come, so be sure to stop back by! In the meantime, if you missed any of the six projects I posted this week, or the blog hops for all 18 designers – yup…there were that many – click on the links below for the starting point of each hop:

Day 1               Day 2               Day 3

And don’t forget to check out the Stamp of Approval – Lovely Notes Collection – it’s live right now – but just for those on the wait list!

Now that we’ve given you a ton of inspiration, it’s your turn – take what you learned here today or over the past three days and create your own cards – go get your fingers inky!!!

Signature

[optin_box style=”12″ alignment=”center” email_field=”email” email_default=”Enter your email address” integration_type=”aweber” double_optin=”Y” list=”3846012″ name_field=”name” name_default=”Enter your first name” name_required=”Y” opm_packages=””][optin_box_field name=”headline”]Learn more with our exclusive FREE video series:[/optin_box_field][optin_box_field name=”paragraph”]PHA+UGx1cyB5b3XigJlsbCBiZSBhZGRlZCB0byBteSBGUkVFIENyZWF0aXZlIFRpcHMgRS1sZXR0ZXIgd2hlcmUgSSBzaGFyZSBleGNsdXNpdmUgcHJvamVjdHMsIHZpZGVvcyAmYW1wOyB0aGUgMTIgRGF5cyBvZiBDaHJpc3RtYXMgUHJvamVjdCBTZXJpZXM8L3A+Cg==[/optin_box_field][optin_box_field name=”privacy”][/optin_box_field][optin_box_field name=”top_color”]undefined[/optin_box_field][optin_box_button type=”0″ button_below=”Y”]Get Instant Access![/optin_box_button] [/optin_box]


SOA Lovely Notes Blog Hop

Lovely Notes SOA Blog Hop

Welcome to the Lovely Notes Collection Blog Hop – Day 3! What do you think so far…pretty amazing, right? Well I hope to add a little creative inspiration for you today with a few projects. I’ve been sharing a few projects over the past few days – this collection is so easy to create with, and I have so much more to keep sharing with you this week.

The Stamp of Approval Lovely Notes Collection is a curated collection of stamps and dies that work fabulously together or alone. Not only do you get a box FULL of amazing stamps and dies, but you’ll get a downloadable PDF Project Guide (for free!) with tons of project tutorials using them!

The stamps and dies in the Stamp of Approval Collections are brand new on the market and won’t be released for individual sale for several months. To find out how to get a box, you have to be on the wait list! Yes, these boxes sell out so fast – the last one was gone in 33 hours….so don’t wait. The wait list will find out before the public will. Click Here to sign up for the wait list and find out more.

Today I’m going to inspire you with several of the components of this collection. Specifically the Lovely Flowers, Lovely Flowers & Banners Dies, Lovely Lattice Background, Butterfly Notes, Wonderful Wreath – all by Catherine Pooler Designs, and Handpainted Thanks by Neat & Tangled. So let’s get right to it with a little Christmas in July, here are your tutorials!

Lovely Notes Project Tutorials

Wonderful Wreath

I was in love with this wreath the moment I saw it. It reminds me of olive branches – delicate and whimsical. To get this clean and simple look, stamp your wreath on white in Stampin Up Pear Pizzazz, the berries in Primrose Petals, hang some ornaments in Baja Breeze and tie it all up with an Early Espresso bow. It was that simple. This is a GREAT mass produced card.

Lovely-Notes-SOA-Project-2---Ingrid-Blackburn-001


For an elegant touch, emboss your greeting in Gilded Gold by Brutus Monroe – my new favorite gold. Add a few sparkling clear sequins by Pretty Pink Posh and a little simple paper piecing in the corners finishes it off.

I’m addicted to the tilt for the matte in the background (thanks Maureen!) – a little Early Espresso on a Pear Pizzazz card base. It’s that simple.

Thanks Friend

This awesome handpainted Thanks stamp by Neat & Tangled is my new favorite greeting – I love bold scripty greetings. I used this stamp just one way – did you know there are two others that layer for a multi tone effect! How cool is that?

You’ll want to stamp some of the Lowely Flowers and cut them using the coordinating Dies. I used the Stampin Up colors – Marina Mist, Wisteria Wonder, Rose Red & Garden Green. On a large piece of white scrap paper – at least card front size, stamp the thanks towards the bottom center/right. Repeatedly stamp thanks in a light neutral tone, I used River Rock. TIP – alter where the word starts on each line so that it flows.

Lovely Notes SOA Collection - Ingrid Blackburn


Stamp the dots from Lovely Flowers in the middle 2/3 of the Soft Suede card base. I stamped it completely across so that the left and right side were even.

Cut your tag out using the large banner die from the Lovely Flowers & Banners Dies set. Try to place the Rose Red Thanks a bit off centered to the right at the bottom. You definitely want some neutral below as well. Stamp the word Friend from the Lovely Flowers Stamp set in Soft Suede on a piece of scrap and attach to your tag.

Pop the tag up using Foam Tape or Fun Foam and adhere your embellishments. TIP – The leaf branch has three sprigs – I cut mine apart to get it just right – sometimes just one or two.

That’s it – it’s a cute card – I had way too much fun with the Lovely Flowers stamps & dies as you’ll see tomorrow!

Bold Watercolor Greetings

If you’ve followed me for a while here, on YouTube or in an online class – you know I love to watercolor! This project takes some of the various greetings in this collection and puts them to good use. I wanted greetings that would stand out, so I used two from Lovely Flowers, one from Butterfly Notes and one of my new favorite Thanks from Handpainted Thanks. Here’s a video tutorial for you:

Click Here to watch video in HD on YouTube

To get this outline look, first stamp your images in versamark. Go back over them with a de-static tool and stamp again in Versafine Onyx Black Ink. Emboss in Black and heat set. Once cool, secure your project down with low tack painters tape on the upper and lower edges.

Smoosh some Distress Ink onto your craft mat or acrylic block – I used Rusty Hinge, Ground Espresso, Gathered Twigs and Vintage Photo. Grab some ink with a large wet brush and start painting onto your dry watercolor paper. You want your watercolor to flow together without getting out of control.

Handpainted Thanks - Lovely Notes Collection - Ingrid Blackburn

TIP – if your paper accumulates too many puddles or your colors blend out of control, gently dip the edge of a dry paper towel into a puddle to sop it up without removing color. Or use a thirsty brush (Not dripping wet). Water will naturally be attracted to a dry surface.

Once you have the look you want, heat set or allow to dry on it’s own. TIP – keep some lighter areas along with dark for a balance.

Stamp the Lovely Lattice Background stamp in Ground Espresso onto a folded Espresso card base. I just inked up the top and bottom. Quickly dip into clear embossing powder and heat set for a tone on tone look. If using a vanilla or white background, use Versamark ink for a watermark look. The key is not to compete with your watercolor, but rather support it.

It’s a pretty quick and easy project. I made four as I wasn’t sure of the look I wanted. Here’s a rainbow one too:

Lovely Notes Stamp of Approval Ingrid Blackburn


I added a little dry embossed line to the top and bottom for a simple embellishment. No matter what color combination you choose, you’ll love this technique.

Now that you have some inspiration…time to find out just how you can win a free box!

Lovely Notes SOA Win

It’s your turn to hop along and check out what the uber talented Amy Tsutura has in store for you next! Here’s the blog hop list:

Catherine Pooler

Neat and Tangled

Kristie Goulet

Yoonsun Hur

Ingrid Blackburn – That’s Me * You are here*

Amy Tsuruta You’re next stop!

Justine Hovey

Be sure to leave a comment on each designers blog for a chance to win a Lovely Notes Collection of your own! There’s a giveaway for all three days of the hop! If you missed out on any of the Blog Hops – start at the beginning with Catherine’s Blog and Day 1.

And stop by tomorrow for more inspiration –

Signature

[optin_box style=”12″ alignment=”center” email_field=”email” email_default=”Enter your email address” integration_type=”aweber” double_optin=”Y” list=”3846012″ name_field=”name” name_default=”Enter your first name” name_required=”Y” opm_packages=””][optin_box_field name=”headline”]Learn more with our exclusive FREE video series:[/optin_box_field][optin_box_field name=”paragraph”]PHA+UGx1cyB5b3XigJlsbCBiZSBhZGRlZCB0byBteSBGUkVFIENyZWF0aXZlIFRpcHMgRS1sZXR0ZXIgd2hlcmUgSSBzaGFyZSBleGNsdXNpdmUgcHJvamVjdHMsIHZpZGVvcyAmYW1wOyB0aGUgMTIgRGF5cyBvZiBDaHJpc3RtYXMgUHJvamVjdCBTZXJpZXM8L3A+Cg==[/optin_box_field][optin_box_field name=”privacy”][/optin_box_field][optin_box_field name=”top_color”]undefined[/optin_box_field][optin_box_button type=”0″ button_below=”Y”]Get Instant Access![/optin_box_button] [/optin_box]

Fill-in-the Blank Colorwash Resist

Have you ever tried a colorwash resist? It’s no secret that I love to emboss and add bright vibrant colors with Distress Inks. This project combines both. It’s day 2 of the Stamp of Approval Blog Hops – did you hop along today and yesterday? If not, I have links below!

13603495_10157037138765580_7410031084960510169_o

There were some seriously wicked cards created by some of the most talented stampers!! Be sure to stop by tomorrow – I’m “on deck”….and I have several projects to share with you.

Watercolor Wash

Today I have a quick, straightforward project that I think you’ll love. It’s super easy and if you’re new to watercolor, it’s a great one to start off with.

First, ink up the Fill-in-the-Blank Birthday Stamp in Versamark, add the Niece (or fill-in whichever you need) and emboss it in white on 140# Cold Pressed Watercolor Paper.

Next add your color – it’s seriously THAT easy!

Colorwash Resist Technique Tips:

  • To duplicate this look, grab a #10 watercolor brush and paint on the colors Spiced Marmalade, Mustard Seed, Peacock Feathers and Picked Raspberries – top down.

Watercolor Colorwash Resist

  • To use the distress ink, use the reinkers, or smoosh your pad into your craft mat (or acrylic block). You don’t need to spritz it – unless you are using the reinkers – that’s very concentrated – spritz a few times.
  • With a wet brush, paint on the colors, one at a time.
  • You’ll want to monitor the amount of water you are adding as the colors start to bleed together.
  • Take your time – use a dry paper towel to lightly dip into an unwanted water pool, the wet will go where the dry is (you can use a thirsty brush also).

Fill-In-the blank Birthday-Color-Wash-003

  • If you have any unwanted blending, just come back into it with a watercolor brush – try a #6 for a bit more control. Go back over that area with a little more color and blend out any unwanted looks.
  • As long as your project is still wet, you have a little play. Once it dries, you can still adjust it, but it’s much more difficult.
  • Distress works great together – pick colors that blend well and don’t create mud.

Simple Watercolor Cards - Ingrid Blackburn

Have fun! If you’re not on the Stamp of Approval wait list yet, click here to find out more about this amazing collection of stamps & dies. It goes on sale on the 13th – but only to the wait list at first. You don’t want to miss out.

Lovely Notes SOA Banner

And if you haven’t seen the other amazing projects created by the SOA team – Click here for the beginning posts of each Blog Hop –

Day 1                 Day 2

Can’t wait to share more with you tomorrow –

Signature

[optin_box style=”12″ alignment=”center” email_field=”email” email_default=”Enter your email address” integration_type=”aweber” double_optin=”Y” list=”3846012″ name_field=”name” name_default=”Enter your first name” name_required=”Y” opm_packages=””][optin_box_field name=”headline”]Learn more with our exclusive FREE video series:[/optin_box_field][optin_box_field name=”paragraph”]PHA+UGx1cyB5b3XigJlsbCBiZSBhZGRlZCB0byBteSBGUkVFIENyZWF0aXZlIFRpcHMgRS1sZXR0ZXIgd2hlcmUgSSBzaGFyZSBleGNsdXNpdmUgcHJvamVjdHMsIHZpZGVvcyAmYW1wOyB0aGUgMTIgRGF5cyBvZiBDaHJpc3RtYXMgUHJvamVjdCBTZXJpZXM8L3A+Cg==[/optin_box_field][optin_box_field name=”privacy”][/optin_box_field][optin_box_field name=”top_color”]undefined[/optin_box_field][optin_box_button type=”0″ button_below=”Y”]Get Instant Access![/optin_box_button] [/optin_box]

Creative uses for Twine

How do you use twine on a card? I’ll admit, I mostly criss-cross it on my pieces – it’s one of my signatures. So when I saw the challenge over at Happy Little Stampers this month uses twine – I thought no problem…wrong! I didn’t just want to do a criss-cross – I always do that….so I really racked my brain to come up with a creative use of twine for you.

I looked at my stash, and I’ll be honest – I don’t get crazy with purchases like these – I mostly like neutrals like browns, white and black. But I remembered that I had some red/white bakers twine from back in my Stampin Up days. My first idea didn’t pan out, but it was perfect for a candy cane…so the card came together from there – with a little inspiration from a card online. Mind you, my card looks nothing at all like the muse, It was a giant strip of white with red flanking the sides that cemented the idea in my head.

How to use Twine on Cards

Candy Cane Twine Tutorial:

  • Sponge the Merry Go Round Stencil by ARTplorations in Barn Door and Festive Berries Distress Ink onto White Card Stock – 3 7/8 x 5 1/8″
  • Round the corners of a Real Red rectangle – 2 1/3 x 3 1/2″
  • Wrap some red/white twine around the top being sure to criss-cross it at the edges and tie a bow with some long tails. Tip – to get my loops to stay to the top and tails downward, I tie like a kindergartner would with bunny ears and upside down, so the top is toward me. I over-exaggerate the loops and make them smaller after by pulling on the tails.

Candy Cane Christmas Cards with Twine

  • Emboss a greeting at the opposite end in white. I used White EP by Brutus Monroe and the stamp set Mixed Christmas Sentiments by Happy Little Stampers
  • In the middle, stamp some lines in Barn Door using my favorite stamp from the Gorgeous Grunge stamp set by Stampin Up. It’s that little something that really helps to make this piece – I stamped it twice and left lots of space top and bottom.
  • Die cut or hand cut a candy cane image. Mine came from a retired SU die cut set. If you don’t have a die like this, stamp a candy cane on scrap paper, cut out and use that as a guide on the back of your card stock.

Peppermint Christmas Cards - Bakers Twine

  • Wrap the red/white twine spaced out to reflect the red parts of the candy cane. TIP – I never cut my twine. On the back, it connects to the upper pieces. I secured them down with glue and double sided tabs before popping it up on mini foam squares.
  • Attach the tag to your card front with fun foam or foam strips. The height helps to add drama to your card.

Creative Bakers Twine Uses Bakers Twine Tutorial - Ingrid Blackburn

  • Adhere your peppermint background to a real red matte that is 1/16″ larger – 4 x 5 1/4″
  • Attach to a white A2 card base – 4 1/4 x 5 1/2 for a 1/8″ matte and you’re done!

It’s a fun, cute card, right?!!! Now it’s your turn – grab some Twine and jump on into the Twine Challenge over at Happy Little Stampers. And while you’re there – check out all the other great challenges going on!

DIY Christmas Cards - Ingrid Blackburn

Of course, I do like to play along with multiple challenges, and two other’s in mind when I made this card. First up, my inspiration for the red/white – this week’s Muse Christmas Visions. The crazy talented muse this week is Kimberly Weiner – I love everything she creates. Kimberly created a beautiful red/white cardinal creation and that helped me to zero in on my candy cane idea for today’s twine card.

And of course, you know I just LOVE to play along with the CAS Mix it Up challenge as well. This month they’re featuring Die Cuts, so jump on into that fun one too!

Hope to see you in all the challenges! See you in a few days for yet another great project!

Now go get those fingers inky –

Signature

[optin_box style=”12″ alignment=”center” email_field=”email” email_default=”Enter your email address” integration_type=”aweber” double_optin=”Y” list=”3846012″ name_field=”name” name_default=”Enter your first name” name_required=”Y” opm_packages=””][optin_box_field name=”headline”]Learn more with our exclusive FREE video series:[/optin_box_field][optin_box_field name=”paragraph”]PHA+UGx1cyB5b3XigJlsbCBiZSBhZGRlZCB0byBteSBGUkVFIENyZWF0aXZlIFRpcHMgRS1sZXR0ZXIgd2hlcmUgSSBzaGFyZSBleGNsdXNpdmUgcHJvamVjdHMsIHZpZGVvcyAmYW1wOyB0aGUgMTIgRGF5cyBvZiBDaHJpc3RtYXMgUHJvamVjdCBTZXJpZXM8L3A+Cg==[/optin_box_field][optin_box_field name=”privacy”][/optin_box_field][optin_box_field name=”top_color”]undefined[/optin_box_field][optin_box_button type=”0″ button_below=”Y”]Get Instant Access![/optin_box_button] [/optin_box]

CAS – Ghosting Technique

Have you ever tried the ghosting technique before? A ghosted look is an image that appears either as a light or double image. You can actually achieve this look in several ways, I’m going to talk about three today.

I personally love this technique, it gives a great look and added emphasis to a stamped or stenciled image. You’ll need to use one of three mediums – water, white pigment ink or a clear watermark ink like Versamark.

This is my first month playing along with a fun challenge over at Happy Little Stampers, and I’m quite excited to be a new member of the CAS team! The challenge for the month of June is to use Ghosting on your card in a CAS (Clean and Simple) style. Here’s what I came up with:

Ghost Stamping

Now I’ll be honest – I’m fresh off a transatlantic trip and have been a little jet lagged! We were in New York for my grand daughter’s Christening – little Lylah is SO cute! It was a short trip, but a long one on the way back. I was excited when I remembered that I created this word cluster using this very technique several months ago for a Christmas challenge and went another way. Even better – I had the snowflakes left over from another project too – I love it when I get to use things from my scrap bin!

Ghosting Technique Tutorials

Technique #1 – Emerging Images (Stamp/Stencil)

To create the ghost image, stamp a word cluster with various greetings from the Happy Little Stampers set Mixed Christmas Greetings in Versamark ink on glossy card stock.  Next brayer colored dye inks, covering your card stock. I used the Distress inks Victorian Velvet and Dusty Concorde for a slight ombre look. The versamark ink resists the dye ink and shows up as a ghost image.

Ghosting-Technique-003

Another way to get the same result, but not quite as sharp is to use Watercolor paper, cover it well with Distress Ink and stamp with water. That’s the water stamping technique which can produce a ghosted result.

For the background, stamp snowflakes from Bring on the Snowflakes by CAS-ual Fridays in Illuminate ink for a subtle pearl look. Add a few white snowflake dies from the companion die set along with ta few sequins and you have a great look.

Although I probably didn’t need an additional sentiment, I added one in embossed silver on a banner. The ghosted circle is popped up for a little drama to the card and the sparkling clear sequins by Pretty Pink Posh for the perfect sparkling effect.

Ghosting-Technique-002

Technique #2 – Double Stamp/Stencil

This technique is my favorite way to achieve a ghosted image.  Click here to see another written & video tutorial on how to use white pigment ink to get a great ghosted image with stamps or a stencil. This is also known as the double stamping technique.

Technique #3 – Water Stamping/Stenciling

The third way to create a great ghosted image is to stamp or lift with water. This can be applied to stamps or stencils. I have another written and video tutorial for this concept in the simplest of manners – the flicked distress technique.  Click here to view the video and written tutorial for this technique.

Ghosting-Technique-005

So that’s three tutorials on how to use this very technique – have fun with it! If you’re a Just Cards online student – you have even more tutorials on various ways to create this technique in your classroom too!

Thanks for joining me today, I don’t share many personal photos, but couldn’t resist with these – here are a few pictures of our sweet little grand daughter Lylah, and the family!

IMG_4647-edit-2

IMG_4554-edit-2

IMG_4789-edit-2

Lylah, Allyson and a rare photo of me – I’m always BEHIND the camera!

Isn’t she cute?!! We miss them already! I hope you have a great start to June…and I can’t wait to see what you create this month in the CAS Ghosting challenge over at Happy Little Stampers – I challenge you to try out the ghosting technique – have fun!

🙂

Ingrid

[optin_box style=”12″ alignment=”center” email_field=”email” email_default=”Enter your email address” integration_type=”aweber” double_optin=”Y” list=”3846012″ name_field=”name” name_default=”Enter your first name” name_required=”Y” opm_packages=””][optin_box_field name=”headline”]Learn more with our exclusive FREE video series:[/optin_box_field][optin_box_field name=”paragraph”]PHA+UGx1cyB5b3XigJlsbCBiZSBhZGRlZCB0byBteSBGUkVFIENyZWF0aXZlIFRpcHMgRS1sZXR0ZXIgd2hlcmUgSSBzaGFyZSBleGNsdXNpdmUgcHJvamVjdHMsIHZpZGVvcyAmYW1wOyB0aGUgMTIgRGF5cyBvZiBDaHJpc3RtYXMgUHJvamVjdCBTZXJpZXM8L3A+Cg==[/optin_box_field][optin_box_field name=”privacy”][/optin_box_field][optin_box_field name=”top_color”]undefined[/optin_box_field][optin_box_button type=”0″ button_below=”Y”]Get Instant Access![/optin_box_button] [/optin_box]

How to Get Inks to Shine

Mixed-Media-Stained-Glass-Window-001

All you really wanted from your card was a little shine, right? Have you ever created a stunning background, but hours later your ink colors are flat and faded? Well, this technique is for you then! I’m playing along with the new Mixed Media Challenge over at Happy Little Stampers – Shine.

HLS Mixed Media challenge May 2016

I LOVE to create backgrounds – have you noticed? All to often in card making, we create these amazing colorful backgrounds on cards and then the colors settle as the project fully dries and we’re left with something that is a bit flat and has no vibrant nature left. At least I do! I’m always thinking where did the shine go? Okay, not all of it is shiny, but you know what I mean.

I have a video and step by step tutorial for you, so grab a drink, learn how to create amazing depth first, then a stain glass window that captures the true nature of those amazing colors by trapping the shine element of your card. Here’s the video:

Watch in HD on YouTube

So what did you think? Not that difficut really. What did you think about stretching your stencil for better coverage? Have you ever done that? Here’s the step by step tutorial, and if you really loved this, be sure to sign up for the Creative Tips E Letter for an exclusive video series and more…

[optin_box style=”12″ alignment=”center” email_field=”email” email_default=”Enter your email address” email_order=”2″ integration_type=”aweber” double_optin=”Y” list=”3846012″ name_field=”name” name_default=”Enter your first name” name_order=”1″ name_required=”Y” opm_packages=””][optin_box_field name=”headline”]Learn more with our exclusive FREE video series:[/optin_box_field][optin_box_field name=”paragraph”]PHA+UGx1cyB5b3XigJlsbCBiZSBhZGRlZCB0byBteSBGUkVFIENyZWF0aXZlIFRpcHMgRS1sZXR0ZXIgd2hlcmUgSSBzaGFyZSBleGNsdXNpdmUgcHJvamVjdHMsIHZpZGVvcyAmYW1wOyB0aGUgMTIgRGF5cyBvZiBDaHJpc3RtYXMgUHJvamVjdCBTZXJpZXM8L3A+Cg==[/optin_box_field][optin_box_field name=”privacy”][/optin_box_field][optin_box_field name=”top_color”]undefined[/optin_box_field][optin_box_button type=”0″ button_below=”Y”]Get Instant Access![/optin_box_button] [/optin_box]

Creative Tips on Shine, Texture and Stretching your Stencils

  • Create an in depth textured piece by using the wrinkle free distress technique on a piece of 140# cold pressed watercolor paper and dye based inks. (shown in detail in the video) Tip – For the most vibrant results, try Ranger’s Distress Inks.

Mixed-Media-Stained-Glass-Window-003


  • This project uses Distress Mustard Seed, Spiced Marmalade, Twisted Citron and Peacock Feathers
  • Once your project is totally dry, lightly buff over it with a de-static tool to remove any oils.
  • Smoosh Versamark through the Latticeworks stencil by Tim Holtz or your favorite one for a detailed design as in the video. Since this stencil didn’t cover my watercolor paper, I had to do this in two parts and overlap my design for a seamless flow.

Vibrant Mixed Media Cards

  • Emboss in Clear Embossing Powder – I used Brutus Monroe – and if you’ve never tried it – do so…it rocks!
  • Once your embossed stencil has fully dried, sponge over with Soot Black distress ink.
  • Wipe off your stenciled design with light pressure and a slightly damp cloth or paper towel to pick up the resisted ink.
  • Emboss your die cut greeting in clear for a shiny look. I used Handlettered Holiday by WPlus9. Adhere with Ranger Multi Medium Matte.

using distress inks in mixed media

  • Stamp and emboss the Christmas greeting from HLS Everyday Sentiments in white on black card stock – trim and adhere.
  • Adhere your watercolor paper with glue to a black matte with a 1/16″ border.
  • Pop up Mixed Media Panel with Fun Foam and adhere to a White card base with a 1/4″ border all around.

That’s it! Simple and striking Mixed Media card. I’m also going to play along with this months challenge over at CAS Mix it Up….it’s heat embossing – we definitely fit there!

may

So hop on over to the HLS Mixed Media Challenge and check out all the amazing projects my teammates have created for this challenge.  Plus you’ll want to stop by our Guest Designer Kalina’s blog – she’s SUPER talented when it comes to Mixed Media and her projects are out of this world!

Then get those fingers inky….I can’t wait to see what you do to let your creations shine!

Signature

[optin_box style=”12″ alignment=”center” email_field=”email” email_default=”Enter your email address” email_order=”2″ integration_type=”aweber” double_optin=”Y” list=”3846012″ name_field=”name” name_default=”Enter your first name” name_order=”1″ name_required=”Y” opm_packages=””][optin_box_field name=”headline”]Learn more with our exclusive FREE video series:[/optin_box_field][optin_box_field name=”paragraph”]PHA+UGx1cyB5b3XigJlsbCBiZSBhZGRlZCB0byBteSBGUkVFIENyZWF0aXZlIFRpcHMgRS1sZXR0ZXIgd2hlcmUgSSBzaGFyZSBleGNsdXNpdmUgcHJvamVjdHMsIHZpZGVvcyAmYW1wOyB0aGUgMTIgRGF5cyBvZiBDaHJpc3RtYXMgUHJvamVjdCBTZXJpZXM8L3A+Cg==[/optin_box_field][optin_box_field name=”privacy”][/optin_box_field][optin_box_field name=”top_color”]undefined[/optin_box_field][optin_box_button type=”0″ button_below=”Y”]Get Instant Access![/optin_box_button] [/optin_box]