Buds and Blooms–Scribble Flower

Scribble Flowers Trio002

It’s the beginning of a new year, which is always exciting.  This week on Less is More Challenge Blog, the theme is New Beginnings – which is very fitting for a new year.  To keep it simple, I have a Clean and Simple card that’s just perfect for a quick go to simple one layer card.

I’m also adding this to the Clean Slate challenge at Virginia’s View Challenge.

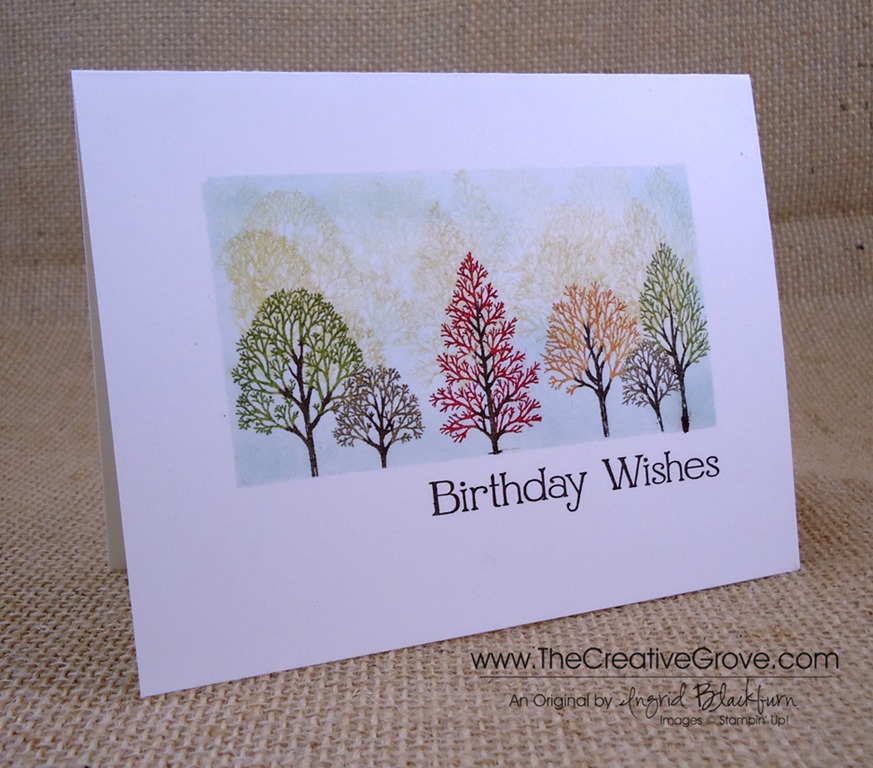
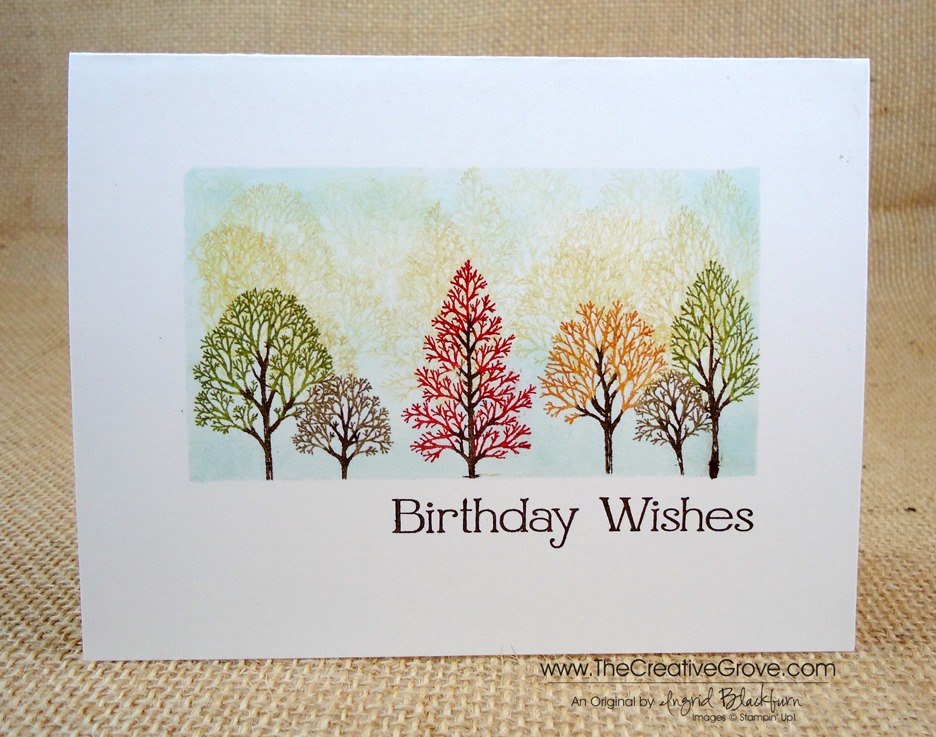
I did end up popping up one of the flowers for emphasis, but it would also look just perfect stamped directly onto the main layer.

Scribble Flowers Trio003

Here you see Scribble Flowers by Simon Says Stamp in some fun bright colors – Picked Raspberries, Mustard Seed and Mowed Lawn Distress Inks by Ranger. For the black, I used Memento Jet Black Ink.

I masked off the buds (the beginning) and stamped the leaves.  For the popped up flower I glued on the middle and leaves, but they would also work perfectly masked as well if stamping on a single layer.  Okay – I know I deviated from the true One Layer Rule, but I just felt like it on this one – forgive me! Smile

Scribble Flowers Trio001

I always make a ton of birthday cards at the beginning of each year – how about you?  This one is great as a quick and easy go to simple card that will brighten anyone’s day.  I hope you loved it as much as I did!

Want more creative inspiration – check out our free video series and ongoing creative tips – sign up for our inspirational newsletter here – Creative Tips Newsletter!

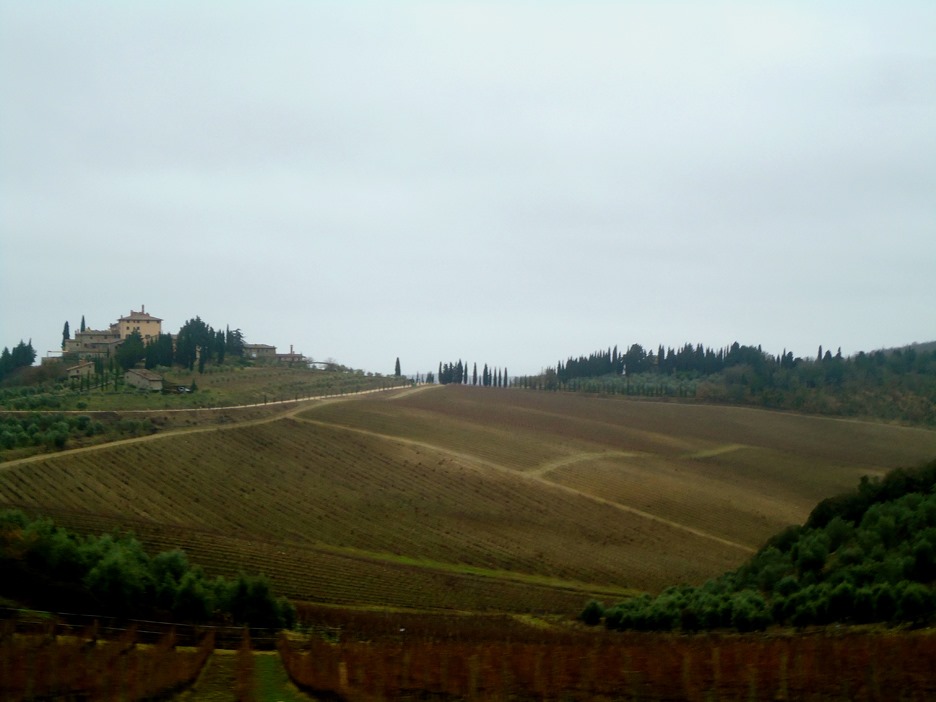
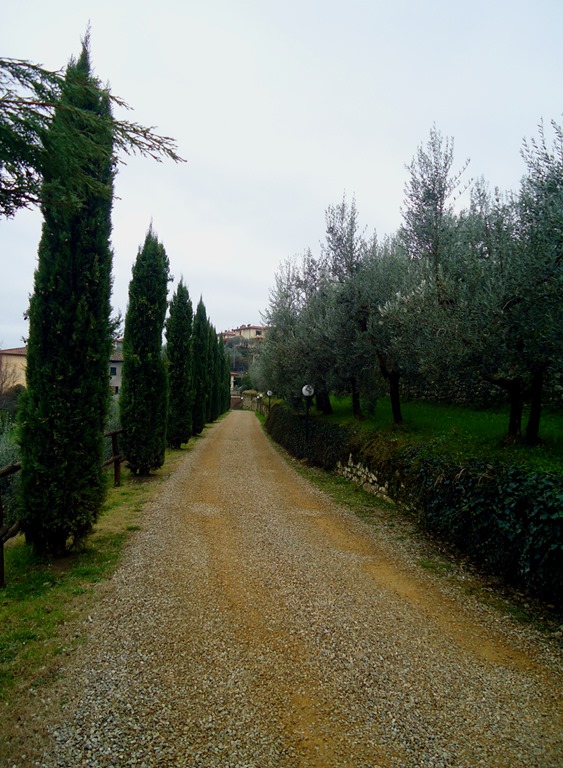
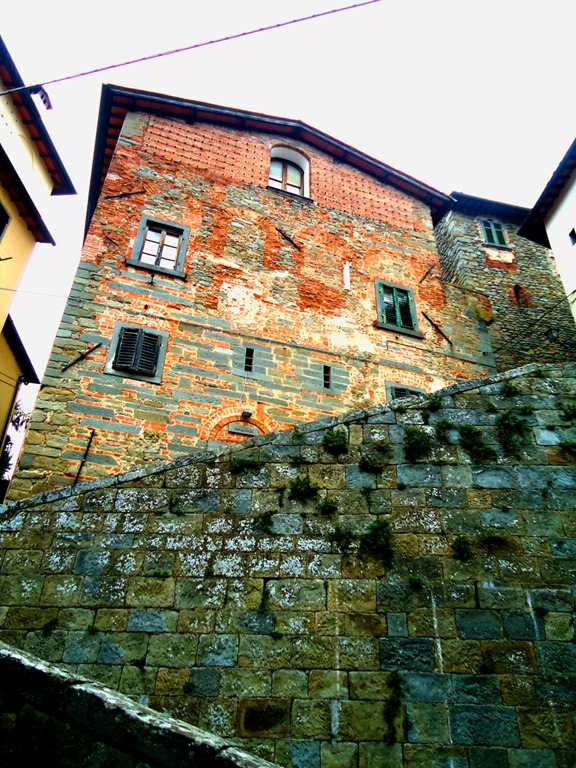
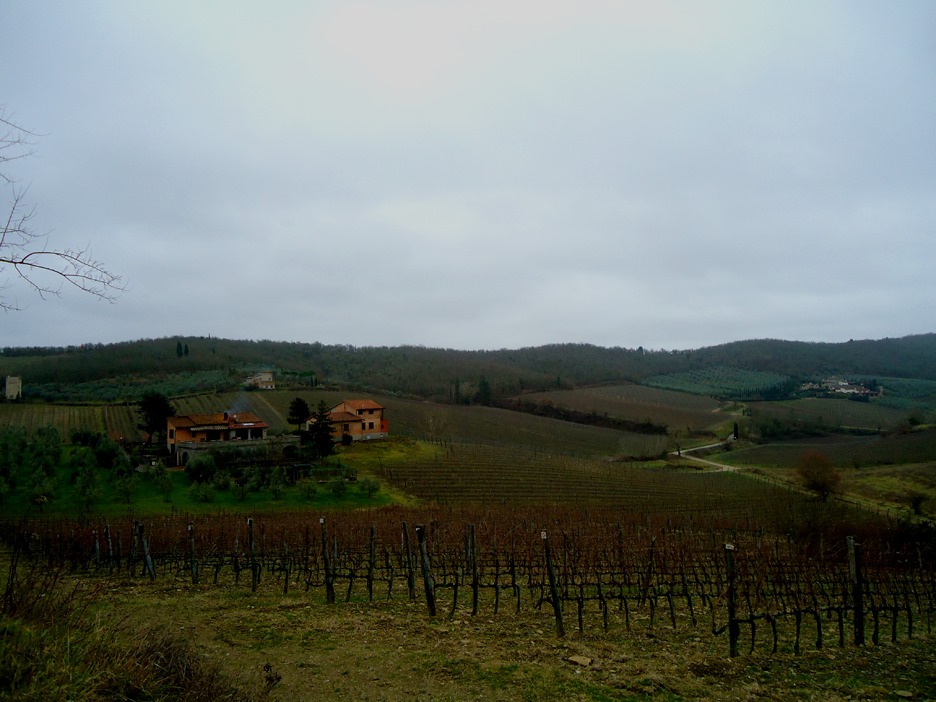
I’m spending the week in Tuscany this week.  We’re off to explore the countryside a bit – here are a few photos from our day yesterday in Chianti and Loro Ciufenna.  Be sure to stop back to see more soon!

Enjoy your day!

Signature

Gently Falling One Layer Card

Gently Falling 2 001

Don’t you just love one layer cards sometimes?  I was inspired this morning by a simple photo of some fall leaves.  I thought, I not create that same feeling on a simple and classic one layer card! 

Sometimes you just need a go to quick card for someone without getting all the papers out, you know? Here’s how you can achieve this exact result.

Creative Tips –

  • Bold images are great for cards like this.  Pick something that will really pop.  I chose the largest leaf from the Gently Falling stamp set.  Does anyone know what kind of leaf this is?  Let me know if the comment section below!Gently Falling 2 006
  • To keep with the falling leaves in fall theme, you can choose a trio of classic colors like Crushed Curry, Cherry Cobbler and Wild Wasabi.  For the outline, the color Early Espresso with tie it all together.
  • The colors are a bit brighter until you put the Early Espresso on it.  Then it mutes it right down.Gently Falling 2 005
  • To tie it all together, stamp your greeting in Early Espresso.
  • That’s it!  You’re done – wasn’t that fast?

And for those of you who think I knock it out of the park on the first turn, I thought I’d show you how many I had to go through before I got it just right!!  Do you appreciate this?  Let me know in the comment section, and I’ll include more of this kind of stuff in the future.  Consider it my photo form of bloopers – I’m just human too, right?

Gently Falling 2 008

Do you want to want more one layer cards?  Clean and Simple cards?  Brayer cards?  Let me know – I’m always curious what my readers want to see!  Let me know below.  Have a great day! SmileGently Falling 2 002

Are you one of my VIP’s?

If you love this card and creative tips, then be sure to sign up for my Creative Tips list!  You’ll get VIP project videos and projects, special list only sales and discounts, and stay on top of all the cool and great things not only available at Stampin’ Up!, but also here at The Creative Grove. Be in the know, first on the list!  I don’t like excess email or stuff I don’t want, so know that your email address is something sacred to me.  I would never abuse that trust!  Click here if You love creative tips and want to be one of my VIP’s! Smile

Signature Snowflake 001

To shop 24/7 for any of the above projectclick here

Gently Falling 2 004

Stamp Sets – Gently Falling Ink – Crushed Curry, Wild Wasabi, Cherry Cobbler, Early Espresso Paper – Whisper White

Simple One Layer Wetlands

Wetlands 005 001

I needed a super quick birthday card the other day and decided to try some acrylic block stamping.  The sandpiper image from the Wetlands stamp set is the perfect image for a beach scene. 

Creative Tips –

  • I used my Stampin’ Write markers to create my own scene on one of my larger acrylic blocks. 
  • For my sand, I used Crumb Cake, and then created my water with Bermuda Bay.  Next I drew a sun in Crushed Curry and colored my sky in Island Indigo around it.  Wetlands 005 009
  • I spritzed my block with a light mist of water and stamped onto a folded piece of card stock.
  • My sandpiper birds were then stamped in Early Espresso as was my greeting from Four You.
  • Here is a similar card done and matted onto Bermuda Bay for a contrasting look, which do you like better – one layer or matted?  Let me know if the comment section.

   Wetlands 005 003 Wetlands 005 006

This card literally takes minutes and is a cute simple watercolor of a fun beach scene.  It’s yet again just one more reason you want to have the Wetlands stamp set in your arsenal – it’s versatile, and easy to use!

Wetlands 005 002


Signature-Snowflake-001_thumb1

To Shop 24/7 in the Creative Store – Click here!

Wetlands 005 010

Stamp Sets – Wetlands (126697c, 126695w), Four You (130538c, 130535w) Ink – Early Espresso, Stampin’ Write Markers: Island Indigo, Crumb Cake, Bermuda Bay, Crushed Curry Paper –Whisper White (100730)

Untitled-12

Fall One Layer Wishes

Have you ever tried creative depth with Lovely as a Tree, or any nature stamps? I was in a simplicity mood this morning.  I love color and the mountains.  When I think of the mountains, I’m reminded of when I lived in Utah and California.  The scenery was so beautiful, and it really put me at peace.  So this morning, I wanted to create a Fall Foliage scenery on a one layer card.

I grabbed my Lovely as a Tree stamp set and went to work.  It took me three cards to get the right result, but I’m happy with it!  Here is the result!

If you love the look of this stamp set – be sure to check out my online brayer class too!

Lovely as a Tree OLC tutorial – 

    • First I cut out a mask leaving a 3/4” border on the top, left and right.
    • I inked up my six tree stamp in Crushed Curry, stamped it off and then stamped it three times filling the top 2/3 of the frame.  When inking my stamp, I did not ink up the bottom grass and trunks.  You can do this with a marker or your ink pad.Lovely as a Tree004 CU
    • I lightly sponged Soft Sky to create my rectangular frame, being sure to focus a bit heavier on the outline than the middle.  I filled in the bottom 1/3 before stamping my main image.
    • To color my main image, I used Stampin’ Write Markers.  I first colored my trees, then my trunks in Early Espresso.
    • For my Greeting, I used the Four You stamp set – I LOVE this set.

Lovely as a Tree004 Main L

It’s a simple card, but I love the color.  It makes me feel like I’m looking out at a scene in the Uinta mountains in Utah.  I hope you like it too!

Lovely as a Tree004 Angle


[optin_box style=”2″ alignment=”center” email_field=”email” email_default=”Enter your email address” email_order=”2″ integration_type=”aweber” double_optin=”Y” list=”3846012″ name_field=”name” name_default=”Enter your first name” name_order=”1″ name_required=”Y” opm_packages=””][optin_box_field name=”headline”]Learn with our exclusive FREE video series[/optin_box_field][optin_box_field name=”paragraph”]PHA+R2V0IHRoZSBmcmVlIENyZWF0aXZlIFRpcHMgRS1sZXR0ZXIgYW5kIGxlYXJuIHdpdGggc3Vic2NyaWJlciBleGNsdXNpdmUgdmlkZW8gYW5kIHBpY3RvcmlhbCBjb250ZW50LiBJbmNsdWRpbmcgb3VyIHllYXJseSAxMiBEYXlzIG9mIENocmlzdG1hcyBzZXJpZXMgJmFtcDsgdGhlIHZpZGVvIGZvciB0aGlzIHByb2plY3QhPC9wPgo=[/optin_box_field][optin_box_field name=”privacy”][/optin_box_field][optin_box_field name=”top_color”]undefined[/optin_box_field][optin_box_button type=”0″ button_below=”Y”]Get Access Now![/optin_box_button] [/optin_box]

Wetland Reeds and Sunshine

Wetlands 004 Main

The sun shines 6.9 out of 7 days here in Florida – there’s  a reason it’s called sunny Florida.  So I wanted to do a sunny card that reflects the summer feel and what better than the reeds stamp from the Wetlands set.  When I decided to make this card I decided on a particular view – I thought what would a field of wheat look like if I was laying on the ground.  And here is the end result!Wetlands 004 Front

Creative Tips –

  • A one layer card would keep the simplicity of the scene in the forefront.  To create the white space, I masked off the top 1 1/4” and bottom 1” of my card.  I stamped my reed (wheat) in Versamark and then the Crushed Curry Classic Ink several times across my card.  Wetlands 004 CU
  • I embossed them with Clear Embossing Powder and used the Crushed Curry Stampin’ Write Marker and VersaMarker with Clear Embossing Powder to fill in the base of the image.
  • Soft Sky Classic Ink formed my base for the sky.  I used a brayer to apply a good base across from the top and base, and then again from the left and right.  Wetlands 004 Side
  • Using 1/2” on my brayer, I applied some Pacific Point to the top of my sky.
  • For a little more depth, I sponged a tiny bit of Midnight Muse at the very edge of the upper sky.
  • The greeting is stamped in Pacific Point using the new Four You set.

This card reminds me of the mid-west.  It just makes me happy and I see field of wheat and grass in the late summer.  I hope you like it too! 

Be sure to check back in the beginning of July for my online brayer classes and technique videos.  You won’t wan to miss these step by step how to videos that will help you to master this amazing and artistic technique. 


Signature-Snowflake-001_thumb1

To Shop 24/7 in the Creative Store – Click here!

Wetlands 004 Angle

Stamp Sets – Wetlands (126697c, 126695w), Four You (130538c, 130535w) Ink – Soft Sky (131181), Pacific Point (126951), Crushed Curry (131173), Midnight Muse (126860), Crushed Curry Stampin’ Write Marker (131264), Versamark (102283) Paper –Whisper White (100730) Cool Tools – Brayer(102395),Stampin’ Sponges (101610), Clear Embossing Powder (109130)

Untitled-12Four You

Wetlands One Layer Card

Wetlands 003 009

It’s been a while since I’ve made a One Layer Card and the Wetlands stamp set is the perfect set for this.  Here is a creative scenery that’s quick, easy, cost effective and just beautiful for anyone receiving this in the mail.  So get out your brayers and sponges today, and follow along with the tutorial.

Creative Tips –

  • I created a mask for the top and bottom using two sheets of printer paper.  I have to admit, my first try at this was foiled because I only used one sheet and the ink bled through to my project.  That’s one of those argh moments!Wetlands 003 Side
  • I brayered my sky and water with Soft Sky and then added a touch of Island Indigo at the top.  My Island Indigo got a little too strong about 1/2” in so I went over it with more Soft Sky to blend it out.  You can usually blend out mistakes with a little more ink in a lighter color.
  • I tossed my top mask (the blue one) and flipped my bottom mask around.  I sponged in my Sahara Sand in a circular motion to create my land.
  • For the horizon, I used a straight edge piece of printer paper and sponged on a little Island Indigo.Wetlands 003 CU
  • I stamped my birds in Early Espresso, any lighter color would not stand out enough.  I tried Basic Gray and even that wasn’t dark enough.  To test out my colors, I stamped my birds on my scrap brayered piece of printer paper that I tossed.
  • Keeping my bottom mask in place I stamped the reeds in Wild Wasabi.  I’ve tried this in lighter shades of green before and they too aren’t dark enough.
  • Brayer cards with scenery work great if you have a focal frame at the bottom of your card, as if you were standing right there looking out at your scene.Wetlands 003 Front
  • Once I had my reeds where I wanted them, I colored my reed stamp in using my Wild Wasabi marker, but only colored the grass portion.  I stamped this over my images to make them a bit fuller and bring my focal frame a little closer to the middle.
  • Normally I would use my white gel pen for some highlights, but I wanted to keep this card light and airy and uncomplicated – so I decided to leave it out.

I love this card – best part – it only cost 1/2 a sheet of Whisper White.  So if you’re stamping on a budget and have to make a lot of cards – next time try some one layer cards!

Learn how to master the techniques behind this card 

Two comprehensive classes leave you feeling like an artist ready to create any scene possible with brayers and sponges.  Detailed step by step video instruction, and much more.  Check it out in the classroom here: Find out more here

Signature-Snowflake-001_thumb1

Wetlands 003 Angle

Stamp Sets – Wetlands (126697c, 126695w) Ink – Soft Sky (131181), Island Indigo (126986), Sahara Sand (126976), Wild Wasabi (126959), Wild Wasabi Stampin’ Write Marker (131264) Paper –Whisper White (100730) Cool Tools – Brayer (102395),Stampin’ Sponges (101610)

Untitled-12

Secret Garden Simplicity

Sometimes the simplest ideas are just the best.  Today I wanted to make a few quick cards to send to members of The Creative Grove for their awesome achievements this past month.  I ended up loving the result so much that I made a few more for my recent party hostesses!  I know they’ll love getting these cards in the mail as a heartfelt thank you from me for supporting my small local business.

Here are the specifics for you to whip up a few of your own!

Creative Tips:

  • I settled on a combination of yellows – So Saffron, More Mustard and Daffodil Delight with a pop of Tangerine Tango.
  • I wanted the leaves to show and not the stem of the leaves, so I stamped on strips that were 2.25” x 11” or 8.5” (depending on what size card I was making).   The best part – I just grabbed strips out of my scrap bin!
  • I created a master strip by stamping my four images together than working across my strip to get the spacing down.  I then used the same pattern to quickly mass produce the others – using one stamp at a time.
  • I wanted to add a little color to the lined flower stamp which I stamped in Tangerine Tango, so I stamped it over the So Saffron solid image of the daisy.  So Saffron is such a light color that the combination really worked together.
  • The great part about this card is that less is more.  Because the images are so striking, I didn’t want to clutter up my card with a ton of cardstock.  I made sure my stamped strip went end to end.
  • These cards are traditional sizes – 5.5”x8.5” and 4.25”x11”.
  • I stamped my greeting from my go to set – Sweet Essentials in Tangerine Tango.

You will be able to whip up several of these in minutes! I made six cards in 20 minutes.  

Signature Snowflake 001

To Shop 24/7 in the Creative Store – Click here!

Stamp Sets – Secret Garden (129141w, 129144c), Sweet Essentials (126455w, 126457c) Ink – Daffodil Delight (126944), Tangerine Tango (126946), So Saffron (126957), More Mustard (126964)  Paper – Whisper White (100730), Daffodil Delight (119683)  Cool Tools – Essentials Paper Piercing Pack (126187), Stampin’ Pierce Mat (126199), Paper-Piercing Tool (126189)  Finishing Touch – Rhinestone Basic Jewels (119246)

Secret GardenUntitled-12

Winter Wonderland

Lovely as a Tree has been in the Stampin’ Up! catalog since before I ever began stamping with SU in January of 2002.  That said – I have never owned this amazing stamp set – until now.  Yes, you read that correctly.  It is the ONLY stamp set that has stood the test of time with this company. 

Why have I never owned this classic, you ask?  Well, since Lovely as a Tree had always been in the catalog, I continually thought it was going to retire; and then I wouldn’t be able to use it for demonstration proposes.  Yes, that’s what I told myself year, after year, after year.  My girlfriend Rose laughed when she heard I broke down and bought it…actually she said – “oh great, now they’re going to retire it, just because you bought it!”  So if they do, I’m sorry Rose and everyone else!

Now that you know my personal history with this stamp set – here is the first ever card that I’ve stamped with this oldie but a goodie!  It’s nothing to complicated – I wanted the image to stand on it’s own so I created a winter wonderland at night around it.

  • First, I stamped a mask for the edge of my hill.  I cut that out and applied it to my Whisper White card stock. 
  • I then went to work creating the moonlit sky at the border of the hill and around the masked moon.
  • I started with Bashful Blue, then worked a little with Marina Mist, added some Midnight Muse and finished with a very thin edging of Night of Navy.
  • I made sure to leave a little white in the sky so that it wasn’t too dark.  This gives it two effects, depending on how you look at it – some illumination from the moonlit sky or a snow storm.
  • Once I was happy with my sky, I added a separate mask for the bottom of the trees (Keep in mind – I haven’t stamped the trees yet since I wanted to use Midnight Muse and not StazOn Jet Black). 
  • I sponged a slight amount of Bashful Blue to add depth to my snow bank around the trunks.
  • I added several masks for the snow drifts and lightly added a little Bashful Blue to each one, working from the top down.


  • I stamped my image onto a Stamp-a-majig so that I could perfectly line up the double image.  First, I stamped in Versamark® and then stamped a second image in Midnight Muse.
  • I then embossed my image using clear embossing powder.  I wanted to give my card a frozen look, rather than a snow-laden look.  If you want the snowy tree look, use white embossing powder.
  • I added a saying in Versamark® and embossed it with White Embossing Powder on the Midnight Muse card base.

My card has depth and a wintery feel to it.  This project would make a great one layer card – which is what I started out intending to make.  I ended up wanting a bit more pop, so I trimmed it and layered it.

If you want to see exact step by step instructions on how I made this card, check out my video here.  I know you’ll have as much fun as I do – and the end result looks SO much better in person.  You’ll say to yourself – did I really just make that!

Signature Snowflake 001

 To Shop 24/7 in the Creative Store – Click here!

Stamp Sets – Lovely as a Tree (127793), Sweet Essentials (128315) Paper – Whisper White (100730), Midnight Muse (126843) Ink – Midnight Muse (126860), Marina Mist (126962), Bashful Blue (126961), Night Of Navy (126970), Versamark (102283) Cool Tools –Stampin’ Sponges (101610), Heat Tool (129053)  The Perfect Finish – Clear Stampin’ Emboss Powder (109130)

Lovely as a Tree