Vintage Christmas Star

Vintage Christmas Star 001

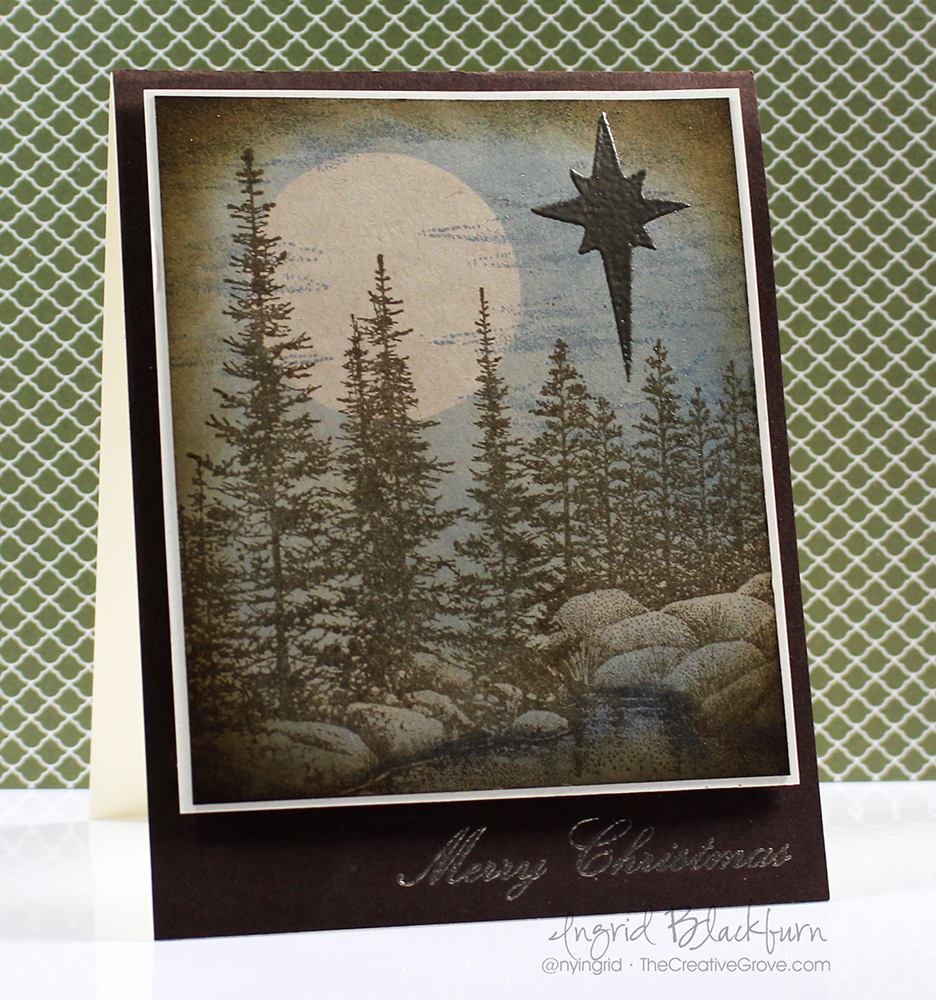
Today’s challenge keyword is star – so let’s learn how to incorporate that into this vintage holiday card. This month’s challenge at Happy Little Stampers is to use a star in some form on your card. I have to admit, I started off in a very different direction…then ultimately decided to create a simple card with a vintage masculine feel that could showcase the ultimate Christmas star.

HLS Christmas Challenge December 2015

I guess I’ve been in a vintage kind of a mood these past few months. At least here on the blog! I don’t know what it is that seems soothing about this color palette to me, but I’m really loving the feel. Maybe it’s because I’ve been injured and not able to walk as much as I would like in the woods…who knows?!! Here’s a quick tutorial for you, and be sure to stop by again next week for the video!

Creating a Quick Vintage Feel to your Holiday Cards –

  • This project was done on kraft colored paper – not white. It helps with the overall look and feel.
  • I find that the brown tone fits this style better than black. So ink your stamps up in a dark brown – something earthy. I used Ground Espresso by Ranger Distress.
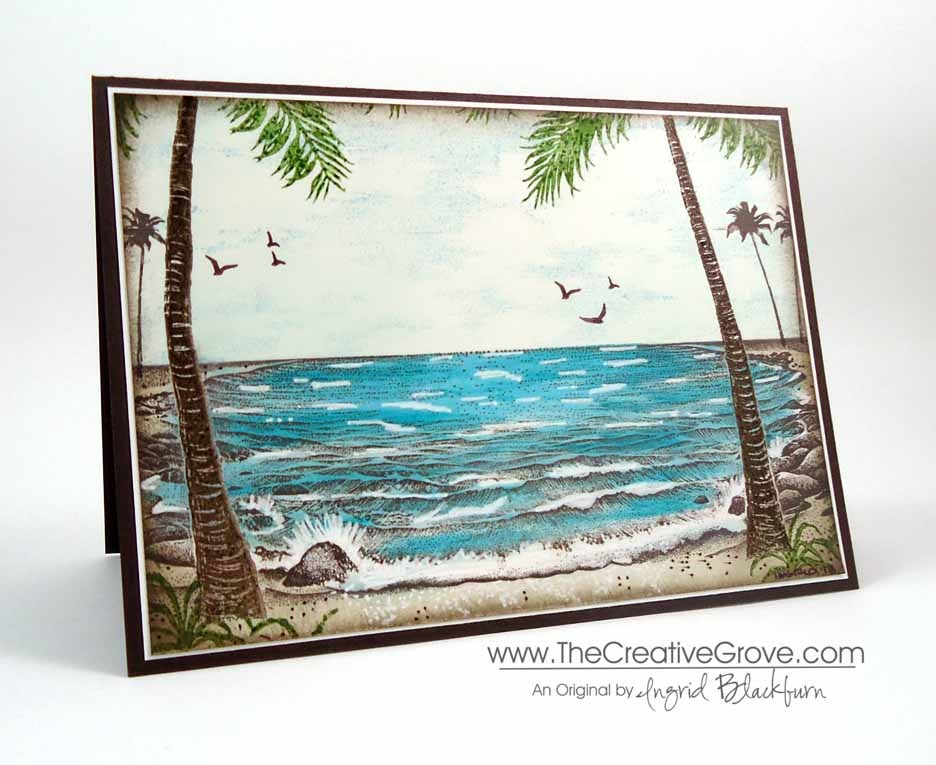
  • Stamp the Stampscapes Pines & Rocks Lg on the left and the left side of Lakeside Reflections Lg to the right Tip – use a torn piece of paper towel to mask off the edge and create a seamless scene.

Vintage Christmas Star 002

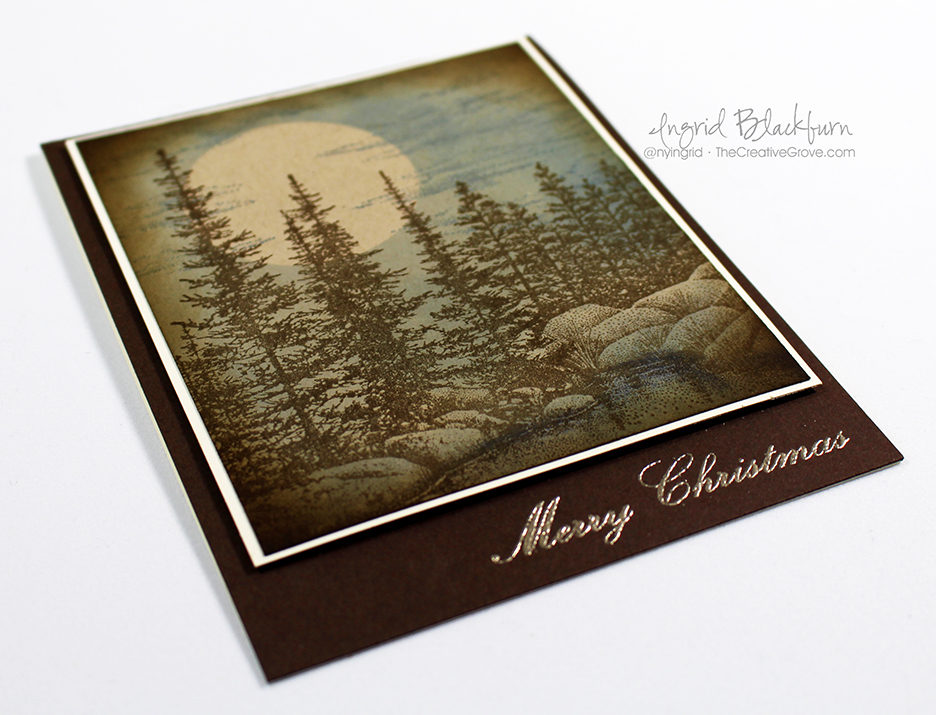
  • Place two post it notes in copy paper and punch out your moon with a 1 1/4″ circle punch. This will be your mask.
  • Place your moon where you’d like it before adding blues to the sky
  • Use a mini sponge tool and some blue hues to shade in your water and sky.
  • Stamp Cloud Strips Lg by Stampscapes in Stormy Sky Distress. Be sure to overlap the moon slightly.
  • Once you have the look you’d like – add a little shading with s neutral like Weathered Wood Distress to the rocks.
  • Sponge the entire scene around the perimeter with  a brown – I used Gathered twigs for a slightly different feel than the trees.
  • Add your star and emboss in Pewter. I used the Nativity Angel Stencil by Stamplorations.

Vintage Christmas Star 004

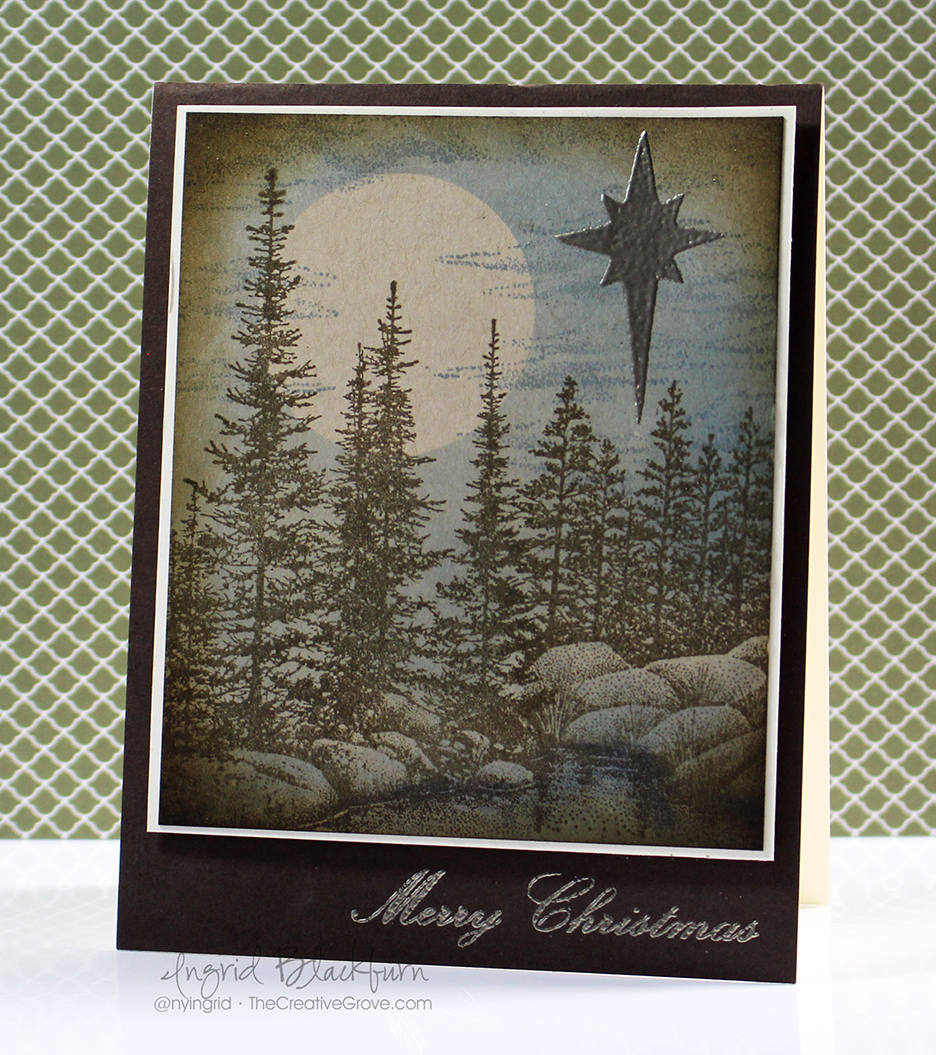
  • The perfect sentiment makes this card and nails the vintage feel. Here you see one of the many sentiments from Mixed Christmas Sentiments by Happy Little Stampers. Emboss it in Pewter for a great look, rather than something bright.
  • The scene is matted onto Vanilla card stock for contrast before being popped up on fun foam onto an Espresso card base.

I do hope you like this card – it’s actually a great one to mass produce and goes much faster than you think! I hope this inspired you to create something special with a star for your cards. Be sure to enter them into the Christmas Challenge at Happy Little Stampers!

Keep those fingers inky –


Signature.jpg

[optin_box style=”2″ width=”500″ alignment=”center” email_field=”email” email_default=”Enter your email address” integration_type=”aweber” double_optin=”Y” list=”3846012″ name_field=”name” name_default=”Enter your first name” name_required=”N”][optin_box_field name=”headline”]Learn with our exclusive FREE Video Series[/optin_box_field][optin_box_field name=”paragraph”]PHA+R2V0IHRoZSBmcmVlIENyZWF0aXZlIFRpcHMgRS1sZXR0ZXIgYW5kIGxlYXJuIHdpdGggc3Vic2NyaWJlciBleGNsdXNpdmUgdmlkZW8gYW5kIHBpY3RvcmlhbCBjb250ZW50LiA8ZW0+PHN0cm9uZz48c3BhbiBzdHlsZT0iY29sb3I6ICM4MDAwMDA7Ij5JbmNsdWRpbmc8L3NwYW4+wqA8L3N0cm9uZz48L2VtPm91ciB5ZWFybHkgMTIgRGF5cyBvZiBDaHJpc3RtYXMgc2VyaWVzITwvcD4K[/optin_box_field][optin_box_field name=”privacy”][/optin_box_field][optin_box_field name=”top_color”]undefined[/optin_box_field][optin_box_button type=”1″ text=”Subscribe now!” text_size=”26″ text_color=”#ffffff” text_bold=”Y” text_letter_spacing=”0″ text_shadow_panel=”Y” text_shadow_vertical=”1″ text_shadow_horizontal=”0″ text_shadow_color=”#000000″ text_shadow_blur=”0″ styling_width=”36″ styling_height=”15″ styling_border_color=”#000000″ styling_border_size=”1″ styling_border_radius=”6″ styling_border_opacity=”100″ styling_shine=”Y” styling_gradient_start_color=”#345523″ styling_gradient_end_color=”#68ab46″ drop_shadow_panel=”Y” drop_shadow_vertical=”1″ drop_shadow_horizontal=”0″ drop_shadow_blur=”1″ drop_shadow_spread=”0″ drop_shadow_color=”#ffffff” drop_shadow_opacity=”50″ inset_shadow_panel=”Y” inset_shadow_vertical=”0″ inset_shadow_horizontal=”0″ inset_shadow_blur=”0″ inset_shadow_spread=”1″ inset_shadow_color=”#000000″ inset_shadow_opacity=”50″ location=”optin_box_style_2″ button_below=”Y”]Subscribe now![/optin_box_button] [/optin_box]

Blue, White & Gold Muse: Christmas Visions

Frosted Evening 002

This week I’m playing along at at few Christmas challenges, but my inspiration came from a new one – Muse: Christmas Visions. It’s no secret that I love clean and simple cards, and Ardyth Percy-Robb is the queen of Clean and Simple. I love all her creations and am inspired by her work. I encourage you to check out her blog – Maskerade. This past week, she started a new Christmas Challenge which is a spin off the weekly challenge – Muse. It’s called Muse: Christmas Visions.

I’m excited to play along in their first challenge. The way the Muse challenge works is a design team member posts a project and you use that as your Muse for your creations. The first challenge was created by Kimberly Wiener and here is her card:

MUSE02

Kimberly’s card has several possibilities to pull from, but I chose the core – Blue, White and Gold. The colors immediately inspired me to think of the Christmas Star and a frosted scene, so I decided to grab one of my Stampscapes stamps and make a scenic card. Here is my creation:

Stampscapes Stamps

If you would like to see the exact video for this project, it’s in our project library at The Creative Grove VIP Community. Click here to find out more about becoming a member.

Creative Tips –

  • To get the soft winter glow in the sky, you’ll want to try Distress Inks as they blend quite effortless – Click Here for a video on how to blend distress inks
  • For the snow banks, I used a few shades of blue to create depth and interest among the drifts. If you’d like to learn more on how to create snow drifts – Click Here for a video on Snow Drifts

Muse Christmas Visions Challenge

  • The Leafless Limb stamp by Stampscapes was stamped twice, once in versamark, then again in Versamark/Espresso just slightly offset. They were then both embossed in clear embossing powder.
  • Embossing your limbs gives you that frosty shadow and allows you to use the emboss resist technique preserving your image while you create the scene around your image.
  • I wanted to have some stars, but wanted a little more gold in my card, so I created several dots with my Versamarker and drew a north star before embossing them in gold.

scenic card tutorials


  • The greeting is cut from Brushed Gold card stock and the Hand Lettered Holiday dies from WPlus9.
  • The scene is matted onto a brushed gold card stock layer before going onto a Night of Navy layer by Stampin Up.

I’m also submitting this project to three other great challenges that I encourage you to check out:

157

I love the feel of this peaceful frozen evening, I hope you do to! I encourage you to play along in all the above challenges, I had fun creating this one, and am excited for a few more at Muse: Christmas Visions. Smile

See you soon –

Signature 24 pt


[optin_box style=”13″ width=”500″ alignment=”center” action=”https://www.aweber.com/scripts/addlead.pl” disable_name=”Y” method=”post” email_field=”email” email_default=”Enter your email address” integration_type=”aweber” double_optin=”Y” list=”3846012″ name_field=”name” name_default=”Enter your first name” name_required=”Y”][optin_box_field name=”headline”]If you enjoyed this tutorial…[/optin_box_field][optin_box_field name=”paragraph”]PHA+4oCmeW914oCZbGwgbG92ZSBvdXIgPGVtPjxzdHJvbmc+PHNwYW4gc3R5bGU9ImNvbG9yOiAjMjQ0YzVlOyI+ZnJlZTwvc3Bhbj4gPC9zdHJvbmc+PC9lbT5zdWJzY3JpYmVyIG9ubHkgdmlkZW8gc2VyaWVzLiDCoExlYXJuIG5ldyB0ZWNobmlxdWVzIHRocm91Z2ggb3VyIDxzcGFuIHN0eWxlPSJjb2xvcjogIzI0NGM1ZTsiPjxlbT48c3Ryb25nPmV4Y2x1c2l2ZTwvc3Ryb25nPjwvZW0+wqA8L3NwYW4+Q3JlYXRpdmUgVGlwcyBlLWxldHRlcsKgYW5kIHN1YnNjcmliZXIgb25seSB2aWRlbyBhbmQgcHJvamVjdCB0dXRvcmlhbHMhPC9wPgo=[/optin_box_field][optin_box_field name=”privacy”][/optin_box_field][optin_box_field name=”top_color”]undefined[/optin_box_field][optin_box_button type=”1″ text=”Send me exclusive tips!” text_size=”32″ text_color=”#000000″ text_bold=”Y” text_letter_spacing=”0″ text_shadow_panel=”Y” text_shadow_vertical=”1″ text_shadow_horizontal=”0″ text_shadow_color=”#f6fefb” text_shadow_blur=”0″ styling_width=”50″ styling_height=”19″ styling_border_color=”#000000″ styling_border_size=”1″ styling_border_radius=”6″ styling_border_opacity=”100″ styling_shine=”Y” styling_gradient_start_color=”#a3b640″ styling_gradient_end_color=”#80902c” drop_shadow_panel=”Y” drop_shadow_vertical=”1″ drop_shadow_horizontal=”0″ drop_shadow_blur=”1″ drop_shadow_spread=”0″ drop_shadow_color=”#000000″ drop_shadow_opacity=”50″ inset_shadow_panel=”Y” inset_shadow_vertical=”0″ inset_shadow_horizontal=”0″ inset_shadow_blur=”0″ inset_shadow_spread=”1″ inset_shadow_color=”#80902c” inset_shadow_opacity=”50″ location=”optin_box_style_13″ button_below=”Y”]Send me exclusive tips![/optin_box_button] [/optin_box]

Vintage Christmas Cards–How to achieve a vintage look

Vintage Snow Covered Bridge

If you have been following my blog for a while, you know one thing you don’t usually see here are vintage Christmas cards! But this week the gals over at Merry Monday threw me for a loop – yes…the theme is to create a vintage Christmas card!

154

I don’t have ANY stamps that fit this bill, so I pulled out my trusty Stampscapes stamps and sat down to create my own vintage feel. Now if you’re a VIP Community member you’ll get to see exactly how I created this in a step by step video…I know all the members who love scenic cards will just love it. And if you want other exclusive videos, be sure to get the creative tips e-letter!

Every now and then it’s good to step outside your comfort zone and try something new. I know doing just that keeps my creative juices sharp! So how exactly do you make a vintage card.

Well, first I googled it…lol! Yes, I know it seems rather cut and dry, but like I said, this is not my style, so I thought I’d surf for a little visual help. I came across several how to tutorials for turning photos into a vintage look with Photoshop and that gave me my color palette. Basically, muted colors – a little more on the earthy side with some framing – which I would do with a scene anyway.

how to make a vintage christmas card

The scene is built on a foundation of Crumb Cake card stock. I used a stipple brush to color in my scene along with some Stampin’ Up! Classic Ink pads. For the road I used Tea Dye and the stream – Stormy Sky Distress inks. My hills are in Pear Pizazz, the barn is in Riding Hood Red, the clouds are in Midnight Muse and the stamping was done in Early Espresso.

You’ll want to add some concentrated Pigment ink in the form of a q-tip from a white Craft Pad, I used one by Stampin Up and a pigment pen – Signo Uniball Gel pen. I also stippled a little with the white craft ink to get a muted white feel. To get the vintage feel around the edges, use a mini sponge tool and some walnut stain distress ink.

Of course there is quite a bit of masking that went on to build the scene along with coloring certain elements. I just wish I had masked the sky off when I did the hills – at the horizon they are a bit green – oh well!

Vintage Snow Covered Bridge -vintage christmas cards

Overall, to build the scene, I used the following stampscapes stamps – Snowy Covered Bridge, Single Pine & Trees and Hills from Nature Set 1, Tree Duo Sm, Lilly Grass, Snowy Rocks Sm, and Cloud Cumulous Large. I stretched out the scene a bit with an Early Espresso Marker in a few spots.

To keep with the vintage feel, the greeting is embossed in Pewter rather than a shiny silver. The finishing touch of course is the sliver just shy of 1/16” matting in Very Vanilla popped up on dimensionals onto Early Espresso. My card measures 6 3/8 x 5 3/8”.

Overall, I think my vintage Christmas card turned out pretty cool. I’m glad I tried it out! Have a crafty weekend!

Signature

[optin_box style=”13″ width=”500″ alignment=”center” action=”https://www.aweber.com/scripts/addlead.pl” disable_name=”Y” method=”post” email_field=”email” email_default=”Enter your email address” integration_type=”aweber” double_optin=”Y” list=”3846012″ name_field=”name” name_default=”Enter your first name” name_required=”Y”][optin_box_field name=”headline”]If you enjoyed this tutorial…[/optin_box_field][optin_box_field name=”paragraph”]PHA+4oCmeW914oCZbGwgbG92ZSBvdXIgPGVtPjxzdHJvbmc+PHNwYW4gc3R5bGU9ImNvbG9yOiAjMjQ0YzVlOyI+ZnJlZTwvc3Bhbj4gPC9zdHJvbmc+PC9lbT5zdWJzY3JpYmVyIG9ubHkgdmlkZW8gc2VyaWVzLiDCoExlYXJuIG5ldyB0ZWNobmlxdWVzIHRocm91Z2ggb3VyIDxzcGFuIHN0eWxlPSJjb2xvcjogIzI0NGM1ZTsiPjxlbT48c3Ryb25nPmV4Y2x1c2l2ZTwvc3Ryb25nPjwvZW0+wqA8L3NwYW4+Q3JlYXRpdmUgVGlwcyBlLWxldHRlcsKgYW5kIHN1YnNjcmliZXIgb25seSB2aWRlbyBhbmQgcHJvamVjdCB0dXRvcmlhbHMhPC9wPgo=[/optin_box_field][optin_box_field name=”privacy”][/optin_box_field][optin_box_field name=”top_color”]undefined[/optin_box_field][optin_box_button type=”1″ text=”Send me exclusive tips!” text_size=”32″ text_color=”#000000″ text_bold=”Y” text_letter_spacing=”0″ text_shadow_panel=”Y” text_shadow_vertical=”1″ text_shadow_horizontal=”0″ text_shadow_color=”#f6fefb” text_shadow_blur=”0″ styling_width=”50″ styling_height=”19″ styling_border_color=”#000000″ styling_border_size=”1″ styling_border_radius=”6″ styling_border_opacity=”100″ styling_shine=”Y” styling_gradient_start_color=”#a3b640″ styling_gradient_end_color=”#80902c” drop_shadow_panel=”Y” drop_shadow_vertical=”1″ drop_shadow_horizontal=”0″ drop_shadow_blur=”1″ drop_shadow_spread=”0″ drop_shadow_color=”#000000″ drop_shadow_opacity=”50″ inset_shadow_panel=”Y” inset_shadow_vertical=”0″ inset_shadow_horizontal=”0″ inset_shadow_blur=”0″ inset_shadow_spread=”1″ inset_shadow_color=”#80902c” inset_shadow_opacity=”50″ location=”optin_box_style_13″ button_below=”Y”]Send me exclusive tips![/optin_box_button] [/optin_box]


Silent Night…Merry Monday

Midnight Snow Drifts 004

It’s well into the fall season here in Germany, and I love that the Christmas Season is approaching.  Making card for the Merry Monday challenge has been a bright spot to my crafting week on Mondays.  This week, the task is to create a card that evokes the feel of a Silent Night before Christmas.  I think this card works, hope you enjoy it!

130

For a tutorial this week, I thought I would show you exactly how I create these snow drifts, so I filmed a step by step video tutorial and put it onto my You Tube channel.  If you are interested in watching the tutorial How to sponge flawless snow drifts, please click here to see it.

Midnight Snow Drifts 010

Thanks for stopping by today!  And in case you missed my YouTube link above…be sure to check out my step by step tutorial here.  Just click this image:

Video Screenshot Title

Creatively yours –

Signature

12 Days of Christmas starts soon!

CLICK HERE to sign up for Creative Tips and get the 12 Days of Christmas sent directly to your inbox free starting Tuesday October 28th!

Simply Sketched Watercolor

Watercolor Bird Mojo Mon 001

Today is my 52nd Mojo Monday challenge!  Wow – that’s enough to fill up a WHOLE year!  Now, it is over the course of not quite two, but still…quite a few.  To say I love this challenge is an understatement.

For today’s challenge, I pulled out my watercolor pencils, aqua painter and was a little creative with my background.  There are so many techniques in this one card, that I had to just film a video for our VIP Community.  Below are the steps in a nutshell.  Enjoy!

Today’s Mojo sketch and my interpretation:

                               Mojo358SketchWatercolor Bird Mojo Mon 008

Creative Steps –

  • I watercolored this image from Simply Sketched.  I pulled color from some Faber Castell Watercolor Pencils with my Aqua Painter in a unique way, rather than color directly on my paper.  We have a watercolor class on this and many other techniques here if you’re interested in watercolor.

Watercolor Bird Mojo Mon 004

  • I wanted to keep the watercolor as the star, so I lightly sponged every background piece. 
  • To keep the card light, fun and neutral, I chose Crumb Cake, Early Espresso, Very Vanilla, Old Olive and Primrose Petals by Stampin’ Up!.
  • The flower was cut using the spring garden framelits, then sponged and bent up at the edges. 

Watercolor Bird Mojo Mon 006Watercolor Bird Mojo Mon 007

  • The greeting was placed on a banner, made with a hexagon punch (see this video for tips on how) and is from the set Lots of Thanks
  • I wanted a subtle background, so I stamped argyle using the Argle Embossing Folder and some Crumb Cake ink.
  • Watercolor Bird Mojo Mon 003

I love how it turned out.  There’s just the right amount of pop with color to compliment the watercolored piece.

Here’s to another 52 Mojo Mondays! Smile

Signature

Want exclusive tutorials and videos – get the Creative Tips E-letter

Want access to 4-5 stamping video tutorials each week?  Learn techniques, projects and get access to our classes!  Check out our VIP Community here.

Sparkly Pines and Rocks

It’s Merry Monday!  I am so honored to be a guest designer this week on this very cool weekly challenge blog.  If you haven’t yet participated…definitely check it out!  The challenges are fresh and intriguing.  You’ll definitely stretch your Christmas card making abilities into a new stratosphere.  Like this week – Sequins!

117

I wouldn’t normally reach for this little embellishment, but boy what a new addiction I have now after this one!  Thanks a lot girls – look what you’ve done. Smile

Pines on Rocks Winter Scene

Creative Tips –

  • I used the large Stampscapes Pines and Rocks stamp in Night of Navy by Stampin’ Up! here.  Simple, just stamped on some Crumb Cake card stock.
  • To bring the snowy feel in, I used a Uniball Signo White Gel pen for some highlights and snow in the sky.

Pines on Rocks Winter Sequin Card (5)

  • To create some mist and bigger flakes, I used a qtip and white pigment ink.
  • For the sparkle and a fun touch, I added not only the sequins in clear, but the little pieces from the sequin holes.  They add just the right sparkle to this project.
  • The card front and banner are popped up for some character along with some subtle sponging in crumb cake.

Pines on Rocks Winter Sequin Card (8)Pines on Rocks Winter Sequin Card (7)

  • A simple banner greeting from Sweet Essentials from Stampin’ Up! finish this card perfectly.

Now it’s your turn!  I can’t wait to see your cards entered.  Have a Merry Monday!

Signature-Blog

[optin_box style=”13″ width=”500″ alignment=”center” action=”https://www.aweber.com/scripts/addlead.pl” disable_name=”Y” method=”post” email_field=”email” email_default=”Enter your email address” integration_type=”aweber” double_optin=”Y” list=”3846012″ name_field=”name” name_default=”Enter your first name” name_required=”Y”][optin_box_field name=”headline”]If you enjoyed this tutorial…[/optin_box_field][optin_box_field name=”paragraph”]PHA+4oCmeW914oCZbGwgbG92ZSBvdXIgPGVtPjxzdHJvbmc+PHNwYW4gc3R5bGU9ImNvbG9yOiAjMjQ0YzVlOyI+ZnJlZTwvc3Bhbj4gPC9zdHJvbmc+PC9lbT5zdWJzY3JpYmVyIG9ubHkgdmlkZW8gc2VyaWVzLiDCoExlYXJuIG5ldyB0ZWNobmlxdWVzIHRocm91Z2ggb3VyIDxzcGFuIHN0eWxlPSJjb2xvcjogIzI0NGM1ZTsiPjxlbT48c3Ryb25nPmV4Y2x1c2l2ZTwvc3Ryb25nPjwvZW0+wqA8L3NwYW4+Q3JlYXRpdmUgVGlwcyBlLWxldHRlcsKgYW5kIHN1YnNjcmliZXIgb25seSB2aWRlbyBhbmQgcHJvamVjdCB0dXRvcmlhbHMhPC9wPgo=[/optin_box_field][optin_box_field name=”privacy”][/optin_box_field][optin_box_field name=”top_color”]undefined[/optin_box_field][optin_box_button type=”1″ text=”Send me exclusive tips!” text_size=”32″ text_color=”#000000″ text_bold=”Y” text_letter_spacing=”0″ text_shadow_panel=”Y” text_shadow_vertical=”1″ text_shadow_horizontal=”0″ text_shadow_color=”#f6fefb” text_shadow_blur=”0″ styling_width=”50″ styling_height=”19″ styling_border_color=”#000000″ styling_border_size=”1″ styling_border_radius=”6″ styling_border_opacity=”100″ styling_shine=”Y” styling_gradient_start_color=”#a3b640″ styling_gradient_end_color=”#80902c” drop_shadow_panel=”Y” drop_shadow_vertical=”1″ drop_shadow_horizontal=”0″ drop_shadow_blur=”1″ drop_shadow_spread=”0″ drop_shadow_color=”#000000″ drop_shadow_opacity=”50″ inset_shadow_panel=”Y” inset_shadow_vertical=”0″ inset_shadow_horizontal=”0″ inset_shadow_blur=”0″ inset_shadow_spread=”1″ inset_shadow_color=”#80902c” inset_shadow_opacity=”50″ location=”optin_box_style_13″ button_below=”Y”]Send me exclusive tips![/optin_box_button] [/optin_box]

Pines on Rocks Winter Sequin Card (3)

Not so tropical Birthday

Today is Michael’s birthday!  He usually wants to be out of the country on a beach somewhere (that way the number doesn’t change in his mind…lol), but he’s stuck here in the Black Forest, Germany with me…not a bad place to be!  So this was as close as I could get him today.  I re-created one of my favorite cards from before.  Thought I’d share it with you.  Enjoy!

We’re headed out for some good ‘ol German fun in the forest.  I hope you all have a great day too – and GO Germany in the World Cup today! Smile

Signature-Blog

One Layer Wetlands Card

DSC01578

Clean and Simple cards is a look that resonates with many people.  Today, learn how to make the simplest of cards with this how-to video and tutorial.  This project was made for the CAS this Sketch Challenge #82 using the Wetlands stamp set by Stampin’ Up!.

The sketch is quite simple, so I kept the card simple:

CTS_Sketch82nwetlands stamp set

A simple mask and easy sponging will yield a scene that blends seamlessly into your one layer card.  Enjoy this video:


I think you’ll agree that it’s an easy card to make.  You can do a ton of these and quickly have a unique little stack to send out anytime!

wetlands one layer cardcards made with wetlands stamp set

To find out more about our VIP community that has exclusive video content, a private facebook community in addition to online classes, click here.

Signature-Blog

wetlands stamp set stampin up