")
It’s only July 7th…but before you know it, the holiday season will yet once again have crept up on us. That’s why I’ve started to religiously make a card for the Merry Monday Christmas Card Challenge. This week the challenge was to create a green and white card. You were able to incorporate a neutral if you chose to.

I kept it completely clean and simple (CAS) this week – just the bare minimum…which can be hard for me. I usually reach for my paper piercer and add some corner piercing to a card like this, but I wanted to keep it really basic. What do you think? Let me know in the comment section – I’d love to know if you think it’s perfect as is, or you think the piercing is the perfect finishing touch.
I’m a bit excited today – this challenge really made me smile. I enter these challenges as a creative mojo booster, and never expect to win. It honestly is the furthest from my mind…so I nearly fell off my chair when I saw that I WON last week’s challenge! ![]() I mean…really…little ‘ol me?!! There were some amazing cards in there! I’m totally honored and can’t wait to be a guest designer in next weeks challenge. Here’s the card that gave me my first ever win!
I mean…really…little ‘ol me?!! There were some amazing cards in there! I’m totally honored and can’t wait to be a guest designer in next weeks challenge. Here’s the card that gave me my first ever win! ![]()

")
Creative Tips –
- To make the trees, stamp various background and large image stamps in tone on tone colors onto a 1 3/4” x 1 1/4” piece of coordinating card stock. I used Pear Pizzazz, Wild Wasabi, and Old Olive.
- Don’t have any – no problem – use a versamark pad for whatever color you have. It’s a watermark of that color and a great muted image.
")
- On the reverse side of your rectangle at the top – make a mark with a pencil half way across the smaller measurement. Should be 5/8”.
- To make your trees, cut from the opposite corners to that middle mark. Use a Paper Trimmer or just scissors – larger ones help here to get a straight cut.
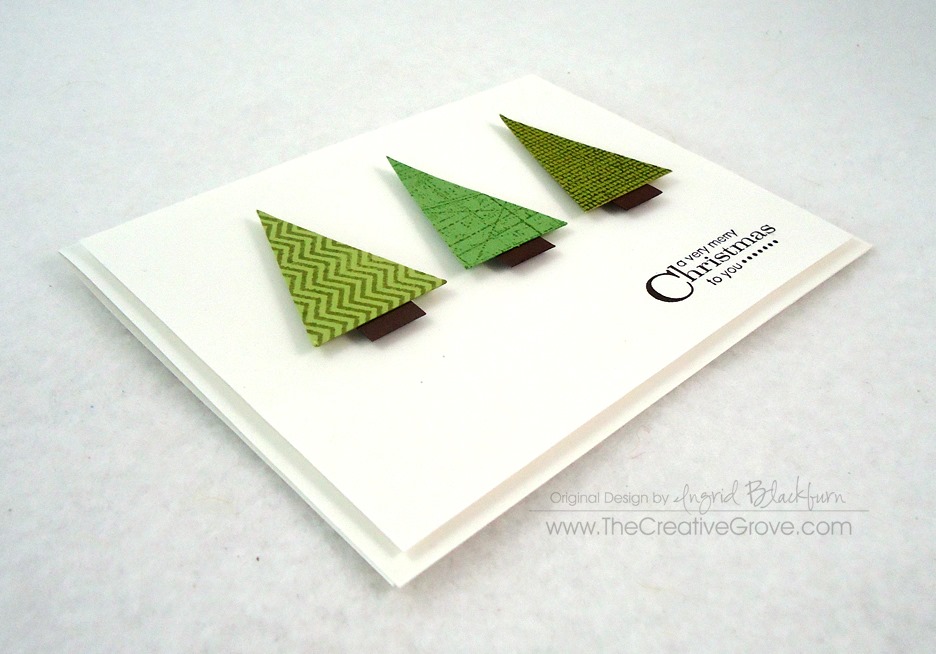
- Add a 1/2” piece of scrap Early Espresso for your trunk and pop them up on a card front of white.
- Stamp your sentiment in the corner – I used a contemporary looking greeting from More Merry Messages by Stampin’ Up!.
")
")
- Pop up your card front and you’re done!
Totally easy, right? You could quickly make a bunch of these watching a movie. Hope you enjoyed that this week. If you did – be sure to sign up for our Creative Tips list. You’ll get a video series emailed to you with several cool projects and the occasional email about exclusive projects you won’t see here on the blog!
")
Now off to make your own green and white Christmas Cards. Join in on the fun over at the Merry Monday Challenge.

[optin_box style=”14″ alignment=”center” action=”http://www.aweber.com/scripts/addlead.pl” disable_name=”Y” method=”post” email_field=”email” email_default=”Enter your email address” email_order=”1″ integration_type=”custom” double_optin=”Y” name_default=”Enter your first name”][optin_box_hidden][/optin_box_hidden][optin_box_code]
[/optin_box_code][optin_box_field name=”headline”]If you enjoyed this tutorial…[/optin_box_field][optin_box_field name=”paragraph”]PHA+PHNwYW4gc3R5bGU9ImNvbG9yOiAjNjQ2MzVlOyI+TGV04oCZcyBzdGF5IGluIHRvdWNoISBNeSBvY2Nhc2lvbmFswqA8L3NwYW4+PHNwYW4gc3R5bGU9ImNvbG9yOiAjNjY2Njk5OyI+PHN0cm9uZz48ZW0+ZXhjbHVzaXZlPC9lbT48L3N0cm9uZz7CoDwvc3Bhbj48c3BhbiBzdHlsZT0iY29sb3I6ICM2NDYzNWU7Ij5DcmVhdGl2ZSBUaXBzIGUtbGV0dGVyIHdpbGwgdGVhY2ggeW91IHRvIG1ha2UgcHJvamVjdHMgdGhhdCB5b3UgbG92ZeKApjwvc3Bhbj48L3A+Cg==[/optin_box_field][optin_box_field name=”privacy”][/optin_box_field][optin_box_field name=”top_color”]undefined[/optin_box_field][optin_box_button type=”0″ button_below=”Y”]Send me exclusive tips![/optin_box_button] [/optin_box]


