Mojo Happy Hour

Happy Hour 001 Main

It’s that sad and exciting week in Stampin’ Up!  It’s our final time to say good bye to good ‘ol friends and hello to new ones.  What am I talking about, you may be wondering – well…it’s the final week for some of my all time favorite products – some that have been with me for 11 1/2 years!  And of course – hello to the brand spankin’ new ones in the new catalog.  If you want your very own free catalog click here!

Of course, what better way to send of our dear favs other than Mojo Monday!  I truly love creating in this fun Challenge.  I find that it really gets my week off to a great creative start. Smile

Mojo295Sketch

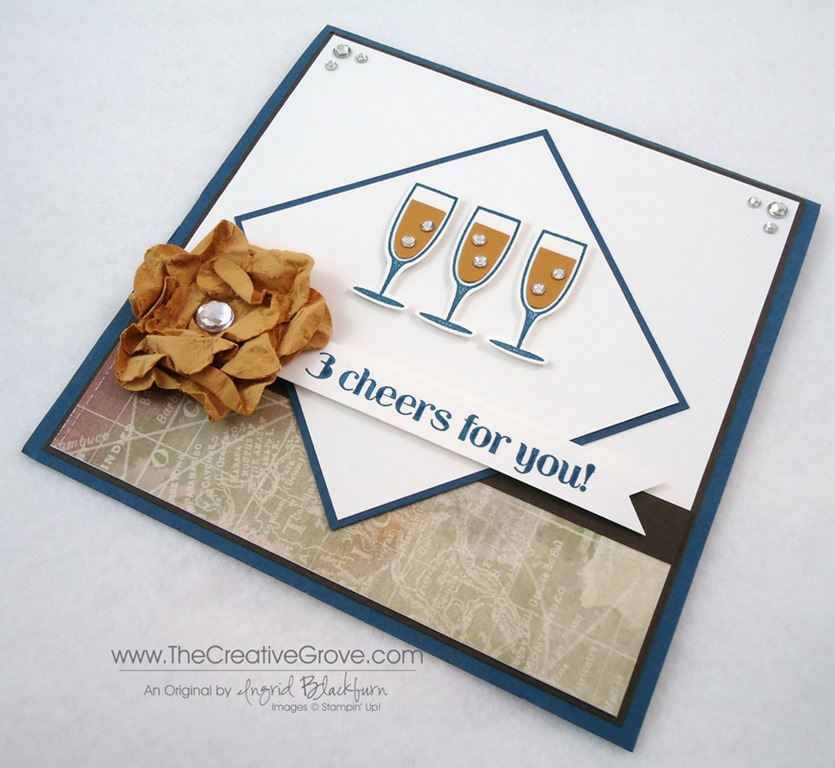
Today we are saying good bye to my two favorite retiring colors – Not Quite Navy (Gasp!!) and More Mustard.  Not Quite Navy and I have been good friends my whole life.  So it was natural, when I joined the Stampin’ Up! sisterhood in January 2002, that Not Quite Navy quickly became my all time favorite color.  And More Mustard, which is the exact color of Dijon Mustard – another favorite of mine…I can’t eat a hard boiled egg without it, is sadly being depleted with each card here in the Creative Studio.  I think I only have three full sheets of it left!

And my favorite Designer Series Paper this year was hands down Fan Fair.  How could you not like something with a giant Eiffel Tower and World Map in it?! 

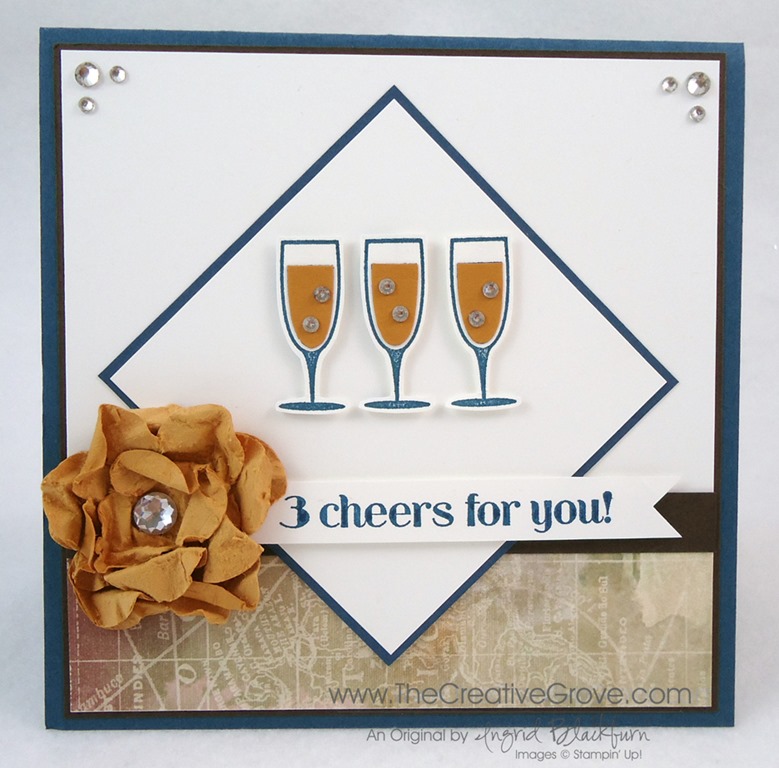
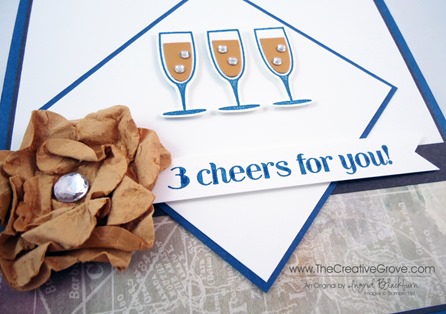
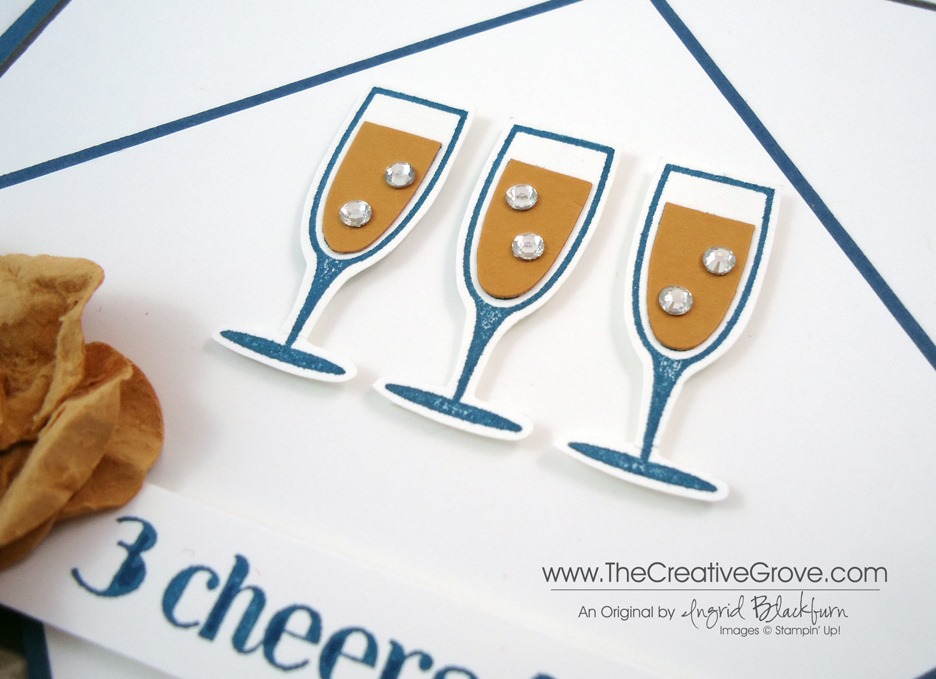
So since we’re saying good bye to some good friends, I thought I would say hello to a new one for me.  Not that the stamp set Happy Hour is new to the catalog, but it is new to me!  I’ve wanted this set all year, and felt it was about time to start stamping with it.  And since Champagne is a fitting beverage to toast our retiring and new friends, why not three glasses of it!

Of course, I had to sneak my signature smashed flower in there too – everything is better with a smashed flower!   And just plug in smashed flower into the search box on the right to see the many projects I’ve created with this easy and addictive flowers.  Click Here To learn how to make smashed flowers

Creative Tips:

  • I gravitate to the square cards in this challenge, so that was an easy choice for me.
  • I used my color coach to choose my colors and then decided on Early Espresso as a highlight. 
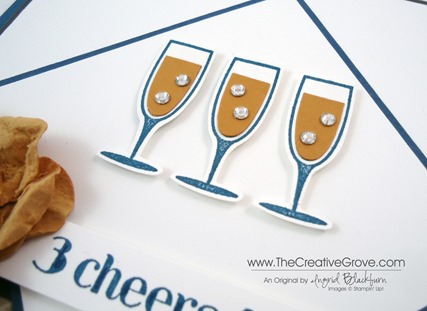
  • Champagne is bubbly and sparkly, so I had to have Rhinestone Basic Jewels!  Instead of my usual flower center, I chose to add our Large Rhinestone Jewels. 
  • My card needed a little something in the corners, so I added a large and two small Rhinestones instead of Paper Piercing.  But the Paper Piercing would have looked great too. Happy Hour 001 Side
  • I chose the Fan Fair DSP because it’s just the right amount of pattern without taking away from the spirit of card.  Balance is important when working with patterned paper, otherwise you can quickly overwhelm your project.
  • To bring a little drama and emphasis to various spots, I popped up the Champagne glasses, banner flag and smashed flowerClick Here for a video on how to make a perfect Banner Flag endHappy Hour 001 Height
  • I couldn’t get my greeting stamped right today for the life of me – ever had that happen?  So I finally just filled it in with my Not Quite Navy Stampin’ Write marker.  I’m so glad it’s the same ink as our Classic Ink Pads.  If you look closely at my photos you can tell, but only because it’s zoomed in, holding the card in front of you, you’d never notice.
  • My card measures 5 3/8” x 5 3/8” and my white panel is 5” x 5”.  My Early Espresso panel is just an 1/8” larger so that I have a 1/16” border…or is it too early in the day for fractions…lol!
  • My interior white square is 3”x 3” and the Not Quite Navy square is 3 1/8”x 3 1/8”. This card came together easily for me.  I hope you like it, it has a classic and traditional look to it.  I love the colors, I hope you do too!  Happy Memorial Day. Smile

Free New Catalog

If you would like your very own brand new FREE 2013-2014 catalog click here to find out how to get one!

Signature-Snowflake-001_thumb1

To Shop 24/7 in the Creative Store – Click here!

Stamp Sets – Happy Hour (126642c, 132013w) Ink – Not Quite Navy (126971), Not Quite Navy Stampin’ Write Marker (Regals Collection – 119701) Paper – Whisper White (100730), Not Quite Navy (101722), Early Espresso (119686), More Mustard (100946), Fan Fair Designer Series Paper (126918) Cool Tools – 1” Square Punch (124094), Fancy Flower Punch (118073), Paper Snips (103579) Finishing Touch – Stampin’ Dimensionals (104430), Rhinestone Basic Jewels (119246), Large Rhinestone Basic Jewels (129324)

Happy Hour

Mojo Monday Vintage Flowers

I just love starting the week out with the Mojo Monday Challenge.  I have to admit, I did not get the opportunity to get it done last week, and I was off all week.  I’m attributing it to not kicking off my week with this fun challenge.  The sketches stretch me to a place that I find easy to piece cool looking projects together.  I encourage you to try it.  Now I have to say, I didn’t know what kind of flower to put on this weeks card, and then it just popped into my head – why not a smashed flower.  I seem to go through little spurts with these addictive little guys.  If you haven’t made one yet, watch my video here and get smashing!

Mojo277Sketch

Now of course I flipped the card this week, I tried it the other way, but wanted the embossed pieces to be a bit bigger.  This card is loaded with technique, I hope you enjoy all the little things!

Creative Tips:

  • I started with my smashed flower and chose Rich Razzleberry as my color.  As it was 5:45 am when I made my flower, I went to my Color Coach and saw the combination of Rich Razzleberry, Pretty in Pink and Early Espresso.  The card quickly fell into place after that.
  • I added two Garden Green leaves to my Smashed Flower.  To give them a little texture, I used my stylus to make veins in the leaves and then folded the cardstock along it.  It looks pretty real.  To punch the leaves out, I used my Blossom Builder punch.

  • These little flowers are vintage looking to me, so I chose my two favorite Textured Impressions Embossing Folders (TIEF) – Lacy Brocade and Fancy Fan.
  • I wanted to have a little softness to the card, so I chose to do the Bisque Pottery Technique in Pretty in Pink with the Lacy Brocade TIEF

  • I ran the Pretty in Pink cardstock through my Big Shot with the Fancy Fan folder.  Both pieces are 1.75” x 2”.
  • I didn’t want the Early Espresso to be too dominate, so I left all those mattes at 1/16”.
  • To make the banner flag, I used my 1” square punch.  I use that punch every single day, it is the most used punch in my collection!  I also popped it up on Stampin’ Dimensionals for a little added depth. 
  • The Pearl Basic Jewels are so pretty when you alternate the sizes.  My center of my flower didn’t stay glued together, so I added a pearl to it.  I like the look!

  • The card needed a little more, so I added what I call the cheapest way to embellish your cards – Paper Piercing.  I added my corners with my Essentials Paper Piercing Pack and the five holes along the vertical sides. 
  • To be able to see the dark well under the light, I popped my entire card front up on Stampin’ Dimensionals.

This card seems to have a few of the techniques that I have been teaching this month in my Creative Cards class.  Both the Bisque Pottery Technique along with Smashed Flowers along with an awesome no-adhesive box is being covered this January.  Join me if you’re in the Orlando, FL area or if you’d like to take the class virtually anytime, email me!

Signature Snowflake 001

To Shop 24/7 in the Creative Store – Click here!

Stamp Sets – Sweet Essentials (126457) Paper – Whisper White (100730), Early Espresso (119686), Pretty in Pink (100459), Rich Razzleberry (115316), Garden Green (102584) Ink – Pretty in Pink (126955), Early Espresso (126974) Cool Tools – 1” Square Punch (124094), Blossom Petals Punch (121808), Simply Scored Stylus (125624), Stampin’ Trimmer (126889), Paper Snips (103579), Big Shot (113439), Fancy Fan TIEF (127751), Lacy Brocade TIEF (127819), Mutipurpose Liquid Glue (110755), Essentials Paper-Piercing Pack (126187), Paper-Piercing Tool (126189), Stampin’ Pierce Mat (126119) The Perfect Finish – Pearl Basic Jewels (119247), Stampin’ Dimensionals (104430)

Elegant Anniversary

Yesterday I celebrated my anniversary.  So, naturally I was on an anniversary card kick!  It all started with my Mojo Monday card HERE.  Then I decided to give my Smashed Flower Card an elegant new styling and here is the result. 

I was challenged by an anniversary challenge by the Creative Crew on Splitcoast Stampers.  I’m on the Design Team this quarter and the sketch was so close to my smashed flower card from last summer that an overhaul for an entirely new card was in order.  See my other card and video tutorial on smashed flowers HERE.

Creative Tips:

  • I wanted to use Cherry Cobbler since it seemed to be the color of the day for me yesterday and represents the color of love so well!
  • I used the Travel Journal builder wheels with Cherry Cobbler ink for the background.  These are by far my favorite wheels ever! 
  • For an elegant touch, I used our Brushed Silver Cardstock.
  • Each Whisper White cardstock piece is sponged with Basic Black ink.  Over the embossed piece I made sure to do it gently so I only hit the raised parts.

The Smashed Flower is super easy to make and SO elegant.  It’s hard to believe that it was just two punched flowers.  Watch my FREE video tutorial on how to make it HERE

Signature Snowflake 001

To Shop 24/7 in the Creative Store Click here!

Stamp Sets – Travel Journal Builder Wheel (3) (126937), Teeny Tiny Wishes (115370c, 127802w) Ink –Basic Black (126980), Cherry Cobbler Ink Refill (119788) Paper – Whisper White (100730), Cherry Cobbler (119685), Basic Black (121045), Brushed Silver (100712) Cool Tools – Fancy Fan TIEF (127751), Big Shot (113439), 1” Square Punch (124094), Scallop Trim Border Punch (118402), Stampin’ Sponges (101610) The Perfect Finish – Stampin’ Dimensionals (104430), Basic Black 3/8” Taffeta Ribbon (109070)

Mojo Monday Big Shot Flowers

Today is the big online extravaganza.  And since the several items are on sale for the first time I can remember, I thought I’d make a fun clean and simple card featuring what else, my trusted friend the Big Shot – just one of the featured products today.

Mojo268Sketch

Creative Tips:

  • I added texture to my Pink Pirouette flower from the Floral Frames Framelits by using the new Fancy Fan Textured Impressions Embossing Folder. 
  • The So Saffron flower is the second smallest framelit in this great set of nested frames.  I highlighted it with a little sponging around the edges
  • I used the ornament punch to create the Wild Wasabi leaf for my three flowers.

  • To create my Elegant Eggplant smashed flower – I used two of the smallest flowers from this Framelit set.  Click here to watch my Smashed Flower Video
  • To make my banner flag end I used a square punch.
  • I wanted to add some small details without taking away from the flowers, so I added some paper piercing around the border of my Bashful Blue and then Pearl Basic Jewels in each corner.

To check out all the great sales going on today and the remainder of the week click here.  You do not want to miss out on the up to 50% off savings that Stampin’ Up! has to offer this week!

flyerheader_Extravaganza_demo_NA_rdax_574x227 Signature Snowflake 001

To Shop 24/7 in the Creative Store Click here!

Stamp Sets – Sweet Essentials (126457) Paper – Whisper White (100730), Elegant Eggplant (105126), Bashful Blue (105120), So Saffron (105118), Wild Wasabi (108641), Pink Pirouette (111351) Ink – Elegant Eggplant (126969) Cool Tools – 1” Square Punch (124094), Stampin’ Trimmer (126889), Paper Snips (103579), Big Shot (113439), Floral Frames Framelits (127012), Ornament Punch (119847), Essentials Paper-Piercing Pack (126187), Paper-Piercing Tool (126189), Stampin’ Pierce Mat (126119) The Perfect Finish – Pearl Basic Jewels (119247), Stampin’ Dimensionals (104430)

Floral Frames Framelits 127012L

Smashed Flower Tutorial

Many of you know that I’m obsessed with making these cool smashed flowers. I now make them in several ways – with punches and Big Shot dies, but my favorite is still with our Fancy Flower punch. Enjoy the tutorial, there are lots of little golden nuggets sprinkled throughout, so enjoy!

[youtube=http://www.youtube.com/watch?v=6vilZdrVBqE&w=448&h=252&hd=1]

Indulge me as I learn this process. I wish the volume was a bit better – I’ll have to work on that.  I’ve love to hear your feedback – so leave me some comments with your thoughts!

Create away –

Ingrid

To Shop 24/7 in the Creative Store – Click here!

Be sure to check out the Clearance Rack!

More fun with Flowers

Okay – my love of these paper flowers is getting out of control!  Here are the new Floral Frames Framelits at work is my version of a smashed flower.  I used the second to largest flower for the four large ones, the third largest for the fifth piece and the Blossom Punch for the center.  I connected all the pieces after crumpling them with with brad and covered it with a Large Pearl – just love those!

I ran that second to largest Framelits through with Gumball Green and cut the petals apart to use as leaves.

The saying is from the new Sweet Essentials set, and is stamped on the bottom of one of the Apothecary Framelits cut pieces.  This flower was relatively easy to put together and looks super cool.  It is rather bulky, so I wouldn’t recommend it being shipped unless it’s in a padded envelope or box.  It sure would look cool as gift wrapping though.  I’ll have to try that next!

I’ll leave it up to you to tell me what kind of flower it looks like, I initially thought Pointsettia, but I just can’t decide.  Leave me a comment and let me know if you can think of a different flower! I’ve begun putting some shots together for a tutorial on how to make these various fun flowers.  So look for that this week!

Enjoy them!

Create Away –

Ingrid

To Shop 24/7 in the Creative Store – Click here!

Be sure to check out the Clearance Rack!

Stamp Sets – Sweet Essentials (126457) Paper – Very Vanilla, Cherry Cobbler, Gumball Green, Summer Starfruit  Ink – Cherry Cobbler Cool Tools – Floral Frames Framelits, Apothecary Accents Framelits, Big Shot, Blossom Punch, Scallop Trim Border Punch, Brads  Finishing Touch – Stampin’ Sponges, Large Pearl Basic Jewels

Fun with Flowers

Today is the last day of the 2011-2012 Catalog.  I was not sure which project I wanted to post, and I thought that I would post one with my favorite stamp from that catalog.  It’s one I will forever keep as I have never seen it before.  What kind of a stamp could this possibly be?  Well, it’s one that was in a hostess only set and it’s a saying – You Inspire Me.  This little stamp struck me so much when I first saw it – I HAD to have it.  If you are interested in getting one for yourself – just ask me how by emailing me here.

So, I made some fun smashed roses using the Flower Punch and Floral Fusion Big Shot dies.  I put them on my favorite Big Shot embossing folder – Vintage Wallpaper and used my favorite label punch – Decorative Label for the saying.  These colors go so well together and of course the perfect finishing touches are Basic Pearl Jewels, linen thread and simple sponging.  I hope you love it as much as I do, I’m mailing this card out to a dear friend today who inspires me.  I hope she loves it just as much.

So who inspires you?  I challenge you to let them know just how much today.

Create Away –

Ingrid

To Shop 24/7 in the Creative Store – Click here!

Be sure to check out the Retired Lists and Clearance Rack!

Stamp Sets – Perfect Words (122472 – Hostess Set  Paper – Whisper White (100730), Certainly Celery (105125), Pink Pirouette (111358), Early Espresso (119686) Cherry Cobbler (119685)  Ink – Early Espresso (119670) Cool Tools Big Shot (113439), Vintage Wallpaper Embossing Folder (120175), Fancy Flower Punch (118073), Decorative Label Punch (120907), 5 Petal Flower (119880) The Perfect Finish – Basic Pearl Jewel Accents (119247), Linen Thread (104199), Cutter Kit (106958)

new stamp