Black, Silver and Gold Christmas

Black SIlver n Gold Xmas001

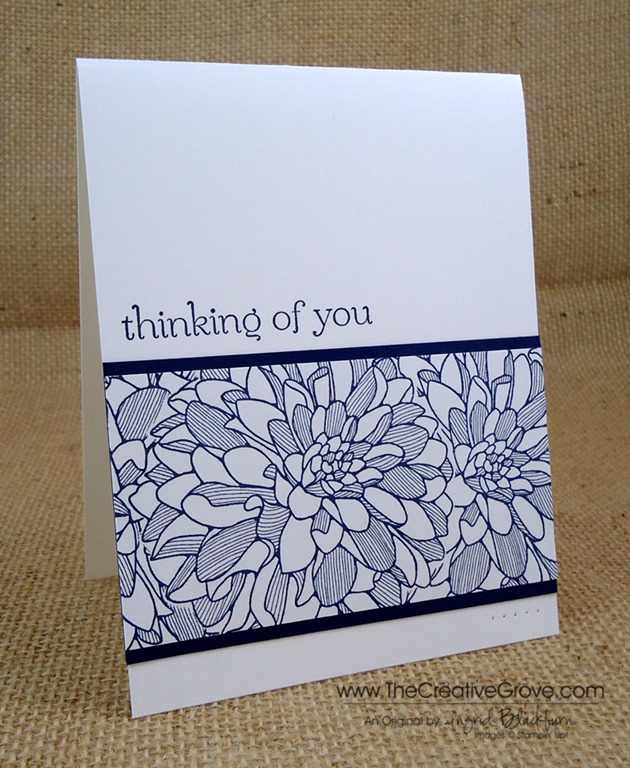
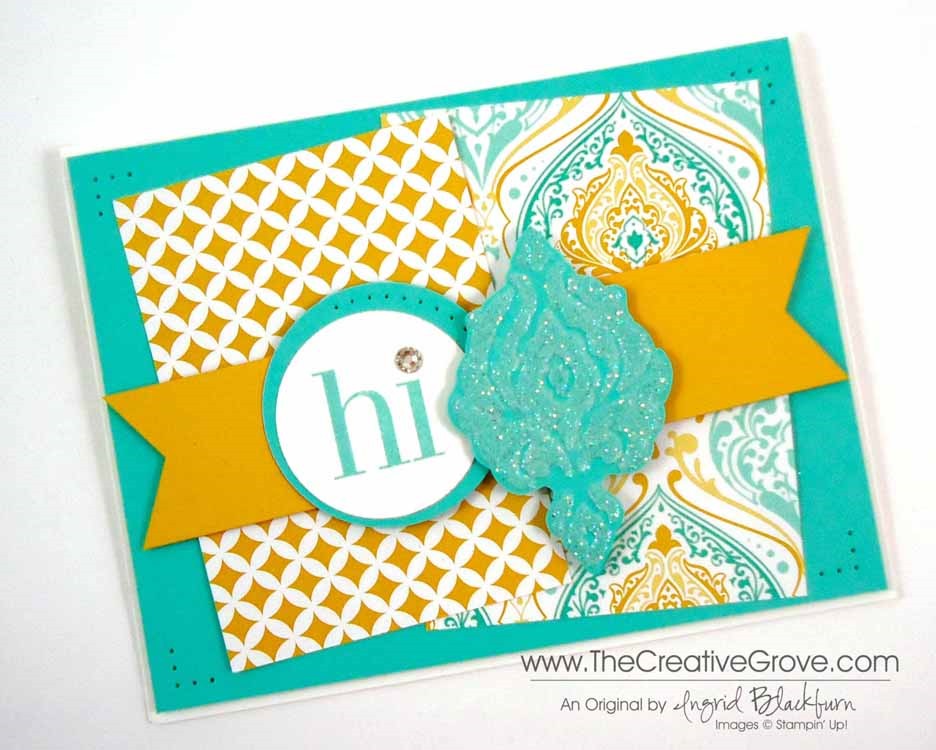
What do the colors Black, Silver and Gold bring to mind when you think Christmas?  You may be thinking…huh?  At first, I was a bit intrigued, as those weren’t colors I would gravitate towards…but I have to admit – I love the combo!  That was the challenge at the Merry Monday Christmas Challenge this week.  I’ve been wanting to play for a few weeks now, and sadly, didn’t have any stamps that went with the themes the past few weeks! Sad smile  Here’s this weeks:

122

But this one…I have.  What do you think?  If you’re on the Creative Tips E-letter list, you’ll get a special tutorial on this and another Black, Gold and Silver Card!  If you’re a VIP Community member – you’ll have videos to go with those!  So watch your inbox this week!

Black SIlver n Gold Xmas005

Not on the E-letter list and want to be?  No problem – it’s free and you’ll get a few project videos sent right to you, Creative Tips list.

Interested in learning more online?  We add 20+ video tutorials every month to the ever growing VIP Community Project and Resource Library.  That’s less than $1 per tutorial!  Get all that and monthly classes right here.

Thanks for stopping by!  Let me know what you think of this card and what these colors mean to you – leave me a comment below!

Signature

Community July Peeks

Have you heard? We added 32 videos during the month of July to our VIP Community!  Here are just a few peeks into some of the amazing step by step video tutorials we added in the past few weeks.

The Creative Grove VIP Community July Sneek Photos

The summer can be a crazy busy time for everyone – kids are out of school, lots of relaxation and relaxation on vacations, holidays and just general warm weather merriment are taking place! So we wanted to kick off our newest corner of The Creative Grove with a wide variety of technique and project tutorials.  We added several that covered:

  • The Ink Swipe technique – unique backgrounds with the Colorbox Stylus Tool
  • Ombre Sponging
  • Various Masking and Masking Tape techniques
  • Bokeh
  • And more watercolor tutorials and projects than we can possibly list!

What’s unique about the watercolor tutorials is that we loaded our Watercolor Techniques that Wow class right into the community!  Just one of the features of our VIP membership – online classes too!  As a matter of fact, we’ve added over 60% of all our classes already with the much sought after Brayer 101 coming this next month.

We’ve had challenges in the private facebook group, project sharing and community all around.  It’s been fun to get to know each other, see what we’re all working on and get technique and tutorial requests directly!

VIP Community Sky

So come visit us – we’re still looking for a handful of founding members that will save before the price increases soon.  To become part of the family – click here!

Signature

Quick Clean and Simple One Layer Card

DSC00051

Here’s a quick little card that I think you’ll love.  The best part, you can interchange the sentiment for whatever you need.  I just love this stamp – you inspire me, from the retired Stampin’ Up! stamp set Perfect Words.  I love the sentiment, but more so, the font.  I love cool clean fonts. 

DSC00060

Chances are, you probably already have a tree of some sort in your stash, be it an oak tree, evergreen or even palm tree!  Here I used Single Pine from the Nature Sheet I by Stampscapes.  I just love this tree!  I stamped my pine tree in Stampin Up Garden Green ink, and used an Early Espresso Stampin’ Write Marker for the trunk.  I stamped the sentiment in Early Espresso as well.

DSC00054

It’s a quick and simple card, yet it captivates you.  Don’t you just love One Layer Cards?!!  Now go make your own quick, simple masterpiece.

Signature Snowflake 001

Take and online class here

Get creative tips and videos sent directly to you, subscribe here for free!

One Layer Simplicity

Blooming In Kindness 01-2014 Main R

Ever just need a card in a pinch?  Well, that’s what today’s card is all about.  It’s a quick one layer card that not only looks elegant, but you can literally put together in under one minute!  Now that’s quick.

Blooming in Kindness 01-2014 Set

Just cut a piece of 8 1/2 x 11” piece of Whisper White cardstock in half, grab the Blooming in Kindness Stamp Set along with your Crisp Cantaloupe and Early Espresso Ink Pad and Marker and you’re all set.  Here’s the finished result.  I tried it with two different sayings in various spots.

Blooming in Kindness 01-2014 Main

Enjoy!

Signature Snowflake 001

To shop in 24/7 in the online store – click here

Stampin’ Up! Gently Falling

Gently Falling 003 001

I hope you had a fabulous weekend  – are ready to get to a great Mojo start!  Today, we have another go to sketch for your arsenal.  This sketch will give you a great card every time.  It’s quick and easy to put together – all the things I love!  I looked at about 20 stamp sets this morning, and remembered the Sweater Weather Designer Series Paper and thought…can I really give them another card with Gently Falling?  But I knew you’d love it in the end, so here it is!

Mojo311SketchGently Falling 003 003

Creative Tips –

  • I think you will notice that this will work with just about any stamp set, but the plaids in this pack of paper scream fall.
  • You will only want to use the filler images if you are using them as a background as here.  The point was to allow the greeting to pop – that’s why it’s embossed in Early Espresso.Gently Falling 003 009
  • To add a little umph to the card (is that a word?), a little paper piercing goes a long way on the Tangerine Tango circle.
  • All the matting and stabilizing part of the card is in Chocolate Chip, so the accent with the Scallop Trim Border Punch is in the same.  Gently Falling 003 006
  • Rather than use some Chocolate Chip Ribbon, I wanted the stamping to really shine, so I enlarged that portion (4” x 2”), popped it up on Stamping Dimensionals, and just added a card stock strip in place of a bow or knot.
  • To give the card a little finishing touch, some Pearl Basic Jewels were added. Gently Falling 003 002

It’s a classic, Julee Tilman did it again.  I love this sketch.  So, now it’s your turn – what are you going to make?

Are you one of my VIP’s?

If you love this card and creative tips, then be sure to sign up for my Creative Tips list!  You’ll get VIP project videos and projects, special list only sales and discounts, and stay on top of all the cool and great things not only available at Stampin’ Up!, but also here at The Creative Grove. Be in the know, first on the list!  I don’t like excess email or stuff I don’t want, so know that your email address is something sacred to me.  I would never abuse that trust!  Click here if You love creative tips and want to be one of my VIP’s! Smile

Signature Snowflake 001

To order 24/7 – Click Here!

Gently Falling 003 005

Stamp Sets – Gently Falling, Seasonal Sayings Ink – Crushed Curry, Wild Wasabi, Early Espresso, Tangerine Tango Paper – Whisper White, Early Espresso, Tangerine Tango, Sweater Weather Designer Series Paper (132184) Tools – Scallop Trim Border Punch, 1 3/4” Circle Punch, Early Espresso Embossing Powder, Paper Piercing Tool, Stampin’ Pierce Mat, Essentials Paper Piercing Pack Finishing Touch – Stamping Dimensionals, Pearl Basic Jewels

Seasonal Sayings 128009LGently Falling

Sweater Weather Designer Series Paper

Beautifully Baroque Eastern Elegance

Don’t you just love light and fun designs?  Cool colors prevail in today’s Mojo Monday sketch; which is a simple go to sketch that you will definitely want to try.  You can see the Eastern Elegance paper plays well with the Beautifully Baroque Embossing Folder.  Here’s the sketch and my interpretation.  Don’t forget about my special that’s running till Wednesday!  It’s at the end. Smile

        Mojo309Sketch

Personal Note – I’m in the process of moving.  Yup, today I’m actually packing up the Stampin’ Studio – and that’s quite a task!  So over the next few weeks, you’ll see a few current and some fun projects from the past.  Don’t worry – I’m finding projects that I just loved – but never blogged…so I hope that’s exciting for you too!  And the only good thing about moving – purging!  So thanks for stopping by!

Creative Tips –

  • You will want to choose two complimentary but completely different pieces of Designer Paper if you go that route.  This way they won’t compete with each other. 
  • For the designs you see in this project – it was necessary to flip the larger rectangle with the smaller one due to the patterns.  It worked better this way.
  • If you don’t like the size of your matte with your circles – try off-setting them like shown here.  Add some piercing to really accentuate it.
  • To help make the baroque medallion stand out, emboss it with the Beautifully Baroque Textured Embossing Folder, then add Dazzling Diamonds glitter to 2-way glue on the raised image portions.
  • Pop the medallion up further than the banner to really give it a little depth.
  • The card front, banner and medallion are all popped up on Stamping Dimensionals.

The Creative Grove Envelope Special

Everyone who orders and Envelope Punch Board (133774) using this hostess code – VWCWVJ34 through me by Wednesday September 4th will get a special packet of 20 sheets of – 6”x6” Designer Series Paper (that’s a value of $5.50!) mailed to them to use for liners or even your own 3” x 4” card sized envelopes!!  And don’t forget about The Creative Grove Rewards Program for free stamps too!

Signature Snowflake 001

To Shop 24/7 in the Creative Store – Click here!

Stamp Sets – Regarding Dahlias (130327c, 130324w) Ink – Coastal Cabana Paper – Whisper White, Eastern Elegance Designer Series Paper, Crushed Curry, Coastal Cabana  Cool Tools – Beautifully Baroque TIEF, Circles Collection Framelits, Two Way Glue, Dazzling Diamonds, Hexagon Punch, 1 3/4” Circle Punch, Paper Piercing Tool, Essentials Mat Pack, Stampin’ Pierce Mat Finishing Touch – Rhinestone Basic Jewels, Stamping Dimensionals

Label Thinlit Flip Flop Card

Regarding Dahlias 004 (2)

Have you ever just needed an really quick wow card?  Well then the new Card Thinlits are for you.  For one, they have an interactive rotating feature.  Second – talk about super quick!  You can literally make this awesome project in a matter of minutes!  Here’s how.Regarding Dahlias 004 (4)

Creative Tips –

  • First cut your cardstock to 6” x 5 1/2”.  Lay your Thinlit over.  Add a piece of Whisper White cardstock cut 5 1/4 x 2 3/4” to the left side with some adhesive lining up the outside three edges.
  • Run through your Big Shot to cut the card and flip flop cuts.
  • Cut the matching label framelits from this set and stamp with Raspberry Ripple using the Regarding Dahlia’s Stamp.
  • Cut a mask using the label portion of the Card Thinlit out of scrap paper – Keep your mask for future use with your Thinlit set!Regarding Dahlias 004 (1)
  • Stamp the Regarding Dahlia’s  in Raspberry Ripple on the left portion of the card.
  • Tie some linen thread and add Rhinestone Basic Jewels.
  • Stamp your greeting and send to someone you love!

Wasn’t that fast!  Be sure to tune in later this week for a video tutorial – I’m so excited to use my new microphone – yes, you read that right…finally better sound!  Have a fabulous day.Regarding Dahlias 004 (7)

New Creative Grove Classroom

Did you know that we have a new classroom for you to take all your online classes?  Check it out by clicking the Classroom tab up top or here.  Our latest class – Class of the Month : Festive Flurry has gotten some rave reviews!  It just launched and is packed with amazing projects that you’ll be able to use no matter what stamps or framelits you own. Check that class out here.

Signature Snowflake 001

To Shop 24/7 in the Creative Store – Click here!

Regarding Dahlias 004 (6)

Stamp Sets – Regarding Dahlias (130327c, 130324w)  Ink – Raspberry Ripple Paper – Whisper White (100730), Raspberry Ripple Cool Tools – Label Thinlits (133479) Finishing Touch – Linen Thread, Rhinestone Basic Jewels 

Regarding DahliasLabel Thinlits

CAS Regarding Dahlias

Regarding Dahlias 003 Main

Clean and Simple (CAS) cards are always great.  They’re quick, easy and striking!  The Regarding Dahlias stamp set has several greetings and one very powerful floral image.  Perfect for clean and simple cards. 

Do you ever have an image remind you of someone?  That happens to me, and today I’m using flowers because I’m thinking of Yvonne.  Regarding Dahlias 003 Main  Duo

I teach card and scrapbooking classes locally here in my home and in various communities.  I’ll never forget the day I met Yvonne.  It was at a vendor event when she made her way to my table with her walker and oxygen tank.  Yvonne could not stop looking at my scrapbooks and cards – I could tell she was definitely an avid paper crafter!  She quickly arranged for me to teach scrapbooking in her community with a few of her friends religiously every month.  Each one became stampers in addition to scrapbookers, and I’ve loved every class that I taught there.  The friendships these ladies have with each other, in addition to just really loving every crafting moment together has always been special to be a part of for me. 

Yvonne has been one of my die hard stampers who never let anything get in the way of her trying all the paper crafting techniques she could – not even a broken shoulder or arm.  I have truly admired her zest for life and not letting the little things get to her (As if those are little things!). 

Yvonne was unable to make the trip up the stairs to my stamping studio for my stamping classes in my home, so one day I decided to bring class to her.  It was an awesome fun afternoon, stamping with a friend.  We made several projects using various techniques and to this day is one of my fondest memories of a private one on one class.  Yvonne never missed a class, and over time, I noticed that she gravitated toward the floral images.  So, today this card is for you Yvonne.  You will be greatly missed and I know that wherever you are, you are most definitely living life to the fullest and certainly stamping and scrapbooking!

                DSC00891 002

Creative Tips –

  • To create the floral design, you will want to make a mask out of printer paper.  Card stock will be too thick, and you will find that you have a white gap at the edge of your masked images, which I know will frustrate you!
  • Turn your stamp as you stamp the other images.  This way you have variety and not a repetitive look.Regarding Dahlias 003 Main Front 1
  • This image above has two stamped identically and then one not – can you see the difference?  My other sample has the flower at a slightly different angle.  It’s a bit easier on the eye.
  • You can see that I chose to matte the strip two ways, white strip on white and white strip on matching Night of Navy card stock.  Both are lovely, and have very different looks.Regarding Dahlias 003 Main  Duo
  • You might want to try stamping a long strip that you can cut to the size you need – that way you will have it for multiple cards.
  • Remember the law of 1/3rds when you are placing your images.  In CAS cards, you want to have a lot of white space, so placing your strip and greeting in the top or bottom third will be visually appealing to the reader.
  • For a finishing touch, add some paper piercing to the the opposite side of your strip. 
    2013 Holiday Catalog
    Have you taken a peek at the new Holiday Catalog yet?  The projects are awesome, the new products, well many are quite addictive!  My personal favorite is the new Expressions Thinlits Dies.  How about you?  View all our Catalogs here

Regarding Dahlias 003 Main Angle 2

To Shop 24/7 in the Creative Store – Click here!

Stamp Sets – Regarding Dahlias (130327c, 130324w), Sweet Essentials (126457c, 132085w) Paper – Whisper White, Night of Navy Ink – Night of Navy  Cool Tools – Paper Piercing Tool, Essentials Mat Pack, Stampin’ Pierce Mat

  Regarding DahliasUntitled-12