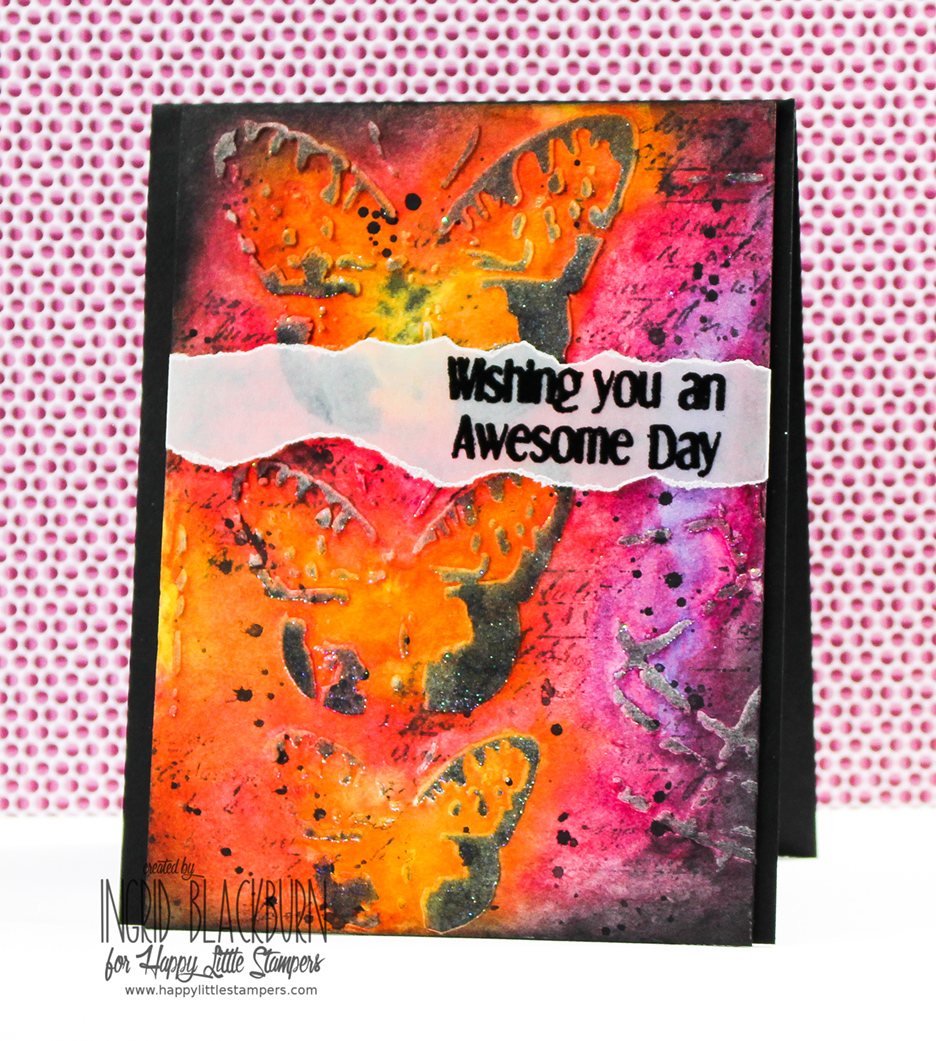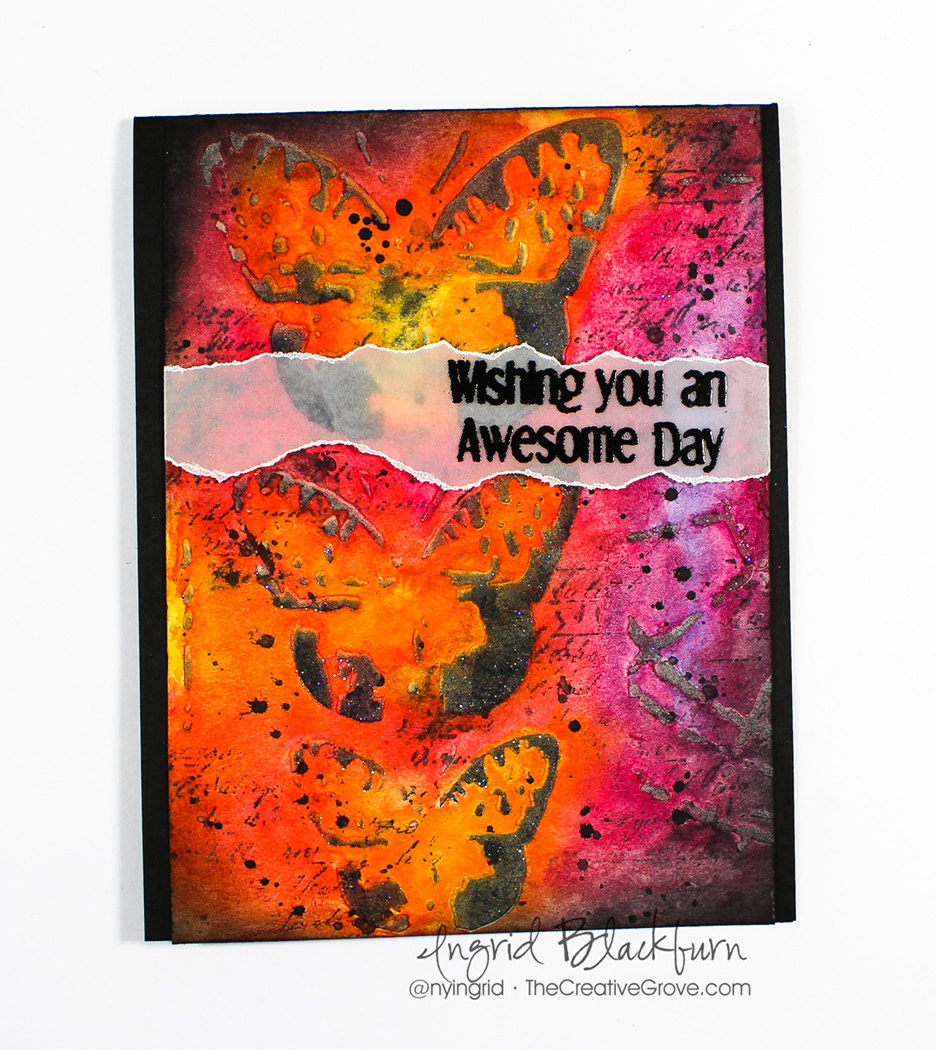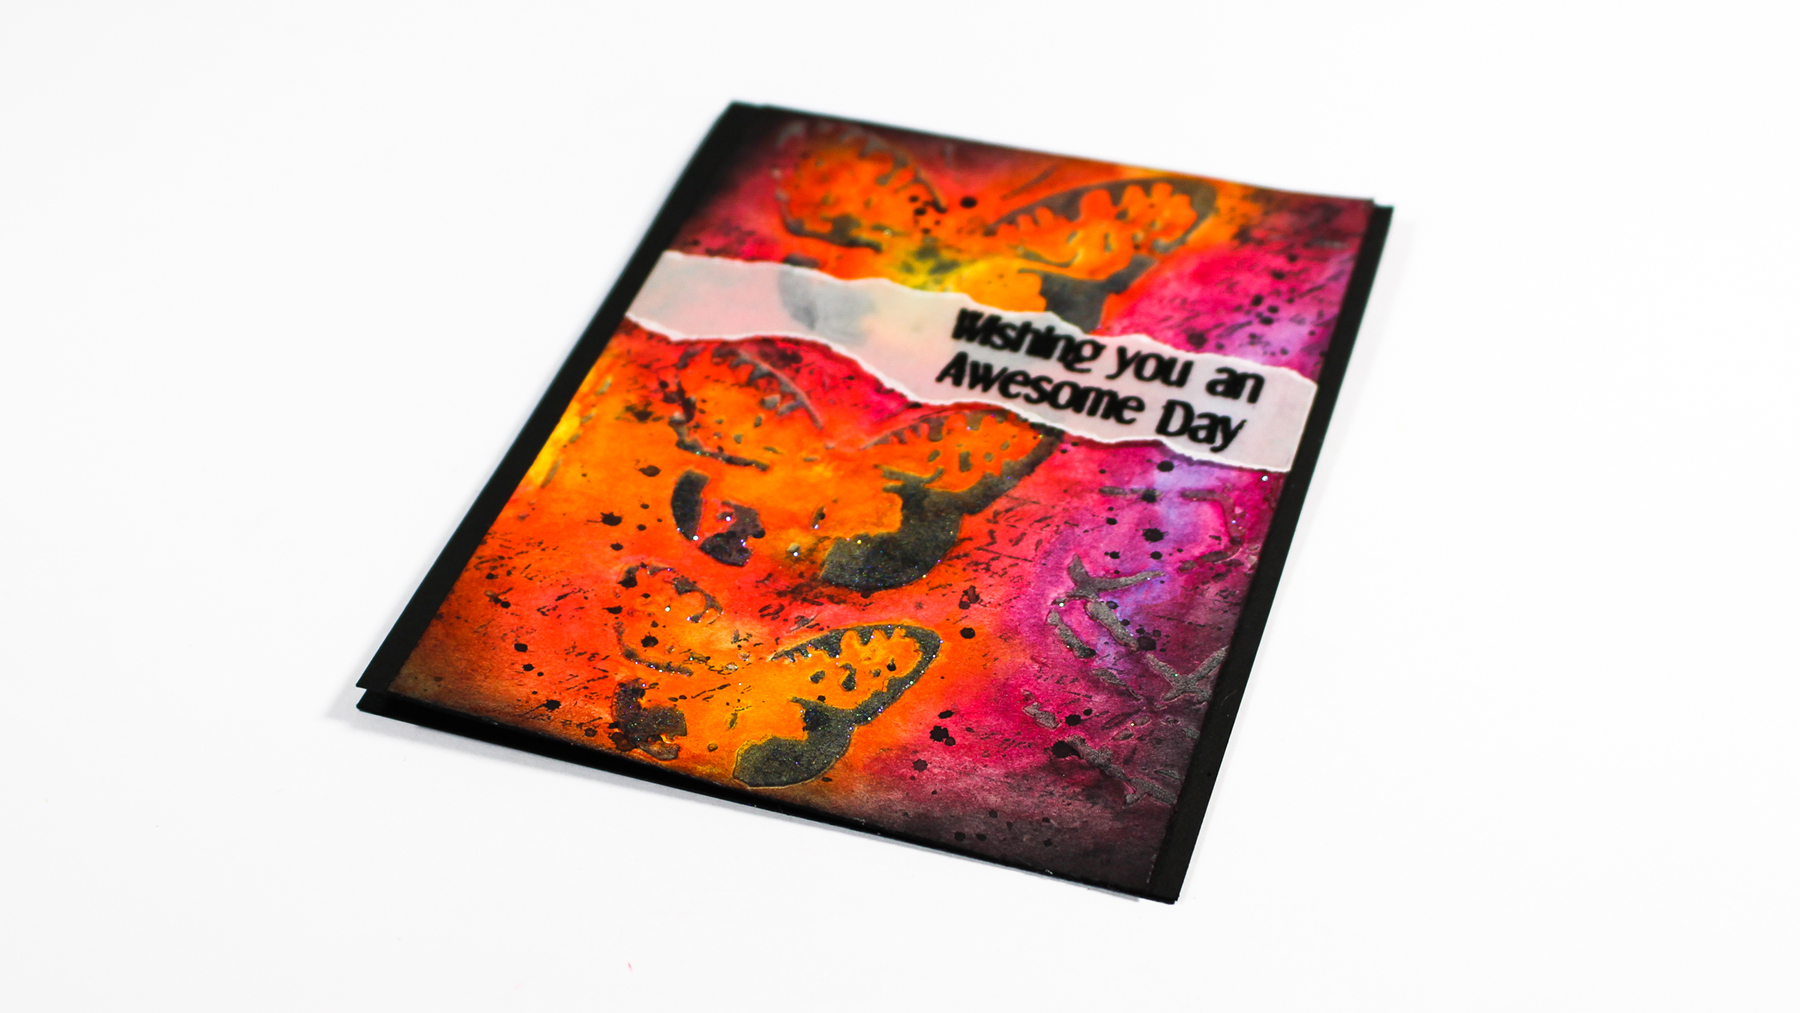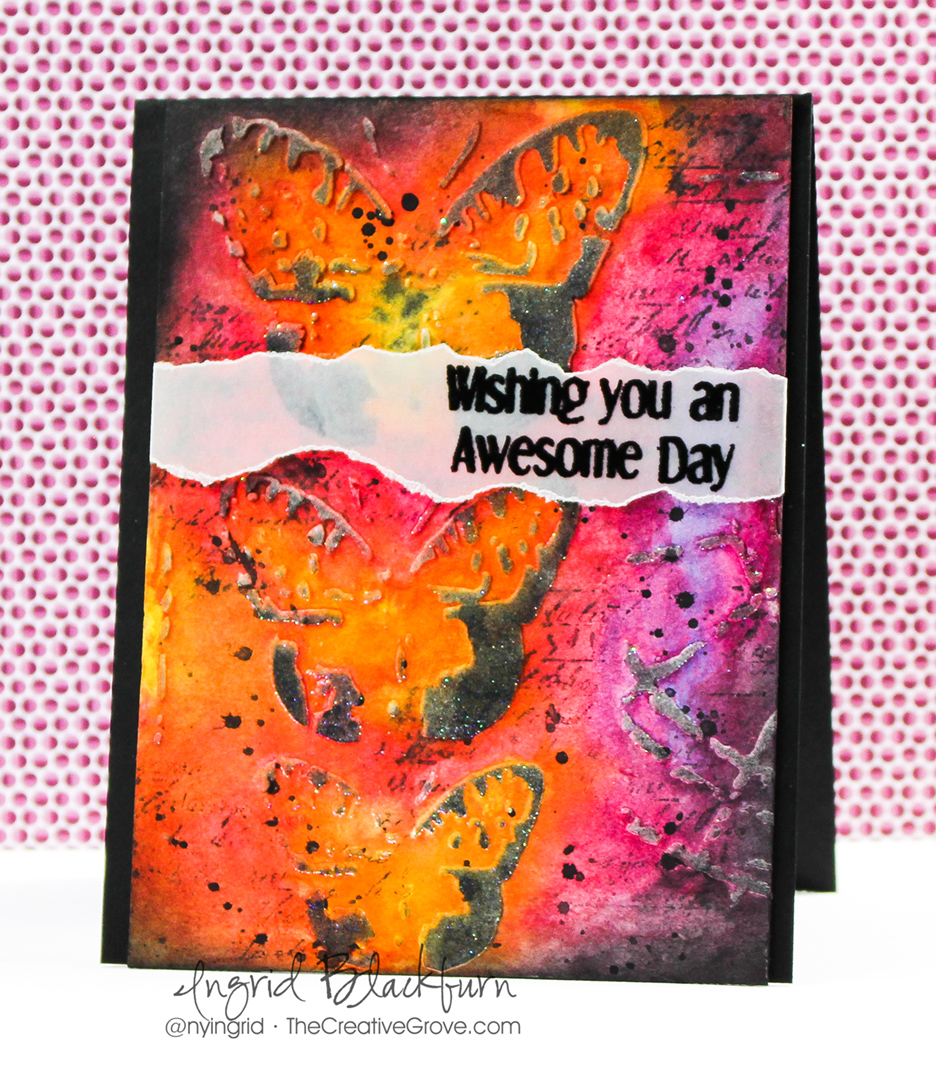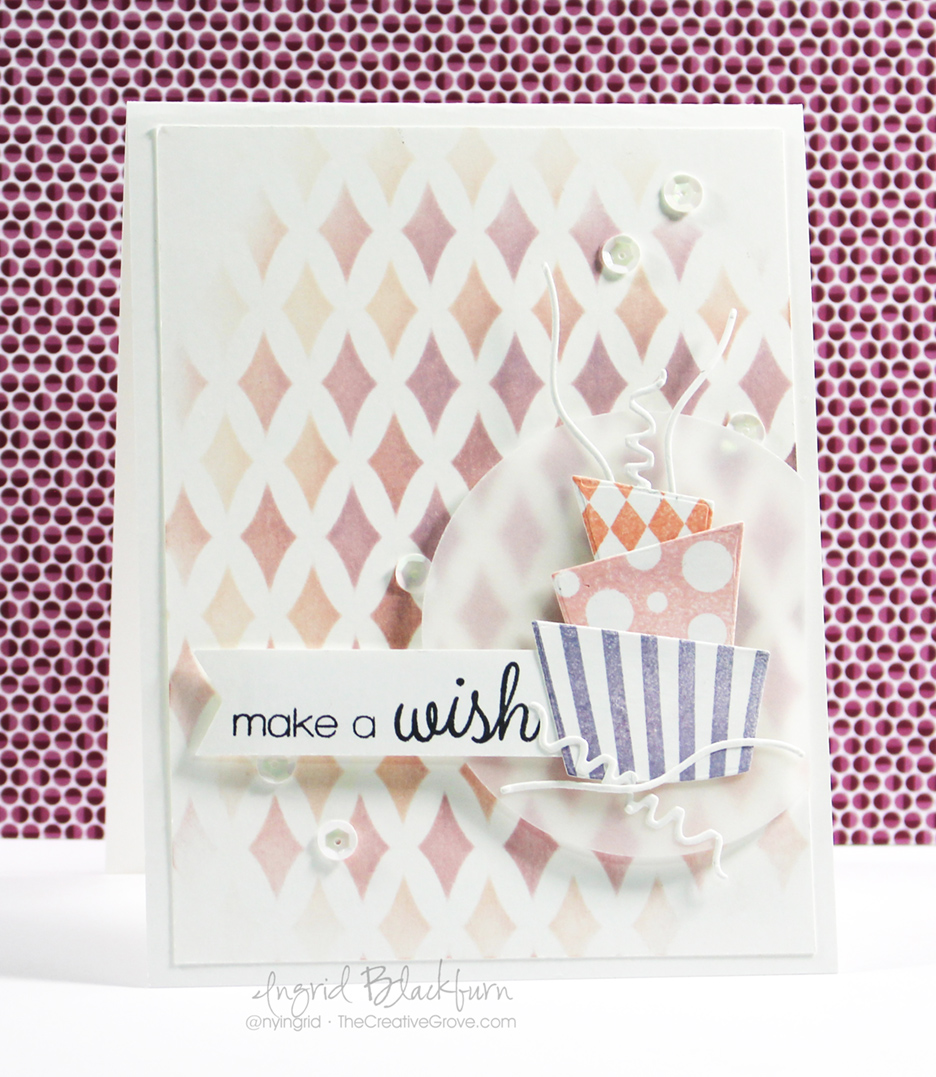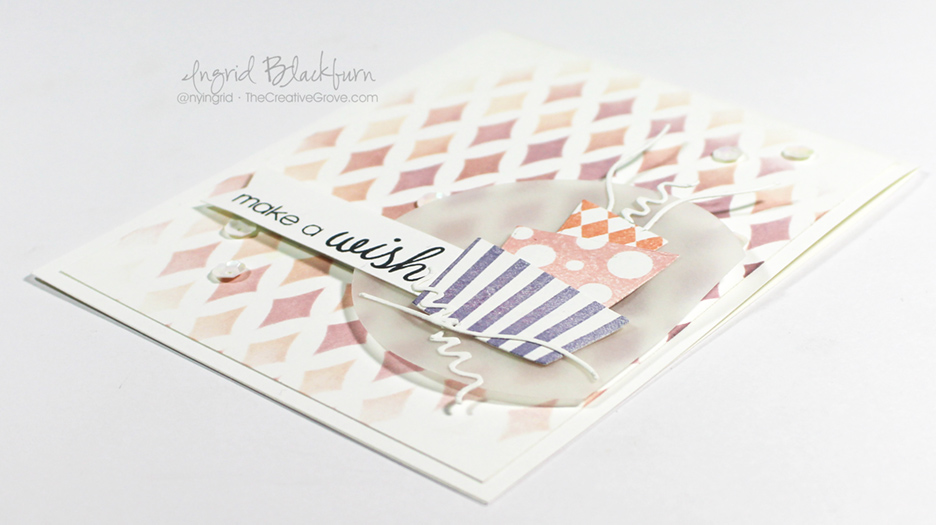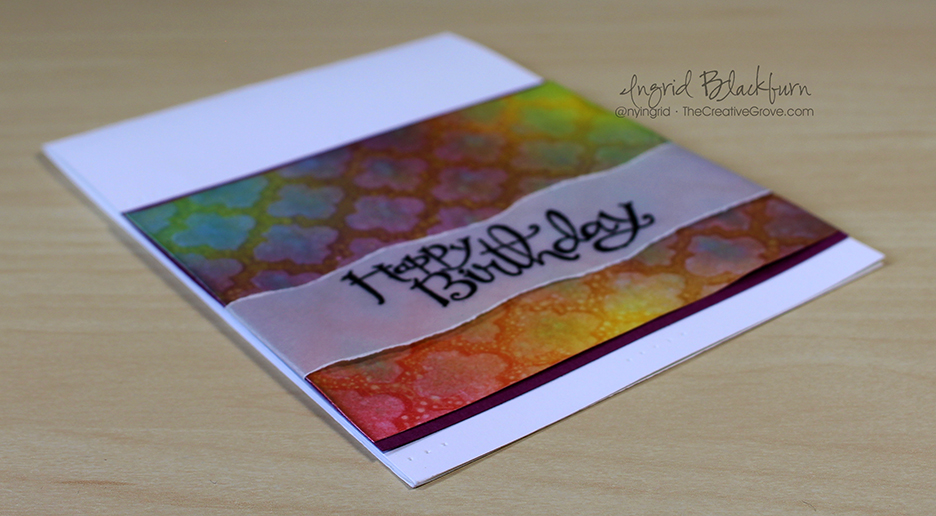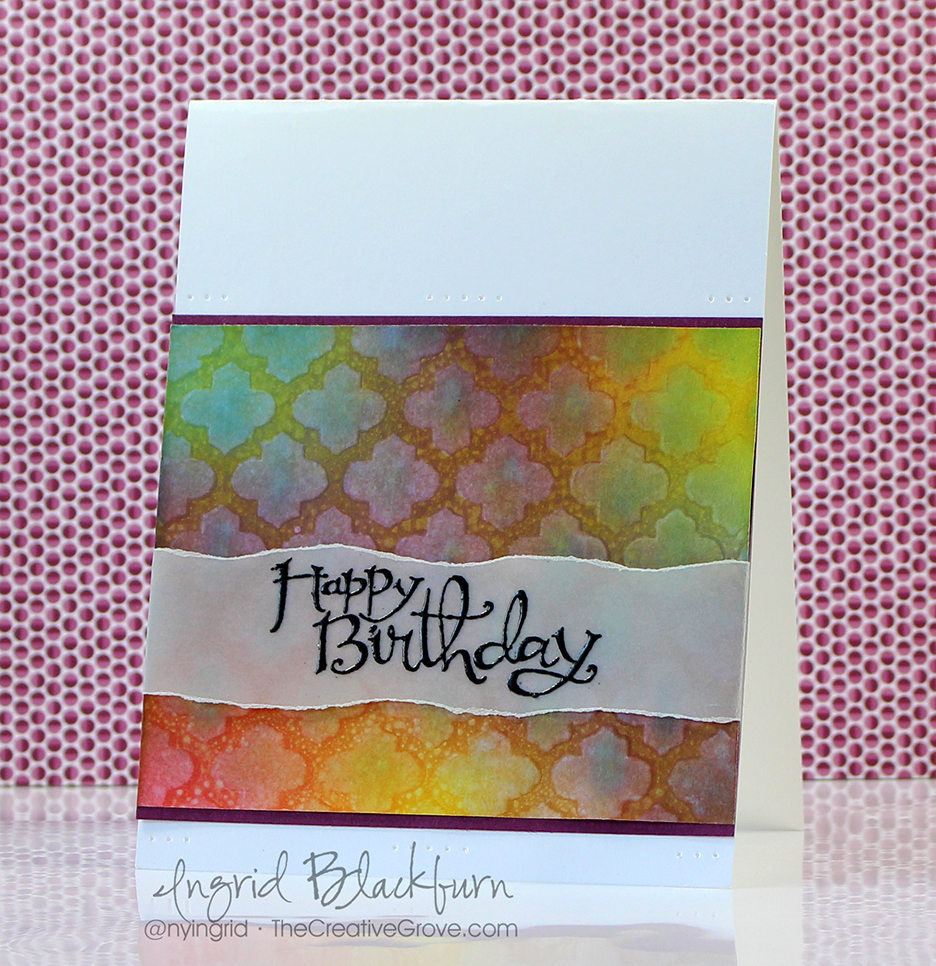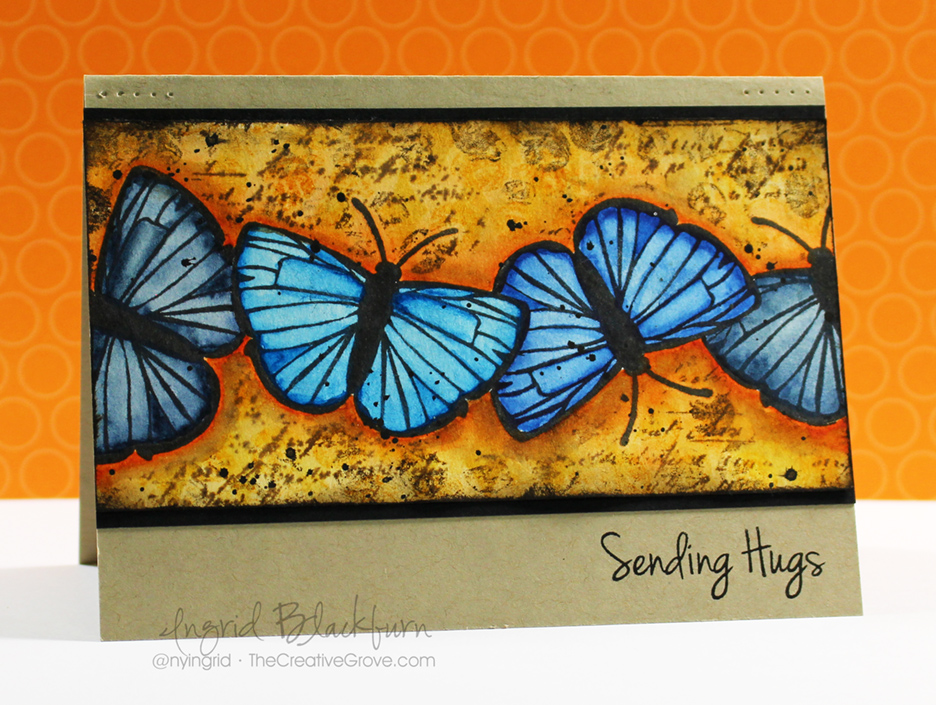
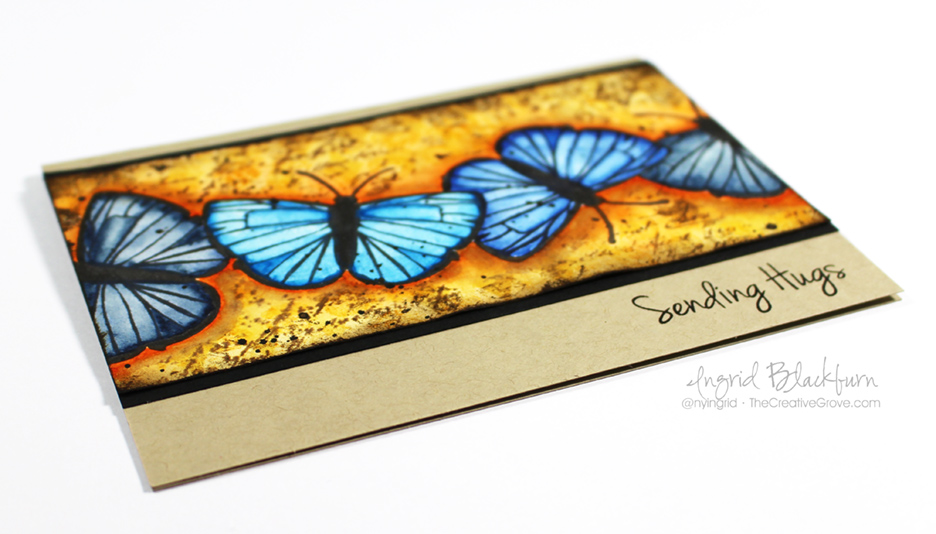
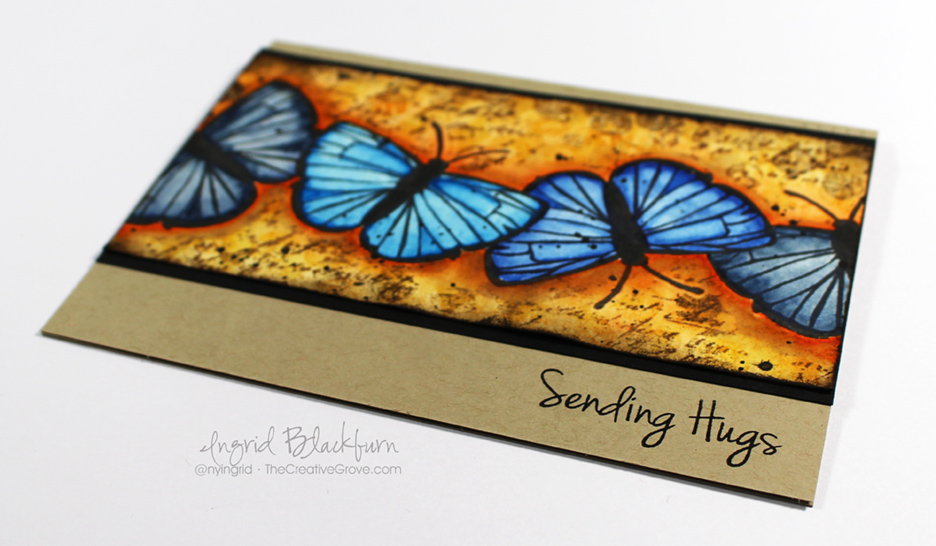
Have you ever wondered how to create depth & texture without bulk? You may find that it’s much easier to do than you think – just grab some watercolor brushes, a few stencils, some distress inks and you may just surprise even yourself! This month over at the Happy Little Stampers we’re challenging you to play around with Wings in your Mixed Media pieces. That could be any way you interpret it. I chose to use the bold butterfly image from Butterfly Birthday set and see if I could make it feel like it was actually fluttering on the paper with some watercolor magic and stencils in the background. What do you think? Did I hit the mark?
Be sure to stop by all the Design Team’s blogs to check out just how they created their own masterpieces. I have a written tutorial for you today, and a video for you! It’s a rather in depth project, so I split it into two videos so you can find your place better. Grab a beverage and enjoy the process! Of course if you want to see it in HD, click the link below to view on YouTube.
View Part One in HD on YouTube
View Part Two in HD on YouTube
This card is actually quite simple to do, it does take a little time, but it’s a great relaxing project – especially if you like to watercolor! Here’s how you can create your very own:
How to Create Depth & Texture without Bulk
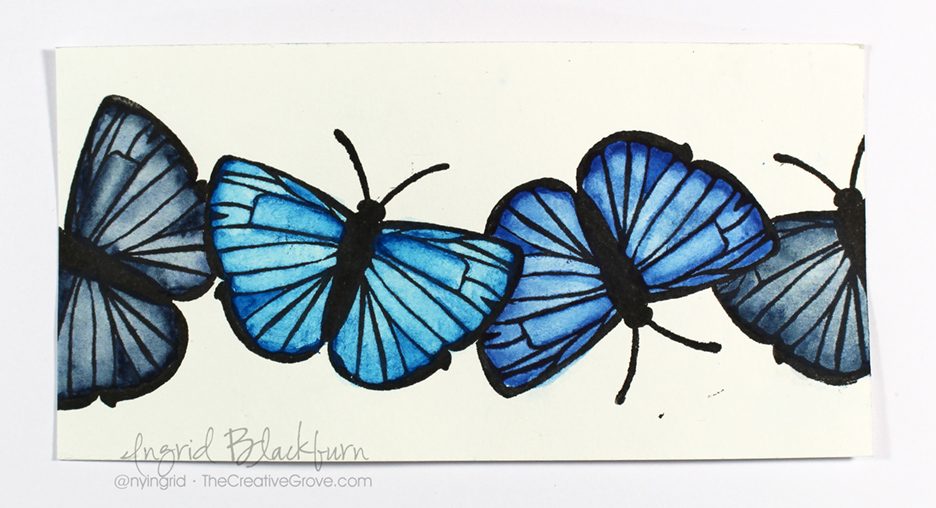
- First you’ll want to cut out a few masks. I used the coordinating Butterfly Dies for the Butterfly Birthday stamp set. I knew I was going to be watercoloring right up to the edge, so I found a way around the ‘edge’ you get when using dies as masks – you’ll see it in the video. Cut several masks – I stacked four post it notes and ran it through once since they were so thin – super easy!
- Stamp your butterfly pattern in a border along your paper. Be sure to overlap them using your masks so that they are on top of each other. I used an image from the Butterfly Birthday stamp set from Happy Little Stampers. I stamped mine in Versafine Onyx Black Pigment Ink on a 12 x 3″ scrap piece of Canson 138# Mixed Media paper. That way I could make two or three projects – depending on how I cut it down.
- Heat set your pigment ink before going to the next step!
- Watercolor your butterflies in similar colors – some vibrant, others more matte. That will allow them to pop and compliment each other. I chose the following watercolors by Schminke – Hordam Aquarelle Artist: Cobalt, Phthalo Blue, Indigo, Paris and Winsor Newton Cotman Ultramarine and Turquoise.
- Watercolor a light base coat in a watered down wash, then once dry come back to add darker highlights allowing for lightness in your wings. This helps your images to really pop!
- Once your butterflies are dry, cut your border down.
- Add a light watercolor wash of Schminke Translucent Orange framing your butterflies. First wet your paper on the half you’re painting, add your darkest color to the border and lighten outward. Try and keep the bulk of the color around your winged creatures.
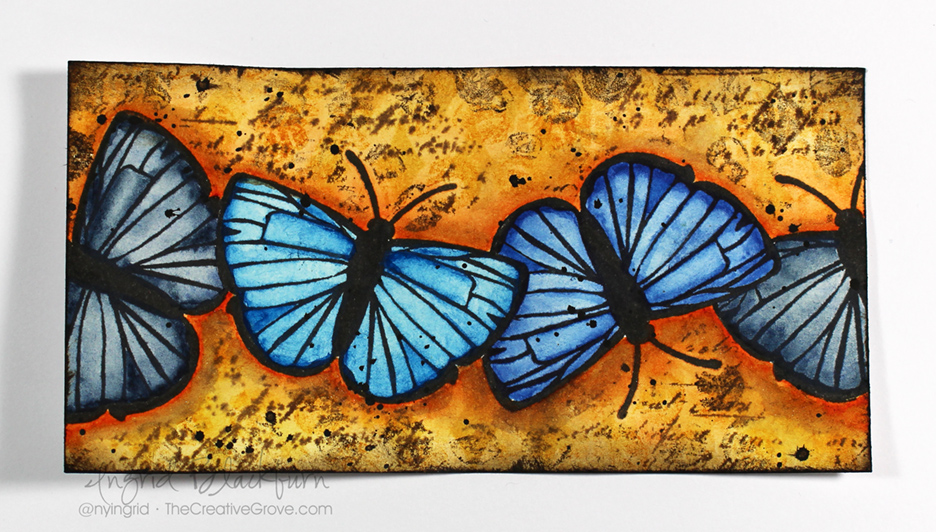
- Once dry, add a light wash of Ochre from the border inward. Try and keep some lightness to the outer border if possible. You want your wings to be the star.
- While your piece is still damp and drying, ink up a script stamp in Ground Espresso Distress Ink – I used one by Kaiser Crafts and stamp in random spots. Be sure to have your butterflies covered with your masks. With the paper wet, your Distress Ink will blur a bit. If it’s too wet you will lose all detail.
- Add various textures with stencils to your outer pieces around your butterflies using Wild Honey, Antique Linen and Espresso Distress Inks. I added texture with some bubble wrap & a diamond stencil (Harleen by Winnie & Walter).
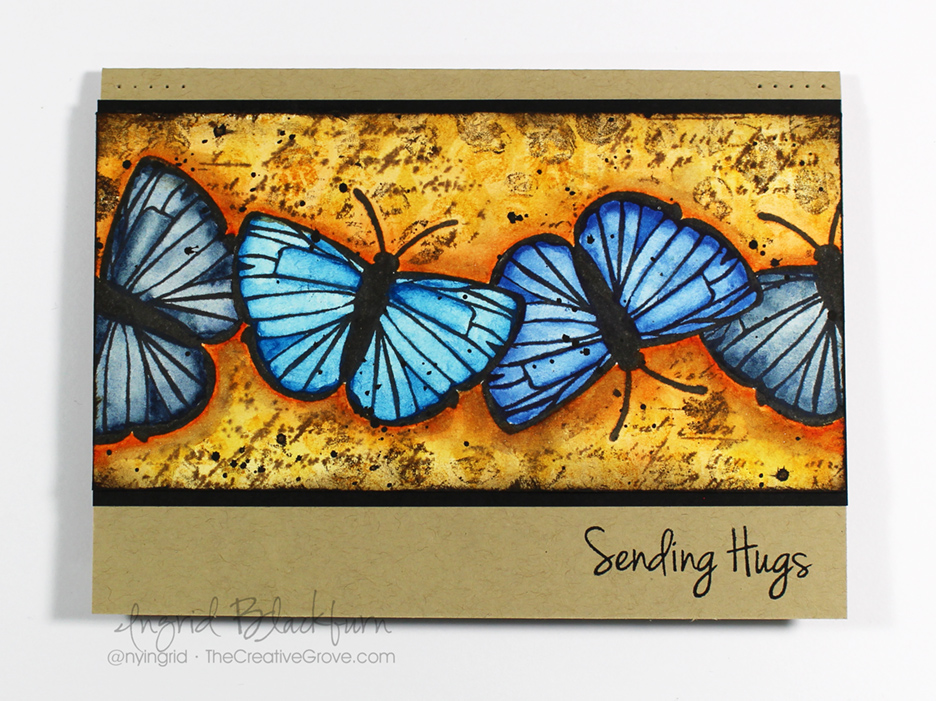
- Smoosh some Ground Espresso Distress Ink on your craft mat and spritz with water. Use a light wash over your orange at the edge of your butterflies. This will dirty it up a bit, tone down the orange, and help give life and depth to your winged creatures. It helps to make them seem as if they are fluttering. Keep your shadow a bit thicker on the bottom than the top. It’s okay if some touches the script, but you don’t want to wash away all the great texture you created.
- Lightly Sponge a frame in Ground Espresso Distress Ink and edge your piece in Soot Black.
- Splatter some Paynes Grey watercolor with a brush.
- Allow it to completely dry.
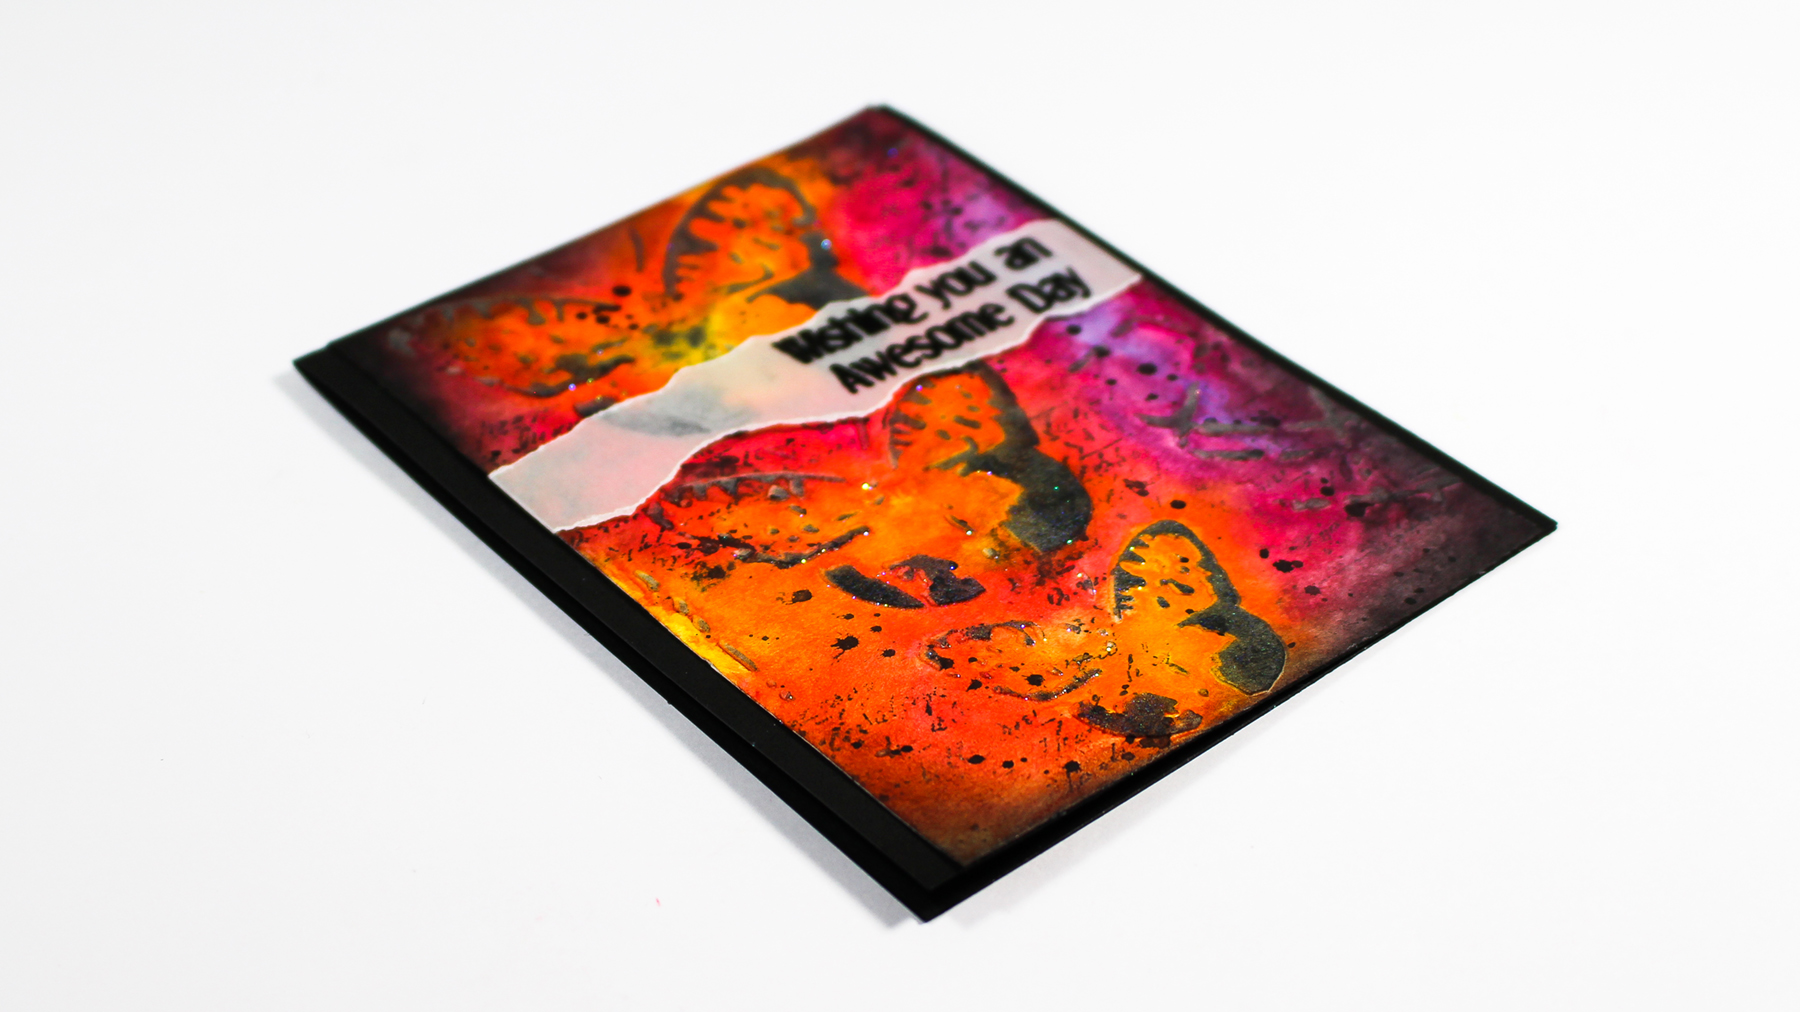
- Matte onto a black strip and add to a kraft colored base.
- Stamp your greeting – I used the fun quirky ones from the new HLS set Doodled Flowers – I LOVE these sentiments. They are the perfect size and looks as if I just wrote it myself.
Part of what makes this project work are the complimentary colors. Not just the butterflies, but blue and orange. Other combinations that are great are purple and yellow or red and green. Basically any two colors that are on the opposite of the color wheel from one another. The black really makes it pop and I love the brown and black together. It works!
Well, there you go, not too many steps. Okay – I’ll be honest, this project did take me over an hour to do – closer to two, but don’t let that scare you. It was fun, relaxing and is truly a piece of artwork. I don’t know if the photos relay it well, but the butterflies look as if they’re about to leap off the page or twirling from one side to the other. It turned out better than I could have imagined. So I encourage you to jump on in and try it yourself. Use whatever you have – hearts, Circles, Snowmen, Butterflies – we all have butterflies! Just have fun.
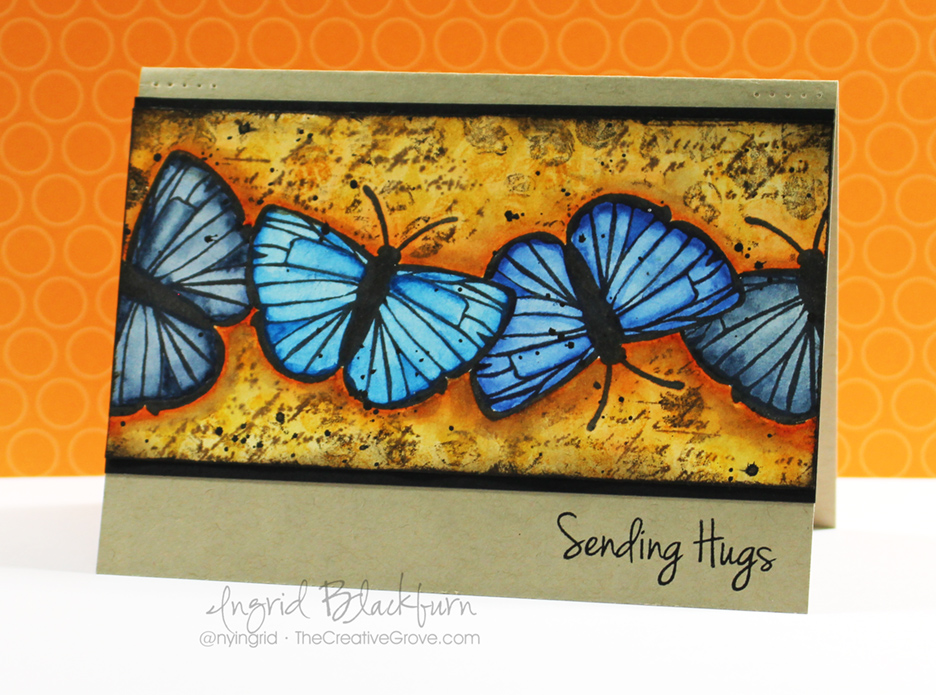
I can’t wait to see your Winged Mixed Media creations – use texture, embossing, whatever you have. I chose Watercolor, Distress, stamping, and stenciling. The sky is the limit. Jump on into the Mixed Media April Challenge – Wings. I can’t wait to see what you do!
I’m also going to play along with one of my new favorite Mixed Media challenges – CAS Mix Up challenge – if you haven’t checked this one out, don’t wait! This month it’s all about stamping & stenciling – LOVE that!
Now go get those fingers inky –

[optin_box style=”2″ alignment=”center” email_field=”email” email_default=”Enter your email address” email_order=”2″ integration_type=”aweber” double_optin=”Y” list=”3846012″ name_field=”name” name_default=”Enter your first name” name_order=”1″ name_required=”Y” opm_packages=””][optin_box_field name=”headline”]Learn more with our exclusive FREE video series:[/optin_box_field][optin_box_field name=”paragraph”]PHA+UGx1cyB5b3UnbGwgYmUgYWRkZWQgdG8gbXk8c3Ryb25nPiBGUkVFPC9zdHJvbmc+IENyZWF0aXZlIFRpcHMgRS1sZXR0ZXIuIEZyb20gdGltZSB0byB0aW1lIHlvdSdsbCBnZXQgZXhjbHVzaXZlIHByb2plY3RzLCB2aWRlb3MgJmFtcDsgdGhlIDEyIERheXMgb2YgQ2hyaXN0bWFzIHNlcmllcy48L3A+Cg==[/optin_box_field][optin_box_field name=”privacy”][/optin_box_field][optin_box_field name=”top_color”]undefined[/optin_box_field][optin_box_button type=”0″ button_below=”Y”]Get Immediate Access![/optin_box_button] [/optin_box]