Ornament Mojo

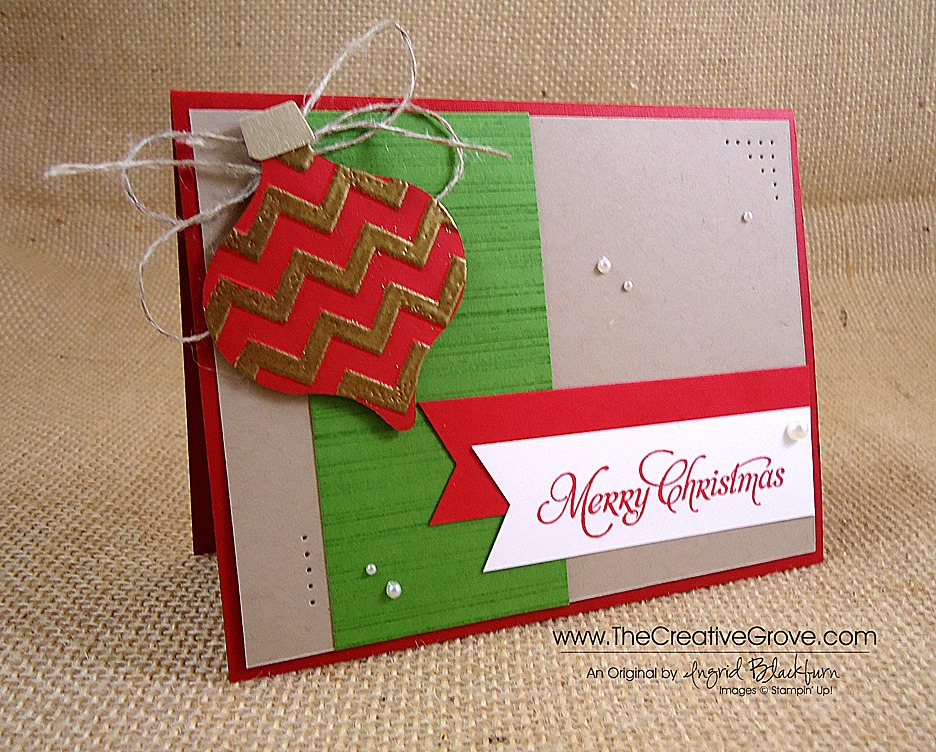
Happy Monday to you!  This morning I decided to break out my Holiday Ornaments Framelits and More Merry Messages for the Mojo Monday Challenge.  The sketch for today is a straightforward one that got me stamping right away.  I hope you love the design!

                More Merry Messages 001 FrontMojo303Sketch

Creative Tips –

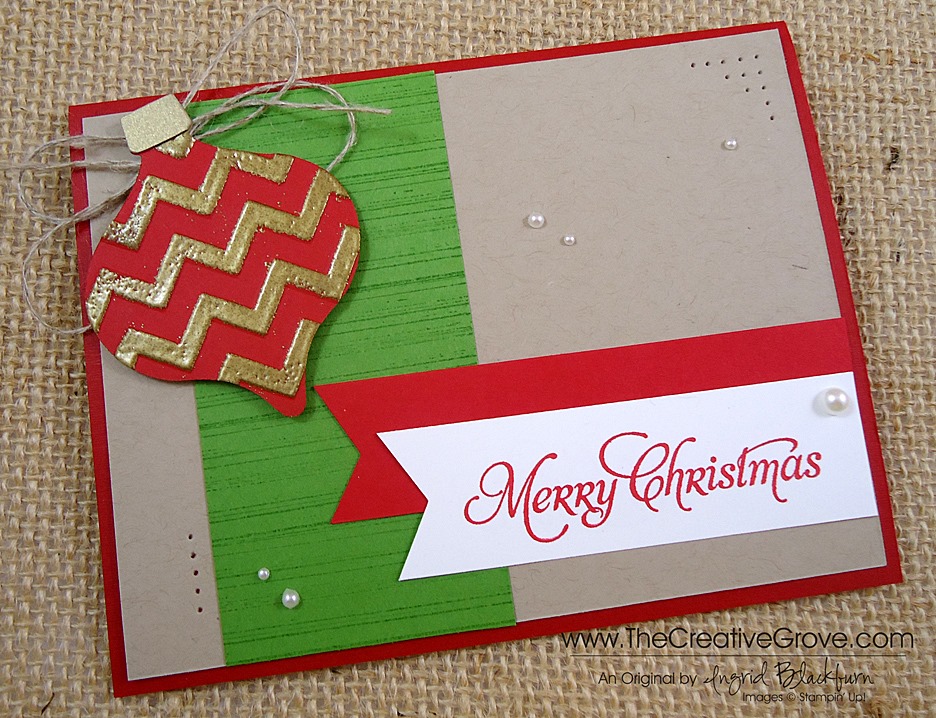
  • I wanted to emboss my ornament and run it through the Big Shot, so I cut the ornament shape using my framelits.  This set has a matching stamp set too – Ornament Keepsakes.  I embossed the ornament with the Chevron Embossing Folder, and lightly rubbed Versamark on the raised chevron lines to add gold embossing powder to it.  I love the end result – it really looks like an ornament!  To finish that off, I added a touch of our Brushed Gold  Card Stock for the top.More Merry Messages 001 CU
  • I wanted to add a little flair to the ornament, so I used some Linen Thread for a fun little accent behind the ornament. 
  • To add a subtle accent under the ornament, I used the Gorgeous Grunge stamp set to add some simple stripes.  More Merry Messages 001 Side
  • A Chevron Punch made perfect banner flags for the greeting and accent banner.
  • For a little finishing touch, some Pearl Basic Jewels give just a little something to the card along with a little decorative Paper Piercing in a few spots.
    More Merry Messages 001 Main L

It’s a simple little card, but captures the spirit of the holidays.  For some quick, easy and straightforward Christmas Cards, use the Ornament Keepsakes and More Merry Messages stamp sets.  Both can be found online only and not in any catalog – so you’d easily miss them.  I’ve made several easy and great looking card with both sets.  You can’t go wrong with them!

Learn a new technique in the Online Brayer Class

      Would you like to learn how to make Creative Scenery cards?  Have you been frustrated when trying to use your brayer?  Creative Scenery classes using a brayer have by far been my biggest hit with stampers.  Learn how to create gorgeous gradual transitions with 100+ minutes of step by step detailed video instruction teaching you how to master this technique.  The end result – You will feel like an artist.  Best of all, you will look at your stamps in a whole new way, make amazing projects and try things you never would have thought to do before.  Find out more here

      Signature Snowflake 001

To Shop 24/7 in the Creative Store – Click here!

Stamp Sets – More Merry Messages (126402c, 126400w), Gorgeous Grunge (130517c, 130514w) Paper – Crumb Cake, Real Red, Gumball Green  Ink –Real Red, Versamark Cool Tools – Holiday Ornaments Framelits ,  Paper Piercing Tool, Essentials Mat Pack, Stampin’ Pierce Mat , Gold Embossing Powder The Perfect Finish – Stampin’ Dimensionals, Linen Thread, Pearl Basic Jewels 

Holiday Ornaments FramelitsUntitled-12

Every Little Bit of Holiday Fun

I love stamp sets that are versatile.  One of my favorite stamp sets to use when I need something time specific throughout the year is the stamp set Every Little Bit.  This stamp set literally covers the year from one end to the other from holidays and moments.  I like to pair it with Petite Pairs for the greetings, another versatile greeting set.  I hope you like this card as much as I do!

This card is a classic and quite easy to make in a few minutes.  Every Little Bit has several stamps that would work for the holidays: an ornament, stocking, gift, menorah, star, and a snowflake.

Creative Tips:

  • The Petals-a-plenty embossing folder is perfect for this project because to me it looks like little poinsettia flowers.
  • I made several of this card in various colors, and some with paper knots, ribbon, or without. 
  • To add a little flair to the card, I added a little dazzling diamonds to the colored images.
  • My favorite one is the white on white card.  It’s simple, but just perfect!
  • To make the faux bow with the on the green card I used cardstock.  Click here to see my video tutorial on how to make this
  • To color my images I used a blender pen and my ink pads.  Tip – squeeze your Stampin’ Up! ink pads to collect ink in the lid.  Then use a blender pen and you’ll have a marker for every color of ink you have!

I just love this set.  I have used it for several times throughout the year.  And it’s perfect if I need a quick and easy card.

There’s only two days left in our online extravaganza!!  To shop at up to a 50% discount on several items in my online store, click the photo below.

flyerheader_Extravaganza_demo_NA_rdax_574x227

Signature Snowflake 001

To Shop 24/7 in the Creative Store Click here!

Stamp Sets – Every Little Bit (120558), Petite Pairs (122497) Paper – Whisper White (100730), Raspberry Ripple (126842), Certainly Celery (105125), Garden Green (102584) Ink – StazOn Jet Black (101406), Certainly Celery (126958), Garden Green (126973), Raspberry Ripple (126859) Cool Tools –Aqua Painter (103954), Argyle TIEF Embossing Folder (127750), Blender Pens (102845) The Perfect Finish – Stampin’ Dimensionals (104430), White 3/8” Taffeta Ribbon (109070), Dazzling Diamonds (102023)


Every Little Bit 120558L

Mojo Monday Snow Swirled Card

It’s Mojo Monday again.  I love starting out the week this way.  My first thing to do is make a creative card – best part – I don’t have to design the layout!  This card quickly came together for me.  I added a little Cherry Cobbler bling to it, and I love the result.  I hope you do to!

Mojo266Sketch

Creative Tips:

  • Rather than leave my Christmas tree on a vanilla block mat with a lot of white space, I wanted to be able to see the Designer Series Paper and other colors – so I cut it out and popped it up using dimensionals.
  • I used Be of Good Cheer DSP for the patterned paper.
  • I wanted to highlight the snowflake aspect of the card, so I added a little drop of Cherry Cobbler Dazzling Details first the the center of the snowflakes and then just a few more to fill in the  tree. 
  • Dazzling Details needs a little bit to dry, so I gave my tree a quick pass with my new Heat Tool on the low setting.  It dried in no time – which is great for me, because if I let it dry naturally, I’m famous for checking before it’s time and ruining my project!
  • For the snowflakes, I used the Snow Flurry Bigz Die in Very Vanilla and Red Glimmer Paper.

  • I created the banner flag end for the greeting with a square punch.
  • For the large banner, since I didn’t have a square punch large enough, I marked the center with a line as high as I wanted to cut from the end.  I used Paper Snips to cut from the points to the line – it’s better than trying to free hand it.

  • This card has a lot of dimension to it, the main vanilla panel is popped up, along with the tree, snowflakes and greeting.
  • The paper piercing adds that perfect finishing touch to the Cherry Cobbler block – it balances the card out nicely.

Snow Swirled has a great Christmas greeting in the set, but I needed something long and thin to fill the space, so I chose my old standby – Sweet Essentials.

Signature Snowflake 001  

To Shop 24/7 in the Creative Store Click here!

Stamp Sets – Snow Swirled (127799), Sweet Essentials (126457) Paper – Very Vanilla (101650), Be of Good Cheer (126896), Cherry Cobbler (119685), Gumball Green (126840), Red Glimmer Paper (121790) Ink – Gumball Green (126861), Cherry Cobbler (126966) Cool Tools – 1” Square Punch (124094), Stampin’ Trimmer (126889), Paper Snips (103579), Heat Tool (129053), Snow Flurry Bigz (127813), Paper-Piercing Tool (126189), Stampin’ Pierce Mat (126119), Essentials Paper-Piercing Pack (126187) The Perfect Finish – Cherry Cobbler Dazzling Details (124177), Stampin’ Dimensionals (104430)

Snow Swirled 127799L

The Creative Crew: Evergreen Beauty

If you know me, then you know I have a love for all things Pine and Redwood.  The redwood tree is actually my personal mascot.  So this stamp set is SO me!  And as you get to know me more through my blog, you’ll learn that one thing I love is two-step stamping.  What’s better than two images that create depth and detail into one!  I love it – I don’t have to color or do anything snazzy to make my project look great.

Today I’m featuring this great Christmas card by Aleida Abreu, guest stamper and team member of my Creative Crew.  I love Aleida’s sense of Clean and Simple style in this Evergreen beauty.  It’s elegant and really pops.  Best yet – you could easily mass produce these for your Christmas cards!

Here Aleida used the new Evergreen stamp set from the Holiday Catalog and combined it with some of our Big Shot accessories – the Lacy Brocade Embossing Folder and Apothecary Accents Framelits.  Here are a few tips and details on what she did to make this card pop.

Creative Tips:

  • To give the card a little elegance, Aleida used the script greeting from the Greetings of the Season set in the Holiday Catalog. Click here for the Holiday Catalog
  • She embossed the greeting with our Gold Embossing Powder on Always Artichoke and popped it up using our Stampin’ Dimensionals
  • Sometimes a project just needs that little something, try adding a few of our Brads!  Here you see that Aleida chose to add the gold ones from our Metallic Brads collection – it’s the perfect touch and you get 30 each of four colors.
  • To add the finishing touch to her card, she used the Essentials Paper-Piercing Pack to pierce around the Apothecary Framelit.

  • Here I duplicated her card and just substituted the lined image for the tree as opposed to the script writing option.  I just love the options in this set.

I think you’ll find that you have several options and ways that you can use this versatile stamp set.  I love the little star in it and the fact that it has a saying for the inside of your Christmas cards.  Enjoy playing with it!

SSF_Seasonal_Sayings

Single Stamps – Do you love that Greeting set, but wish you could buy just the one or two stamps?  Well, now you can from these select stamp sets: Perfectly Penned, Word Play, Seasonal Sayings.  Buy some of our best Greetings Stamps individually!   Hurry, this special is good for a limited time only through Jan 2, 2013! For more details, click here.  

Signature Snowflake 001

To Shop 24/7 in the Creative Store Click here!

Stamp Sets – Evergreen (127973), Greetings of the Season (128033) Paper – Very Vanilla (101650), Always Artichoke (105119), Cherry Cobbler (119685) Ink – Always Artichoke (126972), Versamark (102283) Cool Tools – New Heat Tool (129053), Gold Embossing Powder (109129), Paper-Piercing Tool (126189), Stampin’ Pierce Mat (126119), Essentials Paper-Piercing Pack (126187) The Perfect Finish – Stampin’ Dimensionals (104430), 3/16” Metallic Brads (119741)

Evergreen 127973LGreetings of the Season 128033L

Snowflake Soiree Sparkle

It’s no secret that I love winter.  I know – I must be the only one!  You really start to develop an appreciation for it when you live in Florida.  Don’t get me wrong, I love the palm trees and water, I just love snow more.  So I thought I’d put a little sparkle into my morning with the Snowflake Soiree stamp set and some Silver Glimmer Paper.

This card evolved from a different project of mine that I taught in my Creative Cards class this month and designed for the Stamp Academy Holiday Project Parade.  Click here for Project Parade One of my friends, Linda A, went her own route and this is her version of my card.  The difference was to do the Triple Time Stamping Technique with just the four snowflake stamps.  I loved the simplicity of it.  I wanted to add a little more sparkle, so here is the result!  For me the circles are just additional little flakes. I really like how they give this card some shimmer and sparkle.

Creative tips –

  • I used a few Rhinestone Basic Jewels to add a little bling and glimmer to my card in addition to using the Silver Glimmer Paper.
  • I cut a 1 1/2” square to cut out my snowflake using my Snowflake BigZ die with my Big Shot.  Don’t throw away the scrap – that’s where I punched some of my glimmer circles from.  The rest I punched from the scrap of the medium sized snowflake from another project.  I used the circle from the Itty Bitty Shapes Punch Pack.
  • The technique used to make this card is called the Triple Time Stamping. 
  • Some Baja Breeze Seam Binding Ribbon is the perfect touch to finish this card.

  • Snowflake Soiree is a great set – along with four different sized snowflakes, it has two greetings!
  • I rock n rolled the large snowflake for some variety in Baja Breeze and Not Quite Navy.  The second largest stamp is stamped off once on scratch paper in Baja Breeze for a lighter shade.
  • I popped up my layered snowflakes for a 3D effect.  Since it’s rather large, I added Stampin’ Dimensionals to three of the branches of the snowflake.  I used the edge of my Dimensionals sheet – don’t throw that out!

  • A little snowflake with a Rhinestone Basic Jewel on the inside is perfect to complete the card.
  • The Midnight Muse mattes for the white panels are 1/16th inch so that they don’t overpower the card.

B1_ChristmasGift_demo_Oct0112_NA

New this October 1 – 31, 2012! Get a FREE Festive Paper Piercing Pack when you order one of the Ornament Bundles this month only!  Click here for more details on this limited time offer.

Signature Snowflake 001

To Shop 24/7 in the Creative Store Click here!

Stamp Sets – Snowflake Soiree (127925) Paper – Whisper White (100730), Midnight Muse (126843), Silver Glimmer Paper (124005) Ink – Midnight Muse (126860), Baja Breeze (126960), Not Quite Navy (126971) Cool Tools – Snowflake BigZ die (127813), Itty Bitty Shapes Punch Pack (118309) The Perfect Finish – Stampin’ Dimensionals (104430), Baja Breeze Seam Binding Ribbon (122331), Rhinestone Basic Jewels (119246)

Snowflake Soiree 127925L

CAS Chock-full of Cheer

This is a re-designed card of this one from a few weeks ago.  I wanted to try a sample with my Chock-full of Cheer and Cheerful Christmas wheel.  I wanted a crisp and clean look and here’s the result.

I switched it up a bit by stringing the ornament onto the Cherry Cobbler Baker’s Twine which is a near match to the Raspberry Ripple Cardstock.

  • I punched a small circle with my 1/16th handheld punch to string my ornament.  It’s a tight fit, so I opened the hold a big using my paper piercer.
  • I stamped tone on tone for the two background pieces.  One with the Cheerful Christmas Wheel which I unmounted and use as a clear stamp.  The other with my Distressed Dots background stamp.  Both compliment each other and give that holiday feel to my project.
  • I didn’t want my greeting to take over the card so I stamped onto half a Curly Label punch and adhered it sideways.  It’s just the right amount.

  • I didn’t have the perfect colored button, so I created my own button embellishment using sponged cardstock.  It’s the only sponged piece on the card – but necessary for a little more depth to the button.  I punched two holes just like a normal button so I could tie my Cherry Cobbler Baker’s Twine through it.  It looks pretty close!
  • To completely finish the project off, I popped up the ornament, added the center in Raspberry Ripple, and added a pearl to it.

Overall, this project is fun and colorful.  I like the amount of white space to the card and feel that it really pops off the page.  What do you think?

New this October 1 – 31, 2012! Get a FREE Festive Paper Piercing Pack when you order one of the Ornament Bundles this month only!  Click here for more details on this limited time offer.

B1_ChristmasGift_demo_Oct0112_NA Creatively yours –

Ingrid

To Shop 24/7 in the Creative Store – Click here!

Stamp Sets – Chock-full of Cheer (126717), Distressed Dots (122815), Perfect Pairs (122497), Cheerful Christmas Wheel (127310) Paper – Whisper White (100730), Gumball Green (126840), Raspberry Ripple (126842) Ink – Gumball Green (126861), Raspberry Ripple (126859) Cool Tools – Curly Label Punch (119851), 1 3/4” Circle Punch (119850), 3/4” Circle Punch (119873), 1/16” Circle Handheld Punch (101227), Paper Snips (103579) The Perfect Finish – Pearl Basic Jewels (119247), Cherry Cobbler Baker’s Twine (123125), Stampin’ Dimensionals (104430)

A fun challenge


I was challenged to make a card with the stamp set Chock-Full of Cheer and here is my fun little result!  The images in this set are quite fun in nature, so I find this set easy to use.  Especially with the complimentary wheel Cheerful Christmas and matching Designer Series Paper Be of Good Cheer.

I didn’t want to get too ornate with this one, just quick, simple and colorful.  This set to me screams bright bold color.  I chose to stick to the new 2012-2014 In Color collection and used everything except Primrose Petal!  I also kept the accessories to a minimum and just used the Scallop Border Punch and one Pearl Basic Jewels.  The end result is an easily mass produced card – I made 25 in just a few hours, that is just as fun as it is quirky.


  • To get just a hair of Raspberry Ripple showing around the stamped image squares and rectangle, I measured 1/16th to the left, right and in etween both.  For a total of 4/16 – or 1/4” larger than my white before I cut it up.
  • For the bottom, I used the large row of circles and masked it off if I felt it needed it, depending on where I stamped my Merry Christmas – in this case, to the right. 

You could kick this card up a notch if you wanted to with more Pearl Basic Jewels or some Rhinestone Basic Jewels.  You could even stamp the circles at the bottom in alternating colors like I did for the card in this post.  Just have fun with it – after all, it’s in the name of the set… Chock-full of Cheer!

Creatively yours –

Ingrid

To Shop 24/7 in the Creative Store – Click here!

Stamp Sets – Chock-full of Cheer (126717) Paper – Whisper White (100730), Gumball Green (126840), Raspberry Ripple (126842), Summer Starfruit (126839) Ink – Gumball Green (126861), Raspberry Ripple (126859), Midnight Muse (126860), Summer Starfruit (126853) Cool Tools – Scallop Edge Border Punch (119882) The Perfect Finish – Pearl Basic Jewels (119247)

Chock Full of Cheer

Blast from the Past

Today I thought I would dive into my older projects to share with you one of my all time favorites.  Peaceful Wishes was one of the great stamp sets by Stampin’ Up!  And this was definitely one of my favorite cards.  The pine branches were so realistic.  And the font used for the saying is a favorite among many stampers – doesn’t it look like Scriptina? 

I used a ticket corner punch for the corners on the Purely Pomegranate and Whisper White.  I stamped in River Rock on the background for a muted depth.  This card was a fun one to make and I sent out over 100 that year.  I printed our Story on the inside so everyone knew what we were up to, and quite honestly so that I didn’t have to sign 100 cards!

I didn’t want the white to overtake the card so I did something that I don’t normally do – I left only a 1/16th edge for the base.  The effect was perfect.  I also added just a touch of stitched ribbon.  I tied a knot, fed it through a slot punch and adhered it to the back – it was quite cost effective, and did not take away from the overall look.

I hope you’ve like my little dive into the archives for this card – I miss the Purely Pomegranate color – hopefully it’ll come back one day!

Creatively yours –

Ingrid

To Shop 24/7 in the Creative Store – Click here!

Stamp Sets – Peaceful Wishes – retired Paper – Whisper White (100730), Purely Pomegranate – retired, River Rock (108640) Ink – River Rock, Purely Pomegranate Cool Tools – Horizontal Slot Punch – retired, Ticket Corner Rounder – retired The Perfect Finish – Purely Pomegranate Stitched Grosgrain Ribbon – retired