All That Jazz: New Release from Catherine Pooler – Blog Hop

Catherine Pooler All That Jazz Ink

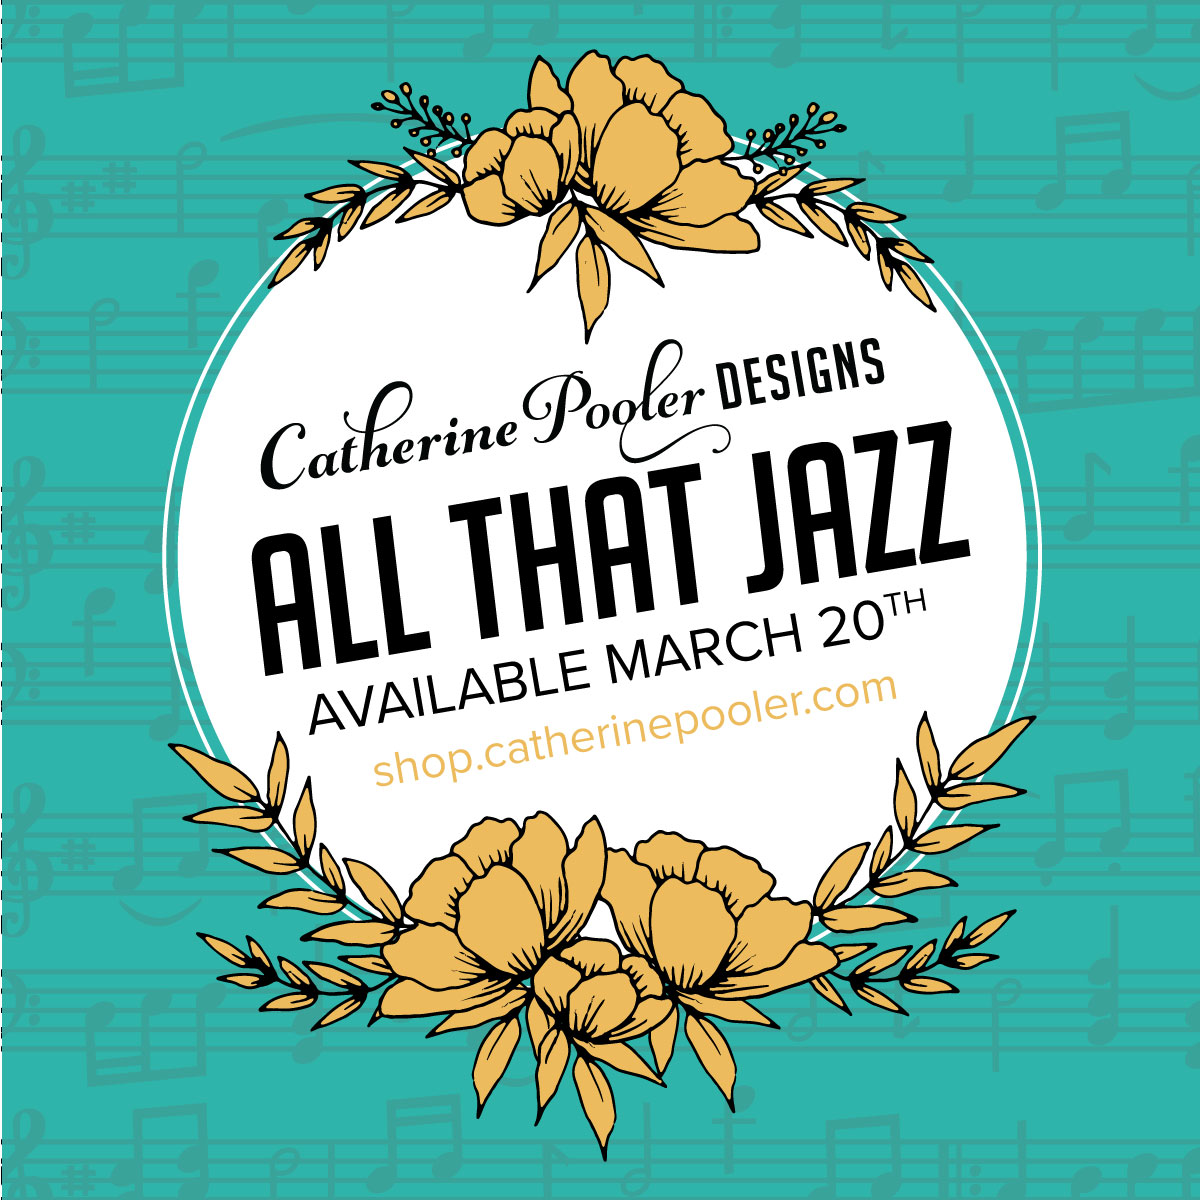
Welcome to the All That Jazz release blog hop – Day One! I’ll be honest, every time I type All That Jazz, I hear a broadway chorus sing it and see jazz hands…lol! Now you will too, sorry about that! So, it’s only fitting that we have that singing around in our heads while looking over all the gorgeous inspiration the Creative Team came up with, right?

Today marks the first day of three amazing project inspired days for the next release over at Catherine Pooler Designs. And what a release it is. It’s literally packed with new cool products (many of which I’ve used today), the previous Stamp of Approval Counting Blessings Collection (one of my all time favorites) and drumroll….you’ve been waiting….the ink color All That Jazz.

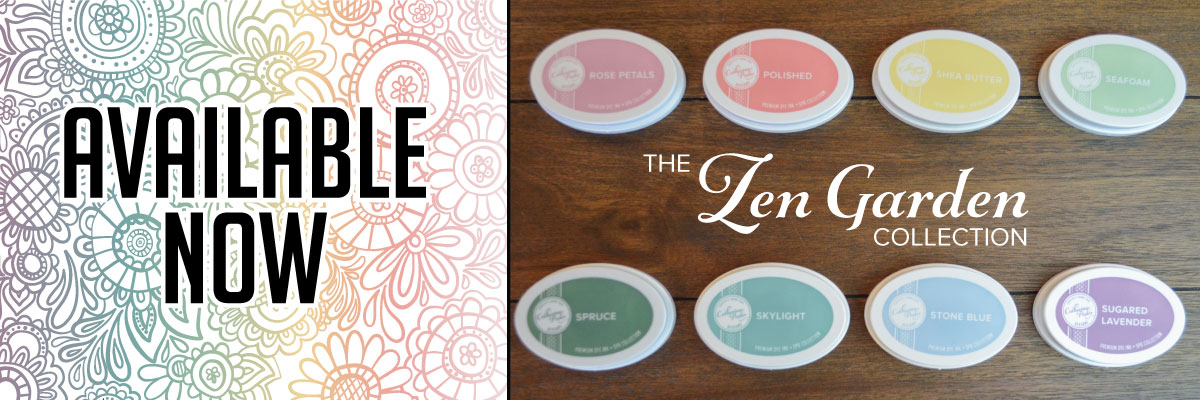
If you were lucky enough to nab a Naturally Inspired SOA last June, then you have this deep Teal that’s part of the Party Collection of Inks. If not, it’s finally here!!

Catherine Pooler All That Jazz Ink

All that Jazz Tutorial #1

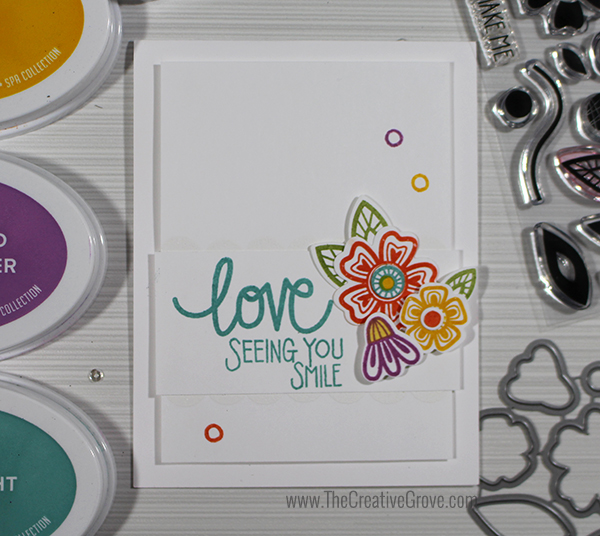
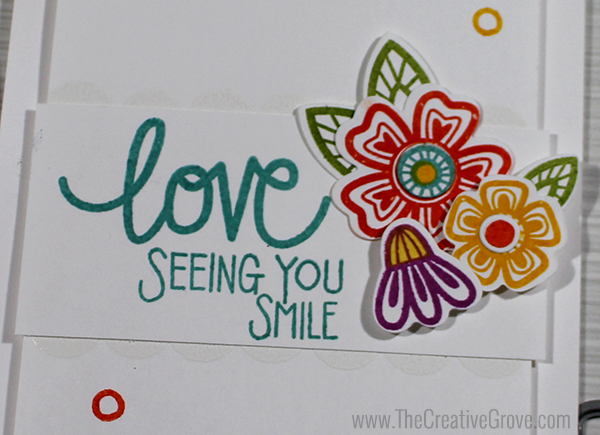
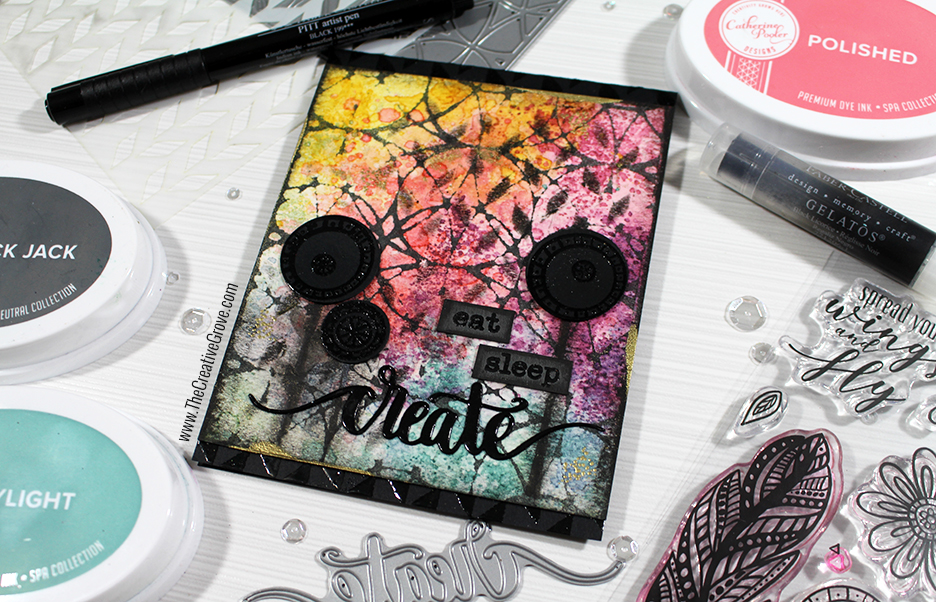
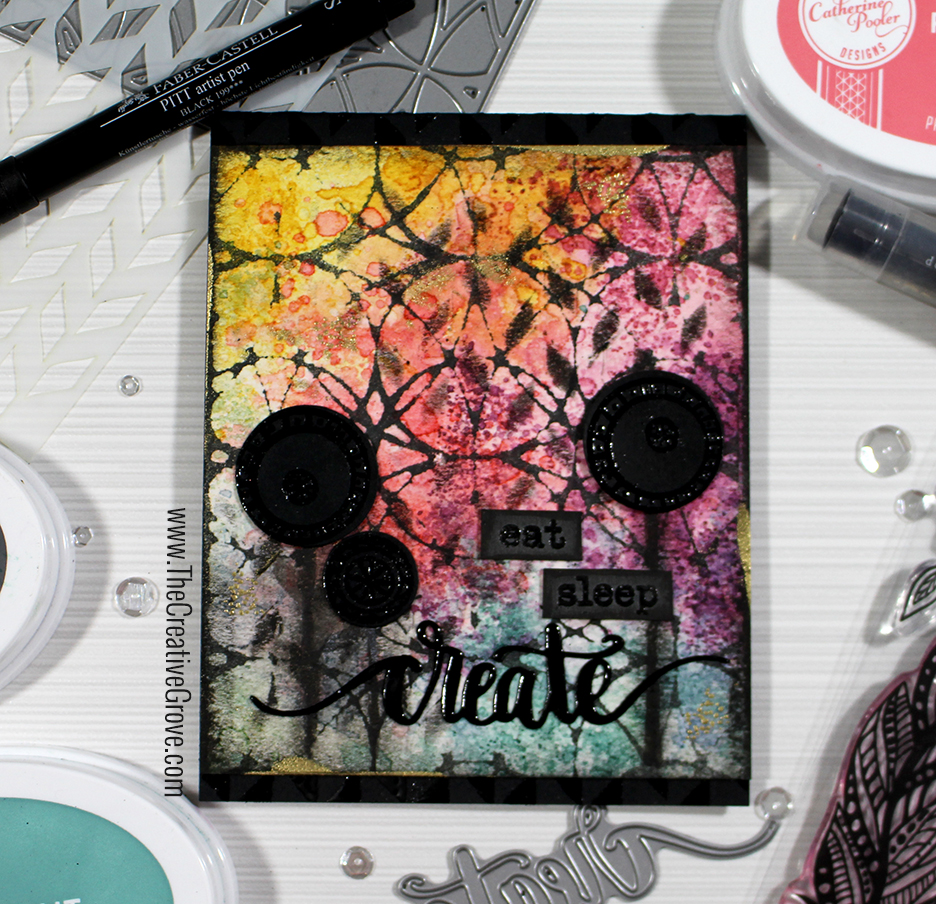
So let’s dive right in. First up is a quick, fun little project that works for just about any occasion….I was tempted to pop a have a…birthday on there, but then decided to leave it just Awesome.

Catherine Pooler Designs Stencils - All that Jazz

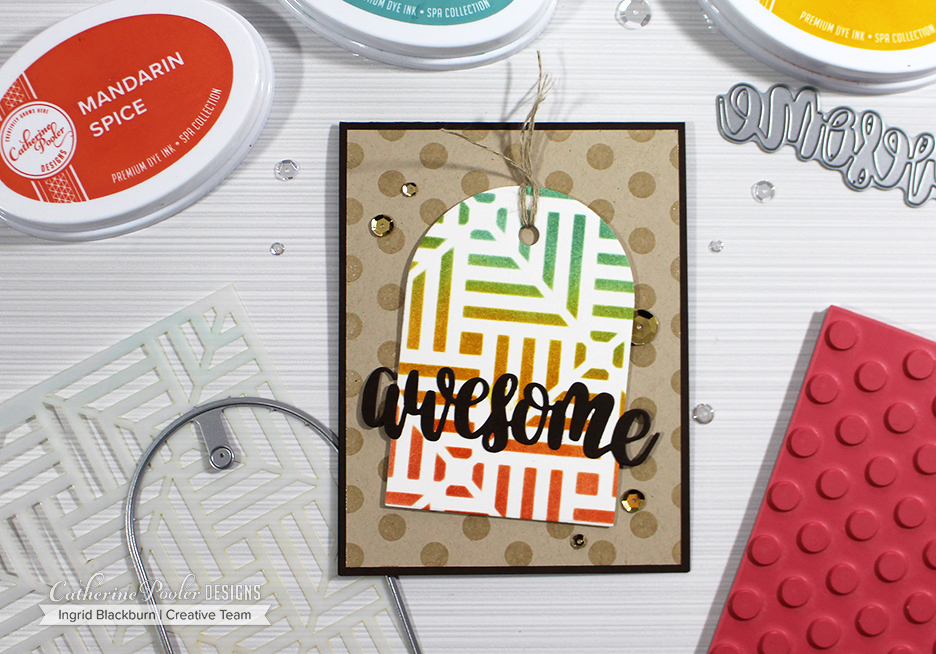
Isn’t that stencil pattern just WAY cool? It’s called Square Dance and you can get it on the 20th in the stencil section over at Catherine Pooler Designs. This stencil has SO many possibilities. I’m just getting started. WAIT till you see what I have up my sleeve for it later this week!

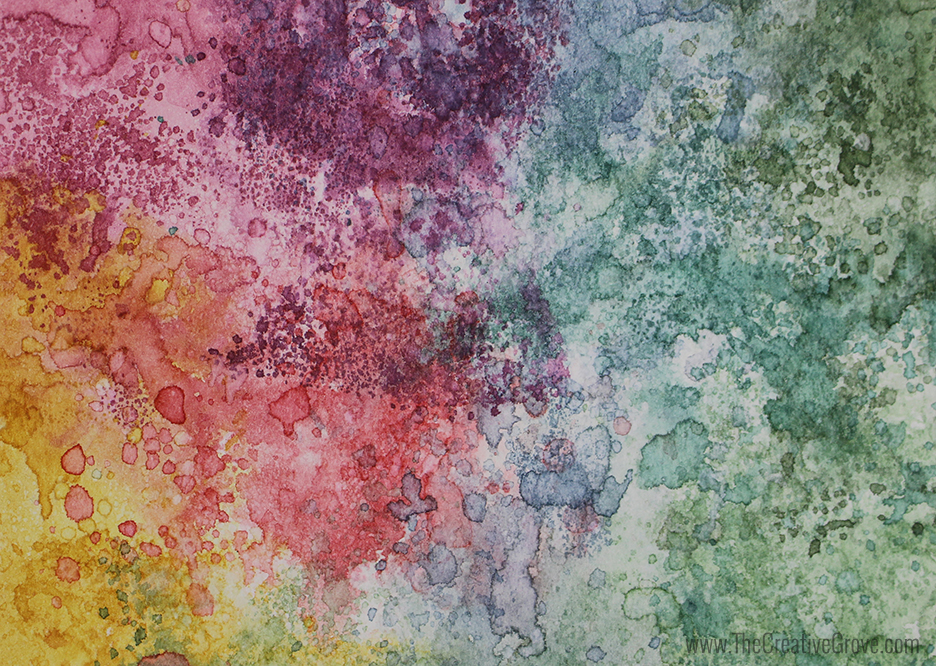
To get this look – sponge some Sauna, over lap it with Mandarin Spice and Daylight and voila! I used watercolor paper to get a smooth blend, and then cut out the tag using the Tags, Etc. Dies set. That’s an awesome collection of shapes and embellishment dies that everyone should have.

Pop it up onto a fun simple embossed in clear background using the new Doin’ the Polka Background stamp. Who doesn’t need a fabulous Polka Dot background stamp. They are just the right size – there, but not over powering, you know?

Catherine Pooler Ink - All that Jazz

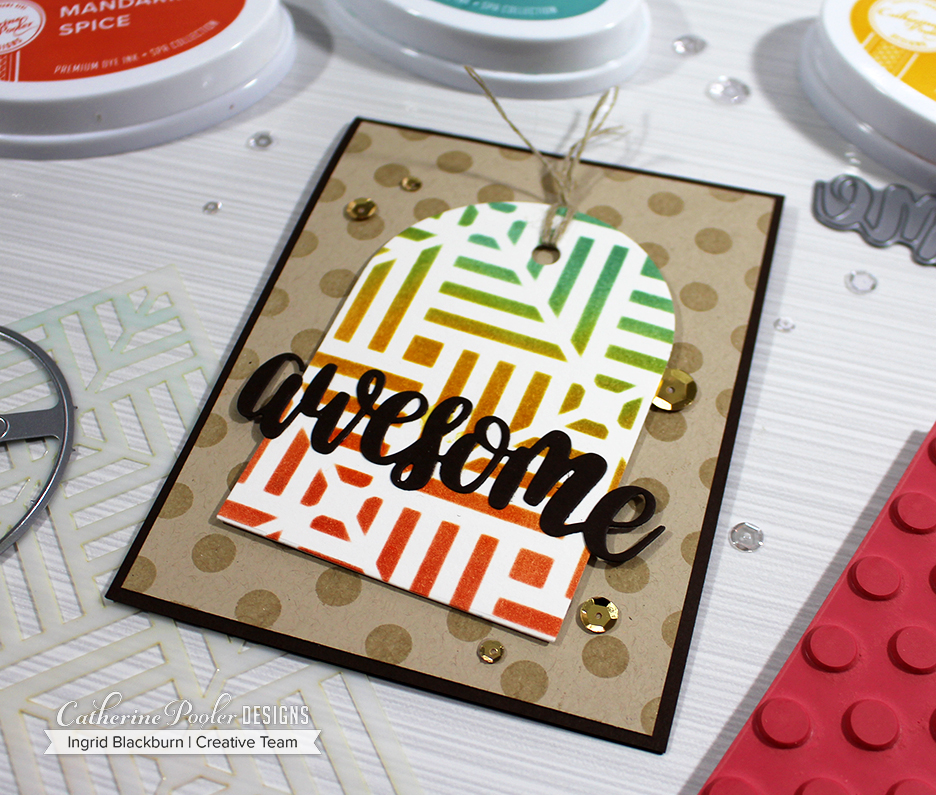
To keep the muted theme going cut out the new hand lettered awesome die and you’re all set. I just LOVE that Chocolate cardstock. Oh speaking of cardstock….um…did you notice the Sand Dunes? YUP – it’s NEW. The perfect shade of sandy goodness.

All That Jazz Tutorial #2

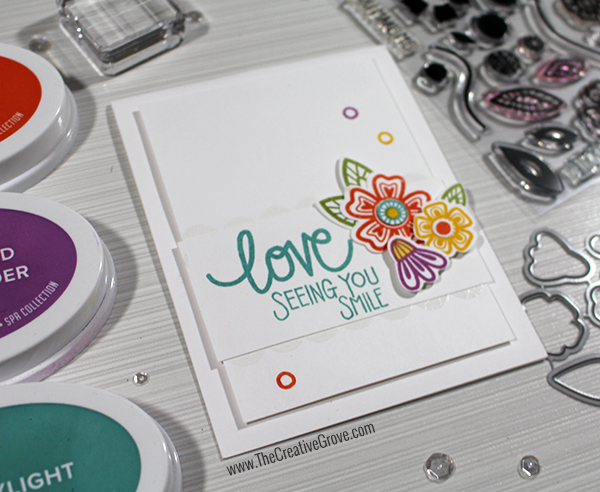
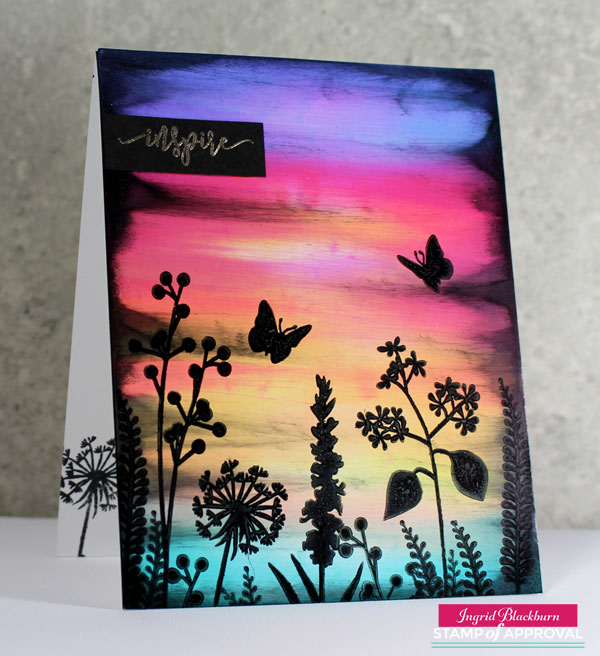
Next up, I have to admit, it’s one of my favorites. When Catherine showed me the Grateful Heart stamp set designed by our very own Creative Team member Lydia Evans, I nearly fell over. True story. This stamp set is SO unbelievably gorgeous it’s crazy! What I love about it the most is that you have all the images as singles AND two huge floral sprays. So masks your own creation, or just stamp – brilliant, right?

All That Jazz Ink Release - Grateful Heart Ingrid Blackburn

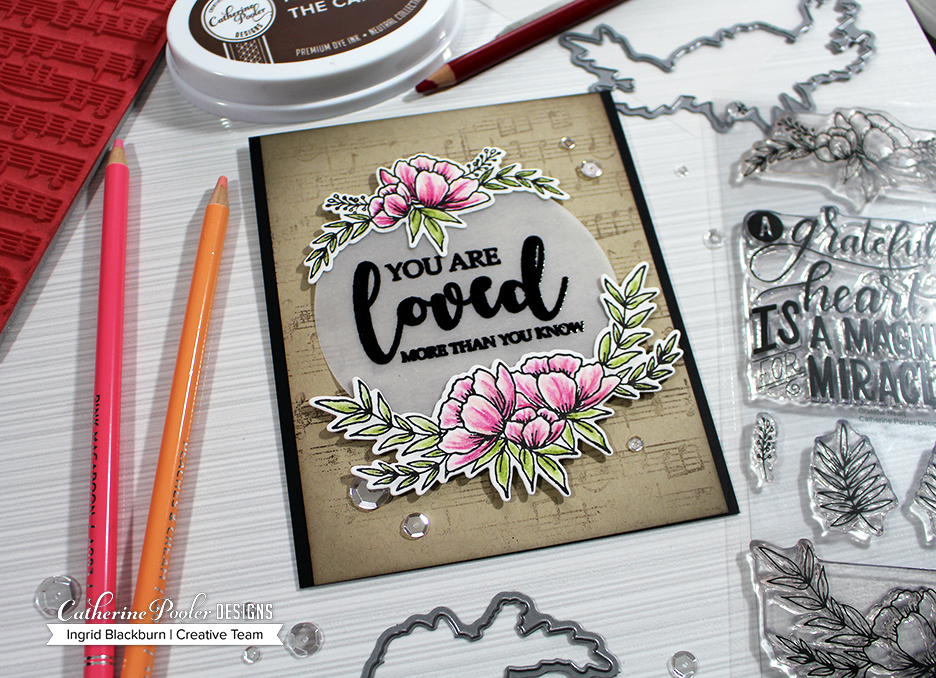
First, stamp the two floral sprays in Midnight ink and then use some pretty colored pencil shades to bring then to life. First add some green to the leaves, I used some colored pencils from Arteza, then create some shadows around the images in light grey keeping in mind where your light source is. You’re going to cut them out, so do the shading first.

Now it’s time to color. Start with your darkest shade for your petals, keeping your strokes light. Feather in some light pink and then blush. Blend your colors with some gamsol and a blending stump and you’ve got a beautiful little creation. Cut each spray out with the coordinating dies from the Grateful Heart Dies Collection. Since it’s so intricate, I used some washi tape to hold them in place.

All that Jazz - Catherine Pooler Ink

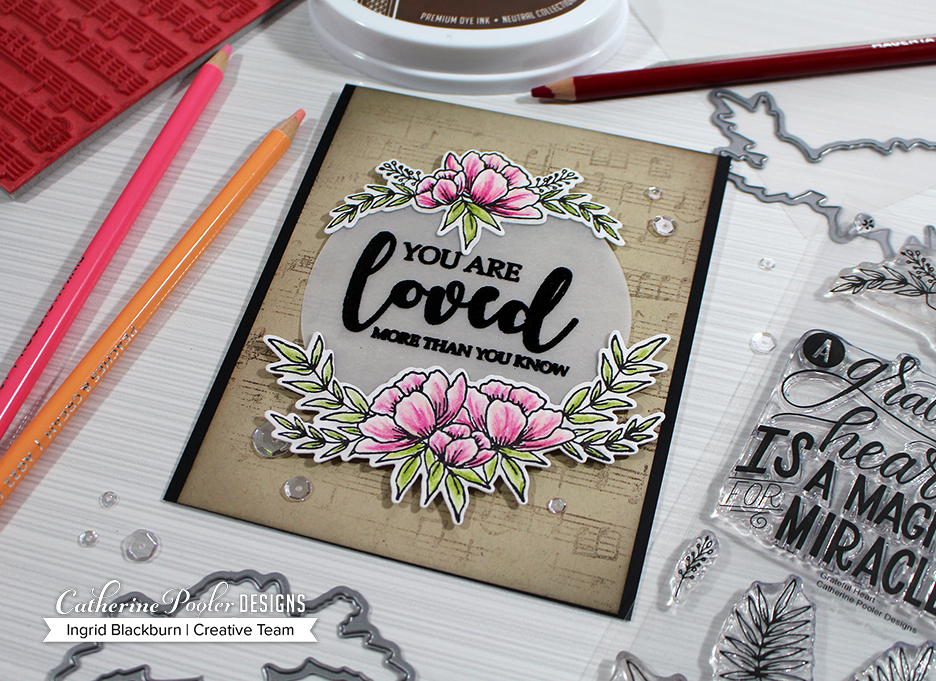
Next use the Circles Dies to cut a large circle out of the new Vellum Cardstock – YES, another new paper. I’m a sucker for Vellum cardstock. This one is 48# weight and just gorgeous. It’s heavy enough to hold up to techniques, yet you can still see through it. Emboss one of the two sentiments in the set onto your circle and glue your spray keeping them off-centered.

Using that gorgeous Sand Dunes cardstock, imperfectly ink up the new Music Notes background stamp in Icing on the Cake. Take a paper towel and dab a little away. Stamp onto scratch paper and then stamp onto your Sand Dunes cardstock. You want that stamped off look so it doesn’t overpower your card. It’s background music support, the flowers are the main show.

To give the card a soft look, try adding some super light sponging around the border with the icing on the cake. I wanted to keep it not just brown, so I used my black sponge tool. That way whatever was on there from last time, mixed with my brown Icing on the Cake and I got this gorgeous aged look.

TIP – put the pressure on your tool that is off your project, kind of angling it so that you keep the pressure SUPER light.

Grateful Heart Stamp Set and Dies - Ingrid Blackburn

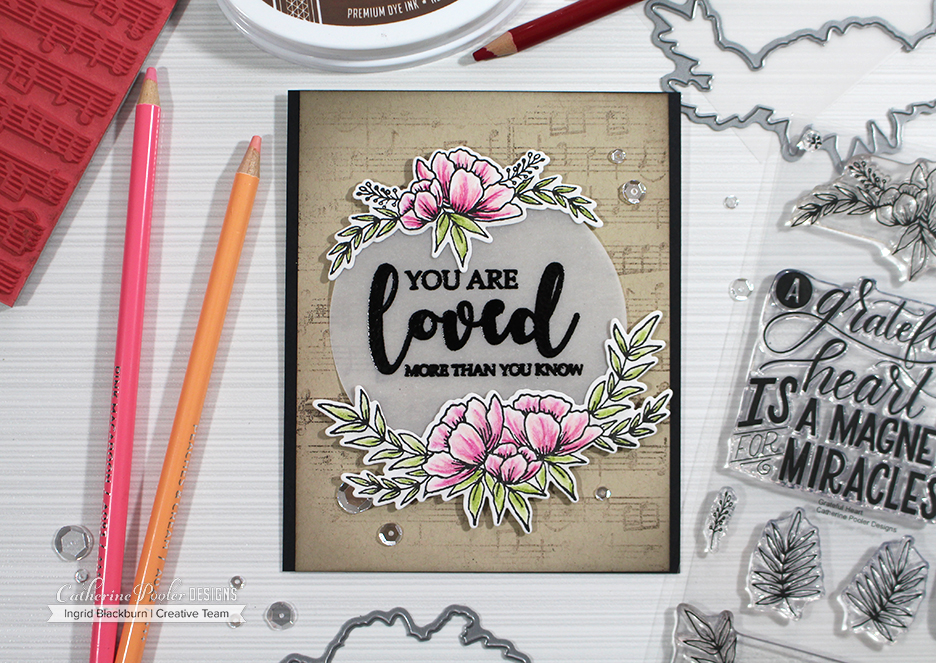
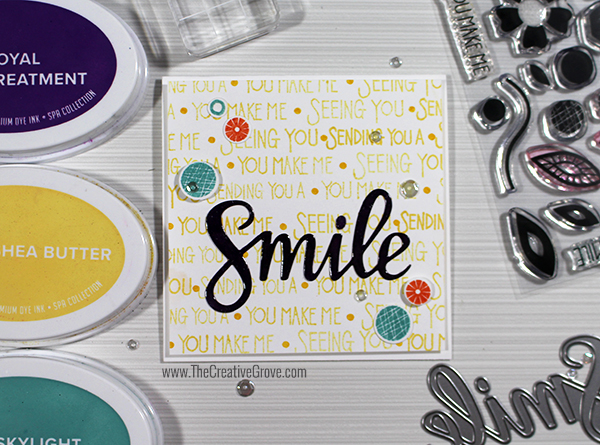
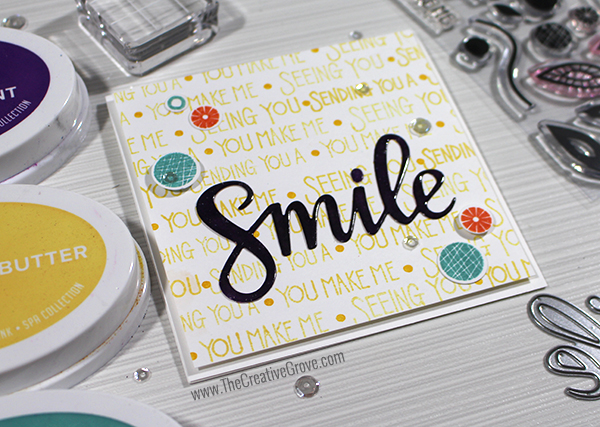
Pop up your flowers and mount onto a black base. My card measures 4.5 x 5.5″. I wanted it a bit wider so it wasn’t too skinny on the sides. I’m sending this card to my mom. I know it’ll make her smile. 🙂

What did you think? I’d love to hear which one is more your style! In addition to the previously released items (counting blessings collection and all that jazz ink pad), there’s also a new hand lettered wonderful die just like the awesome die, and some fun new 6×6 patterned paper – more on that Tuesday ;).

All That Jazz Blog Hop Prizes

Here’s the full hop in case you missed any on the way here. Be sure to comment along the way. There will be five lucky winners that get two free ink pads & free shipping on their order!! 🙂

  1. Catherine Pooler   <– Go Here Next!
  2. Josefine Fouarge   
  3. Melissa Miller  
  4. Jenny Colacicco  
  5. Karen Baker 
  6. Justine Hovey  
  7. Ilina Crouse  
  8. Maureen Merritt  
  9. Allison Cope  
  10.  Ingrid Blackburn  You are here. 🙂

Thanks so much for stopping by today! I hope you loved these couple of projects. Of course if you’re a StampNation member, you’ll get to order early tomorrow – perks of membership! Everything goes on sale Tuesday March 20th over at Catherine Pooler Designs. Be sure to hop along the next two days too. Just start over on Catherine’s blog.

All That Jazz - Catherine Pooler Designs

And stop by here too. I’ll have some more creative fun for you! See you then.
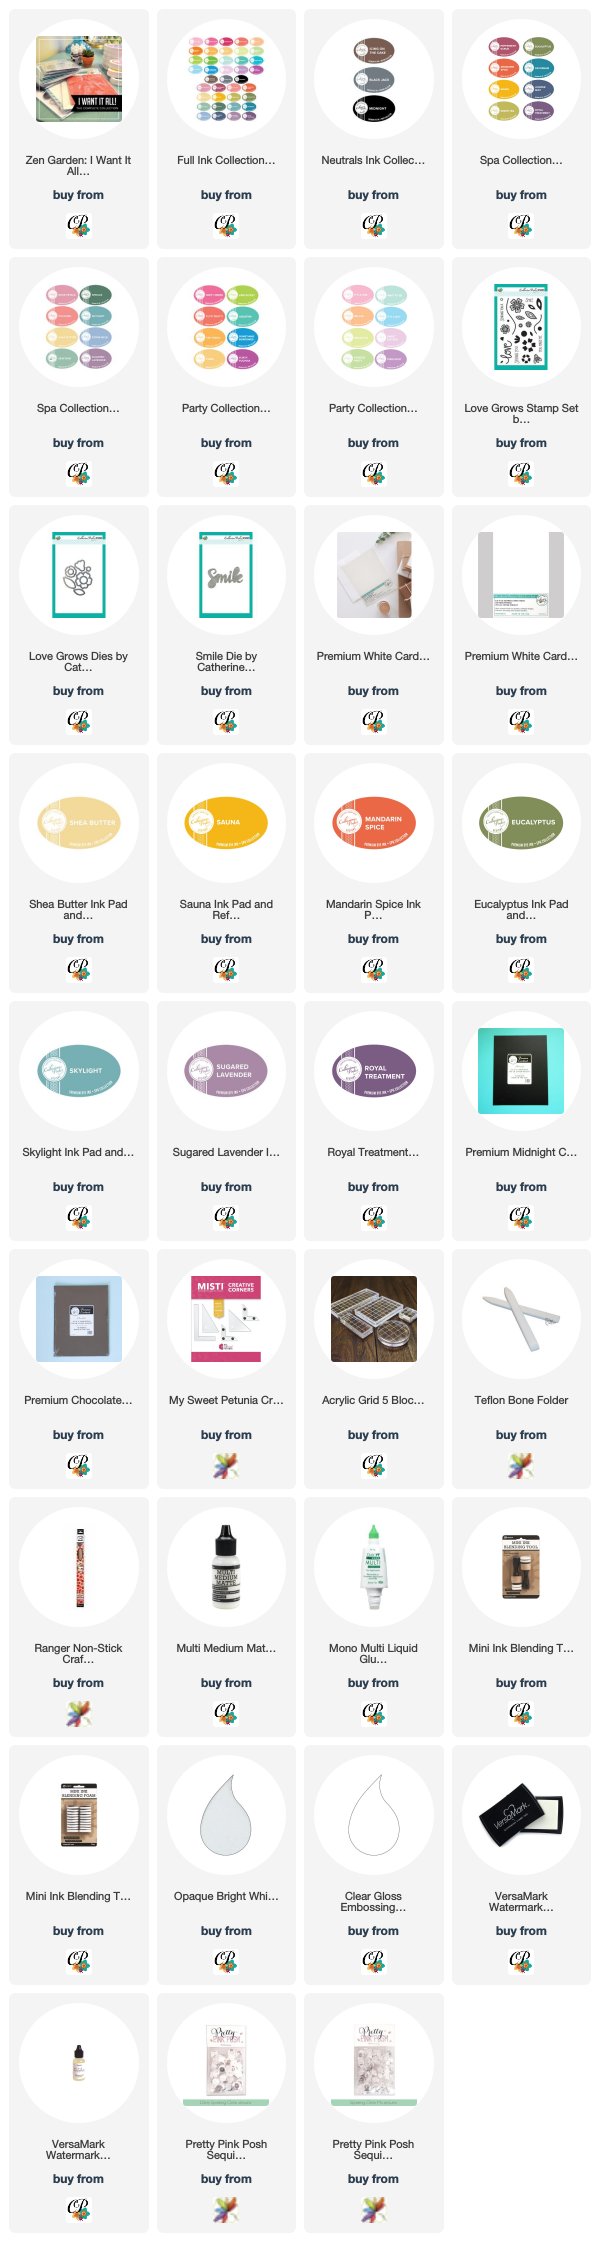
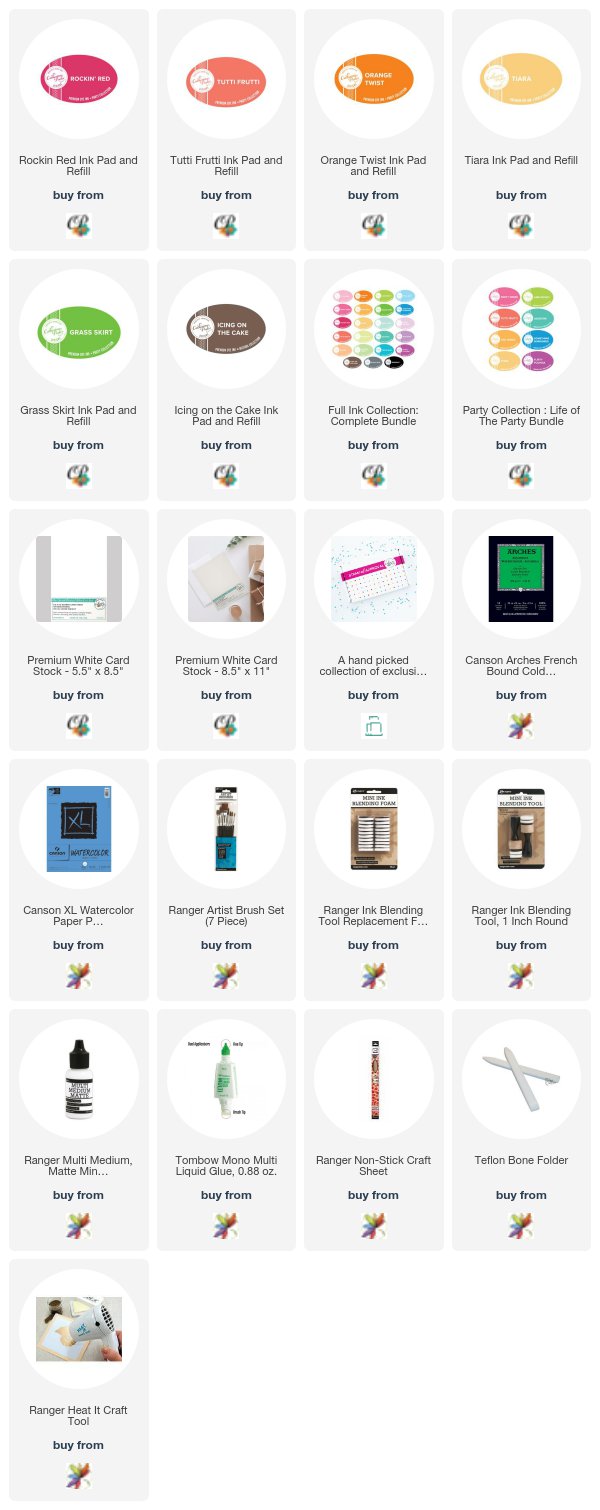
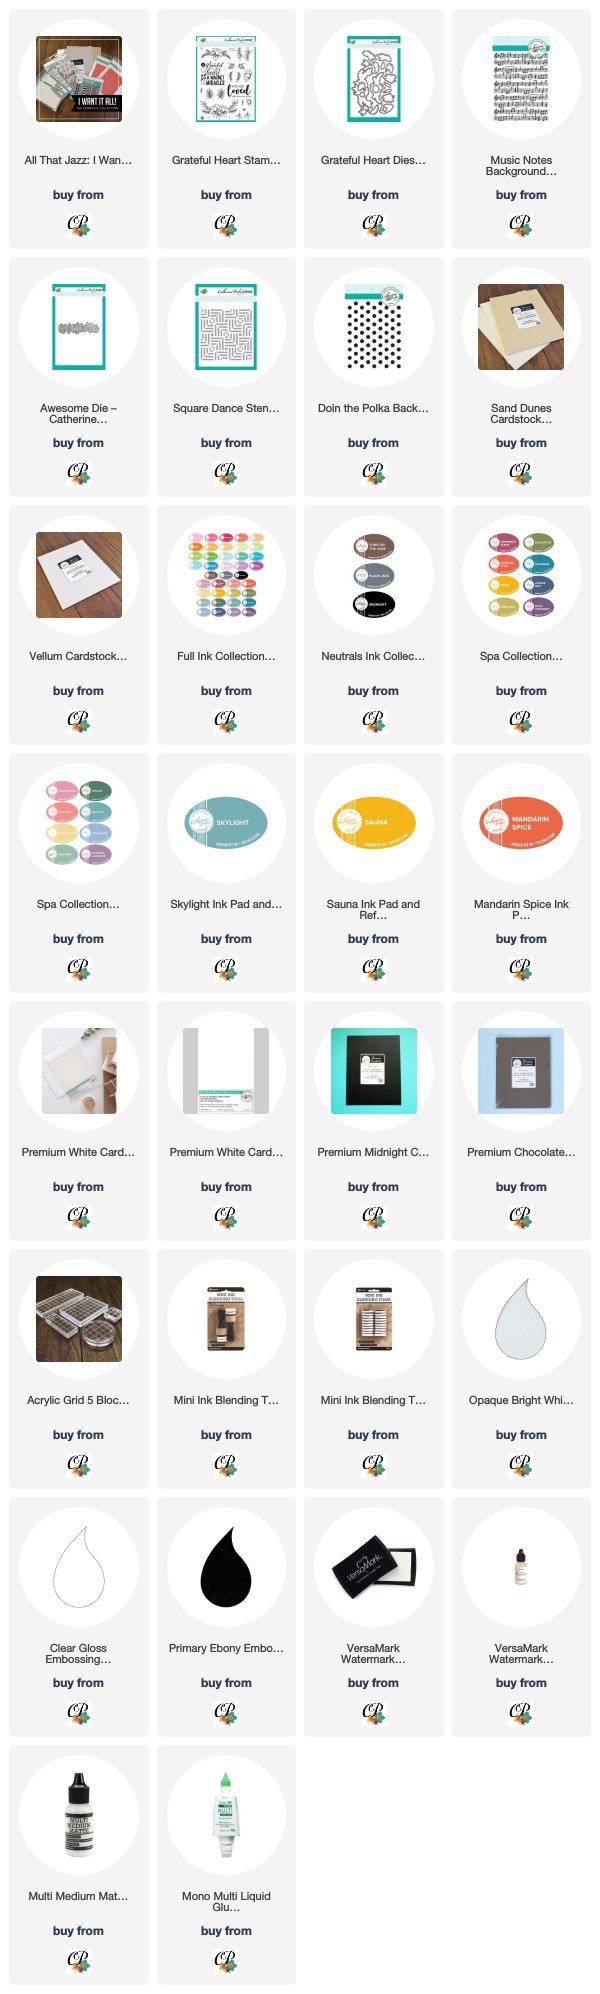
Supplies

To make finding the supplies I used in these projects a bit easier for you, here are a few clickable links. Compensated Affiliate Links are used when possible. Click here for disclosure. Happy Shopping!


FULL Release – Available now!!


Catherine Pooler Zen Garden Blog Hop – Day Two

Zen Garden Blog Hop - Catherine Pooler Designs

Have you seen the new bigger collection of Spa inks over at Catherine Pooler Designs? If not, you’re in for a treat! Welcome to the Zen Garden Day Two Blog Hop! Did you hop along yesterday? If not, I’ll get you caught up at the end.

The new Zen Garden Release was kicked off yesterday. Eight new gorgeous inks were added to the Spa Collection – Rose Petals, Polished, Shea Butter, Seafoam, Spruce, Skylight, Stone Blue, and Sugared Lavender. I love how Catherine names her inks, I know it’s corny…but they make me smile. And let’s be honest it takes less facial muscles to smile than frown, so I try to do that as much as possible – wrinkles and all…lol!

Zen Garden Catherine Pooler Inks

Today we’re featuring the Love Grows stamp set. To say I love this set is an understatement.

I’ll admit, I find it super easy to stamp with just about anything created from the mind of Lisa Kirkbride. And when I first saw this set, I knew I would have loads of fun with so many of the little pieces. SO, my goal today is to showcase just how versatile the little stamps in this set are in addition to all those gorgeous flowers!

I don’t know about you, but for me if I can get versatility out of a stamp set, you know…use stamps for a variety of things – I’m sold. I’ve been stamping for 19 years now…wow! And I’ve purchased my fair share of sets. (Michael, if you’re reading…they were all on sale, I swear…lol) So I can tell right off the bat if I’m going to be able to use that set over and over again. That’s very important to me as a crafter. Love Grows fits that mold for me.

And interesting fact – when Catherine first saw these designs – it was all entangled as one design like patterned paper. But Catherine, being the brilliant designer and stamper that she is said – let’s break the pieces apart, it would make a great stamp set. And you know what – she was right!

Spa Inks Medley No 1: Love Seeing You Smile

Let’s start off with a more traditional Clean and Simple look to start. These flowers were just begging to be stamped, popped up and layered. This card not only showcases how stinkin’ cute they are, but how well the new 8 Spa inks work with the last 8 – together it’s a very powerful collection.

Spa Inks Catherine Pooler Designs

Here’s a TIP for you – cut out your dies first (I cut a ton when I first get my dies – pop a movie in and just cut, cut, cut…). Then grab what you need and stamp away. You’ll speed up your card making, cause you’ll have all the tools you need right at your finger tips.

The two flowers are inked up in Mandarin Spice & Sauna from the Paradise Found Collection, the small cute little conehead is in Sugared Lavender and Shea Butter from the NEW spa inks. For the leaves I wanted an earthy look, so I used Eucalyptus from the Paradise Found inks.

Spa Inks Love Grows Stamp Set

Don’t they all just play really well together? Skylight, Shea Butter and Sugared Lavender play so well with the first 8. That’s the brilliance of the Color Made Easy system by Catherine. No more needing to figure out what goes with what. Spa colors play well with each other…period.

Love Grows Spa Inks

Now for the fun little versatile pieces that I love so much. There’s an awesome stamp in this collection – it’s a circle with all sorts of lines in it – I LOVE that stamp. To get a great little background – stamp it next to each other and emboss white on white to create a scalloped border behind the top layer…did you even notice that? It’s a little subtle thing that totally makes the card. Little stamps like that are priceless to me. That’s where versatility in a stamp set sells me. And how about those little open circles? Notice I don’t need sequins here – I have those little circles!

I’ll admit, I’m in love with this card. Yesterday it was my mixed media card, today it’s all about the Clean and Simple…lol!

Spa Inks medley No 2: Smile

Did you know that Love Grows also works flawlessly with the new word die Smile? There are four sentiment stamps in this set. Seeing you, Sending you a, You make me and the word Smile. So naturally – a word die – Smile, fits perfectly too! And look how awesome this Smile is!! It’s an awesome font, and wide enough you don’t have to take your time placing your Multi Matte Medium (glue) behind it – love that!

Stamp a background in Shea Butter. It’s subtle and soft, yet you can still read it. Stamp a small circle (filler stamp from the awesome Eat, Sleep Create Stamp Set) in Sauna for a little contrast in-between and you’ve got an awesome background.

Catherine Pooler Designs Spa Inks

To make it all pop, use the complimentary color to yellow – purple (across the color wheel). I wanted something dark, so instead of Shea Butter – which would have been just as cool, I chose to use the deeper spa ink color Royal Treatment. Smoosh down some versamark and emboss in clear and you’ve really got a cool word embellishment that pops.

For that little something extra, work in my favorite stamp – the circle with the lines through it in Skylight. Isn’t it just AWESOME? Add that little flower in Mandarin Spice too. It needed something else, and I love to work in odd numbers, so I added that great little circle stamp in skylight too.

Spa Inks Catherine Pooler Designs

Of course, sometimes you just need a little bling too – so sneak in some sparkling clear sequins by Pretty Pink Posh – you know those are my go to…lol!

I was having SO much fun with the color combo of Skylight, Shea Butter/Sauna, Mandarin Spice and Sugared Lavender/Royal Treatment. It’s an awesome combo – you have to try it…the spa inks go SO well together.

So what do you think…fun, right? Have you checked the shop out yet? What are you waiting for?

Catherine Pooler Prizes

When you’re all done shopping – don’t forget to check out all the incredible designs by the Creative Team today. Don’t forget to comment too – Catherine is giving away two set of Zen Garden Spa Inks. And if you already purchased them…you’ll get a $45 gift certificate, so you can’t lose! Now it’s your time to keep getting inspired – hop along!!

  1. Catherine Pooler  <—Hop here Next!! 
  2. Laurel Beard  
  3. Chrissie Tobas  
  4. Jenny Colacicco  
  5. Ashlea Cornell  
  6. Melissa Miller  
  7. Tracie Pond  
  8. Karen Baker 
  9. Lydia Evans
  10. Ingrid Blackburn <— You are Here!!

Fun, right? Tomorrow the hops continue….SO much great inspiration this week. Don’t forget to comment below! Till next time…

Keep those fingers inky!

Supplies

To make finding the supplies I used in these projects a bit easier for you, here are a few clickable links. Compensated Affiliate Links are used when possible. Click here for disclosure. Happy Shopping!


Catherine Pooler Zen Garden Blog Hop – Day One

Zen Garden Blog Hop - Catherine Pooler Designs

The Zen Garden release is finally here! I’m absolutely head over heels in love with this release, and I bet you will be too. The eight ink colors Catherine Pooler created to go along with the Paradise Found collection complete each other. This week you’ll see exactly what I mean!

Zen Garden Catherine Pooler Inks

Mixed Media Zen Feather Tutorial

I love to play with the watercolor smoosh technique, also known as Wrinkle Free. For my first project today, I wanted to create a Mixed Media piece. I was immediately drawn to the quirky circles in the Zen Feather set. I just HAD to create these flowers….lol. Normally I create separate watercolor swatches of each color with this technique, this time I put them all on one big 5×7 piece. The beauty of that is I was able to use it for two projects!

Just look at these colors – isn’t the Zen Garden Collection gorgeous! To create this project, I used the new Stained Glass Coverplate as a stencil. I cut one out of heavy weight cardstock and sealed it with Gel Medium. That way I could use it over and over. To get this look you’ll want to smoosh your Versamark pad through the stencil and onto your project. Emboss in Clear and fill in the gaps left by your stencil with Black Jack – that’s the Joseph’s Coat technique.

Next I removed my embossing powder – WHAT? Yup, you read that right. I put my technique piece into a phone book and ironed the embossing powder right off it. It melted into the pages of my phone book leaving me with not only a super flat piece (thanks to all that ironing)…but a single sheet leaving your friends to ask…how did she do that?!!

Zen Garden Mixed Media Card

Next, Add a little stenciling with a Black Licorice Gelato – don’t worry about being perfect – just add some fun texture. Edge your project with the same Gelato and rub your finger over it to smudge it a bit. Stamp a few fine spats from the Eat Sleep Create stamp set in versamark and emboss in Metallic Gold. Randomly edge your piece with the versamark pad and do the same.

Your piece is beginning to take shape. Add some black on black embossed flowers – die cut them with the matching Zen Feather dies, cut the awesome hand lettered Create die and emboss all the pieces. Add some Eat Sleep ones too – just do those on Charcoal paper instead of black.

Zen Garden Mixed Media Ingrid Blackburn

Add some flower stems in some black and grey Pitt Pens, smudge with your finger and adhere everything to your piece. Smoosh versamark through the Split Chevron stencil to the top and bottom of your card base and emboss in black. Add your card front and you’re all set!

It’s a beauty, right?

Masculine Feathered Thanks

Here’s one for complete contrast!

I love the look of Stone Blue and Icing on the Cake. It’s great for masculine cards and I thought, why not just keep it simple and straightforward. This is a card I can use in many ways.

Zen Feather - Zen Garden Release

No rocket science here – Just fun little triangle filler stamps – love those! And what do you think of that word die? Gorgeous, right? Did you know there was a matching YOU too?!!

Zen Garden Zen Feather Stamp Set

Zen Garden Doodled Bouquet

And I thought it would be fun for you to see just how well the Zen Feather stamp set works with the most amazing background stamp ever….seriously – Doodle Garden!! Here’s a bed of Seafoam sponged over a white embossed Doodle Garden. It’s like a field of flowers!

Zen Feather and Doodle Background - Zen Garden Release

Doesn’t the Zen Garden ink collection pair really well with neutrals? That’s because it’s filled with soft, muted tones. I love how these colors work with Black Jack. Cut out some of the Zen Feather Dies, stamp and create a fun little bouquet! Add some Spruce sponged stems, tie with a little sentiment block – I used Just from Zen Feather and paired it up with the Create Die. My create is cut out of Fun Foam and has some Wanderlust Embossing Powder melted on it (carefully – that stuff burns quick!!).

Doodle Background & Zen Faeather

Add some sequins and you’re all set. Super easy, fun and a little different.

So there you have it – all 8 inks, many projects and now for the really good stuff. If you’re ready to grab those inks – just click any photo in the supply list below. It’ll take you directly to the shop.

zen garden ink collection

Don’t forget to hop! Leave comments all along the way – Catherine is giving away two Zen Garden collections! If you won and ordered, she’ll issue you a gift card to use in the shop! Here’s the list of players today. I’ll be back tomorrow with some more projects for that hop!

  1. Catherine Pooler  
  2. Kristie Goulet 
  3. Ardyth Percy-Robb  
  4. Ilina Crouse  
  5. Justine Hovey
  6. Kelly Martin 
  7. Jen Carter  
  8. Susan Powell  
  9. Ingrid Blackburn <— You are Here!!
  10. Dana Joy  <— Head here Next!!

Want to see more? Here’s a post I did yesterday with a video! Let me know what you’re favorite new Zen Garden Ink Color is in the comments below! I’m dying to know. 🙂

Till next time, keep those fingers inky (mine definitely are after that Mixed Media piece…lol)


Effortless Ink Blending + Adding Texture – Video Hop with 120 Prizes

Do you want to know just how easy effortless ink blending can be? Well, then you’re in the right place! Today I’m participating in a video hop along with 55 other crafty friends to help Save the Crafty YouTuber!

Ink Blending Tutorial and Video Hop with prizes

What does that mean? YouTube just recently changed their requirements for being able to earn on your videos and channels. That’s how many crafters earn a little extra money to help pay for all those crafty supplies you want to see us teach you about in videos. Making a video seems like such a simple thing – trust me, it’s not. The little 8 minute video I’m showing you today took me 7 hours start to finish to bring to you. And that’s just the video part.

It’s nice to be able to earn a little bit from the ads you see on the videos. Trust me, it’s nothing to retire on, it helps cover some crafty/tech costs – but not much. I do it more for the love, but it is nice!

YouTube recently changed the minimum requirements for the ability to monetize your channel (ads on videos), and it will now take a new crafter quite an effort to get to that point. I remember what it was like to be new, it’s not easy, and it’ll take a bit to get to these new minimums.

So my good friend and fellow crafty YouTuber Justine Hovey had the brilliant idea to organize a video tutorial hop to help SAVE some of the crafty YouTuber’s out there. She’s like that – always the cheerleader for every single YouTuber – big and small. Not everyone is like that, and I’m proud to call her a dear friend.

Everyone was invited to join – including some big names. The folks you see on this hop are all true champions. They don’t care about WHO is on the hop – they just wanted to help the smaller channels. And I applaud that.

So, today I, along with several of my seasoned crafty friends and companies have teamed up with many smaller channels being directly affected by this.

The goal – help us save their ability to continue like they had before. WATCH the videos (minutes watched are important), & subscribe to their channels – another key component. I want to thank you for taking the time, not just to read this, but hop along. For your time and effort – COMMENT along the way on every video. LITERALLY every video has prizes attached to it!!!

Catherine Pooler Ink is great for Effortless Ink Blending

Catherine Pooler is giving away some ink pads on every single video! Simon Says Stamp is giving away a $25 gift certificate on every single video! Plus there are even more prizes from these amazing companies:

Ink Blending Video Hop Prizes

Effortless Ink Blending Tutorial & Video

For today’s tutorial, I wanted to showcase a technique that I have perfected. Seriously, if you have any trouble with getting an absolute effortless look to your ink blending – look no further. In just a few minutes I’ll show you how YOU too can have the perfectly ink blended look to your projects:

Click HERE to watch on YouTube in HD

Here are some tips to keep in mind:

  • Your pressure is EVERYTHING
  • Seriously, watch exactly how LIGHT I hold my tool in the video (1:05)
  • Work light to dark – not the other way around
  • Bring your lighter colors back into the transitions to help blend it out – KEY

I recently read an article that said to work dark to light. I 100% disagree with that.

You can not take away color, you CAN build it up.

Trust me, I have been ink blending for years. It’s probably one of the few techniques I’m the most disciplined at. Why? Pressure is EVERYTHING.

I am a fast crafter. Meaning – I’m a bit impatient. But not with ink blending. Cue screeching brake sounds….. Yes, even I have an internal throw on the brakes – watch your pressure, Ingrid voice!

Effortless look with ink blending

Isn’t that just gorgeous? Did you watch the video yet? Did you see how to add some fun sparkly texture to this project – oh, and did you notice the BRAND spanking new colors, word die and stencil?!!! YES, they are all being released tomorrow (2/13) over at CatherinePooler.com. Stop back by here for an awesome blog hop the next few days.

Ingrid Blackburn's Ink Blending tips

Want to learn more? Try these tutorials out:

Thanks for watching & thanks for subscribing…now go comment on everyone’s video post!!! Win those 120 prizes up for grabs!!! 🙂

Keep those fingers inky –

Ingrid Blackburn - The Creative Grove

Supplies

To shop all the fun items I used in today’s video visit these sites. Have any questions? Leave a comment here or on my YouTube Channel. I’ll be adding the new products on 2/13 so check back for links to those!


Adoring You SOA Collection – Blog Hop + Giveaway

Welcome to the Adoring You Blog Hop – isn’t a Stamp of Approval collection a great way to kick off the new 2019 year?!! And you’re in for a treat – this collection has some incredible products. Let’s dive right in…

Hopefully you’ve been hopping along the blog hop – if this is your first stop, you have some incredibly talented stampers that will knock your socks off today! If I’m your last stop, I hope you love my take on one layout – two cards.

I’ve been in Europe traveling (and doing a little work) for several weeks now. This collection comes to my mind everywhere I look. I got some real inspiration for my projects over the next several days.

Since I’m traveling – I was limited to how much I could bring with me – so I’m doing everything with just the Life of the Party, Foundations, Midnight, Icing on the Cake, Twilight and Black Jack! That was a challenge for me – I’m so used to having my spa collection, but those were the minis I had – so off we went!

Adoring You Stamp of Approval

Stamp of Approval is a curated box put together by Catherine Pooler. It has stamps/dies and even sometimes stencils and ink in it! The products work effortlessly together, and this box is no exception. SOA is sold while supplies last, and I wouldn’t be surprised if this one sold out.

StampNation members will get to order first (perk of being a member) the night before. They also get a special kick off party live with Catherine and the CPD staff from the clubhouse. Then the next morning at 9 am, if anything is left – the waitlist will get a secret link to shop! It’s free to be on the waitlist – if you’re not on it – what are you waiting for?

The remaining boxes and add-ons will go live to the public at 6 pm on Wednesday January 9th. Seriously – at least get on the waitlist – have I mentioned that it’s free?

Here’s what’s in the collection:

Add Ons:

The Key – One Layout, Two Ways

I’m gonna play a little with a stamp set that literally stopped me in my place the first time I saw it – The Key. If you’ve followed me on social media or my travels over the years – you know that I LOVE to take photos of doors, locks and interesting textures. Over here in Europe, there are SO many interesting doors, locks and each one feels like it has an amazing story to tell.

The basic design for the cards today was to feature a long tall card front 3 1/2 inch wide. Use those amazing locks and keys in fun ways – both in the foreground and background. Plus don’t you just want to pop some of these incredible locks up? Here are two different looks:

The Last Key – Project No. 1

The Key Stamp Set - Adoring You SOA

A good color palette is always key to a great project (do you like that play on the stamp set name…lol?!!). When you need something eyecatching that will work for men and women, try the combo – Tutti Fruitti, Tiki Torch, Aquatini and Icing on the Cake. I wanted a warm golden look to the lock, so I used Tiara and a Zig Blender to color it in.

Don’t you just love the sentiments in this set – Love is the Key to Happily Ever After, If it doesn’t open, It’s not your door? And that’s just two! There are four.

The Key Stamp set - Adoring You SOA

The locks are absolutely stunning. Such detail, character and charm. This card has all the heart locks in the background, the four keys on the card front and the next features the remainder of the locks.

You’ll want the coordinating The Key Dies set too – look how perfectly those locks are cut out on the inside!!

Simple thin Matte in Chocolate cardstock is the perfect accent. You don’t need much!

Congratulations Lock & Key – No 2

In addition to the gorgeous curves of all those locks and keys, this collection boasts an incredible Congratulations Sentiments Stamp Set. This set not only has many options on how to congratulate someone, but some very cool little pieces. And if you love the little tile pieces, definitely check out their larger die form – Backsplash Dies. I have a cool project with those in the coming days…

Congratulations Sentiments Stamp Set - Adoring You SOA

So, as you can see – the basic design of this card is the same, just with a slight little twist! Instead of the card front running the length of the card, shorten it by a quarter of an inch and pop a smaller matte behind it only 3 1/8″ wide. That little gap at the edges adds a fun little look to a traditionally matted piece.

For a fun rainbow look, stamp the three Congratulations Sentiments in rainbow order using the Life of the Party and Foundations ink collections. It’s a fun card, right? Perfect for someone just moving into a new home – or other occasion.

Pop up your matte and add a lock/key done the same way as the first card – only use BlackJack/Twilight and a Zig Blender pen. I love to stamp with Black Jack instead of black. It’s slightly softer and doesn’t overpower the card.

What did you think? I’m totally curious – do you too take photos of locks and doors when you’re traveling? Tell me in the comments below!!

I have to say it was fun to keep my color palette for this release simple. When you are used to using the entire CPD rainbow, you get used to the colors that are your go to colors. I enjoyed picking up colors I don’t normally reach for again. I challenge you to try something similar.

Now it’s your turn. Leave a comment on ALL the blogs in the hop to be entered in for a prize. Hey, it’s a new year – you never know!! And stay tuned to my Instagram channel and come back to the blog in a few days – I have more to share! Below you’ll find the full hop list and product list.

Till then – keep those fingers inky –

Harry Potter Inspired Card Video Hop

Harry Potter Card Hop

Have you ever been inspired by a favorite book or movie? Today I bring you a fun little video card hop, inspired by the Harry Potter series and a few of my crafty friends for a Harry Potter Scenic Card Tutorial!

This summer, Justine Hovey and I met up for lunch in Stuttgart, Germany while we were both visiting. I don’t even remember how we got onto the conversation – but we discovered yet, another love that we shared in common – Harry Potter! We thought, that would be a just for fun video hop – and my mind immediately went to my friend Laurel Beard – who I knew loved Harry Potter just as much as me. And Justine knew Jessica Frost Ballas was just as addicted, and this hop was born!

Harry Potter Scenic Card Tutorial - Ingrid Blackburn

So here’s a fun, book/movie series inspired hop for you – filled with prizes, a little magic and of course – Harry Potter!

Be sure to hop along all four blogs and YouTube channels – leave comments – cause we’re giving away prizes on each blog – Harry Potter themed prizes!! Plus it’s fun to see how each designer was inspired.

If you’ve followed me a little, I’m sure it’s no surprise to you that I just HAD to create a Harry Potter scenic card! Harry Potter inspires me in so many ways – the castle, forest, bricks, owls, forest, dark vs. light, books, forest, wands, magic and oh, did I mention FOREST?!!! Naturally I had to create one of my favorite scenes of all time (Spoiler Alert) – the Dementor attack/Patronus charm at the end of Book 3.

Harry Potter Scenic Card Tutorial

I knew the perfect stamps to use too…Stampscapes. Kevin Nakagawa’s gorgeous line of stamps would perfectly evoke that larger than life feel I wanted to create along the frozen lake deep into the Forbidden Forest. Here’s a video of exactly how I created this beauty.

Click Here to watch video in HD on YouTube

The Tree Trunk stamp was perfect for this card. But I needed it at different heights – and what do you do when your card is larger than the stamp? That’s part of the beauty of Stampscapes stamps. The way Kevin has beautifully drawn these scenic elements is with little dots. So it’s very easy to naturally stretch and build onto your scene with it looking effortless and part of the original design.

So in this image, the left most trunk is actually only 4.5″ tall and the card is 5.25″ high. So how do you stretch your image so that it goes the full length? Simple – flip the top of the trunk around and stamp to fill that area. Now, you can’t have your tree get fatter – so you’re limited to a small part of the stamp, but see how it seamlessly lines up?

Stampscapes Tree Trunk Stamp

For the bottom – fill in the area with a little bit of color – add some dots with a micron pen and some distress markers. Then take the bottom of your stamp – ink it up and fade out the edges on it. That leaves you with the gorgeous texture – use that to fill in your trunk base. It just blends effortlessly! With more shading, and there’s zero chance of anyone noticing that wasn’t meant to be. Would you have seen the seam if I hadn’t pointed it out to you?

To bring the Harry Potter Scenic Card to life, layer your ink colors light to dark into your scene from the edge in. I used Kromekote Glossy cardstock – 12 pt for a strong base that let the colors glide with the Colorbox Stylus tool. Blues, Greys, Greens and Browns – your nature colors fill the scene with depth.

The key to this scene is the dark mystical nature of the Forbidden Forest. Without it, and it’s just another forest scene. We need the play of good vs. evil here – light vs. dark. Since I wasn’t sure how I could create a Dementor, I used dark shadows to get that effect playing off the bright explosive Patronus Charm.

Harry Potter Card - Forest Scene

And to get that bright glow – emboss the large buck (my Harry Patronus – the stag) and surround it with the white explosive glow. To get it to look just right, I had to play – and as you see in the video…a few ways just didn’t give the right feel. Swirls with a paper towel and some Hero Hues Unicorn Pigment ink did the trick.

Some finishing touches of white gel pen to emphasize ice and cold along the lake edge and glow in the tree trunks mixed with the perfect dark edging pulls the scene together. I didn’t have a greeting that worked for me, so I created my own with a downloaded Harry Potter free font.

I LOVE the third movie – and this is one of my favorite scenes. I think I love Harry and Hermine climbing over the huge roots at the base of these monster trees the most. The forest is so mystical and dark – I can do with out the dementors – they always freak me out…so it’s a good thing I can create my own Patronus – at least in a Harry Potter Scenic Card form!

Harry Potter Forest Card - Stampscapes - Ingrid Blackburn

What’s your favorite book/movie? Do you have something about this series that inspires you? Colors, characters, elements? When you start to create yourself – tag us with #CraftyPotterHeads! We’d love to see what you make.

Leave me a comment and I’ll enter you into my Harry Potter drawing! I’m giving away a couple decks of Harry Potter playing cards – to be delivered by Owl Oct. 1st….okay…I guess USPS will have to do. Back to reality for this muggle…

Thanks for stopping by! Now Accio Firebolt – hop on and visit my crafty friends for more chances to win and some creative magical inspiration!

Harry Potter Magical Blog Hop List

Ingrid Blackburn – You are Here
Jessica Frost Ballas – Head on over here Next!
Justine Hovey
Laurel Beard

[optin_box style=”27″ alignment=”center” email_field=”email” email_default=”Enter your email address” integration_type=”aweber” double_optin=”Y” list=”3846012″ name_field=”name” name_default=”Enter your first name” name_required=”Y” opm_packages=””][optin_box_field name=”headline”]Want to LEARN with more exclusive videos?[/optin_box_field][optin_box_field name=”paragraph”]PHA+UGx1cyB5b3XigJlsbCBiZSBhZGRlZCB0byBteTxzdHJvbmc+wqBGUkVFPC9zdHJvbmc+wqBDcmVhdGl2ZSBUaXBzIEUtbGV0dGVyIHdoZXJlIEkgc2hhcmUgZXhjbHVzaXZlIHByb2plY3RzLCB2aWRlb3MgJmFtcDsgdGhlIDEyIERheXMgb2YgQ2hyaXN0bWFzPC9wPgo=[/optin_box_field][optin_box_field name=”privacy”][/optin_box_field][optin_box_field name=”top_color”]undefined[/optin_box_field][optin_box_button type=”0″ button_below=”Y”]Get Instant Access![/optin_box_button] [/optin_box]

Supplies

To make finding the supplies I used in these projects a bit easier for you, here are a few clickable links. Compensated Affiliate Links are used when possible. Click here for disclosure. Happy Shopping!


Counting Blessings SOA Blog Hop

Welcome to the Counting Blessings Day 3 Blog Hop! Today I have a treat for you – three projects…so let’s dive right in!

If you are new to Stamp of Approval, Catherine curates a box of stamps/dies/stencils that can be used together for endless hours of fun. This box has a fall theme to it, but I’ll be honest with you – you’ll be able to use the Counting Blessings collection all year long. I’ve seen so many projects in the first two blog hop days that prove that point!

The last collection sold out in just 15 hours, so if you love what you see – do not wait. Make sure you are on the wait list – as you’ll get the chance to grab a collection before anyone else!

The Counting Blessings collection has:

  • Four Stamp Sets
  • Three Dies
  • Two Stencils
  • A free NEW block – seriously – they are my all time favorites (you’ll LOVE the weight, design and feel)
  • A special SURPRISE
  • A Free PDF packed with project ideas ($15 value!)

Be sure to leave comments along the way to get a chance to enter into the drawing for a free Counting Blessings collection yourself.

Our first project is a classic take on Fall Foliage. I lived in New York for seven years, and the fall foliage was by far my favorite time of year. I still dream of all those vibrant colors – well, Catherine Pooler Designs Ink is perfect to showcase that! Um, hello Rockin’ Red, Grass Skirt, Tiara, Orange Twist and the new Icing on the Cake!!! You’ll find detailed instructions on this one in the free project packed PDF with the Counting Blessings Collection.

Counting Blessings Stamp of Approval card by Ingrid Blackburn

That background was created with the Leaf Motif stamp set. On the tag – I used a little Whipped Spackle for some texture with the Marching Leaves Stencil on the cool tag using the Tags, Etc. Dies. The fall colored leaf die is one of the two from the Fallen Leaves Dies and how about that Thankful die? I LOVE that hand lettered script by designer and artist Shawna Clingerman. And if you love that one – just wait till you see the next project.

The Autumn Blessings stamp set is beyond fall perfection to me. You’ll get three gorgeous hand lettered sentiments that work for any occasion. Catherine does such an amazing job at making sure there are lots of little extra pieces to really stretch your creativity – that’s one of the reasons I love her projects SO much. It’s the little things that make all the difference.

In this set you’ll find awesome little stamps that give you so much more to just a sentiment set. And how awesome is it that Bless – has two options for endings – LOVE that!

My Personal Favorite – The sentiment add ons in this set that I love the most are the three individual words – You Are Home. How great for military, loved ones, those recovering from a hospital stay, etc… I just love that this set reaches so many more options for card making than just fall and thanksgiving.

Gradient Watercolor Wash by Ingrid Blackburn

Stretch one of the sentiments from the Good Things stamp set by just using the top and bottom of it along with the three main sentiments in the Autumn Blessings set – don’t they just work together flawlessly! Notice all the little bits added – the wheat, leaf and little spray do hickey at the very bottom – don’t you just love my official name for that one. If you know the official name for that one – seriously…tell me in the comments!

A quick little watercolor wash, some flicking and then embossing with water and you’re all set. If you want to learn how to do ALL those techniques – check out StampNation. The library of tutorials there is insane – over 700 to date!

The sentiment in this next project may look familiar – do you recognize the top and bottom from the one above? Pair that up with a simple masked window using the Tags, Etc. Dies set – I LOVE that giant scalloped die – don’t forget to use it as a stencil like here! Stamp the leaves from the Leaf Motif stamp set in those amazing colors using Catherine Pooler inks and you’re all set! A simple one layer card that has amazing interest to it.

Counting Blessings SOA - One Layer by Ingrid Blackburn

Not bad right? Be sure to stop by tomorrow for more – it’s Release Day! Yay! Of course if you are a StampNation member – you can hang with us live in the Pajama Party Release tonight and get your box before everyone on the wait list! Membership has its perks!

Counting Blessings Stamp of Approval

Now hop on along to Kimberly Wiener’s Blog and then everyone else on the Blog Hop today. Leave a comment along with way to be entered in for a free Counting Blessings collection!! And check out Day 1 and 2 as well.

1. Catherine
2. Taheerah 
3. Lydia Evans
4. Ingrid Blackburn – You are Here
5. Kimberly Wiener – Hop here Next!
6. Jill

Supplies: To make finding the supplies I used in these projects a bit easier for you, here are a few clickable links. Compensated Affiliate Links are used when possible. Click here for disclosure. Happy Shopping!


Naturally Inspired Stamp of Approval Collection – 2 videos!

Naturally Inspired Stamp of Approval Blog Hop - Ingrid Blackburn

Welcome to Day 3 of The Naturally Inspired Stamp of Approval Blog Hop! You probably hopped on over from Lydia Evans’ blog – she’s uber talented, isn’t she? I’m such a fan of hers. The whole hop list is at the end, but first here are a few projects to showcase just how amazing this curated collection inspired me.

If you’re new to Stamp of Approval – click here to check out everything you need to know about this amazing collection of Stamps, Dies and Stencils.

And make sure you are on the wait list so you get access to the collection at 9:00 am tomorrow June 7th before the public. The Add-ons are limited – especially the Wild Garden Dies, you don’t want to miss out.

Of course, If you are a StampNation member – you not only get to order hours earlier…but I’ll see you at the exclusive Slumber Party release tonight – I’ll be participating live – so come stamp with me, Catherine and many others from the Design Team.

Stamp of Approval

How I’m Naturally Inspired

If you’ve followed me for a while you know nature is my thing – in case you haven’t noticed – I love trees, the mountains, flowers – and especially greenery! I’m 100% at home walking in the mountains, woods, among trees & flowing water – I’m a born and raised northern California girl after all. Growing up in San Francisco, I’m partial to the ocean – and having lived 10 years in Florida…I never tire of these sunsets:

My true inspiration for my work is nature around me – it brings me the peace I need to think clearly and allow the creativity to flow. So much so, that I even have a few little Christmas trees all around me on my desk…lol!

In a few weeks, I’m heading back to the Black Forest for the Summer – and I can’t wait to just be in my element again (I spent the last three years there). Here’s a little sneak into my world – sadly it’s the wrong time of year for the snow, but you will definitely find me shortly wandering along one of thousands of paths and trails daily:

I love the textures and colors of nature. It drives my creations. Today I have a few colorful pieces (and videos) for you too! And wouldn’t you know…I even managed two scenic cards – very different from each other as well. Enjoy!

Project One – Naturally Inspired Sunset Silhouettes

I love scenic cards – and when I first saw the Wild Garden stamp set designed by Lisa Kirkbride, this card literally popped into my head. Paired up with Catherine Pooler Designs vibrant inks, I just knew the ink swipe technique was calling. Here’s a video on how I created this colorful layered sunset on glossy paper.

Click Here to view the video tutorial in HD on YouTube

Aren’t those colors just amazing. And with this fun technique, the possibilities are unlimited. In addition to the SOA collection, the Wild Garden set also has add-on dies which are perfect to cut out those intricate shapes.

Ink Swipe Technique on Scenic Cards

Project Two – Medallions

One of my favorite parts of this box is the surprise elements. Usually you’ll have some awesome stamps, dies and maybe even a stencil – but Catherine really outdid herself this time. Especially with the Wanderlust exclusive embossing glitter by WOW! It’s an exclusive mix just for this Collection and let me tell you – it sparkles! I think I was able to capture the sparkle pretty well here – it’s super cool on black too, becomes sparkly yellow – like a yellow diamond.

The Medallions are so versatile – I’ve just scratched the surface with them. If you didn’t see the sneak peek Catherine let you in on for my Navy Metallic card in the Facebook Live the other day – stop by in a few days, I’ll have that project right here along with a few more.

This project showcases Catherine Pooler Designs Inks: Party Dress, Bellini, It’s a Girl, Sweet Sixteen and Tiki Torch.

Medallion Mix Up by Catherine Pooler Designs

This project keeps the Medallion Mix Up images stamped as a nest within each other – but then uses the same colors in an overlapped pattern in the back. While I love the look, it was a bit busy – so to tone it down just a smidge and allow the focal piece to jump out a bit – try adding a simple sheet of vellum. You still see all that colorful goodness, without allowing it to overtake your project.

But today it’s all about some fun colorful medallions mixed with all that sparkly goodness. I won’t lie, I’m addicted to the Best Die – I LOVE Shawna Clingerman’s (the illustrator) hand scripted font – who wouldn’t, right?

And then glitter that baby up – WOW! Literally.

WOW! Wanderlust Embossing Glitter

But don’t think to just keep the glitter to just there – add it to the edge of your circle or card front for a truly special look. And just imagine this card in Blues & browns for a great Masculine look!

Project Three – Colorful Feathers

The Naturally Inspired Collection lends itself quite well to great clean and simple design, here’s a super quick and fun one. The Feather stamp is amazing – did you see that all the little birds in the set that can be stamped as if they are transformed out of the tip?!! How clever is that!

I kept things colorful and simple here – some great ink colors…a little mystery too! I’m in LOVE with the Simply the Best stamp set – you can create so many amazing sentiments with this set. And I just love the various ways to stamp Best – quirky, scripty – just LOVE that.

Quick Clean and Simple Cards by Ingrid Blackburn

But I have to admit – my favorite stamp in the entire collection is that diamond pattern. It’s only about 1 1/2 inches long – but look at how cool it looks stamped in a row?!! You will find that it is SUPER easy to layer end to end – I did this one by hand – no Misti needed here.

Pretty cool huh? NOW…see how I used that very same feather – and colors in the next project. Yes, this next project was made with all those colorful bright colors – honest!

Project Four – Watercolored Landscape

I love both my scenic cards today for very different reasons. The techniques couldn’t be any farther apart from one another. This one is an effortless watercolor that combines the vibrant colors from the first into the muted subtle shades that you see here. The moment I saw the little birds from Birds of a Feather, I was on a mission to see how I could take the stamps from this collection and stretch them into something different – trees!

Here’s a detailed video on how to recreate just that. And if you loved this, definitely subscribe to my YouTube channel too:

Click Here to see this video tutorial in HD on YouTube

Kind of cool, huh? I love creating something new and unique from existing supplies – versatility in my products is SO important. Plus being a fan and DT team mate of Kristie Goulet – the queen of uniquely stamped cards will do that to you!

Watercolor Landscape Cards using the Naturally Inspired Collection

I have detailed supplies and instructions on both scenic cards in the Naturally Inspired SOA PDF Guide – it’s jam packed with great projects to get you started – definitely one of my favorite components of each collection – detailed how to instructions!

So I encourage you to think outside the box with this collection. It won’t be hard. You’ll get such varied results which is just awesome.

These four projects believe it or not – uses almost every item in the box. I love it when I can create 10 different projects and no two are the same – I can’t wait to show you the rest. That’s the sign of a home run to me! So let’s get you entered in to win one of these amazing Naturally Inspired collections yourself!

Naturally Inspired Stamp of Approval Collection by Catherine Pooler Designs

To win one, just hop along and leave some love on all my team mates blogs. All the blogs from the last two days too – the Design Team inspirational line up is epic! Tell us what inspires you too.

Here’s the talented line up for today:

1. Catherine Pooler
2. Taheerah Atchia
3. Laurel Beard
4. Lydia Evans
5. Ingrid Blackburn You are here!
6. Heather North < Hop here Next!
7. Cynde Whitlow

Hope you enjoyed these projects and videos. Was I was able to inspire you to get creating yourself? I want to know what inspires you – tell me in the comments below! You never know – you may just win a Naturally Inspired Collection yourself.

Till next time –

[optin_box style=”31″ alignment=”center” email_field=”email” email_default=”Enter your email address” integration_type=”aweber” double_optin=”Y” list=”3846012″ name_field=”name” name_default=”Enter your first name” name_required=”Y” opm_packages=””][optin_box_field name=”headline”]LEARN MORE WITH OUR EXCLUSIVE FREE VIDEO SERIES[/optin_box_field][optin_box_field name=”paragraph”]PHA+TG9yZW0gaXBzdW0gZG9sb3Igc2l0IGFtZXQsIGNvbnNlY3RldHVyIGFkaXBpc2NpbmcgZWxpdC4gRG9uZWMgdmVsIG51bmMgbm9uIGxhY3VzIHZlbmVuYXRpcyBjb21tb2RvLjwvcD4K[/optin_box_field][optin_box_field name=”privacy”][/optin_box_field][optin_box_field name=”top_color”]undefined[/optin_box_field][optin_box_button type=”0″ button_below=”Y”]Get Instant Access![/optin_box_button] [/optin_box]