MM Watercolor Butterflies Video

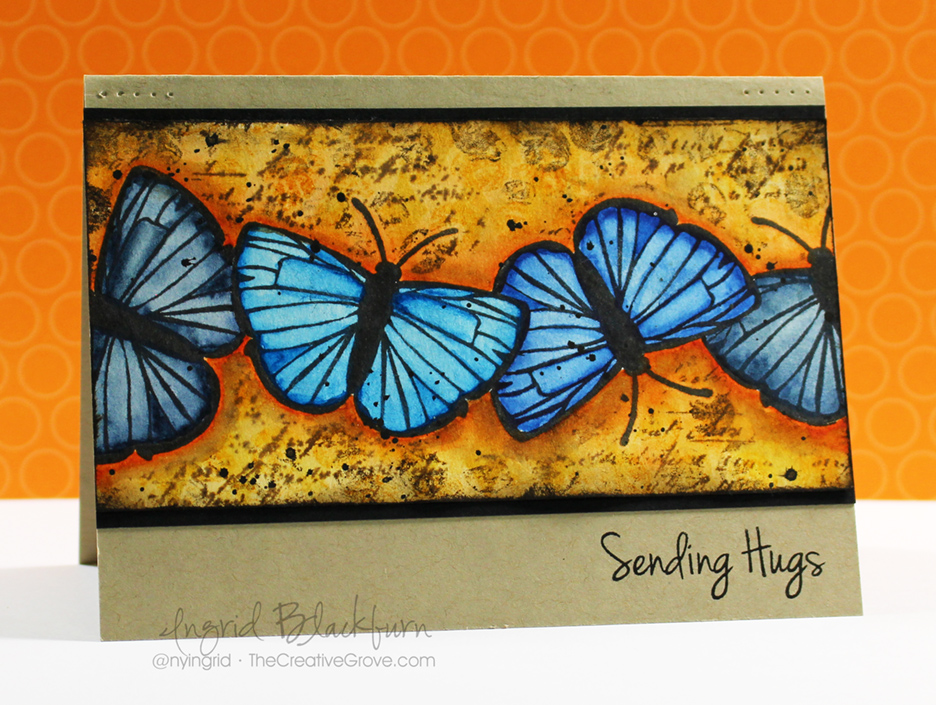
Yesterday I posted a very cool, fun and quirky butterfly card for the Wings Mixed Media challenge over at Happy Little Stampers. It was such a fun project to create, rather relaxing actually, I’m so glad that I filmed it for you! I won’t lie – the project took me two hours to create, so I had to majorly edit the video down for you. I even split it up so that you can find your way easier around the two distinct different components of this card – watercoloring the butterflies and creating the mixed media background that allows them to literally fly off the page.

Mixed-Media-Watercolor-Butterflies-001

Enjoy the process – grab a beverage and have fun – I’d LOVE to see your cards when you create them! And if you haven’t subscribed to my YouTube channel yet – be sure to do so so you see them as they first come out.

Part One focuses on the masked border used to create this card and the actual watercoloring process for keeping the light and darker tones in the butterflies.

Click Here to watch Part One in HD on YouTube

Part two focuses on the Mixed Media portion of this card used to literally pop the butterflies off the page.

Click Here to see Part Two in HD on YouTube

If you want to see the written tutorial and close up photos, be sure to check out the original post right HERE.

See you soon –

Signature

[optin_box style=”2″ alignment=”center” email_field=”email” email_default=”Enter your email address” email_order=”2″ integration_type=”aweber” double_optin=”Y” list=”3846012″ name_field=”name” name_default=”Enter your first name” name_order=”1″ name_required=”Y” opm_packages=””][optin_box_field name=”headline”]Learn more with our exclusive FREE video series:[/optin_box_field][optin_box_field name=”paragraph”]PHA+UGx1cyB5b3XigJlsbCBiZSBhZGRlZCB0byBteTxzdHJvbmc+IEZSRUU8L3N0cm9uZz4gQ3JlYXRpdmUgVGlwcyBFLWxldHRlci4gRnJvbSB0aW1lIHRvIHRpbWUgeW914oCZbGwgZ2V0IGV4Y2x1c2l2ZSBwcm9qZWN0cywgdmlkZW9zICZhbXA7IHRoZSAxMiBEYXlzIG9mIENocmlzdG1hcyBzZXJpZXMuPC9wPgo=[/optin_box_field][optin_box_field name=”privacy”][/optin_box_field][optin_box_field name=”top_color”]undefined[/optin_box_field][optin_box_button type=”0″ button_below=”Y”]Get Immediate Access![/optin_box_button] [/optin_box]

Swallowtail Emboss Resist

Swallowtail 008 Main

The Swallowtail stamp is one of my favorites to create an simple but elegant card in just minutes.  Today I decided to emboss and show you a little emboss resist. 

Creative Tips:

  • I like stamping with the swallowtail stamp on an angle.  To me it’s like she’s in flight.  Try it at different angles.
  • This is a detailed stamp, so I encourage you to use an Embossing Buddy first on your Whisper White card stock. 
  • Next ink up your image in Versamark ink.  Versamark is a watermark pigment ink.  It’s sticky – that’s how we’re going to get the embossing powder to stick to it.  Because it’s a watermark ink, stamped on a color, you immediately have a faint (watermark) matching color of ink – it’s a must have!
  • Next I poured White Embossing Powder all over my Swallowtail image.  Because our powder is so fine, it really gets into the detail of this stamp well.  If you haven’t tried Stampin’ Up! embossing powder, I encourage you to do so.  I guarantee you’ll notice the difference, my customers swear by it!
  • Melt your powder using our Heat Tool being sure to really get the entire image.  Tip – if your powder looks grainy and not smooth, it’s not melted.  With an image this large it’s easy to miss some, so take your time and check.Swallowtail 008 CU
  • I used Tangerine Tango to color my butterfly.  I gave my project a couple of minutes to cool, and then sponged my Classic Tangerine Tango directly over my image.  The raised embossed image resists the ink and pops.  It’s a cool technique that’s a big wow. 
  • To finish my project off, I sponged around the edge to create a frame. 

You can over emboss, and there’s no real fix for that.  Before I joined the Stampin’ Up! sisterhood, I over embossed all the time. I would get so frustrated because my images always looked really funny and not that pretty.  My embossing powder would turn this funky color, and you just knew it wasn’t right.  I guess that’s why I’m not a good griller either…I always over cook the meat.  It never looks done…lol!

This is a simple project that really comes together in minutes.  I love the simplicity of it.  Now it’s your turn!

Are you getting my Exclusive Video Series?

Be sure to sign up for my Creative Tips Newsletter and get the latest Creative Grove news in addition to my free Creative Techniques Video Series!  Don’t miss out on our creative community – the only way to get this exclusive content is to sign up in the box on the upper right or click here.

Signature Snowflake 001

To Shop 24/7 in the Creative Store – Click here!

Swallowtail 008 Main

Stamp Sets – Swallowtail (129213w, 129216c), Thanks so Much (retired) Ink – Versamark (102283), Tangerine Tango (126946)  Paper – Whisper White (100730), Tangerine Tango (111349) Cool Tools – Heat Tool (129053), Embossing Buddy (103083), White Embossing Powder (109132) 

Swallowtail Stamp 129216L

Making Mistakes Work for You

I would love to tell you that I always get it right the first time, but that just isn’t my reality!  I wanted to write this blog for all those of you – and I’m guessing that’s 99% of you, who don’t craft in a perfected way.

Recently I took on an inspiration challenge.  I counted out all the pieces I would need and made sure my measurements were just what I needed, at least I thought I had counted correctly.  I ended up forgetting a crucial part to the measuring process – probably because I was so excited to see what it would all look like (not a first!).  So what happened to my incorrect dimensions that I put together for my project?  I have to admit, it just sat on my table and didn’t make it onto a card.  Well today I was cleaning up my creative space and came across my mistake (yes, I don’t clean every tiny detail up immediately – mostly because I’m crafting until the very last second that I can and then have to pay attention to my family – thankfully I have my own crafting room so I can shut the door.  I held up my incorrectly measured piece, thought about throwing it away for a split second, and then decided to put it to good use.

So, I trimmed up my mistake and ended up with a shorter piece than I wanted, but I just off set it onto my card.  To help tie the entire card together, I took out my paper piercing tool and mat pack (one of my favorite finishing touch tools) and filled the space.

The end result – I actually like my mistake card better than the original!  So don’t always throw away those mistakes – sometimes mistakes lead us down the road we’re supposed to be on!

02.10 

Original Card                                      Mistake Card

Happy Creating –

Ingrid

To Shop 24/7 in the Creative Store – Click here!

Stamp Sets – Baroque Motifs (113490) Sincere Salutations (115068); Paper – River Rock (108640), Basic Black (121045), Bravo Burgundy (105123); Ink – Versamark (102283), Classic Basic Black (101179); Cool Tools – Stamping Sponges (101610), Black Stamping Emboss Powder (109133), Embossing Buddy (103083) Heat Tool (100005), Powder Pals (102197; The Perfect Finish – Stamping Dimensionals (104430), Paper Piercing Tool (116631), Mat Pack (105826)

A Clean Slate

I love to create.

There is not other way to put it – at my core…I’m a creative person.  By day I blog and plan travel for Elite Travel Planners, and by night I sell Silpada sterling silver jewelry.  While I can call Travel one of my passions, I have found that recently I’ve been missing another one of my passions – stamping and scrapbooking.  You see, I worked in the crafts industry – specifically teaching scrapbooking and then adding the art of stamping when I became a Stampin’ Up! independent consultant in 2002.  After 6 1/2 years, I needed a change.  So I walked away to pursue other interests.  And I stayed away for 3 1/2 years.  What I found was that although I do love many other industries – I am a crafter.  There, I’ve said it.  I love to create, inspire and most of all – share.  Ironic that that is Stampin’ Up’s tag line.

So… I’m starting this blog to share my love of stamping and scrapbooking with you.  I’ve been scrapbooking since the mid 90’s and stamping for the past 11 years.  And today I’ve discovered that I love digital scrapbooking – and I think I’m going to quickly become an addict!

Here are a few projects that I’ve been working on lately.  This is a simple card (very Ingrid), but I love the effect the stipple brushes give over the image.  The depth it creates (hard to see) is magical.  I love this set – it was a hostess set years ago, but this image works for just about any occasion.  Of course – if you know my work, you’ll recognize one of my trademarks – the strip (Tip #1).  I can’t stand all that white space – to me the cards usually need something breaking all that space up!  Simple, but elegant.

Europe Sympathy Card 2

This next 3D project was a fun one – and super easy.  I’m sad that Stampin’ Up! doesn’t carry these chipboard clipboards anymore, but you can use any clip board.  The key is to sand down the edges for a worn look, and layer all the papers first before attaching to the board.  I just love these colors together.  What’s better than Christmas!

I used mod podge over it to protect the paper from wear and tear.  To get the cardstock perfectly tucked behind, I make a 1/2 inch slit in the center at the top of my cardstock and cut out to the distance of the clip.  I cut two small openings in the shape of the clip and tuck the rest underneath once I have it around the clip.  Another Ingrid Tip – and that one’s a keeper! 🙂

I will add more projects and tips as I keep digging out all my favorite supplies.  I hope you enjoy the creative path with me!

Happy crafting! 🙂

Ingrid

These are original projects of mine.  I’d love your feedback!  And feel free to share! If you are interested in ordering any of these products, let me know!  I know a ton of people who can help you out…lol! 🙂

If you would like help with any upcoming travel – even just advice – contact me!