Mixed Media Christmas Tag

Mixed Media Stamping Techniques

Creating mixed media Christmas tags can be a fun creative exercise that really showcases a fun style that is all your own. When I think of mixed media, I have always thought of those amazing colorful art journal pages we see so often. I’ve always been an admirer, but I have to admit, a bit scared to start. Well, when Kylie at Happy Little Stampers asked me if I wanted to be on the mixed media team, I was a bit apprehensive. I thought two things – 1 – I know nothing about mixed media other than it looks so cool and 2 – Is this style biting off a little more than I can chew?! Well, I never do anything the easy way, so when she told me most of what I do is by definition mixed media already, I figured, it was time to jump into the deep end and figure this mixed media thing out! – I was in!

HLS Mixed Media challenge

So today’s tutorial is the beginning of a journey into the art of Mixed Media for me. I hope you’ll join me for this fun ride! We’re going to start out with the 1st Mixed Media challenge at Happy Little Stampers – there’s even a prize! If you’ve ever wanted to try something new, or just give it a go – join me this month – the theme is TAG. Now that can be literally anything tag related – Card with a tag, and actual tag, etc… Here’s a video to show you some of my thought process into this project. I hope you love it, I have to say – I had no idea where this project was going, I enjoyed the path and definitely the end result.

Watch on YouTube

Leave me a comment with your thoughts – about this project, on the mixed media style, anything really! I’ll randomly select one commenter to get this beauty in the mail! 🙂

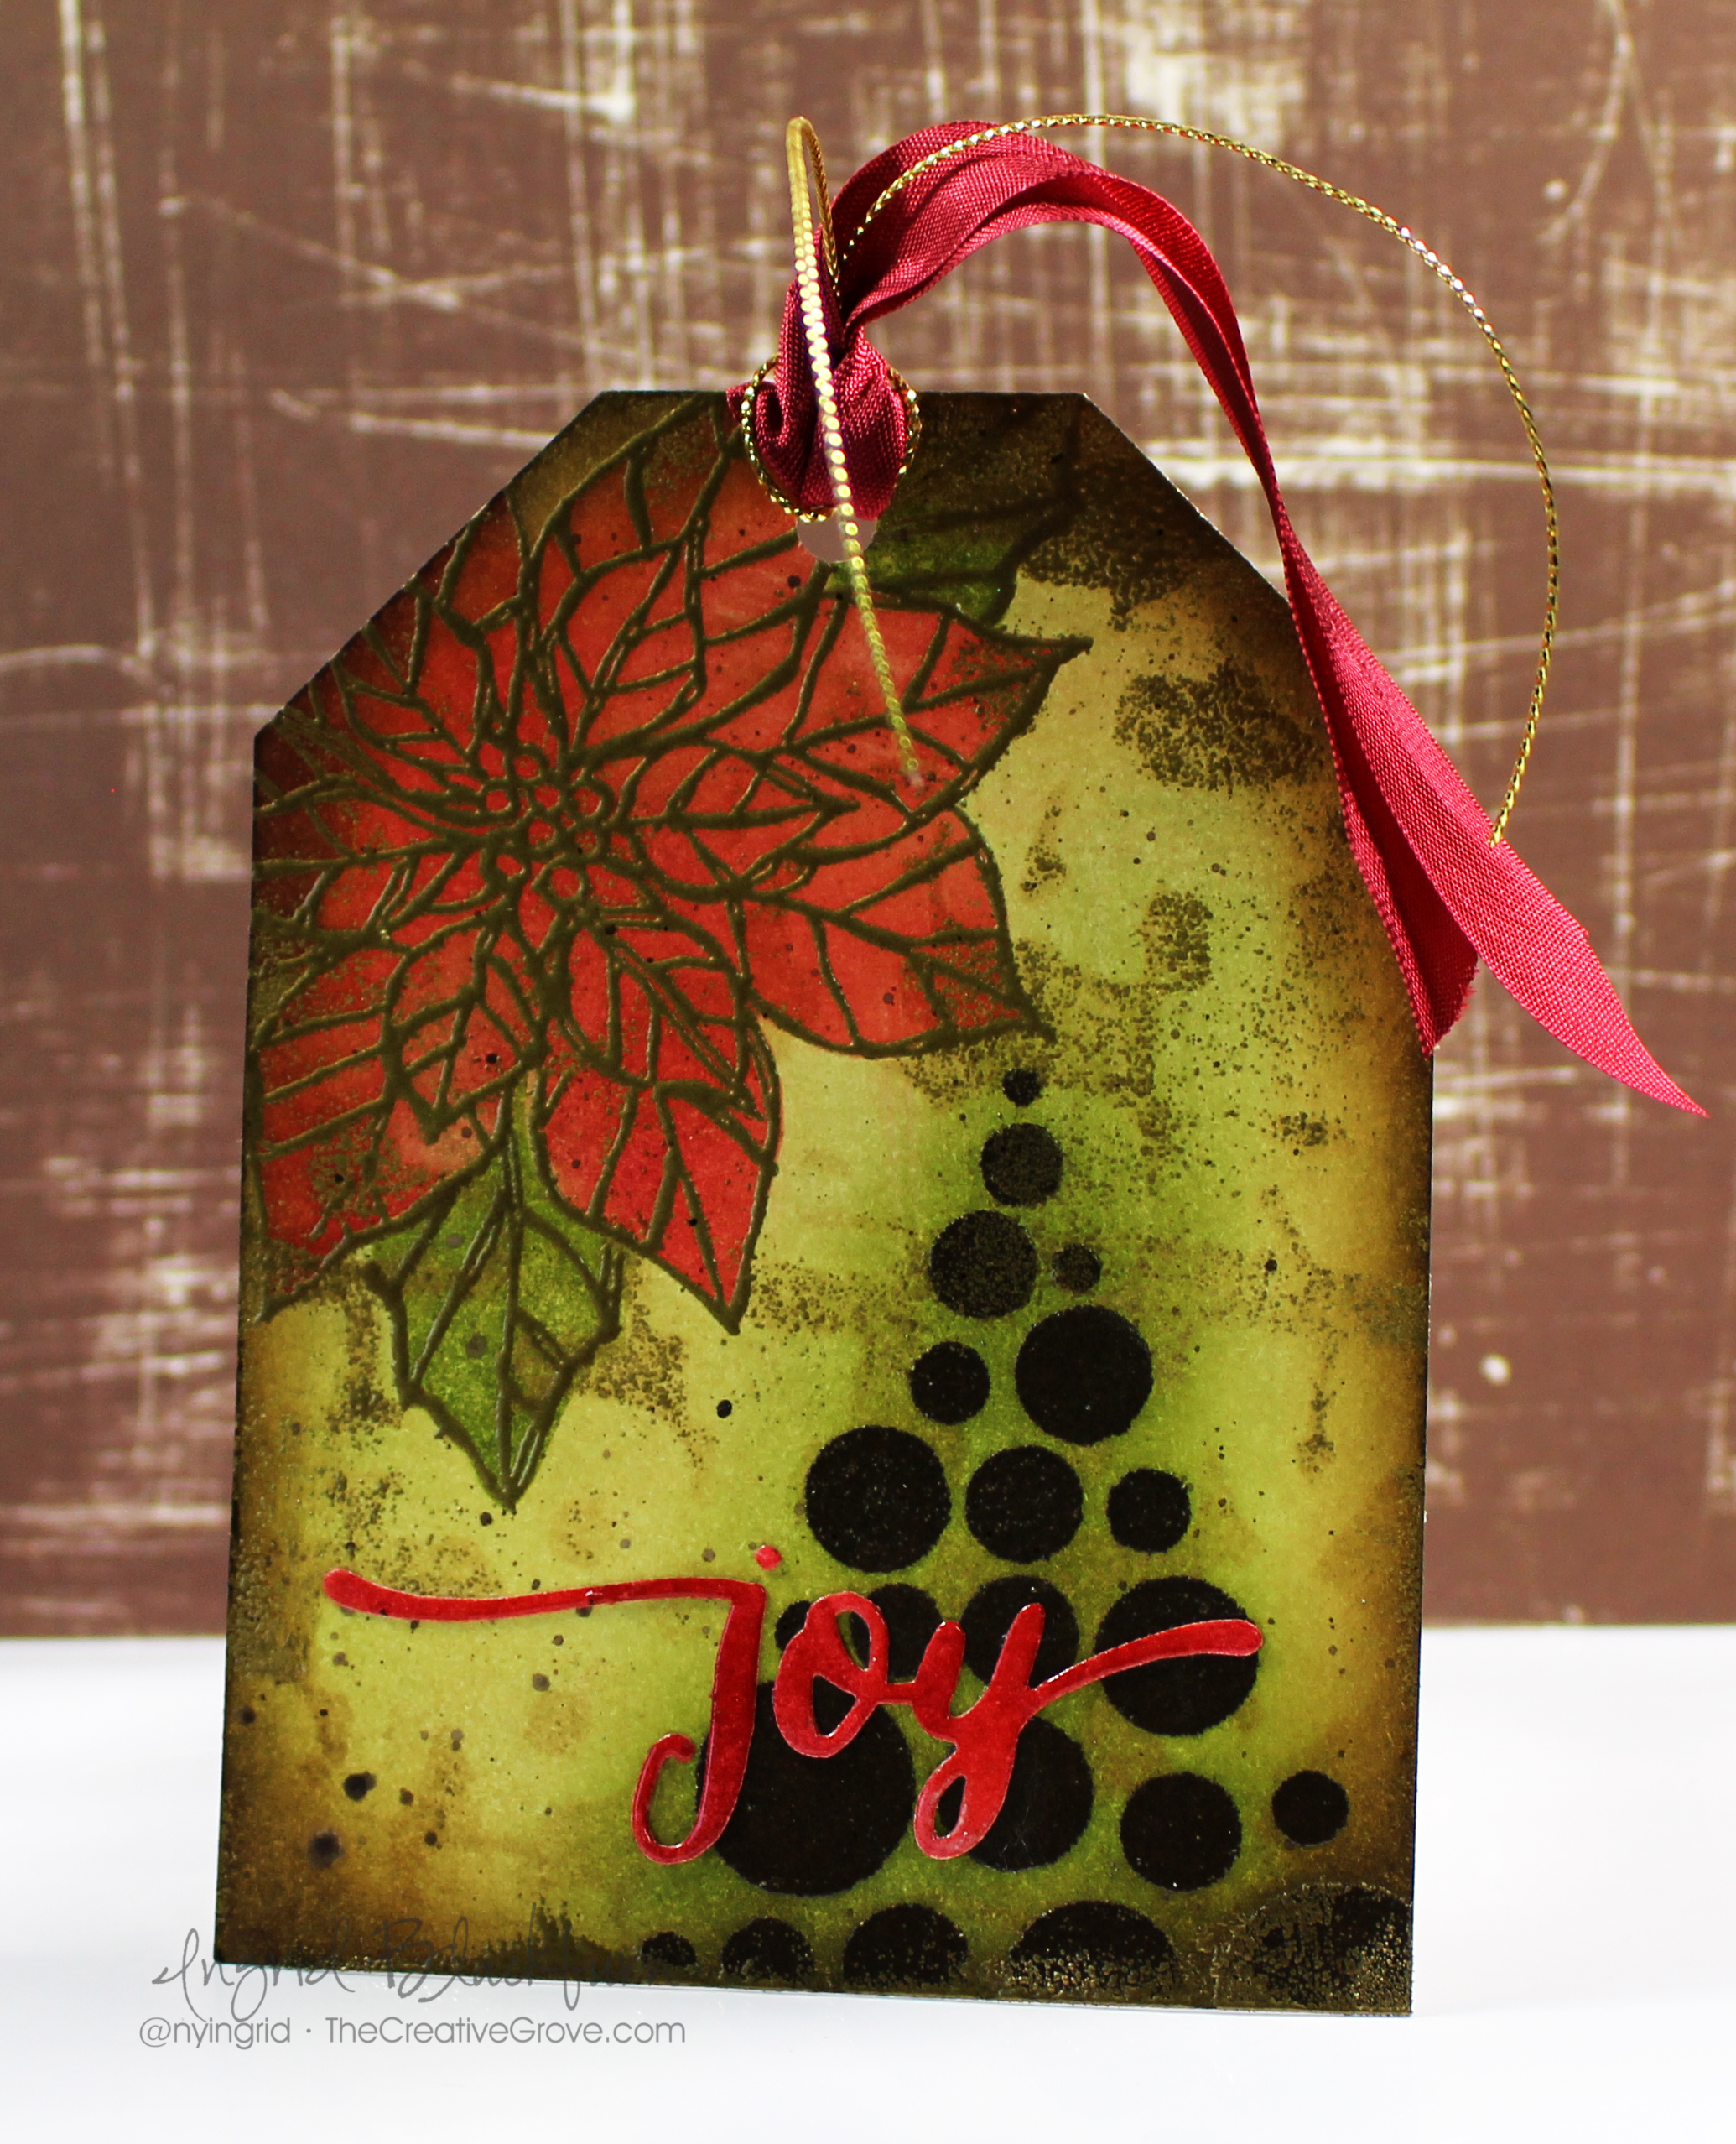
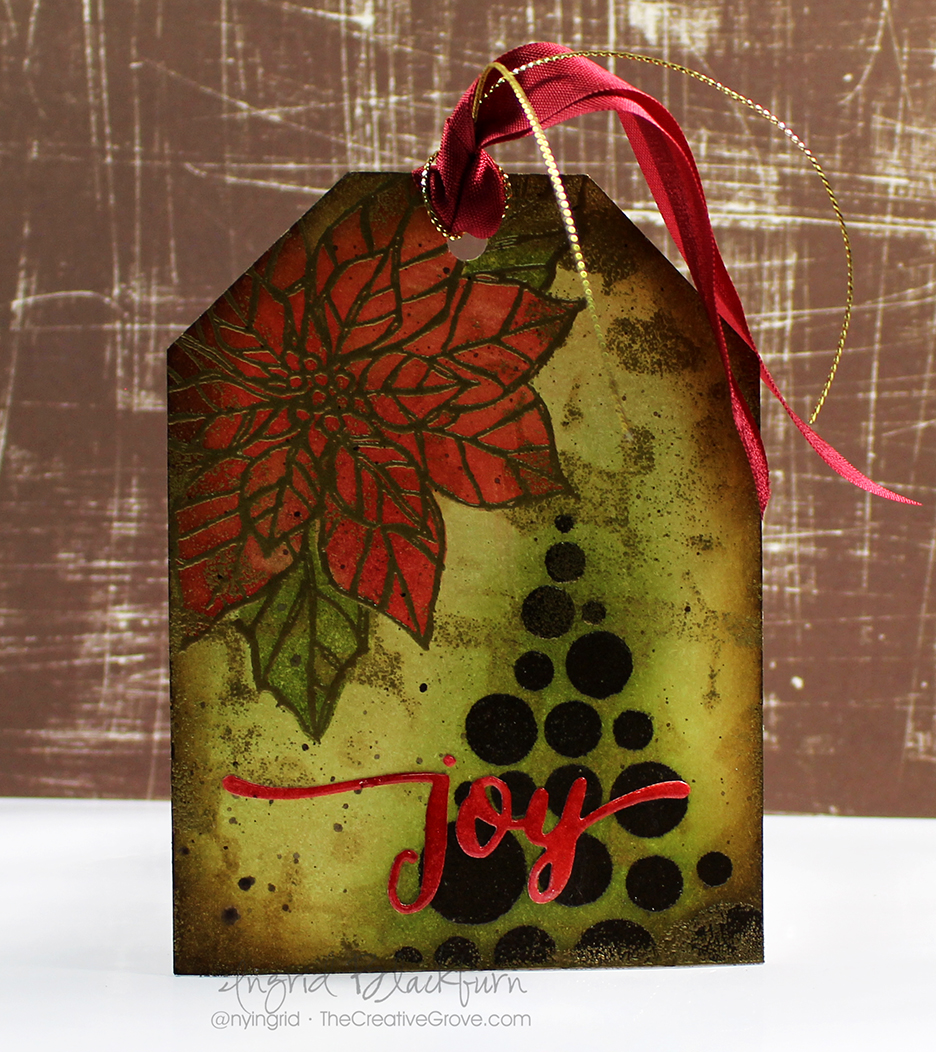
Creating your own Mixed Media poinsettia tag

  • Start with a white piece of card stock – 3 3/4 x 5″. Cut your tag corners as in this video (0:00 min)
  • Create a Vintage background for your project using distress inks – Antique Linen, Scattered Straw, Old Paper, Vintage Photo, Ground Espresso and sponge tools  Click Here for a step by step tutorial

mixed media video tutorials

  • Layer stencil over and add more Antique Linen and a little Vintage Photo to bring it out
  • Zap a bit with a heat tool, but not completely. Test in Gold embossing powder and emboss any strays to project
  • Dry with heat tool again. Emboss Tree with stencil and espresso embossing powder
  • Add a little green to your tag – Bundled Sage, Peeled Paint and Forest Moss
  • Add gold poinsettia and color using festive berrries distress ink and a negative image mask.
  • Add leaves in same manner as in the video.

How to create a mixed media project

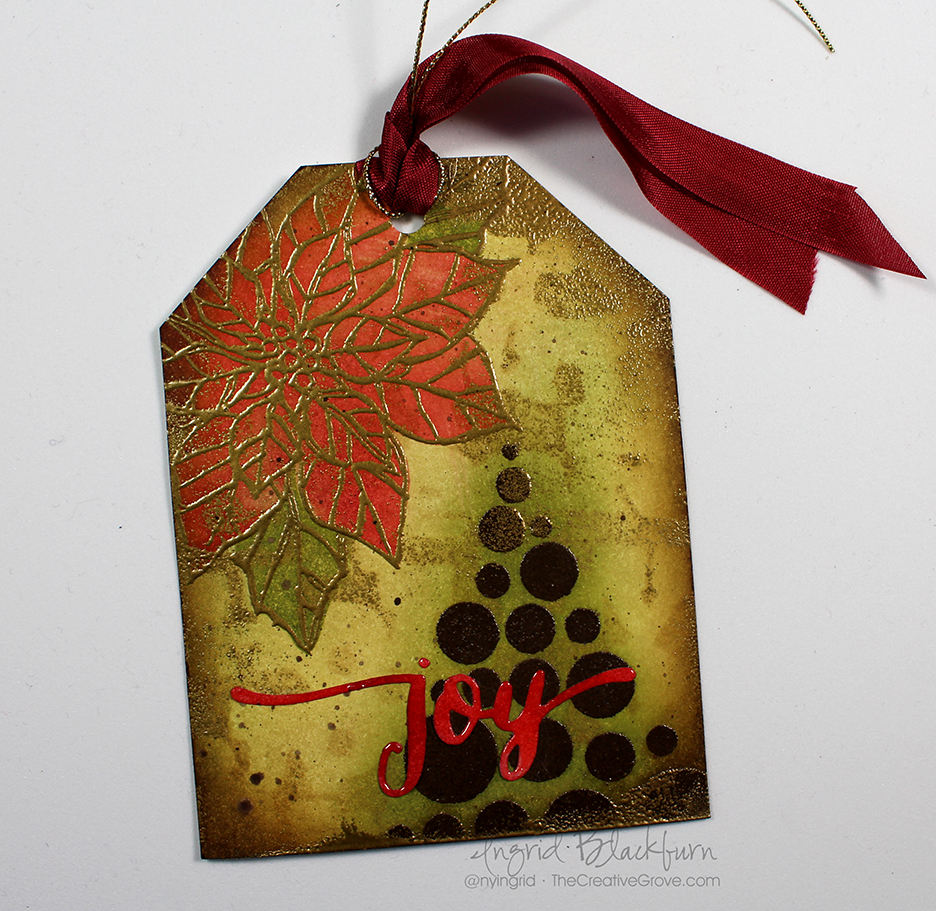
  • Edge tag with Vintage Photo and Ground Espresso
  • Add a little gold embossing powder to random spots – after I shot the video, I did this at the bottom of the tag by dragging my versamark pad directly to to the edge.
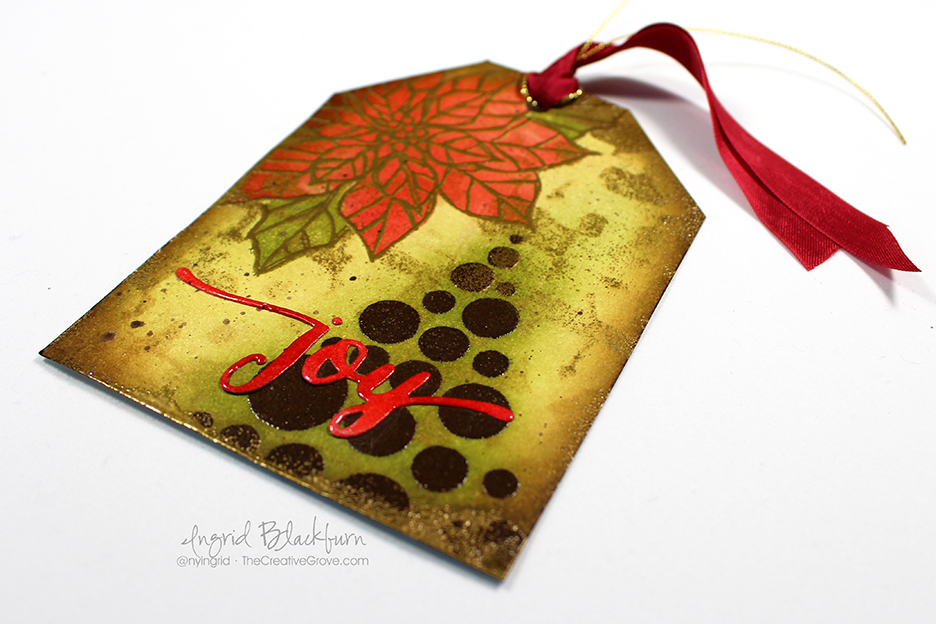
  • Sponge a piece of white scrap with festive berries and fired brick distress – cut out using hand lettered holiday by WPlus9
  • Emboss greeting in clear and add to tag.
  • Punch 1/4″ circle at top and add ribbon as in video

Mixed Media Christmas Tags

This tag was so much fun to make and would look exquisite on a gift or wine bottle. I would LOVE to see your interpretation of a mixed media tag in the challenge! And be sure to enter your creation into my friend Loll’s Christmas Tag Challenge too – I did:

Loll Thompson's Tag Challenge

And in case you haven’t seen yet – here’s the talented line up of  the new Mixed Media Team – be sure to check out their creations from the HLS blog too!

stamping design teams

Have fun getting those fingers inky!

Signature-24-pt_thumb.jpg

[optin_box style=”8″ width=”500″ alignment=”center” disable_name=”Y” email_field=”email” email_default=”Enter your email address” email_order=”Enter your email address” integration_type=”aweber” double_optin=”Y” list=”3846012″ name_field=”name” name_default=”Enter your first name” name_order=”1″ name_required=”N” extra_field_1_name=”name” extra_field_1_title=”Enter your first name” extra_field_1_order=”1″ extra_field_1_required=”N”][optin_box_field name=”headline”]If you enjoyed this tutorial…[/optin_box_field][optin_box_field name=”paragraph”]PHA+4oCmeW914oCZbGwgbG92ZSBvdXIgPGVtPjxzdHJvbmc+ZnJlZSA8L3N0cm9uZz48L2VtPnN1YnNjcmliZXIgb25seSB2aWRlbyBzZXJpZXMuIMKgTGVhcm4gbmV3IHRlY2huaXF1ZXMgdGhyb3VnaCBvdXIgPGVtPjxzdHJvbmc+ZXhjbHVzaXZlPC9zdHJvbmc+PC9lbT7CoENyZWF0aXZlIFRpcHMgZS1sZXR0ZXLCoGFuZCBzdWJzY3JpYmVyIG9ubHkgdmlkZW8gYW5kIHByb2plY3QgdHV0b3JpYWxzITwvcD4K[/optin_box_field][optin_box_field name=”privacy”][/optin_box_field][optin_box_field name=”top_color”]undefined[/optin_box_field][optin_box_button type=”1″ text=”Send me exclusive tips!” text_size=”32″ text_color=”#000000″ text_bold=”Y” text_letter_spacing=”0″ text_shadow_panel=”Y” text_shadow_vertical=”1″ text_shadow_horizontal=”0″ text_shadow_color=”#ffffff” text_shadow_blur=”0″ styling_width=”40″ styling_height=”30″ styling_border_color=”#000000″ styling_border_size=”1″ styling_border_radius=”6″ styling_border_opacity=”100″ styling_shine=”Y” styling_gradient_start_color=”#a3b640″ styling_gradient_end_color=”#80902c” drop_shadow_panel=”Y” drop_shadow_vertical=”1″ drop_shadow_horizontal=”0″ drop_shadow_blur=”1″ drop_shadow_spread=”0″ drop_shadow_color=”#000000″ drop_shadow_opacity=”50″ inset_shadow_panel=”Y” inset_shadow_vertical=”0″ inset_shadow_horizontal=”0″ inset_shadow_blur=”0″ inset_shadow_spread=”1″ inset_shadow_color=”#80902c” inset_shadow_opacity=”50″ location=”optin_box_style_8″ button_below=”Y”]Send me exclusive tips![/optin_box_button] [/optin_box]

An exercise in Blueberry Watercolor

I have been wanting to paint a Blueberry Watercolor for the longest time. I know I just had a week in Tuscany, but I’ll be honest – it was a work-cation!  I know, must be nice, right? Well, I wear two hats in this family – Paper Crafting artist and Travel marketing specialist.  That means for our other business – Elite Travel Planners, I blog, design and maintain websites, socially engage through media and of course – Tech Support!  So, since our week in Tuscany was rather heavy on the travel work…I took a day off when we came home.  It’s rare actually, for me to totally take a day for myself.  So I decided to dust off my watercolor paints and dive into a project I had been wanting to tackle for six months – a blueberry watercolor botanical.

I learned to paint botanicals with a multi layer method I learned from the watercolor artist Anna Mason.  I adapted this style of painting for some of the projects in our online paper crafting class – Watercolor Techniques that Wow!  But that’s cards, and this is full size painting.  For me, I truly get elated seeing a watercolor painting come together.  Keep in mind, I’ve only done four in my life!  To say I’m new to the full sized art is an understatement.  But what I have done is learned the skills and practiced more than you would believe.

Here are my various stages and final result of my blueberry watercolor.  This painting was based off one of Anna’s.  The blueberry measures 7 1/4” x 7 1/2”.

Blueberry Watercolor Painting Stages

Blueberry Watercolor Botanical Painting 001

Three Key Things to Keep in Mind when Painting in Watercolor

Painting a large painting is VERY different than a 5 1/2” x 4 1/4” card.  It can be a little intimidating.  And the sheer time it takes is much more than card making – that’s for sure. Here are a  few things I learned along the way:

1 – Paint – You get what you pay for

If you are just working on cards, many of the inexpensive sets are just fine.  The size is key here – most cards are small.  Of course, better quality paints are more vibrant and translucent.  But if you’re going to take 1+ days to create a full sized painting – these two factors are key.  You don’t want your painting to look dull, invest in a few artist quality paints.  If cost is a huge factor – start out with student grade paints, but stay away from inexpensive sets.  Basic rule in life applies here – if it looks too good to be true (set of 18 tubes of watercolor paints for $15), than it usually is!

You can find good quality student grade paints for a few dollars a tube.  Artist grade will run you $5 – $20 per pan/tube.  I have some links at the end for great shopping options.

2 – Paper – Block or not?

Paper is the foundation of your project.  There are many options and types of paper out there – chose wisely.  I suggest a block.  Okay – Arches cold pressed artist block may not be in your budget – but there are all sorts of options.  If you’re not sure, buy a few single sheets and cut them down to the size you need.  You’ll need to stretch them first, and by the time you’ve gotten everything you need to do that and spent the time – you may as well have bought a block!  The pluses here are too many.  Time is everything in our lives these days.  And what’s great about an block (four glued sides), beginners can really use too much water and be okay.  But beware – if you are the impatient type and speed dry your work (which I don’t recommend), a block is not for you – tape your pieces down and stretch them instead.

3 – Education

No, you don’t have to go to art school.  But take a class or two.  You’ll be glad you did.  There’s nothing better than being able to ask questions, have someone look at your work, or being able to back up an online video to really review each step.  I’ve learned so much myself!  And it’s all applicable – whether it’s a paper card making watercolor class (we have one right here) or a traditional watercolor class.  Most classes are not that expensive, and it’s great to be able to have somewhere to learn!

Ultimately – watercolor painting is fun, just get started and have a good time.  There are millions of watercolor artists around the world – jump in, the water is great and inspiration lies everywhere.  Take a little time for yourself – I sure am glad I did for my Blueberry Watercolor!

Signature

Creative Cards Watercolor VIP

Some great places to shop:

The USA –

Jerry’s Artarama

Dick Blick

UK –

Jackson’s Art Supplies

Blueberry Watercolor 001

My Blueberry Watercolor – an exercise learned from Anna Mason

Watercolor Wash Mojo Monday

DSC01411

Do you sometimes just need a little pop of color in your life?  A watercolor wash is the perfect way to do just that!  Today is Monday and I have another Mojo Monday Challenge card for you.  I kept it simple and let the color be the star here without adding too much.  Here’s the original sketch and my interpretation:

                   Mojo350SketchDSC01413

If you just love the simple blend of color and want to learn various techniques to use watercolor in your cards, try our Watercolor Techniques that Wow class.

Watercolor Narrow 125

Creative Tips –

  • Choose colors that work with each other.  If you’re unsure of what to choose, get yourself a little color wheel like the one here.  The colors you see here are a Tetrad group – two sets of complimentary colors.  I knew the Magenta would blend into violet, so I chose that as a better blend then straight violet.
  • DSC01434

  • The colors used are Schminke Hordam Aquarell Yellow Lemon, Translucent Orange, Paris Blue and for the yellow – Stampin’ Up! Daffodil Yellow Cardstock.
  • The colors are the star, so the remainder of the card is kept really neutral – Basic Black and Whisper White. 
  • Stamp your greeting in a bold color like Pacific Point here.
  • I don’t own a smaller set of circle framelits for that perfect border…yes, I know – what?!!  On my list (which is quite long, for some reason it keeps getting bumped…lol).

DSC01436DSC01435


  • For an accent – try something simple like paper piercing.  Keep it balanced.
  • Pop up various elements like your greeting and card front to give your project dimension.

DSC01412

    If you liked this card – check out some of our classes or our monthly technique community!  Thanks for visiting today – now get stamping!

    Signature

    Creative Techniques Banner 72

    Wetlands Seascape Watercolor Tutorial

    wetlands watercolor

    I was feeling artistic last night and wanted to bring my watercolor experience this past few weeks full circle by combining my first ever landscape with one of my favorite Stampin’ Up! stamp sets – Wetlands.   Here are all the details to this journey plus several tips on supplies at the end that I like to use for this medium.  I know it’s long, but it’s quite in depth! Enjoy this tutorial.  For the complimentary article on tools and supplies click here.

    As you may have read a few weeks ago, I took a local art class in watercolor.  If you didn’t see my first ever landscape, it’s pictured below, but I’ve detailed the process here – you have to see what it started out as to appreciate the end result.  Check it out here.  I still can’t believe I turned my beginning mess into something beautiful that I’m actually quite proud of.  (that’s hard to do, I’m quite hard on myself with my own artwork)  Since my original had more mistakes than imaginable, I thought it might be fun to try it again, just in a smaller version that I could use stamps on as well to combine two artistic passions.

    watercolor wetlands tutorial

    I was undecided on size, so I took out the stamp I wanted to use – the sandpipers from Wetlands.  It’s a rather long stamp and to get the perspective right, I realized my card was going to have to be much larger than the traditional A2 size (5 1/2 x 4 1/4).  I held the stamp up to my grid paper and settled on a  4 x 6” size for my watercolor image with a final card of  5 1/4 x 6 3/4”.  Now that I have the Envelope Punch Board, I never worry about fitting my card to an envelope – I can just make whatever size I need!

    I used my painting and other similar cards as inspiration.  I used my 100 pound rough watercolor block which is 9.4 x 12.6 inches.  I wanted to work with something that was secured and wouldn’t warp.  Of course, I wasn’t paying attention, and used the side which wasn’t glued – so that kind of worked against me in the end at the bottom – oh well!  I won’t make that mistake a second time…lol!  Here’s my workspace:

    DSC09982

    Creating this seascape comes over several stages.  To begin, you don’t need to worry too much about being too precise, just throw down some yellow ochre wash (really light – really watered down) in the general area and let the painting form from there.  I used a size 14 brush.

    DSC09985

    Using Yellow Ochre in a variety of consistencies from water, milk and cream – create your rocks from the edge of your negative space.  To give them definition, decide where the light is coming from and start to shadow the rocks with a rather light wash of paynes grey or yellow ochre or a mixture of both with some burnt sienna in them.  Keep it on the light side and build up your color.

    DSC09986

    Add some more definition to the bottom of your rocks with a variety of consistencies of Burnt Umber and Paynes Grey as shadows under and between.  Use that also to define your cliffs and crevices.  Use your imagination or photos as inspiration for tone.

    I went rather light in my card because it was small, you see much more depth in the full watercolor painting of my original.  I used several images of water colored rocks that I found online as inspiration as I found rocks quite difficult to attempt.  But after a few, I got the hang of them.

    DSC09991

    Use a variety of washes and mixtures in a milk consistency of Yellow Ochre, Burnt Sienna, Burnt Umber and Payne’s Grey as you can see here.  TIP – Paint a quick swatch on a scrap piece of watercolor paper so that you know if you need to go heavier or more than likely – lighter with water.  This is a great habit to get into rather than practicing on your painting.

    DSC09989

    Next I added the blues to create the sea and sky.  I used Cerulean, Ultramarine, Prussian and Paris Blues in addition to Paynes Grey to darken any up if needed.

    DSC09993

    I started with the water.  Begin with a very light wash of Paynes Grey – super light for the boundry of where you want your water to go.  Then layer a really light wash of Cerulean Blue over that.  Don’t worry if you get too much color on the beach part.  I went back and forth getting it just right.  While that area is wet, use a clean watercolor brush to push the color from the beach back into the sea.

    Add a light ultramarine/cerulean wash to the darker areas of the sea.  Once you have it the depth you want, let it dry.  Once dry, add some highlights in pure Ultramarine, but keep it minimal – just a highlight to show variety in your water depth and character.  I also added three small strands of a light watered down Prussian Blue after.

    DSC09994DSC09995

    Go over it with a clean wet watercolor brush to soften up and blend in the colors.  Play around with it, I guarantee you – you will mess it up, but while it’s wet, you can adjust it.  It’s quite forgiving, and that’s the beauty of water coloring!  Take note of the sea above and in this photo.  You can see how I blended it out a bit using a clean wet brush.

    DSC09997

    For the sky, start with a rather light wash of Paris Blue.  Choose a blue that is a bit more sky color rather than the bright sea colors.  They relate, but you can see the difference in hue between the two.  As it was still wet, I brought the intensity of the color closer to the cliff line.  I was a bit over-zealous and crossed over into my brown, but fixed that with a little Olive/Burnt Sienna mixture.  It added some color break and interest too – a happy accident.

    For the clouds, while the sky was wet, I took a clean wet brush and removed some of the blue by gently moving my brush around in spots.  It creates a nice natural look of billowy clouds.

    DSC00003

    If you make a mistake, don’t fret – go over that area first with a clean wet brush and work the color back to where you want it with a light scrubbing motion.  If that doesn’t work, just adapt!  TIP – Work in light color washes first, that way you can always bring the intensity up or adjust as needed.  It’s harder to take away – not impossible, but harder.

    To stamp, I removed my piece by cutting it off the block (for more on my watercolor block, read below).  I needed to use a stamp-a-majig, so I wanted to have a flat surface.  The birds were a bit long, so I left off the last two.  I inked the image up and wiped away the reflections and last two birds with a wet paper towel.  Position your transparent piece to exactly where you want it.  If you don’t have a stamp-a-majig, use a piece of transparency, or plastic to get a feel for where the birds need to be.  There’s nothing worse than spending all that time on a masterpiece only to mis-place your stamped image!

    DSC09996

    Once your scene is dry – I can’t stress that enough – do not attempt this with a wet scene.  A hairdryer will dull your colors, so air drying is the best option.  Clean up, work on your sky, something so that your sea dries.  Lightly go over your birds with a small watercolor brush (I used a size 1) in a very light Paynes Grey wash.  Be careful not to add too much water, you don’t want your image to run.  You can use Staz-On Permanent…I used Memento Tuxedo Black Dye Ink.  I have a good result with that black ink pad.  Be sure to let it dry after stamping.  I added a bit too much grey to the shadows in the water, try using a light cerulean wash instead.

    DSC00006DSC00009

    With your small watercolor brush, add a very light Cerulean wash around your stamped images to fill in the water where needed.  Be careful not to touch your birds if you’ve used Dye Ink!  This really finished my oncoming water on the shoreline and added just the right amount of color.  Remember with layers you can bring your scene to just the right color level.  You also create interest with under layers.  Just be careful not to wash away your underwork when doing this, a light touch is key.

    The birds give the scene a human interest.  It’s important to put something there – a house, boat, people, something.  It helps to balance the scene and make the reader connect with the painting.  TIP – Notice that I placed the birds in the forefront of the painting.  The stamp that I used was large in comparison to the scene, so it’s important to have the perspective just right.  That’s why the rocks are larger in the foreground and get smaller as the scene goes back.

    DSC00004

    To finish your project, matte your cut out painting onto Very Vanilla leaving a 1/8” border.  Pop that up on several stamping dimensionals (I used 12!) to really keep it elevated.  Matte onto another piece of Very Vanilla cardstock for the card base.  I used a greeting from the Four You stamp set by Stampin’ Up.  I inked that up first in Stampin’ Up!’s Island Indigo, stamped off then in Marvy Light Blue for just the right blue.

    Note – there is no white on my card at all. I think it’s best when your painting is completely painted!  My beach area has a super light wash of Yellow Ochre/Burnt Sienna and in spots Paynes Grey.

    DSC00001

    I have some great tips and DIY solutions for supplies and tools for getting started in a complementary article to this post here.  I hope you enjoyed this tutorial on this scene.  It’s super fun, is quite satisfying and I know the recipient of this card will love it, especially when they realize you pretty much created it yourself – Be sure to sign and date it!

    Signature Snowflake 001

    Watercolor Supplies–Paper, Brushes, Palettes and Paints

    Getting started with watercolors can become quite daunting, but it doesn’t need to be.  Pictured below is really all you need:  Paper, a few brushes, two small drinking glasses, some paint and a throw away dish.  Read on for more details on a few DIY items and what I use to make landscapes and cards.  I hope you find it helpful on your watercolor journey.

    To see the project in the related blog post click here.

    DSC09982_thumb[5]

    Watercolor paper comes in all thickness, texture and sizes.  Not/Cold Pressed is what most people are looking for, texture ranges from rough to . You want a good weight of at least 140 pound, but can get great quality paper up to 300 pound.  Stampin’ Up!’s watercolor paper is 140 pound cold pressed paper.  Despite that,  it’s not my favorite to use!  You’ll have to play around to find one that you love.

    Watercolor Blocks

    A watercolor block is several sheets (usually 10-30) of watercolor paper glued together so that it will straighten itself out once dried.  They are bound with a gummed edge on all or three sides while wet so that they dry flat regardless of how much fluid you add to it.  It’s a great work surface that is easily portable with a thick piece of cardboard at the base for support.  I highly recommend getting one if you really get into watercolor.  It’s also a great way to sketch, use pastels, or several kinds of mediums.  You’ll also find them for acrylics and oils.

    DSC00026_thumb[2]DSC09982_thumb[7]DSC09985_thumb[7]

    Just like individual paper, blocks come in several sizes, texture of paper and paper weights.  I am using one by Hahnemuhle as I couldn’t find the Arches cold pressed block locally – Arches is considered one of the best – from France.  I went with a small block for landscapes and cards that had 30 sheets that had 100 pound rough paper attached as a block.  My other block (larger projects), also by Hahnemuhle is cold pressed 140 pound (10 sheet), and there is definitely a difference in the quality of the paper – which the price reflected as well.  But for cards, the 100 pound was just fine.

    Once finished with your project, you just use a dull metal side like a palette knife or I used the edge of my closed paper snips to loosen your completed project off the block. It’s rather awesome when watercoloring, and I do highly recommend a block for its ease.

    DSC00013_thumb[5]

    Paper

    You of course can take paper from a watercolor pad or purchased individually.  When working, to prevent the warp of the paper as you add fluid, make sure to tape it to your firm surface.  A wooden or firm drawing board is ideal.  Do not remove the paper from the tape until it has completely dried.  The tape will help bring the paper back to its shape.

    DIY Painting Palette and Mixing Surfaces

    I found two of these flat china plates (pictured below top left) in a close out section of a target like store.  They are perfect for making washes.  I squeeze a little color on the lip that will dry and pull from that as needed in addition to my half pans. 

    DSC00019_thumb[2]

    Since I haven’t found the perfect water color metal tin yet for my pans, I used a piece of cardboard and layered a piece of cardstock on top (pictured above bottom right and below).  I double wrapped the entire thing in thick plastic from some packaging that I was throwing away to create a water resistant surface.  I laid two pieces of sticky strip to one side and attached my 1/2 pans.  I wrote the colors onto the cardstock first, then laid the pans next to them.  They don’t move and it’s a great make-shift palette with a little mixing space to the left if needed. 

    DSC00013 copy_thumb[2]

    Half Pans vs. Tubes

    This is a personal choice.  I actually like both.  But, if I were forced at gunpoint to chose one, I’d go with Pans.  Less messy, more control and less waste.  You truly only pull off what you need. 

    Quality

    Now this is not so subjective.  I have a lesser quality tubes, as I’m just starting out and it was a gift set meant as a starter set.  Perfectly fine for me at this point.  I got 24 colors in a good range for not so much, perfect if you’re just starting out.  But as with anything in life, you get what you pay for.  So my gift set of tubes that was about $18 for 24 tubes is chalky and a bit dull in color. 

    Not that I realized that until I purchased artist quality pans and started painting with those!  Holy cow – to say there is a noticeable difference is an understatement!  They are vibrant and much truer in hue once watered down.  And that’s where you’ll really see it – plus when you start mixing.  It really is night and day.

    So  where do you start if you’re just beginning?  My recommendation – go with a student/academy set.  The price is a bit cheaper than artist colors, but much more vibrant than the grade school and hobby sets you’ll find.  And if the cost isn’t an issue – then hands down – go for the artists colors. 

    Start with the basics – you don’t need every color – and there are a lot of colors when you get to the artist level.  But the advantage of starting with the primaries and just a few extras…you’ll learn to mix your own!  Ask your art professional in the store – not the after school kid just looking to make a few bucks – someone that knows what they are dealing with.  After all, my Schminke Hordaram Artist Watercolor 1/2 sized pans range from $5-$10 each – and yes those are the small 1/2 size!  So, get a good 12 or 24 color set with a tin (you’ll save).  You can get a 24 color Schminke 1/2 pan set for $180 (the tin by itself is $44 – ridiculous, I know!)  But you can get a wide variety of colors – or make your own collection.  The tin will make it easy to transport your pans with you, but if you only plan on water coloring at home, try my DIY palette!

    I don’t have access to Winsor and Newton watercolors locally, but if you can get your hands on  these – go for this brand.  The colors are brilliant!  There is a wide range of brands out there – but if you’re going to spend $50, you might as well, just go for a few of the basics Red, Yellow and Blue of a really good quality and work your way up to more colors.  The lessons in learning to create your own colors through mixing the three primaries will be invaluable.  That’s what I’m doing, after all…I still need money for stamps! Smile

    Tubes

    Of course, you can squeeze tubes into wells of palettes or empty pans as well.  Be sure you use better quality paints, because as you add water and thin out your paints, once it dries if it’s lower quality – like my Maries, it’ll contract and flake right out.  The thing about tubes, squeeze out just what you need.  It’s easy to squeeze out too much.  I squeezed out just the minimum onto my palette above, and look at how much was left over at the end!  It’s sitting dry on my plate for next time.  But if that’s a while in-between, it’ll just fall right off.

    DSC09930

    The paint from tubes are easier on your brushes and mix with water easier for your exact desired consistency.  When I was working on my 10 inch Basil Leaf (click here to see that), I needed a lot of olive green and sap green.  I used tubes, because I needed a ton.  I didn’t have pans at the time, but being able to mix larger portions of exact color was definitely easier.

    Pans are less expensive than tubes and easily accessible – no lid to take off, so they are preferred by many.  I think you’ll find that you like using both.  There’s nothing wrong with that!

    Brushes

    I use a Da Vinci Cosmo Top Mix B in a size 14 and a Da Vinci Kolinsky Rotmarder in size 3 and 5 for smaller touches.   These brushes when wet come to a point and can make the smallest of details.  Use anything you have, Aqua Painter or other ones you have lying around.  This will definitely be another post in itself someday.  I’m just scratching the surface here. 

    DSC00028

    For more detailed layered paintings like botanicals, I use my Kolinsky (Sable Hair) Rotmarder brushes, but don’t go higher than size 5.  I use size 1, 0, 000 and 3 as well.  Using the size 14 was quite an adjustment, but I found that I had more versatility.  I spend money on good brushes, so that’s why I don’t have that many. 

    DSC00029

    To supplement my stash, I have two $10 sets of flat and rounded brushes in various sizes.  They are more for acrylic painting, but I use them none-the-less.  Not much with the watercolors, but for water, mixing and scrubbing if needed.

    For water pots, I use 2-3 small glasses, one for clean, one dirty and another I rotate in if needed.  It’s easy, and they stack for easy back and forth to the sink.

    I hope that helped you with some basic supplies.  I’m still exploring the many, many brands and great supplies out there!

    Signature Snowflake 001

    Shop 24/7 in my Online Store – Here

    For other art supplies, check out these online resources:

    Dick Blick and Jerry’s Artarama

    For online card classes – be sure to check them out in the classroom under the Online Classes tab above!

    Watercolor Landscape Card

    DSC09941

    So have you tried your hand at a watercolor card yet?  Here is my third very different look for a quick, easy and totally artistic card – a watercolor landscape.  But this photo may do this card a little injustice – it’s a mini!  This is the perfect little gift card to really make you stand out from the rest.  Here is my first watercolor that has a graphic look to it  and here you will find my second – similar, yet completely different.

    DSC09946

    Of course, you could make this type of card in any size, I just wanted to get two out of the watercolor piece of paper I had, so I only used half the sheet and flipped it around to make a second.  The fun part is that this card literally took me about 5 minutes to make.  And that’s only because I had to let it dry in-between a few layers.

    I used Schminke artist watercolor pans in the following colors: Paris Blue, Olive Green, Translucent Orange, Cadmium Red Deep and in Marie’s Tubes: Burnt Umber, Ultramarine, and Gambouge.  For the violet, I combined Paris Blue, Paynes Grey and Cadmium Red Deep.  For the greeting, I didn’t want it to stand out too much, so I used Pewter embossing powder rather than silver.

    DSC09945

    It’s fun to play with your colors.  I use a white flat China Plate as my Palette (round flat plate picture on bottom left).  If I’m using tubes, I squeeze a tiny bit on the edges and even allow them to dry.  I then treat it like the pans.  I’m come to the conclusion that I want all pans.  Although I have yet to watercolor anything larger than 10 inches.  I may feel different if I’m working on something large…lol!

    DSC09930

    I used my DaVinci Cosmotop blend #14 brush for the entire scene (large brush above).  I love that with the tip I can make the finest of details – although if I was going to need a ton of detail, I would definitely grab my smaller brushes!

    Watercolor Landscape Cards Main L

    I hope you have enjoyed this little series of watercolors, they are quite different from each other, but I made them all in one sitting in about 30 minutes.  It was fun to be varied, but yet also carry the theme of water coloring.

    In case you need some more inspiration, head on over to a new challenge blog – Virginia’s View Challenge.  Her first challenge is about watercoloring and there are 250+ entries which give great inspiration.  Enjoy! 🙂

    Now you give it a try!

    Signature Snowflake 001

    Shop 24/7 in my Online Store – Here

    For other art supplies, check out these online resources:

    Dick Blick and Jerry’s Artarama

    For online card classes – be sure to check them out in the classroom under the Online Classes tab above!

    Spring Flowers Watercolor Card

    What did you think about the last watercolored card?  Did you miss it, see it here!  Today you will want to use the same two Schminke colors – Translucent Orange and Magenta, in the same style, but with a totally different look.  Add some free form leaves with Sap Green and Olive Green as well.  To give the card that pop, you will want to use some Stampin’ Up! Rose Red card stock.  For a little drama, add some Dimenionals to help it stand out a bit more!  It was surprising that the Magenta color matched the Rose Red card stock.  But, the deep hue was almost a perfect color. 

    See how much different the card looks from the last one without the lemon yellow wash painted as the background?  It’s really surprising to see them side by side and how different they look.

             Watercolor Handmade Card Main L

    I know I added a thinking of you greeting, but this would be the perfect blank or mother’s day card!  Since it is an original artwork piece, I also added a title to my little masterpiece – Spring Flowers and signed my name and date.  Definitely add the date – it gives your art value, especially as the years go on!  It’s also to see the progression over time.  The card is 1/4 larger than the traditional A2 sized other card.  It measures 5×6”.

    To see the specifics about how to watercolor, technique and supplies used, visit the original post for the other sample here.  To purchase or find out about any of the supplies, click the links below.  I hope you enjoyed this little watercolor, my next is a landscape done mini style!  Be sure to stop by in a few days for that.  Happy watercoloring!

    Signature Snowflake 001

    Shop 24/7 in my Online StoreHere

    For other art supplies, check out these online resources:

    Dick Blick and Jerry’s Artarama

    For online card classes – be sure to check them out in the classroom under the Online Classes tab above!

    Watercolor Polka Dots

    Watercolor Handmade Card Main L

    Have you just sometimes wanted a fun card?  Well that’s what todays project is all about – just plain old fun.  Lord knows we all need more of it in life, right?  Here’s your recipe for a fun energetic card – take a few vibrant colors, paint alternating circles – don’t worry so much about the size and shape or getting it perfect.  This is all about just letting go and letting your imagination take control. 

    Tools and Colors –  I went with Schminke Hordam Aquarell Half Pans (Artists Watercolors) in Transluscent Orange and Magenta, and used my starter set made by Marie’s in Lemon Yellow.  You can use whatever watercolors your have, or even Stampin’ Up! inks – just use the refills.  Paint brushes – I used a Da Vinci Cosmo Top Mix B in a size 14 and a Da Vinci Kolinsky Rotmarder in size 3 and 5 for smaller touches.   These are out of my painting brush supplies, but use anything you have, Aqua Painter or other ones you have lying around. 

    Paper – I used the Stampin’ Up! watercolor paper, which works fine for these purposes.  Since I’ve been painting a bit lately, I’ve been using higher quality papers.  The Stampin’ Up! paper, while 140 pound cold pressed paper, I found it to be a bit rough.  For the black in the project I used the Basic Black Stampin’ Write Marker – both ends.  The stamp is from the set Four You by Stampin’ Up!

    Watercolor Handmade Card Angle R

    Tip – I first wet my piece of Stampin’ Up! Watercolor Paper completely and then made my circles.  After doing it this way, I would recommend to paint on dry paper instead.  Especially if you are brand new to watercolor, as it’s very easy to be heavy handed with water.  And in this case – your colors will run and expand – which is what you’re looking to achieve with wet on wet.  If you look closely at mine, you’ll see some bleed beyond the black – that’s because I added the black to minimize this look, but I couldn’t get rid of it all.

    I added the black also for a point of interest to help the dots stand out.  This is a fun and easy way to fix your card, but also adding contrast with the ultimate dark color against the fun, vibrant bolds.  For the yellow, I chose a watered down wash of Lemon Yellow, applied once my watercolor paper was dry.  This is an important step – and one of the hardest to do – allow your paper to dry in between!  Just make another and by the time you’re done, you should be good to go.

    Watercolor Handmade Card Angle

    Tip – Don’t crop your paper first – it’s better to go larger and then have the ability to edit down in case you make any mistakes!  And it goes without saying – think like wrapping paper – your design does not end before the edge.  Give your project that continuous look that is more natural.

    Scribbles – I didn’t have a stamp to use that I liked on the dots, so I just scribbled a continuous circle using the finer point of my Marker.  Here’s the biggest tip with this – don’t try and be precise.  Just be sure to cross at least one line at some point.  It creates a little nest and looks a bit more whimsical.  Practice on scrap paper if you’re nervous.

    Watercolor Handmade Card Main R

    I wanted my print to stand out as that’s the real star here, so the banner is white with just black ink, and the color is matted on black cardstock with a wider white base.  Just the banner is popped up on dimensionals.

    I hope you liked this fun little project.  It would be a fun birthday card for anyone!  While they aren’t totally perfect, the best part – I totally let myself go and just let the art flow.  Be sure to stop by again this week for more fun ways to watercolour your cards!

    Signature Snowflake 001

    Watercolor Handmade Card Angle L

    Shop 24/7 in my Online Store – Here

    For other art supplies, check out these online resources:

    Dick Blick and Jerry’s Artarama

    For online card classes – be sure to check them out in the classroom under the Online Classes tab above!