Spring Flowers Watercolor Card

What did you think about the last watercolored card?  Did you miss it, see it here!  Today you will want to use the same two Schminke colors – Translucent Orange and Magenta, in the same style, but with a totally different look.  Add some free form leaves with Sap Green and Olive Green as well.  To give the card that pop, you will want to use some Stampin’ Up! Rose Red card stock.  For a little drama, add some Dimenionals to help it stand out a bit more!  It was surprising that the Magenta color matched the Rose Red card stock.  But, the deep hue was almost a perfect color. 

See how much different the card looks from the last one without the lemon yellow wash painted as the background?  It’s really surprising to see them side by side and how different they look.

         Watercolor Handmade Card Main L

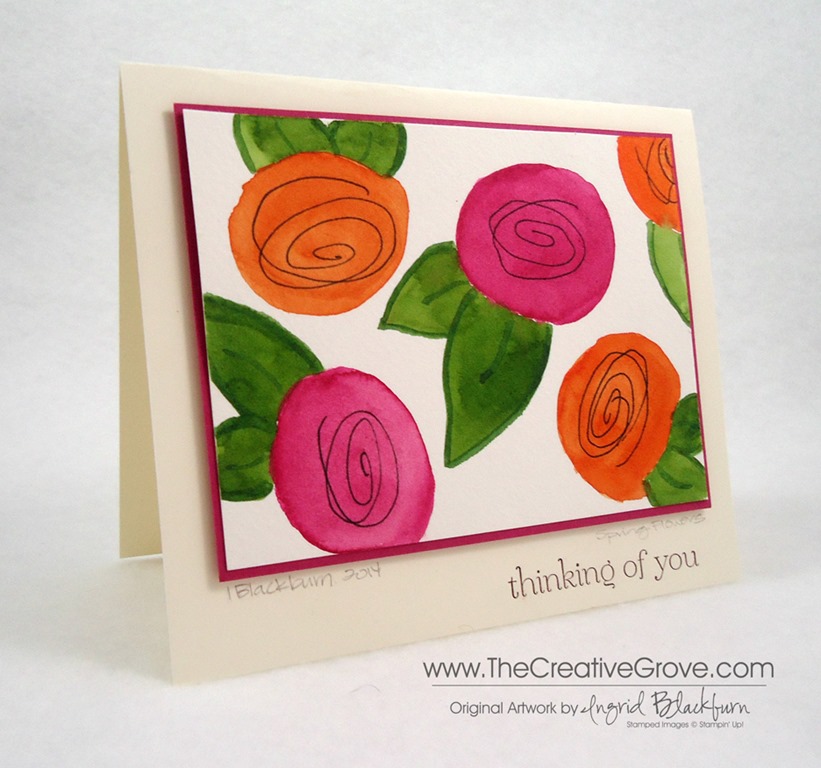
I know I added a thinking of you greeting, but this would be the perfect blank or mother’s day card!  Since it is an original artwork piece, I also added a title to my little masterpiece – Spring Flowers and signed my name and date.  Definitely add the date – it gives your art value, especially as the years go on!  It’s also to see the progression over time.  The card is 1/4 larger than the traditional A2 sized other card.  It measures 5×6”.

To see the specifics about how to watercolor, technique and supplies used, visit the original post for the other sample here.  To purchase or find out about any of the supplies, click the links below.  I hope you enjoyed this little watercolor, my next is a landscape done mini style!  Be sure to stop by in a few days for that.  Happy watercoloring!

Signature Snowflake 001

Shop 24/7 in my Online StoreHere

For other art supplies, check out these online resources:

Dick Blick and Jerry’s Artarama

For online card classes – be sure to check them out in the classroom under the Online Classes tab above!

An Experiment in Watercolor

DSC09930

My oldest – Rachel asked me to create a project for her upcoming wedding – an artistic guest book.  You may know it by a Jewish Ketubah, or have seen it from Quaker weddings as well.  It’s basically a large sized declaration of the couples love, and vows signed by all who witnessed the union and celebration.  It makes a great keepsake of a very special day.

Well, any of these online go for a pretty hefty price tag.  I saw the norm between $300-$500!  SO, enter the crafty step-mom.  The kids had given me watercolors for Christmas (how ironic), as most of these I found online were done by watercolor artists.  Thus, my experiment in Watercolor.

I’ve been playing around learning exactly how to watercolor.  I of course know a little from watercoloring my images on my cards.  Since I do consider myself somewhat creative and artistic…I thought, why not?  Well…the art world is a whole other animal!  And me with my K-8 art training!  Thankfully I am a crafty paper crafter who happens to love making creative scenery with dye based inks – a head start!  But learning the world of color, perspective, negative and positives, notation, and so much more without the proper education has been quite…well how do we say it – thrown into the deep end with cement shoes! 

So, since I’ve been laid up with a nagging thumb and wrist injury that’s kept me off my blogs on the computer and stamping…I you tubed, googled, pinterest and researched till the cows came home – mostly with my left hand and on my smart phone!  I stumbled upon some great watercolor artist instructional sites and waded into the water.  To my surprise, painting doesn’t hurt me the way stamping does at the moment – I can keep being creative while I heal– yeah!!!  My first project – a basil leaf.  Now, if you know me…you know that I don’t do anything half way, and certainly not simple!

Getting into botanical watercoloring is precise and I decided to learn from a great self taught UK artist – Anna Mason.  She came up with her own technique to layer (that’s an understatement) colors over one another to create gorgeous 3D watercolors.  Since Rachel wants a floral motif, I wanted to paint as realistic as I could and Anna’s technique suits my purposes perfectly.

The small one was my first go at it – and then I went life size – 10 inches in height.  I still have a way to go to master this technique – but this leaf looks amazing in real life close up!

I also ventured out to take a local watercolor class.  It’s always great to learn something from someone trained.  And honestly, nice to be a student too – doesn’t happen often!  Tanya – my local art teacher is well…let’s just say uber talented!  She bit off a little more than we could chew in the class – as no one was close to finishing either project in the 5 hour class!  Yes, you read that right!  Boy did I learn a ton!

Our class was on positive and negative.  We basically threw some paint down randomly in certain areas and created scenery out of the space!  It was quite interesting.  I think you’ll laugh at my piece that I created in class…but be amazed at what it turned into!

Here is the initial piece with the spaces that I identified as rocks (Don’t be scared – keep reading…it turns out okay!)…

DSC09903

Now…here’s what I turned in into – I’m still a bit amazed!  Note – rocks suck…they are SUPER hard to do, and I really had to keep perspective and light in my mind.  Creating a shape that actually looks like something out of a blob isn’t all that easy!  But it’s amazing what your mind does start to see. 

DSC09919

You can see it all start to take shape.  I removed some color and ugly patches – not that my paper liked that…and once I did a more drastic transformation – here is the finished piece…

DSC09927 

I know…there were colors in places that did not belong – and for all the stuff that went wrong – I just love it.  It was definitely a work in progress and I learned so much from the experience.  I think that’s why I love the end result.  I doesn’t always have to be perfect – I know…pick yourself up off the floor!  Here they are side by side – cool to see the transformation.

I’m still working on the forest scene that was our second project, and I”ll share that someday in the future when I’m ready to!  I hope you enjoyed this watercolor journey with me today.  I’m excited to keep going and learn more – always the student!

You’ll have to let me know what you think – Don’t be shy…I’m very much in the beginning stages of this – do you watercolor or paint?  I’d sure love to know!!

Signature Snowflake 001