Freshly Picked: Layered Watercolor Stamping

Today I have some fun new cards using products from the latest release by Catherine Pooler Designs – the Freshly Picked collection. The Freshly Picked Collection has four stencils, two new stamp sets, three new die sets and two new ink colors – neutrals!!! I have been waiting for these inks – and you won’t be disappointed – the shades are gorgeous.

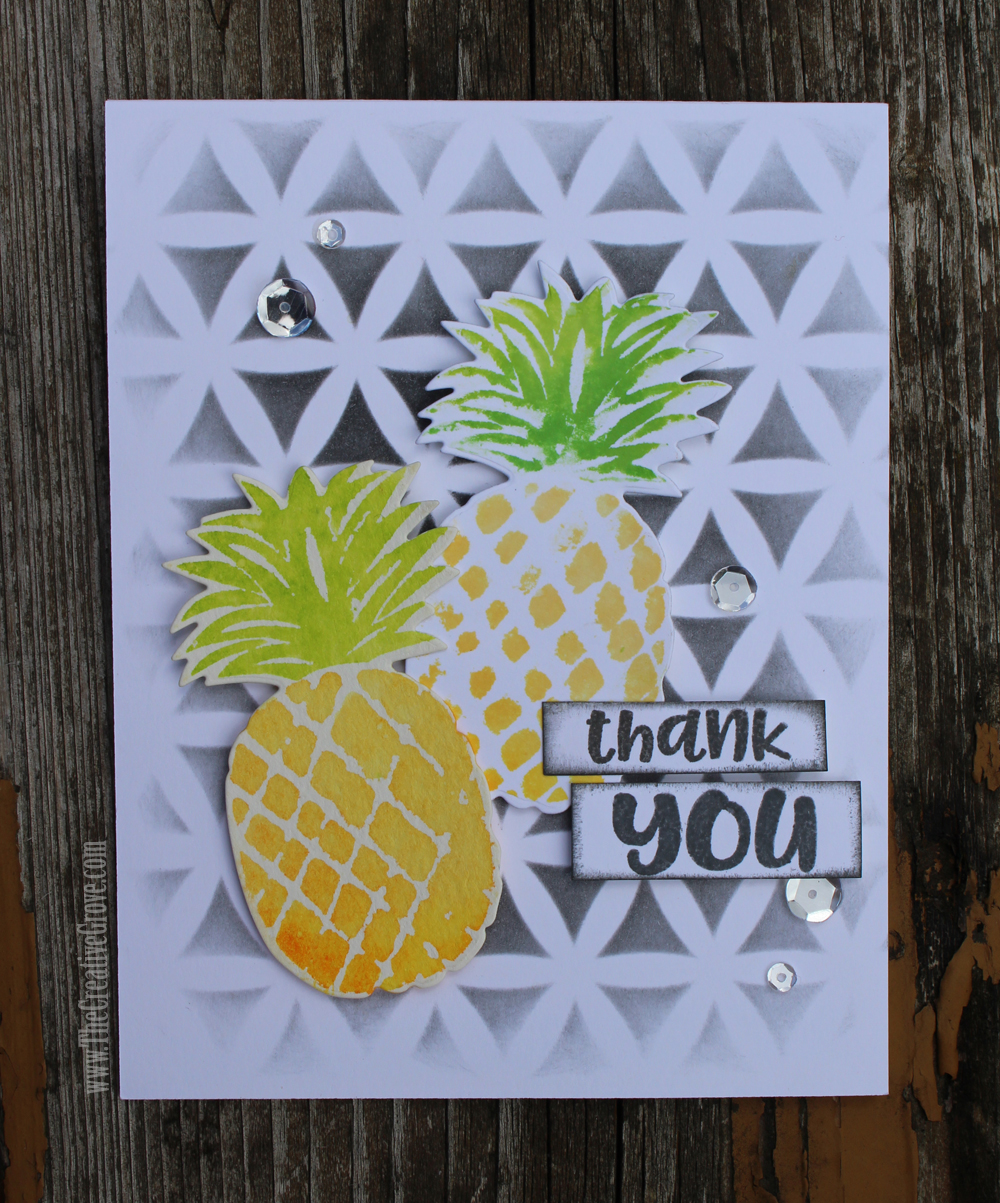
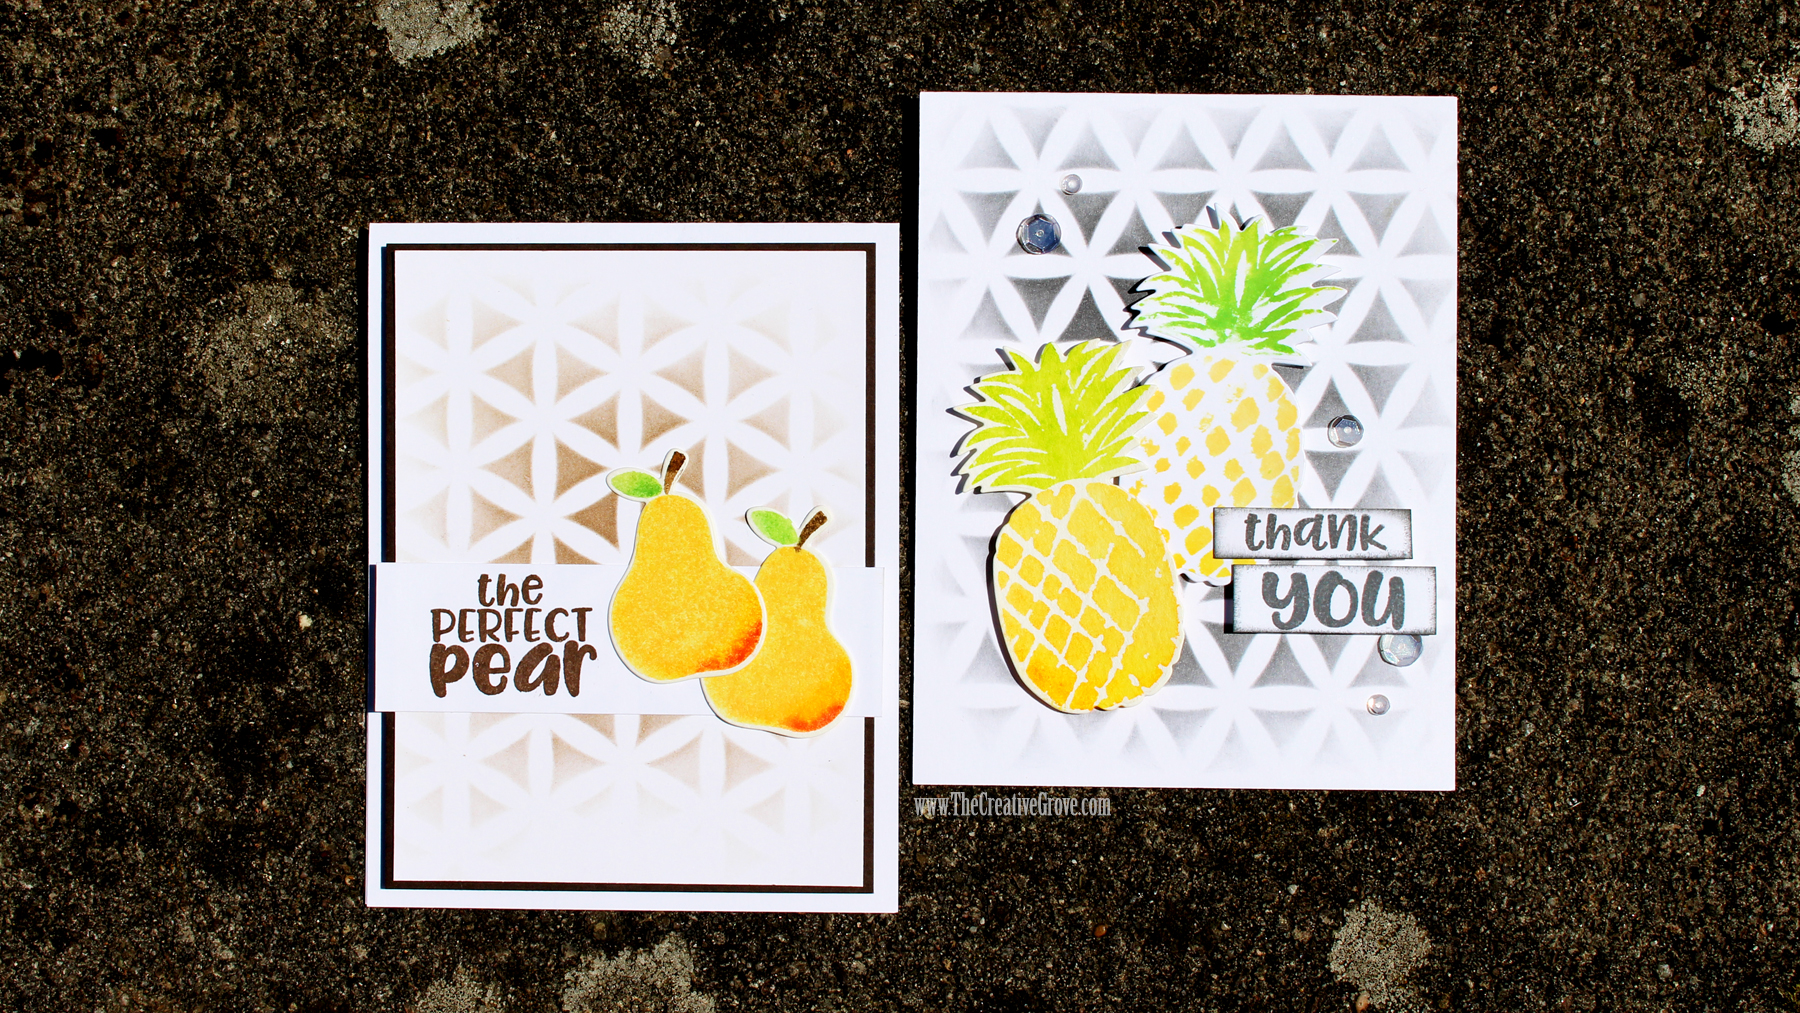
Today I have two cards using the I Pick You stamp/die sets and the Mod Flowers stencil from the Freshly Picked collection. And naturally – we’ll play with a simple little watercolor technique that I love – layered watercoloring.

When you layer multiple colors in watercoloring, you get a little more realism in your works of art. Now, you can also layer the same color over dry layers for more depth, but today we’re going to work with different hues. Adding a different hue gives a little more depth to your image – and that’s perfect for fruit. I even created a quick video tutorial for you here:

Click Here to watch in HD on YouTube

Freshly Picked Watercolor Tutorial

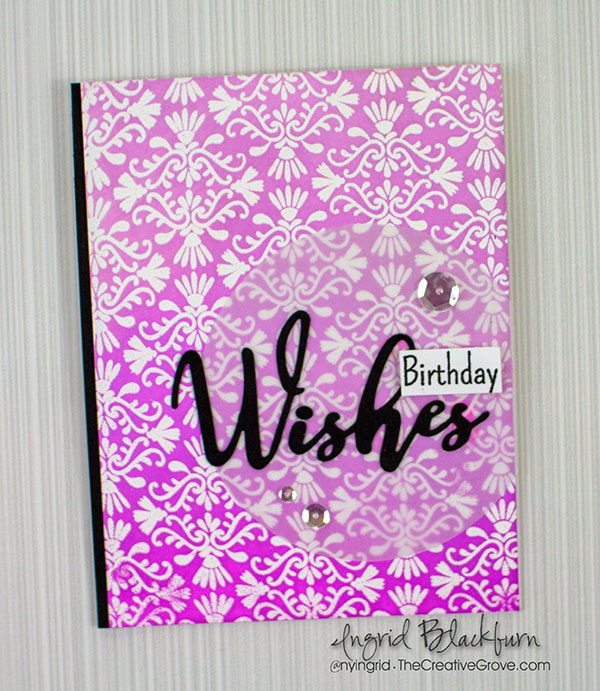
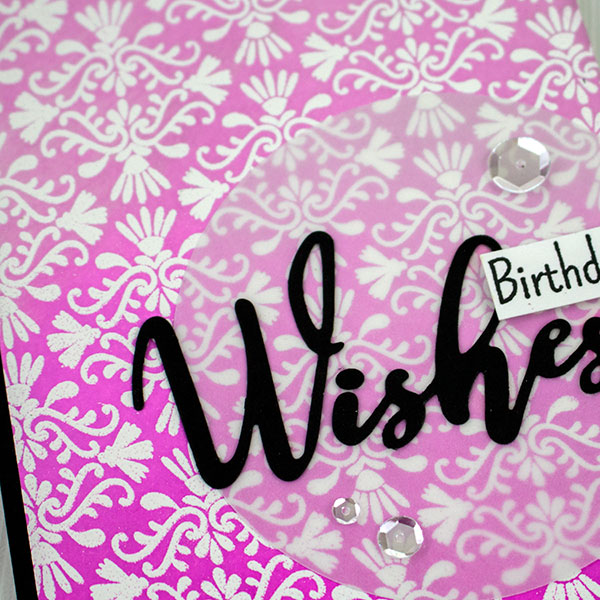
First we’ll create our background. Secure your project and Mod Flowers stencil to your surface. Using a light touch, blend a background from the center outward, fading your pressure as you near the edges. That helps to give you a faded vignette look. Isn’t this color just gorgeous?!!

Next die cut the fruit shapes you wish to use out of 140# cold pressed watercolor paper. The die shapes are together, making it easy to create multi colored images by just stamping the pieces you need – I LOVE the way that is designed!

Freshly Picked Collection by Catherine Pooler Designs

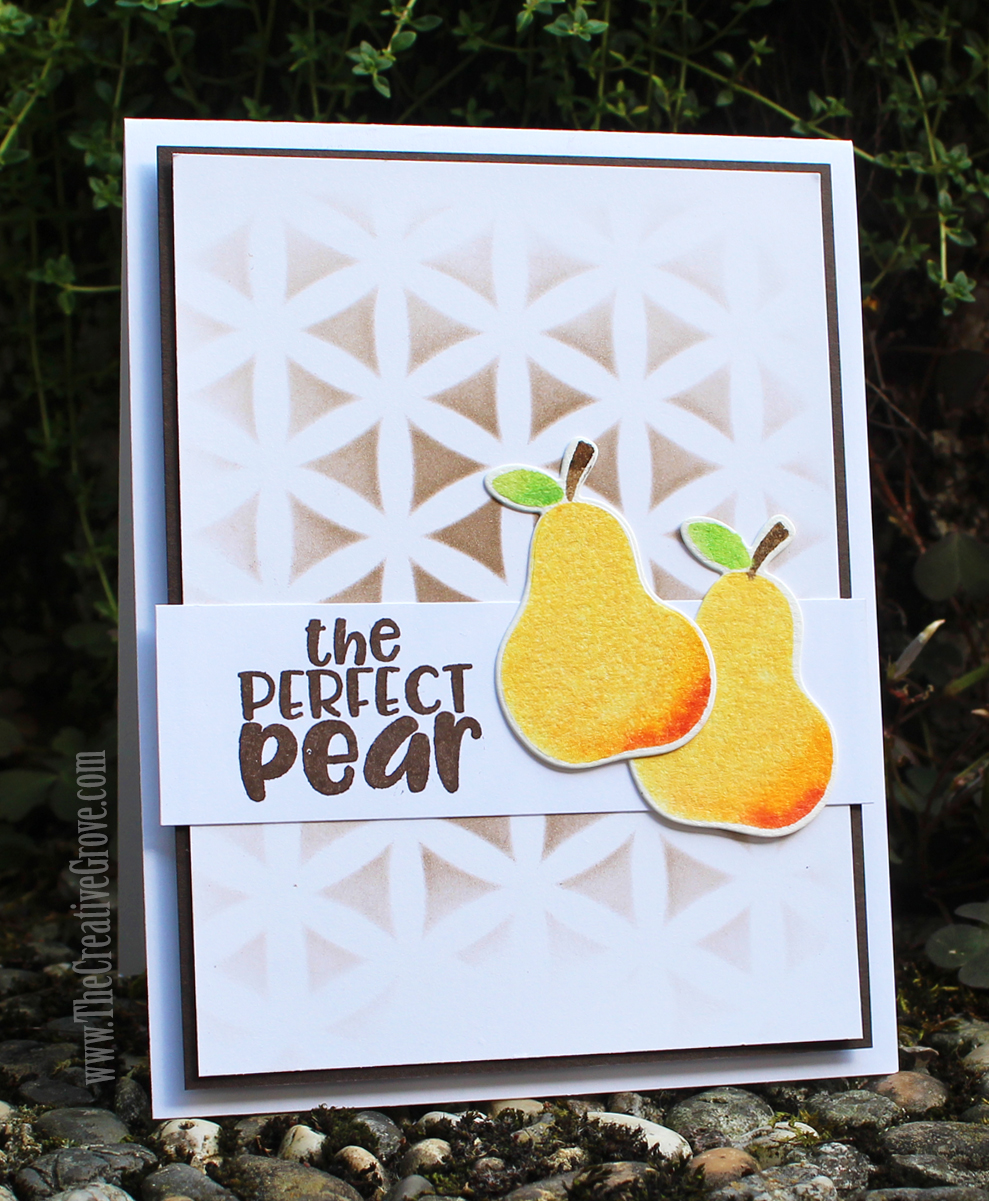
Ink up your Pear in Tiara ink first. Then add a little shading on the bottom with Tiki Torch. Come back over it with your Tiara pad just like in the video to blend the edge out. If you don’t do that, you’ll have a harsher transition that doesn’t always look natural. If you get some of the darker ink on your pad, gently lift it off with a paper towel. As long as your pad comes up the right color – you’re good to go!

Finish the edge off with a little Tutti Fruitti and lightly spritz with a mini mister. Stamp and you’re all set!

You can see how easy it is to create these artsy little creations.

In this one – I had a little too much water on my first stamped image – and the second is a second generation stamped image – thus much more white!

I pick You Stamp set - Freshly Picked Collection

Because the Black Jack background was a bit more prominent, I didn’t want the greeting to get lost – so I edged it with the Black Jack color. I can tell you – this is absolutely my all time favorite deep grey I’ve ever owned. It’s the perfect alternate to black and when watered down is the perfect light grey shade for grounding images in watercolor.

Both the new neutrals are a must have in my opinion. They are deep, rich and flawless colors – you will not be disappointed!

So, now it’s your turn. There are awesome new stencils in this Freshly Picked release – so check them all out…and I’ll have some more projects for you soon.

Mod Flowers Stencil - Freshly Picked

And if you’re a StampNation member – check out the new challenge that went live today for the Concord & 9th Masterclass. There’s even a live class with the owners of Concord & 9th today. Don’t miss out – if you’re not a member…you have no idea what you’re missing!

Be sure to stop by tomorrow…I have a special video featuring Concord & 9th products! Now it’s your turn – get inky!

Till tomorrow –

[optin_box style=”27″ alignment=”center” email_field=”email” email_default=”Enter your email address” integration_type=”aweber” double_optin=”Y” list=”3846012″ name_field=”name” name_default=”Enter your first name” name_required=”Y” opm_packages=””][optin_box_field name=”headline”]Want to LEARN with more exclusive videos?[/optin_box_field][optin_box_field name=”paragraph”]PHA+UGx1cyB5b3XigJlsbCBiZSBhZGRlZCB0byBteTxzdHJvbmc+wqBGUkVFPC9zdHJvbmc+wqBDcmVhdGl2ZSBUaXBzIEUtbGV0dGVyIHdoZXJlIEkgc2hhcmUgZXhjbHVzaXZlIHByb2plY3RzLCB2aWRlb3MgJmFtcDsgdGhlIDEyIERheXMgb2YgQ2hyaXN0bWFzPC9wPgo=[/optin_box_field][optin_box_field name=”privacy”][/optin_box_field][optin_box_field name=”top_color”]undefined[/optin_box_field][optin_box_button type=”0″ button_below=”Y”]Get Instant Access![/optin_box_button] [/optin_box]
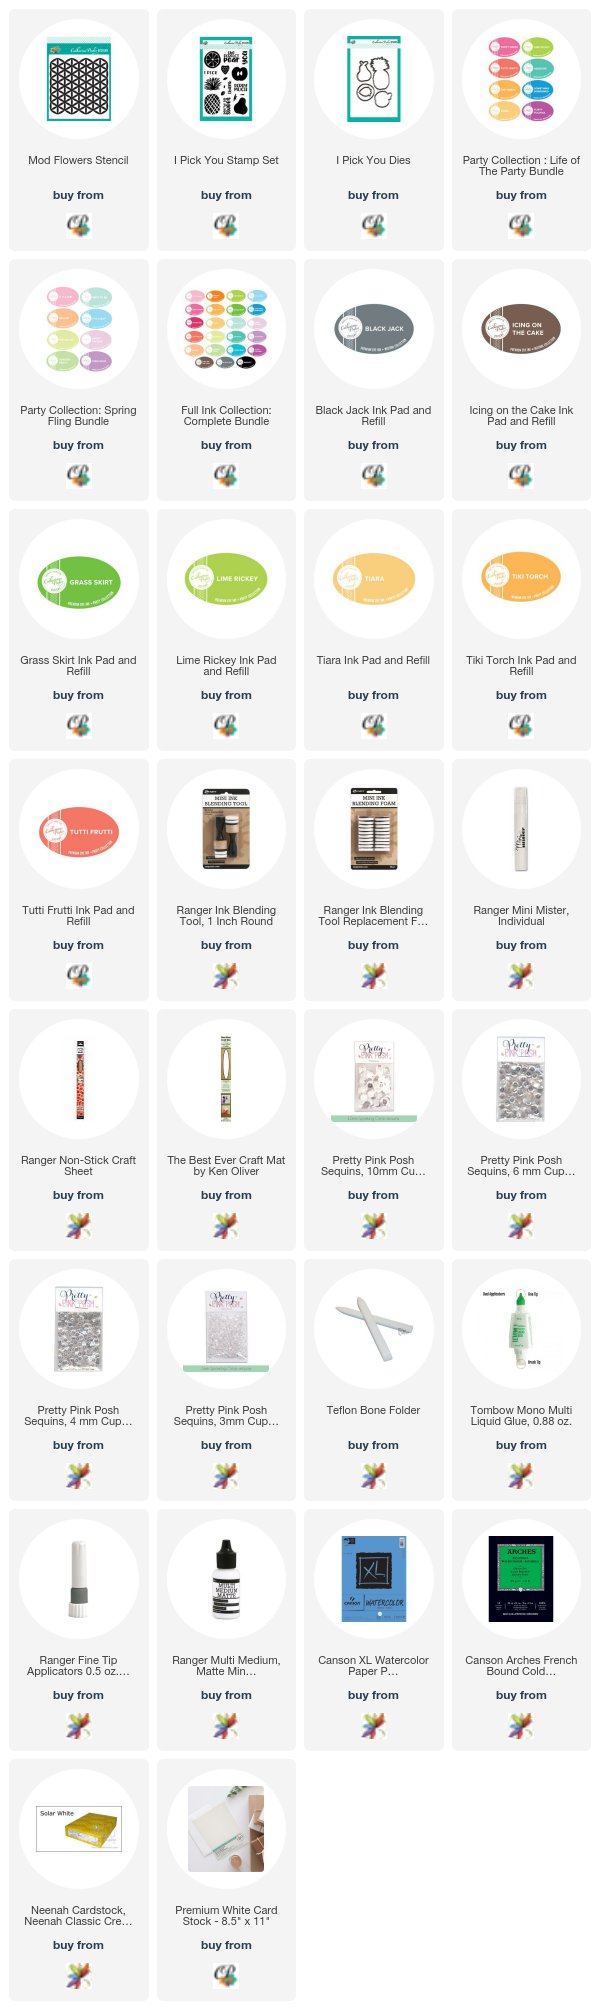
Supplies

To make finding the supplies I used in this project a bit easier for you, here are a few clickable links. Those that have multiple shopping options are indicated with letters – EH – Ellen Hutson, SSS – Simon Says Stamp. Compensated Affiliate Links are used when possible. Click here for disclosure. Happy Shopping!


Spring Fling Sneak Peek

Today I have a sneak peek into the new Spring Fling release over at Catherine Pooler Designs tomorrow! Yup, you get a glimpse into some fun new products – and new ink colors!!! Gotta love that.

For the last few weeks, Catherine has been revealing the new ink colors and products on her blog. And the entire Design Team has been sneaking projects yesterday and today, getting ready for the big day tomorrow.

I thought it would be fun to see how a few of the new colors played with the old today – so here’s how to create a cool, simple ombre look for my Sneak Peek!

Spring Fling Ombre Wishes Tutorial

First you’ll want to emboss the new Modern Damask Background Stamp in white onto some Catherine Pooler Designs Bright White 100# card stock (it’s great for ink blending). Can I just say I’m in LOVE, LOVE, LOVE with this background stamp. The pattern is fabulous, and it has a lot of negative space – perfect for coloring, if you’re into that like me!

Spring Fling Inks by Catherine Pooler Designs

To get the ombre look, you’ll always want to start out with your lightest shade of ink. Here I used the new Sweet Sixteen – at the top. Use a mini sponge tool to evenly add it to the top 1/3 of your project. I went maybe a little over that, as I wanted it to blend effortlessly with my next new ink color – Pixie Pink.

Isn’t the Pixie Pink gorgeous. It’s the perfect blend heading between Sweet Sixteen and Flirty Fuchsia – my last shade, and one from the last Party Collection release.

The look is gradual, but really cool. Each color has its own unique character, and creates a beautiful background.

Spring Fling Ombre

To finish off your card, stamp Birthday from the Hello World Stamp Set. Pop it up over the new Spot on Sentiments word die – Wishes. If you want it to stand out just a bit more, add a vellum circle – cut with my new Circles Dies – they’re coming out tomorrow too!

I love adding vellum over bright backgrounds to tone them down if you need to – or just for a little accent. Some sequins are the perfect finishing touch along with a 1/8″ black edge to balance my card.

I hope you liked it – be sure to pop on by tomorrow. At 9 am, we have a Spring Fling Blog hop with the Dream Team – it should be pretty amazing. And of course…there are prizes, why not!

If you’re a StampNation member, be sure to check out today’s challenge too. My card is the upper right one – I LOVE it when Maureen Merritt puts Mood Boards together as inspiration – it’s the perfect way to jump right into a card.

StampNation

See you tomorrow!

Showcasing the Negative

Negative die cuts

When you think Die Cuts, usually you would think about something laying on top of your project, or a paper piecing. But do you ever think in reverse? Today is all about showcasing what’s left over, once you use your die cuts to cut out your images – the negative die cut images. Over at Happy Little Stampers this month, the theme is Die Cuts. Now, normally I’d whip up something way cool piecing together some cool images that pop off your card. I thought it would be fun instead to pop UP my card and show a shadowed negative of the image. Best part – I still have the positive images cut out by my steel dies! That’s for another project….oh wait – I already created it HERE.

Happy Little Stampers Die Cut Challenge

Before I get into the nitty gritty of how easy it is to create this very cool card – be sure to welcome our Guest Designer for this month – Christine.

For this month’s project, I paired up with a rocking HLS sentiment from Everyday Sentiments and a few sparkling clear sequins – I have a great card that’s not only quick – serves double duty – not bad! Here’s how you can create your own:

using negative die cuts

How to Use Negative Die Cuts

  • Emboss your greeting in black first in the lower right corner of your card front – 3 13/16 x 5 1/16″. I wanted something big and bold to balance our my snowflake sky, so I chose Everyday Sentiments by HLS.
  • Arrange your snowflake dies – I used Bring on the Snowflakes by CAS-ual Fridays – , and cut out with your Die Cutting Machine. I got mine in the Holiday Collection from Stamp of Approval, but they’ll be released individually later this year.
  • Remove the dies cuts, leaving only the negative images in your card front

backgrounds for negative die cuts

  • On a second slightly smaller piece – 3 11/16 x 4 15/16″ , sponge your desired colors or use a fun colored piece of card stock. You can do anything here, washi tape, watercolors, solids, patterned papers – it’s literally endless possibilities. I sponged an Ombre look starting with Broken China-Salty Ocean-Faded Jeans-Seedless Preserves and ending in Dusty Concord.
  • Adhere your colored background piece to a black piece of card stock cut slightly larger than your card front – mine is 1/16th larger  – 4 x 5 1/4″

easy christmas cards

  • Now for the fun part – pop up your card front using fun foam, foam tape and dimensionals – I used all three with two sizes of smaller dots. Every nook and cranny was popped up – so nothing droops after shipping. You really want your card to have that full shadow effect.
  • Attach your black card stock to a folded A2 sized card (4 1/4 x 5 1/2″)
  • Add some sparkling clear sequins  by pretty pink posh – and you’re all set!

happy little stampers christmas challenge

And if you used colored card stock or sparkly paper, think of how easy and mass producible this card is!! Now it’s your turn – whip out those die cuts and get in on the action. It’s Happy Little Stampers birthday, so don’t miss out on some great prizes! Can’t wait to see what you create!

Now go get those fingers inky –

Signature

[optin_box style=”2″ alignment=”center” email_field=”email” email_default=”Enter your email address” email_order=”2″ integration_type=”aweber” double_optin=”Y” list=”3846012″ name_field=”name” name_default=”Enter your first name” name_order=”1″ name_required=”Y” opm_packages=””][optin_box_field name=”headline”]Learn more with our exclusive FREE video series:[/optin_box_field][optin_box_field name=”paragraph”]PHA+UGx1cyB5b3UnbGwgYmUgYWRkZWQgdG8gbXkgRlJFRSBDcmVhdGl2ZSBUaXBzIEUtbGV0dGVyIHdoZXJlIEkgc2hhcmUgZXhjbHVzaXZlIHByb2plY3RzLCB2aWRlb3MgJmFtcDsgdGhlIDEyIERheXMgb2YgQ2hyaXN0bWFzPC9wPgo=[/optin_box_field][optin_box_field name=”privacy”][/optin_box_field][optin_box_field name=”top_color”]undefined[/optin_box_field][optin_box_button type=”0″ button_below=”Y”]Get access now![/optin_box_button] [/optin_box]