Getting started with watercolors can become quite daunting, but it doesn’t need to be. Pictured below is really all you need: Paper, a few brushes, two small drinking glasses, some paint and a throw away dish. Read on for more details on a few DIY items and what I use to make landscapes and cards. I hope you find it helpful on your watercolor journey.
To see the project in the related blog post click here.
Watercolor paper comes in all thickness, texture and sizes. Not/Cold Pressed is what most people are looking for, texture ranges from rough to . You want a good weight of at least 140 pound, but can get great quality paper up to 300 pound. Stampin’ Up!’s watercolor paper is 140 pound cold pressed paper. Despite that, it’s not my favorite to use! You’ll have to play around to find one that you love.
Watercolor Blocks
A watercolor block is several sheets (usually 10-30) of watercolor paper glued together so that it will straighten itself out once dried. They are bound with a gummed edge on all or three sides while wet so that they dry flat regardless of how much fluid you add to it. It’s a great work surface that is easily portable with a thick piece of cardboard at the base for support. I highly recommend getting one if you really get into watercolor. It’s also a great way to sketch, use pastels, or several kinds of mediums. You’ll also find them for acrylics and oils.
Just like individual paper, blocks come in several sizes, texture of paper and paper weights. I am using one by Hahnemuhle as I couldn’t find the Arches cold pressed block locally – Arches is considered one of the best – from France. I went with a small block for landscapes and cards that had 30 sheets that had 100 pound rough paper attached as a block. My other block (larger projects), also by Hahnemuhle is cold pressed 140 pound (10 sheet), and there is definitely a difference in the quality of the paper – which the price reflected as well. But for cards, the 100 pound was just fine.
Once finished with your project, you just use a dull metal side like a palette knife or I used the edge of my closed paper snips to loosen your completed project off the block. It’s rather awesome when watercoloring, and I do highly recommend a block for its ease.
Paper
You of course can take paper from a watercolor pad or purchased individually. When working, to prevent the warp of the paper as you add fluid, make sure to tape it to your firm surface. A wooden or firm drawing board is ideal. Do not remove the paper from the tape until it has completely dried. The tape will help bring the paper back to its shape.
DIY Painting Palette and Mixing Surfaces
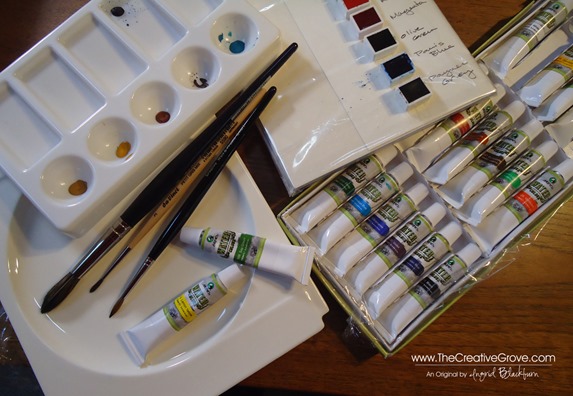
I found two of these flat china plates (pictured below top left) in a close out section of a target like store. They are perfect for making washes. I squeeze a little color on the lip that will dry and pull from that as needed in addition to my half pans.
Since I haven’t found the perfect water color metal tin yet for my pans, I used a piece of cardboard and layered a piece of cardstock on top (pictured above bottom right and below). I double wrapped the entire thing in thick plastic from some packaging that I was throwing away to create a water resistant surface. I laid two pieces of sticky strip to one side and attached my 1/2 pans. I wrote the colors onto the cardstock first, then laid the pans next to them. They don’t move and it’s a great make-shift palette with a little mixing space to the left if needed.
Half Pans vs. Tubes
This is a personal choice. I actually like both. But, if I were forced at gunpoint to chose one, I’d go with Pans. Less messy, more control and less waste. You truly only pull off what you need.
Quality
Now this is not so subjective. I have a lesser quality tubes, as I’m just starting out and it was a gift set meant as a starter set. Perfectly fine for me at this point. I got 24 colors in a good range for not so much, perfect if you’re just starting out. But as with anything in life, you get what you pay for. So my gift set of tubes that was about $18 for 24 tubes is chalky and a bit dull in color.
Not that I realized that until I purchased artist quality pans and started painting with those! Holy cow – to say there is a noticeable difference is an understatement! They are vibrant and much truer in hue once watered down. And that’s where you’ll really see it – plus when you start mixing. It really is night and day.
So where do you start if you’re just beginning? My recommendation – go with a student/academy set. The price is a bit cheaper than artist colors, but much more vibrant than the grade school and hobby sets you’ll find. And if the cost isn’t an issue – then hands down – go for the artists colors.
Start with the basics – you don’t need every color – and there are a lot of colors when you get to the artist level. But the advantage of starting with the primaries and just a few extras…you’ll learn to mix your own! Ask your art professional in the store – not the after school kid just looking to make a few bucks – someone that knows what they are dealing with. After all, my Schminke Hordaram Artist Watercolor 1/2 sized pans range from $5-$10 each – and yes those are the small 1/2 size! So, get a good 12 or 24 color set with a tin (you’ll save). You can get a 24 color Schminke 1/2 pan set for $180 (the tin by itself is $44 – ridiculous, I know!) But you can get a wide variety of colors – or make your own collection. The tin will make it easy to transport your pans with you, but if you only plan on water coloring at home, try my DIY palette!
I don’t have access to Winsor and Newton watercolors locally, but if you can get your hands on these – go for this brand. The colors are brilliant! There is a wide range of brands out there – but if you’re going to spend $50, you might as well, just go for a few of the basics Red, Yellow and Blue of a really good quality and work your way up to more colors. The lessons in learning to create your own colors through mixing the three primaries will be invaluable. That’s what I’m doing, after all…I still need money for stamps! ![]()
Tubes
Of course, you can squeeze tubes into wells of palettes or empty pans as well. Be sure you use better quality paints, because as you add water and thin out your paints, once it dries if it’s lower quality – like my Maries, it’ll contract and flake right out. The thing about tubes, squeeze out just what you need. It’s easy to squeeze out too much. I squeezed out just the minimum onto my palette above, and look at how much was left over at the end! It’s sitting dry on my plate for next time. But if that’s a while in-between, it’ll just fall right off.
The paint from tubes are easier on your brushes and mix with water easier for your exact desired consistency. When I was working on my 10 inch Basil Leaf (click here to see that), I needed a lot of olive green and sap green. I used tubes, because I needed a ton. I didn’t have pans at the time, but being able to mix larger portions of exact color was definitely easier.
Pans are less expensive than tubes and easily accessible – no lid to take off, so they are preferred by many. I think you’ll find that you like using both. There’s nothing wrong with that!
Brushes
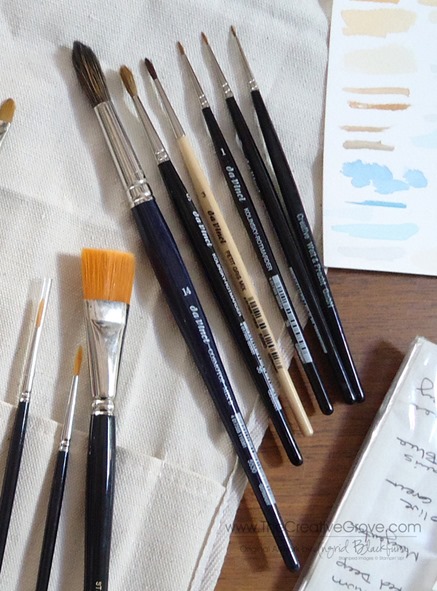
I use a Da Vinci Cosmo Top Mix B in a size 14 and a Da Vinci Kolinsky Rotmarder in size 3 and 5 for smaller touches. These brushes when wet come to a point and can make the smallest of details. Use anything you have, Aqua Painter or other ones you have lying around. This will definitely be another post in itself someday. I’m just scratching the surface here.
For more detailed layered paintings like botanicals, I use my Kolinsky (Sable Hair) Rotmarder brushes, but don’t go higher than size 5. I use size 1, 0, 000 and 3 as well. Using the size 14 was quite an adjustment, but I found that I had more versatility. I spend money on good brushes, so that’s why I don’t have that many.
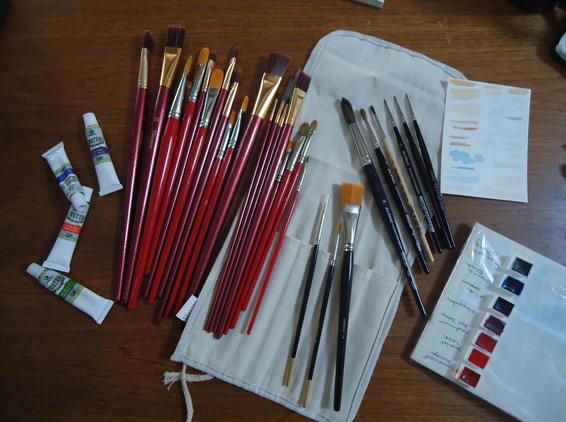
To supplement my stash, I have two $10 sets of flat and rounded brushes in various sizes. They are more for acrylic painting, but I use them none-the-less. Not much with the watercolors, but for water, mixing and scrubbing if needed.
For water pots, I use 2-3 small glasses, one for clean, one dirty and another I rotate in if needed. It’s easy, and they stack for easy back and forth to the sink.
I hope that helped you with some basic supplies. I’m still exploring the many, many brands and great supplies out there!
Shop 24/7 in my Online Store – Here
For other art supplies, check out these online resources:
Dick Blick and Jerry’s Artarama
For online card classes – be sure to check them out in the classroom under the Online Classes tab above!
![DSC09982_thumb[5] DSC09982_thumb[5]](https://thecreativegrove.com/wp-content/uploads/2014/03/DSC09982_thumb5_thumb.jpg)
![DSC00026_thumb[2] DSC00026_thumb[2]](https://thecreativegrove.com/wp-content/uploads/2014/03/DSC00026_thumb2_thumb.jpg)
![DSC09982_thumb[7] DSC09982_thumb[7]](https://thecreativegrove.com/wp-content/uploads/2014/03/DSC09982_thumb7_thumb.jpg)
![DSC09985_thumb[7] DSC09985_thumb[7]](https://thecreativegrove.com/wp-content/uploads/2014/03/DSC09985_thumb7_thumb.jpg)
![DSC00013_thumb[5] DSC00013_thumb[5]](https://thecreativegrove.com/wp-content/uploads/2014/03/DSC00013_thumb5_thumb.jpg)
![DSC00019_thumb[2] DSC00019_thumb[2]](https://thecreativegrove.com/wp-content/uploads/2014/03/DSC00019_thumb2_thumb.jpg)
![DSC00013 copy_thumb[2] DSC00013 copy_thumb[2]](https://thecreativegrove.com/wp-content/uploads/2014/03/DSC00013-copy_thumb2_thumb.jpg)


Valuable information, will have to make a hard copy of this to take with me as I start purchasing supplies. Your water coloring is beautiful and getting your tips, hints, even your mistakes happy or not so, is such a great help.
I’m so glad it helped!!! I know I felt lost in the beginning. Start small and have fun with it. Experimenting with colors is fun. I made my own olive green for the basil leaf. That was definitely a cool thing! Happy shopping! 🙂