An exercise in Blueberry Watercolor

I have been wanting to paint a Blueberry Watercolor for the longest time. I know I just had a week in Tuscany, but I’ll be honest – it was a work-cation!  I know, must be nice, right? Well, I wear two hats in this family – Paper Crafting artist and Travel marketing specialist.  That means for our other business – Elite Travel Planners, I blog, design and maintain websites, socially engage through media and of course – Tech Support!  So, since our week in Tuscany was rather heavy on the travel work…I took a day off when we came home.  It’s rare actually, for me to totally take a day for myself.  So I decided to dust off my watercolor paints and dive into a project I had been wanting to tackle for six months – a blueberry watercolor botanical.

I learned to paint botanicals with a multi layer method I learned from the watercolor artist Anna Mason.  I adapted this style of painting for some of the projects in our online paper crafting class – Watercolor Techniques that Wow!  But that’s cards, and this is full size painting.  For me, I truly get elated seeing a watercolor painting come together.  Keep in mind, I’ve only done four in my life!  To say I’m new to the full sized art is an understatement.  But what I have done is learned the skills and practiced more than you would believe.

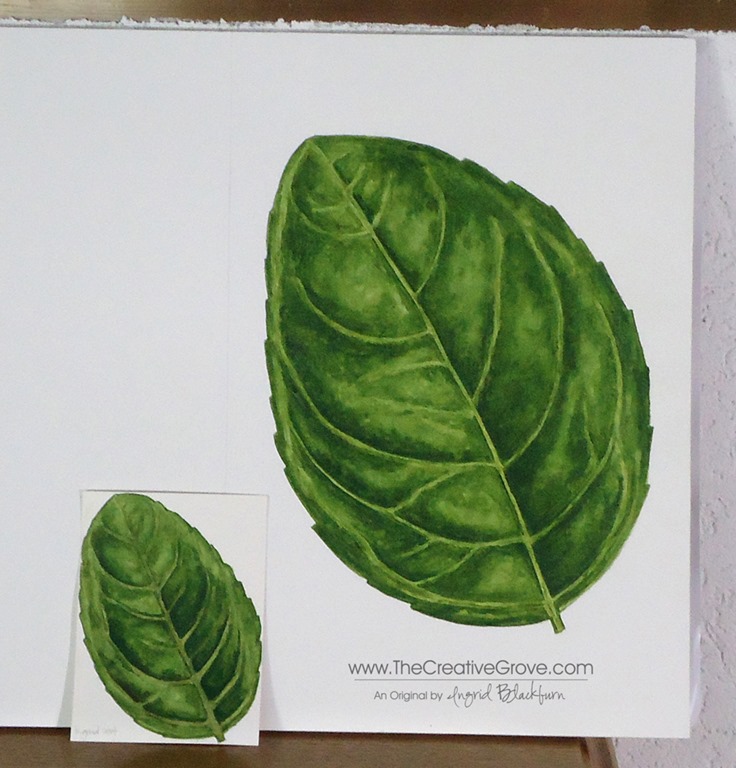
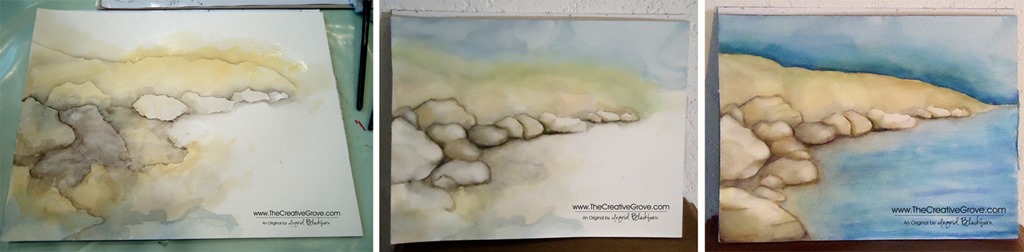
Here are my various stages and final result of my blueberry watercolor.  This painting was based off one of Anna’s.  The blueberry measures 7 1/4” x 7 1/2”.

Blueberry Watercolor Painting Stages

Blueberry Watercolor Botanical Painting 001

Three Key Things to Keep in Mind when Painting in Watercolor

Painting a large painting is VERY different than a 5 1/2” x 4 1/4” card.  It can be a little intimidating.  And the sheer time it takes is much more than card making – that’s for sure. Here are a  few things I learned along the way:

1 – Paint – You get what you pay for

If you are just working on cards, many of the inexpensive sets are just fine.  The size is key here – most cards are small.  Of course, better quality paints are more vibrant and translucent.  But if you’re going to take 1+ days to create a full sized painting – these two factors are key.  You don’t want your painting to look dull, invest in a few artist quality paints.  If cost is a huge factor – start out with student grade paints, but stay away from inexpensive sets.  Basic rule in life applies here – if it looks too good to be true (set of 18 tubes of watercolor paints for $15), than it usually is!

You can find good quality student grade paints for a few dollars a tube.  Artist grade will run you $5 – $20 per pan/tube.  I have some links at the end for great shopping options.

2 – Paper – Block or not?

Paper is the foundation of your project.  There are many options and types of paper out there – chose wisely.  I suggest a block.  Okay – Arches cold pressed artist block may not be in your budget – but there are all sorts of options.  If you’re not sure, buy a few single sheets and cut them down to the size you need.  You’ll need to stretch them first, and by the time you’ve gotten everything you need to do that and spent the time – you may as well have bought a block!  The pluses here are too many.  Time is everything in our lives these days.  And what’s great about an block (four glued sides), beginners can really use too much water and be okay.  But beware – if you are the impatient type and speed dry your work (which I don’t recommend), a block is not for you – tape your pieces down and stretch them instead.

3 – Education

No, you don’t have to go to art school.  But take a class or two.  You’ll be glad you did.  There’s nothing better than being able to ask questions, have someone look at your work, or being able to back up an online video to really review each step.  I’ve learned so much myself!  And it’s all applicable – whether it’s a paper card making watercolor class (we have one right here) or a traditional watercolor class.  Most classes are not that expensive, and it’s great to be able to have somewhere to learn!

Ultimately – watercolor painting is fun, just get started and have a good time.  There are millions of watercolor artists around the world – jump in, the water is great and inspiration lies everywhere.  Take a little time for yourself – I sure am glad I did for my Blueberry Watercolor!

Signature

Creative Cards Watercolor VIP

Some great places to shop:

The USA –

Jerry’s Artarama

Dick Blick

UK –

Jackson’s Art Supplies

Blueberry Watercolor 001

My Blueberry Watercolor – an exercise learned from Anna Mason

An Experiment in Watercolor

DSC09930

My oldest – Rachel asked me to create a project for her upcoming wedding – an artistic guest book.  You may know it by a Jewish Ketubah, or have seen it from Quaker weddings as well.  It’s basically a large sized declaration of the couples love, and vows signed by all who witnessed the union and celebration.  It makes a great keepsake of a very special day.

Well, any of these online go for a pretty hefty price tag.  I saw the norm between $300-$500!  SO, enter the crafty step-mom.  The kids had given me watercolors for Christmas (how ironic), as most of these I found online were done by watercolor artists.  Thus, my experiment in Watercolor.

I’ve been playing around learning exactly how to watercolor.  I of course know a little from watercoloring my images on my cards.  Since I do consider myself somewhat creative and artistic…I thought, why not?  Well…the art world is a whole other animal!  And me with my K-8 art training!  Thankfully I am a crafty paper crafter who happens to love making creative scenery with dye based inks – a head start!  But learning the world of color, perspective, negative and positives, notation, and so much more without the proper education has been quite…well how do we say it – thrown into the deep end with cement shoes! 

So, since I’ve been laid up with a nagging thumb and wrist injury that’s kept me off my blogs on the computer and stamping…I you tubed, googled, pinterest and researched till the cows came home – mostly with my left hand and on my smart phone!  I stumbled upon some great watercolor artist instructional sites and waded into the water.  To my surprise, painting doesn’t hurt me the way stamping does at the moment – I can keep being creative while I heal– yeah!!!  My first project – a basil leaf.  Now, if you know me…you know that I don’t do anything half way, and certainly not simple!

Getting into botanical watercoloring is precise and I decided to learn from a great self taught UK artist – Anna Mason.  She came up with her own technique to layer (that’s an understatement) colors over one another to create gorgeous 3D watercolors.  Since Rachel wants a floral motif, I wanted to paint as realistic as I could and Anna’s technique suits my purposes perfectly.

The small one was my first go at it – and then I went life size – 10 inches in height.  I still have a way to go to master this technique – but this leaf looks amazing in real life close up!

I also ventured out to take a local watercolor class.  It’s always great to learn something from someone trained.  And honestly, nice to be a student too – doesn’t happen often!  Tanya – my local art teacher is well…let’s just say uber talented!  She bit off a little more than we could chew in the class – as no one was close to finishing either project in the 5 hour class!  Yes, you read that right!  Boy did I learn a ton!

Our class was on positive and negative.  We basically threw some paint down randomly in certain areas and created scenery out of the space!  It was quite interesting.  I think you’ll laugh at my piece that I created in class…but be amazed at what it turned into!

Here is the initial piece with the spaces that I identified as rocks (Don’t be scared – keep reading…it turns out okay!)…

DSC09903

Now…here’s what I turned in into – I’m still a bit amazed!  Note – rocks suck…they are SUPER hard to do, and I really had to keep perspective and light in my mind.  Creating a shape that actually looks like something out of a blob isn’t all that easy!  But it’s amazing what your mind does start to see. 

DSC09919

You can see it all start to take shape.  I removed some color and ugly patches – not that my paper liked that…and once I did a more drastic transformation – here is the finished piece…

DSC09927 

I know…there were colors in places that did not belong – and for all the stuff that went wrong – I just love it.  It was definitely a work in progress and I learned so much from the experience.  I think that’s why I love the end result.  I doesn’t always have to be perfect – I know…pick yourself up off the floor!  Here they are side by side – cool to see the transformation.

I’m still working on the forest scene that was our second project, and I”ll share that someday in the future when I’m ready to!  I hope you enjoyed this watercolor journey with me today.  I’m excited to keep going and learn more – always the student!

You’ll have to let me know what you think – Don’t be shy…I’m very much in the beginning stages of this – do you watercolor or paint?  I’d sure love to know!!

Signature Snowflake 001