Black and White Emboss Resist Poppies

Pleasant Poppies Background Stamp

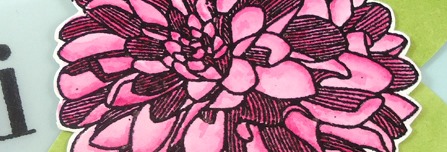
The emboss resist technique is one that you probably use in card making so often that you don’t even give it a thought. It can be used in several ways; today we’re going to feature it with a little coloring using markers and the Pleasant Poppies background stamp.

Embossing techniques are probably some of my favorites. And embossing in general was probably one of the biggest wow techniques you first saw when learning how to stamp, am I right? I’d love to know what it was for you…tell me in the comments below!

Emboss Resist + Markers Video Tutorial

This project tutorial uses emboss resist to create monochromatic poppies for a truly striking card. Like I say in the video, creating black flowers is kind of weird for me, but I have to admit, the card is gorgeous! Here’s the step by step tutorial:

View on YouTube

Now that you’ve seen the video, I listed some instructions for this project. If you haven’t had a chance to see the video, it gives a lot more detail than the tutorial below.

Emboss Resist Technique

Creative Tips –

  • You’ll want to create your background first. Stamp the Dictionary stamp in tone on tone ink (Basic Gray). The Basic Gray card front measures 4 x 5 1/4”.
  • Be sure the background is completely dry as in the video.
  • Use a de-static tool like an embossing buddy on your card front.
  • Emboss the Pleasant Poppies stamp using White Pigment Ink and embossing powder.
  • Color your flowers in using a Basic Black marker.

Embossing Techniques

    • The embossed poppy outline will “resist” the dye ink – that’s the emboss resist technique! Simple, right?
    • Color your images in sections.
    • Lightly dampen a paper towel by spritzing it with a fine mist mini-spritzer. I can not stress lightly enough. You don’t want to add water to your project, just use it as a tool to remove the ink that the embossed image resisted.
    • Wipe lightly over your emboss resisted image. I first pat it, then wipe, being careful not to push my towel into my cardstock. You want to just stay on the raised surface.
    • Add a greeting embossed on Vellum card stock and adhere your card front to the white base. The card base measures 4 1/4 x 11”.

How to embossing tutorials

That’s it! You can try this technique with any colors, but you’ll want to make sure that your marker is darker than your background image (the dictionary stamp). Otherwise you’ll see the background image through your colored flower.

I entered this card in the following challenges:  Happy Little Stampers and Virginia’s View.

HLS March Sketch Challenge   Virginias View March 2014

So what did you think? Are the emboss resist flowers Weird or Striking for you – tell me in the comments – I’d love to know!

Signature

[optin_box style=”14″ alignment=”center” disable_name=”Y” email_field=”email” email_default=”Enter your email address” email_order=”1″ integration_type=”aweber” double_optin=”Y” list=”2841626″ name_field=”name” name_default=”Enter your first name” name_required=”Y”][optin_box_field name=”headline”]If you enjoyed this tutorial…[/optin_box_field][optin_box_field name=”paragraph”]PHA+Li4ueW914oCZbGwgbG92ZSBvdXIgPHNwYW4gc3R5bGU9ImNvbG9yOiAjMjQ0YzVlOyI+PGVtPjxzdHJvbmc+ZnJlZSA8L3N0cm9uZz48L2VtPjwvc3Bhbj5zdWJzY3JpYmVyIG9ubHkgdmlkZW8gc2VyaWVzISDCoEdldCB0aGXCoDxzcGFuIHN0eWxlPSJjb2xvcjogIzI0NGM1ZTsiPjxlbT48c3Ryb25nPmV4Y2x1c2l2ZTwvc3Ryb25nPjwvZW0+PC9zcGFuPsKgQ3JlYXRpdmUgVGlwcyBlLWxldHRlciB3aGljaCB3aWxsIHRlYWNoIHlvdSBuZXcgdGVjaG5pcXVlcyB0byBhZGQgdG8geW91ciBzdGFtcGluZyBza2lsbCBzZXQuIMKgTGVhcm4gaG93IHRvIG1ha2UgcHJvamVjdHMgeW91J2xswqBsb3ZlITwvcD4K[/optin_box_field][optin_box_field name=”privacy”][/optin_box_field][optin_box_field name=”top_color”]undefined[/optin_box_field][optin_box_button type=”1″ text=”Send me exclusive tips!” text_size=”26″ text_color=”#000000″ text_bold=”Y” text_letter_spacing=”-1″ text_shadow_panel=”Y” text_shadow_vertical=”1″ text_shadow_horizontal=”0″ text_shadow_color=”#a3b640″ text_shadow_blur=”0″ styling_width=”100″ styling_height=”10″ styling_border_color=”#000000″ styling_border_size=”1″ styling_border_radius=”6″ styling_border_opacity=”100″ styling_shine=”Y” styling_gradient_start_color=”#a3b640″ styling_gradient_end_color=”#5b661e” drop_shadow_panel=”Y” drop_shadow_vertical=”1″ drop_shadow_horizontal=”0″ drop_shadow_blur=”1″ drop_shadow_spread=”0″ drop_shadow_color=”#000000″ drop_shadow_opacity=”50″ inset_shadow_panel=”Y” inset_shadow_vertical=”0″ inset_shadow_horizontal=”0″ inset_shadow_blur=”0″ inset_shadow_spread=”1″ inset_shadow_color=”#a3b640″ inset_shadow_opacity=”50″ location=”optin_box_style_14″ button_below=”Y”]Send me exclusive tips![/optin_box_button] [/optin_box]

Fall Creations

So what exactly have you been creating this past month?  We’ve been quite busy, behind the scenes in our Community here at The Creative Grove!  Here’s just a quick little peek into our little creative world:

Sept-2014-The-Creative-Grove-Projects

It’s been class mania with both our Brayer 101 and 102 classes being added to the project and resource libraries.  That’s a HUGE savings off the individual cost!  And well worth it.  While the 102 class is still being added this month, it’s been six weeks of creative scenery inspiration fun.  Plus of course lots of clean and simple and watercolor madness also being added.

So if you haven’t checked us out yet, what are you waiting for?  We’re approaching 70 project videos in just a little over three months – crazy, right?  Plus we have lots just waiting to be added.

So come stamp with us in the VIP Community – join in on the conversation in our private members only facebook group and get a craftin’!

See you on the inside.

xoxo –

Signature

To find out more about The Creative Grove Community, click here!

VIP Community

A Watercolored Poinsettia

Joyful Christmas Watercolored (2)

It’s no secret that you’ve seen lots of watercolor projects at The Creative Grove lately.  To say I’ve fallen in with this medium is putting it mildly!  Today I wanted to share with you a project I made a few days ago, because I just needed a little something fun, light and creative in my day.

We all have them – days that are bogged down with work and stuff that isn’t so much fun.  Lately, mine have been filled with the other side of running a creative classroom and blog – the business end: building websites, connecting them, creating digital images and making sure all the SEO is in place.  If you told me a few years ago that I’d be doing that on a regular basis – I probably would have laughed.  Well, I’ve become quite proficient at it!

We just finished up our latest class – Watercolor Techniques that Wow! a few weeks ago.  The feedback was through the roof.  I had so much fun putting the class together for you, that I guess it really showed.  One of the things I love about our classes here at the Grove is that you don’t have to have anything in particular that we use.  Just use what you have.  Colors, mediums, stamps, etc…  The goal is for you to have fun – play with what you have and above all – learn something new.

That’s why I’m SO excited to announce our latest educational venture – our VIP Community!

TCG-VIP-Wide-Header


This isn’t just any old class – it’s a course.  So what’s the difference?  It’s a monthly course where you learn something new every two weeks.  There are two levels – one that builds as you go, and one that is all access from the get-go.  To learn more about it click here.

Joyful Christmas Watercolored (5)

Bet you thought I forgot about the watercolored Poinsettia card! Smile  Like I was telling you, I was smack dab in the middle of building web pages and I couldn’t see straight or think clearly.  I decided I needed to clear my head, so I whipped out some watercolor paper, clear embossing powder, my two aqua painters, a paint palette and some watercolor pencils.  A little while later…I had this:

Joyful Christmas Watercolored (1)Joyful Christmas Watercolored (6)

To really see exactly how I colored this flower in layer after layer after layer creating depth and dimension, you’ll have to watch my three videos on it in the resource section of our Watercolor Class, or on Project #6 – click here to read about what to expect.

That’s the cool thing about that class, it’s loaded with step by step resource videos explaining techniques before you even get to the project videos!  For example, I show you how to make your own shades of colors – I didn’t have a green pencil this shade – I created my own!  I hope you love this card – I can’t stop looking at it – it’s so much prettier than the photographs even show.

Joyful Christmas Watercolored (3)

To learn seven different techniques with watercolors, brushes, inks and so much more, click here.  I guarantee you will not be disappointed!

Signature Snowflake 001

Looking to learn something new?  Join us in class – here are just a few:

TCG-VIP-Wide-Header     Watercolor Narrow

Quick and Easy Masked Tag

DSC01313

Sometimes you just need a really super quick thank you card.  Today I thought I’d share a fun, quick and super easy way to add a custom background to your project.  Create your own stencil from whatever background you’d like, here you see a tag made from the Chalk Talk Framelit set by Stampin’ Up!, use a sponge to mask a background and complete your card!

DSC01318

To see this project as part of the Creative Tips video series, be sure to join the Creative Tips list!

Creative Tips –

  • Create your mask out of copy paper.
  • Sponge lightly with Wild Honey Distress ink DSC01316
  • Stamp two step stamping images using Cherry Cobbler and Old Olive
  • Stamp greeting from Lots of Thanks by Stampin’ Up! in Memento Tuxedo Black
  • Spritz black ink from a dye based black marker and color spritzer by Ranger DSC01317
  • Pop up panel on dimensionals and add pearls.
  • Complete card – final dimension is 4 1/4 x 5 1/2 DSC01322

To see even more tips and exactly how I did all the steps above, subscribe to the Creative Tips list and stay in the know!


Are you interested in learning more?  Try one of our classes out.  Click here to find one that interests you!

Signature Snowflake 001