Mojo Epic Day

Really Good Greetings Main

Hello Mojo Monday fans!  Today you’re getting a sneak peek into the new Greeting set Really Good Greetings combined with the all new Epic Day Designer Series Paper and one awesome sketch!  I wanted to do a birthday card today since it’s my good friend Becky’s birthday today.  We’ve lived an amazing life as good friends for the past 20+ years since we went to the University of Utah together – so I thought she deserved an epic card for today!  Read on to see all the creative details that went into making this card.

              Mojo293SketchReally Good Greetings Front

Creative Details:

  • I decided to flip the orientation of the card to suit my banners better.  They already are only 1/2” wide so I didn’t want to lose too much of the cool design in the Epic Day DSP.
  • One of the things I love about Stampin’ Up! Designer Series Paper is that on the back of the package it tells you what colors are used.  So you don’t have to try to figure out which colors are used in the patterns.  Let me tell you, that rocks!Really Good Greetings Side
  • I went with a few neutrals as my main colors based on those used in the DSP.  I then added the pool party because it was a subtle little color pop.  The Epic Day This and That DSP already has so much going on, I didn’t want to overwhelm my card. 
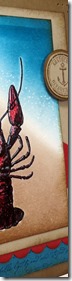
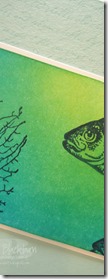
  • I decided to emboss my saying using Versamark ink and the new Pool Party Embossing Powder available in our Spring Mini Catalog.  I first didn’t use an Embossing Buddy, but that experiment didn’t go over so well.  Here is an example of one without an Embossing Buddy and one with.  Really Good Greetings No EBReally Good Greetings W EB
  • An Embossing Buddy rubbed over your cardstock will get rid of the oils and static that embossing powder loves to cling to.  With a greeting that is so detailed an fine, you can clearly see why you need one.
  • To make my banners, I used a 1” Square Punch.  For my video on how to make these cool little embellishments click here.
  • I wanted a little something on my Pool Party strip that wouldn’t take away from the rest of my card, so I dragged my Pool Party Classic Ink pad directly over the top for a little texture.  It was that perfect little something the card needed.Really Good Greetings CU
  • I tied a bow originally for the top embellishment, but you know, I’m just not a bow kind of person.  To I changed it to a single know with some of our linen thread coming out of it.  Tip – the best way to attach a knot like this is with Glue Dots.
  • Instead of adding a larger circle for a border in Basic Gray, I just edged my circles directly with my ink pad.  It was that little separation to the rest of the card. 
  • Finally, I popped up my greeting for a little drama in the card.  I know you’re thinking drama?  But it is something that sets it apart.  To me it’s an embellishment being dramatic, so yet – drama in your card!  (Yes, I know I am goofy sometimes!)
  • Really Good Greetings Height

I love the end result, I hope you do too!  The DSP that I used today is meant to coordinate with our new This and That Book and products.  If you haven’t checked it out yet, be sure to.  It’s a very trendy cool way to capture your life and I think you’ll love all the cool things that coordinate with this epic paper. Check it out here

Are you getting my Exclusive Video Series?

Be sure to sign up for my Creative Tips Newsletter and get the latest Creative Grove news in addition to my free Creative Techniques Video Series!  Don’t miss out on our creative community – the only way to get this exclusive content is to sign up in the box on the upper right or click here.

Signature-Snowflake-001_thumb1_thumb[1]

To Shop 24/7 in the Creative Store – Click here!

Really Good Greetings Angle

Stamp Sets – Really Good Greetings (130333c, 130330w)  Ink – Versamark (102283), Pool Party (126982), Basic Gray (126981) Paper – Very Vanilla (101650), Pool Party (122924), Basic Gray (121044), Crumb Cake (120953), Epic Day This and That DSP (130814) Cool Tools – 2 1/2” Circle Punch (120906), Heat Tool (129053), Pool Party EP (129398),  1” Square Punch (102094) Finishing Touch – Stampin’ Dimensionals (104430), Pool Party Ribbon (SAB Retired), Linen Thread (104199)

Pool Party Embossing PowderEpic Day This and That DSP

By the Tide Blog Tour

       blogtour-stampmonth-MayBy the Tide 003 Main

Welcome to the RemARKable Stamp of the Month Blog Tour!  I’m stop #3 on the RemARKable Blog Tour!  You probably came from Linda’s blog Ink Stamp and Scrap – I love Linda’s work and think she is quite talented!  Today we are stamping with the ‘must have’ stamp set out of the Spring Catalog – By the Tide.  I couldn’t wait to get my hands on this set when this catalog was released.

By the Tide 003 Side

I love using my brayer along with this set.  So for today, I created a tropical underwater scene for you.

Creative Tips:

  • I wanted to use the retiring color River Rock – just about the only retired color that you can still get paper and ink refills for!  I just love this color and I quickly got out my Color Coach and chose the combination Cherry Cobbler and Marina Mist to go along with River Rock.  To see my favorite card made with similar colors – click here.
  • I started by embossing the coral in Cherry Cobbler (Versamark and then my Classic Pad) and added the sea horses in Marina Mist the same way.  I used Clear Embossing Powder to set them.By the Tide 003 CU1
  • I brayered River Rock on the bottom of the largest Framelit for sand.
  • Next I brayered the colors Pool Party, Tempting Turquoise, our new In Color – Coastal Cabana and just a tiny amount of Marina Mist.

By the Tide 003 CU2

  • I refreshed my Sea Horses with my Marina Mist marker and embossed them again with Clear EP.
  • For the River Rock background I repeatedly stamped tone on tone the script stamp (My favorite from this set).  By the Tide 003 Height
  • I popped the underwater world framelit window up on Stampin’ Dimensionals and added a few large Pearl Basic Jewels. By the Tide 003 Front Set
  • I started to add a banner, but didn’t want to take away from my creative scenery, so I just embossed my greeting in Cherry Cobbler directly over the River Rock script.
  • Of course, don’t forget to do your envelope too!  I even added a little sand with my brayer on it! The contrast in colors work.  I hope you love my little glimpse into the under water world with By the Tide.  Be sure to stop by tomorrow to see what I create for Mojo Monday!
    If you’d like to see more samples that I’ve previously done with this set just click on the pictures below.  Or you can use the search box on the right – just type in By the Tide.

                 By The Tide 129120L

Be sure to head on over to Melissa’s blog next – http://www.stampinup.net/blog/2089191 to see what amazing things she’s created! Enjoy the tour!

blogtour-stampmonth-next_thumb1

Signature-Snowflake-001_thumb1

By the Tide 003 Angle

Creative Supplies Used:

Stamp Sets – By the Tide, Sweet Essentials Ink – Versamark, Cherry Cobbler, Marina Mist, River Rock, Tempting Turquoise, Coastal Cabana, Pool Party Paper – Whisper White, River Rock Cool Tools – Apothecary Accents Framelits, Brayer, Heat Tool The Perfect Finish – Stampin’ Dimensionals, Pearls

Simply Sketched Simplicity

Simply Sketched 002 Main

I am in love with the new Simply Sketched hostess stamp set, I just can’t stop using it.  This is a little sneak peek into a cool new set available as hostess stampin’ rewards starting May 31st.  (Tip – any order over $150 qualifies for hostess stampin’ rewards – you don’t have to have a party to get this – although you most certainly can – book, in person, or virtual!) I wanted to make a quick and simple card showcasing the natural beauty of the images, so I started with the poppy image.

Simply Sketched 002 Side

Creative Tips:

    • I really wanted the star of the card to be the poppy image, so I cut a block just the size of the image – 1 3/4” x 3”.
    • I used Jet Black StazOn as my outline, and then watercolored my image using the Aqua Painters.

Simply Sketched 002 CU

  • I used the new colors as my muse and made my poppy Crisp Cantaloupe (quickly becoming a favorite) with some Strawberry Slush highlights.  For the stem I went to returning color Pear Pizazz.  I added a little emphasis in the center of the flower using my Classic Basic Black ink as well.
  • Three sayings come in this set making this a quite versatile stamp set.  I quickly made a banner for the greeting.


Simply Sketched 002 Height

  • I only popped the poppy image up so it really highlighted it.
  • I chose a white on white approach which really looks classic and elegant.


White on white cards are beautiful – if you haven’t made one yet, I encourage you to try.  Best of all, this card took all of about 5 minutes from start to finish.  So enjoy making one with one of your stamp sets today!  Me, I’m getting ready for the CG Crew to come over and play with all the new fun things in the new catalog during our team meeting.  Wish you could come play with us today!

Are you getting my Exclusive Video Series?

Be sure to sign up for my Creative Tips Newsletter and get the latest Creative Grove news in addition to my free Creative Techniques Video Series!  Don’t miss out on our creative community – the only way to get this exclusive content is to sign up in the box on the upper right or click here.

blogtour-stampmonth-smMay

Be sure to tune in tomorrow – it’s the RemARKable Stamp of the Month Blog Tour!  Tomorrow we will be showcasing the stamp set – By the Tide, one of my favorites.  So tune in tomorrow – have a great Saturday!

Signature-Snowflake-001_thumb1_thumb

To Shop 24/7 in the Creative Store – Click here!

Simply Sketched 002 Angle

Stamp Sets – Simply Sketched (129672c, 129669w)  Ink – Crisp Cantaloupe (131176), Strawberry Slush (131178), Pear Pizazz (131180), Jet Black StazOn (101406), Basic Black (126980) Paper – Whisper White (100730) Cool Tools – Aqua Painters (103954), 1” Square Punch (102094) Finishing Touch – Stampin’ Dimensionals (104430)

Simply Sketched Sneak Peek

Simply Sketched 001 Main

I love making creative scenery cards with my brayer.  And what better way to give you a sneak peek into the next catalog (goes live May 31st!), than to do a creative Bermuda Scene using one of the new exclusive hostess stamp sets – Simply Sketched.

Here I used two stamps – the bird on the grass and the berry/leaf branch.  I wanted to use some of the new 2013-2014 In Colors, so I settled on a daytime Bermuda scene.  I hope you love this card as much as I do!

Simply Sketched 001 Front

Creative Tips:

  • I settled on a primary color combination – the new In Colors – Crisp Cantaloupe and Coastal Cabana.  I then pulled in Strawberry Slush (new), Pear Pizazz, Wild Wasabi, Baked Brown Sugar (new), Tempting Turquoise, Bermuda Bay, Soft Sky, Cherry Cobbler and Early Espresso.Simply Sketched 001 AB
  • I began by stamping my scene in Jet Black StazOn.  I colored my scene using the Aqua Painters and the Classic Ink Pads in various colors.  I then embossed it in crystal clear so that I could brayer directly over top. Simply Sketched 001 AA
  • To create the sandy beach I used Sahara Sand.  I wanted to keep it light and Crumb Cake would have been a little too dark.  I thought a beach scene would be a nice way for the stamped images to pop on the neutral background.
  • I then brayered my water after masking off my horizon.  I used a foundation of Tempting Turquoise, then Coastal Cabana and finally Bermuda Bay. Simply Sketched 001 AC
  • For my sky, I used Soft Sky – which to my surprise was a little bluish gray, so I added a little pop of Tempting Turquoise to brighten it up.
  • I masked my islands in Early Espresso and added my water movement and foam in our Uniball White Gel Pen.  Simply Sketched 001 Side
  • One of my birds got a little thick unfortunately and there really wasn’t a way to fix it, so I have a little fat seagull…lol!
  • I usually sponge the edges in a dark color and I would have used Early Espresso if I did that, but I wanted to keep it nice and light on the Cantaloupe, so I left the edge clean.

Overall, I think the card is light and fun.  I matted my scenery onto Crisp Cantaloupe because it really gave it a Bermuda feel.  This is the type of card you would learn to make in my Creative Scenery 102 class or 200 level classes.  Be sure to sign up for my creative tips mailing list at the right to be sure you are getting the latest information about classes in the Orlando area and my online classes.   If you are interested in hosting a weekend of brayer classes in your area – be sure to contact me – I do travel!

Learn Online!

If you loved this card – be sure to check out my in depth step by step video online class for how to create scenes just like this one!  Check out brayer classes here – Brayer 101   Brayer 102  and save huge with the Bundled Classes here

Are you getting my Exclusive Video Series?

Be sure to sign up for my Creative Tips Newsletter and get the latest Creative Grove news in addition to my free Creative Techniques Video Series!  Don’t miss out on our creative community – the only way to get this exclusive content is to sign up in the box on the upper right or click here.

Signature-Snowflake-001_thumb1_thumb

To Shop 24/7 in the Creative Store – Click here!

Simply Sketched 001 Angle

Stamp Sets – Simply Sketched (129672c, 129669w)  Ink –Sahara Sand (126976), Crisp Cantaloupe (131176), Strawberry Slush (131178), Baked Brown Sugar (131174), Pear Pizazz (131180), Soft Sky (131181), Cherry Cobbler (126966), Coastal Cabana (131175), Bermuda Bay (131171), Tempting Turquoise (126952), Early Espresso (126974), Jet Black StazOn (101406), Wild Wasabi (126959) Paper – Whisper White (100730), Crisp Cantaloupe (131298) Cool Tools – Brayer (102395), Stampin’ Sponges (101610), Versamarker, Clear Embossing Powder (109130), Heat Tool (129053), Aqua Painter (103954) Finishing Touch – Uniball White Gel Pen (105021)

Topsy-Turvey Celebration Case

Topsy-Turvey Celebration 001 Main

I just love this card from the 2012-2013 Annual Catalog.  I had to recreate it with of course a little twist and flair!  Don’t be afraid to CASE (Copy and Steal Everything) a great project, but turn it into your own!  So what exactly did I do differently, read on to find out.

Topsy-Turvey Celebration 001 Front

Creative Tips:

  • I immediately changed the base of the card to a gate fold and threw a So Saffron panel on the inside.  I kept the main image mostly the same because honestly, it rocks!
  • The bottom layer is stamped in Raspberry Ripple, the middle in Primrose Petal and the Top in Pink Pirouette.  The candles were colored using a Pumpkin Pie marker and Daffodil Delight Marker.  I stamped each one individually.  Tip – It’s easiest to start with the middle one for spacing purposes.Topsy-Turvey Celebration 001 CU
  • The flower is actually a So Saffron flower and two petals of a Wild Wasabi flower. 
  • I added the cake base in Pumpkin Pie.
  • Instead of Rhinestones, I used Dazzling Details on the circles and the center of the flower.  Dazzling Details go a long way!Topsy-Turvey Celebration 001 Inside
  • I stamped Celebrate on the inside in Raspberry Ripple.
  • The Celebrate panels were stamped tone on tone in Pink Pirouette.  The only real major change is  the gate fold.  So to not take too much away from the beauty of the cake, I kept the panels to a 1/16” border of Whisper White.
  • The card needed a little something, so I edged the Celebrate Panels in Pink Pirouette with the Direct to Paper technique.  I also added a little paper piercing in the corners using the Essentials Paper Piercing Pack. Topsy-Turvey Celebration 001 Side

While I can’t take conceptual credit for the cake center, the rest of the card was a little twist on the original.  I hope this gives you a little inspiration to put your own twist on a good idea yourself!

    Are you getting my Exclusive Video Series?

    Be sure to sign up for my Creative Tips Newsletter and get the latest Creative Grove news in addition to my free Creative Techniques Video Series!  Don’t miss out on our creative community – the only way to get this exclusive content is to sign up in the box on the upper right or click here.

Signature-Snowflake-001_thumb1

To Shop 24/7 in the Creative Store – Click here!

Topsy-Turvey Celebration 001 Angle

Stamp Sets – Topsy-Turvey Celebration (125822c, 126470w)  Ink –Raspberry Ripple (126859), Primrose Petals (126858), Pumpkin Pie (126945), So Saffron (126957), Pink Pirouette (126956), Wild Wasabi (126959) Paper – Whisper White (100730), Pink Pirouette (111351), Raspberry Ripple (126842), So Saffron (105118) Cool Tools – Paper Piercing Tool (126189), Stampin’ Pierce Mat (126199), Essentials Paper Piercing Pack (126187) Finishing Touch – Dazzling Details (124117)

Untitled-12

Swallowtail Spotlight

Swallowtail 007 Main

What better way to showcase the Swallowtail Stamp, than by using the spotlight technique!  This is just one way to use this technique and it’s a beautiful way to accentuate this gorgeous stamp that has been all the rage this spring.

Swallowtail 007 Side

Creative Tips:

  • I stamped my image twice – once on my card front and again on another piece of scrap paper.  Both images were stamped using the Jet Black StazOn pad.
  • I left only a 1/16” border of Basic Black for my card base.
  • The image on the scrap paper I water colored using Daffodil Delight, More Mustard, Tangerine Tango and Island Indigo Classic Ink Pads.  I used the Aqua Painter to get my achieved look, but you can also use the Blender Pens or Stampin’ Write Markers if you wanted to.
  • Once I had my image colored just as I wanted, I punched several circles out using the smallest circle from the Itty Bitty Shapes Punch Pack, a 3/4” and 1” Circle Punches.  I then attached my images to my card sample exactly where they fit to give a spotlight effect. Swallowtail 007 CU
  • Tip – Go outside the lines when you punch – don’t worry if your punched part is off the edge of the butterfly, that gives it a cool look, rather than constraining yourself to just within the lines.

I love the finished result that the Spotlight Technique gives this project.  Now you give it a try!

    Are you getting my Exclusive Video Series?

    Be sure to sign up for my Creative Tips Newsletter and get the latest Creative Grove news in addition to my free Creative Techniques Video Series!  The only way to get this exclusive content is to sign up in the box on the upper right or click here.

Signature Snowflake 001

Swallowtail 007 Angle

Stamp Sets – Swallowtail (129216c, 129213w)  Ink – Jet Black StazOn (101406), Daffodil Delight (126944), Tangerine Tango (126946), More Mustard (126964), Island Indigo (126986)  Paper – Whisper White (100730), Basic Black (121045) Cool Tools – Aqua Painters (103954), Itty Bitty Shapes Pack (118309), 3/4” Circle Punch (119873), 1” Circle Punch (119868)

Swallowtail Stamp 129216L

Creative Notebook Covers

Notebook Cover 001 Main

Who doesn’t love a great notebook and a handmade gift?  I had the privilege to help a good friend and fellow CG Crew team mate out with a fun little project she was doing – personalized notebooks for Admin Day this past week as one of their gifts.  Isn’t she a cool boss?  I’ve never had a boss make me something before – if that doesn’t say “I value you”, I don’t know what does!  Here is one of the notebooks that were made that day.

Notebook Cover 001 Front Notebook Cover 001 Inside

Amy got these cool Notebook covers that had a place to do something fun and creative in the cover. They came in a cute box and were just screaming to be personalized.  She had to make a few, so I just let the creative juices start flowing and this is what we ended up with for one of them.

Creative Tips:

  • We was going to make polka dots using sponge daubers, but then decided on a cleaner look and punched out polka dots with the 1” circle punch instead.
  • To give a little more emphasis to the name plate – we ran the Basic Black card stock through the big shot first with the Labels Framelits Collection and then through the Chevron TIEF folder.Notebook Cover 001 Name CU2
  • To really make it pop – we created a banner display behind it in the Tempting Turquoise, Tangerine Tango and Whisper White. 
  • The initial was made using the Typeset Alphabet Bigz dies and the Silver Glimmer Paper.
  • We wanted to add a little flair, so we created hanging banners in the corner with Basic Black and Whisper White cardstock.  We added a Tangerine Tango striped Designer Series Paper from the Sycamore Street DSP Collection that was available during Sale-a-bration (now Retired). 
  • To make the hanging banners we used a 1” Square punch.  It make the larger banner, we used a 1 3/8” Square Punch.
  •               Notebook Cover 001 Button CU Notebook Cover 001 Button Height

  • We added a little flair to the banners by putting one of the Silver Basic Designer Buttons from the Spring Catalog. 
  • We threaded it with some Basic Black Baker’s Twine.  You might be asking  – wait Stampin’ Up! doesn’t carry that?  You would be correct – we made it from the Whisper White Baker’s twine – something that everyone should have.  What we did was run my Classic Basic Black ink pad over it on our Grid Paper and voila, Basic Black Baker’s Twine!
  • We then popped one of our Large Rhinestone Basic Jewels to the top for a little bling!
  • This project turned out super cute and I know the recipient will love it.  According to Amy, it totally fits her personality, and the fact that it was handmade will certainly make her feel appreciated.

Signature Snowflake 001

Be sure to check out the Retired Lists!  Get all your favorites while you still can.

Retired Stamp Sets                      Retired Accessories List

To Shop 24/7 in the Creative Store – Click here!

Notebook Cover 001 Angle

Stamp Sets – none! Paper – Whisper White (100730), Certainly Celery (105125), Tempting Turquoise (102067), Tangerine Tango (111349), Basic Black (121045), Silver Glimmer Paper (124005), Sycamore Street DSP (retired) Ink – Basic Black (126980) Cool Tools – Big Shot (103954), Chevron Embossing Folder (127749), 1 3/8” Square Punch (119877), 1” Circle Punch (119868)  The Perfect Finish – Silver Basics Designer Buttons (129325), Large Rhinestone Basic Jewels (129324), Whisper White Baker’s Twine (124262)

    Large Rhinestone Silver Basics Buttons

Mojo Artistic Etchings

Artistic Etchings 003 Main

I just love the set Artistic Etchings, it gives me the sense of being in Paris at a sidewalk café sipping a cappuccino and people watching.  I just love it when paper crafting takes me somewhere else.  This morning I went to check out the Mojo Monday sketch and have to tell you, I struggled.  The Mojo just wasn’t flowing.  Then I decided to go to one of my favorite stamp sets – Artistic Etchings.  The card then quickly came together – the stamping not so much…lol!

This morning I had to repeat the crown literally…NINE times!!!  The sad thing is that was even using a Stamp-a-Majig!  I know, you’re saying…I’m so glad it’s not just me sometimes!  (Okay, I should stop using exclamation marks so much in the morning…but that’s how I feel!)  The sad thing is that my first go at the crown was perfect, till as I put the whole card together, some Basic Gray ink got on my fingernail and (can you see where this is going) ultimately my perfectly stamped square.  Normally I don’t care too much, but it was squarely in the white area and just didn’t make the cut anymore.

Okay – on to the creative tips part of this card…

Mojo290SketchArtistic Etchings 003 Front

Creative Tips:

  • When I pull the Eiffel Tower stamp out I immediate gravitate toward my Basic Gray Ink Pad.  I know, cliché, but I can’t help it, any other color to me just isn’t right (it’s a total personal choice) Smile
  • I knew I wanted the Eiffel Tower in the center, long and popped up, so the other two main images were easy to choose.  The dimensions just kind of happened.  I used my Grid Paper (can’t live without it), to help me perfect the size.  I wanted to have just a pop of Basic Gray Cardstock, so I knew I wanted a 1/16th border.  My dimensions settled on 1 5/8” x 1 3/8” for the smaller white and 1 5/8” x 2 7/8” for the Tower.  Increase your Basic Gray dimensions by 1/8” width and height for the 1/16” border – 1 3/4” x 1 1/2” and 1 3/4” x 3”.Artistic Etchings 003 Side
  • I decided to use a Cherry Cobbler backing of 5 1/4” x 4”.  I put a 2” x 5 1/4” piece of Designer Series Paper from the Fan Fair collection on the bottom.  It had some Basic Gray and Cherry Cobbler in it that added some great character to the card.  I love this collection, it feels worldly to me.
  • I used some 1/2” Seam Binding Ribbon in Cherry Cobbler and tied a flat knot.  Artistic Etchings 003 CU
  • I went back and forth on whether to even put a greeting on the card, but ultimately decided on the Amour stamp that comes with this set.  I think it was the use of Cherry Cobbler in my project that swayed me – this card screams love to me – maybe it’s the whole Eiffel Tower/Paris connection.Artistic Etchings 003 Height
  • As finishing touches I added the three sizes of Pearl Basic Jewels as an accent to my greeting and popped both the greeting banner (made with a 1” Square Punch) and the Eiffel Tower up on Stampin’ Dimensionals.
  • Ultimately I love the final result, but I have to say it was a little difficult this morning…lol!  I do love this challenge and I encourage you to take the Mojo Monday sketch above and give it a shot!  Have a great week and be sure to check back Wednesday – our retiring list is coming out!!

Signature Snowflake 001

To Shop 24/7 in the Creative Store – Click here!

Artistic Etchings 003 Angle

Stamp Sets – Artistic Etchings (118517w, 120573c) Paper – Whisper White (100730), Basic Gray (121044), Cherry Cobbler (119685), Fan Fair Designer Series Paper (DSP) (126918) Ink – Basic Gray (126981) Cool Tools – 1” Square Punch (124094), Stampin’ Trimmer (126889), Craft Scissors (108360), Stamp-a-Majig (101049), Grid Paper (102787)  The Perfect Finish – Pearl Basic Jewels (119247), Stampin’ Dimensionals (104430), Cherry Cobbler 1/2” Seam Binding Ribbon (120992)

Artistic Etchings 120573L