White Christmas Cards

White-Christmas-Cards-001

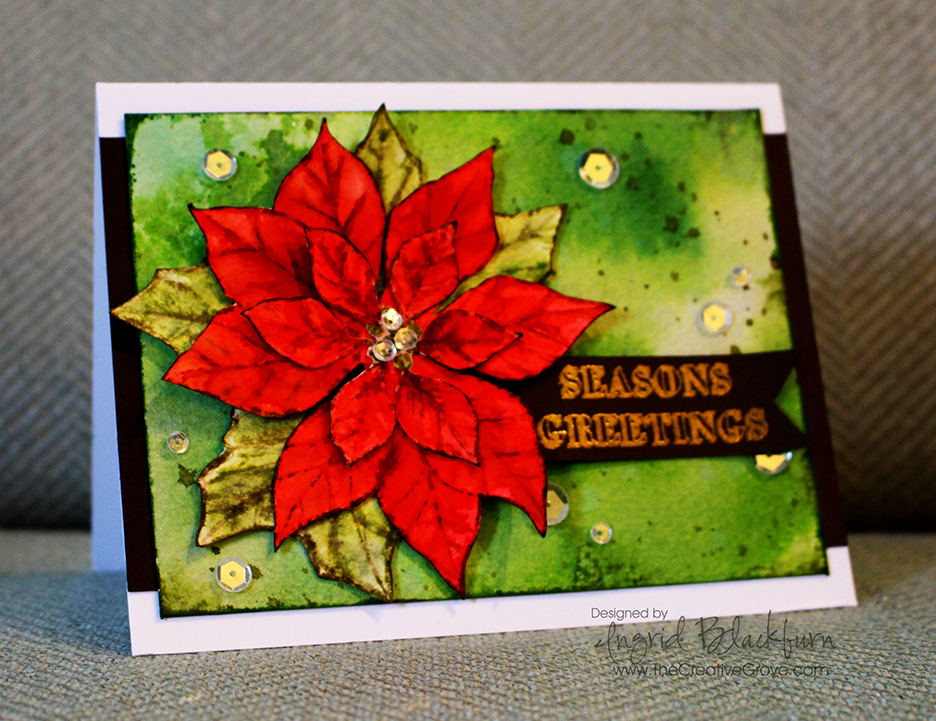
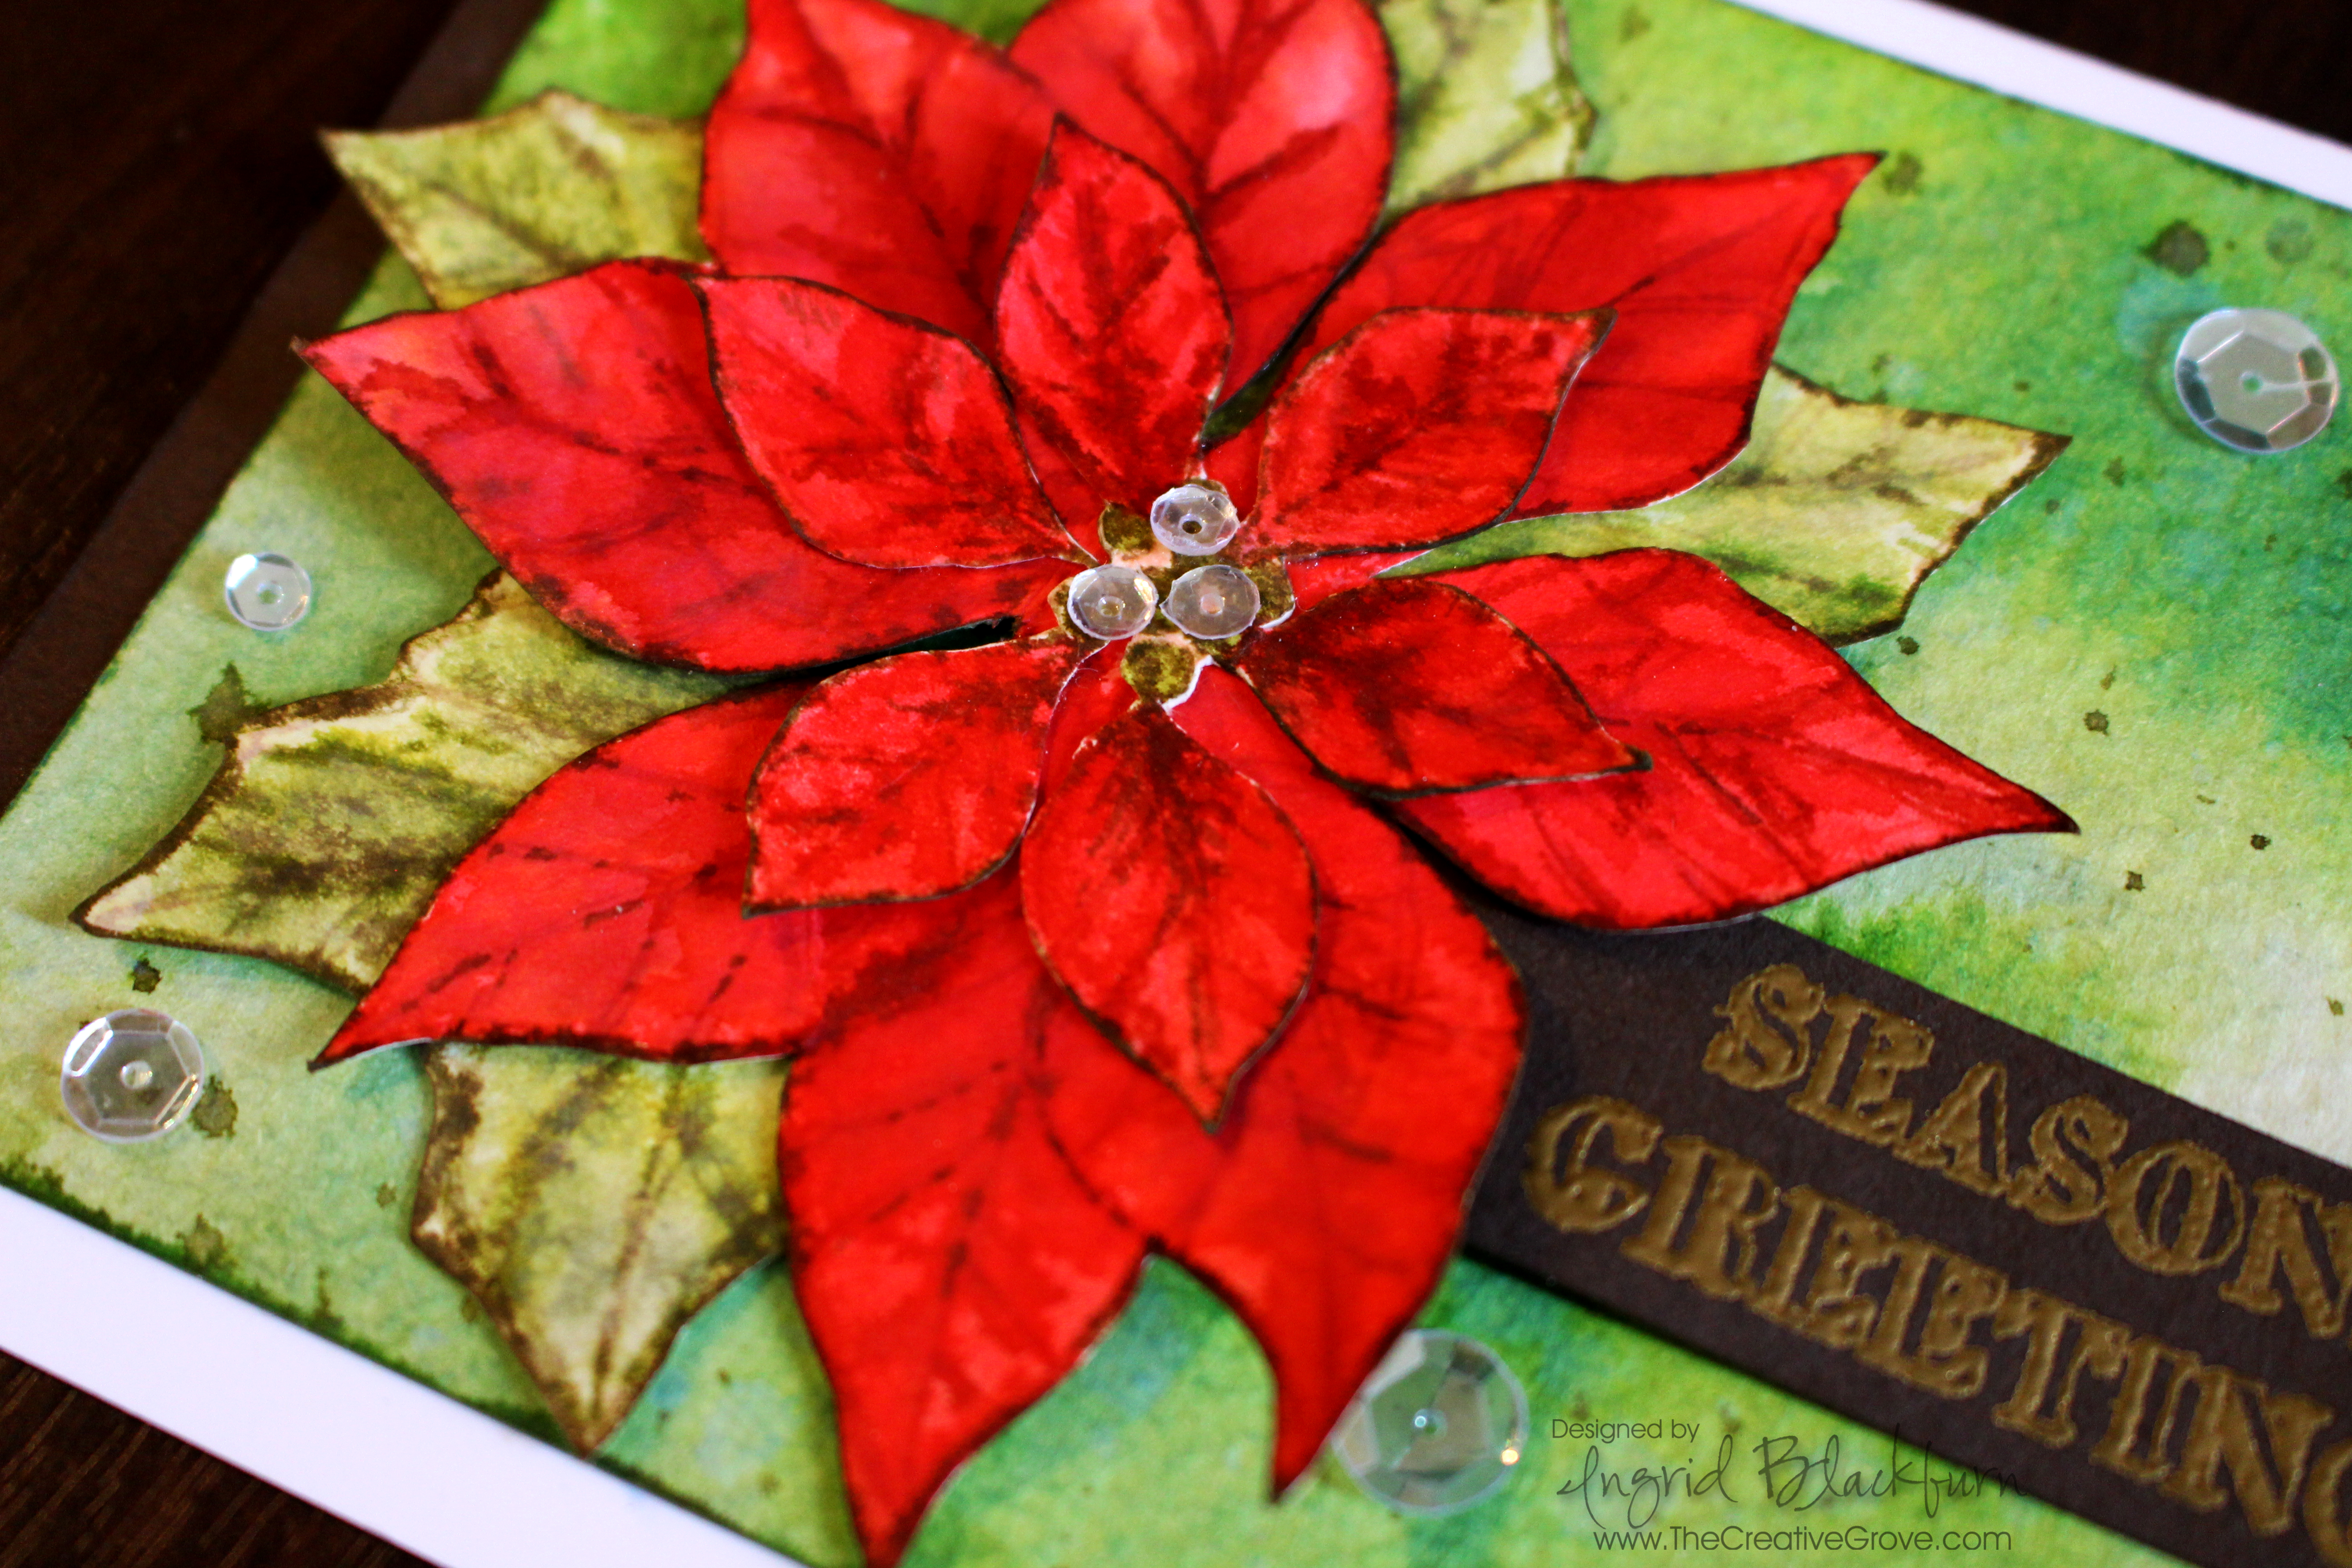
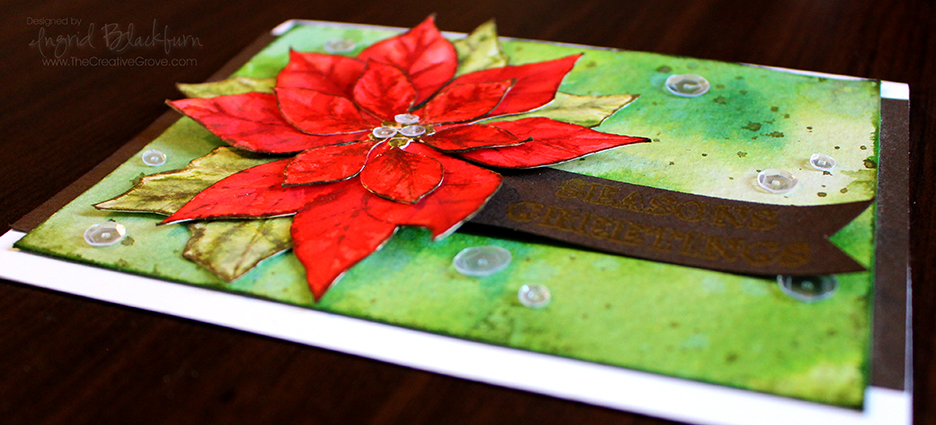
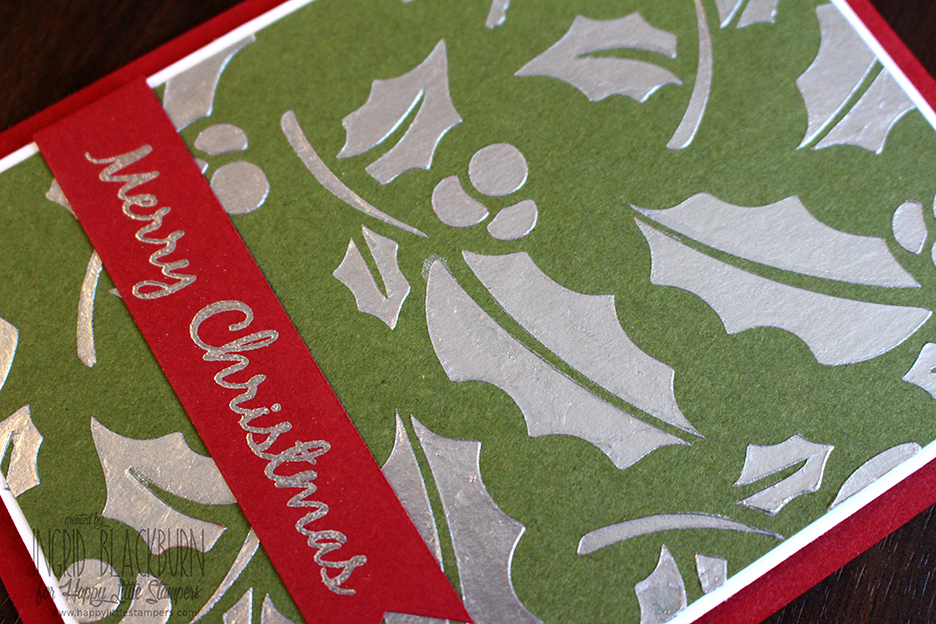
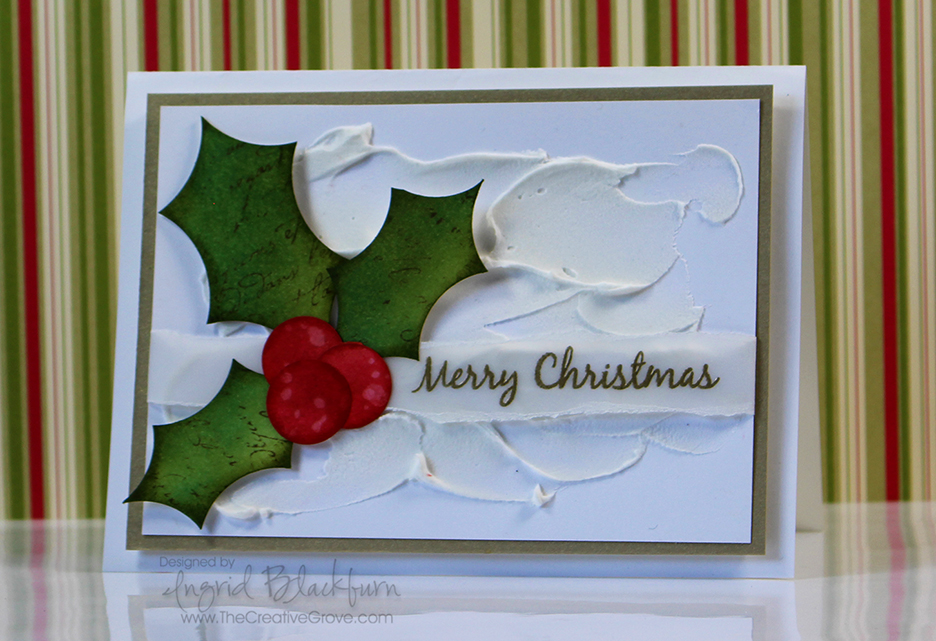
Don’t you just love white on white cards? They make the perfect Christmas cards. This month at the Happy Little Stampers Christmas Challenge, we have a Tic Tac Toe challenge. I chose the classic diagonal path of White, Gold and Sentiment – a classic.

HLS Christmas Challenge February 2016tictactoe badge

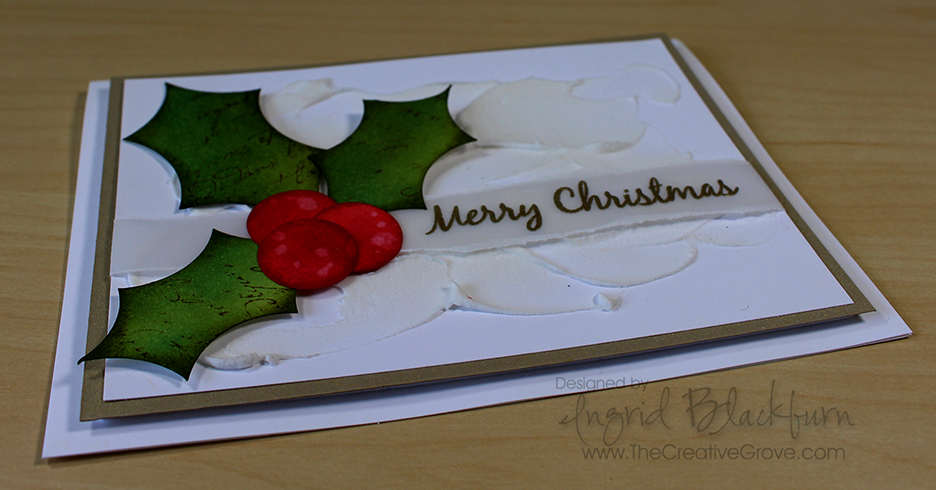
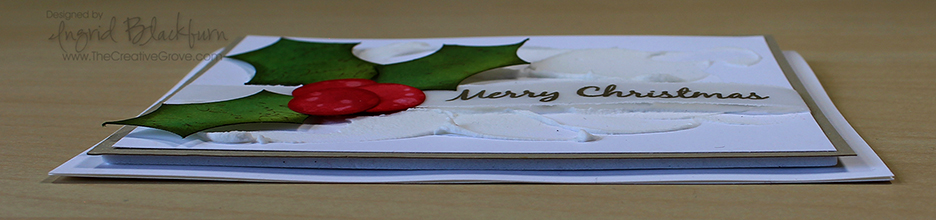
This month we have an awesome guest designer for the Christmas Challenge – Ksenija Rizova, you may know her in the blog-o-sphere as Sweet Kobylkin. Be sure to Click Here to check out her blog and creation.

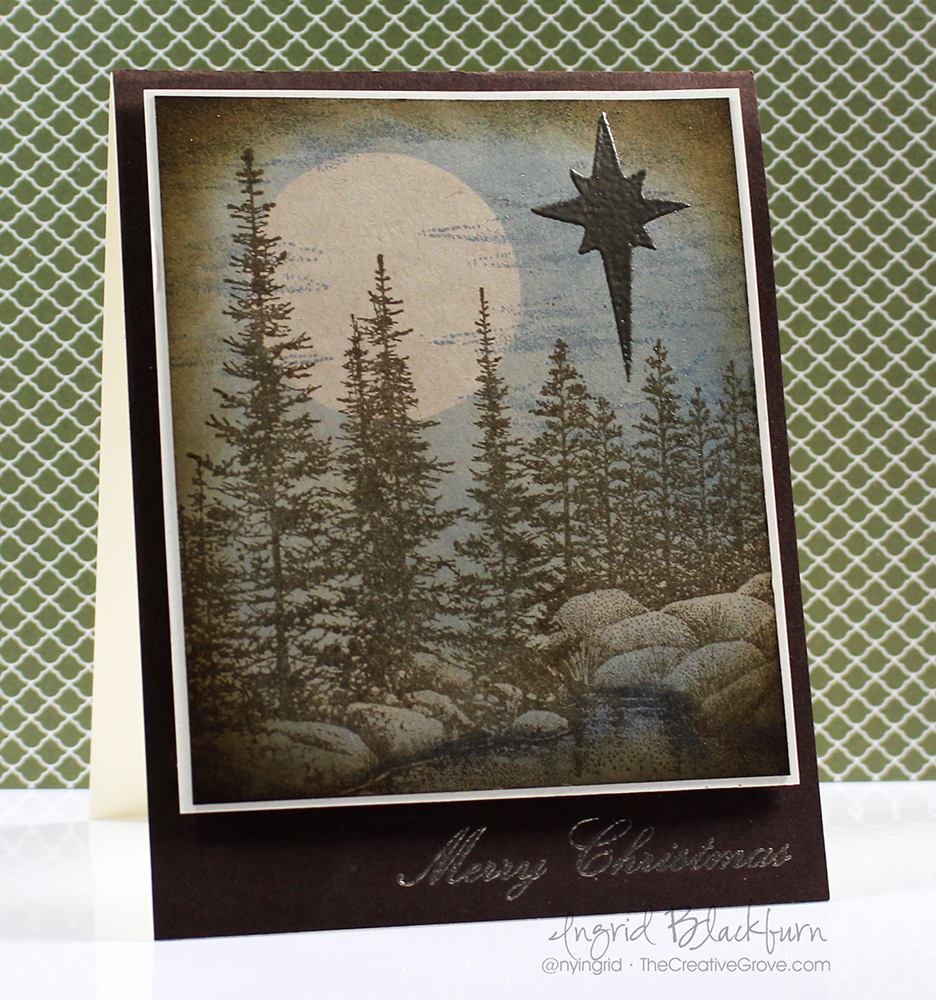
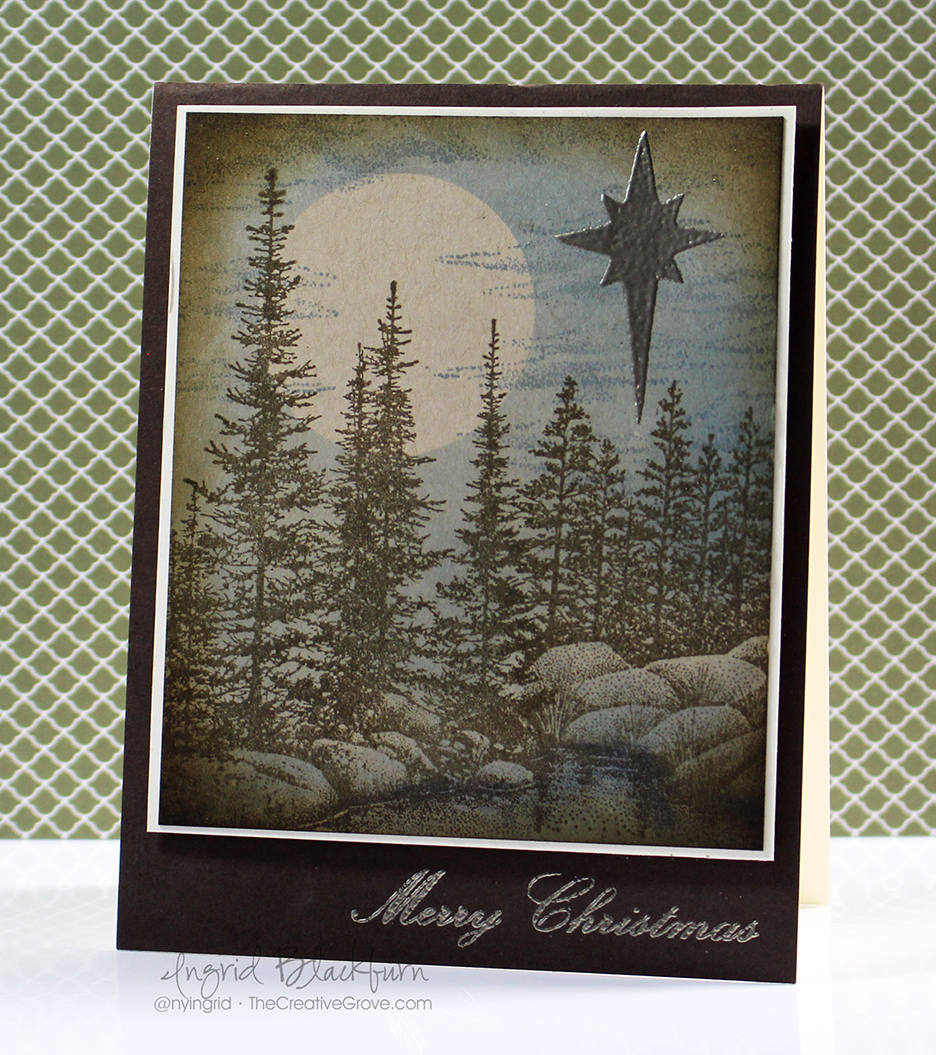
White Christmas Tutorial

  • Create your textured background on the top 2/3 of a folded A2 white card. I used the Large Winter Snowflakes by Memory Box and Dreamweaver white embossing paste.

White-Christmas-Cards-005

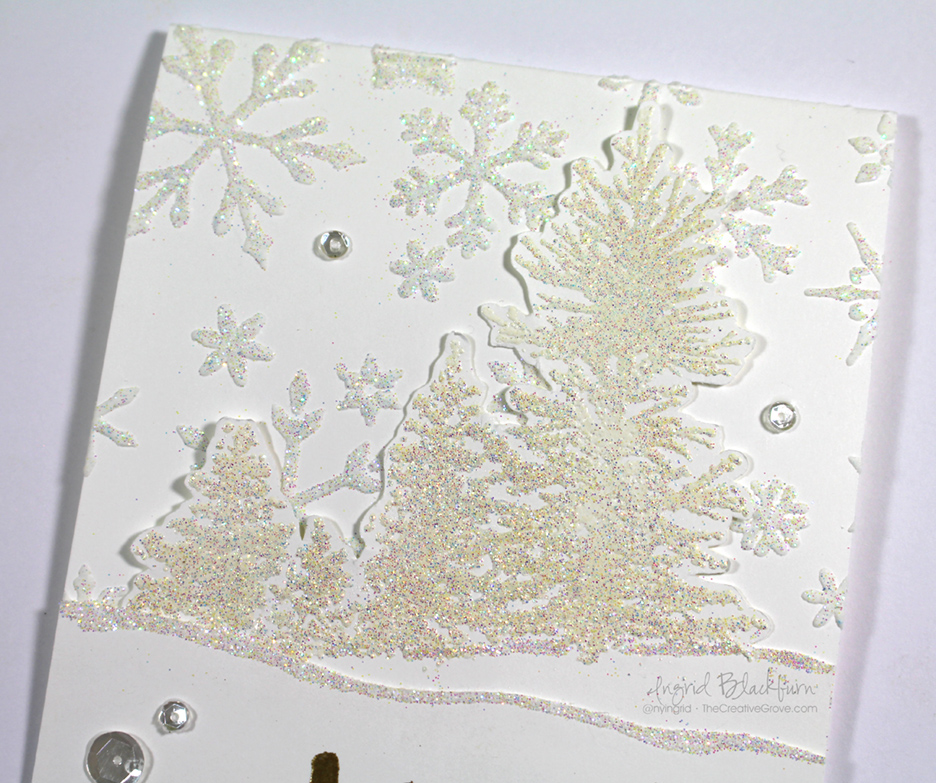
  • Sprinkle glitter onto your wet embossing paste snowflakes, and set aside to dry completely.
  • Emboss the Impression Obsession Tree Group in White, then Iridescent Ice.
  • Fussy Cut out and add glitter to the hill line.

White-Christmas-Cards-003

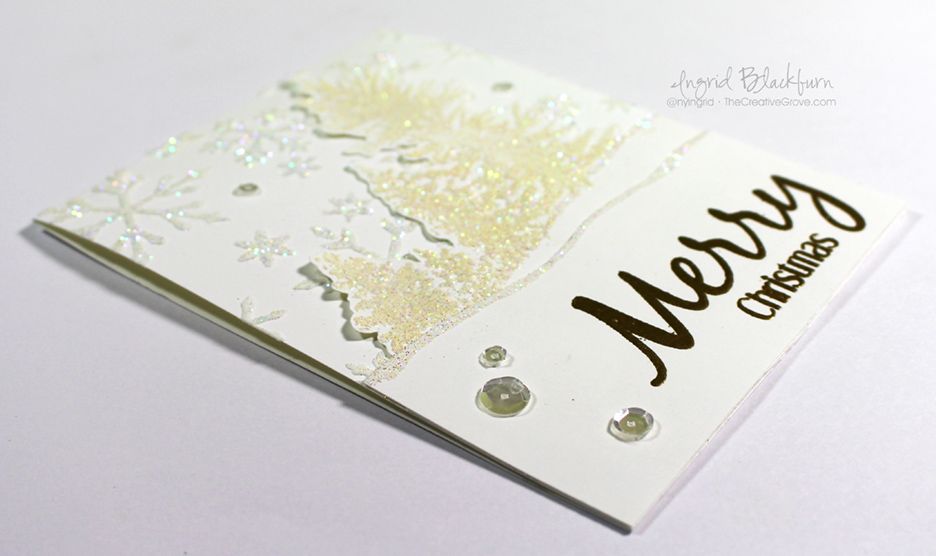
  • Add a second piece of card  stock with a slight downward slope in the opposite direction to overlap over your stamped trees. Add glitter with two way glue to the hill edge.
  • Once your embossing paste is dry. Add trees and front hill to your card, getting the spacing just right. Trim the bottom to fit the front and add a greeting embossed in Gold. I chose one from Everyday Sentiments by Happy Little Stampers.

White-Christmas-Cards-004

  • Add sparkling clear sequins by Pretty Pink Posh.

Now it’s your turn! Which bingo path are you going to take? I can’t wait to see what you enter into this month’s Christmas Challenge.

Keep those fingers inky –

Signature

[optin_box style=”2″ alignment=”center” email_field=”email” email_default=”Enter your email address” email_order=”2″ integration_type=”aweber” double_optin=”Y” list=”3846012″ name_field=”name” name_default=”Enter your first name” name_order=”1″ name_required=”Y”][optin_box_field name=”headline”]Learn with our exclusive FREE video series[/optin_box_field][optin_box_field name=”paragraph”]PHA+R2V0IHRoZSBmcmVlIENyZWF0aXZlIFRpcHMgRS1sZXR0ZXIgYW5kIGxlYXJuIHdpdGggc3Vic2NyaWJlciBleGNsdXNpdmUgdmlkZW8gYW5kIHBpY3RvcmlhbCBjb250ZW50LsKgPGVtPjxzdHJvbmc+SW5jbHVkaW5nwqA8L3N0cm9uZz48L2VtPm91ciB5ZWFybHkgMTIgRGF5cyBvZiBDaHJpc3RtYXMgc2VyaWVzITwvcD4K[/optin_box_field][optin_box_field name=”privacy”][/optin_box_field][optin_box_field name=”top_color”]undefined[/optin_box_field][optin_box_button type=”0″ button_below=”Y”]Send me exclusive tips now![/optin_box_button] [/optin_box]


Watercolor Stamped Butterflies Video

Today I have a fun little video tutorial for you. You may remember this card from a few months back. Well, I was finally able to get the video uploaded. I created it as a tutorial for the Happy Little Stampers YouTube channel. I’m on their video crew and will be contributing every month to that channel as well. Be sure to subscribe to it to see the rest of the teams creations each week. 🙂

Now for some crafty goodness. Watercolor stamping is so much fun, easy to do and really looks artistic. This stamp set lends itself well to this technique as the images are quite detailed and have great space in-between the lines. Enjoy the video and be sure to subscribe to my YouTube channel if you haven’t already!

Click Here to Watch on YouTube

I hope you enjoyed that! It’s a super fun technique and I love that it works well with clean and simple design! Click Here to see the original blog post.

Watercolor Stamped Birthday Butterflies 002

Till next time. Keep those fingers inky –

Signature.png

Vintage Christmas Star

Vintage Christmas Star 001

Today’s challenge keyword is star – so let’s learn how to incorporate that into this vintage holiday card. This month’s challenge at Happy Little Stampers is to use a star in some form on your card. I have to admit, I started off in a very different direction…then ultimately decided to create a simple card with a vintage masculine feel that could showcase the ultimate Christmas star.

HLS Christmas Challenge December 2015

I guess I’ve been in a vintage kind of a mood these past few months. At least here on the blog! I don’t know what it is that seems soothing about this color palette to me, but I’m really loving the feel. Maybe it’s because I’ve been injured and not able to walk as much as I would like in the woods…who knows?!! Here’s a quick tutorial for you, and be sure to stop by again next week for the video!

Creating a Quick Vintage Feel to your Holiday Cards –

  • This project was done on kraft colored paper – not white. It helps with the overall look and feel.
  • I find that the brown tone fits this style better than black. So ink your stamps up in a dark brown – something earthy. I used Ground Espresso by Ranger Distress.
  • Stamp the Stampscapes Pines & Rocks Lg on the left and the left side of Lakeside Reflections Lg to the right Tip – use a torn piece of paper towel to mask off the edge and create a seamless scene.

Vintage Christmas Star 002

  • Place two post it notes in copy paper and punch out your moon with a 1 1/4″ circle punch. This will be your mask.
  • Place your moon where you’d like it before adding blues to the sky
  • Use a mini sponge tool and some blue hues to shade in your water and sky.
  • Stamp Cloud Strips Lg by Stampscapes in Stormy Sky Distress. Be sure to overlap the moon slightly.
  • Once you have the look you’d like – add a little shading with s neutral like Weathered Wood Distress to the rocks.
  • Sponge the entire scene around the perimeter with  a brown – I used Gathered twigs for a slightly different feel than the trees.
  • Add your star and emboss in Pewter. I used the Nativity Angel Stencil by Stamplorations.

Vintage Christmas Star 004

  • The perfect sentiment makes this card and nails the vintage feel. Here you see one of the many sentiments from Mixed Christmas Sentiments by Happy Little Stampers. Emboss it in Pewter for a great look, rather than something bright.
  • The scene is matted onto Vanilla card stock for contrast before being popped up on fun foam onto an Espresso card base.

I do hope you like this card – it’s actually a great one to mass produce and goes much faster than you think! I hope this inspired you to create something special with a star for your cards. Be sure to enter them into the Christmas Challenge at Happy Little Stampers!

Keep those fingers inky –


Signature.jpg

[optin_box style=”2″ width=”500″ alignment=”center” email_field=”email” email_default=”Enter your email address” integration_type=”aweber” double_optin=”Y” list=”3846012″ name_field=”name” name_default=”Enter your first name” name_required=”N”][optin_box_field name=”headline”]Learn with our exclusive FREE Video Series[/optin_box_field][optin_box_field name=”paragraph”]PHA+R2V0IHRoZSBmcmVlIENyZWF0aXZlIFRpcHMgRS1sZXR0ZXIgYW5kIGxlYXJuIHdpdGggc3Vic2NyaWJlciBleGNsdXNpdmUgdmlkZW8gYW5kIHBpY3RvcmlhbCBjb250ZW50LiA8ZW0+PHN0cm9uZz48c3BhbiBzdHlsZT0iY29sb3I6ICM4MDAwMDA7Ij5JbmNsdWRpbmc8L3NwYW4+wqA8L3N0cm9uZz48L2VtPm91ciB5ZWFybHkgMTIgRGF5cyBvZiBDaHJpc3RtYXMgc2VyaWVzITwvcD4K[/optin_box_field][optin_box_field name=”privacy”][/optin_box_field][optin_box_field name=”top_color”]undefined[/optin_box_field][optin_box_button type=”1″ text=”Subscribe now!” text_size=”26″ text_color=”#ffffff” text_bold=”Y” text_letter_spacing=”0″ text_shadow_panel=”Y” text_shadow_vertical=”1″ text_shadow_horizontal=”0″ text_shadow_color=”#000000″ text_shadow_blur=”0″ styling_width=”36″ styling_height=”15″ styling_border_color=”#000000″ styling_border_size=”1″ styling_border_radius=”6″ styling_border_opacity=”100″ styling_shine=”Y” styling_gradient_start_color=”#345523″ styling_gradient_end_color=”#68ab46″ drop_shadow_panel=”Y” drop_shadow_vertical=”1″ drop_shadow_horizontal=”0″ drop_shadow_blur=”1″ drop_shadow_spread=”0″ drop_shadow_color=”#ffffff” drop_shadow_opacity=”50″ inset_shadow_panel=”Y” inset_shadow_vertical=”0″ inset_shadow_horizontal=”0″ inset_shadow_blur=”0″ inset_shadow_spread=”1″ inset_shadow_color=”#000000″ inset_shadow_opacity=”50″ location=”optin_box_style_2″ button_below=”Y”]Subscribe now![/optin_box_button] [/optin_box]

Happy Little Stampers 2nd Blog Hop!

Welcome to The Creative Grove and the second Blog Hop for Happy Little Stampers! Chances are you hopped along from Carol’s blog. Today I have three projects to share for you from the second release at Happy Little Stampers!

Happy Little Stampers Blog Hop

In addition to some great inspired projects, HLS is giving away a $50 gift certificate to the store to one commenter! And, four other randomly selected lucky commenters will win a mystery prize too!  So as you’re hopping along, don’t forget to leave a comment!

Here’s what you do:
  • Start off by leaving a comment on the Happy Little Stampers blog, and then continue on to each Designer.
  • Be sure to comment on all the blogs – including the Happy Little Stampers blog in order to be eligible for the prizes!
  • The blog hop will run for one week giving you enough time to hop through and check out what the designers will be creating.

I used two of the new sets – Mix Mash and Everyday Sentiments to make some great cards that I hope you’ll love! Here are all the creative tips and details…

Blog Hop Projects

Ingrid Blackburn CAS Cards

Project One – OMG #YOUROCK

For this fun card I wanted something funky and cool for my niece Rebecca. I love the lightheartedness of some of the sentiments in the Mix Mash set. To create this card:

  • You’ll want to use the OMG and #YouRock stamps embossed in Black to really stand out from the colorful background.
  • You’ll need to match the quirkiness of the stamps, so choose a fun background stamp or stencil. I chose a Hero Arts Stencil that I recently purchased.
  • To get that fun colorful design, use a sponge applicator and sponge Mustard Seed, Fossilized Amber, Mowed Lawn and Spiced Marmalade Distress Inks to create the pattern on a piece of white card stock.

Hero Arts Stencils

  • To get the sentiment perfectly positioned, you’ll want to figure out how large you want your space to be, then plan on 1/8″ for the top and bottom.
  • I chose 3/4″ for my space and to keep with the Rule of Thirds theory of design, made sure to split my piece 1/3 of the way through. This helps to balance your project.
  • For a little dramatic effect – pop your panels up with dimensionals or foam tape. That will help to give you a great shadow effect.

It’s a fun project, right?

Happy Little Stampers

Project Two – Spunky Birthday

I just spent several weeks with my family in NY. My 10 year old niece Chiarra is all spunk and spirit. She loves to break out in song, dance or just start acting a scene – mark my words…she’ll be a future actress! I couldn’t get her singing out of my head this morning when I was stamping – so… fun, bright and playful is the direction this project went.

The Mix Mash stamp set is filled with great birthday sentiments and some awesome little detail stamps. I actually was going to add white sequins to it, when I decided to add the circle and lined circles in their place – it looks way better and talk about versatile! I love stamps like that. This project is a fun mixed mash itself! Here is how to recreate it:

  • First stamp your main sentiment.  Ink up the center of the largest Happy Birthday stamp with Distress – More Mustard, then use Picked Raspberries and Salty Ocean being sure to overlap them a bit to get a great mix of color. Keep it towards the bottom of a 3 3/4 x 4″ panel, leaving an inch to stamp other sentiments.
  • An embossing buddy/destatic tool is key for this project, as you’ll be handling it numerous times. Use your embossing buddy on a space above or below your main sentiment, and stamp one of the happy birthday stamps repeatedly across in versamark.

Happy Little Stampers Stamps

  • Try to keep them aligned. I had to stamp, add powder, then stamp again to see it right.
  • Once you have white powder on a line  – emboss with a heat tool and then repeat till your panel is filled.
  • Matte onto a matching panel – I used Melon Mambo by SU.  I trimmed my panel so that it was just slightly smaller than a 1/16″ border.
  • Figure out where you are placing your panel and stamp solid and lined circles in a few spots as in the card.
  • Pop up your panel and you’re all set!
  • This card is an A2 top folding card – 4 1/4 x 5 1/2″.

I know she’ll love it, it’s bright and fun. The white Happy Birthday’s really make a statement.

Masculine Cards

Project Three – Masculine Birthday

For this card, I wanted a more masculine look for my nephew Matt’s upcoming birthday. So I decided to go with a grey panel and keep it rather simple. Originally I was going to stamp and emboss the greeting on vellum, tear and overlay, but as I began, I thought simple might be better here. What do you think? This one is pretty straightforward, but here’s the step by step anyway!

  • Stamp and emboss your greeting from Everyday Sentiments in black about 1/3 rd of the way up from the bottom onto a piece of Basic Grey card stock (SU) – 3 7/8 x 5 1/8″.
  • Stamp the arrow stamps from the Mix Mash set in Versamark and emboss with clear powder to get the darker grey color.

Everyday Sentiments Masculine Card 002

  • Stamp and emboss your circle stamps from the Mix Mash set in black.
  • Add gold sequins and matte onto a black base 1/16″ larger ( 4 x 5 1/4″)
  • Adhere to a top folding A2 card – 4 1/4 x 5 1/2″.

It’s a simple card, but sometimes simple is just perfect. One of the reasons I just love CAS cards!!

Well, there you have it – just a few ideas and fun ways to use some of the new stamp sets in this second release. I hope you enjoyed the creative juice…and that’s a wrap for the second blog hop! If you didn’t start at the beginning with the Happy Little Stampers blog…be sure to head there next and hop along the way for 20 other designers ideas! WOW…that’s a ton of creativity!!

And be sure to comment to win too – in order to win, you need to comment on all the blogs including the HLS blog. Happy Hopping, see you next time!!

Signature-24-pt_thumb.jpg

Here are links for the whole hop!

Happy Little Stampers
Kylie Purtell
Loll Thompson
Joyce Mehrberg
Gloria Lee
Tanja Kabel
Susan Bridgman
LesLee
Gail Townsend
Carol Steedman
Melissa Lane
Linda Walmsley
Birgit Norton
Kim Heggins
Valentyna
Sue T.
Bonnie Klass
Toni
Chrissie
Anita
Carol Dunham
Ingrid Blackburn <—- You are Here!

HLS Poinsettia Challenge

Watercolored Poinsettia 001

What’s a girl to do to create amazing cards for you from the road – watercolor using distress inks, naturally! I brought a few Christmas sets with me, just in case we weren’t back yet (We’ve been traveling for 9 weeks so far); so when I sat down for this month’s Poinsettia Challenge, I stared at my stamp set and this idea popped in my head.

You know by now that I love to watercolor, especially with distress inks, so I thought a more three dimensional Poinsettia on a cool smooshed background might look cool, and I have to say – even I’m thrilled with how it turned out – and I’m my worst critic! I bet you are your own worst critic too – tell me in the comments – it can’t just be me!

HLS Christmas Challenge October 2015

This month at the Happy Little Stampers Christmas Challenge, the theme is Poinsettia. So I hope this card inspires you in some way to create your own amazing creation and join in the Challenge. Not only does the design team have some amazing projects created for you…we also have a guest designer this month – Pat from Colourful Creations.

You’ll see a tutorial below. I know I normally have a video, but I don’t have a tripod with me – sorry about that! But if you are looking for some great holiday inspiration – later this month my annual 12 Days of Christmas card series is starting – be sure to be on the Creative Tips E-Letter to get those – they won’t be on the blog!!

To join me this month, use any element of this or the design teams cards as inspiration, just make sure it has a poinsettia in some way on your card and is Christmas themed. I can’t wait to see your creations – now for the good stuff!

Watercolored Poinsettia 003

Creative Tips on Watercolor using Distress Inks

Here was my thought process for choosing the colors for the card. Originally I was going to do a no line watercolor white poinsettia, but then I was in the mood for red. I knew a deeply watercolored red 3D poinsettia would look awesome, but needed an equally awesome background. So what do you choose? On the color wheel, the complimentary color (opposite on the wheel) to red  is green. So while the leaves would be green, I thought maybe a more vibrant version with lighter bleached out in spots along with great texture created with deeper flicks and edges might just do the trick!

  • To start, you’ll want to smoosh a few greens into your craft mat or work surface. I used Bundled Sage, Peeled Paint and Mowed Lawn. Bundled Sage helped me with the lighter bleached out spots, Mowed Lawn was my bright vibrant contrast to that, Peeled Paint married the two.
  • Generously spritz your colors. Make sure you lay down enough to cover your background piece. While spritzing, you want to have enough water down without overdoing it. To gauge the amount of water, when you press your watercolor card front down and it comes up dry or not glistening, you don’t have enough water. On the other hand if all your color runs right off your watercolor paper, you have too much! It’s a science, so play around. Don’t worry if you don’t get it right, just go right back with another layer adjusted with more or less water. Layers is what makes this piece awesome! So it’s very forgiving.

Watercolored Poinsettia 002

  • Don’t over do the smooshing – get just enough to cover your piece. This way you keep the light areas light. If you have too much light, strategically smoosh more vibrant spots over some without pressing it into the whole card.
  • Set your background aside to dry before moving onto the next step.
  • Next – create the splatter. I did this in two ways – flicked water, then colored splatter.
  • First spritz your hand and flick your colored surface. Here’s a video on this technique (at the 2:59 mark)
  • Smoosh some Forest Moss into your craft mat. Spritz with water to get it into a liquid state – just add enough, you don’t want it too diluted in hue. Load up a paint brush and splatter it hard with your finger on the opposite hand creating splatter onto your card. If you hold it closer to your project it will be more condensed. I held mine about 10 inches from my card to get it to splatter outward.
  • Edge your watercolor paper directly with your ink pad – a little more generously at the corners to complete your background.
  • Set it aside to try. Now you can move onto the Poinsettia!

Watercolored Poinsettia 006

  • To get a more painted look to your Poinsettia. you’ll want to use a few shades of red and create layers. Stamp your image in a lighter shade twice on a larger piece of 140# cold pressed watercolor paper. I used Tattered Rose and stamped it off so that it was really light. This will give you an outline to work with without defining the edges. This allows you to control the look of the flower, rather than painting in the lines of an outlined image.
  • You will color one flower completely and another just the smaller inner flower. When painting the larger flower – ignore the lines of the smaller flower – just extend the leaf as if it’s a large petal. Look really close at mine and you’ll see the smaller outline slightly – but you have to really look for it!

Watercolored Poinsettia 005

  • Color your berries on the smaller flower in using Peeled Paint. Your larger flower you’ll color the berries with Festive Berries to match the flower better.
  • Next create a light wash of Worn Lipstick by spritzing it generously with water. Test it out on a scrap piece to make sure it’s light. It’s easier to start lighter and add darker layers for depth – you can’t go so easily dark to light.
  • Add a spritzed version of Festive Berries, keeping some light areas. Apply your color using the veins of the flower as a guide and spread the color outward with wet brush – I used a Pentel AquaBrush.
  • Repeat using Barn Door and add a little detail to the veins with Fired Brick. With each layer, add the color in different spots – some heavier and lighter. This will help you to develop texture in  your flower.
  • Fussy cut both of your flowers out right at the line image – don’t leave any excess white. You should have a large and smaller flower.
  • Edge your petals in Gathered Twigs. Be careful to just get the very edge and not onto the flower if possible. Use a Distress marker if you’re more comfortable.

Watercolored Poinsettia 004

  • Stamp your leaves in Bundled Sage and Paint them in a similar manner using a light wash of Bundled Sage and add a little Peeled Paint  and an even smaller amount of Forest Moss at the veins. Keep them really light to help as a contrast from the background.
  • Fussy cut them out. Glue your leaves to the larger flower, and then your smaller flower on top.
  • Emboss your greeting onto Espresso card stock – I used the set Mixed Christmas Sentiments by Happy Little Stampers. I then created a banner and attached it to the back of my flower.
  • Before using liquid glue to attach the flower and banner to the card, I gently bent up s few of the petals and the banner to give a better 3D look.
  • Add some sparkling clear sequins by pretty pink posh for a final touch.

Watercolored Poinsettia 007

Here are the card dimensions:

  • Card – Top folding 8 1/2 x 5 1/2″ White
  • Card front – 140# water color paper by Canson – 3 3/4 x 5″
  • Espresso – Matte – 5 1/2 x 3 1/2″, banner – scrap

I hope you enjoyed this little tutorial on watercolor using distress inks, okay – not so little. You can use watercolor paints as well, or any dye based inks that blend well with water. In my experience, the distress are the most transparent of the dye inks out there. Have fun with it, and I can’t wait to see what you create. And don’t forget – if you want the 12 Days of Christmas series, be sure to sign up for the Creative Tips E-letter.

Signature-24-pt_thumb.jpg

Happy Little Stampers Blog Hop

Happy Little Stampers just had their first release of stamps and to celebrate we’re having a blog hop! So this month you get a whole lot of inspiration from a brand new stamp company – Happy Little Stampers, along with 18 of my crafty friends for some great inspiration.

blog hop graphic 2

In addition to some great inspired projects, the whole lot of stamps will be given away to one commenter. And, four other randomly selected lucky commenters will win a gift certificate to the HLS store!  So as you’re hopping along, don’t forget to leave a comment!

Here’s what you do:
  • Start off by leaving a comment on the Happy Little Stampers blog, and then continue on to each Designer.
  • To be eligible for the prizes, you must comment on all the blogs in the hop.
  • The blog hop will run for one week giving you enough time to hop through and check out what the designers will be creating.
You probably arrived here from Gloria’s blog. Pretty great isn’t she?! Well, here are a few projects I made for you today. Enjoy all the creative tips!

Colored Texture Paste Birthday 001

To get this look, you’ll want to color some white embossing paste with distress inks – the piece I used for this project is actually the left over from an hombre colored project I made for one of our classes here at The Creative Grove. I ended up with a lot left over, so I quickly took my scrap paste and ran it over another stencil for an extra piece – I actually got five extra projects that way!! I just love the way the yellows blended together with the orange and the texture the embossing paste gives is awesome!

Colored Texture Paste Birthday 003

I spread it over a fun stencil by The Crafters Workshop, added a little banner using the new, great birthday set from HLS – Bold Birthday Sentiments , added a few sequins and had a quick, bright, fun project.

But I didn’t stop there…I also played around the other day with my crafty friend Amy. We broke out her silver embossing paste and ran it over my new Holly stencil from Stamplorations. I just love the fluid look of the embossing paste against the Artichoke card stock. It really pops.

Texture Holly 001

Of course the card is only made complete with the silver embossed Merry Christmas greeting. I have to admit, I can’t seem to stop using it! You’ll just HAVE to check out the new Mixed Christmas Sentiments by Happy Little Stampers – the mixed set of fonts are great.

Texture Holly 002

To add a punch to the project I wanted to use Cherry Cobbler card stock. First you’ll want to separate the two colors with a small white 1/16″ edge so that it helps to define it a bit better. Little touches like that really help to bring the project together.

And since Holly is the theme over at Happy Little Stampers Christmas Challenge, I think I’ll add this one to the gallery as well – be sure to play along too! But first….time for more creative genius…

Now hop on over to Birgit’s blog to see more inspiration!

 Don’t forget to comment to win – now hop along!! 🙂
ingrid signature

[optin_box style=”13″ width=”500″ alignment=”center” action=”https://www.aweber.com/scripts/addlead.pl” disable_name=”Y” method=”post” email_field=”email” email_default=”Enter your email address” integration_type=”aweber” double_optin=”Y” list=”3846012″ name_field=”name” name_default=”Enter your first name” name_required=”Y”][optin_box_field name=”headline”]If you enjoyed this tutorial…[/optin_box_field][optin_box_field name=”paragraph”]PHA+4oCmeW914oCZbGwgbG92ZSBvdXIgPGVtPjxzdHJvbmc+PHNwYW4gc3R5bGU9ImNvbG9yOiAjMjQ0YzVlOyI+ZnJlZTwvc3Bhbj4gPC9zdHJvbmc+PC9lbT5zdWJzY3JpYmVyIG9ubHkgdmlkZW8gc2VyaWVzLiDCoExlYXJuIG5ldyB0ZWNobmlxdWVzIHRocm91Z2ggb3VyIDxzcGFuIHN0eWxlPSJjb2xvcjogIzI0NGM1ZTsiPjxlbT48c3Ryb25nPmV4Y2x1c2l2ZTwvc3Ryb25nPjwvZW0+wqA8L3NwYW4+Q3JlYXRpdmUgVGlwcyBlLWxldHRlcsKgYW5kIHN1YnNjcmliZXIgb25seSB2aWRlbyBhbmQgcHJvamVjdCB0dXRvcmlhbHMhPC9wPgo=[/optin_box_field][optin_box_field name=”privacy”][/optin_box_field][optin_box_field name=”top_color”]undefined[/optin_box_field][optin_box_button type=”1″ text=”Send me exclusive tips!” text_size=”32″ text_color=”#000000″ text_bold=”Y” text_letter_spacing=”0″ text_shadow_panel=”Y” text_shadow_vertical=”1″ text_shadow_horizontal=”0″ text_shadow_color=”#f6fefb” text_shadow_blur=”0″ styling_width=”50″ styling_height=”19″ styling_border_color=”#000000″ styling_border_size=”1″ styling_border_radius=”6″ styling_border_opacity=”100″ styling_shine=”Y” styling_gradient_start_color=”#a3b640″ styling_gradient_end_color=”#80902c” drop_shadow_panel=”Y” drop_shadow_vertical=”1″ drop_shadow_horizontal=”0″ drop_shadow_blur=”1″ drop_shadow_spread=”0″ drop_shadow_color=”#000000″ drop_shadow_opacity=”50″ inset_shadow_panel=”Y” inset_shadow_vertical=”0″ inset_shadow_horizontal=”0″ inset_shadow_blur=”0″ inset_shadow_spread=”1″ inset_shadow_color=”#80902c” inset_shadow_opacity=”50″ location=”optin_box_style_13″ button_below=”Y”]Send me exclusive tips![/optin_box_button] [/optin_box]

HLS Texture & Layered Holly

This month at Happy Little Stampers there is a new Christmas Challenge and I thought you would like to get a little creative with some DIY Holly since that’s the theme – Holly! You will have SO much fun making this project – it’s different, has great texture, and is by far one of my favorite Christmas Cards I’ve made all year.

HLS Christmas Challenge September 2015

If you’ve visited my blog before, it’s no secret that I love to create Christmas Cards all year long. Even before being on the design team for HLS! Once I started entering Christmas Challenges a few years ago, I started to send out different cards to all my friends and loved ones. I had always mass produced one or two designs be fore, but I LOVE sending unique individual cards out!

Gone are the days of mass production for me, and it’s kind of nice not having that big work day/week looming over my shoulders. One of the fun processes I go through is picking which card for which person – it’s a tough one sometimes, but the cards speak to me…I know I must sound nuts. If you do this, I’d love to know in the comments that I’m not alone!

Well, onto the cool tutorial and video – yes, of course there’s a video!

Happy Little Stampers Christmas Challenge

I broke out the embossing paste for this project – and used it in an unconventional way. I usually use it with stencils, but for this project, I just thought I’d slather it on – and what a cool look! Here’s the video – I know it’s a bit longer than my normal tutorials, but it’s jam packed with how to’s, tips and lots of various techniques – so enjoy!

So what did you think? Here are a few Creative Tips for you as well. Be sure to play along with us at the Happy Little Stampers Christmas Challenge.

Did you know…HLS put out their own stamps just recently? The sentiment I used on my project is from the Mixed Christmas Sentiments set – it’s awesome – high quality photopolymer that stamped beautifully. (And no, I didn’t get it for free – I paid for it – so that’s an honest opinion!)

Creative Tips –

  • To get an abstract look with the embossing paste – use a rounded short palette knife. This way you can easily slather it on allowing it to create a random look. It spreads like buttercream frosting.
  • When sponging your scrap pieces for your embellishments, don’t worry about getting it perfectly blended. The rough edges of the sponge tool and random spots will give you great texture in your holly leaves.

DIY Holly and Berries

  • Try using different colors to get depth in your leaves and berries
    • Leaves – Mowed Lawn, Peeled Paint, Pine Needles, Forest Moss (edge)
    • Berries – Worn Lipstick, Festive Berries, Barn Door, Fired Brick (edge)
  • To create the layered torn edge, tear a piece of vellum card stock towards you – tearing away puts the texture on the back.
  • Use liquid glue to get the pieces to stick to unfriendly surfaces like vellum and embossing paste.

CAS - clean and simple christmas cards

  • To create your holly leaves – use circle punches – larger are a bit easier. Create your top point as in the video, and continue around the edge.
  • Add water spots to your berries by adding water to your hand then flicking or dripping it onto your distress piece just as in the video. Distress works with water and it creates an amazing look – perfect for the berries.
  • The wider base makes it easier to glue your leaves together. You won’t see it with the berries over it.
  • Be sure to edge your berries and leaves – it helps to create a border that gives you a little interest.

Distress Ink Techniques and Embossing Paste

  • To pop up the entire panel, use fun foam to keep it up through the mail – it’s rather large and that will help ensure you get the same effect once the card is delivered.

Dimensions – 

  • Card Base – White card stock 4 1/2 x 6″
  • Card Front:
    • White – 3 3/4 x 5 3/8″
    • Brushed Gold Matte – 4 1/8 x 5 5/8″
  • Vellum Card Stock – 1 1/2 x 8 1/2″
  • White scraps :
    • Leaves – one at least 2 1/4″ wide the other 2″ wide strips
    • Berries – at least 1″ wide strip

Overall, this projects has lots of techniques in it. They are all simple and that’s what I love about this card so much – it’s clean and simple style with all that white space. Creating your own embellishments is also a great accent – adding little touches like different shades, edging, water spots and partially stamped script just gives your pieces dimension and character.

Christmas Cards with embossing paste

I hope you join me and the talented design team over at Happy Little Stampers for a great Holly Christmas Challenge!

I thought I’d enter this card in another fun challenge –  Merry Monday for their holly challenge this week. Must be a holly week! 🙂

Merry Monday Holly Challenge

I can’t wait to see what YOU create!

ingrid signature

[optin_box style=”13″ width=”500″ alignment=”center” action=”https://www.aweber.com/scripts/addlead.pl” disable_name=”Y” method=”post” email_field=”email” email_default=”Enter your email address” integration_type=”aweber” double_optin=”Y” list=”3846012″ name_field=”name” name_default=”Enter your first name” name_required=”Y”][optin_box_field name=”headline”]If you enjoyed this tutorial…[/optin_box_field][optin_box_field name=”paragraph”]PHA+4oCmeW914oCZbGwgbG92ZSBvdXIgPGVtPjxzdHJvbmc+PHNwYW4gc3R5bGU9ImNvbG9yOiAjMjQ0YzVlOyI+ZnJlZTwvc3Bhbj4gPC9zdHJvbmc+PC9lbT5zdWJzY3JpYmVyIG9ubHkgdmlkZW8gc2VyaWVzLiDCoExlYXJuIG5ldyB0ZWNobmlxdWVzIHRocm91Z2ggb3VyIDxzcGFuIHN0eWxlPSJjb2xvcjogIzI0NGM1ZTsiPjxlbT48c3Ryb25nPmV4Y2x1c2l2ZTwvc3Ryb25nPjwvZW0+wqA8L3NwYW4+Q3JlYXRpdmUgVGlwcyBlLWxldHRlcsKgYW5kIHN1YnNjcmliZXIgb25seSB2aWRlbyBhbmQgcHJvamVjdCB0dXRvcmlhbHMhPC9wPgo=[/optin_box_field][optin_box_field name=”privacy”][/optin_box_field][optin_box_field name=”top_color”]undefined[/optin_box_field][optin_box_button type=”1″ text=”Send me exclusive tips!” text_size=”32″ text_color=”#000000″ text_bold=”Y” text_letter_spacing=”0″ text_shadow_panel=”Y” text_shadow_vertical=”1″ text_shadow_horizontal=”0″ text_shadow_color=”#f6fefb” text_shadow_blur=”0″ styling_width=”50″ styling_height=”19″ styling_border_color=”#000000″ styling_border_size=”1″ styling_border_radius=”6″ styling_border_opacity=”100″ styling_shine=”Y” styling_gradient_start_color=”#a3b640″ styling_gradient_end_color=”#80902c” drop_shadow_panel=”Y” drop_shadow_vertical=”1″ drop_shadow_horizontal=”0″ drop_shadow_blur=”1″ drop_shadow_spread=”0″ drop_shadow_color=”#000000″ drop_shadow_opacity=”50″ inset_shadow_panel=”Y” inset_shadow_vertical=”0″ inset_shadow_horizontal=”0″ inset_shadow_blur=”0″ inset_shadow_spread=”1″ inset_shadow_color=”#80902c” inset_shadow_opacity=”50″ location=”optin_box_style_13″ button_below=”Y”]Send me exclusive tips![/optin_box_button] [/optin_box]


Butterfly Birthday

Watercolor Stamped Birthday Butterflies 005

I am so excited…today the mailman brought me some stamps from the first ever release from Happy Little Stampers! Yes, there’s a new stamp company in town and get a load to this amazing Butterfly Birthday set! I always think of my friend Dawn when I see a butterfly – as she really loves them! Do you have a stamp image that reminds you of somebody, or is it just me? Tell me in the Comments below!

This Butterfly Birthday set has three very different bold butterflies that will definitely give you loads of ideas and a good variety of cards – just what you want from a stamp set. Even better – there are three great sayings that are the perfect size and in a handwritten print. It’s the perfect compliment, I just love it when there are greetings mixed in with great images.

Watercolor Stamped Birthday Butterflies 002

Now, you may think I’m biased, because I’m on the design team for the Christmas Challenge, but I purchased these myself, and let me tell you – the quality is there and I’m overjoyed with the design and size of each. Kylie will get these right out to you, they’re well priced and she ships internationally quite reasonably. I can’t wait to use the Mixed Christmas Sentiments set on my next challenge card – it’s always great when a set uses different fonts. Love that kind of variety.

So if you haven’t checked them out yet…be sure to do so – and one of the many challenges over at Happy Little Stampers – there is definitely something for everyone!

I watercolor stamped this card  using water along with the following distress inks – Mustard Seed, Spiced Marmalade, Tumbled Glass, Broken China, Peeled Paint, Seedless Preserves and Soot Black. I did a little light wet on wet watercoloring for the background.  Stay tuned for a video of this technique card in the upcoming weeks!

🙂

Signature-24-pt_thumb.jpg