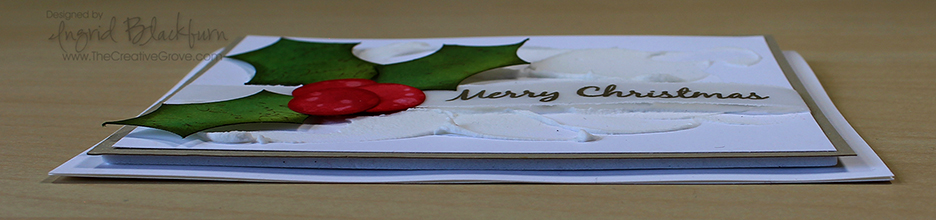
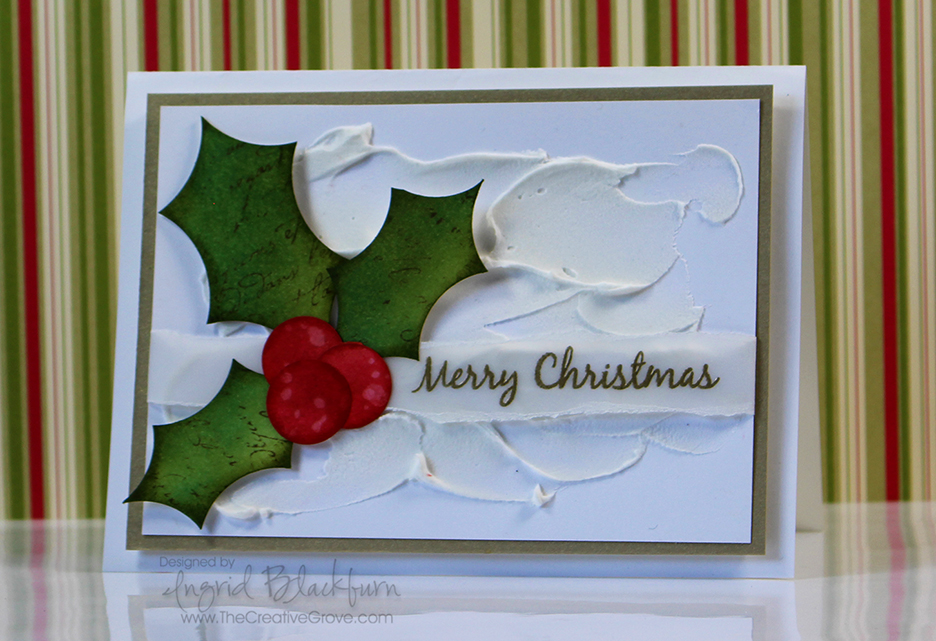
This month at Happy Little Stampers there is a new Christmas Challenge and I thought you would like to get a little creative with some DIY Holly since that’s the theme – Holly! You will have SO much fun making this project – it’s different, has great texture, and is by far one of my favorite Christmas Cards I’ve made all year.
If you’ve visited my blog before, it’s no secret that I love to create Christmas Cards all year long. Even before being on the design team for HLS! Once I started entering Christmas Challenges a few years ago, I started to send out different cards to all my friends and loved ones. I had always mass produced one or two designs be fore, but I LOVE sending unique individual cards out!
Gone are the days of mass production for me, and it’s kind of nice not having that big work day/week looming over my shoulders. One of the fun processes I go through is picking which card for which person – it’s a tough one sometimes, but the cards speak to me…I know I must sound nuts. If you do this, I’d love to know in the comments that I’m not alone!
Well, onto the cool tutorial and video – yes, of course there’s a video!
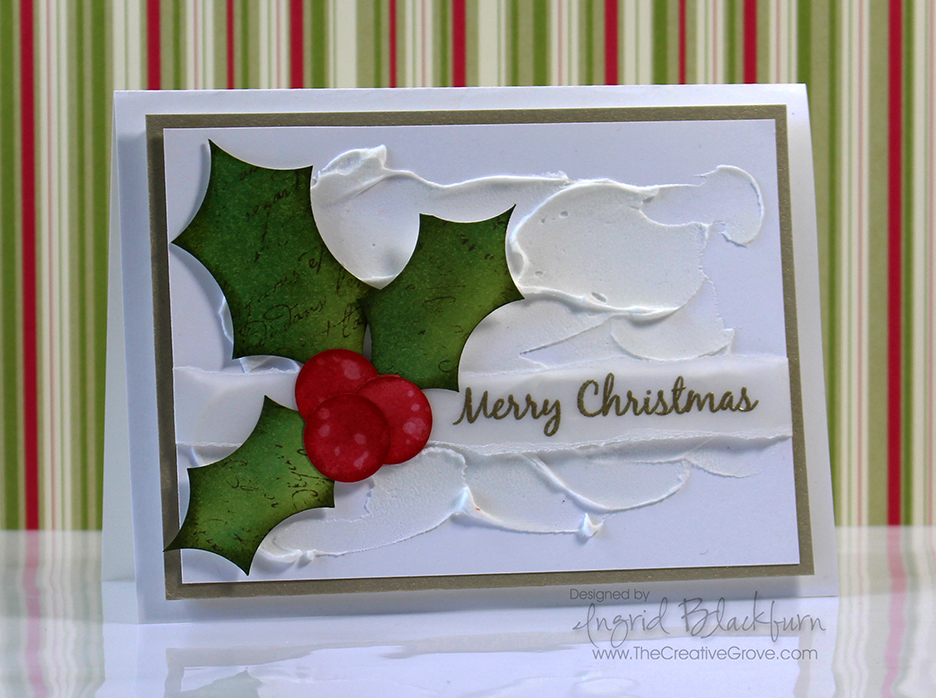
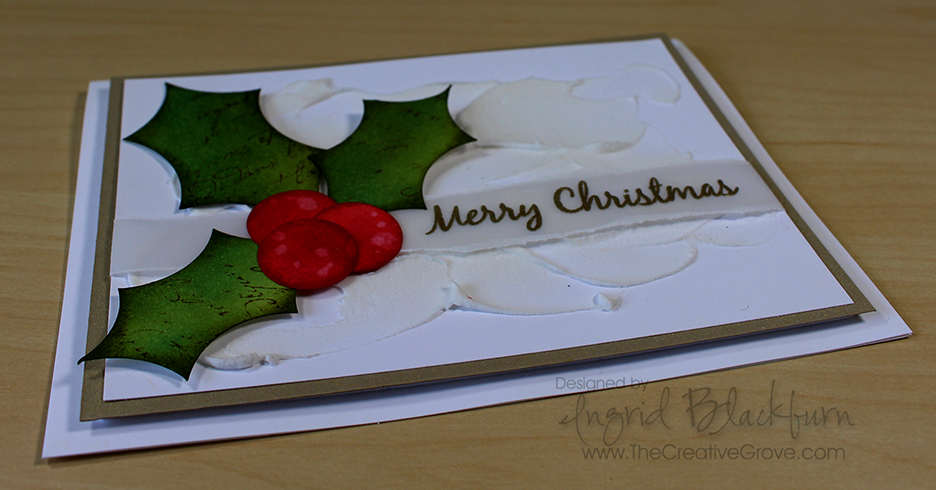
I broke out the embossing paste for this project – and used it in an unconventional way. I usually use it with stencils, but for this project, I just thought I’d slather it on – and what a cool look! Here’s the video – I know it’s a bit longer than my normal tutorials, but it’s jam packed with how to’s, tips and lots of various techniques – so enjoy!
So what did you think? Here are a few Creative Tips for you as well. Be sure to play along with us at the Happy Little Stampers Christmas Challenge.
Did you know…HLS put out their own stamps just recently? The sentiment I used on my project is from the Mixed Christmas Sentiments set – it’s awesome – high quality photopolymer that stamped beautifully. (And no, I didn’t get it for free – I paid for it – so that’s an honest opinion!)
Creative Tips –
- To get an abstract look with the embossing paste – use a rounded short palette knife. This way you can easily slather it on allowing it to create a random look. It spreads like buttercream frosting.
- When sponging your scrap pieces for your embellishments, don’t worry about getting it perfectly blended. The rough edges of the sponge tool and random spots will give you great texture in your holly leaves.
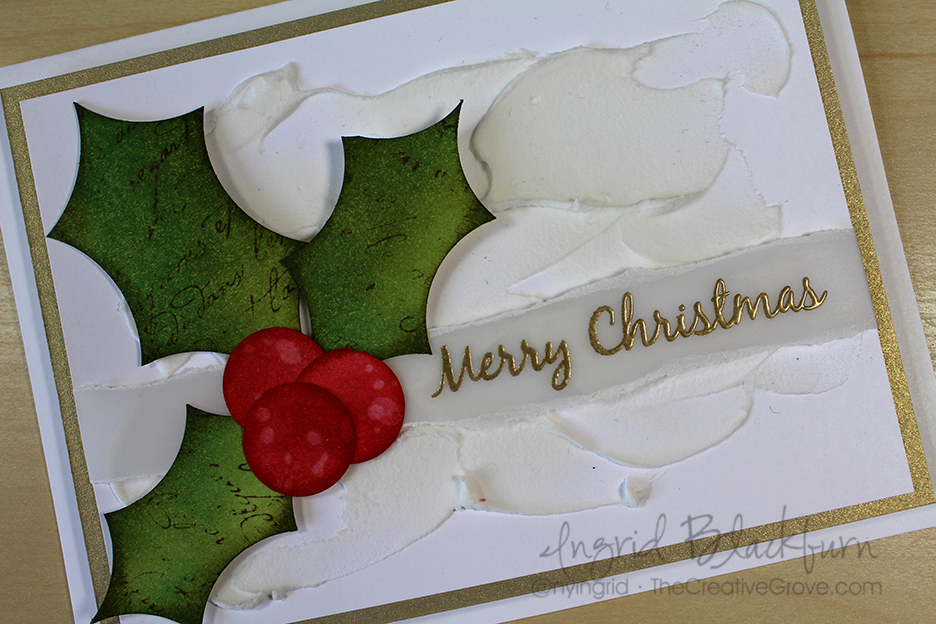
- Try using different colors to get depth in your leaves and berries
- Leaves – Mowed Lawn, Peeled Paint, Pine Needles, Forest Moss (edge)
- Berries – Worn Lipstick, Festive Berries, Barn Door, Fired Brick (edge)
- To create the layered torn edge, tear a piece of vellum card stock towards you – tearing away puts the texture on the back.
- Use liquid glue to get the pieces to stick to unfriendly surfaces like vellum and embossing paste.
- To create your holly leaves – use circle punches – larger are a bit easier. Create your top point as in the video, and continue around the edge.
- Add water spots to your berries by adding water to your hand then flicking or dripping it onto your distress piece just as in the video. Distress works with water and it creates an amazing look – perfect for the berries.
- The wider base makes it easier to glue your leaves together. You won’t see it with the berries over it.
- Be sure to edge your berries and leaves – it helps to create a border that gives you a little interest.
- To pop up the entire panel, use fun foam to keep it up through the mail – it’s rather large and that will help ensure you get the same effect once the card is delivered.
Dimensions –
- Card Base – White card stock 4 1/2 x 6″
- Card Front:
- White – 3 3/4 x 5 3/8″
- Brushed Gold Matte – 4 1/8 x 5 5/8″
- Vellum Card Stock – 1 1/2 x 8 1/2″
- White scraps :
- Leaves – one at least 2 1/4″ wide the other 2″ wide strips
- Berries – at least 1″ wide strip
Overall, this projects has lots of techniques in it. They are all simple and that’s what I love about this card so much – it’s clean and simple style with all that white space. Creating your own embellishments is also a great accent – adding little touches like different shades, edging, water spots and partially stamped script just gives your pieces dimension and character.
I hope you join me and the talented design team over at Happy Little Stampers for a great Holly Christmas Challenge!
I thought I’d enter this card in another fun challenge – Merry Monday for their holly challenge this week. Must be a holly week! 🙂
I can’t wait to see what YOU create!

[optin_box style=”13″ width=”500″ alignment=”center” action=”https://www.aweber.com/scripts/addlead.pl” disable_name=”Y” method=”post” email_field=”email” email_default=”Enter your email address” integration_type=”aweber” double_optin=”Y” list=”3846012″ name_field=”name” name_default=”Enter your first name” name_required=”Y”][optin_box_field name=”headline”]If you enjoyed this tutorial…[/optin_box_field][optin_box_field name=”paragraph”]PHA+4oCmeW914oCZbGwgbG92ZSBvdXIgPGVtPjxzdHJvbmc+PHNwYW4gc3R5bGU9ImNvbG9yOiAjMjQ0YzVlOyI+ZnJlZTwvc3Bhbj4gPC9zdHJvbmc+PC9lbT5zdWJzY3JpYmVyIG9ubHkgdmlkZW8gc2VyaWVzLiDCoExlYXJuIG5ldyB0ZWNobmlxdWVzIHRocm91Z2ggb3VyIDxzcGFuIHN0eWxlPSJjb2xvcjogIzI0NGM1ZTsiPjxlbT48c3Ryb25nPmV4Y2x1c2l2ZTwvc3Ryb25nPjwvZW0+wqA8L3NwYW4+Q3JlYXRpdmUgVGlwcyBlLWxldHRlcsKgYW5kIHN1YnNjcmliZXIgb25seSB2aWRlbyBhbmQgcHJvamVjdCB0dXRvcmlhbHMhPC9wPgo=[/optin_box_field][optin_box_field name=”privacy”][/optin_box_field][optin_box_field name=”top_color”]undefined[/optin_box_field][optin_box_button type=”1″ text=”Send me exclusive tips!” text_size=”32″ text_color=”#000000″ text_bold=”Y” text_letter_spacing=”0″ text_shadow_panel=”Y” text_shadow_vertical=”1″ text_shadow_horizontal=”0″ text_shadow_color=”#f6fefb” text_shadow_blur=”0″ styling_width=”50″ styling_height=”19″ styling_border_color=”#000000″ styling_border_size=”1″ styling_border_radius=”6″ styling_border_opacity=”100″ styling_shine=”Y” styling_gradient_start_color=”#a3b640″ styling_gradient_end_color=”#80902c” drop_shadow_panel=”Y” drop_shadow_vertical=”1″ drop_shadow_horizontal=”0″ drop_shadow_blur=”1″ drop_shadow_spread=”0″ drop_shadow_color=”#000000″ drop_shadow_opacity=”50″ inset_shadow_panel=”Y” inset_shadow_vertical=”0″ inset_shadow_horizontal=”0″ inset_shadow_blur=”0″ inset_shadow_spread=”1″ inset_shadow_color=”#80902c” inset_shadow_opacity=”50″ location=”optin_box_style_13″ button_below=”Y”]Send me exclusive tips![/optin_box_button] [/optin_box]