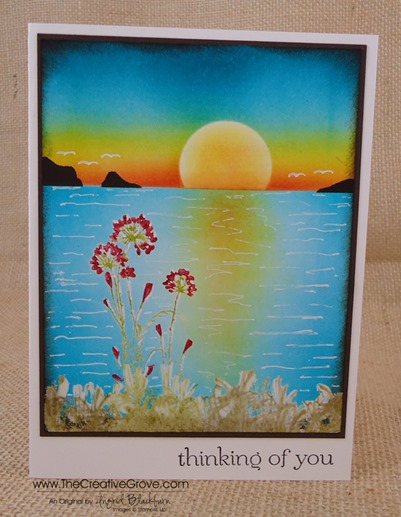
Into the Sunset with Serene Silhouettes

Today is about color.  I have to admit, I struggled with a project today…let’s just say that I can procrastinate with the best of them if I put my mind to it, how about you?  This is why I usually create between the hours of 5 and 9 am!  Well, if this is the result of a little procrastination every now and then, I guess it’s not that bad!  Today I focused on starting with three of the retiring colors as no other stamp set struck me with inspiration.  So it’s all about River Rock, Bashful Blue and Riding Hood Red today.

Once I knew what colors wanted, I went looking for inspiration on Pinterest and I happened to see a card with Serene Silhouettes and the rest is shall we say history.  Thankfully this stamp set isn’t going away, and I thought, humm….it’s been a few weeks since I whipped out my brayer.  I’m sure my friend and CG Crew member Amy has been wondering if my brayer got locked up in a drawer somewhere…she and I seem to text each other a new brayer project we’ve created almost every week it feels like…lol!

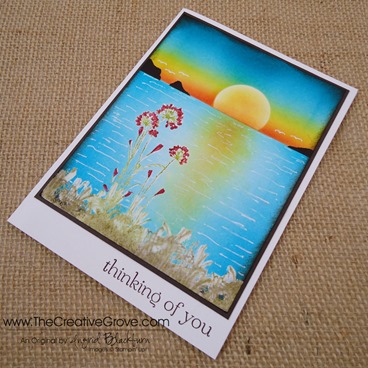
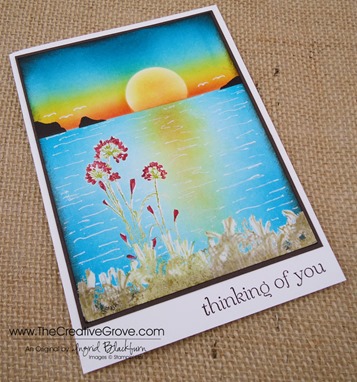
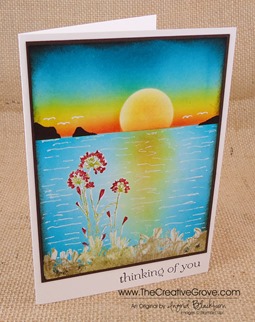
As I sat in front of my blank piece of 5.5” x 4.25” Whisper White paper, I thought of my Dad.  I grew up in San Francisco and we had a view of the Pacific Ocean from my house.  I’m lucky, I’ve seen my fair share of amazing sunsets over Ocean Beach.  And on a good day, you can even see the Farallon Islands in the distance.  My dad used to always tell us stories about the firemen who would dive for abalone there in the shark infested waters.  This card is paying homage to my roots back home in San Francisco, California.  The grass in the sand dunes, gorgeous blue waters, an amazing sunset and sea gulls flying around with islands in the distance.   Here’s to you Dad, I miss seeing you more often, I’m thinking of you and hope your day is filled with beauty like this!

Creative Tips –

  • I started out by stamping my main image in Versamark and then coloring it with all retiring colors – Lucky Limeade, River Rock and Riding Hood Red with Classic Ink Pads and Stampin’ Write Markers.  (They’ll be gone for good on June 3rd – if even available still)
  • I then embossed my image in Crystal Clear Embossing Powder. 
  • I repeated the grass portion of the same stamp set several times along the bottom. Serene Silhouettes 001 Bottom Angle
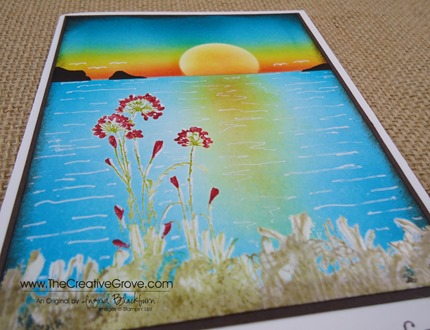
  • Once my stamped images were cooled and set, I masked my horizon and began to brayer my ocean in Bashful Blue.  I went across in a horizontal motion and then focused from the left and then the right in a vertical motion, leaving my middle a bit white.
  • I went over it with Tempting Turquoise to brighten it up a bit and then focused on the horizon line both with my brayer and a sponge.
  • I switched my mask and placed a sun on my paper under my mask in the area where the sun sinks into the water. 
  • I brayered the top 2/3 of my sky, in this order, with Bashful Blue, Tempting Turquoise and hit the very top with Island Indigo.
  • I layered Daffodil Delight next with my brayer from the horizon to the blue to create a little pop of yellow.  Where it met the Bashful Blue it created that pop of green that you get.  Serene Silhouettes 001 CU Sunset
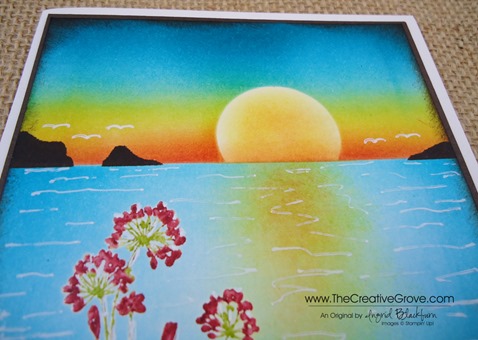
  • I intensified my color with a Daffodil Delight sponge in a circular motion.
  • I added a hint of Tangerine Tango first with a brayer and then with a little sponging from the horizon.
  • My final color is Riding Hood Red just at the horizon line to add a little drama and intense orange color right at the horizon.
  • I removed all my mask and sponged a little color into my sun with Daffodil Delight and then just a hint of Tangerine Tango.
  • I lightly sponged some Daffodil Delight in the water where I left the white area.  I didn’t over do this as I didn’t want it to turn green from the Bashful Blue.  If you don’t leave enough whitish space, you will get too much green – remember yellow and blue make green.  I followed up with a hint of Tangerine Tango.Serene Silhouettes 001 Front
  • I created a mask of two islands and sponged them in using Early Espresso.
  • For my finishing touch, I used a White Gel Pen to create my seagulls & water ripples .  Finally, I used Early Espresso and a sponge to frame my card.

I hope you love this card as much as I do.  I just love sunsets, who doesn’t!  We’ve had some amazing ones here in Florida this week, maybe I just have them on the brain!  I hope your evening is filled with beauty today.  I’d love to hear from you – let me know if you whip out your brayer and give some creative scenery a try! 

Hands on Creative Scenery Classes

If you’re in the Orlando area on June 21st, I will be teaching Creative Scenery 101!  For more information on this fun class click here.  If you would like me to come to you directly, contact me – I’m up for traveling to teach these classes!  Be sure to check back here for the online version of this class later this month as well. Smile

To Shop 24/7 in the Creative Store – Click here!

Serene Silhouettes 001 Side


Stamp Sets – Serene Silhouettes (127324c, 132073w), Sweet Essentials (126455w, 126457c) Ink – Versamark (102283), Tempting Turquoise (126952), Island Indigo (126986), River Rock (126977), Daffodil Delight (126944), Tangerine Tango (126946), Riding Hood Red (126968), Red Riding Hood Marker (119701 – Regals Marker Collection)  Paper – Whisper White (100730), Early Espresso (119686)  Cool Tools – Stamping Sponges (101610), Brayer (102395), Blender Pen (102845), VersaMarker (retired), Clear Embossing Powder (109130), Heat Tool (129053), 1” Circle Punch (119868)  Finishing Touch – White Gel Pen (105021)
Simply Sketched Sneak Peek

Simply Sketched 001 Main

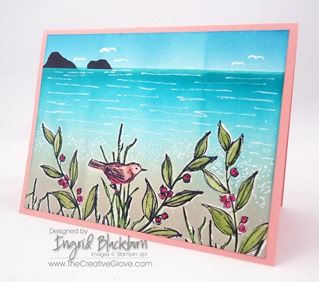
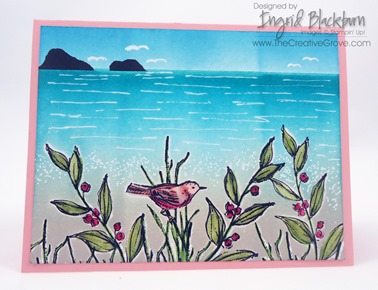
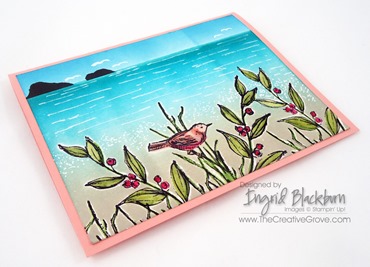
I love making creative scenery cards with my brayer.  And what better way to give you a sneak peek into the next catalog (goes live May 31st!), than to do a creative Bermuda Scene using one of the new exclusive hostess stamp sets – Simply Sketched.

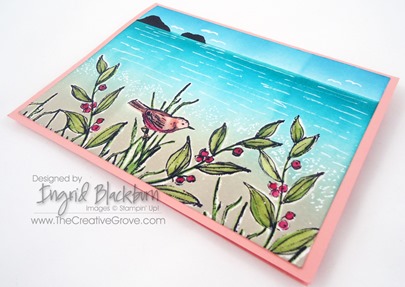
Here I used two stamps – the bird on the grass and the berry/leaf branch.  I wanted to use some of the new 2013-2014 In Colors, so I settled on a daytime Bermuda scene.  I hope you love this card as much as I do!

Simply Sketched 001 Front

Creative Tips:

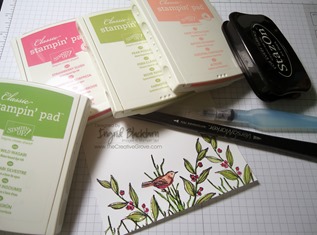
  • I settled on a primary color combination – the new In Colors – Crisp Cantaloupe and Coastal Cabana.  I then pulled in Strawberry Slush (new), Pear Pizazz, Wild Wasabi, Baked Brown Sugar (new), Tempting Turquoise, Bermuda Bay, Soft Sky, Cherry Cobbler and Early Espresso.Simply Sketched 001 AB
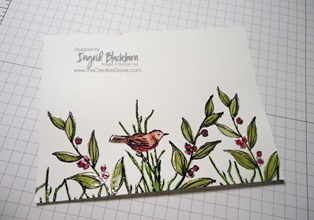
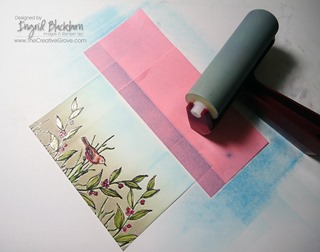
  • I began by stamping my scene in Jet Black StazOn.  I colored my scene using the Aqua Painters and the Classic Ink Pads in various colors.  I then embossed it in crystal clear so that I could brayer directly over top. Simply Sketched 001 AA
  • To create the sandy beach I used Sahara Sand.  I wanted to keep it light and Crumb Cake would have been a little too dark.  I thought a beach scene would be a nice way for the stamped images to pop on the neutral background.
  • I then brayered my water after masking off my horizon.  I used a foundation of Tempting Turquoise, then Coastal Cabana and finally Bermuda Bay. Simply Sketched 001 AC
  • For my sky, I used Soft Sky – which to my surprise was a little bluish gray, so I added a little pop of Tempting Turquoise to brighten it up.
  • I masked my islands in Early Espresso and added my water movement and foam in our Uniball White Gel Pen.  Simply Sketched 001 Side
  • One of my birds got a little thick unfortunately and there really wasn’t a way to fix it, so I have a little fat seagull…lol!
  • I usually sponge the edges in a dark color and I would have used Early Espresso if I did that, but I wanted to keep it nice and light on the Cantaloupe, so I left the edge clean.

Overall, I think the card is light and fun.  I matted my scenery onto Crisp Cantaloupe because it really gave it a Bermuda feel.  This is the type of card you would learn to make in my Creative Scenery 102 class or 200 level classes.  Be sure to sign up for my creative tips mailing list at the right to be sure you are getting the latest information about classes in the Orlando area and my online classes.   If you are interested in hosting a weekend of brayer classes in your area – be sure to contact me – I do travel!

Learn Online!

If you loved this card – be sure to check out my in depth step by step video online class for how to create scenes just like this one!  Check out brayer classes here – Brayer 101   Brayer 102  and save huge with the Bundled Classes here

Are you getting my Exclusive Video Series?

Be sure to sign up for my Creative Tips Newsletter and get the latest Creative Grove news in addition to my free Creative Techniques Video Series!  Don’t miss out on our creative community – the only way to get this exclusive content is to sign up in the box on the upper right or click here.

Signature-Snowflake-001_thumb1_thumb

To Shop 24/7 in the Creative Store – Click here!

Simply Sketched 001 Angle

Stamp Sets – Simply Sketched (129672c, 129669w)  Ink –Sahara Sand (126976), Crisp Cantaloupe (131176), Strawberry Slush (131178), Baked Brown Sugar (131174), Pear Pizazz (131180), Soft Sky (131181), Cherry Cobbler (126966), Coastal Cabana (131175), Bermuda Bay (131171), Tempting Turquoise (126952), Early Espresso (126974), Jet Black StazOn (101406), Wild Wasabi (126959) Paper – Whisper White (100730), Crisp Cantaloupe (131298) Cool Tools – Brayer (102395), Stampin’ Sponges (101610), Versamarker, Clear Embossing Powder (109130), Heat Tool (129053), Aqua Painter (103954) Finishing Touch – Uniball White Gel Pen (105021)

Ciao Baby from St. Barts

St Barts Columbier Point

Ciao from St. Barts!  I’m loving my trip through the Caribbean, and thought I’d pull a little inspiration for this month’s featured RemARKable Stamp Set Blog Tour from my actual surroundings today here on St. Bart’s in the French West Indies.  I’m sure you enjoyed your creative inspiration on Linda’s blog Ink Stamp and Scrap and are ready for a little brayer and sponging creativity.

blogtour-stampmonth-Mar

When I thought about what to do for today’s Blog Tour, the first thing that sprang to mind was the word Ciao.  In Europe that could be hello or goodbye, so it was entirely appropriate for my project today.  I’m saying hello from the French West Indies and goodbye to St. Barts as we’re on our way to St. Maarten.  Here is a little of what I did today.

Gouverneur Beach St Barts

Today, I spent the day on Gouverneur Beach on the south side of St. Barts.  This was the most highly recommended beach by every local we spoke to, and it was quite an experience driving there.  The narrow roads that wound around the island at several steep points was so worth every frightful turn as we ended up here.  This is my inspiration photo for my card today.  I hope you love it as much as I enjoyed making it.

Ciao Baby 001 Main

Creative Tips:

  • I brayered River Rock and Crumb Cake for my sand and used a sponge for the contouring.
  • I brayered Tempting Turqoise and Island Indigo for my Caribbean Sea.  I used a sponge for contouring and spotlighting.
  • My sky was done out of Tempting Turqoise and Baja Breeze.
  • For the land, I masked two islands in Crumb cake, Soft Suede, Old Olive and Gumball Green.

  • I used a Garden Green Marker for the shrubbery.
  • I used a White Gel Pen to create my foam, clouds, seagulls and water movement.

Ciao Baby 001 PortA little St. Barts with some luxury inspiration in the backdrop – mega yachts!

  • St. Barts is a luxury French island with unbelievable white sand beaches, and luxury properties as a playground for the rich and famous – it’s a literal who’s who and who has the biggest yacht here.  To capture that spirit I used the Ciao Stamp and matching punch (a SAB freebie – get yours while you still can!).  I stamped it in Early Espresso and adhered it to an Island Indigo banner.

Ciao Baby 001 CU Banner

  • I blinged up my banner which I cut with a 1” Square punch.

Brayering cards like this are little pieces of artwork.  I encourage you to sign them like I did, with the year and location.  My card is sitting in my stateroom and I’m going to leave it for my Stateroom attendant at the end of my cruise with a tip.

Ciao Baby 001 CU

I hope you enjoyed my brayering piece today.  I loved my inspiration just as much as I do this little work of art.  Enjoy Melissa’s creative inspiration on her blog http://www.stampinup.net/blog/2089191.  See you next week for the 25th Anniversary Blog Tour or next month for another featured stamp set!

blogtour-stampmonth-next

Signature Snowflake 001

Ciao Baby 001 Angle

Ciao Baby 129648S


Mojo Monday By The Tide Brayer Scenery

I have been making creative scenery cards with my brayer for days now.  I am happy to say I’ve become one with my brayer (my inky fingers, not so much)!  This past weekend I taught my first Creative University series classes and we made the most amazing projects.  So, naturally this morning when I saw the Mojo Monday sketch, I picked up my brayer and had to create this lobster scene.  I hope you like it! To learn more about my University Class series click here

Mojo280Sketch

Creative Tips:

  • I first stamped my lobster on Whisper White cardstock in StazOn Jet Black ink.  Then colored it in using an aqua painter and my Real Red ink pad.  I added some detail with my Red Riding Hood marker and then embossed the image in Clear Embossing Powder using a VersaMarker.
  • I began by brayering my water in Tempting Turquoise and then Island Indigo.  I created the horizon line with a post it note and sponging more inks along the edge.

  • To create the foam in the water, I used a white gel pen.
  • To create my sand, I used Crumb Cake and Soft Suede.  I then edged the entire image and each panel of the card with Soft Suede.
  • My color highlights for this card are Red Riding Hood – I love that sash!
  • I used a scallop border punch for the bottom in Red Riding Hood.
  • To get the script perfectly aligned, I used my trusty Stamp-a-Majig.  I just LOVE that thing. 


  • To create my banner, I used a 1” square punch and my go to saying set – Sweet Essentials.  I popped it up on dimensionals and the Round Nantucket Coin. 
  • Of course, for a finishing touch, I pierced the upper corners using my Essentials Paper-Piercing Pack and my Ergonomic Paper Piercer – if you haven’t tried it, you don’t know what you’re missing.  It’s literally the best $3.95 I ever spent!  And that’s saying a lot, since I already had 6 paper piercers! My finger never gets that painful flat spot when doing a lot of paper-piercing anymore.
  • Brayer Tip #1: To properly clean your brayer – use baby wipes – it’s the best way to get all the ink properly off the roller!
  • Brayer Tip #2: Be sure to roll the edge of your brayer off from time to time – ink loves to collect there, and that’s when you get those awful lines.

I hope you love this card as much as I do.  I was waiting to create just this scene when I saw this stamp in the new Spring Mini Catalog

Signature Snowflake 001

To Shop 24/7 in the Creative Store – Click here!

Stamp Sets – By the Tide (129120c, 129117w), Sweet Essentials (126455w, 126457c) Ink – StazOn Jet Black (101406), Tempting Turquoise (126952), Island Indigo (126986), Crumb Cake (126975), Soft Suede (126978), Real Red 126949, Red Riding Hood Marker (119701 – Regals Marker Collection)  Paper – Whisper White (100730), Island Indigo (122923), Crumb Cake (120953), Soft Suede (115318), Riding Hood Red (111348)  Cool Tools – Stamping Sponges (101610), Brayer (102395), Stamp-a-Majig (101049), Aqua Painters (103954), VersaMarker (retired), Clear Embossing Powder (109130), Heat Tool (129053), White Gel Pen (105021), Scallop Border Punch (119882), 1” Square Punch (124094), 1” Circle Punch (119868)  Finishing Touch – Stampin’ Dimensionals (104430), Essentials Paper Piercing Pack (126187), Stampin’ Pierce Mat (126199), Paper-Piercing Tool (126189)

Mojo Monday Swallowtail Elegance

I have been dying to use this stamp!  I saw the Mojo Monday sketch early this morning, and just had to get the Swallowtail background stamp out.  I knew I wanted to color it in, rather than just stamp it on a piece of colored cardstock, so I went the whole way with the card.  I have to admit, I struggled a bit with this card this morning.

Mojo278Sketch

As you can see, the sketch called for a square or circle card, I just couldn’t stay in those shapes, I tried and tried…and then finally forgave myself and pushed the height of the card up a bit.  I love the end result and I think you’ll love my process in getting to this beautiful finish.

Creative Tips:

  • I purchased the clear mount Swallowtail stamp by accident.  I forgot that this was a background stamp – those I usually like getting in wood mount because I only stamp them upside down, so why not have it’s own block each time?  I was surprised to find that I liked it on my clear block – so I saved a little money!
  • I find that it is too hard to use a stamp this large in the traditional sense.  Place your stamp up (rubber up) and lay your cardstock on top.  Use a piece of scrap paper to cover and then your hand to transfer the image to it by rubbing over your paper gently.  You’ll get a better image every time!

  • I embossed the Swallowtail stamp in Basic Black Craft Ink and Clear Embossing Powder.  I wanted to have a defined black that helped keep my coloring in its place.
  • I started out wanting to use a 3.5”x3.5” piece of Ultra Smooth Whisper White card stock, but it wasn’t large enough to show the butterfly image, so I chose a 3.5” x 4” piece instead. This caused the dilemma for me with the square size, and I just needed to push the final card size to 5.5” x 6”.  I’m going to make my own envelope using the Diagonal Simply Scored Plate. You can get this free right now during Sale-a-brationClick here to find out how.

  • I used my bone folder to flare the banner flags out a bit.  Be sure not to have adhesive on the exposed portion to do this.
  • To finish my card, I added a little Paper-Piercing using the Essentials Paper-Piercing Pack and Stampin’ Mat. When I do this, I like to pop that panel up with Stampin’ Dimensionals so you can see the color through the pierced holes.
  • Since the Swallowtail image was so large, I wanted a good sized knot.  I chose a retired Satin Ribbon in coordinating Chocolate Chip.

I really love the end result.  I’ve really been on a brayer kick lately with my Creative University series classes coming up next month.  We’re going to feature Brayering Creative Scenery in February.  So here are a few simple brayer tips for you:

  • Be aware of how you are storing your brayer.  The roller should never rest on a flat surface (Including putting it back in the box!).  It will take on the flat shape and you will have a difficult time getting a smooth look.  If that’s happened – you may just need to splurge for another brayer – don’t worry, they’re only $12.50!
  • Most important tip I can give you – Start off your paper and end off your paper.  When you start or end on your paper, that’s when you get those harsh lines.
  • If you are having a problem with lines – check the edges of your brayer.  When you cleaned it, did you roll out the edges too?  Probably not!  Ink can build up on the edge of your roller as well.  That’s the usual culprit!

Online Brayer Class

Do you want to learn how to make creative scenery cards?  Try our Brayer 101 – Introduction to Creative Scenery online class.  You’ll learn how to master this technique using a brayer to create unbelievable scenes that will leave you feeling like an artist.  Find out more here.

Signature Snowflake 001

To Shop 24/7 in the Creative Store – Click here!

Stamp Sets – Swallowtail (129216c, 129213w), Kindness Matters (122902c,122900w)  Ink –Pool Party (126982),  Chocolate Chip (126979), Black Craft Pad (102192), Summer Starfruit Marker (2013-2014 Collection) (126856), Tangerine Tango Marker – Brights Collection (119702),  Island Indigo (126986)  Paper – Whisper White (100730), Pool Party (122924), Chocolate Chip (102128), Sycamore Street (Sale-a-bration FREE item) Cool Tools – Stamping Sponges (101610), Brayer (102395), 1” Square Punch (124094), 1” Circle Punch (119868), Essentials Paper-Piercing Pack (126187), Paper-Piercing Tool (126189), Stampin’ Pierce Mat (126119), Clear Embossing Powder (109130), Blender Pens (102845) The Perfect Finish – Pearl Basic Jewels (119247), Stampin’ Dimensionals (104430), Chocolate Chip Satin Ribbon – retired

Swallowtail Stamp 129216Lnew stamp

By The Tide Underwater Scene

When I first opened up my Spring Mini Catalog – I immediately focused in on this set – By the Tide.  I have to say I was waiting to make this card.  I wanted to create an underwater scene and this card did not disappoint.  This set is super easy to use, and I just love the coral stamp.  It’s a big stamp, so I mostly only use a partial image, but I love the texture of the coral branches.  This card is loaded with tips, and techniques.

Creative Tips:

  • My concept was an underwater world.  To get that effect I started sponging Daffodil Delight in the center surrounded by Lucky Limeade.
  • I then brayered Pool Party and Tempting Turquoise adding more of the same color with a sponge as I needed it.  I finished by adding a little Marina Mist with a sponge on the edges to create a little depth of darkness.
  • Brayer Tip – be sure to start off and end off your paper.  Work lightest to darkest.  If you want to master this technique – check out my Creative University Series Brayer Class here.
  • The school of fish are stamped in Midnight Muse along with the Coral.
  • I found that it was easier to add the lead fish first and work backwards.

  • My greeting originally said Happy Birthday Wishes and is from the set Petite Pairs.  I removed the W from wishes with a blender pen – it’s perfect for that small omitting item.  I replaced it with and F from Simply Serif Mini Alphabet using a Stamp-a-Majig to perfectly place it.
  • I used the script stamp in the By the Tide set (love those kind of stamps) and free hand stamped it.  But if you are worried about lining it up just perfectly – use a Stamp-a-Majig!

  • My card is a traditional size A2 card and the creative underwater scenery is 5.5” x 2”.  I used a 1/16” white mat for the scenery to pop it off my Pool Party card base.
  • I made thirty of these cards.  I found it was easier to leave the strip in a 5.5” x 4” size, do all my sponging and brayering and then cut it in half.  Why do twice the work?!

This was a fun project that my team – The Creative Crew, made at our last Creative Gathering.  Everyone loved seeing the Magic – as they described it, happen as the underwater scene unfolded.  I hope you try it and I know you too will fall in love with underwater scenery!  If you too would love to join The Creative Crew at a Creative Gathering, or join us online, click here to find out more!

If you live in the Orlando, Florida area and you would like to learn how to create amazing scenery first hand, I’m offering a Creative University series class around Brayering Creative Scenery.  For more information, click here.

SignatureSnowflake001_thumb1

To Shop 24/7 in the Creative Store – Click here!

Stamp Sets – By the Tide (129120c, 129117w), Petite Pairs (122497c,122495w) Simply Serif Mini Alphabet (126360w) Ink –Pool Party (126982),  Tempting Turquoise (126952), Daffodil Delight (126944), Lucky Limeade (126984), Marina Mist (126962), Midnight Muse (126860)  Paper – Whisper White (100730), Pool Party (122924),  Cool Tools – Stamping Sponges (101610), Brayer (102395), Stamp-a-Majig (101049)

By The Tide 129120L