Using a Variety of Supplies

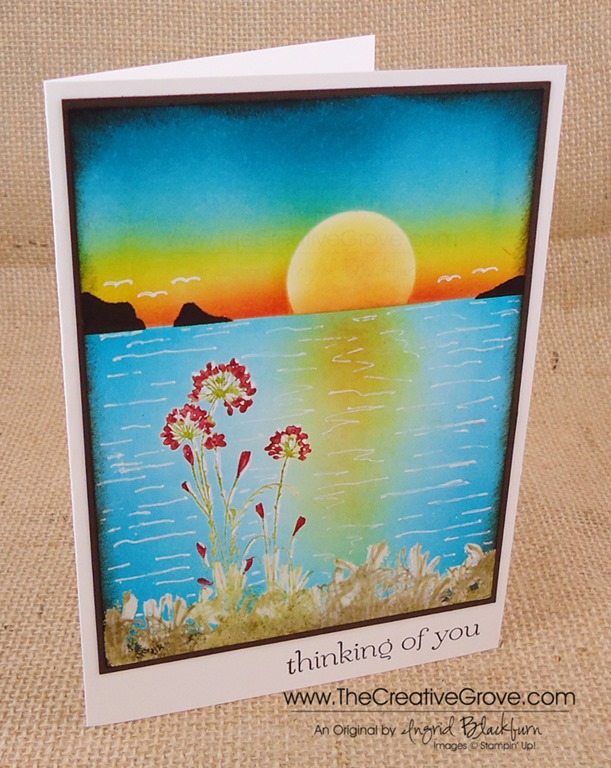
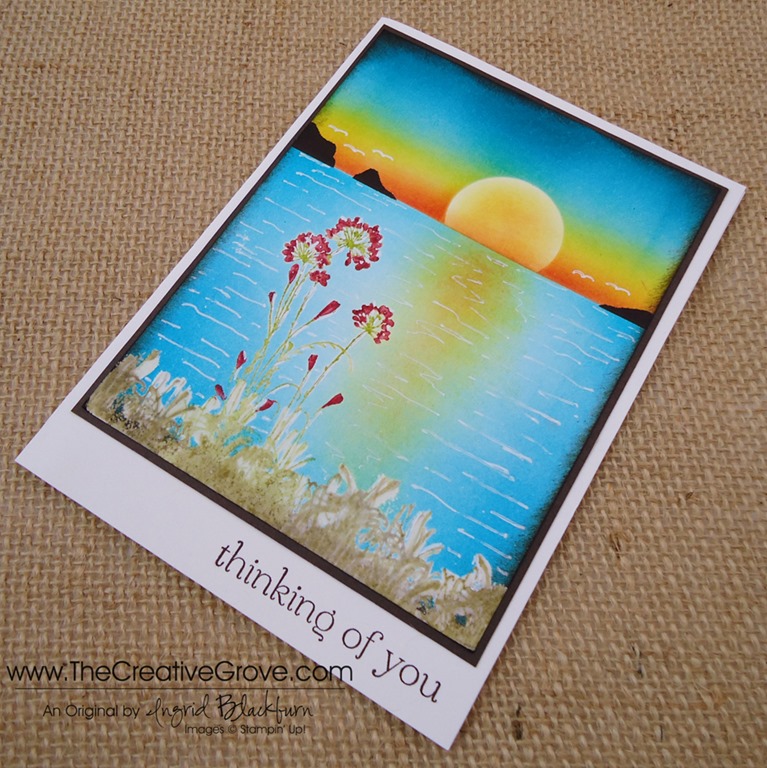
Diversity is always great in artistic supplies.  Today I wanted to share a card with you that uses a variety of companies.  After all, do ALL your clothes come from the same store?  Probably not.  So, along with that theory, here is a colorful scene that uses Stampscapes Images, Marvy  and Adirondack Dye based inks and a Signo White Gel Pen.  This scene is a re-creation of one done by Kevin Nakagawa from Stampscapes

Misty Forest Buck (3)

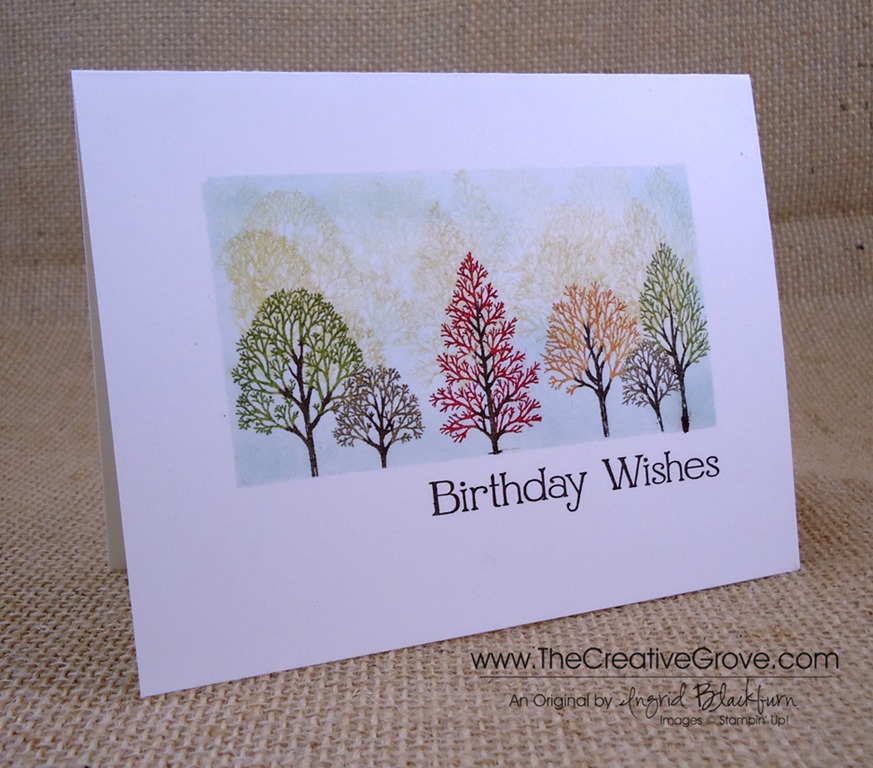
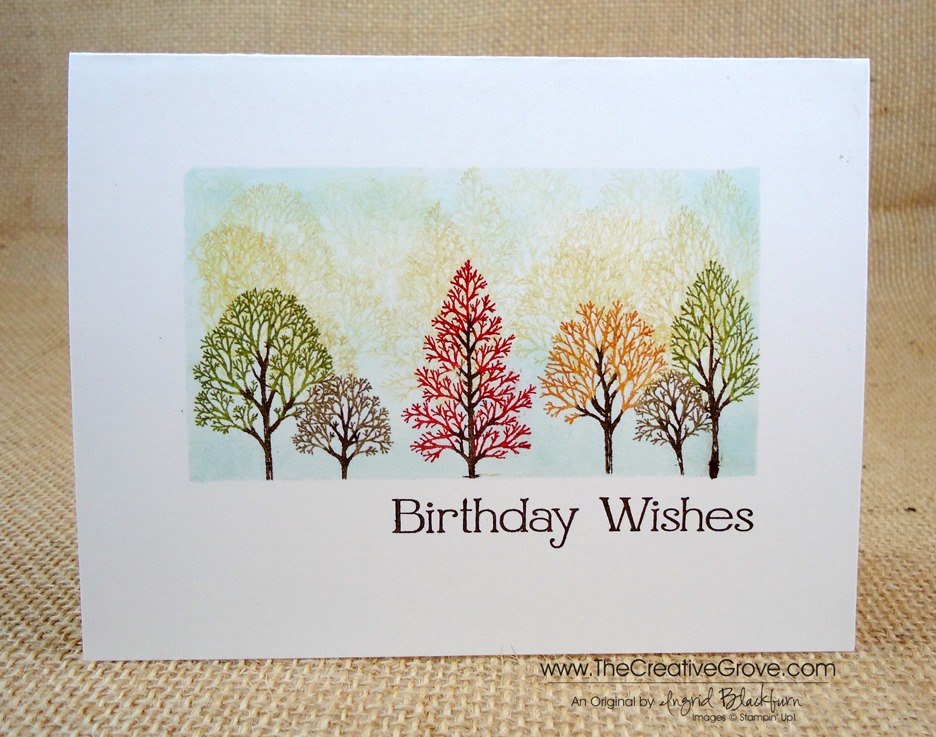
This misty forest scene makes me want to go hiking!  To get the sweeping motion of the ink carried across the cardstock, you will need a Colorbox Stylus which has sponge applicators.  You can find this tool in almost any craft store.  It does take a little getting used to and be sure to use a light touch.  But when using the stylus tool, you have to have the right inks. 

While I love my Stampin’ Up! inkpads, they tore up my sponge tips with this technique.  Which, I’ll be honest – will frustrate you and you’ll need new tips!  Stampin’ Up’s fast drying edge is great for clean and simple stamping, but not for this technique.   What you need, is the right ink – a wetter dye based ink like the Marvy Matchables or Adirondack Ink Pads.  Both of these have a wetter saturation and work better with the stylus tool and glossy cardstock. 

Note – Marvy has discontinued several of their colors of ink pads here in the US (just a few months ago), so if you come across them – nab them up!  Not to worry, the reinkers are not being discontinued, so you’ll have access to the full color spectrum for their markers (which let’s be honest – ROCK!) and you can always use the reinkers just like paints, which is great for this technique.

Misty Forest Buck (2)

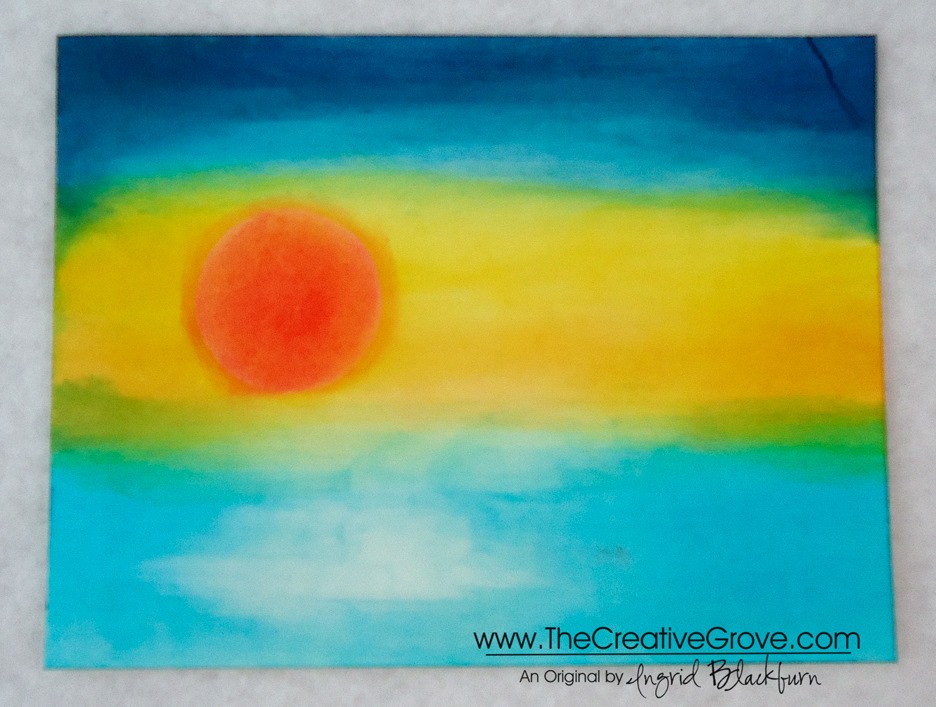
To stamp the images first, use a black that sets well without bleeding – I use Memento Tuxedo Black Ink.  It’s the best non-bleed ink I’ve come across.  Then create your under layer with your lighter tones first.  Remember, you can always darken any scene up, you can’t however make it lighter.  It’s the same theory in painting.  Get your undertones first. 

Once I have my scene set up, I can add highlights and contrasts using darker colors.  I framed my scene here using darker blues, greens and browns.  Leaving some light can be hard – I have to admit, one of my challenges – but I promise, you’ll love that contrast at the end – so resist, resist, resist!  For finishing touches, you’ll want to use white pigment ink and a q-tip to create the fog.  The highlights were made with a white gel pen. 

Misty Forest Buck (1)

The depth in this card captivates you.  the light in the sky balances the darkness.  It really seems like the beginning or end of an old movie – you know and the dark circle opens or closes the scene?  I hope you enjoyed it!  Now go have fun with all your supplies!

Personal Note – thanks to so many of you emailing me lately!  I have to admit I haven’t been stamping too much lately due to an injury to my right thumb which affected my right wrist.  Of course I’m right handed – and it’s just doesn’t work with my left hand!  No matter how hard I try. Smile  This also kept me off the computer for any long sort of typing.  The angle has been tough – including using a mouse.  So, after a lot of trying to work my way through it, I actually had to take a real break to recover!  Not so easy. 

Thankfully, I’ve been back in the studio and even trying some other artistic mediums that aren’t as much pressure on my thumb and wrist – like painting!  It’s been therapeutic to be creative again!  I’ve only been able to watch stuff online and make sketches and notes on projects and upcoming classes.  Thanks for stopping by today, I look forward to seeing you around the grove for more.

Signature Snowflake 001

Products Used:

Adirondack Ink Pads  Colorbox Stylus Tool Marvy Matchables  Signo White Gel Pen

Warmth and Wonder: Just out of the woods

Warmth & Wonder Christmas Brayer Card 008

Today, I wanted to make a simple Creative Scene using advanced Brayer techniques and the Holiday Hostess Set Warmth and Wonder.  I have to confess, I slept in today.  Usually I start Mojo Monday at 5 am, that’s what time the sketch goes up!  So as I began to wake up and saw the sketch, I knew this would take me a while.  I’ve been dying to make this card, and today’s sketch was perfect for it!

Many of you have wondered how to make amazing scenes like this.  They look so simple, but actually aren’t.  They involve many different techniques and steps, but every person can make this card – regardless of your stamping ability.  In our classroom, we have a few Brayer classes that teach you step by step with precise videos to help bring the inner artist out in each of you.  The advanced class is in pre-release, save $10 until 10/24 here.  Similar Brayer Cards:

      Evergreen 003 005Plant Hope 002 Side

I needed a custom size card and envelope for this card.  I didn’t want the creative scene to be too small.  So I started out by deciding how big my scene should be and built my card around that.  With the Envelope Punch Board I can make any size envelope I need, so I didn’t have to worry about that!  What a stress relief!  Click here for a quick video on how to make a custom sized envelope.  Here’s the Mojo Monday sketch and my project.

            Warmth & Wonder Christmas Brayer Card 011Mojo316Sketch

Creative Tips –

  • Create the scene using Early Espresso, Always Artichoke, Soft Sky and Marina Mist, embossing powders, masks, a brayer and some sponges.  You will want to pop it up on dimensionals to help set it apart from the rest of the card.Warmth & Wonder Christmas Brayer Card 013
  • Sponging the various pieces of the card tied it together.  Sponging the creative scene draws the reader into it.
  • The background was sanded using the Stampin’ Sanding System in a random fashion. 
  • The circle was cut out with the Circle Collections Framelits – it’s the 3rd largest.Warmth & Wonder Christmas Brayer Card 014
  • To get the diagonal stripe on the vellum, use the Stylish Stripes Embossing Folder.
  • The ribbon is Soft Sky 1/2” Seam Binding Ribbon Warmth & Wonder Christmas Brayer Card 020
  • The little banner flags are made with paper from the Winter Frost Designer Series Paper Stack and the hexagon punch.  View a video to see how to make banner flags here
  • It was hard to figure out how to incorporate a greeting.  You don’t want to take away from the scene too much, so a simple banner with a greeting from this very set brought out to the circle worked well.Warmth & Wonder Christmas Brayer Card 007
  • Here is the card height so you can see the height of the various elements.
    Warmth & Wonder Christmas Brayer Card 010
    If you’d like to learn how to use your brayer along with many other tools to create little works of art like this one, check out all the classes we have.  We even have a bundle here at a huge savings!
    Have a creative day!
    Signature Snowflake 001

Shop 24/7 in the Creative Online Store – click here

Tropical Sunset Stampscape

Stampscapes 002 006

If you hadn’t noticed, I love creating sunset scenery.  Today I have a tropical sunset using a great image from Stampscapes.  This is the perfect birthday card for someone who would love a little of the tropics to escape to.  For me – I’m sending this to my mom for her Birthday this week.  I know she’ll love it.

I worked on glossy paper with a colorbox sylus tool for this scene and Stampscapes 002 008

Creative Tips –

    • I used the now retired Stampin’ Up! glossy paper as my base.
    • To keep my paper wet so that my stylus could move a bit better, I worked in sections.
    • I gave the middle of my paper a good coat of So saffron in the middle, followed by Daffodil Delight and Crushed Curry.  I had masked the sun, so I had a white sun when done.
    • Next I layered a small amount of Tangerine Tango towards my horizon line.  Stampscapes 002 002
    • I created my sun first with a light coating of Crushed Curry followed by Real Red.  I worked my stylus just outside the white lined border to not have such a defined line, but have that white outline that you see in the sun.
    • For my sea, I began with a light coat of Soft Sky.
    • Next I layered Pool Party, Bermuda Bay and a little Tempting Turquoise into my water in a streaking motion.  I kept a little white area off to the left just below the sun.
    • For the sky I started with Soft Sky, followed by Tempting Turquoise, Marina Mist and Island Indigo.Stampscapes 002 010
    • I stamped my tropical island, birds and water texture stamp in Black.  I wanted the island in a particular spot, so I used a Stamp-a-Majig to position my stamp.  Of course I dropped it as I lifted it, so I had to stamp it twice since on the glossy, the Black ink was still wet and smeared.  I was able to save the image!
    • I used a White Gel Pen to accent my trees and water.

 Stampscapes 002 008

My colored base was so pretty – I almost didn’t want to stamp on it!  Something unexpected happened to me – This scene made me want to paint.  So I have a feeling the more I do these types of scenes on paper – the more I will definitely venture into the art of painting.  Do any of you paint?  If so, what is your favorite medium?Stampscapes 002 007

Try our Online Brayer Class

Creative Scenery classes using a brayer have by far been my biggest hit with stampers.  Learn how to create gorgeous gradual transitions with 100+ minutes of step by step detailed video instruction teaching you how to master this technique.  The end result – You will feel like an artist.  Best of all, you will look at your stamps in a whole new way, and try things you never would have thought to do before.  Find out more here

Signature-Snowflake-001_thumb1


[optin_box style=”14″ alignment=”center” action=”http://www.aweber.com/scripts/addlead.pl” disable_name=”Y” method=”post” email_field=”email” email_default=”Enter your email address” email_order=”1″ integration_type=”custom” double_optin=”Y” name_default=”Enter your first name”][optin_box_hidden][/optin_box_hidden][optin_box_code]

[/optin_box_code][optin_box_field name=”headline”]If you enjoyed this tutorial…[/optin_box_field][optin_box_field name=”paragraph”]PHA+PHNwYW4gc3R5bGU9ImNvbG9yOiAjNjQ2MzVlOyI+TGV04oCZcyBzdGF5IGluIHRvdWNoISBNeSBvY2Nhc2lvbmFswqA8L3NwYW4+PHNwYW4gc3R5bGU9ImNvbG9yOiAjNjY2Njk5OyI+PHN0cm9uZz48ZW0+ZXhjbHVzaXZlPC9lbT48L3N0cm9uZz7CoDwvc3Bhbj48c3BhbiBzdHlsZT0iY29sb3I6ICM2NDYzNWU7Ij5DcmVhdGl2ZSBUaXBzIGUtbGV0dGVyIHdpbGwgdGVhY2ggeW91IHRvIG1ha2UgcHJvamVjdHMgdGhhdCB5b3UgbG92ZeKApjwvc3Bhbj48L3A+Cg==[/optin_box_field][optin_box_field name=”privacy”][/optin_box_field][optin_box_field name=”top_color”]undefined[/optin_box_field][optin_box_button type=”0″ button_below=”Y”]Send me exclusive tips![/optin_box_button] [/optin_box]

Stampscapes 002 009

Stamp Sets – Four You (130538c, 130535w), Stampscapes Stamps Ink – Memento Tuxedo Black, Soft Sky, Pool Party, Tempting Turquoise, Bermuda Bay, Marina Mist, Island Indigo, So Saffron, Daffodil Delight, Crushed Curry, Tangerine Tango, Real Red, Versamark Paper –Glossy White,Whisper White, Tangerine Tango Tools – Colorbox Stylus Finishing Touch – Black Embossing Powder, Signo White Gel Pen


Fall One Layer Wishes

Have you ever tried creative depth with Lovely as a Tree, or any nature stamps? I was in a simplicity mood this morning.  I love color and the mountains.  When I think of the mountains, I’m reminded of when I lived in Utah and California.  The scenery was so beautiful, and it really put me at peace.  So this morning, I wanted to create a Fall Foliage scenery on a one layer card.

I grabbed my Lovely as a Tree stamp set and went to work.  It took me three cards to get the right result, but I’m happy with it!  Here is the result!

If you love the look of this stamp set – be sure to check out my online brayer class too!

Lovely as a Tree OLC tutorial – 

    • First I cut out a mask leaving a 3/4” border on the top, left and right.
    • I inked up my six tree stamp in Crushed Curry, stamped it off and then stamped it three times filling the top 2/3 of the frame.  When inking my stamp, I did not ink up the bottom grass and trunks.  You can do this with a marker or your ink pad.Lovely as a Tree004 CU
    • I lightly sponged Soft Sky to create my rectangular frame, being sure to focus a bit heavier on the outline than the middle.  I filled in the bottom 1/3 before stamping my main image.
    • To color my main image, I used Stampin’ Write Markers.  I first colored my trees, then my trunks in Early Espresso.
    • For my Greeting, I used the Four You stamp set – I LOVE this set.

Lovely as a Tree004 Main L

It’s a simple card, but I love the color.  It makes me feel like I’m looking out at a scene in the Uinta mountains in Utah.  I hope you like it too!

Lovely as a Tree004 Angle


[optin_box style=”2″ alignment=”center” email_field=”email” email_default=”Enter your email address” email_order=”2″ integration_type=”aweber” double_optin=”Y” list=”3846012″ name_field=”name” name_default=”Enter your first name” name_order=”1″ name_required=”Y” opm_packages=””][optin_box_field name=”headline”]Learn with our exclusive FREE video series[/optin_box_field][optin_box_field name=”paragraph”]PHA+R2V0IHRoZSBmcmVlIENyZWF0aXZlIFRpcHMgRS1sZXR0ZXIgYW5kIGxlYXJuIHdpdGggc3Vic2NyaWJlciBleGNsdXNpdmUgdmlkZW8gYW5kIHBpY3RvcmlhbCBjb250ZW50LiBJbmNsdWRpbmcgb3VyIHllYXJseSAxMiBEYXlzIG9mIENocmlzdG1hcyBzZXJpZXMgJmFtcDsgdGhlIHZpZGVvIGZvciB0aGlzIHByb2plY3QhPC9wPgo=[/optin_box_field][optin_box_field name=”privacy”][/optin_box_field][optin_box_field name=”top_color”]undefined[/optin_box_field][optin_box_button type=”0″ button_below=”Y”]Get Access Now![/optin_box_button] [/optin_box]

Evergreen Snowy Hillside

Evergreen 002 Main

I was feeling in an Evergreen tree mood this morning.  I wanted to create a hilly snow scene since we’re having another scorching hot day here in Florida today.  Sometimes you just want to feel the cold!  I hope you like my little piece of mountain heaven.

Did you know that there are six holiday stamp sets that you won’t find in our physical catalog, but rather online only.  Be sure to check out stamps that are available only online too! Check out our exclusive online stamps here 

Creative Tips –

  • I stamped the large Evergreen solid image in various heights using a torn mask for my hillside.  First I stamped in Versamark ink and then I alternated between Wild Wasabi and Pear Pizazz. 
  • Once I had my skyline done I wanted two larger trees up close that I could decorate.  I tore another mask and stamped two Wild Wasabi Trees.Evergreen 002 Side
  • To give my trees a glossy look and protect them from the brayer, I embossed all my trees in Clear Embossing powder.
  • I used the skyline mask and brayered over my trees in Soft Sky and Marina Mist. 
  • To accentuate the ridge, I used the reverse mask to sponge a light edge for the snow. Evergreen 002 Trees
  • To create the snow drifts, I used the same mask, but alternated it’s direction.
  • For my tree decorations, I used Pearl Basic Jewels.Evergreen 002 Banner
  • I used my new Hexagon Punch for the perfect banner end with my greeting.  My greeting is also stamped in Versamark and Cherry Cobbler.  This way it really pops when embossed with Clear Embossing Powder.

It’s a simple little card, but cute.  I love the wintery feel of it and I could easily mass produce these for the holidays!

Signature Snowflake 001

To Shop 24/7 in the Creative Store – Click here!

Evergreen 002 Angle

Stamp Sets – Evergreen (127973), Greetings of the Season (128033) Paper – Whisper White (107330), Crumb Cake (120953) Ink – Wild Wasabi (126959), Pear Pizazz (131180), Soft Sky (131181), Marina Mist (126962), Versamark (102283) Cool Tools – New Heat Tool (129053), Clear Embossing Powder (109130), Brayer (102395) The Perfect Finish –Stampin’ Dimensionals (104430), Pearl Basic Jewels (119247)

Evergreen 127973LGreetings of the Season 128033L

Into the Sunset with Serene Silhouettes

Today is about color.  I have to admit, I struggled with a project today…let’s just say that I can procrastinate with the best of them if I put my mind to it, how about you?  This is why I usually create between the hours of 5 and 9 am!  Well, if this is the result of a little procrastination every now and then, I guess it’s not that bad!  Today I focused on starting with three of the retiring colors as no other stamp set struck me with inspiration.  So it’s all about River Rock, Bashful Blue and Riding Hood Red today.

Once I knew what colors wanted, I went looking for inspiration on Pinterest and I happened to see a card with Serene Silhouettes and the rest is shall we say history.  Thankfully this stamp set isn’t going away, and I thought, humm….it’s been a few weeks since I whipped out my brayer.  I’m sure my friend and CG Crew member Amy has been wondering if my brayer got locked up in a drawer somewhere…she and I seem to text each other a new brayer project we’ve created almost every week it feels like…lol!

As I sat in front of my blank piece of 5.5” x 4.25” Whisper White paper, I thought of my Dad.  I grew up in San Francisco and we had a view of the Pacific Ocean from my house.  I’m lucky, I’ve seen my fair share of amazing sunsets over Ocean Beach.  And on a good day, you can even see the Farallon Islands in the distance.  My dad used to always tell us stories about the firemen who would dive for abalone there in the shark infested waters.  This card is paying homage to my roots back home in San Francisco, California.  The grass in the sand dunes, gorgeous blue waters, an amazing sunset and sea gulls flying around with islands in the distance.   Here’s to you Dad, I miss seeing you more often, I’m thinking of you and hope your day is filled with beauty like this!

Creative Tips –

  • I started out by stamping my main image in Versamark and then coloring it with all retiring colors – Lucky Limeade, River Rock and Riding Hood Red with Classic Ink Pads and Stampin’ Write Markers.  (They’ll be gone for good on June 3rd – if even available still)
  • I then embossed my image in Crystal Clear Embossing Powder. 
  • I repeated the grass portion of the same stamp set several times along the bottom. Serene Silhouettes 001 Bottom Angle
  • Once my stamped images were cooled and set, I masked my horizon and began to brayer my ocean in Bashful Blue.  I went across in a horizontal motion and then focused from the left and then the right in a vertical motion, leaving my middle a bit white.
  • I went over it with Tempting Turquoise to brighten it up a bit and then focused on the horizon line both with my brayer and a sponge.
  • I switched my mask and placed a sun on my paper under my mask in the area where the sun sinks into the water. 
  • I brayered the top 2/3 of my sky, in this order, with Bashful Blue, Tempting Turquoise and hit the very top with Island Indigo.
  • I layered Daffodil Delight next with my brayer from the horizon to the blue to create a little pop of yellow.  Where it met the Bashful Blue it created that pop of green that you get.  Serene Silhouettes 001 CU Sunset
  • I intensified my color with a Daffodil Delight sponge in a circular motion.
  • I added a hint of Tangerine Tango first with a brayer and then with a little sponging from the horizon.
  • My final color is Riding Hood Red just at the horizon line to add a little drama and intense orange color right at the horizon.
  • I removed all my mask and sponged a little color into my sun with Daffodil Delight and then just a hint of Tangerine Tango.
  • I lightly sponged some Daffodil Delight in the water where I left the white area.  I didn’t over do this as I didn’t want it to turn green from the Bashful Blue.  If you don’t leave enough whitish space, you will get too much green – remember yellow and blue make green.  I followed up with a hint of Tangerine Tango.Serene Silhouettes 001 Front
  • I created a mask of two islands and sponged them in using Early Espresso.
  • For my finishing touch, I used a White Gel Pen to create my seagulls & water ripples .  Finally, I used Early Espresso and a sponge to frame my card.

I hope you love this card as much as I do.  I just love sunsets, who doesn’t!  We’ve had some amazing ones here in Florida this week, maybe I just have them on the brain!  I hope your evening is filled with beauty today.  I’d love to hear from you – let me know if you whip out your brayer and give some creative scenery a try! 

Hands on Creative Scenery Classes

If you’re in the Orlando area on June 21st, I will be teaching Creative Scenery 101!  For more information on this fun class click here.  If you would like me to come to you directly, contact me – I’m up for traveling to teach these classes!  Be sure to check back here for the online version of this class later this month as well. Smile

To Shop 24/7 in the Creative Store – Click here!

Serene Silhouettes 001 Side


Stamp Sets – Serene Silhouettes (127324c, 132073w), Sweet Essentials (126455w, 126457c) Ink – Versamark (102283), Tempting Turquoise (126952), Island Indigo (126986), River Rock (126977), Daffodil Delight (126944), Tangerine Tango (126946), Riding Hood Red (126968), Red Riding Hood Marker (119701 – Regals Marker Collection)  Paper – Whisper White (100730), Early Espresso (119686)  Cool Tools – Stamping Sponges (101610), Brayer (102395), Blender Pen (102845), VersaMarker (retired), Clear Embossing Powder (109130), Heat Tool (129053), 1” Circle Punch (119868)  Finishing Touch – White Gel Pen (105021)