Clean and Simple: It’s Catherine Pooler’s Stamp of Approval Love is in the Air

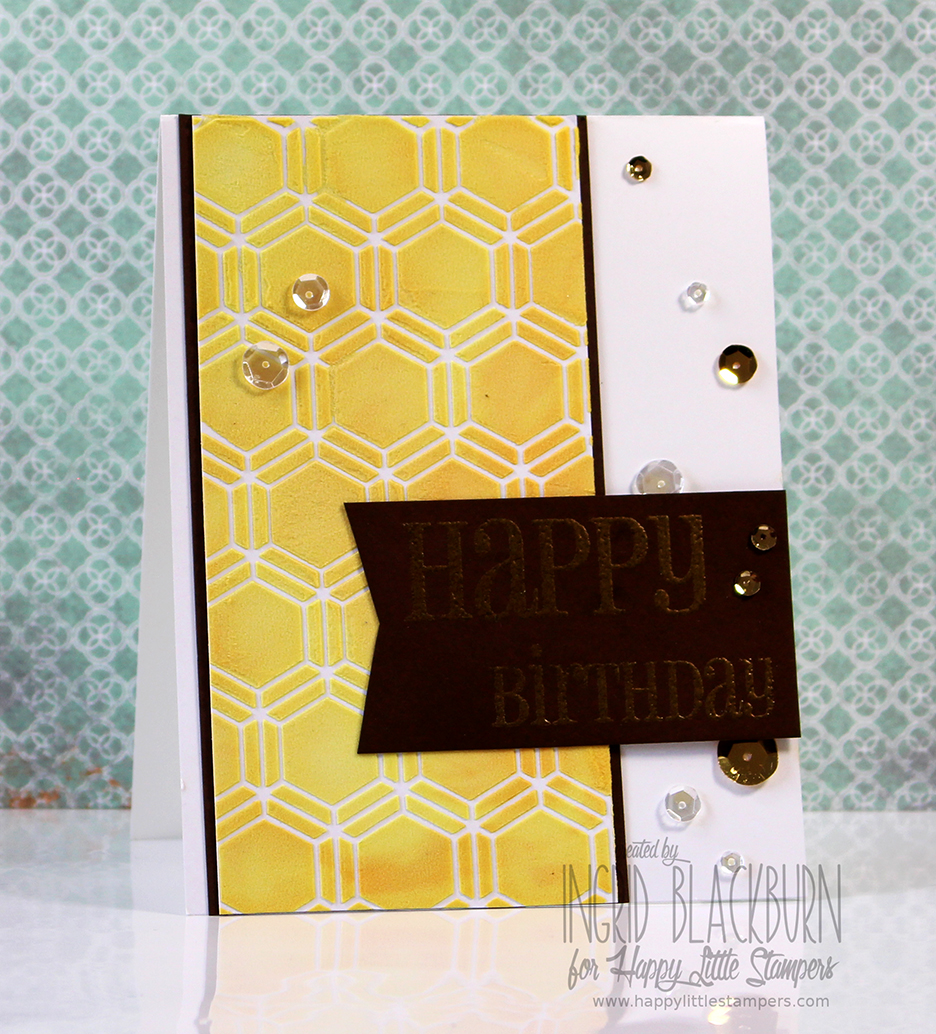
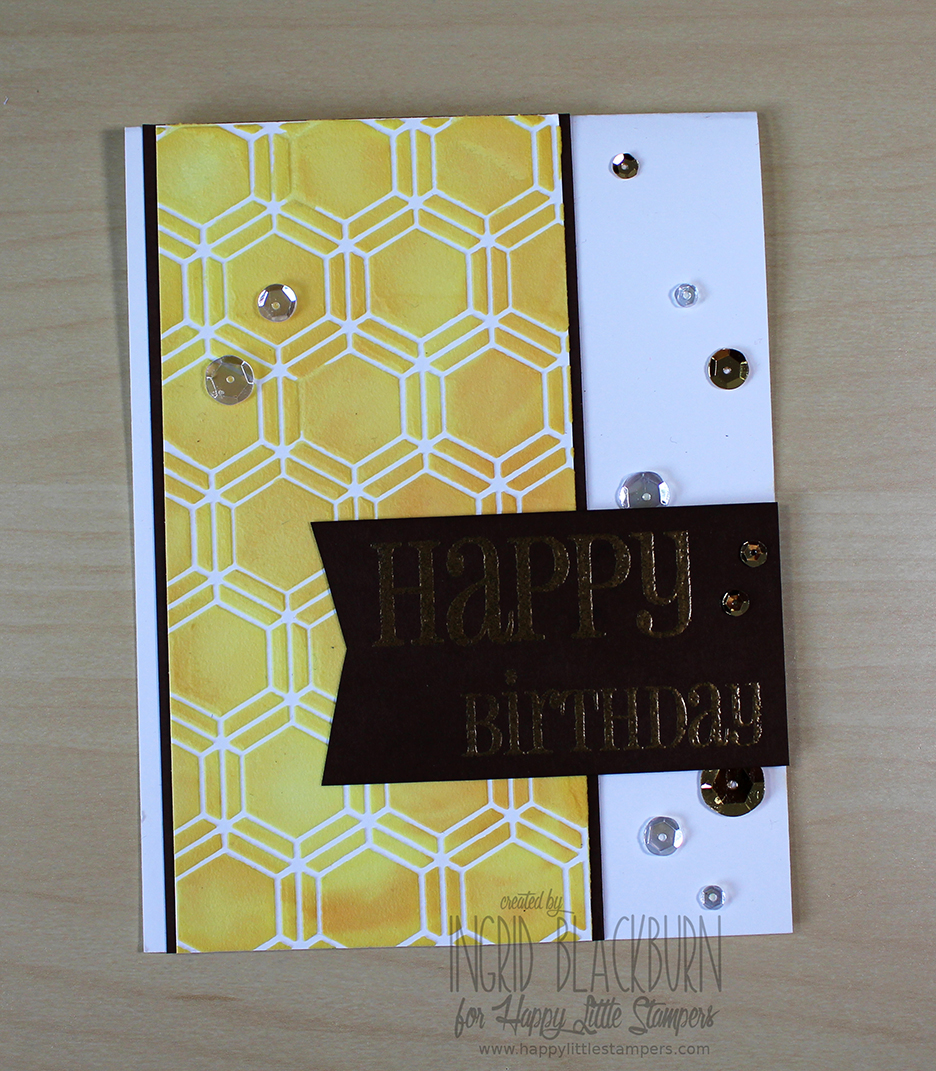
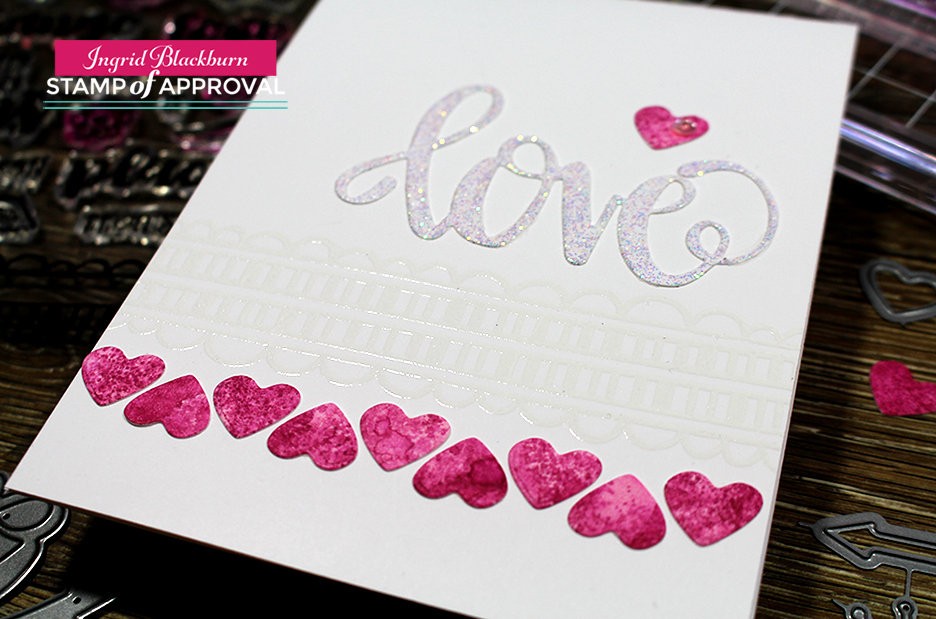
Today I have a fun clean and simple project for you using the brand new released Love is in the Air Stamp of Approval Collection! After making that fun wrinkle free watercolor piece with Catherine’s awesome ink pads in this collection the other day, I thought I’d keep using that same piece and cut out some water textured little hearts! Don’t they just look like those little message candy hearts?

The easy to use stamps, dies, mystery ink won’t be available again for 6+ months, so if you want it now, don’t miss out – it’s selling quickly! This collection was created to use together and stand alone! I’m in love with so many parts of it, to see all the pieces – hop though the three days of blog hops, and check out the videos on Catherine’s blog.

Stamp of approval catherine pooler - Ingrid Blackburn

But first – check out this fun little project and the brand new BLOCKS – check it out below.

Ingrid Blackburn - Catherine Pooler's Stamp of Approval Collection

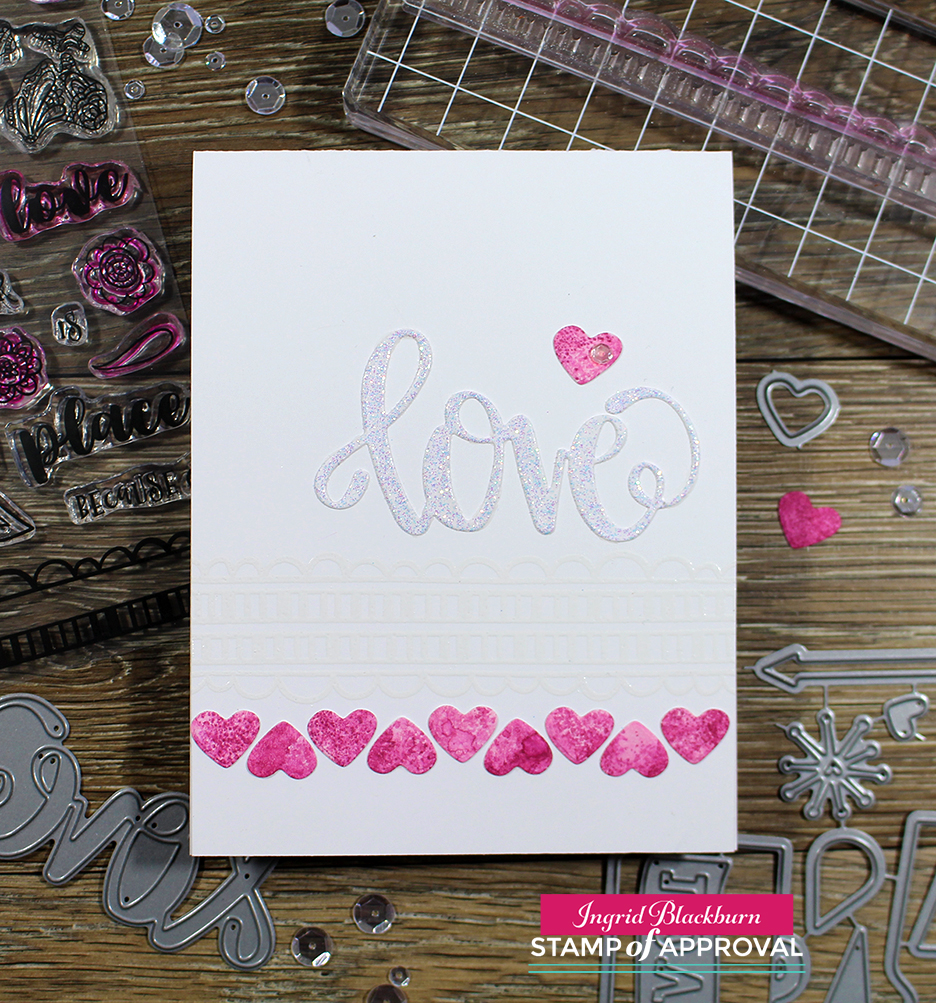
Yes, I used my favorite two border stamps from the World Awaits stamp set, and did you see the hand lettered die? Try embossing it in Wanderlust embossing powder for a truly glittery WOW look!

Aren’t those hearts just awesome! Layering them up and down gave the card a fun little feel. And those border stamps – it’s pure love! That heart was from the Bon Voyage Accoutrements Dies – an add-on accessory to the collection. Isn’t that little sequin just cute! It’s a fun little whimsical card.

Ingrid Blackburn - Stamp of Approval Love is in the Air

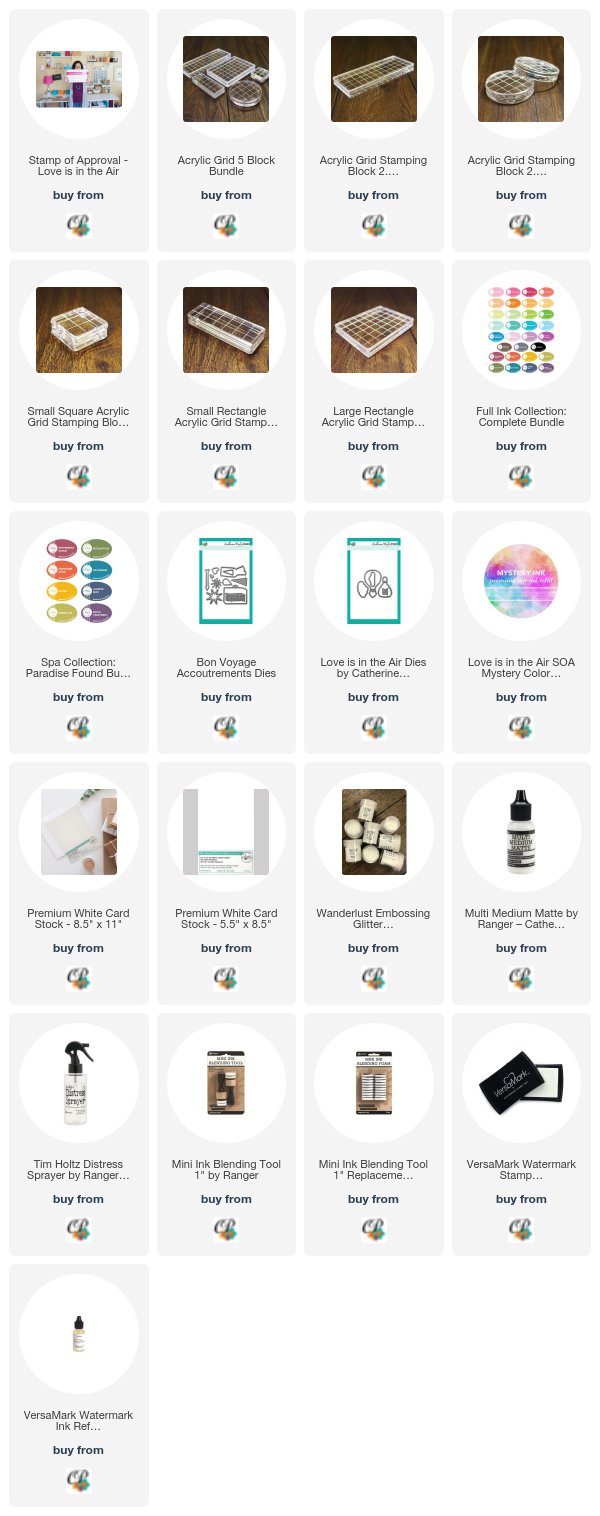
Catherine Pooler Acrylic Grid Stamping Blocks

Now, let me tell you about these blocks. I have been stamping since 1999. Granted, I mostly used wood blocks for the longest time, but just like you – I’ve used my fair share of acrylic blocks over the past 10 years.

Here’s what I look for in a phenomenal block – grip, comfort and lightweight. One of the must haves for me is a grid too. Catherine does not disappoint. These custom made exclusive designed blocks are pure heaven for me!
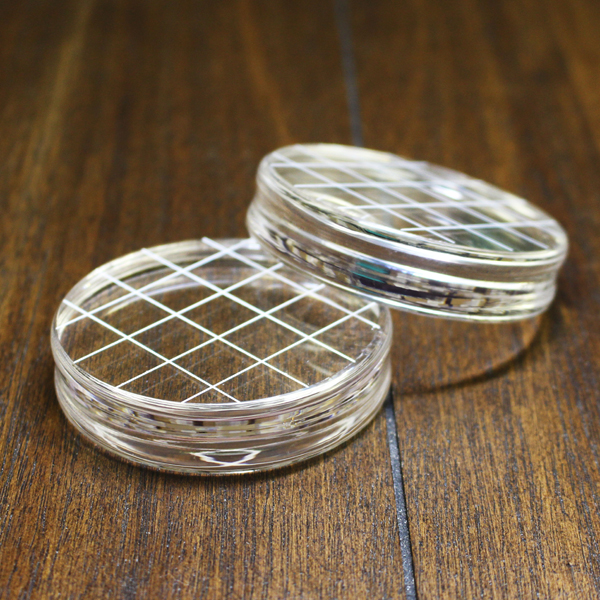
The Round Block

I have about 7 of these little guys on my desk – yes….7. I use this size the most – hands down. Now Catherine did release a round block a little over a year ago, but the grid is new. You HAVE to try it.

Acrylic Grid Stamping Block - Round

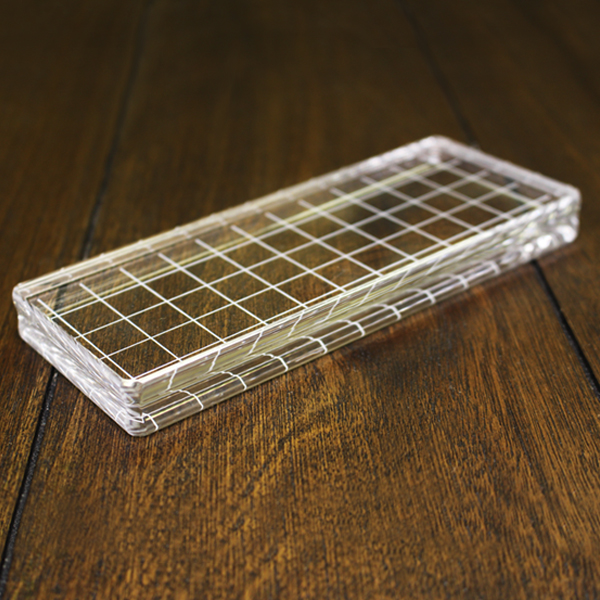
The NEW Long Rectangle Block

Did you notice those border stamps on this card? If you have stamps like that or long sentiments or even tall stamps like trees, you need this block. Let me say this again – you NEED this block. It’s the lightest one of it’s size that meets all my requirements. It’s an AWESOME block.

Acrylic Grid Stampin Block

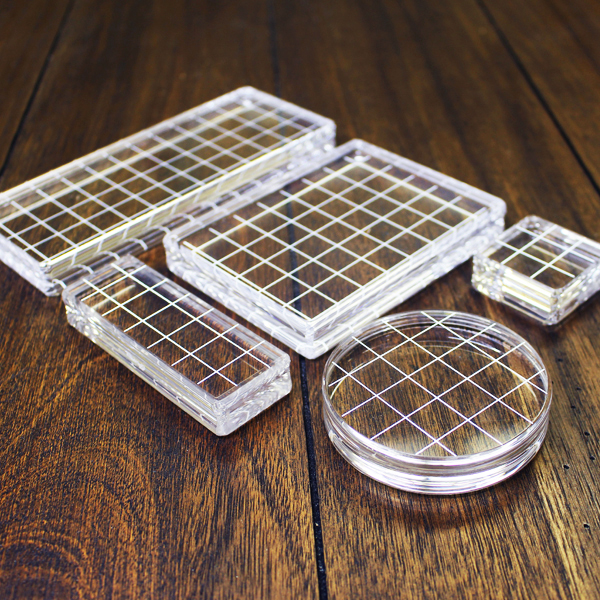
The full Catherine Pooler Acrylic Grid Stamping Block Collection

Aren’t they just pretty! That small rectangle is a unique size you won’t easily find. It’s perfect for sentiments, and the small square is awesome for small stamps. It’s easy to hold and works with all your smaller stamps. And the large rectangle is a great go to staple. Together you’ll be all set – I promise!

Acrylic Grid Stamping Block

So there you have it. New blocks, fun stamps, dies and even a mystery ink in the Stamp of Approval collection. Well, what are you waiting for? Run, don’t walk – click here to see the shop!

Not convinced? Click here to check out my other projects and hop along for three days of fun blog hop inspiration from the most talented creative team. You won’t be disappointed! But first – check out the blocks here….lol!

Till next time –


Happy Little Stampers Blog Hop

Happy Little Stampers just had their first release of stamps and to celebrate we’re having a blog hop! So this month you get a whole lot of inspiration from a brand new stamp company – Happy Little Stampers, along with 18 of my crafty friends for some great inspiration.

blog hop graphic 2

In addition to some great inspired projects, the whole lot of stamps will be given away to one commenter. And, four other randomly selected lucky commenters will win a gift certificate to the HLS store!  So as you’re hopping along, don’t forget to leave a comment!

Here’s what you do:
  • Start off by leaving a comment on the Happy Little Stampers blog, and then continue on to each Designer.
  • To be eligible for the prizes, you must comment on all the blogs in the hop.
  • The blog hop will run for one week giving you enough time to hop through and check out what the designers will be creating.
You probably arrived here from Gloria’s blog. Pretty great isn’t she?! Well, here are a few projects I made for you today. Enjoy all the creative tips!

Colored Texture Paste Birthday 001

To get this look, you’ll want to color some white embossing paste with distress inks – the piece I used for this project is actually the left over from an hombre colored project I made for one of our classes here at The Creative Grove. I ended up with a lot left over, so I quickly took my scrap paste and ran it over another stencil for an extra piece – I actually got five extra projects that way!! I just love the way the yellows blended together with the orange and the texture the embossing paste gives is awesome!

Colored Texture Paste Birthday 003

I spread it over a fun stencil by The Crafters Workshop, added a little banner using the new, great birthday set from HLS – Bold Birthday Sentiments , added a few sequins and had a quick, bright, fun project.

But I didn’t stop there…I also played around the other day with my crafty friend Amy. We broke out her silver embossing paste and ran it over my new Holly stencil from Stamplorations. I just love the fluid look of the embossing paste against the Artichoke card stock. It really pops.

Texture Holly 001

Of course the card is only made complete with the silver embossed Merry Christmas greeting. I have to admit, I can’t seem to stop using it! You’ll just HAVE to check out the new Mixed Christmas Sentiments by Happy Little Stampers – the mixed set of fonts are great.

Texture Holly 002

To add a punch to the project I wanted to use Cherry Cobbler card stock. First you’ll want to separate the two colors with a small white 1/16″ edge so that it helps to define it a bit better. Little touches like that really help to bring the project together.

And since Holly is the theme over at Happy Little Stampers Christmas Challenge, I think I’ll add this one to the gallery as well – be sure to play along too! But first….time for more creative genius…

Now hop on over to Birgit’s blog to see more inspiration!

 Don’t forget to comment to win – now hop along!! 🙂
ingrid signature

[optin_box style=”13″ width=”500″ alignment=”center” action=”https://www.aweber.com/scripts/addlead.pl” disable_name=”Y” method=”post” email_field=”email” email_default=”Enter your email address” integration_type=”aweber” double_optin=”Y” list=”3846012″ name_field=”name” name_default=”Enter your first name” name_required=”Y”][optin_box_field name=”headline”]If you enjoyed this tutorial…[/optin_box_field][optin_box_field name=”paragraph”]PHA+4oCmeW914oCZbGwgbG92ZSBvdXIgPGVtPjxzdHJvbmc+PHNwYW4gc3R5bGU9ImNvbG9yOiAjMjQ0YzVlOyI+ZnJlZTwvc3Bhbj4gPC9zdHJvbmc+PC9lbT5zdWJzY3JpYmVyIG9ubHkgdmlkZW8gc2VyaWVzLiDCoExlYXJuIG5ldyB0ZWNobmlxdWVzIHRocm91Z2ggb3VyIDxzcGFuIHN0eWxlPSJjb2xvcjogIzI0NGM1ZTsiPjxlbT48c3Ryb25nPmV4Y2x1c2l2ZTwvc3Ryb25nPjwvZW0+wqA8L3NwYW4+Q3JlYXRpdmUgVGlwcyBlLWxldHRlcsKgYW5kIHN1YnNjcmliZXIgb25seSB2aWRlbyBhbmQgcHJvamVjdCB0dXRvcmlhbHMhPC9wPgo=[/optin_box_field][optin_box_field name=”privacy”][/optin_box_field][optin_box_field name=”top_color”]undefined[/optin_box_field][optin_box_button type=”1″ text=”Send me exclusive tips!” text_size=”32″ text_color=”#000000″ text_bold=”Y” text_letter_spacing=”0″ text_shadow_panel=”Y” text_shadow_vertical=”1″ text_shadow_horizontal=”0″ text_shadow_color=”#f6fefb” text_shadow_blur=”0″ styling_width=”50″ styling_height=”19″ styling_border_color=”#000000″ styling_border_size=”1″ styling_border_radius=”6″ styling_border_opacity=”100″ styling_shine=”Y” styling_gradient_start_color=”#a3b640″ styling_gradient_end_color=”#80902c” drop_shadow_panel=”Y” drop_shadow_vertical=”1″ drop_shadow_horizontal=”0″ drop_shadow_blur=”1″ drop_shadow_spread=”0″ drop_shadow_color=”#000000″ drop_shadow_opacity=”50″ inset_shadow_panel=”Y” inset_shadow_vertical=”0″ inset_shadow_horizontal=”0″ inset_shadow_blur=”0″ inset_shadow_spread=”1″ inset_shadow_color=”#80902c” inset_shadow_opacity=”50″ location=”optin_box_style_13″ button_below=”Y”]Send me exclusive tips![/optin_box_button] [/optin_box]

CAS Embossed Tree

So have you had a chance to play along with the Happy Little Stampers new Christmas Challenge yet? If not, jump right on in! Here’s a little more quick, simple, easily mass produced inspiration for you!

This tree is simply embossed using a fun background stamp and then cut at several angles to form a few trees. You would be surprised at how quick and easy it is to mass produce these beauties.

HLS Christmas Challenge July 2015

CAS Embossed Tree July 2015 HLS

I made several versions on different neutral colored card bases. My tree is in Always Artichoke with an Early Espresso trunk. The background stamp is Dotted Fusion by Penny Black, embossed in gold.

CAS Embossed Tree 003 CAS Embossed Tree Trio

So if you’re in a pinch for a super quick, fun, very clean and simple card – this one is a winner!

Tell me which base you like the best in the comments below – I’m still undecided. And be sure to jump into the challenge fun over at the Happy Little Stampers Christmas Challenge! I can’t wait to see how you are inspired!

Signature-24-pt_thumb.jpg

CAS Non-traditional Christmas

Do you ever use non-traditional Christmas colors or images? Today’s projects were inspired from Muse: Christmas Visions. Chris Blagrave created this non-traditional flower card. Her reasoning behind it was that it reminded her of a Poinsettia. Here is mine along side her creation.

Chris Blagrave Muse Christmas Visions   One Layer Christmas Cards

I love the clean and simple style of the card, it’s crisp and straightforward. The sentiment pops and the warm silver is perfect for it.

When I look at her card, I think Peacock for some reason – maybe it’s the color and the way her flower fans out. I didn’t have a peacock image, and I didn’t want to use Distress which has the perfect shade – Peacock Feathers. I wanted to use Bermuda Bay by Stampin Up, so off I went to create. My original project was this:

Non Traditional Evergreen Christmas Cards

Although it is a great simple CAS card, something just wasn’t sitting well with me as far as the inspiration went. So I created the coral embossed card instead.

The image is perfect, and I love the Teal Christmas in-between the Silver Embossed Joyful Wishes – that looks great! You will want to use a Bermuda Bay Marker to do that part first, then you would use a stamp-a-majig/Misti to add the Versamark Words to emboss them in the Pewter.

My Non-Traditional Christmas Creation

I also created one where the coral was going off the side and a bit smaller so I could layer it with a pop of the Bermuda Bay teal color.  You can also add a few sequins – it didn’t necessarily need it, but I couldn’t resist! Smile

Beach Christmas Cards

Overall, what you’ll love the most is how quick and easy these cards are to make. I literally made all three in a just a few minutes – they all work for Christmas cards.

I found it so interesting that the Coral stamp worked so well as a non-traditional Christmas image. It’s a beauty when embossed – and would be good for any occasion – especially weddings!

TIP – You will want to stay with a rich feel, so you’ll want to use Pewter instead of traditional Silver. It’s a bit warmer and muted which suits this card much better.

If I had to pick an absolute favorite…it’s the One Layer one! The simplicity and ease of just the single layer is stunning.

How about you? Which one is your favorite? Tell me in the comments – I’d love to know.

Quick DIY Christmas CardsClean and Simple Christmas Cards

Have fun crafting, be sure to whip out your Bermuda Bay or any Teal color – Peacock Feathers Distress would be great! Try the non-traditional Christmas route…you may just surprise yourself!

Signature 24 pt


[optin_box style=”13″ width=”500″ alignment=”center” action=”https://www.aweber.com/scripts/addlead.pl” disable_name=”Y” method=”post” email_field=”email” email_default=”Enter your email address” integration_type=”aweber” double_optin=”Y” list=”3846012″ name_field=”name” name_default=”Enter your first name” name_required=”Y”][optin_box_field name=”headline”]If you enjoyed this tutorial…[/optin_box_field][optin_box_field name=”paragraph”]PHA+4oCmeW914oCZbGwgbG92ZSBvdXIgPGVtPjxzdHJvbmc+PHNwYW4gc3R5bGU9ImNvbG9yOiAjMjQ0YzVlOyI+ZnJlZTwvc3Bhbj4gPC9zdHJvbmc+PC9lbT5zdWJzY3JpYmVyIG9ubHkgdmlkZW8gc2VyaWVzLiDCoExlYXJuIG5ldyB0ZWNobmlxdWVzIHRocm91Z2ggb3VyIDxzcGFuIHN0eWxlPSJjb2xvcjogIzI0NGM1ZTsiPjxlbT48c3Ryb25nPmV4Y2x1c2l2ZTwvc3Ryb25nPjwvZW0+wqA8L3NwYW4+Q3JlYXRpdmUgVGlwcyBlLWxldHRlcsKgYW5kIHN1YnNjcmliZXIgb25seSB2aWRlbyBhbmQgcHJvamVjdCB0dXRvcmlhbHMhPC9wPgo=[/optin_box_field][optin_box_field name=”privacy”][/optin_box_field][optin_box_field name=”top_color”]undefined[/optin_box_field][optin_box_button type=”1″ text=”Send me exclusive tips!” text_size=”32″ text_color=”#000000″ text_bold=”Y” text_letter_spacing=”0″ text_shadow_panel=”Y” text_shadow_vertical=”1″ text_shadow_horizontal=”0″ text_shadow_color=”#f6fefb” text_shadow_blur=”0″ styling_width=”50″ styling_height=”19″ styling_border_color=”#000000″ styling_border_size=”1″ styling_border_radius=”6″ styling_border_opacity=”100″ styling_shine=”Y” styling_gradient_start_color=”#a3b640″ styling_gradient_end_color=”#80902c” drop_shadow_panel=”Y” drop_shadow_vertical=”1″ drop_shadow_horizontal=”0″ drop_shadow_blur=”1″ drop_shadow_spread=”0″ drop_shadow_color=”#000000″ drop_shadow_opacity=”50″ inset_shadow_panel=”Y” inset_shadow_vertical=”0″ inset_shadow_horizontal=”0″ inset_shadow_blur=”0″ inset_shadow_spread=”1″ inset_shadow_color=”#80902c” inset_shadow_opacity=”50″ location=”optin_box_style_13″ button_below=”Y”]Send me exclusive tips![/optin_box_button] [/optin_box]