Muse – Christmas Visions Inspiration

MuseCVguestbadge (2)

This week I am serving as guest inspiration over at Muse Christmas Visions weekly challenge. I have to say, I was completely honored to be asked by Ardyth to design an inspiration card for you this week. I’m always inspired by her CAS designs. The team she has put together to challenge you on a weekly basis is made up of very inspirational card makers – I encourage you to check out their work!

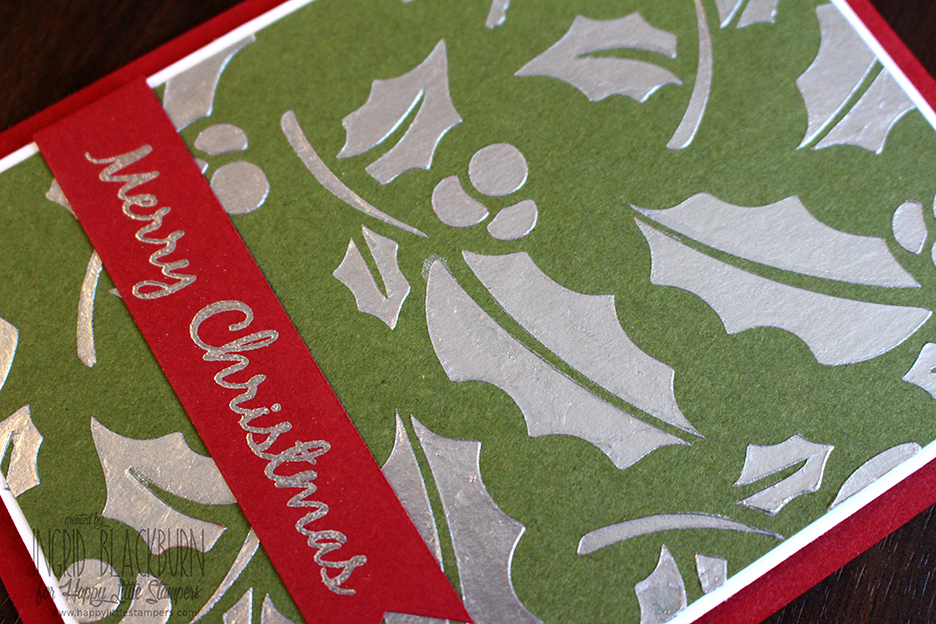
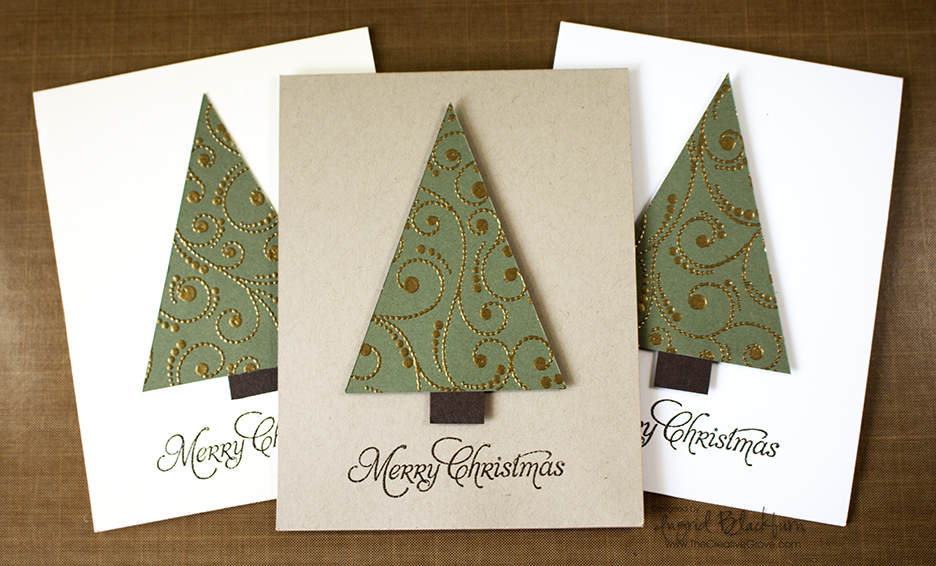
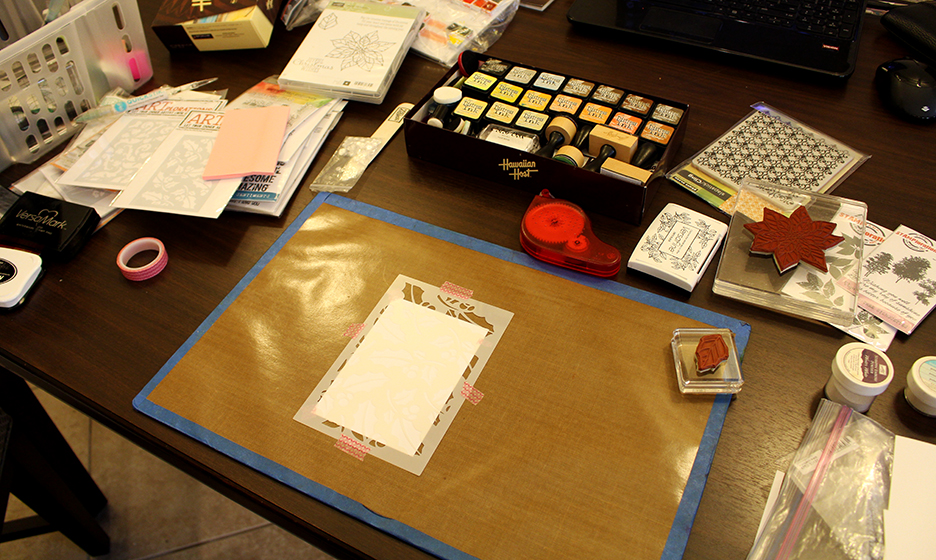
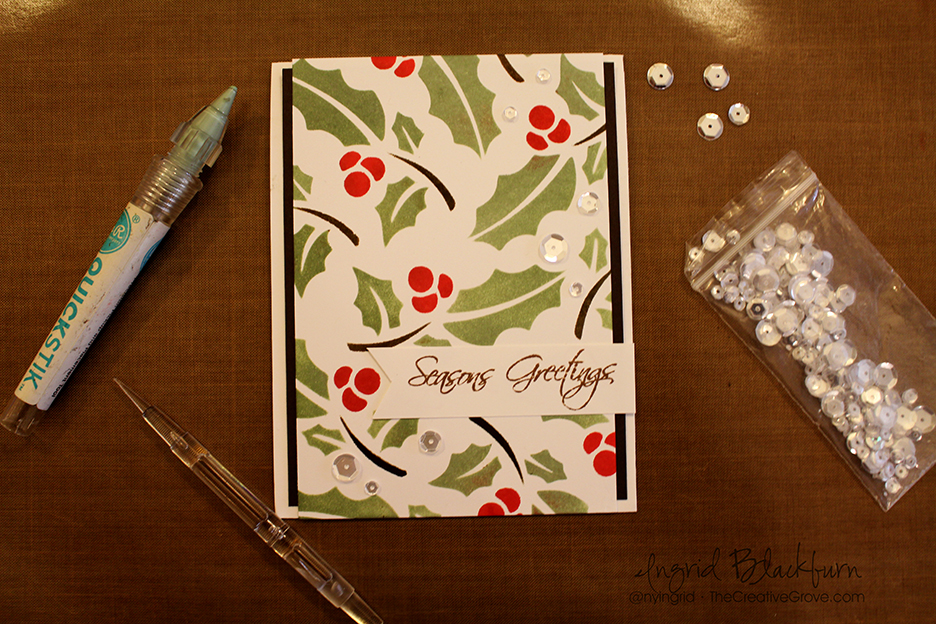
This Christmas Challenge is always a joy to participate in – I highly encourage you to play along with me this week! The challenge for me was that I am limited with supplies, as I’m on the road! But luckily I have my distress spots with me and this super cool holly stencil from Stamplorations. You all travel with your favorite stamping supplies too, right…lol? Okay – I’m on the road for two months, and did a little teaching along the way – no I don’t always pack my stamping supplies! Here is the result:

Muse Christmas Visions 21

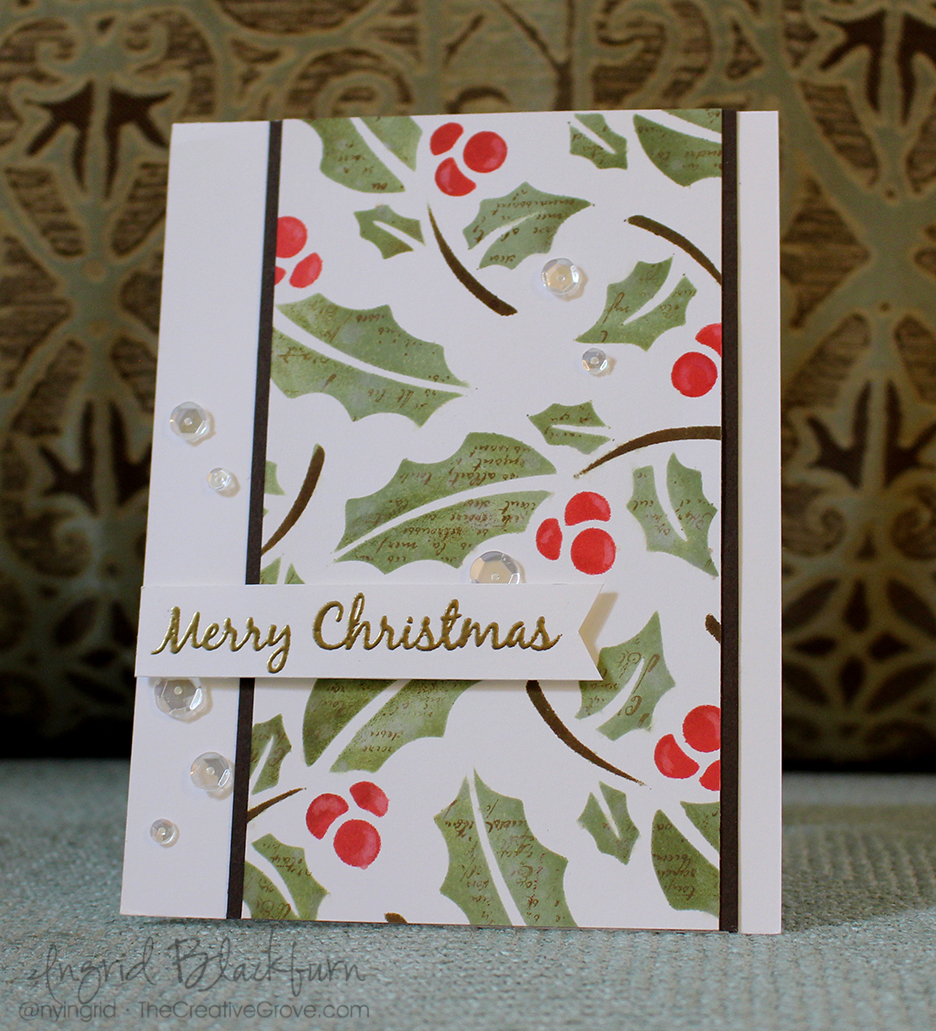
I know, it looks rather simple – but there are little touches that make this fun to look at. Normally I’d have a video for you, but being on the road – I don’t have my tripod – it didn’t make the final packing cut due to weight…argh! So I did the next best thing for you – I took photos along the way!

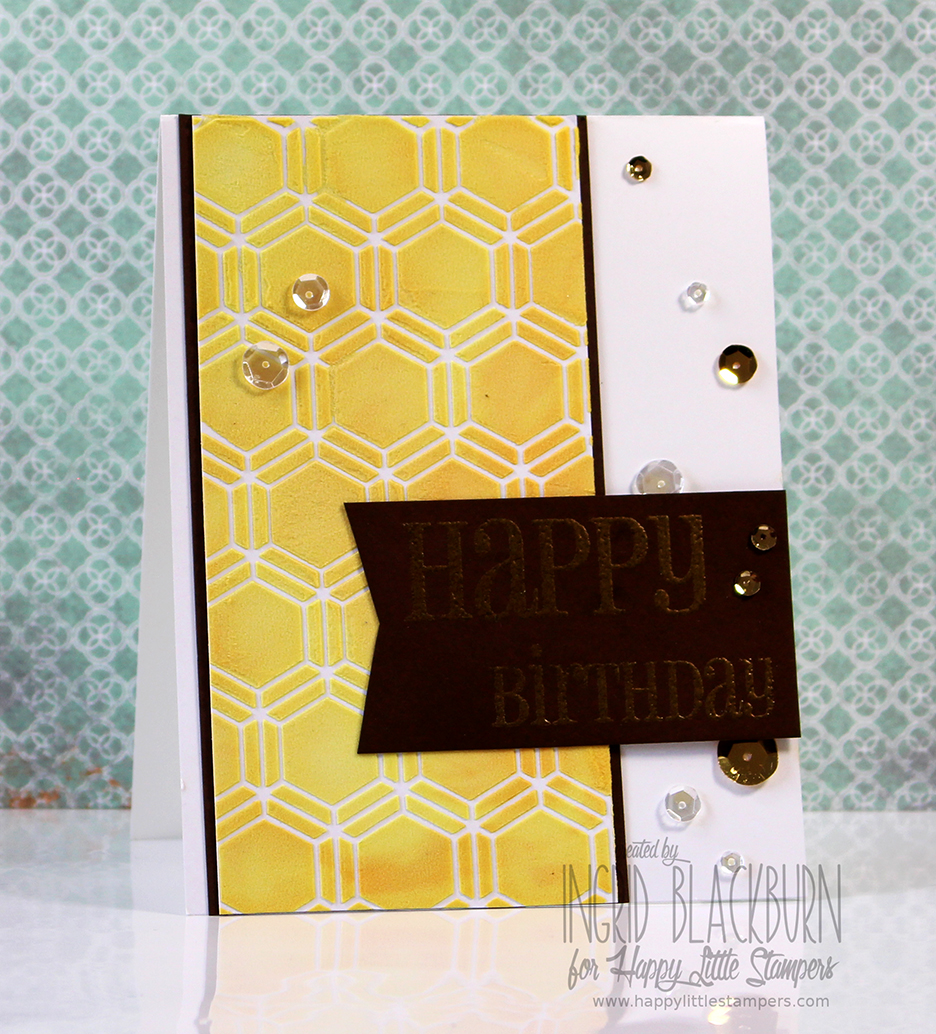
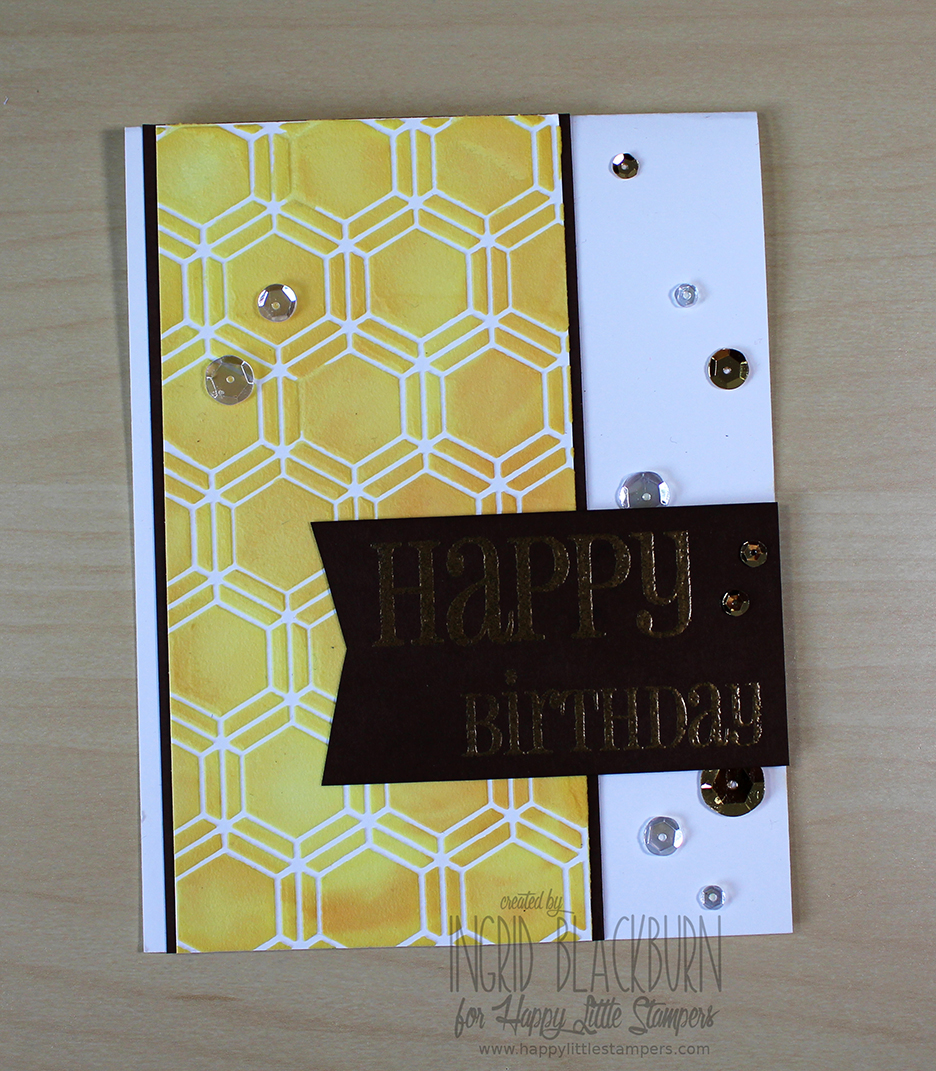
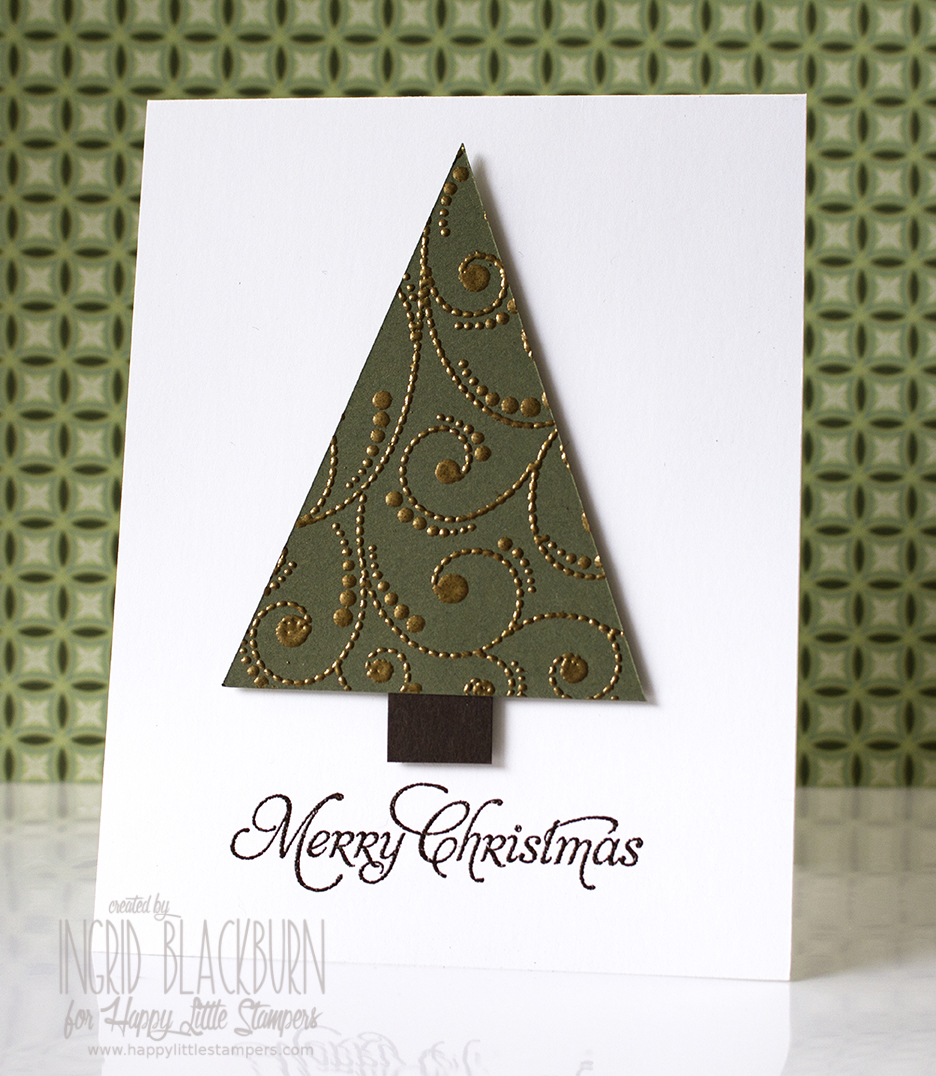
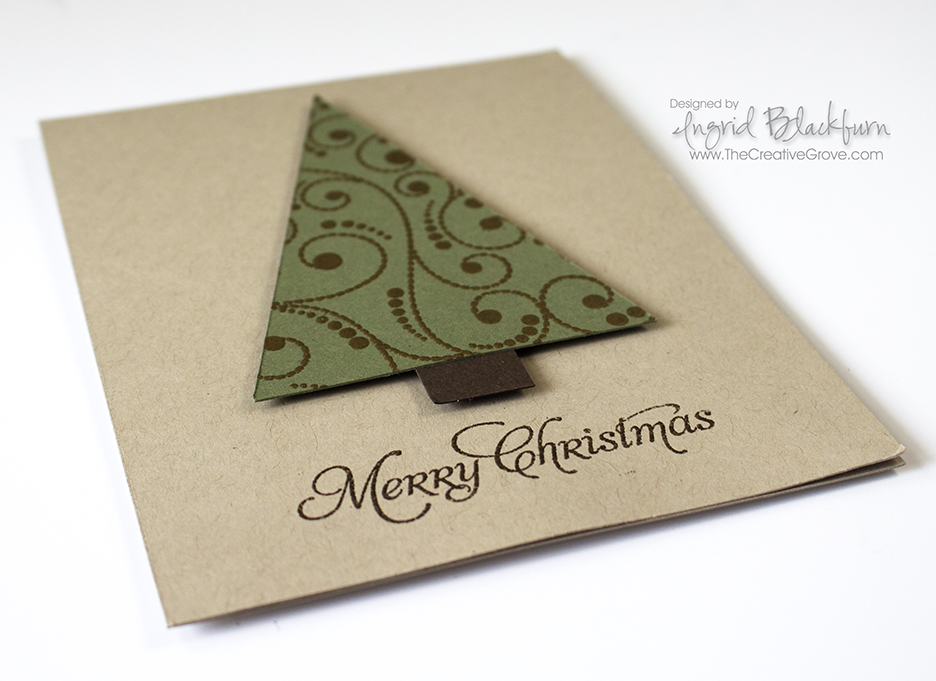
This card actually evolved over a few days. I made a similar one first, but it fell flat for me. It needed something so here they are side by side. The photo tutorial is for the first one, but it’s the core of them both.

Muse Christmas Visions 21 OriginalMuse Christmas Visions 21 002

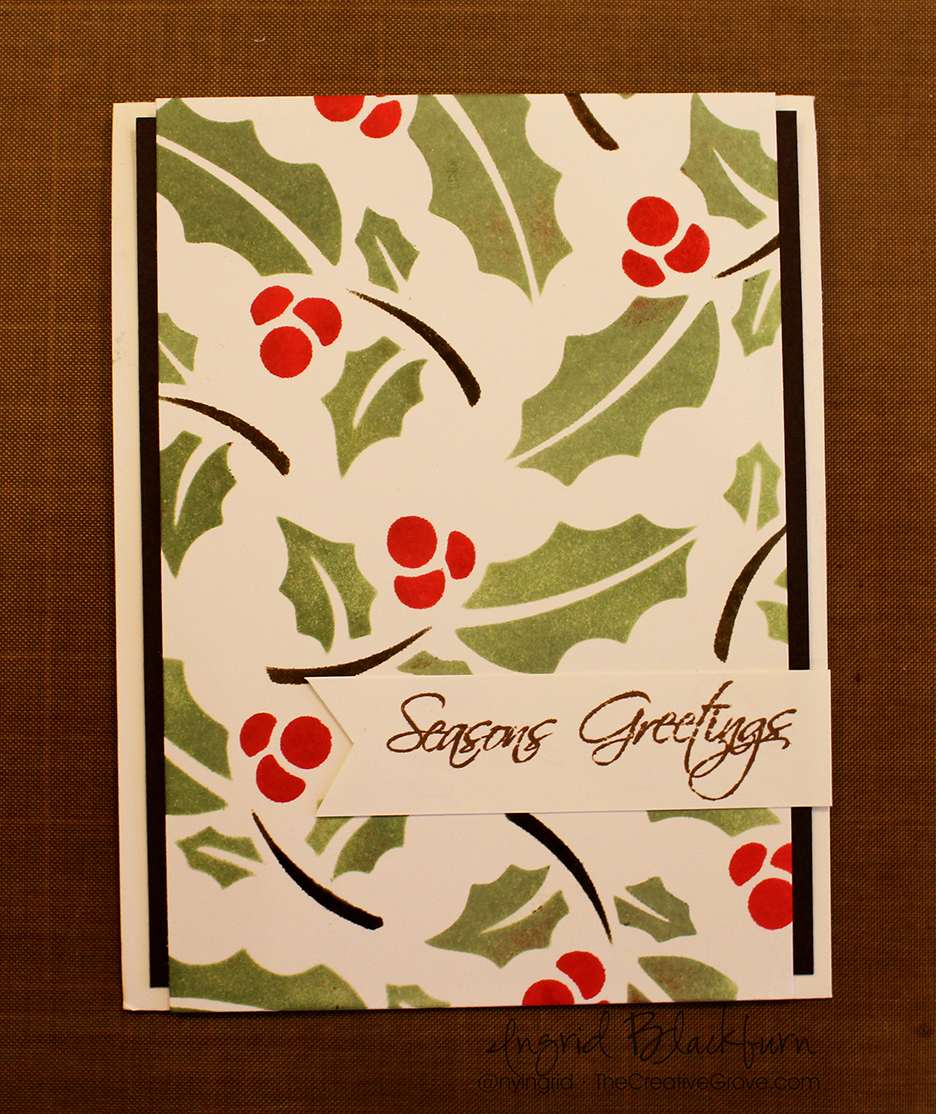
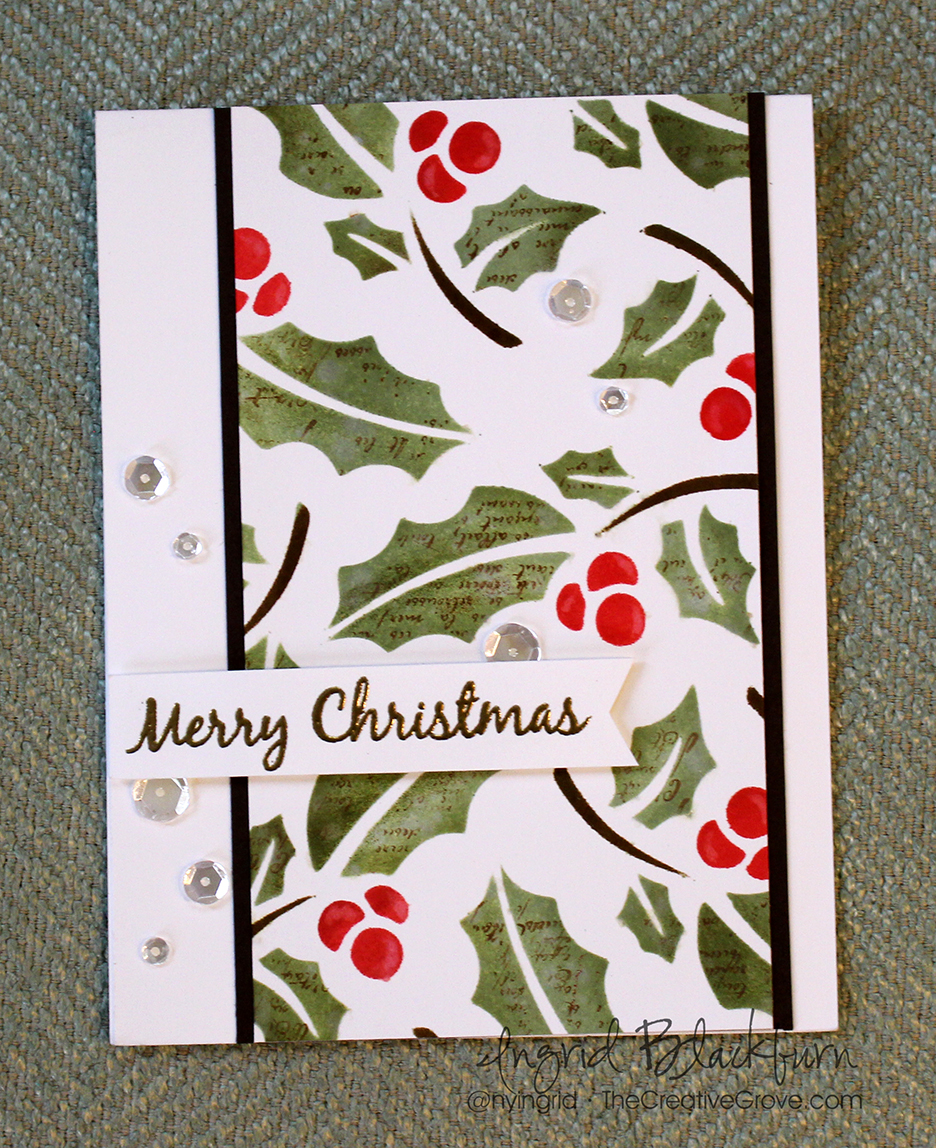
I think you’ll agree with me, that the second has much for character than the first. Not that there’s anything wrong with the first, but for me, it was just a bit plain. So I altered the brown behind my panel, trimmed down the size of the card front (I probably could have even done this a bit more in retrospect), added a lot of little details – read in depth below, and gave the card much more life. I hope you like it!

Creative Tips – 

  • Most important, secure your card and stencil to your work surface. The #1 mistake is having your stencil move on you.

Muse Christmas Visions 21 - working on the road

  • Next, you’ll want to mask off all the berries first. Since they were odd shapes, I used washi tape to help me here.
  • To apply the color, pounce it in using sponge tools. It’s easier to get good coverage through your stencil rather than using a swirling motion.
  • To make it easy, color everything first in greens – stems too. I began with Bundled Sage. In my updated panel (not pictured here) I edged the leaves the best I could using my sponge tool with Peeled Paint.

Holly CT 001

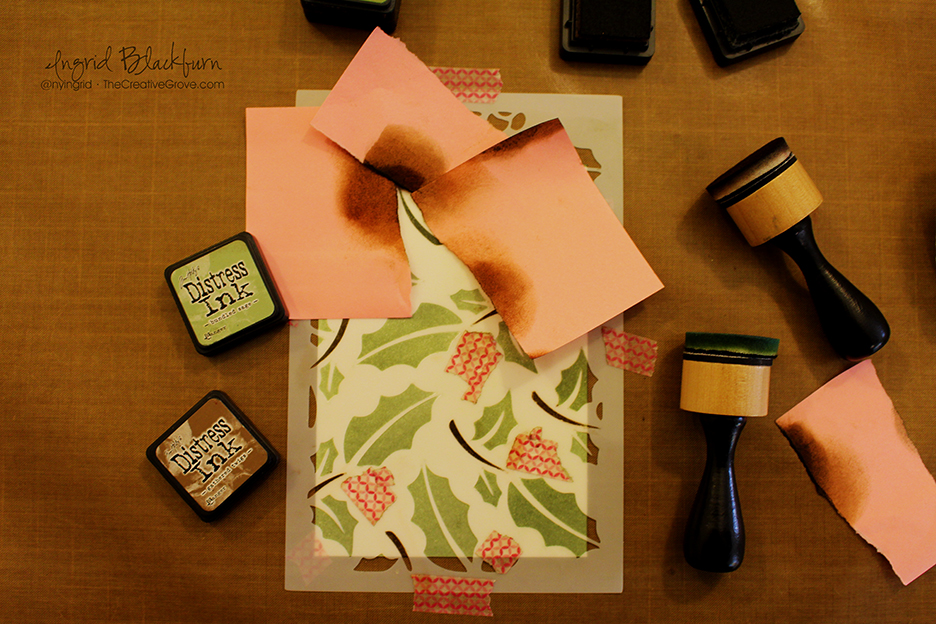
  • Once you have the leaves done – go over your stems with Gathered twigs, using some post it notes to mask them off.
  • With your berries still covered, spritz water into one of your hands and flick it at your project. The goal is to get droplets on your leaves, lifting up a little of the color and creating water spots. Place a paper towel over them to remove the water and the spots will continue to ‘lift’ the color as they dry. Look closely at this photo to see the spots and how they give your leaves a little character. This is the Flicking Technique Need a video – Check out this video here
  • Next, ink up a small script stamp with Vintage Photo and randomly stamp it over your leaves. I didn’t press mine down to hard so that it is only in some spots and not in others.

Muse Christmas Visions 21 002

  • Next, remove your washi tape, mask off your leaves and twigs with post its and apply your reds to your berries. I started with Festive Berries & Barn Door and edged them in Fired Brick.

Holly CT 002

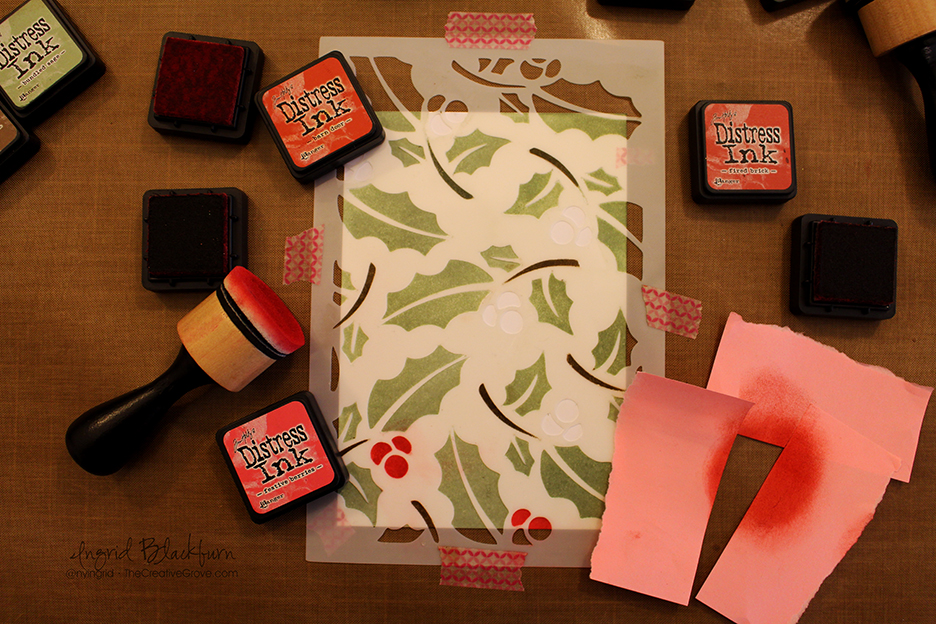
  • Once your berries are done, create a semi circle on them using an aqua painter (water filled handle brush). This will lift the color a little giving it a bit of texture.
  • Next, trim down your piece – mine measures 3 x 5 1/2″, matte onto an espresso brown piece that is 3 1/4 x 5 1/2″ and then offset onto a white card base – 5 1/2 x 4 1/4.
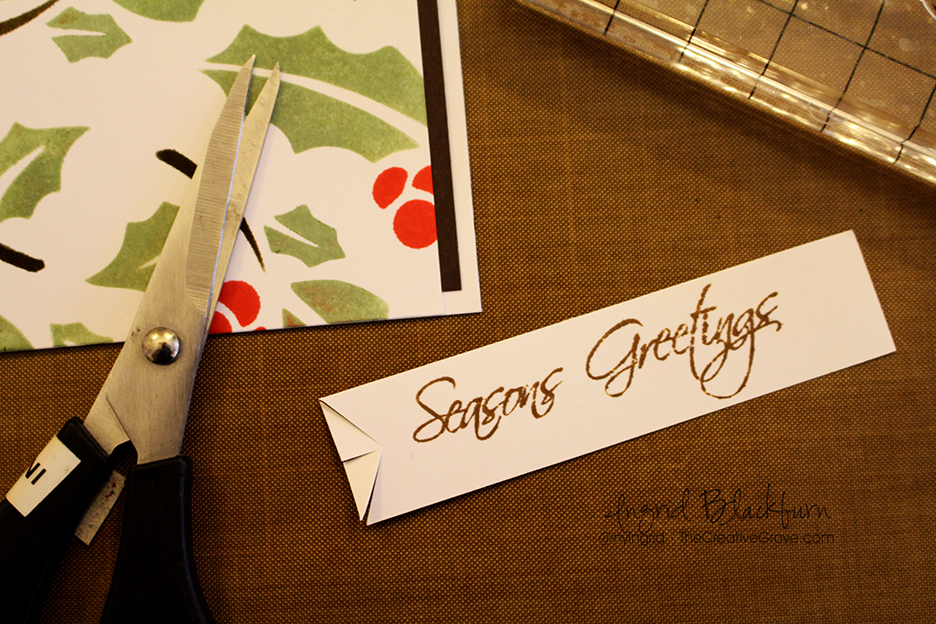
  • Stamp your sentiment from Mixed Christmas Sentiments by Happy Little Stampers in Versamark Ink and embossed it in gold. My strip was 3/8 x  4″.
  • Trim your edges for how far you need for a banner and edge to your paper.
  • Use pointed scissors (paper snips) to create your banner end by cutting up from the middle and then to that inward cut from each point.

Holly CT 004

  • Pop your sentiment up on stamping dimensionals and add clear sequins by Pretty Pink Posh to complete your project. I use a Quick Stik tool and Mono Liquid Glue to adhere mine.

Holly CT 005Muse Christmas Visions 21 003

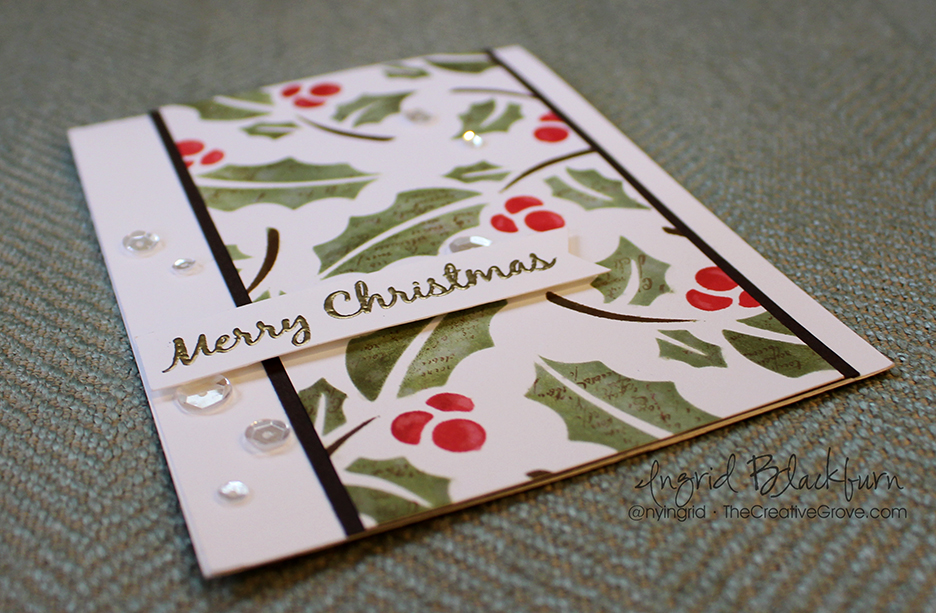
It’s a simple project, but has various layers. The little touches make all the difference. My original card had an interesting matte that was shorter, but ultimately I felt it needed more white space. So I trimmed it down and offset it. Of course, I don’t know if you noticed – I mounted my panel upside down…lol! I didn’t see it at first, but thankfully the script is so small, it’s not too noticeable. Oh well…we all do that from time to time, right?

Muse Christmas Visions 21

Be sure to play along at Muse Christmas Visions this week. And I hope this photo tutorial inspired you a bit. I’m curious, what do you prefer – pictorial, or video? Let me know in the comments below! Can’t wait to see your creations! Now run along and create!

Signature-24-pt_thumb.jpg

Happy Little Stampers Blog Hop

Happy Little Stampers just had their first release of stamps and to celebrate we’re having a blog hop! So this month you get a whole lot of inspiration from a brand new stamp company – Happy Little Stampers, along with 18 of my crafty friends for some great inspiration.

blog hop graphic 2

In addition to some great inspired projects, the whole lot of stamps will be given away to one commenter. And, four other randomly selected lucky commenters will win a gift certificate to the HLS store!  So as you’re hopping along, don’t forget to leave a comment!

Here’s what you do:
  • Start off by leaving a comment on the Happy Little Stampers blog, and then continue on to each Designer.
  • To be eligible for the prizes, you must comment on all the blogs in the hop.
  • The blog hop will run for one week giving you enough time to hop through and check out what the designers will be creating.
You probably arrived here from Gloria’s blog. Pretty great isn’t she?! Well, here are a few projects I made for you today. Enjoy all the creative tips!

Colored Texture Paste Birthday 001

To get this look, you’ll want to color some white embossing paste with distress inks – the piece I used for this project is actually the left over from an hombre colored project I made for one of our classes here at The Creative Grove. I ended up with a lot left over, so I quickly took my scrap paste and ran it over another stencil for an extra piece – I actually got five extra projects that way!! I just love the way the yellows blended together with the orange and the texture the embossing paste gives is awesome!

Colored Texture Paste Birthday 003

I spread it over a fun stencil by The Crafters Workshop, added a little banner using the new, great birthday set from HLS – Bold Birthday Sentiments , added a few sequins and had a quick, bright, fun project.

But I didn’t stop there…I also played around the other day with my crafty friend Amy. We broke out her silver embossing paste and ran it over my new Holly stencil from Stamplorations. I just love the fluid look of the embossing paste against the Artichoke card stock. It really pops.

Texture Holly 001

Of course the card is only made complete with the silver embossed Merry Christmas greeting. I have to admit, I can’t seem to stop using it! You’ll just HAVE to check out the new Mixed Christmas Sentiments by Happy Little Stampers – the mixed set of fonts are great.

Texture Holly 002

To add a punch to the project I wanted to use Cherry Cobbler card stock. First you’ll want to separate the two colors with a small white 1/16″ edge so that it helps to define it a bit better. Little touches like that really help to bring the project together.

And since Holly is the theme over at Happy Little Stampers Christmas Challenge, I think I’ll add this one to the gallery as well – be sure to play along too! But first….time for more creative genius…

Now hop on over to Birgit’s blog to see more inspiration!

 Don’t forget to comment to win – now hop along!! 🙂
ingrid signature

[optin_box style=”13″ width=”500″ alignment=”center” action=”https://www.aweber.com/scripts/addlead.pl” disable_name=”Y” method=”post” email_field=”email” email_default=”Enter your email address” integration_type=”aweber” double_optin=”Y” list=”3846012″ name_field=”name” name_default=”Enter your first name” name_required=”Y”][optin_box_field name=”headline”]If you enjoyed this tutorial…[/optin_box_field][optin_box_field name=”paragraph”]PHA+4oCmeW914oCZbGwgbG92ZSBvdXIgPGVtPjxzdHJvbmc+PHNwYW4gc3R5bGU9ImNvbG9yOiAjMjQ0YzVlOyI+ZnJlZTwvc3Bhbj4gPC9zdHJvbmc+PC9lbT5zdWJzY3JpYmVyIG9ubHkgdmlkZW8gc2VyaWVzLiDCoExlYXJuIG5ldyB0ZWNobmlxdWVzIHRocm91Z2ggb3VyIDxzcGFuIHN0eWxlPSJjb2xvcjogIzI0NGM1ZTsiPjxlbT48c3Ryb25nPmV4Y2x1c2l2ZTwvc3Ryb25nPjwvZW0+wqA8L3NwYW4+Q3JlYXRpdmUgVGlwcyBlLWxldHRlcsKgYW5kIHN1YnNjcmliZXIgb25seSB2aWRlbyBhbmQgcHJvamVjdCB0dXRvcmlhbHMhPC9wPgo=[/optin_box_field][optin_box_field name=”privacy”][/optin_box_field][optin_box_field name=”top_color”]undefined[/optin_box_field][optin_box_button type=”1″ text=”Send me exclusive tips!” text_size=”32″ text_color=”#000000″ text_bold=”Y” text_letter_spacing=”0″ text_shadow_panel=”Y” text_shadow_vertical=”1″ text_shadow_horizontal=”0″ text_shadow_color=”#f6fefb” text_shadow_blur=”0″ styling_width=”50″ styling_height=”19″ styling_border_color=”#000000″ styling_border_size=”1″ styling_border_radius=”6″ styling_border_opacity=”100″ styling_shine=”Y” styling_gradient_start_color=”#a3b640″ styling_gradient_end_color=”#80902c” drop_shadow_panel=”Y” drop_shadow_vertical=”1″ drop_shadow_horizontal=”0″ drop_shadow_blur=”1″ drop_shadow_spread=”0″ drop_shadow_color=”#000000″ drop_shadow_opacity=”50″ inset_shadow_panel=”Y” inset_shadow_vertical=”0″ inset_shadow_horizontal=”0″ inset_shadow_blur=”0″ inset_shadow_spread=”1″ inset_shadow_color=”#80902c” inset_shadow_opacity=”50″ location=”optin_box_style_13″ button_below=”Y”]Send me exclusive tips![/optin_box_button] [/optin_box]

Butterfly Birthday

Watercolor Stamped Birthday Butterflies 005

I am so excited…today the mailman brought me some stamps from the first ever release from Happy Little Stampers! Yes, there’s a new stamp company in town and get a load to this amazing Butterfly Birthday set! I always think of my friend Dawn when I see a butterfly – as she really loves them! Do you have a stamp image that reminds you of somebody, or is it just me? Tell me in the Comments below!

This Butterfly Birthday set has three very different bold butterflies that will definitely give you loads of ideas and a good variety of cards – just what you want from a stamp set. Even better – there are three great sayings that are the perfect size and in a handwritten print. It’s the perfect compliment, I just love it when there are greetings mixed in with great images.

Watercolor Stamped Birthday Butterflies 002

Now, you may think I’m biased, because I’m on the design team for the Christmas Challenge, but I purchased these myself, and let me tell you – the quality is there and I’m overjoyed with the design and size of each. Kylie will get these right out to you, they’re well priced and she ships internationally quite reasonably. I can’t wait to use the Mixed Christmas Sentiments set on my next challenge card – it’s always great when a set uses different fonts. Love that kind of variety.

So if you haven’t checked them out yet…be sure to do so – and one of the many challenges over at Happy Little Stampers – there is definitely something for everyone!

I watercolor stamped this card  using water along with the following distress inks – Mustard Seed, Spiced Marmalade, Tumbled Glass, Broken China, Peeled Paint, Seedless Preserves and Soot Black. I did a little light wet on wet watercoloring for the background.  Stay tuned for a video of this technique card in the upcoming weeks!

🙂

Signature-24-pt_thumb.jpg

CAS Embossed Tree

So have you had a chance to play along with the Happy Little Stampers new Christmas Challenge yet? If not, jump right on in! Here’s a little more quick, simple, easily mass produced inspiration for you!

This tree is simply embossed using a fun background stamp and then cut at several angles to form a few trees. You would be surprised at how quick and easy it is to mass produce these beauties.

HLS Christmas Challenge July 2015

CAS Embossed Tree July 2015 HLS

I made several versions on different neutral colored card bases. My tree is in Always Artichoke with an Early Espresso trunk. The background stamp is Dotted Fusion by Penny Black, embossed in gold.

CAS Embossed Tree 003 CAS Embossed Tree Trio

So if you’re in a pinch for a super quick, fun, very clean and simple card – this one is a winner!

Tell me which base you like the best in the comments below – I’m still undecided. And be sure to jump into the challenge fun over at the Happy Little Stampers Christmas Challenge! I can’t wait to see how you are inspired!

Signature-24-pt_thumb.jpg

Stacked Die Cuts – CAS Green Christmas Card

Stacked Die Cuts seem to be all the rage lately. If you haven’t tried this creative technique yet, I think you’ll be surprised at just how easy it is. Enjoy this quick tutorial into how this simple card was created!

Stacked Die Cuts 001

Stacked Die Cuts Card

  • You will first want to create your blended background on the top fourth of the card.  To see a step by step video tutorial on how to create a perfectly blended background, click here.
  • Mask off the bottom 3/4 of your card with post it notes. Use the following Distress inks in order when blending from the bottom up – Bundled Sage, Peeled Paint and Forest Moss.
  • Die cut the word Merry from your project, being sure to keep all the little pieces (Y, M – 2, E, R).  I keep these stuck to a piece of washi or painters tape so they don’t go missing.
  • Emboss the word Christmas in Black up above your Negative Die Cut word in the green area. Tip – be sure that area is totally dry – definitely use a de-static tool like an embossing buddy.

Stacked Die Cuts 003

  • Lay your Green/White cut out word Merry on a piece of painters tape or masking tape. Smoosh a versamark pad over your word and emboss in clear to give a shine. Once cool, remove with tweezers and set aside.
  • Stamp your gift in the bottom right corner using Memento Tuxedo Black ink. I use this ink because I’m going to watercolor with distress inks and it doesn’t bleed and gives a crisp image.
  • Watercolor your image using Bundled Sage, Peeled Paint and Fire Brick with an Aqua Painter.  Tip – be sure your paint brush isn’t too wet, as this is regular card stock. If you use too much water, you’ll get little white dots or lines from your paper.
  • Die Cut four more words in white.
  • To create your Die Cut stack, glue all five die cuts to each other with your Blended Piece on top.

Stacked Die Cuts 004Stacked Die Cuts 006

  • Add adhesive to a piece of Copy Paper that is wider than your negative cut out, adhere so that the sticky side faces the front.
  • Add your die cut and the cut out pieces to the sticky paper exposed in the negative die cut image. And there’s your stacked die cut!
  • Attach your card front to your card base and add a little Forest Moss to the top at the fold so there is no white exposed.
  • Add sparkling clear sequins from Pretty Pink Posh if you desire using Tombow Mono Liquid Glue.

Stacked Die Cuts 002

I designed this card with three challenges in mind today – Merry Monday – Gifts and Addicted to CAS – Green and Happy Little Stampers – Sponged.

CAS_Mar2015 150ATCAS - code word green

If you liked this tutorial on Stacked Die Cuts, be sure to get our exclusive video tutorial series by being on the Creative Tips E-letter list, sign up at the bottom!

Signature

[optin_box style=”14″ alignment=”center” disable_name=”Y” email_field=”email” email_default=”Enter your email address” email_order=”1″ integration_type=”aweber” double_optin=”Y” list=”2841626″ name_field=”name” name_default=”Enter your first name” name_required=”Y”][optin_box_field name=”headline”]If you enjoyed this tutorial…[/optin_box_field][optin_box_field name=”paragraph”]PHA+Li4ueW914oCZbGwgbG92ZSBvdXIgPHNwYW4gc3R5bGU9ImNvbG9yOiAjMjQ0YzVlOyI+PGVtPjxzdHJvbmc+ZnJlZSA8L3N0cm9uZz48L2VtPjwvc3Bhbj5zdWJzY3JpYmVyIG9ubHkgdmlkZW8gc2VyaWVzISDCoEdldCB0aGXCoDxzcGFuIHN0eWxlPSJjb2xvcjogIzI0NGM1ZTsiPjxlbT48c3Ryb25nPmV4Y2x1c2l2ZTwvc3Ryb25nPjwvZW0+PC9zcGFuPsKgQ3JlYXRpdmUgVGlwcyBlLWxldHRlciB3aGljaCB3aWxsIHRlYWNoIHlvdSBuZXcgdGVjaG5pcXVlcyB0byBhZGQgdG8geW91ciBzdGFtcGluZyBza2lsbCBzZXQuIMKgTGVhcm4gaG93IHRvIG1ha2UgcHJvamVjdHMgeW91J2xswqBsb3ZlITwvcD4K[/optin_box_field][optin_box_field name=”privacy”][/optin_box_field][optin_box_field name=”top_color”]undefined[/optin_box_field][optin_box_button type=”1″ text=”Send me exclusive tips!” text_size=”26″ text_color=”#000000″ text_bold=”Y” text_letter_spacing=”-1″ text_shadow_panel=”Y” text_shadow_vertical=”1″ text_shadow_horizontal=”0″ text_shadow_color=”#a3b640″ text_shadow_blur=”0″ styling_width=”100″ styling_height=”10″ styling_border_color=”#000000″ styling_border_size=”1″ styling_border_radius=”6″ styling_border_opacity=”100″ styling_shine=”Y” styling_gradient_start_color=”#a3b640″ styling_gradient_end_color=”#5b661e” drop_shadow_panel=”Y” drop_shadow_vertical=”1″ drop_shadow_horizontal=”0″ drop_shadow_blur=”1″ drop_shadow_spread=”0″ drop_shadow_color=”#000000″ drop_shadow_opacity=”50″ inset_shadow_panel=”Y” inset_shadow_vertical=”0″ inset_shadow_horizontal=”0″ inset_shadow_blur=”0″ inset_shadow_spread=”1″ inset_shadow_color=”#a3b640″ inset_shadow_opacity=”50″ location=”optin_box_style_14″ button_below=”Y”]Send me exclusive tips![/optin_box_button] [/optin_box]

Using the Watercolor Stamping Technique with the Swallowtail Stamp

Have you tried watercolor stamping yet? This clean and simple quick project uses a great background stamp, the Swallowtail stamp by Stampin Up, and a simple – yet creative watercolor technique.

Watercolor stamping technique

The best part about this technique is that you can get more than one card with just one inking! To help showcase just how easy the watercolor stamping technique is, I made a video just for you!  If you like the video, be sure to give it a thumbs up on You Tube and subscribe to my YouTube channel for continued technique inspiration.

View video on YouTube

As you saw in the video above, this is a super easy stamping technique that gives you the look of watercolor, but with stamping and detail you’d never be able to achieve on your own.  Here’s a breakdown of just how to do it.

Creative Tips for the Watercolor Stamping Technique

First, pick a large image – this doesn’t work too well with tiny images as they get lost.  This particular project uses a rather large stamp – yours doesn’t have to be so big! We chose the Swallowtail stamp by Stampin Up.

Next, ink up your stamp – we chose Ranger Distress Inks for two reasons – translucency and how well they react with water.  The specific colors are Tumbled Glass, Broken China, Salty Ocean, Peacock Feathers and Faded Jeans.  Be sure to pay attention to the little tricks of how and the sequence we use them in, in the video!

Watercolor Stamped Swallowtail Stamp by Stampin Up

Spritz your stamp with a fine mister.  You’ll want a fine spray rather than too strong a spray – think of a garden hose Jet Spray vs. a Shower Spray…there’s a big difference.  You want to coat your stamp, not spray your ink away.  The amount is important too – too much water will leave you with an inky splotch, vs true watercolor stamping.  You want to be able to still see some detail mixed with watercolor.  I used the Stampin Up mister, Ranger has one too.

Stamp onto 140 pound cold pressed watercolor paper.  Choose the smooth side vs. the toothy side.  You’ll want to use watercolor paper.  This particular technique uses quite a bit of water, and that amount will degrade the fibers of regular card stock into an unattractive mess that will take away from your project.

Watercolor Stamping with Distress Inks

Hold your stamp down and with this particular stamp, put a fair amount of pressure on it – it’s big!  If you can put your project onto a foam pad, you’ll get an even better impression with ease.

Distress Swallowtail 008

You can immediately stamp a second time onto regular card stock for a second impression.  You’ll get another impression just fine.  The reason you don’t need watercolor paper the second time is that the watercolor paper the first time around took most of the water away allowing you to safely stamp onto regular card stock for your second image.

Matte and add embellishments as you want.  You can see here that I created two very different project with slight adjustments.  Both have the color spritzing for a little added effect.  I love them both – hopefully you do too!

Distress Swallowtail 010

If you liked this tutorial and learned something – be sure you’re on our exclusive e-letter list – Creative Tips for a great video series you won’t see anywhere else!

Have fun creating your own watercolor stamping projects – be sure to share them with us on our facebook page!

Signature


[optin_box style=”14″ alignment=”center” disable_name=”Y” email_field=”email” email_default=”Enter your email address” email_order=”1″ integration_type=”aweber” double_optin=”Y” list=”2841626″ name_field=”name” name_default=”Enter your first name” name_required=”Y”][optin_box_field name=”headline”]If you enjoyed this tutorial…[/optin_box_field][optin_box_field name=”paragraph”]PHA+Li4ueW914oCZbGwgbG92ZSBvdXIgPHNwYW4gc3R5bGU9ImNvbG9yOiAjMjQ0YzVlOyI+PGVtPjxzdHJvbmc+ZnJlZSA8L3N0cm9uZz48L2VtPjwvc3Bhbj5zdWJzY3JpYmVyIG9ubHkgdmlkZW8gc2VyaWVzISDCoEdldCB0aGXCoDxzcGFuIHN0eWxlPSJjb2xvcjogIzI0NGM1ZTsiPjxlbT48c3Ryb25nPmV4Y2x1c2l2ZTwvc3Ryb25nPjwvZW0+PC9zcGFuPsKgQ3JlYXRpdmUgVGlwcyBlLWxldHRlciB3aGljaCB3aWxsIHRlYWNoIHlvdSBuZXcgdGVjaG5pcXVlcyB0byBhZGQgdG8geW91ciBzdGFtcGluZyBza2lsbCBzZXQuIMKgTGVhcm4gaG93IHRvIG1ha2UgcHJvamVjdHMgeW91J2xswqBsb3ZlITwvcD4K[/optin_box_field][optin_box_field name=”privacy”][/optin_box_field][optin_box_field name=”top_color”]undefined[/optin_box_field][optin_box_button type=”1″ text=”Send me exclusive tips!” text_size=”26″ text_color=”#000000″ text_bold=”Y” text_letter_spacing=”-1″ text_shadow_panel=”Y” text_shadow_vertical=”1″ text_shadow_horizontal=”0″ text_shadow_color=”#a3b640″ text_shadow_blur=”0″ styling_width=”100″ styling_height=”10″ styling_border_color=”#000000″ styling_border_size=”1″ styling_border_radius=”6″ styling_border_opacity=”100″ styling_shine=”Y” styling_gradient_start_color=”#a3b640″ styling_gradient_end_color=”#5b661e” drop_shadow_panel=”Y” drop_shadow_vertical=”1″ drop_shadow_horizontal=”0″ drop_shadow_blur=”1″ drop_shadow_spread=”0″ drop_shadow_color=”#000000″ drop_shadow_opacity=”50″ inset_shadow_panel=”Y” inset_shadow_vertical=”0″ inset_shadow_horizontal=”0″ inset_shadow_blur=”0″ inset_shadow_spread=”1″ inset_shadow_color=”#a3b640″ inset_shadow_opacity=”50″ location=”optin_box_style_14″ button_below=”Y”]Send me exclusive tips![/optin_box_button] [/optin_box]

Chalktalk Distress Layered Thanks

Chalktalk Thanks 001

What do you do when you try out a new technique on a piece of scrap paper?  Do you use the left over piece for a project?  I try to, I figure if I’m going to take the time to figure it out, why not create something small at the very least!  That’s what this project is – my scrap turned into tag.

Chalktalk Thanks 003

Layer several shades of blue distress inks with Vintage Photo, spatter a little water, dry your piece thoroughly and then layer a lightly stamped layer from a background script stamp.  The end result is stunning!  I cut out my scrap with the biggest tag framelit from the set Chalk Talk by Stampin’ Up! Next, you’ll want to use a darker brown to stamp your greeting from the stamp set Thanks by Simon Says Stamp on an angle and voila – you have a perfect tag.

Chalktalk Thanks 002

For a little emphasis, I decided to use some left over tiny strips of white to randomly place back and forth behind my tag.  I added a few pearls and some corner piercing to the main card front.  I like that the colors of the card are masculine – this card is a great clean and simple design that’s easily mass produced – just sponge colors on larger strips of white paper and then cut out your tags!

We have videos on this technique in our VIP Community with a few different projects if you want more step by step tutorials.  Hope to see you there!

I’m wrapping up our week in Tuscany, we’re sad to go, but had a wonderful time here!  I must say after all the rich colors and texture, I’m excited to get into the stamping studio.  See you soon with more great projects.  For now, I’ll leave you with a few of the rich colors of the Tuscan countryside and villages.

20150113_15553720150112_144755DSC0831720141118_02332020150112_144938DSC08243DSC08355

Have a great day – thanks for stopping by!

Signature

Buds and Blooms–Scribble Flower

Scribble Flowers Trio002

It’s the beginning of a new year, which is always exciting.  This week on Less is More Challenge Blog, the theme is New Beginnings – which is very fitting for a new year.  To keep it simple, I have a Clean and Simple card that’s just perfect for a quick go to simple one layer card.

I’m also adding this to the Clean Slate challenge at Virginia’s View Challenge.

I did end up popping up one of the flowers for emphasis, but it would also look just perfect stamped directly onto the main layer.

Scribble Flowers Trio003

Here you see Scribble Flowers by Simon Says Stamp in some fun bright colors – Picked Raspberries, Mustard Seed and Mowed Lawn Distress Inks by Ranger. For the black, I used Memento Jet Black Ink.

I masked off the buds (the beginning) and stamped the leaves.  For the popped up flower I glued on the middle and leaves, but they would also work perfectly masked as well if stamping on a single layer.  Okay – I know I deviated from the true One Layer Rule, but I just felt like it on this one – forgive me! Smile

Scribble Flowers Trio001

I always make a ton of birthday cards at the beginning of each year – how about you?  This one is great as a quick and easy go to simple card that will brighten anyone’s day.  I hope you loved it as much as I did!

Want more creative inspiration – check out our free video series and ongoing creative tips – sign up for our inspirational newsletter here – Creative Tips Newsletter!

I’m spending the week in Tuscany this week.  We’re off to explore the countryside a bit – here are a few photos from our day yesterday in Chianti and Loro Ciufenna.  Be sure to stop back to see more soon!

Enjoy your day!

Signature