Home Sweet Home

SF Day 1 009 edited

This week I’m spending time in San Francisco, California to visit my family and celebrate my dad’s 80th birthday, spend some quality time with my mom, and brother.  I was born and raised in San Francisco and it’s a beautiful place to visit.  Plus I’m super excited to meet my new niece – Aubrey.

I would never change a thing about growing up in San Francisco.  We had amazing culture, I grew up in a melting pot of people, culture, excellent food, and more physical sports and outdoor activities than you can think of.  I’m quite proud to say I’m a California girl – even if I don’t live here anymore.  

One of the things we loved about being in the Bay Area was going to our old family cabin in the Santa Cruz Mountains.  I loved being surrounded by the towering Redwoods (hummm, wonder where my love of redwoods came from?)  We would go on hikes, walk through the Basins, and go to the Boardwalk in Santa Cruz.  The Boardwalk had the scariest (well as a kid) rollercoaster, because it was all wood!  I loved it.  So when we had the free Sale-a-bration Stamp set Feeling Sentimental, I had to do a sunset boardwalk scene – it just reminded me of the Boardwalk in Santa Cruz. 

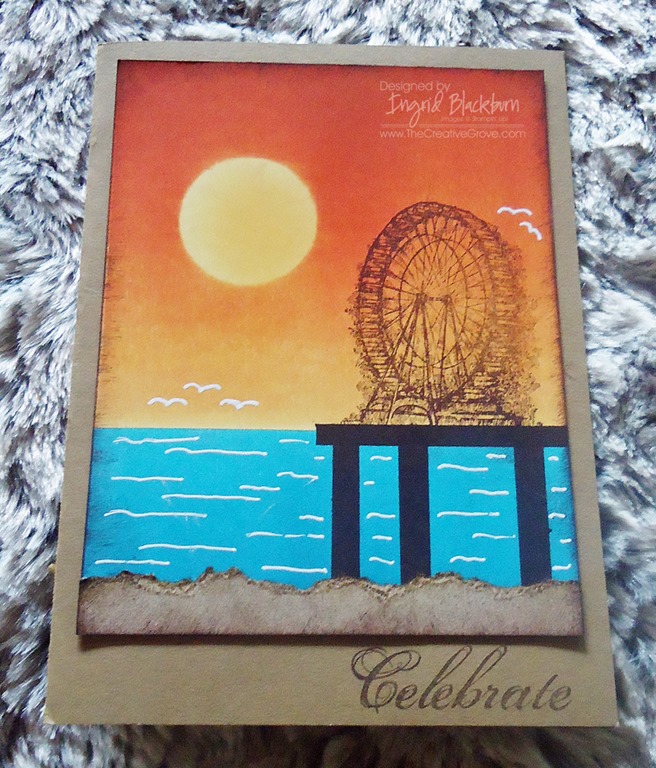
This card was one of the projects in my Brayer 101 – Introduction to Creative Scenery class that I taught the past few months.  The stamp set is now gone (but I know several of you have it!), so I’ve come up with a great new project to replace it, but wanted to share this beautiful card with you.  I hope you like it!

I will be sharing how I made this card in a detailed post filled with Creative Tips to anyone subscribed to my Creative Tips mailing list!  I’m going to share it on Saturday at 12 noon – the day of my Dad’s party, so you have plenty of time to subscribe still! 

Have a great day – enjoy your families – I’m going to enjoy spending quality time with mine.  I’ll be sure to report back all week so that you can see all the fun places and things I’m doing.

For information about taking Brayer classes as part of my Creative University series in person, check out my upcoming events page by clicking here.

Signature Snowflake 001

To Shop 24/7 in the Creative Store – Click here!

Emerald Pool Creative Scenery

In Dominica, we took a tour to the Emerald Pool.  After a short walk through the rain forest, the trail opened up revealing this beauty.  I took some photos from above and then walked down to the pool itself.  As we approached, the water was this amazing turquoise blue with slabs of grey rocks peaking out.  The walls were lush with green foliage and amazing chocolate brown ropes hanging down from above. 

I took several pictures from the grey rock steps, then took a dip into the pool itself.  The water was, shall we say refreshing, but after a few minutes surprisingly comfortable.  I grabbed my camera and took a few shots of the waterfall from the view of the pool and ended up with this shot.  I digitally enhanced the colors to try and capture the vibrant nature of this beautiful spot hidden deep in the rain forest. 

I woke up this morning at 4 am, I know – I’m on a beautiful ship well into the Caribbean Sea and what am I doing up?  Well, I was thinking about this pool and how much I wanted to try to re-create it with my Brayer, Ink and Sponges.  After lying awake for an hour I finally took all my ink pads and tools up to the pool deck to create while watching the sun rise over the ocean.  Here is the final result. 

Creative Tips:

  • I started out creating the pool.  I wasn’t sure which colors would do it justice and finally settled on brayering pure Tempting Turquoise.  I added a little Pacific Point with a sponge and ultimately a little Basic Gray for the underwater rocks in the center and at the waterfall line.
  • I next went to work on the structure of the cavern.  First I created a mask for my rocks.  I then brayered River Rock on an angle from both sides.  I made sure to keep the center top v a little white for my sky.

  • I then tore a little area for my sky.  I left my Bashful Blue at home, so I had to settle for some Baja Breeze.  It seemed to do the job just fine.  I sponged a tiny bit of Tempting Turquoise to brighten it up a bit.
  • I then sponged some more River Rock in my cavern to blend it and darken spots. 
  • Next I sponged Soft Suede along the base of my cavern and in spots along the waterline.  The color was really starting to come together.
  • To add the lush foliage, I lightly sponged Old Olive first and then spotlighted a few areas in Wild Wasabi with a few dabs of Gumball Green.  Once I was happy with how that looked, I moved on to the rocky area.
  • To create the rocks, I brayered Basic Gray lightly from the pool upward.  Be sure to keep your masks in place over the water and at the line of the rocks.  I added a small amount at the mouth of the falls as well.
  • I used both a Basic Black marker and Basic Grey sponge to create the separation of the rocks and shadows. 

  • To create the plants, I used the brush side of an Old Olive Marker.  I worked in sections using a sponge to blend it as I went.  Once happy with the Old Olive, I went over it in sections again using a Garden Green Marker.  I spotlighted a few areas using a Summer Starfruit marker which has a great green tone to it.
  • I added my vines using the pointed part of a Chocolate Chip and Early Espresso Marker.  Start with an Old Olive Marker until you are comfortable – it will blend in underneath and allow you to make a mistake.
  • I added my moss on the rocks using the same colors, but did not blend them with a sponge.
  • To make the waterfall, I used a White Gel Pen.  I had a lot of layers of ink by now on my card, and I think this process would have gone easier had I let my project dry a bit.  I was so excited to get it done though!  The gel pen doesn’t work so great for a complete stream of this length, so I did it in stages. 
  • First I created the pool waterline so I wouldn’t go too far.  If you do, just take a little Tempting Turquoise sponge over it and you can correct that. 

  • Next, I created my two outermost streams and worked to fill it in from there.  I used my finger to blend it a little, and it would have been nice to have my Whisper White Craft Pad, but alas – that’s in Orlando!
  • I took my time with it and when I thought I wanted to keep going, I did what I always advise my students – I stopped.
  • I created a few ripples, didn’t like how they turned out, so I went over them with a Tempting Turquoise Sponge and started over.  I didn’t add too many as I didn’t want to take away from the beauty of the pool.
  • I chose to mat my finished project on Whisper White and then put it on a White Card to let the beauty of it stand alone.

I hope you like my finished card.  I signed it with the location, my initials and year.  I had several guests and crew members stop by to see what I was creating and one even asked if I was selling my work!  I told him no, but what do you think?  If I sold this, how much would you ask for (tell me in the comment section)? 

I bumped into another Stampin’ Up! addict as she put it – Gail from South Carolina.  I certainly enjoyed speaking to her, and it was good to know that I was in good company on board this ship.  Gail saw my card in its beginning stages, be sure to leave me a comment when you see it on the blog Gail!

I’m sure several of you are wondering how long it takes me to create these projects.  Each one differs.  My last one of St. Barts I was able to do in one hour.  I had created beach scenes before, so the basic knowledge and direction I was going was already in my mind.  This project was quite different.  I tested several colors out first on scrap paper as my project is 5” x 7” and I wanted to get it just right.  With some breaks so that I could capture the slate blue sun rise this morning from several points on the ship (look for that project later), this project took me three hours.  Okay – pick yourselves up off the floor!  Yes, you can’t rush art as I told Michael when I came back to the room.  If I were to do this a second time, I know I would cut that down to just over one hour.  It takes time to conceptualize a project initially and break it down into steps.

I’m thrilled with the end result and I know if you venture on to tackle this on your own – you’ll love it too.

If you are in the Orlando, Florida area and would like to take my Creative University Brayering Creative Scenery classes – check out my schedule on the Upcoming Events page or my Events page from my Online Store Website.  If you would like me to travel to you to teach a class, contact me for details. To learn more about my University Class series click here

Signature Snowflake 001

To Shop 24/7 in the Creative Store – Click here!

Stamp – none Ink – Tempting Turquoise (126952), Pacific Point (126951), Old Olive (126953), Wild Wasabi (126959), Basic Gray (126981), River Rock (126977), Soft Suede (126978), Garden Green Marker (119701 – Regals Marker Collection), Old Olive Marker (100079), Summer Starfruit Marker (2012-2014 In Color Marker Collection 126856), Basic Black Marker (100082) Paper – Whisper White (100730) Cool Tools – Stamping Sponges (101610), Brayer (102395), White Gel Pen (105021)