Fabulous Florets Mojo

Fabulous Florets 001 Main R

It’s a fabulous Mojo Monday morning!  I thought I’d have some fun with the Fabulous Florets stamp set – which is a new one for me.  The flower images in this set are super easy to stamp with – and just gorgeous.  I can see that this will quickly become a favorite, especially when doing any kind of wedding ideas!

I’ve been working hard on my online class as you know and think I almost have the membership portion worked out!  I decided to release the class and email the links until I can get the rest figured out – that way you can still have some fun learning how to brayer – so check that out at the bottom!

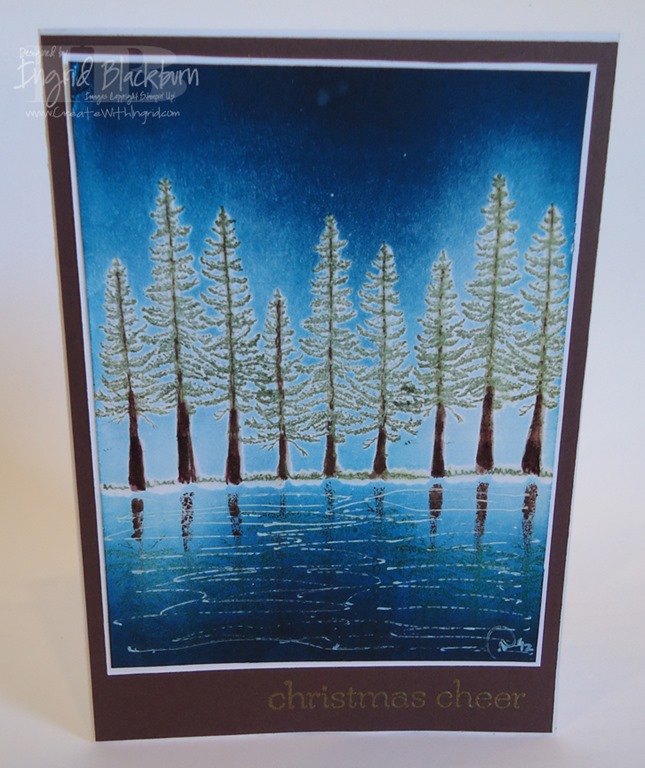
Here is this weeks Mojo Monday sketch and my interpretation – pretty literal this week, and I just love this card – especially the colors.I hope you do to – let me know what you think in the comments!

            Fabulous Florets 001 FrontMojo302Sketch

Creative Tips –

  • I did something different with my color coach today.  Usually I just thumb through it and find a main color I like.  Today, I looked only at the combinations on the back until one spoke to me.  I chose the Elegant Eggplant, Always Artichoke, Sahara Sand combo.Fabulous Florets 001 Angle
  • I played with arranging how my colors were going to be layered – I have to admit, it took me at least 5 minutes to decide!  I finally went with Always Artichoke as the card base and the then the rest fell into line.
  • I was lucky, I had the Sahara Sand card front already pierced from another project, so that was easy this morning!Fabulous Florets 001 CU
  • For a little contrast, I stamped my Elegant Eggplant in various images using all the flowers and the leaf stamp.  I stamped the bold image on Sahara Sand and cut that out to pop up as an embellishment.
  • I just wanted something simple in the foreground, so I ran my Always Artichoke though my Big Shot using the Chevron Embossing Folder.
  • For a greeting I used the new Hostess set – Banner Greetings.  Isn’t it cute?!Fabulous Florets 001 Faux Ribbon
  • I did not have any ribbon in any of these three colors – which honestly was surprising!  I must have used up all my Always Artichoke – I know I had some.  So, I made my own.  I distressed the edges of a piece of Sahara Sand and made a knot to resemble ribbon.  Here a video on how to make Faux Ribbon Fabulous Florets 001 Height
  • For some depth in my card, I popped up the Sahara Sand card base, Flower and Banner.
  • It’s a good looking card – I love the color combination.  I think it would work for anyone, and for a total masculine look, you could substitute the flowers for a general image – I’m thinking the Lacy & Lovely stamp set. SmileFabulous Florets 001 Main L

    Online Brayer Class now Available

    You’ve patiently waited…it’s finally here!  Learn the fundamentals on how to create amazing and beautiful Creative Scenery cards using a brayer.  The Brayer has stumped many, well no more.  Over three varied projects, you will master how to create gradual transitions than stun the card recipient.  You will feel like an artist.  Best of all, you will look at your stamps in a whole new way, and try things you never would have thought to do before.  Take part of the series, take the whole series, or get the class for free – you choose. Find out more here

Signature Snowflake 001

To Shop 24/7 in the Creative Store – Click here!

Fabulous Florets 001 Side

Stamp Sets – Fabulous Florets (123027c, 128574w), Banner Greetings (Hostess) Ink – Elegant Eggplant  Paper – Elegant Eggplant (105126), Always Artichoke (105119), Sahara Sand (121043) Cool Tools –Paper Snips (103579), Chevron Embossing Folder, Distressing Tool (127562) Finishing Touch –Stampin’ Dimensionals (104430), Paper Piercing Tool(126189),Stampin’ Pierce Mat (126199), Essentials Paper Piercing Pack (126187)


    Chalk Talk Birthday Wishes

    Chalk Talk 003 Main R

    Who doesn’t love a bright and cheery Birthday card?  Today I’ve combined the new Chalk Talk stamp set and framelit collection with some of our new Eastern Elegance Designer Series Paper and the Gorgeous Grunge stamp set for a fun little Birthday for someone special.  I needed a quick and easy birthday card, I’ve been stamping, filming and editing my Brayer 101 – Introduction the Creative online video class series the last few days.  It’s almost ready – look for it tomorrow!  If you’ve taken the live class with me, you’ll love this class too – the projects are all different!

    Creative Tips –

    • I stamped the large tag in So Saffron and cut it out using the Chalk Talk Collection Framelits.  If you get the stamp set and the framelits together – it’s a bundle and you save 15%!  I’m all about savings. Chalk Talk 003 CU
    • To give a little variety to my tag, I stamped it again in Rose Red and cut out the banner within the tag.  I tried it on white, but it didn’t look right.
    • I wanted to add a little splash of design behind my tag, but I didn’t want to take away from it, so I picked a simple design and then created another with my stripe stamp from the gorgeous grunge set.
    • To make my banner ends I used the 1” square punch for the smaller banner and cut the large one with my paper snipsCheck out this video on how to make Banner Flags Chalk Talk 003 Side
    • I used the Greeting from the new Four You stamp set, it covers all bases without breaking the bank!
    • I popped my greeting banner and Chalk Talk tag up on Stamping Dimensionals for some depth to the card.
    • For finishing touches, I added a little piercing to the extra white space at the top of the card and some Pearl Basic Jewels on the tag, banner and card.
      Chalk Talk 003 Main L

    It’s a fun card that is bright, cherry and simple.  Best of all it took me under 10 minutes to make!  My kind of birthday card. Smile

    Announcing a new Online Video Class

    It’s coming – Saturday July 13th!!  Brayer 101 – Introduction to Creative Scenery will be available as an online class.  Be sure to stop by to check it out.  You will want to learn how to make these amazing projects.  Get step by step video instruction and access to a private blog just for this class. 


    Signature-Snowflake-001_thumb1

    To Shop 24/7 in the Creative Store – Click here!

    Chalk Talk 003 Angle

    To view the details or see close ups of any products used in the above project, just click on the green link to view it in my store 24/7. 

    Stamp Sets – Chalk Talk (130634c, 130631w),  Chalk Talk Bundle (132730c, 132731w), Gorgeous Grunge (130517c, 130514w), Four You (130538c, 130535w) Ink – So Saffron, Rose Red Paper –Whisper White, So Saffron, Rose Red Cool Tools – 1” Square Punch, Chalk Talk Framelits,Stampin’ Sponges Finishing Touch – Stampin’ Dimensionals,Pearl Basic Jewels

    Gorgeous GrungeFour You

    Chalk Talk Bundle

    Starry Brayered Sky

    Plant Hope 002 Main

    Have you ever had a card that you just wanted to re-do?  I made this card for my father for Christmas last year and I’ve been dying to re-do it for myself, but with a few changes.  I hope you like it’s evolution.

    This card was originally my first creative scenery brayered creation after taking amazing classes on the art of brayering.  Since then, I’ve played…taught…played…taught…and played some more.  What I’ve learned is that your card is only as limited as your imagination, and with the help of pinterest and you tube – I’ve learned how to be quite imaginative!  

    Plant Hope 002 Front

    Creative Tips –

    • I wanted to change up the colors a bit and add a starry sky.  I kept my tree line in the center so that I could get enough sky and lake at the same time.
    • Once I added my tree images and embossed them in Always Artichoke and Chocolate Chip, I used a base of Soft Sky around the bottom of my trees.  I first masked off my lake shore line and added the light Soft Sky color.   My trees have better coverage this time around because I have the new ink pads.  Last year I was still using the canvas covered ones, not the awesome foam pads.  Notice the difference!Plant Hope 002 Trees
    • Then from the top I added Tempting Turquoise, Marina Mist and Midnight Muse.  I kept the Midnight Muse to the top 1 1/2 inches.
    • For that really dark night sky I added Elegant Eggplant.  Adding that over the blue gives just the right Indigo color for a night sky without making it too dark.Plant Hope 002 Side
    • For the lake I brayered Tempting Turquoise, island Indigo and just a hint of Midnight Muse at the very edge.  You can see this is much lighter than my original.
    • I added a little earth with my Chocolate Chip marker so the shore line wasn’t too thin.  This time when I embossed my shoreline I masked the bottom so that my VersaMarker wasn’t too over zealous.  That way I avoided all the white from the first one.
    • Plant Hope 002 Water
    • I added the reflection of the tree line in Midnight Muse so that it would look realistic versus the color as in the first one.
    • I kept my water simple – not over done this time.  I also added a little Midnight Muse for shadows in the movement.  I drew a little at the water line as well, which gave it a more realistic look.  Plant Hope 002 Stars
    • For stars, I used my white gel pen and made them different diameters.  I wanted to create a north star and another not quite as large, so I went over it with a qtip and some white pigment ink.

    I love the way the night sky turned out.  This card is a huge improvement over the original.  I still love both, but the night sky adds some mystery and intrigue that the original one didn’t have.  Of course the colors are a bit different too, but both are lovely!  Which one do you love?

    Signature Snowflake 001

    To Shop 24/7 in the Creative Store – Click here!

    Plant Hope 002 Angle

    Stamp Sets – Plant Hope (retired), Sweet Essentials (128315) Paper – Whisper White (100730), Chocolate Chip (102128) Ink – New Card – Soft Sky, Tempting Turquoise, Marina Mist, Midnight Muse, Elegant Eggplant, Always Artichoke, Chocolate Chip Marker; Original Card – Midnight Muse (126860), Marina Mist (126962), Not Quite Navy (126971), Tempting Turquoise (126952), Versamark (102283), Early Espresso Stampin’ Write Marker (119680) Cool Tools –Brayer (102395), Stamp-a-Majig (101049), Heat Tool (129053), The Perfect Finish – Clear Embossing Powder (109130), Gold Embossing Powder (109129), Silver Embossing Powder

    Wetland Reeds and Sunshine

    Wetlands 004 Main

    The sun shines 6.9 out of 7 days here in Florida – there’s  a reason it’s called sunny Florida.  So I wanted to do a sunny card that reflects the summer feel and what better than the reeds stamp from the Wetlands set.  When I decided to make this card I decided on a particular view – I thought what would a field of wheat look like if I was laying on the ground.  And here is the end result!Wetlands 004 Front

    Creative Tips –

    • A one layer card would keep the simplicity of the scene in the forefront.  To create the white space, I masked off the top 1 1/4” and bottom 1” of my card.  I stamped my reed (wheat) in Versamark and then the Crushed Curry Classic Ink several times across my card.  Wetlands 004 CU
    • I embossed them with Clear Embossing Powder and used the Crushed Curry Stampin’ Write Marker and VersaMarker with Clear Embossing Powder to fill in the base of the image.
    • Soft Sky Classic Ink formed my base for the sky.  I used a brayer to apply a good base across from the top and base, and then again from the left and right.  Wetlands 004 Side
    • Using 1/2” on my brayer, I applied some Pacific Point to the top of my sky.
    • For a little more depth, I sponged a tiny bit of Midnight Muse at the very edge of the upper sky.
    • The greeting is stamped in Pacific Point using the new Four You set.

    This card reminds me of the mid-west.  It just makes me happy and I see field of wheat and grass in the late summer.  I hope you like it too! 

    Be sure to check back in the beginning of July for my online brayer classes and technique videos.  You won’t wan to miss these step by step how to videos that will help you to master this amazing and artistic technique. 


    Signature-Snowflake-001_thumb1

    To Shop 24/7 in the Creative Store – Click here!

    Wetlands 004 Angle

    Stamp Sets – Wetlands (126697c, 126695w), Four You (130538c, 130535w) Ink – Soft Sky (131181), Pacific Point (126951), Crushed Curry (131173), Midnight Muse (126860), Crushed Curry Stampin’ Write Marker (131264), Versamark (102283) Paper –Whisper White (100730) Cool Tools – Brayer(102395),Stampin’ Sponges (101610), Clear Embossing Powder (109130)

    Untitled-12Four You

    Wetlands One Layer Card

    Wetlands 003 009

    It’s been a while since I’ve made a One Layer Card and the Wetlands stamp set is the perfect set for this.  Here is a creative scenery that’s quick, easy, cost effective and just beautiful for anyone receiving this in the mail.  So get out your brayers and sponges today, and follow along with the tutorial.

    Creative Tips –

    • I created a mask for the top and bottom using two sheets of printer paper.  I have to admit, my first try at this was foiled because I only used one sheet and the ink bled through to my project.  That’s one of those argh moments!Wetlands 003 Side
    • I brayered my sky and water with Soft Sky and then added a touch of Island Indigo at the top.  My Island Indigo got a little too strong about 1/2” in so I went over it with more Soft Sky to blend it out.  You can usually blend out mistakes with a little more ink in a lighter color.
    • I tossed my top mask (the blue one) and flipped my bottom mask around.  I sponged in my Sahara Sand in a circular motion to create my land.
    • For the horizon, I used a straight edge piece of printer paper and sponged on a little Island Indigo.Wetlands 003 CU
    • I stamped my birds in Early Espresso, any lighter color would not stand out enough.  I tried Basic Gray and even that wasn’t dark enough.  To test out my colors, I stamped my birds on my scrap brayered piece of printer paper that I tossed.
    • Keeping my bottom mask in place I stamped the reeds in Wild Wasabi.  I’ve tried this in lighter shades of green before and they too aren’t dark enough.
    • Brayer cards with scenery work great if you have a focal frame at the bottom of your card, as if you were standing right there looking out at your scene.Wetlands 003 Front
    • Once I had my reeds where I wanted them, I colored my reed stamp in using my Wild Wasabi marker, but only colored the grass portion.  I stamped this over my images to make them a bit fuller and bring my focal frame a little closer to the middle.
    • Normally I would use my white gel pen for some highlights, but I wanted to keep this card light and airy and uncomplicated – so I decided to leave it out.

    I love this card – best part – it only cost 1/2 a sheet of Whisper White.  So if you’re stamping on a budget and have to make a lot of cards – next time try some one layer cards!

    Learn how to master the techniques behind this card 

    Two comprehensive classes leave you feeling like an artist ready to create any scene possible with brayers and sponges.  Detailed step by step video instruction, and much more.  Check it out in the classroom here: Find out more here

    Signature-Snowflake-001_thumb1

    Wetlands 003 Angle

    Stamp Sets – Wetlands (126697c, 126695w) Ink – Soft Sky (131181), Island Indigo (126986), Sahara Sand (126976), Wild Wasabi (126959), Wild Wasabi Stampin’ Write Marker (131264) Paper –Whisper White (100730) Cool Tools – Brayer (102395),Stampin’ Sponges (101610)

    Untitled-12

    By the Tide Blog Tour

           blogtour-stampmonth-MayBy the Tide 003 Main

    Welcome to the RemARKable Stamp of the Month Blog Tour!  I’m stop #3 on the RemARKable Blog Tour!  You probably came from Linda’s blog Ink Stamp and Scrap – I love Linda’s work and think she is quite talented!  Today we are stamping with the ‘must have’ stamp set out of the Spring Catalog – By the Tide.  I couldn’t wait to get my hands on this set when this catalog was released.

    By the Tide 003 Side

    I love using my brayer along with this set.  So for today, I created a tropical underwater scene for you.

    Creative Tips:

    • I wanted to use the retiring color River Rock – just about the only retired color that you can still get paper and ink refills for!  I just love this color and I quickly got out my Color Coach and chose the combination Cherry Cobbler and Marina Mist to go along with River Rock.  To see my favorite card made with similar colors – click here.
    • I started by embossing the coral in Cherry Cobbler (Versamark and then my Classic Pad) and added the sea horses in Marina Mist the same way.  I used Clear Embossing Powder to set them.By the Tide 003 CU1
    • I brayered River Rock on the bottom of the largest Framelit for sand.
    • Next I brayered the colors Pool Party, Tempting Turquoise, our new In Color – Coastal Cabana and just a tiny amount of Marina Mist.

    By the Tide 003 CU2

    • I refreshed my Sea Horses with my Marina Mist marker and embossed them again with Clear EP.
    • For the River Rock background I repeatedly stamped tone on tone the script stamp (My favorite from this set).  By the Tide 003 Height
    • I popped the underwater world framelit window up on Stampin’ Dimensionals and added a few large Pearl Basic Jewels. By the Tide 003 Front Set
    • I started to add a banner, but didn’t want to take away from my creative scenery, so I just embossed my greeting in Cherry Cobbler directly over the River Rock script.
    • Of course, don’t forget to do your envelope too!  I even added a little sand with my brayer on it! The contrast in colors work.  I hope you love my little glimpse into the under water world with By the Tide.  Be sure to stop by tomorrow to see what I create for Mojo Monday!
      If you’d like to see more samples that I’ve previously done with this set just click on the pictures below.  Or you can use the search box on the right – just type in By the Tide.

                     By The Tide 129120L

    Be sure to head on over to Melissa’s blog next – http://www.stampinup.net/blog/2089191 to see what amazing things she’s created! Enjoy the tour!

    blogtour-stampmonth-next_thumb1

    Signature-Snowflake-001_thumb1

    By the Tide 003 Angle

    Creative Supplies Used:

    Stamp Sets – By the Tide, Sweet Essentials Ink – Versamark, Cherry Cobbler, Marina Mist, River Rock, Tempting Turquoise, Coastal Cabana, Pool Party Paper – Whisper White, River Rock Cool Tools – Apothecary Accents Framelits, Brayer, Heat Tool The Perfect Finish – Stampin’ Dimensionals, Pearls

    By The Tide Underwater Scene

    When I first opened up my Spring Mini Catalog – I immediately focused in on this set – By the Tide.  I have to say I was waiting to make this card.  I wanted to create an underwater scene and this card did not disappoint.  This set is super easy to use, and I just love the coral stamp.  It’s a big stamp, so I mostly only use a partial image, but I love the texture of the coral branches.  This card is loaded with tips, and techniques.

    Creative Tips:

    • My concept was an underwater world.  To get that effect I started sponging Daffodil Delight in the center surrounded by Lucky Limeade.
    • I then brayered Pool Party and Tempting Turquoise adding more of the same color with a sponge as I needed it.  I finished by adding a little Marina Mist with a sponge on the edges to create a little depth of darkness.
    • Brayer Tip – be sure to start off and end off your paper.  Work lightest to darkest.  If you want to master this technique – check out my Creative University Series Brayer Class here.
    • The school of fish are stamped in Midnight Muse along with the Coral.
    • I found that it was easier to add the lead fish first and work backwards.

    • My greeting originally said Happy Birthday Wishes and is from the set Petite Pairs.  I removed the W from wishes with a blender pen – it’s perfect for that small omitting item.  I replaced it with and F from Simply Serif Mini Alphabet using a Stamp-a-Majig to perfectly place it.
    • I used the script stamp in the By the Tide set (love those kind of stamps) and free hand stamped it.  But if you are worried about lining it up just perfectly – use a Stamp-a-Majig!

    • My card is a traditional size A2 card and the creative underwater scenery is 5.5” x 2”.  I used a 1/16” white mat for the scenery to pop it off my Pool Party card base.
    • I made thirty of these cards.  I found it was easier to leave the strip in a 5.5” x 4” size, do all my sponging and brayering and then cut it in half.  Why do twice the work?!

    This was a fun project that my team – The Creative Crew, made at our last Creative Gathering.  Everyone loved seeing the Magic – as they described it, happen as the underwater scene unfolded.  I hope you try it and I know you too will fall in love with underwater scenery!  If you too would love to join The Creative Crew at a Creative Gathering, or join us online, click here to find out more!

    If you live in the Orlando, Florida area and you would like to learn how to create amazing scenery first hand, I’m offering a Creative University series class around Brayering Creative Scenery.  For more information, click here.

    SignatureSnowflake001_thumb1

    To Shop 24/7 in the Creative Store – Click here!

    Stamp Sets – By the Tide (129120c, 129117w), Petite Pairs (122497c,122495w) Simply Serif Mini Alphabet (126360w) Ink –Pool Party (126982),  Tempting Turquoise (126952), Daffodil Delight (126944), Lucky Limeade (126984), Marina Mist (126962), Midnight Muse (126860)  Paper – Whisper White (100730), Pool Party (122924),  Cool Tools – Stamping Sponges (101610), Brayer (102395), Stamp-a-Majig (101049)

    By The Tide 129120L

    Pleasant Poppies

    I wanted to play a little with my brayer today, so I did a quick background for one of the newest background sets this yet – Pleasant Poppies.  This is my first time using this sweet stamp and I have to admit I was rather excited!

    I started to create my sky with the three blues – Bashful Blue, Baja Breeze and Marina Mist.  I like the strong sky the three colors formed.  I then added a little Certainly Celery to the bottom of my card panel.  I wanted it to have a wispy look to it without getting too strong with the brayer.  Here you see two cards – one I left as blue poppies and the other I added Tangerine Tango.


    • I created a good base with Certainly Celery (isn’t that just such a great name!) before taking to my card with a sponge and the ink pad.  I started off my card and sponged on in circles to create the light green feel.
    • I also did the same with a quick coat of Bashful Blue to pop the sky a little after having brayered the look I wanted to achieve.

    • To give that rich orange look that poppies – especially California Poppies from my home state have, I used Tangerine Tango.
    • I stamped on the Tangerine Tango cardstock and cut out each image with my Paper Snips before adding it to my brayered background.  This gives the card a definite pop.
    • I didn’t want the poppies to be too 3D as I felt this would take away from the card, so I popped up the card panel instead. 
    • To finish the card I matted the brayered background on Whisper White before adding the dimensionals on the orange sample.

    For a more subtle look, I left the blue poppies alone and added a slight white border before adhering it directly to the Marina Mist Card.  I popped up the saying to add a little dimension.

    Two similar card with very different looks.  Which one is more your style? 

    Creatively yours –

    Ingrid

    To Shop 24/7 in the Creative Store – Click here!

    Stamp Sets – Pleasant Poppies (129499), Sweet Essentials (128315) Paper – Whisper White (100730), Marina Mist (119682), Tangerine Tango (111349) Ink – Bashful Blue (126961), Baja Breeze (126960), Marina Mist (126962), Certainly Celery (126958), Basic Black (126980) Cool Tools –Brayer (102395), 1” square punch, Paper Snips (103579), Stampin’ Sponges (101610) The Perfect Finish – Stampin’ Dimensionals (104430)

    Untitled-12

    Untitled-12