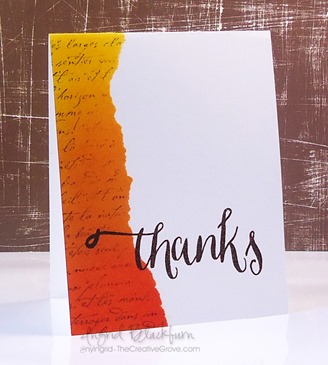
Have you ever created an Ombre faux torn edge on a card before? This is a technique that I pull out of my toolbox over an over. Seriously…I have been teaching this technique for over 12 years! As a matter of fact – this project specifically. Do you ever have a project that just sticks with you? I’d love to know – tell me in the comments.
I love this project so much, that I finally broke down and created a video to share with you – just like I promised last week. There is a ton going on in this simple looking card – stippling, faux tearing, ombre, masking and embossing. Here – see for yourself!
So what did you think? Did you make it to the end with all the great close up photos? I love how when it all comes together it’s such a striking look. It’s funny, I remember the very first time I taught this technique live – it was at one of my class hostess’ home – Stephanie and we had about 16 people there. It was such a fun class. We actually made stationary, not a card with this technique – Edge on a 5 1/2 x 8 1/2 sheet with a matching envelope. So try it any way that you can think of.
Creative Tips –
- When I tear paper, I always tear towards me. Usually the piece I’m adding an edge to is on the left and I’m tearing around it with my right. That way I have all those amazing layers of paper on the piece I’m looking for. This project, however, you want to use the throw away piece – the right side as is. You do not want those great layers showing.
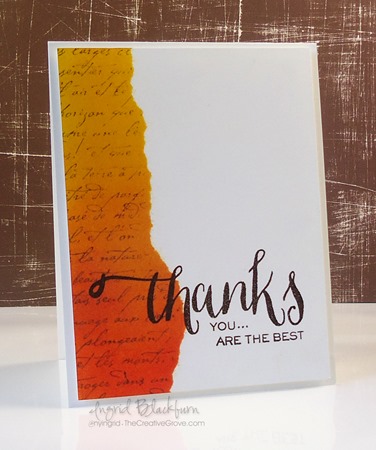
- When stippling, be sure to keep your brush moving in different spots. The key to a smooth transition – and one that is important for the Ombre look, is to not stay in the same general area. That way it flows.
- Work with colors that have the same tone – warm, cool, etc… That way they blend together.
- My first combination that I tried 12 years ago was a gorgeous one – Stampin’ Up! retired – Summer Sun, Really Rust, and the current Old Olive. That was a gorgeous combination.
- The WPlus9 stamp set Hand lettered Thanks is a great one to pair with this project. I love the scripty bold look.
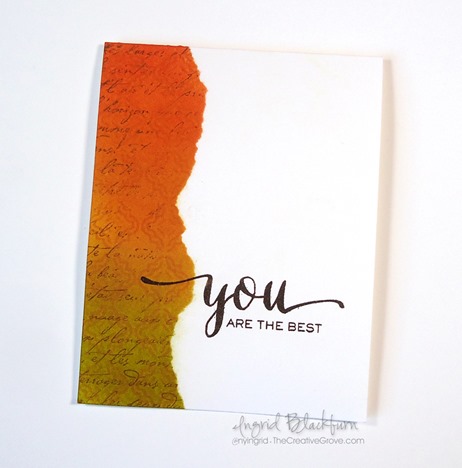
Here is a deepened version of this card – it has a little Peeled Paint at the bottom and the Penny Black stencil – Oscillations in Orange as an added layer.
I’m entering this project into a few challenges this week – be sure to stop by their sites and check out the amazing talent at each!
- Just us Girls – Color Week #289
- Happy Little Stampers – April Stenciling Challenge
- Case this Sketch – Sketch #119
- CASology – Cue Card #143 – Ombre
I would love to know if you have a project that you duplicate over and over through the years – let me know in the comments below. I hope you enjoyed this project as much as I have. I can’t wait to see your Ombre Faux Torn Edge creations!
See you next time –
[optin_box style=”13″ width=”500″ alignment=”center” action=”https://www.aweber.com/scripts/addlead.pl” disable_name=”Y” method=”post” email_field=”email” email_default=”Enter your email address” integration_type=”aweber” double_optin=”Y” list=”3846012″ name_field=”name” name_default=”Enter your first name” name_required=”Y”][optin_box_field name=”headline”]If you enjoyed this tutorial…[/optin_box_field][optin_box_field name=”paragraph”]PHA+4oCmeW914oCZbGwgbG92ZSBvdXIgPGVtPjxzdHJvbmc+PHNwYW4gc3R5bGU9ImNvbG9yOiAjMjQ0YzVlOyI+ZnJlZTwvc3Bhbj4gPC9zdHJvbmc+PC9lbT5zdWJzY3JpYmVyIG9ubHkgdmlkZW8gc2VyaWVzLiDCoExlYXJuIG5ldyB0ZWNobmlxdWVzIHRocm91Z2ggb3VyIDxzcGFuIHN0eWxlPSJjb2xvcjogIzI0NGM1ZTsiPjxlbT48c3Ryb25nPmV4Y2x1c2l2ZTwvc3Ryb25nPjwvZW0+wqA8L3NwYW4+Q3JlYXRpdmUgVGlwcyBlLWxldHRlcsKgYW5kIHN1YnNjcmliZXIgb25seSB2aWRlbyBhbmQgcHJvamVjdCB0dXRvcmlhbHMhPC9wPgo=[/optin_box_field][optin_box_field name=”privacy”][/optin_box_field][optin_box_field name=”top_color”]undefined[/optin_box_field][optin_box_button type=”1″ text=”Send me exclusive tips!” text_size=”32″ text_color=”#000000″ text_bold=”Y” text_letter_spacing=”0″ text_shadow_panel=”Y” text_shadow_vertical=”1″ text_shadow_horizontal=”0″ text_shadow_color=”#f6fefb” text_shadow_blur=”0″ styling_width=”50″ styling_height=”19″ styling_border_color=”#000000″ styling_border_size=”1″ styling_border_radius=”6″ styling_border_opacity=”100″ styling_shine=”Y” styling_gradient_start_color=”#a3b640″ styling_gradient_end_color=”#80902c” drop_shadow_panel=”Y” drop_shadow_vertical=”1″ drop_shadow_horizontal=”0″ drop_shadow_blur=”1″ drop_shadow_spread=”0″ drop_shadow_color=”#000000″ drop_shadow_opacity=”50″ inset_shadow_panel=”Y” inset_shadow_vertical=”0″ inset_shadow_horizontal=”0″ inset_shadow_blur=”0″ inset_shadow_spread=”1″ inset_shadow_color=”#80902c” inset_shadow_opacity=”50″ location=”optin_box_style_13″ button_below=”Y”]Send me exclusive tips![/optin_box_button] [/optin_box]


Wow, this is brilliant Ingrid.
Thanks Lisa – glad you like it! 🙂
What a fabulous technique, Ingrid! Your ombre inking is flawless and the torn edge is so cool! Thanks for playing along with CASology this week!
Glad you liked it Jen – thanks for stopping by! 🙂
Ingrid, your card is simply awesome and thank you so much for sharing your technique! I must try this!
You’ll love it Angela – have fun! 🙂
I love this technique and haven’t used it in a while. Great video and love your card! Thanks for playing with Just Us Girls!
Thanks Lisa for stopping by! I’m glad you liked the video – was a fun challenge. 🙂
Love this technique too and yours look Perfect! Thanks for sharing your talents with us at Just Us Girls this week and we hope you join us again soon!
Thanks Nancy – it’s a fun project, glad you enjoyed it. 🙂
So beautiful! I love how you’ve used this multi-technique element but kept your card so CAS by using so much white space! So glad you joined us at CASology this week!
Thanks Ardyth! It’s a fun card, always a challenge to make it look simple. 🙂
Its an absolutely fantastic card! And thanks for the video!!
I’m so glad you enjoyed it! 🙂
Hi Ingrid. Beautiful card and a great tutorial. Thanks for playing along at Happy Little Stampers!
Thanks Loll! Just trying to keep up with yours! 🙂
So pretty! Great take on the sketch!
Thanks Leigh! It was a great straightforward one. 🙂
Love this technique. Your cards are so pretty and CAS, my fav.
Glad you liked it Carol – this one has always been a fav of mine. 🙂