Have you ever made a cool shaker card? I’ve been a card making fool lately, and the past week was crazy around here at The Creative Grove. Thousands, thousands and thousands of you visited, many commented and overall it was a fun, crazy and certainly creative week!
Somehow over the past seven days I managed to add three videos to My YouTube Channel , one to StampNation, two to ongoing online classes here at the grove, and one over at another channel I contribute to – insane! PLUS….you saw details on 11 projects, hundreds of you decide you wanted more inspiration so you subscribed to the free video series we have here at The Creative Grove, and two lucky people that commented among the blog hop that saw thousands of entries won the Beautiful World collection. Congrats to Donna Phelan and Terri Mansfield – contact Catherine and she’ll get you all set!
Oh, and in case you missed it – the Stamp of Approval – Beautiful World Collection sold out in just 33 hours! That’s insane – it almost didn’t make it to the public, solely StampNation Members and the wait list. CRAZY!
I wanted to say thanks for stopping by so many days, and leaving me awesome comments – I read every one – even all 471 the other day alone! So to thank you and to tell you how awesome you all are…I wanted to keep you inspired, so I have one last card for you in this series – let’s call it a bonus!
I think you all are Just Awesome – so here’s a fun little shaker card – enjoy the detailed tutorial. And if you’re wanting more – sign up for the Creative Tips E-letter and get lots of great exclusive videos and projects sent directly to you – it’s free. You can sign up here…
[divider style=”10″]
[optin_box style=”12″ alignment=”center” email_field=”email” email_default=”Enter your email address” email_order=”2″ integration_type=”aweber” double_optin=”Y” list=”3846012″ name_field=”name” name_default=”Enter your first name” name_order=”1″ name_required=”Y” opm_packages=””][optin_box_field name=”headline”]Learn more with our exclusive FREE video series:[/optin_box_field][optin_box_field name=”paragraph”]PHA+UGx1cyB5b3UnbGwgYmUgYWRkZWQgdG8gbXkgRlJFRSBDcmVhdGl2ZSBUaXBzIEUtbGV0dGVyIHdoZXJlIEkgc2hhcmUgZXhjbHVzaXZlIHByb2plY3RzLCB2aWRlb3MgJiB0aGUgMTIgRGF5cyBvZiBDaHJpc3RtYXMgUHJvamVjdCBTZXJpZXM8L3A+Cg==[/optin_box_field][optin_box_field name=”privacy”][/optin_box_field][optin_box_field name=”top_color”]undefined[/optin_box_field][optin_box_button type=”0″ button_below=”Y”]Get Instant Access![/optin_box_button] [/optin_box]
[divider style=”10″]
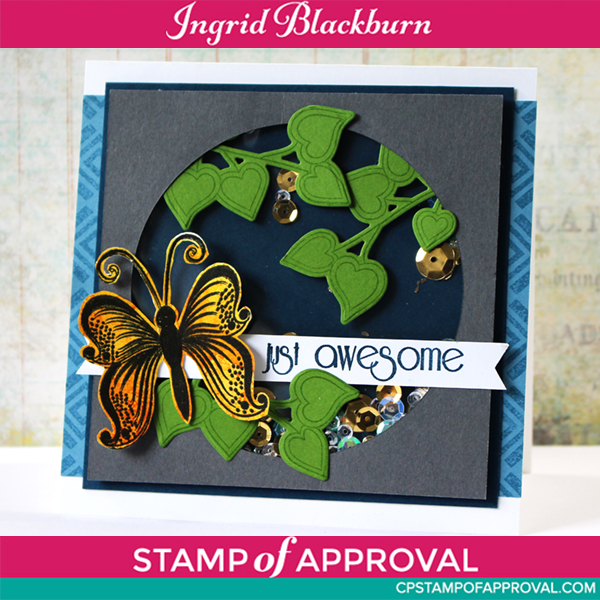
I wanted something fun and a WOW card to finish off this amazing creative journey with you into the Beautiful World collection, so I figured I would create something I almost NEVER do – a shaker card.
I’ll be honest with you, originally I planned on just a window instead of a shaker card, but then I thought about who I would send this card to. While I made it with my blog readers & subscribers in mind, the practical part of actually sending the card is going to my 10 year old niece Chiarra for her awesome job competing in Odyssey of the Mind in upstate NY – her team won locally and made it to the next round. While they didn’t make it all the way to the world competition (like she wanted), I’m SO proud of her and her accomplishments – definitely shaker card worthy! So here we go…
Shaker Card Tutorial & Creative Tips
This card has precise measurements to maximize the size that fits a particular envelope I have. So I had to kind of tweak the circles. I hope this makes sense, if not, leave me a comment and I’ll clarify anything you need. 🙂
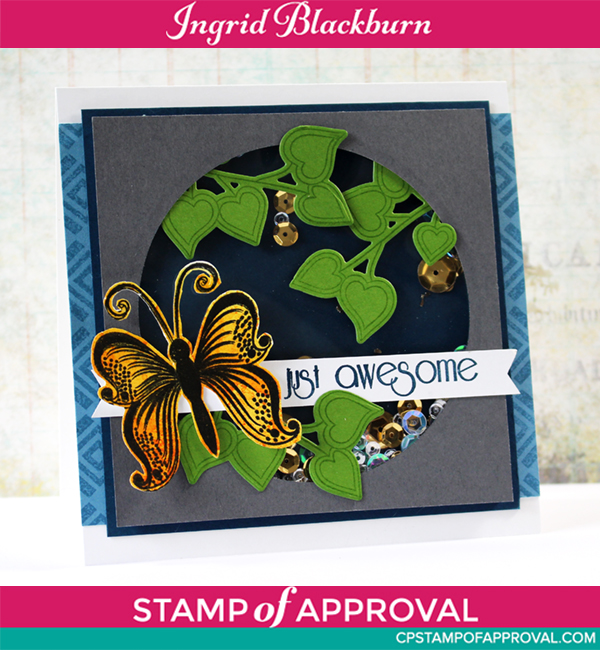
- This card measures 5 x 5″ square. I like the circle shaker as it is a nice contrast with the square shape. If you do not have circle dies for this card, you can just as easily cut a square with a paper trimmer or die too!
- Lay your grey square – 4 3/8 x 4 3/8″under your fun foam – 4 3 /16 x 4 3/16″ – note that the foam is just slightly smaller than the card stock. Cut a circle in the middle of both at once – fun foam compresses, so it’ll go through your Big Shot just fine. My circle measures 3 5/8″ wide.
- Your circle will have a slight indent from the edge of your die. Use your scissors to cut it slightly larger. Of course if you have the in-between measurements of a slightly larger circle (sadly I don’t), then use that if you wish!
- Your fun foam circle cut should be just slightly larger than your grey circle, yet hidden by the grey square. If it isn’t, trim as needed, but try to keep the skinny parts of the sides as wide as possible.
- You can always use foam tape as well, but the whole piece from fun foam with no little crack to slip in- between is my preferred choice for a good shaker card.
- Stamp and die cut your images from Enchanted Garden. Of course, if you use anything here – leaf, fern, snowflakes, balloons, monkeys – literally anything you have! TIP – The key is to have three – always work in odd numbers, it’s more pleasing to the eye.
- Watercolor, color with copics, or do the wrinkle free distress technique (video here) for an interesting butterfly. I used the gorgeous image from Beautiful World by Gina K.

- Stamp your greeting on a strip that goes a little past your colored squares – mine measures 4 5/8″ cut. I used the greetings from All about You by CAS-usal Fridays. TIP – I keep all my 1/2″ strips from cutting down card bases and fronts. This is what I used for my banner….only when I stamped my greeting, I put in on a strip that was almost 8″ long! That gave me play for placement on the card, as I needed it to be just right.
- Figure out the placement of your vines, banner and butterfly. TIP – I add a little removable adhesive (Dotto) to the back of my pieces so my vines had somewhere to clutch or they move all over the place and drive me crazy!
- Secure them to where they need to be. popping in and out of your window for a cool 3D effect. Pop up your butterfly wings with a small foam dimensional uner the wings to help it stay popped up at it’s destination and the desired effect.
- Attach your grey panel to your acetate sheet with strong two sided tape like sticky strip. It’s plastic, so it is a tough surface – Snail or regular adhesive will just fall apart – especially in humid areas.
- Choose to do this part in whichever sequence makes you comfortable. I’ll explain how I did mine. Add sticky strip to one side of your fun foam square/circle around the perimeter. Attach to your Midnight Muse (darker blue) base – 4 5/8 x 4 5/8″. Tip – to get it just right, make sure your borders are the same – always think – is the top/bottom & left/right the same. That way you’ll be even.
- Here’s the important part – fill your circle center with what you’ll be shaking before moving on to the next step. Seems simple, but I’ve forgotten that before…lol! I used a variety of sequins – colors and sizes plus a little chunky glitter. Seed beads are a great alternative too – anything that will be cool looking and make a little noise!
- Add the same perimeter to the top of the fun foam. TIP – if your strip is wider than your fun foam, have the excess go to the outside, not the inside of the circle – that will just catch and shaking pieces. If you make this with a larger panel – it’s much easier to gauge – I just didn’t….lol.
- Stamp your Marina Mist (lighter blue) piece – 4 1/4 x 5″ – with a cool geometric shape for interest and contrast. I used Geobuilders by Catherine Pooler Designs.
- Adhere your dark/lighter blue pieces together keeping the lighter in the center either vertically or horizontally. Adhere to your white card base and you’ll all set. You have a fun interactive shaker card!
How was that for a fun card! I’ll have to film how to make another shaker card and put it on My YouTube Channel for you some day. If you have anything you’d like me to write about or film, or just have questions on a product, please let me know in the comments below! And of course, if you missed the previous 11 projects from this series, here are some links to get you to those and the videos.
Day One Day Two Day Three Day Four Day Five
Now it’s your turn….you’ve had plenty of inspiration – go get those fingers inky!

[optin_box style=”12″ alignment=”center” email_field=”email” email_default=”Enter your email address” email_order=”2″ integration_type=”aweber” double_optin=”Y” list=”3846012″ name_field=”name” name_default=”Enter your first name” name_order=”1″ name_required=”Y” opm_packages=””][optin_box_field name=”headline”]Learn more with our exclusive FREE video series:[/optin_box_field][optin_box_field name=”paragraph”]PHA+UGx1cyB5b3UnbGwgYmUgYWRkZWQgdG8gbXkgRlJFRSBDcmVhdGl2ZSBUaXBzIEUtbGV0dGVyIHdoZXJlIEkgc2hhcmUgZXhjbHVzaXZlIHByb2plY3RzLCB2aWRlb3MgJiB0aGUgMTIgRGF5cyBvZiBDaHJpc3RtYXMgUHJvamVjdCBTZXJpZXM8L3A+Cg==[/optin_box_field][optin_box_field name=”privacy”][/optin_box_field][optin_box_field name=”top_color”]undefined[/optin_box_field][optin_box_button type=”0″ button_below=”Y”]Get Instant Access![/optin_box_button] [/optin_box]
WoW!! This is beautiful and fun shaker card! Thank you so much for the tips, Ingrid! You rock!
I’m so glad you liked it Helen!! 🙂
Love your card. I think the fun foam is the greatest idea for these shaker cards. Thanks!
Absolutely fabulous x
I love this card and can’t wait to try it. So beautiful!
Gorgeous!! I adore shaker cards.
Beautiful shaker card! Can’t wait to get my SOA box so I can play!