Fill-in-the Blank Colorwash Resist

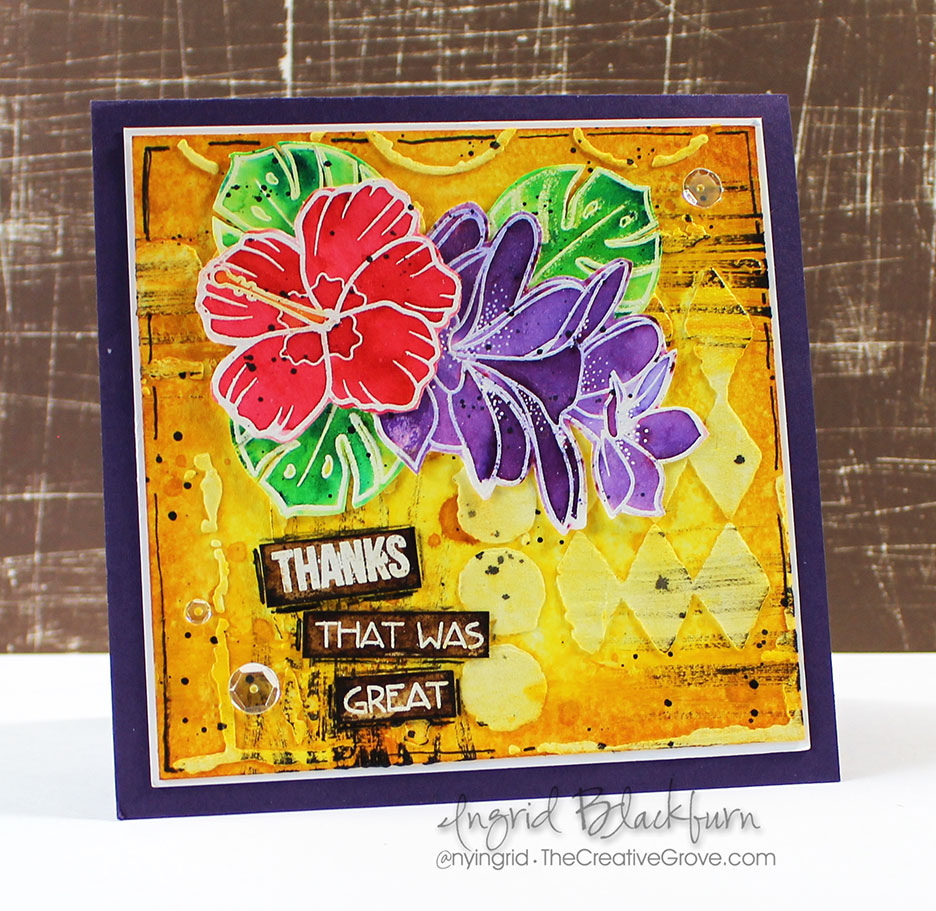
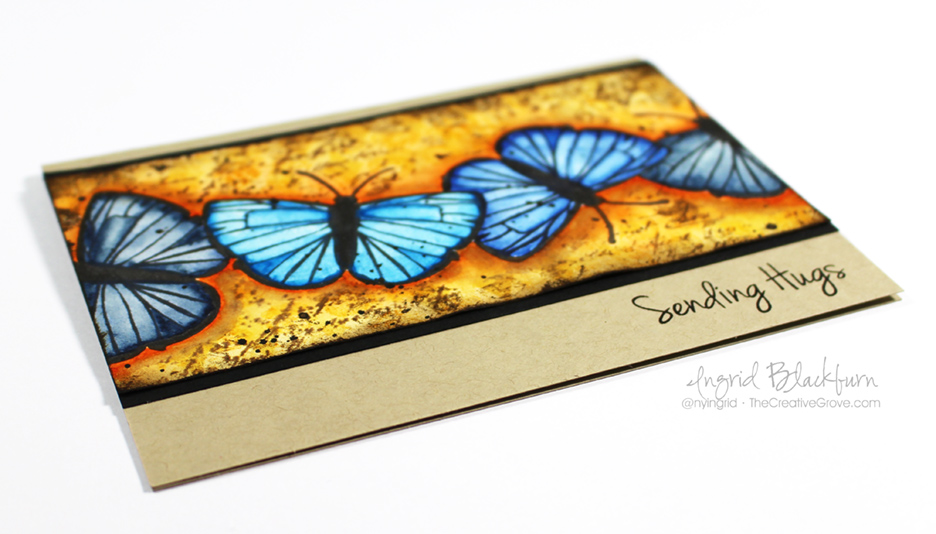
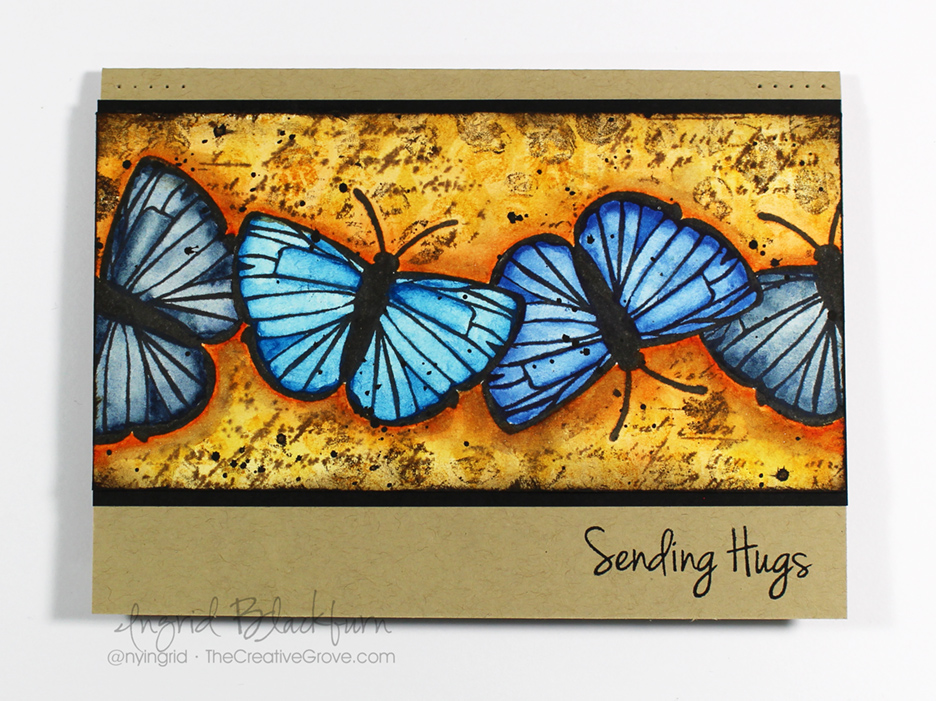
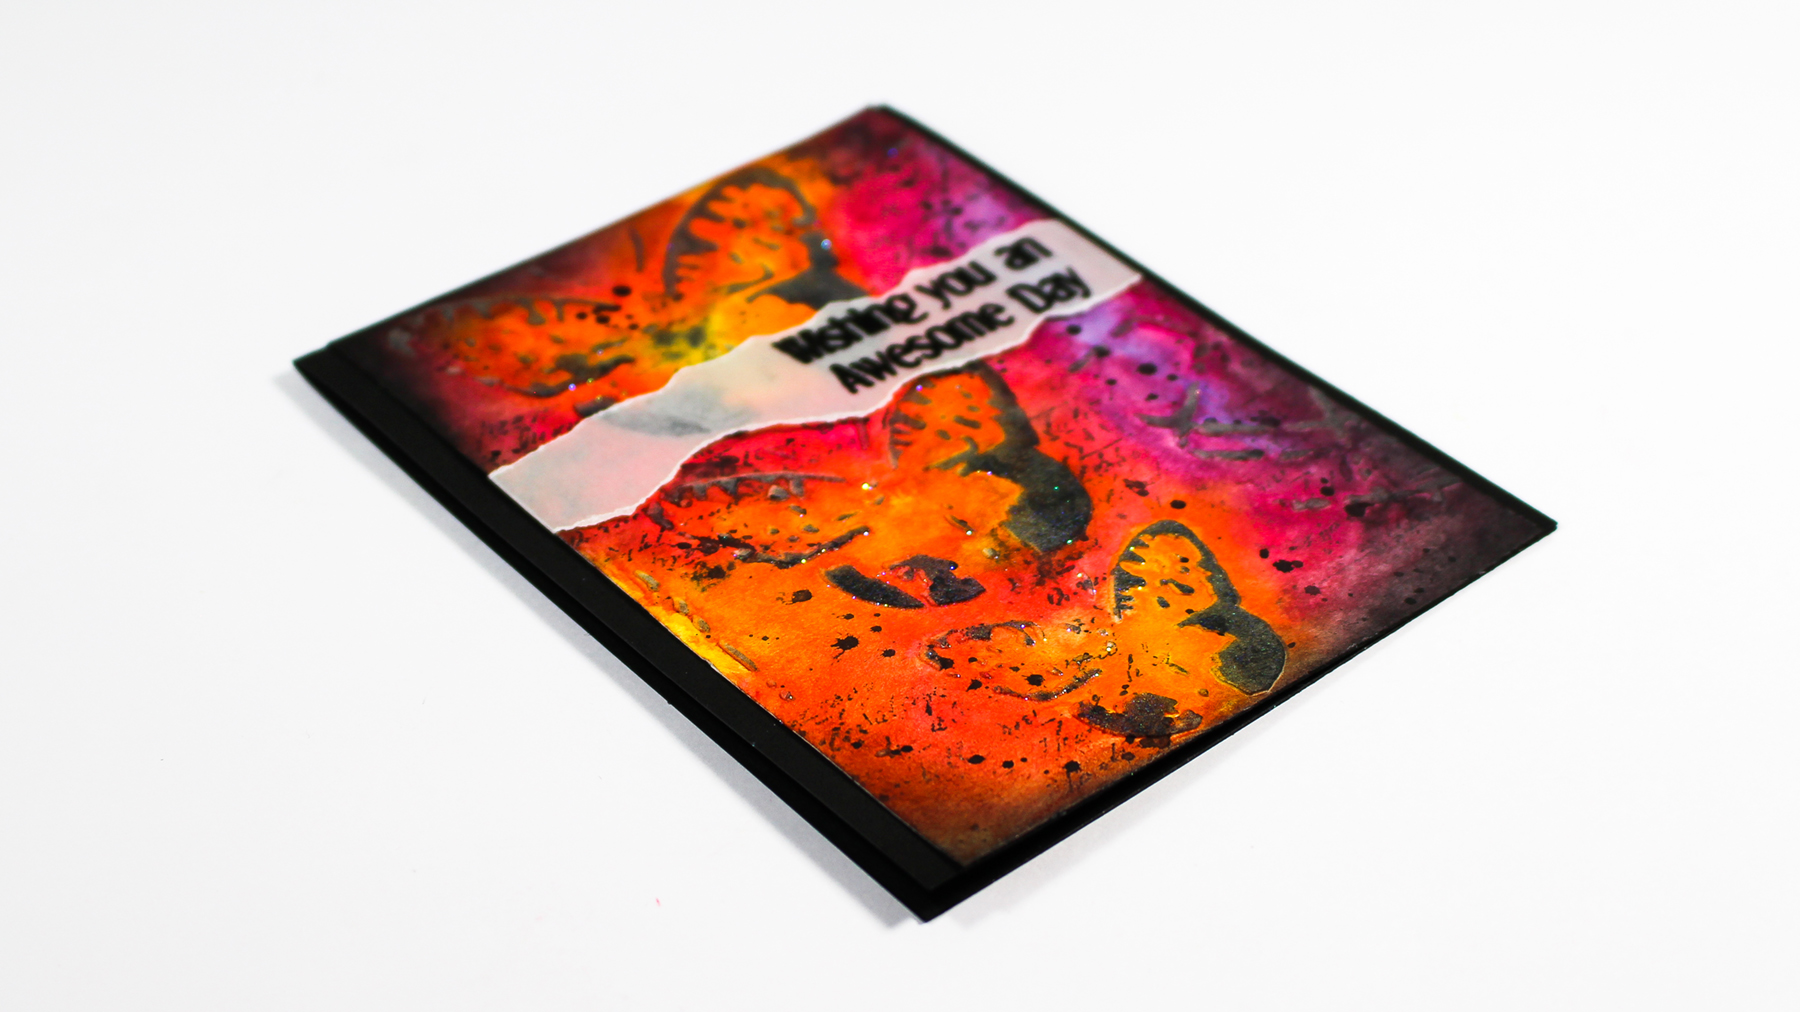
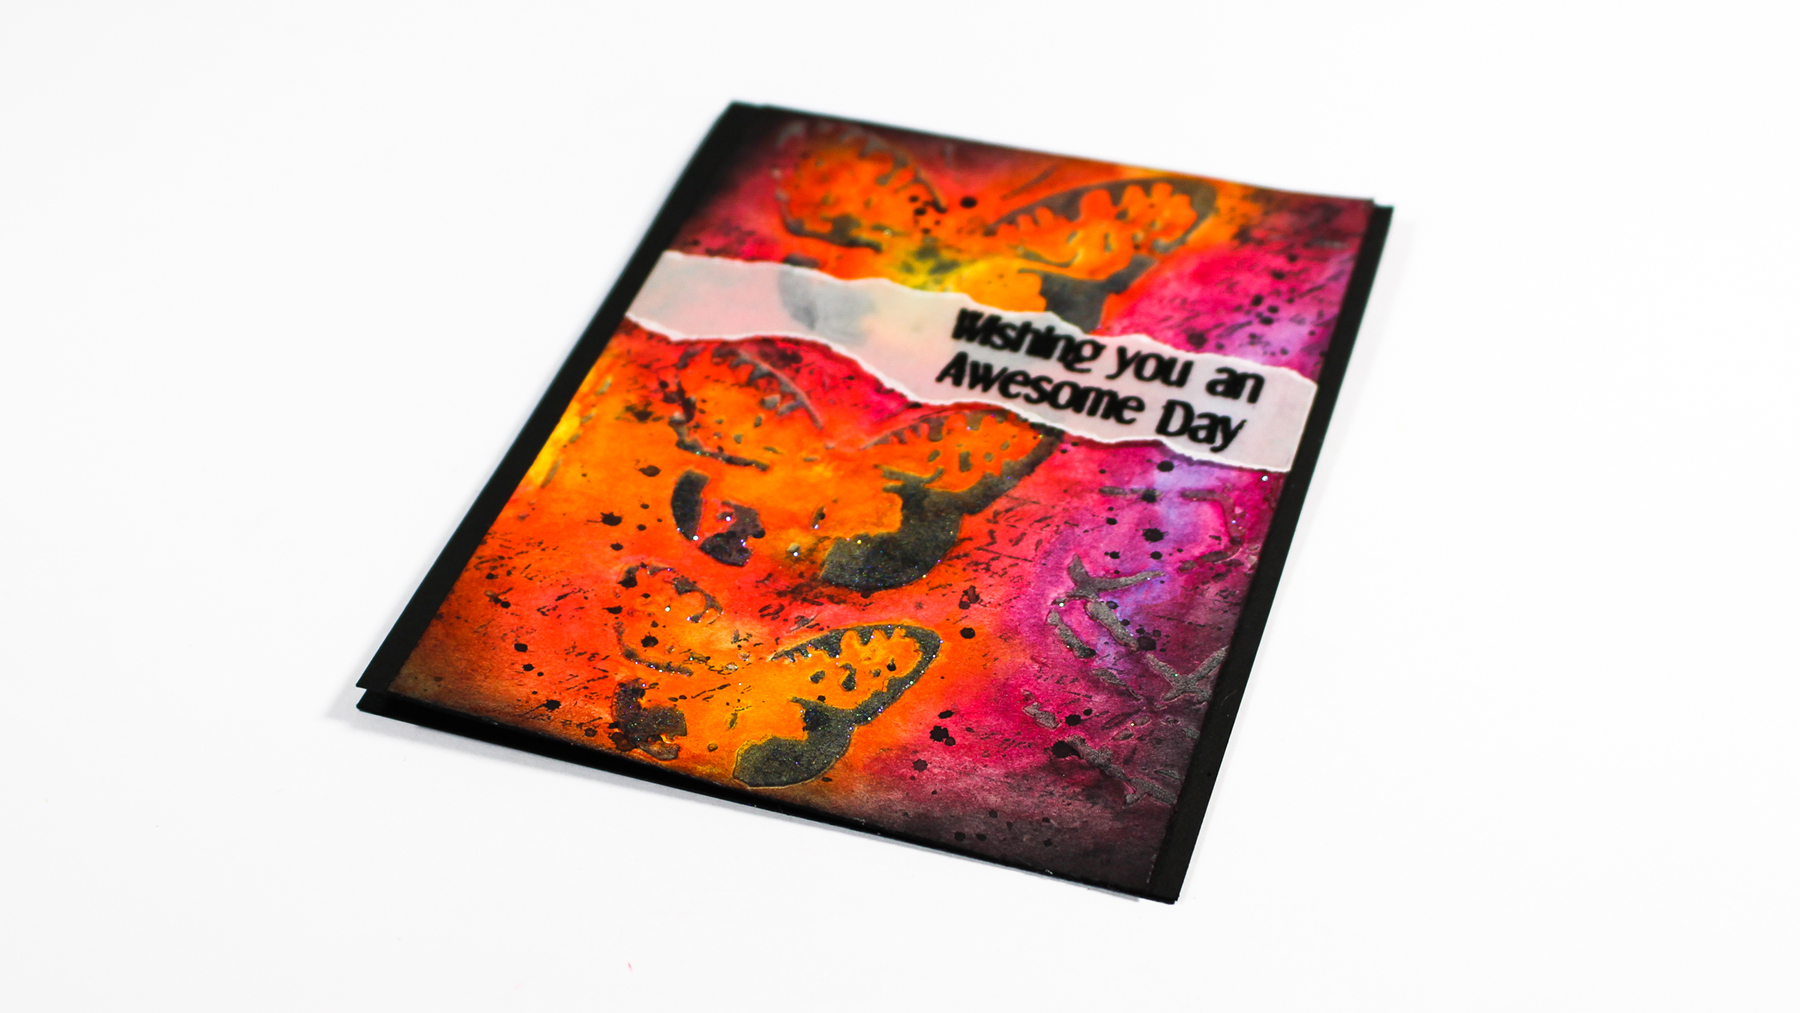
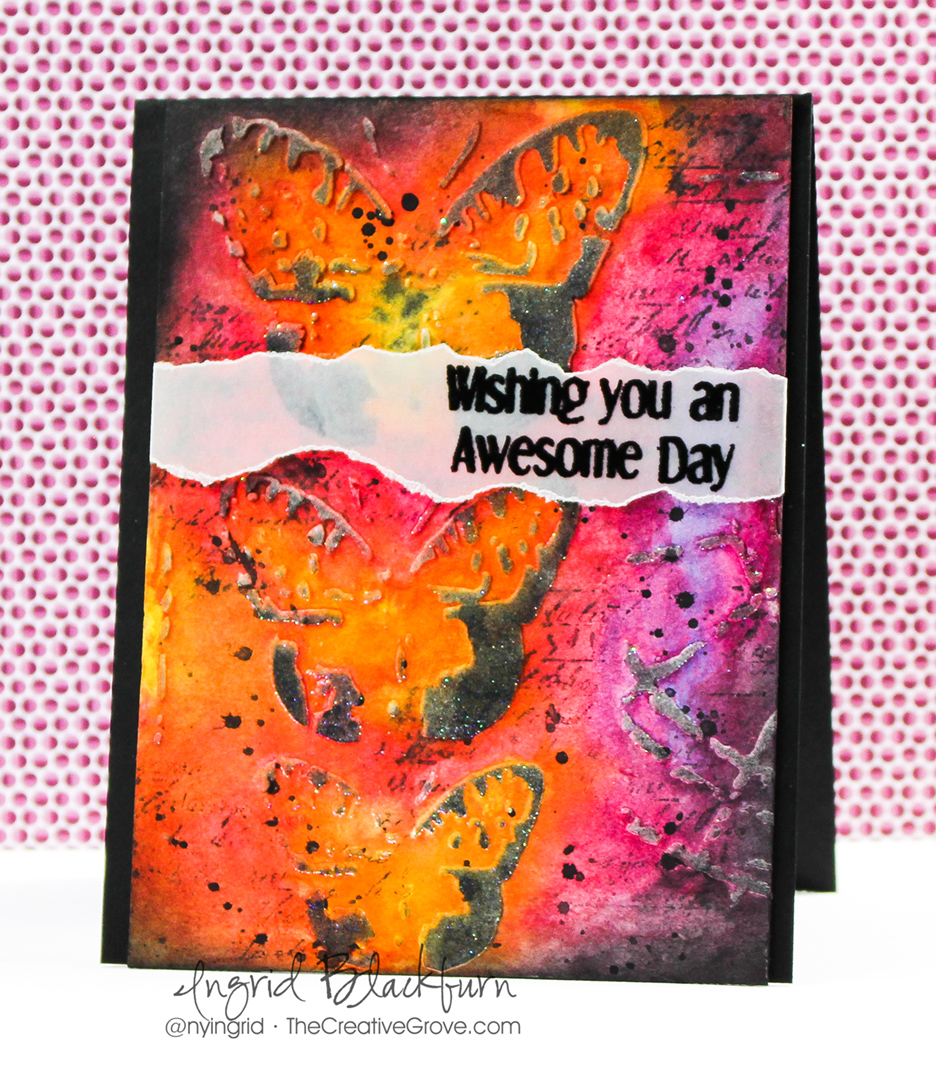
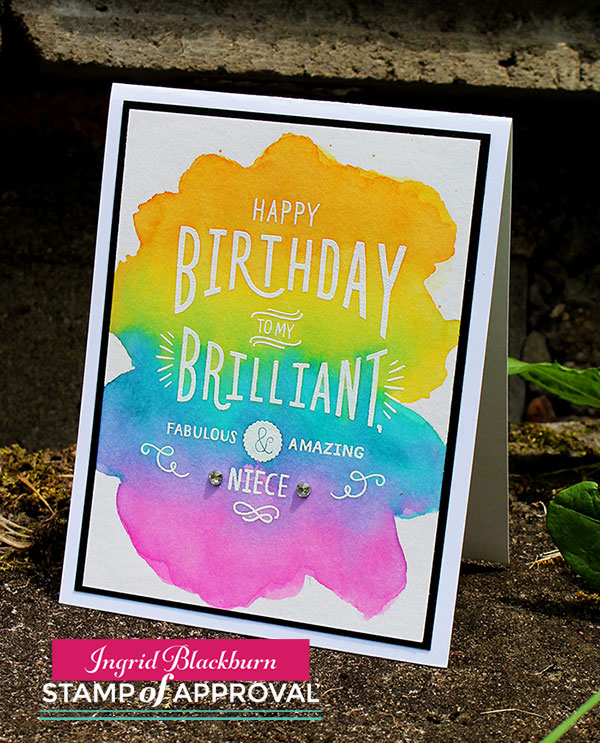
Have you ever tried a colorwash resist? It’s no secret that I love to emboss and add bright vibrant colors with Distress Inks. This project combines both. It’s day 2 of the Stamp of Approval Blog Hops – did you hop along today and yesterday? If not, I have links below!

13603495_10157037138765580_7410031084960510169_o

There were some seriously wicked cards created by some of the most talented stampers!! Be sure to stop by tomorrow – I’m “on deck”….and I have several projects to share with you.

Watercolor Wash

Today I have a quick, straightforward project that I think you’ll love. It’s super easy and if you’re new to watercolor, it’s a great one to start off with.

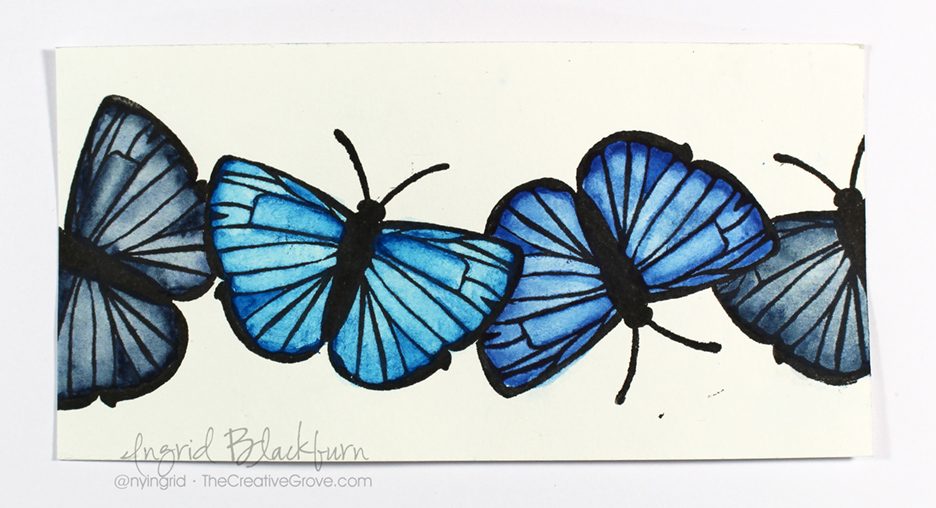
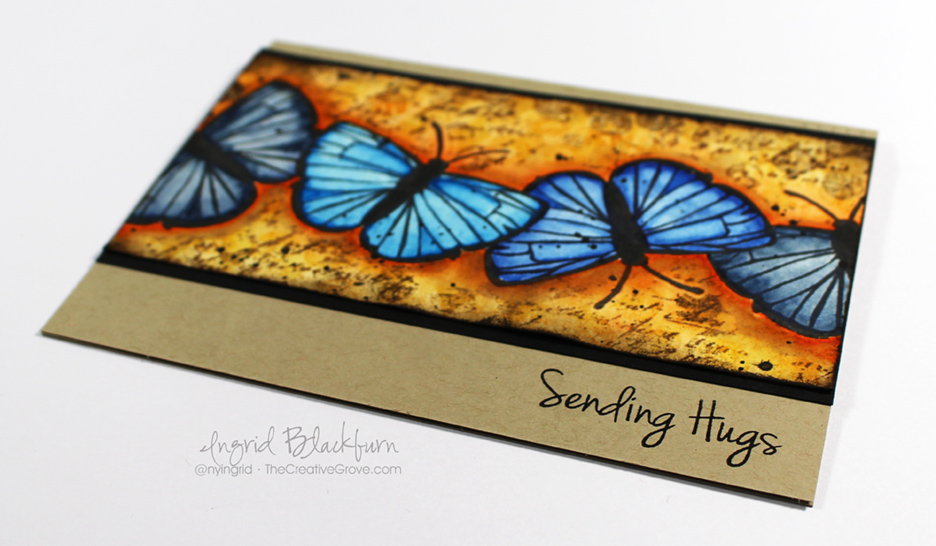
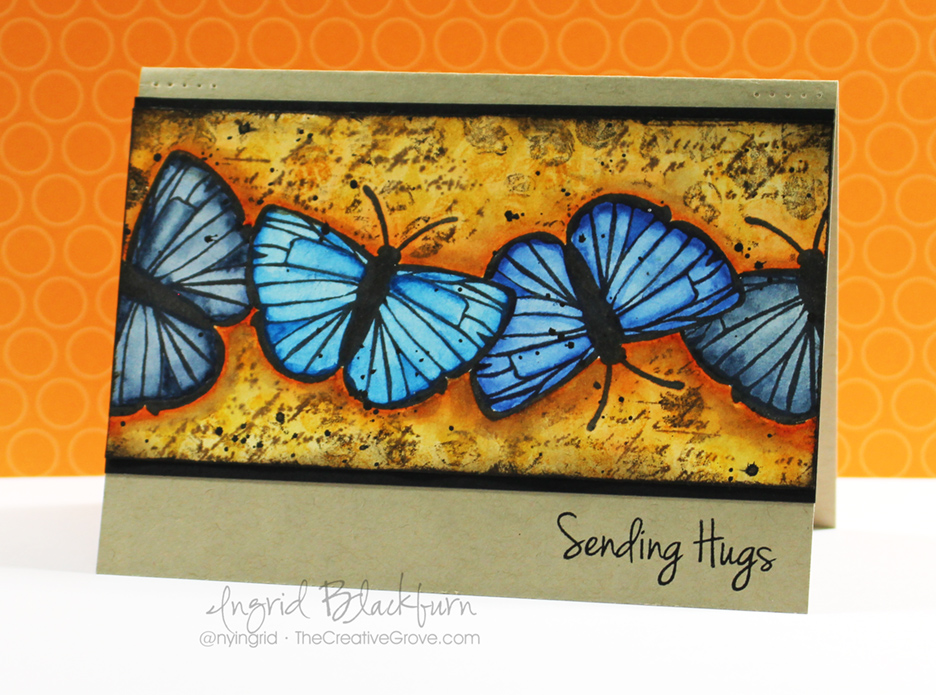
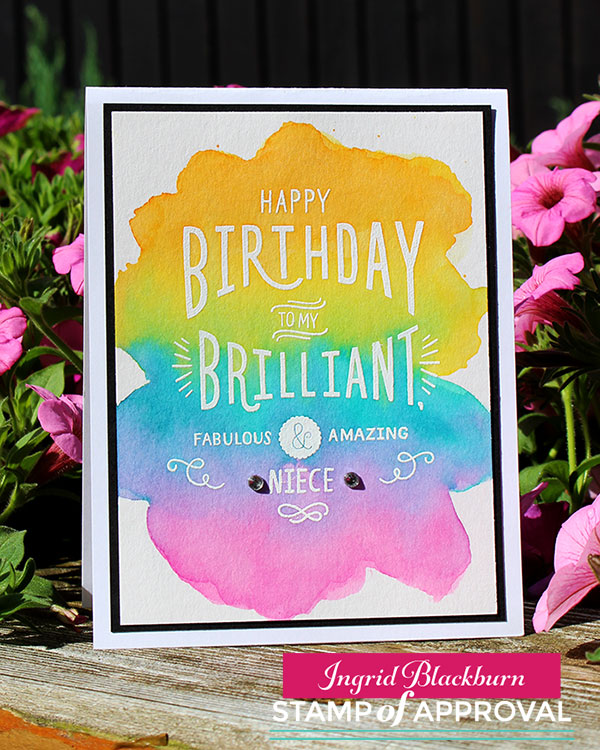
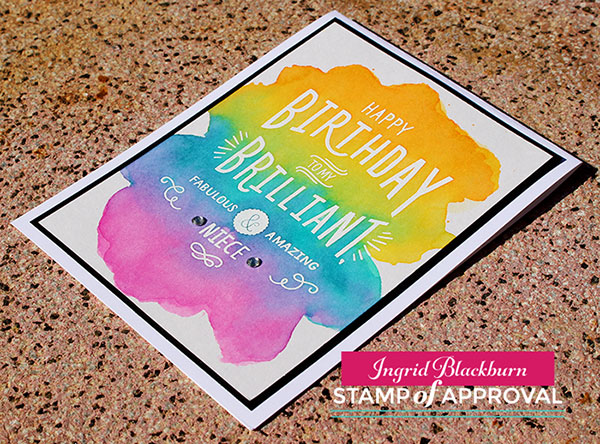
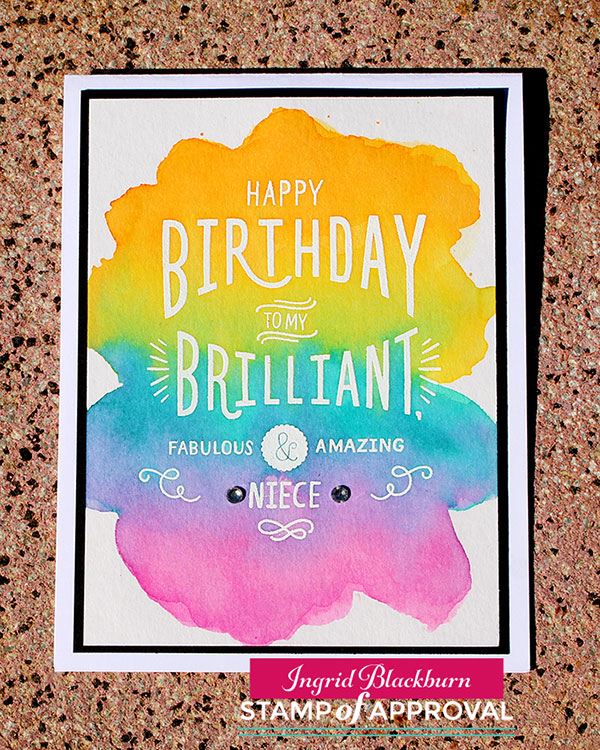
First, ink up the Fill-in-the-Blank Birthday Stamp in Versamark, add the Niece (or fill-in whichever you need) and emboss it in white on 140# Cold Pressed Watercolor Paper.

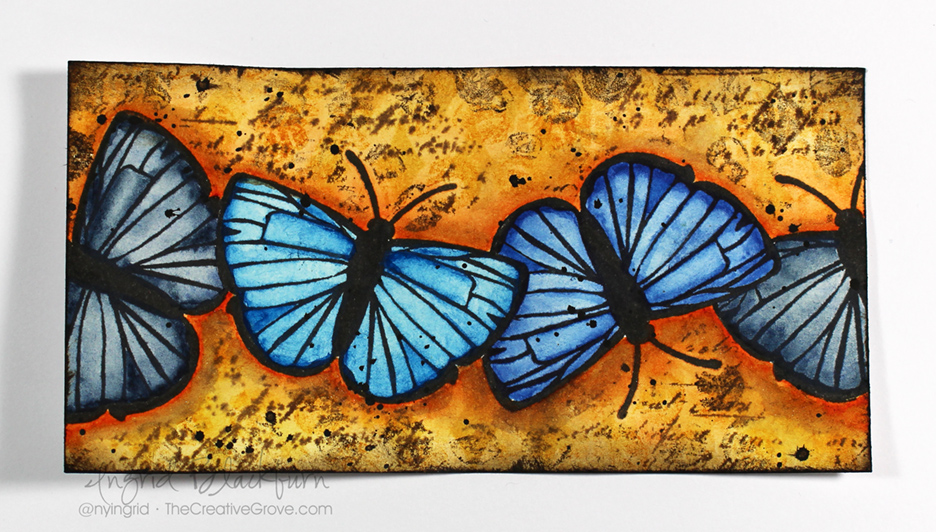
Next add your color – it’s seriously THAT easy!

Colorwash Resist Technique Tips:

  • To duplicate this look, grab a #10 watercolor brush and paint on the colors Spiced Marmalade, Mustard Seed, Peacock Feathers and Picked Raspberries – top down.

Watercolor Colorwash Resist

  • To use the distress ink, use the reinkers, or smoosh your pad into your craft mat (or acrylic block). You don’t need to spritz it – unless you are using the reinkers – that’s very concentrated – spritz a few times.
  • With a wet brush, paint on the colors, one at a time.
  • You’ll want to monitor the amount of water you are adding as the colors start to bleed together.
  • Take your time – use a dry paper towel to lightly dip into an unwanted water pool, the wet will go where the dry is (you can use a thirsty brush also).

Fill-In-the blank Birthday-Color-Wash-003

  • If you have any unwanted blending, just come back into it with a watercolor brush – try a #6 for a bit more control. Go back over that area with a little more color and blend out any unwanted looks.
  • As long as your project is still wet, you have a little play. Once it dries, you can still adjust it, but it’s much more difficult.
  • Distress works great together – pick colors that blend well and don’t create mud.

Simple Watercolor Cards - Ingrid Blackburn

Have fun! If you’re not on the Stamp of Approval wait list yet, click here to find out more about this amazing collection of stamps & dies. It goes on sale on the 13th – but only to the wait list at first. You don’t want to miss out.

Lovely Notes SOA Banner

And if you haven’t seen the other amazing projects created by the SOA team – Click here for the beginning posts of each Blog Hop –

Day 1                 Day 2

Can’t wait to share more with you tomorrow –

Signature

[optin_box style=”12″ alignment=”center” email_field=”email” email_default=”Enter your email address” integration_type=”aweber” double_optin=”Y” list=”3846012″ name_field=”name” name_default=”Enter your first name” name_required=”Y” opm_packages=””][optin_box_field name=”headline”]Learn more with our exclusive FREE video series:[/optin_box_field][optin_box_field name=”paragraph”]PHA+UGx1cyB5b3XigJlsbCBiZSBhZGRlZCB0byBteSBGUkVFIENyZWF0aXZlIFRpcHMgRS1sZXR0ZXIgd2hlcmUgSSBzaGFyZSBleGNsdXNpdmUgcHJvamVjdHMsIHZpZGVvcyAmYW1wOyB0aGUgMTIgRGF5cyBvZiBDaHJpc3RtYXMgUHJvamVjdCBTZXJpZXM8L3A+Cg==[/optin_box_field][optin_box_field name=”privacy”][/optin_box_field][optin_box_field name=”top_color”]undefined[/optin_box_field][optin_box_button type=”0″ button_below=”Y”]Get Instant Access![/optin_box_button] [/optin_box]

Easy Texture in Mixed Media

Mixed-Media-Tropical-Thanks-001

What would a mixed media piece be without a little texture? Today’s project showcases just how easy it is to add some great texture, both literally, and then with ink too!

For the mixed media challenge over at Happy Little Stampers – we were challenged to use texture in our projects. This project uses embossing paste as a texture base. Once dry, add some color to it. I chose to not go the traditional watercolor route, rather use a wrinkle free distress watercolor technique instead.

Mixed-Media-Tropical-Thanks-002

I love the vibrant colors of Ranger’s Distress Inks, how about you? This base showcases several shades of yellow – Squeezed Lemonade, Mustard Seed, Fossilized Amber and Mustard Seed. Here’s the light version with just a few layers and splotches, and the final version with blending added to it, plus a little acrylic paint brushed over – Lemon Yellow, Cadmium Yellow, Ochre and Raw Umber mixed with Paynes Grey. I love how it turned out – it was hard to cover any of it up!

Mixed-Media-Tropical-base-003

Mixed-Media-Tropical-Thanks-003Mixed-Media-Tropical-Thanks-006

To complete the piece, Add a few embellishments. I chose to add a few fussy cut flowers and leaves watercolored with Brusho from the Aloha Spirit set by Create a  Smile as well as some greetings from the Mini Thanks set – LOVE those stamps!

Add a little doodling around the border and greeting pieces – which, by the way were also colored with Early Espresso and Gathered Twigs after embossing them in White. Some sparkling clear sequins by Pretty Pink Posh and you’re all set!

Mixed-Media-Tropical-Thanks-005

I hope you like it – it was super fun to make, I’m really into adding textures and character to projects.  I can’t wait to see what you do with yours! Till next time –

Signature

[optin_box style=”12″ alignment=”center” email_field=”email” email_default=”Enter your email address” integration_type=”aweber” double_optin=”Y” list=”3846012″ name_field=”name” name_default=”Enter your first name” name_required=”Y” opm_packages=””][optin_box_field name=”headline”]Learn more with our exclusive FREE video series:[/optin_box_field][optin_box_field name=”paragraph”]PHA+UGx1cyB5b3XigJlsbCBiZSBhZGRlZCB0byBteSBGUkVFIENyZWF0aXZlIFRpcHMgRS1sZXR0ZXIgd2hlcmUgSSBzaGFyZSBleGNsdXNpdmUgcHJvamVjdHMsIHZpZGVvcyAmYW1wOyB0aGUgMTIgRGF5cyBvZiBDaHJpc3RtYXMgUHJvamVjdCBTZXJpZXM8L3A+Cg==[/optin_box_field][optin_box_field name=”privacy”][/optin_box_field][optin_box_field name=”top_color”]undefined[/optin_box_field][optin_box_button type=”0″ button_below=”Y”]Get Instant Access![/optin_box_button] [/optin_box]

How to Get Inks to Shine

Mixed-Media-Stained-Glass-Window-001

All you really wanted from your card was a little shine, right? Have you ever created a stunning background, but hours later your ink colors are flat and faded? Well, this technique is for you then! I’m playing along with the new Mixed Media Challenge over at Happy Little Stampers – Shine.

HLS Mixed Media challenge May 2016

I LOVE to create backgrounds – have you noticed? All to often in card making, we create these amazing colorful backgrounds on cards and then the colors settle as the project fully dries and we’re left with something that is a bit flat and has no vibrant nature left. At least I do! I’m always thinking where did the shine go? Okay, not all of it is shiny, but you know what I mean.

I have a video and step by step tutorial for you, so grab a drink, learn how to create amazing depth first, then a stain glass window that captures the true nature of those amazing colors by trapping the shine element of your card. Here’s the video:

Watch in HD on YouTube

So what did you think? Not that difficut really. What did you think about stretching your stencil for better coverage? Have you ever done that? Here’s the step by step tutorial, and if you really loved this, be sure to sign up for the Creative Tips E Letter for an exclusive video series and more…

[optin_box style=”12″ alignment=”center” email_field=”email” email_default=”Enter your email address” email_order=”2″ integration_type=”aweber” double_optin=”Y” list=”3846012″ name_field=”name” name_default=”Enter your first name” name_order=”1″ name_required=”Y” opm_packages=””][optin_box_field name=”headline”]Learn more with our exclusive FREE video series:[/optin_box_field][optin_box_field name=”paragraph”]PHA+UGx1cyB5b3XigJlsbCBiZSBhZGRlZCB0byBteSBGUkVFIENyZWF0aXZlIFRpcHMgRS1sZXR0ZXIgd2hlcmUgSSBzaGFyZSBleGNsdXNpdmUgcHJvamVjdHMsIHZpZGVvcyAmYW1wOyB0aGUgMTIgRGF5cyBvZiBDaHJpc3RtYXMgUHJvamVjdCBTZXJpZXM8L3A+Cg==[/optin_box_field][optin_box_field name=”privacy”][/optin_box_field][optin_box_field name=”top_color”]undefined[/optin_box_field][optin_box_button type=”0″ button_below=”Y”]Get Instant Access![/optin_box_button] [/optin_box]

Creative Tips on Shine, Texture and Stretching your Stencils

  • Create an in depth textured piece by using the wrinkle free distress technique on a piece of 140# cold pressed watercolor paper and dye based inks. (shown in detail in the video) Tip – For the most vibrant results, try Ranger’s Distress Inks.

Mixed-Media-Stained-Glass-Window-003


  • This project uses Distress Mustard Seed, Spiced Marmalade, Twisted Citron and Peacock Feathers
  • Once your project is totally dry, lightly buff over it with a de-static tool to remove any oils.
  • Smoosh Versamark through the Latticeworks stencil by Tim Holtz or your favorite one for a detailed design as in the video. Since this stencil didn’t cover my watercolor paper, I had to do this in two parts and overlap my design for a seamless flow.

Vibrant Mixed Media Cards

  • Emboss in Clear Embossing Powder – I used Brutus Monroe – and if you’ve never tried it – do so…it rocks!
  • Once your embossed stencil has fully dried, sponge over with Soot Black distress ink.
  • Wipe off your stenciled design with light pressure and a slightly damp cloth or paper towel to pick up the resisted ink.
  • Emboss your die cut greeting in clear for a shiny look. I used Handlettered Holiday by WPlus9. Adhere with Ranger Multi Medium Matte.

using distress inks in mixed media

  • Stamp and emboss the Christmas greeting from HLS Everyday Sentiments in white on black card stock – trim and adhere.
  • Adhere your watercolor paper with glue to a black matte with a 1/16″ border.
  • Pop up Mixed Media Panel with Fun Foam and adhere to a White card base with a 1/4″ border all around.

That’s it! Simple and striking Mixed Media card. I’m also going to play along with this months challenge over at CAS Mix it Up….it’s heat embossing – we definitely fit there!

may

So hop on over to the HLS Mixed Media Challenge and check out all the amazing projects my teammates have created for this challenge.  Plus you’ll want to stop by our Guest Designer Kalina’s blog – she’s SUPER talented when it comes to Mixed Media and her projects are out of this world!

Then get those fingers inky….I can’t wait to see what you do to let your creations shine!

Signature

[optin_box style=”12″ alignment=”center” email_field=”email” email_default=”Enter your email address” email_order=”2″ integration_type=”aweber” double_optin=”Y” list=”3846012″ name_field=”name” name_default=”Enter your first name” name_order=”1″ name_required=”Y” opm_packages=””][optin_box_field name=”headline”]Learn more with our exclusive FREE video series:[/optin_box_field][optin_box_field name=”paragraph”]PHA+UGx1cyB5b3XigJlsbCBiZSBhZGRlZCB0byBteSBGUkVFIENyZWF0aXZlIFRpcHMgRS1sZXR0ZXIgd2hlcmUgSSBzaGFyZSBleGNsdXNpdmUgcHJvamVjdHMsIHZpZGVvcyAmYW1wOyB0aGUgMTIgRGF5cyBvZiBDaHJpc3RtYXMgUHJvamVjdCBTZXJpZXM8L3A+Cg==[/optin_box_field][optin_box_field name=”privacy”][/optin_box_field][optin_box_field name=”top_color”]undefined[/optin_box_field][optin_box_button type=”0″ button_below=”Y”]Get Instant Access![/optin_box_button] [/optin_box]

MM Watercolor Butterflies Video

Yesterday I posted a very cool, fun and quirky butterfly card for the Wings Mixed Media challenge over at Happy Little Stampers. It was such a fun project to create, rather relaxing actually, I’m so glad that I filmed it for you! I won’t lie – the project took me two hours to create, so I had to majorly edit the video down for you. I even split it up so that you can find your way easier around the two distinct different components of this card – watercoloring the butterflies and creating the mixed media background that allows them to literally fly off the page.

Mixed-Media-Watercolor-Butterflies-001

Enjoy the process – grab a beverage and have fun – I’d LOVE to see your cards when you create them! And if you haven’t subscribed to my YouTube channel yet – be sure to do so so you see them as they first come out.

Part One focuses on the masked border used to create this card and the actual watercoloring process for keeping the light and darker tones in the butterflies.

Click Here to watch Part One in HD on YouTube

Part two focuses on the Mixed Media portion of this card used to literally pop the butterflies off the page.

Click Here to see Part Two in HD on YouTube

If you want to see the written tutorial and close up photos, be sure to check out the original post right HERE.

See you soon –

Signature

[optin_box style=”2″ alignment=”center” email_field=”email” email_default=”Enter your email address” email_order=”2″ integration_type=”aweber” double_optin=”Y” list=”3846012″ name_field=”name” name_default=”Enter your first name” name_order=”1″ name_required=”Y” opm_packages=””][optin_box_field name=”headline”]Learn more with our exclusive FREE video series:[/optin_box_field][optin_box_field name=”paragraph”]PHA+UGx1cyB5b3XigJlsbCBiZSBhZGRlZCB0byBteTxzdHJvbmc+IEZSRUU8L3N0cm9uZz4gQ3JlYXRpdmUgVGlwcyBFLWxldHRlci4gRnJvbSB0aW1lIHRvIHRpbWUgeW914oCZbGwgZ2V0IGV4Y2x1c2l2ZSBwcm9qZWN0cywgdmlkZW9zICZhbXA7IHRoZSAxMiBEYXlzIG9mIENocmlzdG1hcyBzZXJpZXMuPC9wPgo=[/optin_box_field][optin_box_field name=”privacy”][/optin_box_field][optin_box_field name=”top_color”]undefined[/optin_box_field][optin_box_button type=”0″ button_below=”Y”]Get Immediate Access![/optin_box_button] [/optin_box]

Mixed Media Watercolored Butterflies

Mixed-Media-Watercolor-Butterflies-001

Have you ever wondered how to create depth & texture without bulk? You may find that it’s much easier to do than you think – just grab some watercolor brushes, a few stencils, some distress inks and you may just surprise even yourself! This  month over at the Happy Little Stampers we’re challenging you to play around with Wings in your Mixed Media pieces. That could be any way you interpret it. I chose to use the bold butterfly image from Butterfly Birthday set and see if I could make it feel like it was actually fluttering on the paper with some watercolor magic and stencils in the background. What do you think? Did I hit the mark?

HLS Mixed Media challenge April 2016

Be sure to stop by all the Design Team’s blogs to check out just how they created their own masterpieces. I have a written tutorial for you today, and a video for you! It’s a rather in depth project, so I split it into two videos so you can find your place better. Grab a beverage and enjoy the process! Of course if you want to see it in HD, click the link below to view on YouTube.

View Part One in HD on YouTube

View Part Two in HD on YouTube

This card is actually quite simple to do, it does take a little time, but it’s a great relaxing project – especially if you like to watercolor! Here’s how you can create your very own:

How to Create Depth & Texture without Bulk

  • First you’ll want to cut out a few masks. I used the coordinating Butterfly Dies for the Butterfly Birthday stamp set. I knew I was going to be watercoloring right up to the edge, so I found a way around the ‘edge’ you get when using dies as masks – you’ll see it in the video. Cut several masks – I stacked four post it notes and ran it through once since they were so thin – super easy!
  • Stamp your butterfly pattern in a border along your paper. Be sure to overlap them using your masks so that they are on top of each other. I used an image from the Butterfly Birthday stamp set from Happy Little Stampers. I stamped mine in Versafine Onyx Black Pigment Ink on a 12 x 3″ scrap piece of Canson 138# Mixed Media paper. That way I could make two or three projects – depending on how I cut it down.
  • Heat set your pigment ink before going to the next step!

Mixed-Media-Watercolor-Butterflies-004

  • Watercolor your butterflies in similar colors – some vibrant, others more matte. That will allow them to pop and compliment each other. I chose the following watercolors by Schminke – Hordam Aquarelle Artist: Cobalt, Phthalo Blue, Indigo, Paris and Winsor Newton Cotman Ultramarine and Turquoise.
  • Watercolor a light base coat in a watered down wash, then once dry come back to add darker highlights allowing for lightness in your wings. This helps your images to really pop!
  • Once your butterflies are dry, cut your border down.
  • Add a light watercolor wash of Schminke Translucent Orange framing your butterflies. First wet your paper on the half you’re painting, add your darkest color to the border and lighten outward. Try and keep the bulk of the color around your winged creatures.

Mixed-Media-Watercolor-Butterflies-007Mixed Media Textures

  • Once dry, add a light wash of Ochre from the border inward. Try and keep some lightness to the outer border if possible. You want your wings to be the star.
  • While your piece is still damp and drying, ink up a script stamp in Ground Espresso Distress Ink – I used one by Kaiser Crafts and stamp in random spots. Be sure to have your butterflies covered with your masks. With the paper wet, your Distress Ink will blur a bit. If it’s too wet you will lose all detail.
  • Add various textures with stencils to your outer pieces around your butterflies using Wild Honey, Antique Linen and Espresso Distress Inks. I added texture with some bubble wrap & a diamond stencil (Harleen by Winnie & Walter).

CAS mixed media cards

  • Smoosh some Ground Espresso Distress Ink on your craft mat and spritz with water. Use a light wash over your orange at the edge of your butterflies. This will dirty it up a bit, tone down the orange, and help give life and depth to your winged creatures. It helps to make them seem as if they are fluttering. Keep your shadow a bit thicker on the bottom than the top. It’s okay if some touches the script, but you don’t want to wash away all the great texture you created.
  • Lightly Sponge a frame in Ground Espresso Distress Ink and edge your piece in Soot Black.
  • Splatter some Paynes Grey watercolor with a brush.

Depth & Texture in Bulk

  • Allow it to completely dry.
  • Matte onto a black strip and add to a kraft colored base.
  • Stamp your greeting – I used the fun quirky ones from the new HLS set Doodled Flowers – I LOVE these sentiments. They are the perfect size and looks as if I just wrote it myself.

Part of what makes this project work are the complimentary colors. Not just the butterflies, but blue and orange. Other combinations that are great are purple and yellow or red and green. Basically any two colors that are on the opposite of the color wheel from one another. The black really makes it pop and I love the brown and black together. It works!

Well, there you go, not too many steps. Okay – I’ll be honest, this project did take me over an hour to do – closer to two, but don’t let that scare you. It was fun, relaxing and is truly a piece of artwork. I don’t know if the photos relay it well, but the butterflies look as if they’re about to leap off the page or twirling from one side to the other. It turned out better than I could have imagined. So I encourage you to jump on in and try it yourself. Use whatever you have – hearts, Circles, Snowmen, Butterflies – we all have butterflies! Just have fun.

Mixed-Media-Watercolor-Butterflies-006

I can’t wait to see your Winged Mixed Media creations – use texture, embossing, whatever you have. I chose Watercolor, Distress, stamping, and stenciling. The sky is the limit. Jump on into the Mixed Media April Challenge – Wings. I can’t wait to see what you do!

I’m also going to play along with one of my new favorite Mixed Media challenges – CAS Mix Up challenge – if you haven’t checked this one out, don’t wait! This month it’s all about stamping & stenciling – LOVE that!

april

Now go get those fingers inky –

Signature

[optin_box style=”2″ alignment=”center” email_field=”email” email_default=”Enter your email address” email_order=”2″ integration_type=”aweber” double_optin=”Y” list=”3846012″ name_field=”name” name_default=”Enter your first name” name_order=”1″ name_required=”Y” opm_packages=””][optin_box_field name=”headline”]Learn more with our exclusive FREE video series:[/optin_box_field][optin_box_field name=”paragraph”]PHA+UGx1cyB5b3UnbGwgYmUgYWRkZWQgdG8gbXk8c3Ryb25nPiBGUkVFPC9zdHJvbmc+IENyZWF0aXZlIFRpcHMgRS1sZXR0ZXIuIEZyb20gdGltZSB0byB0aW1lIHlvdSdsbCBnZXQgZXhjbHVzaXZlIHByb2plY3RzLCB2aWRlb3MgJmFtcDsgdGhlIDEyIERheXMgb2YgQ2hyaXN0bWFzIHNlcmllcy48L3A+Cg==[/optin_box_field][optin_box_field name=”privacy”][/optin_box_field][optin_box_field name=”top_color”]undefined[/optin_box_field][optin_box_button type=”0″ button_below=”Y”]Get Immediate Access![/optin_box_button] [/optin_box]


Mixed Media Watercolor

Mixed-Media-Watercolor-March-2016-HLS

If I were to say Textured Watercolor to you, what would you think of? Mixed Media? Embossing Paste? I have to admit, this month I felt a little challenged when I saw the theme over at the Mixed Media Challenge at Happy Little Stampers – Water. Now you can take this a few ways – water based  techniques or literally create a water scene (Usually what I’d do). SO, I thought I’d give a little Textured Watercolor a shot.

HLS Mixed Media challenge March 2016

To get the water flowing on my mixed media piece, and have a little fun – I whipped out some bright colors, stencils, stamps and a few different mediums. I even shot a real time video for you too – so if you want to see how I watercolored Embossing Paste to create a beautiful textured card, just watch here – or click the link below to watch in HD on YouTube.

Watch in HD on YouTube

The snow is falling as I write this blog post, so it was fun to work on a project that gave me a spring/summer feel. That’s what I love about art, it takes you away to some cool places! Here’s a written tutorial for you too – but the video has much more detail.

Mixed Media: Creating Textured Watercolor

  • Add embossing paste  through a stencil where you want to on 140# cold pressed watercolor or mixed media paper. I used Specimens 12×12″ by The Crafters Workshop. Set aside to dry.
  • Paint over your dried piece with bright vibrant watercolors as in the video. I used Lemon Yellow, Translucent Orange, Magenta, Quinacrodone Violet, Cobalt, Paynes Grey (Schminke) and Permanent Rose (Mission).

Mixed Media Watercolor-002

  • Keep your watercolor loose and bright, adding dimension through layers and depth by keeping the darker areas balanced with the light.
  • Allow to dry thoroughly.
  • Stamp Script stamp in Soot Black Distress Ink in random spots, touching up in spots with water to keep it loose and imperfect.
  • Add splats with a watery Paynes Grey and a paint brush.

Textured Mixed Media

  • Once dry, add a little sponging to the edges and lightly on the sides with Hickory Smoke and Soot Black Distress inks.
  • Secure your project and stencil over it again. Sponge your embossing paste in Hickory Smoke and Soot Black. If not dark enough to your liking, use your Distress Inks in the direct to paper method.
  • Cover your project with a destatic tool.
  • Place your stencil over top your project again and smoosh a versamark pad over your embossed images.

Mixed Media Watercolor

  • Add glitter, then a little clear embossing powder. Heat set
  • Rub over your project with a cloth or paper towel to remove the destatic powder and some of the glitter.
  • Emboss a greeting on a piece of Vellum card stock, tear and add to your project as in the video. I used Everyday Sentiments (Happy Little Stampers)
  • Add piece to black card stock and trim if needed. If you do trim, add a little black to the bottom as in the video and touch up your sponging.

Mixed-Media-Watercolor-007

And come to think of it – I created another Watercolor Mixed Media piece earlier in the week for my friends Loll & Bonnie’s new challenge too – CAS Mix Up. See that card here. I decided to play along with two other challenges today – Anything but Cute – Color and Mixed Media Mojo – Springtime/Watercolor.

abc-badge-crazy-for-color  Graphic to copy 3

So grab those bright watercolors, and have fun creating your own Mixed Media piece! I’m sure you’ll get just as lost in it as I did. Till next time –

Signature

[optin_box style=”2″ alignment=”center” email_field=”email” email_default=”Enter your email address” email_order=”2″ integration_type=”aweber” double_optin=”Y” list=”3846012″ name_field=”name” name_default=”Enter your first name” name_order=”1″ name_required=”Y” opm_packages=””][optin_box_field name=”headline”]Learn with our exclusive FREE video series[/optin_box_field][optin_box_field name=”paragraph”]PHA+R2V0IHRoZSBmcmVlIENyZWF0aXZlIFRpcHMgRS1sZXR0ZXIgYW5kIGxlYXJuIHdpdGggc3Vic2NyaWJlciBleGNsdXNpdmUgdmlkZW8gYW5kIHBpY3RvcmlhbCBjb250ZW50LiBJbmNsdWRpbmcgb3VyIHllYXJseSAxMiBEYXlzIG9mIENocmlzdG1hcyBzZXJpZXMhPC9wPgo=[/optin_box_field][optin_box_field name=”privacy”][/optin_box_field][optin_box_field name=”top_color”]undefined[/optin_box_field][optin_box_button type=”0″ button_below=”Y”]Get Instant Access![/optin_box_button] [/optin_box]

CAS Mix Up

Skinny-Watercolor-Stenciled-Chevron-001

March 1st was a great day! Two exciting things happened – we welcomed little Lylah into the world – more about that below….and my super creative and very CAS styled friends Bonnie Klass and Loll Thompson launched their new challenge – CAS Mix Up – a clean and simple mixed media challenge. So, naturally I created a birthday card to welcome little Lylah – after all – it literally was her birthday!

The new CAS Mix Up challenge is dedicated to clean and simple cards with a mixed media twist. Now you may think that mixed media can’t be CAS, but at it’s heart, mixed media is just that – mixed mediums. Why can’t it be CAS? That’s the challenge – no pun intended! For the first one this month, we’re challenged to use watercolor, stamping and your choice – I chose watercolor stenciling – and it’s actually a negative image that was stamped from a stencil!

march 2016

Skinny-Watercolor-Stenciled-Chevron-2006

This project is actually a bonus panel from a regularly stenciled project using sponged distress inks. I had all this ink left over on my stencil, so I spritzed it to get it wet with a fine mist spritzer, and stamped the stencil onto a piece of watercolor. Here’s how I did it.

Negative Watercolor Stamped Stencil Technique – 

  • Create a project where you use the stencil in a positive way – or just add ink to your stencil directly without worrying about the “stenciling” part. I used the Skinny Chevron stencil by Create a Smile to give off a skinny positive image like this one I created for a challenge over at StampNation (Of course it’s double stenciled – but you get the point):

Double-Stenciled-Background-Sneak-2

  • For this project, I used More Mustard, Fossilized Amber, Spiced Marmalade, Worn Lipstick, Mermaid Lagoon and Seedless Preserves
  • This will leave lots of color on the negative part of your stencil that you would normally just wash or clean up.  Instead – mist your stencil with a fine mist spritzer to get the ink to bead up on the stencil.

Skinny-Watercolor-Stenciled-Chevron-002

  • Lay a piece of 140# cold pressed watercolor paper onto your stencil to stamp the stenciled image. You can also pick up your stencil and stamp, but I didn’t want the colors to run when I picked it up. Hold your paper there a few seconds to allow the water to soak in.
  • You are left with a negative image – the part you couldn’t stencil!

Skinny-Watercolor-Stenciled-Chevron-003

  • Adhere to an A2 card base, add a stamped greeting and die – both also from Create a Smile – I just LOVE their fonts. This is from the birthday trio dies and the Mini Birthday stamp set.
  • Add a few sparkling clear sequins by Pretty Pink Posh and you’re all set!

I love the way this card turned out. Look at how bold the colors are in the sneak peek image above and how muted the very same colors are with a little water spritzed onto them. Truly amazing! And that’s mixed media at it’s core. Not so scary, huh?!!

I’d love for you all to play along in Loll and Bonnie’s first challenge over at CAS Mix it Up – so head on over and check it out! I’m also playing along in a few other challenges – Laura’s Loft, and NBUS – as this is the first time I’m using this stencil and die by Create a Smile!

Feb.-Challenge-Board button aqua use this the

I can’t wait to see what you create!

Skinny-Watercolor-Stenciled-Chevron-004

On a personal note –

I know this blog is all about paper crafting, but from time to time we all have big moments in our lives. Yesterday was definitely one – our first grandchild! Yes, I’m a grandmother at the tender age of 46! Michael is a bit older than me, and I’ve been blessed to have two beautiful and amazing girls as my bonus daughters for the past 18 years. Our youngest – Allyson and Jeff welcomed their first child into the world yesterday – Lylah RaeAnn.

First Family Photo

Lylah is a character from a book that Allyson read in high school and just fell in love with the name. Raeann is in honor of Rachel and Annie – Allyson & Jeff’s sisters – isn’t that just sweet. I love the name!

Mom & Lylah

We can’t wait to fly to New York and meet our precious little grand daughter Lylah. Feel free to leave me any grandmom (I’m going to go by Omi – German) advice in the comments below!

Thank for stopping by , now go get those fingers inky and have a great day!

Ingrid Blackburn - The Creative Grove

[optin_box style=”2″ alignment=”center” email_field=”email” email_default=”Enter your email address” email_order=”2″ integration_type=”aweber” double_optin=”Y” list=”3846012″ name_field=”name” name_default=”Enter your first name” name_order=”1″ name_required=”Y” opm_packages=””][optin_box_field name=”headline”]Learn with our exclusive FREE video series[/optin_box_field][optin_box_field name=”paragraph”]PHA+R2V0IHRoZSBmcmVlIENyZWF0aXZlIFRpcHMgRS1sZXR0ZXIgYW5kIGxlYXJuIHdpdGggc3Vic2NyaWJlciBleGNsdXNpdmUgdmlkZW8gYW5kIHBpY3RvcmlhbCBjb250ZW50LiBJbmNsdWRpbmcgb3VyIHllYXJseSAxMiBEYXlzIG9mIENocmlzdG1hcyBzZXJpZXMhPC9wPgo=[/optin_box_field][optin_box_field name=”privacy”][/optin_box_field][optin_box_field name=”top_color”]undefined[/optin_box_field][optin_box_button type=”0″ button_below=”Y”]Get Instant Access![/optin_box_button] [/optin_box]

Winter Berries

WInter-Berries-001

It’s been a while since I’ve had a chance to play along with the girls over at Merry Monday. This week Bonnie challenged us to use Berries on a Christmas Card. I was in a watercolor stamping mood, so I pieced this quick little card together.

192

First I did a light wash using Broken China and Tumbled Glass Distress inks in the background, keeping the darker colors toward the top. Next I inked up my Berry Bevy stamp by Penny Black in Ground Espresso and Barn Door Distress Markers, gave it a good light spritz and stamped onto my watercolor background. I added a sponged and embossed greeting using the Handlettered Holiday dies by WPlus9.

WInter-Berries-002

It’s a quick and simple card, okay there are a few steps in there, but I love the CAS style. To finish the card I added a little paper piercing up top after matting my watercolored berries on espresso card stock.

Berries on branches are some of my favorite things, I’m always fascinated by them. Here’s another Christmas card done for this year…I’m running a bit behind…have to play along a little more with Merry Monday’s – hope to see you there too!

WInter-Berries-003

Thanks for stopping by today –

Signature

[optin_box style=”2″ alignment=”center” email_field=”email” email_default=”Enter your email address” email_order=”2″ integration_type=”aweber” double_optin=”Y” list=”3846012″ name_field=”name” name_default=”Enter your first name” name_order=”1″ name_required=”Y” opm_packages=””][optin_box_field name=”headline”]Learn with our exclusive FREE video series[/optin_box_field][optin_box_field name=”paragraph”]PHA+R2V0IHRoZSBmcmVlIENyZWF0aXZlIFRpcHMgRS1sZXR0ZXIgYW5kIGxlYXJuIHdpdGggc3Vic2NyaWJlciBleGNsdXNpdmUgdmlkZW8gYW5kIHBpY3RvcmlhbCBjb250ZW50LiBJbmNsdWRpbmcgb3VyIHllYXJseSAxMiBEYXlzIG9mIENocmlzdG1hcyBzZXJpZXMhPC9wPgo=[/optin_box_field][optin_box_field name=”privacy”][/optin_box_field][optin_box_field name=”top_color”]undefined[/optin_box_field][optin_box_button type=”0″ button_below=”Y”]Send me exclusive videos![/optin_box_button] [/optin_box]